
2021 Fiat 500X Fuses and Fuse Box Setup
The 2021 Fiat 500X is a stylish and compact crossover SUV that offers a blend of Italian design and practicality. One essential but often overlooked component in any vehicle is its fuse box, a vital element responsible for safeguarding the electrical systems and ensuring smooth operation. In this introduction, we’ll take a closer look at the 2021 Fiat 500X fuses and fuse box, shedding light on their significance and role in maintaining the vehicle’s functionality and safety. Understanding how the fuses work and where to find the fuse box can be crucial for troubleshooting electrical issues and ensuring the continued reliability of your Fiat 500X. Let’s delve into the world of fuses and the fuse box in this remarkable automobile.
FUSES
General Information
The fuses protect electrical systems against excessive current. When a device does not work, you must check the electrical circuit inside the fuse for a break/melt.
Also please be aware that using power outlets for extended periods of time with the engine off may result in vehicle battery discharge.
WARNING
- When replacing a blown fuse, always use an appropriate replacement fuse with the same amp rating as the original fuse. Never replace a fuse with another fuse of higher amp rating. Never replace a blown fuse with metal wires or any other material. Failure to use proper fuses may result in serious personal injury, fire and/or property damage.
- Before replacing a fuse, make sure that the ignition is off and that all the other services are switched off and/or disengaged.
- If the replaced fuse blows again, contact an authorized dealer.
- If a general protection fuse for safety systems (air bag system, braking system), power unit systems (engine system, gearbox system), steering system or Body Control Module (BCM) blows, contact an authorized dealer.
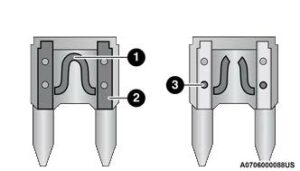
Blade Fuses
- Electrical Circuit
- Blade Fuse With Good Electrical Circuit
- Blade Fuse With Bad Electrical Circuit
Fuse Removal
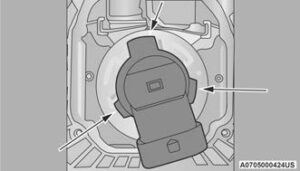
To replace a fuse use the extractor attached to the fuse cover (located on the inside of the engine compartment fuse cover.)
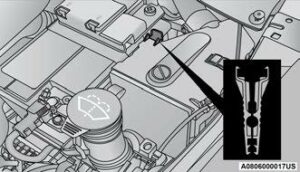
Fuse Extractor Location
Access To The Fuses
The fuses are grouped into four controllers located in the engine compartment, under the instrument panel and on the inside of the left side cargo trim panel.
Engine Compartment Fuses/Distribution Unit
The engine compartment fuse panel is part of the Body Control Module (BCM), located on the left side of the engine compartment.
NOTE:
See an authorized dealer for BCM fuse replacement.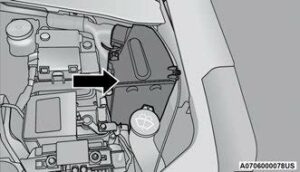
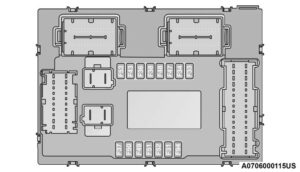
Engine Compartment Fuse Location
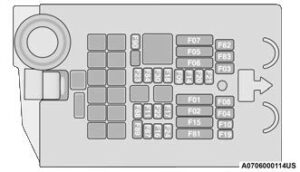
Engine Compartment Fuse Cavities
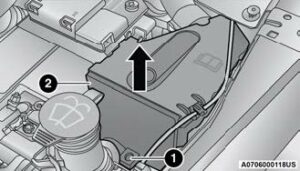
Fuse Panel And Cover Location
- Mounting Screw
- Fuse Cover
Removing Fuse Cover and Locking Scre
Proceed as follows:
- Slowly turn the screw counterclockwise.
- Slowly release the screw.
- Remove the fuse cover by sliding it upward.
Mounting Fuse Cover and Locking Screw
Proceed as follows:
- Properly secure the fuse cover to the box, slide completely from top to bottom.
- Fully press the screw, using the special screwdriver supplied.
- Slowly turn the screw clockwise.
- Release the screw.
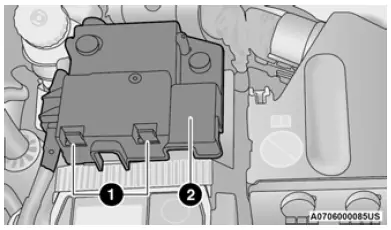
Battery Fuse Cover Location
- Fuse Cover Tabs
- Fuse Cover
| Cavity | Maxi Fuse | Cartridge Fuse | Mini Fuse | Description |
| F01 | 70 Amp Tan | – | – | Module Body Computer |
| F02 | 60 Amp Blue | – | – | Module Body Computer, Rear Distribution Units |
| F03 | – | 20 Amp Blue | – | Controller Power Supply Body Computer |
| F04 | – | 30 Amp Pink | – | Brake Control Electronics Module |
| F05 | 70 Amp Tan | – | – | Electric Power-Assisted Steering |
| F06 | 70 Amp Tan | – | – | Engine Cooling fan |
| F08 | – | 30 Amp Pink | – | Automatic Transmission, GSM |
| F09 | – | – | 5 Amp Tan | Control Module Engine |
| F10 | – | – | 10 Amp Red | Horn |
| F11 | – | – | 5 Amp Tan | Supply Secondary Loads |
| F14 | – | – | 7.5 Amp Brown | Pump Power “After run” AGS Supply |
| F15 | 40 Amp Orange | – | – | Brake Control Module Pump |
| F16 | – | – | 5 Amp Tan | Engine Control Module Power, Automatic Transmission |
| F17 | – | – | 30 Amp Green | Power Control Module Engine |
| F18 | – | – | 30 Amp Green | Power All-Wheel Drive |
| F19 | – | – | 7.5 Amp Brown | Air Conditioner Compressor |
| Cavity | Maxi Fuse | Cartridge Fuse | Mini Fuse | Description |
| F20 | – | – | 5 Amp Tan | Electronic Power Four-Wheel Drive |
| F21 | – | – | 15 Amp Blue | Fuel Pump |
| F22 | – | – | 10 Amp Red | Supply Primary Loads |
| F23 | – | – | 20 Amp Yellow (Customer Installed) | Power Outlet (Battery Powered) |
| F24 | – | – | 15 Amp Blue | Electronic Unit Supply Automatic Transmission |
| F30 | – | – | 30 Amp Green | Heated Windshield – If Equipped |
| F83 | – | 40 Amp Green | – | Air Conditioning Fan |
| F84 | – | – | 20 Amp Yellow | Power Outlet (Ignition Powered) |
| F87 | – | – | 5 Amp Tan | Gear Selector Automatic Transmission |
| F88 | – | – | 7.5 Amp Brown | Heated Outside Mirrors |
| F89 | – | 30 Amp Pink | – | Heated Rear Window |
| F90 | – | – | 5 Amp Tan | IBS Sensor (Battery State of Charge) |
Body Computer Fuse Center
The controller is located at the left side of the steering column at the bottom of the instrument panel. For the fuse replacement see an authorized dealer.
Body Controller Fuse Cavities
| Cavity | Mini Fuse | Description |
| F31 | 7.5 Amp Brown | Fan Air Conditioning, Power Socket |
| F33 | 20 Amp Yellow | Power Window Front (Passenger Side) |
| F34 | 20 Amp Yellow | Power Window Front (Driver’s Side) |
| F36 | 15 Amp Blue | Supply Uconnect System, Air Conditioning, USB Port, Rear lateral ceiling light in case of open roof, EOBD port |
| F37 | 10 Amp Red | System Power Forward Collision Warning Plus, All–Wheel Drive (AWD), IPC, Central stack switches, Brake Pedal Switch (NC) |
| F38 | 20 Amp Yellow | Central Locking |
| F42 | 7.5 Amp Brown | BSM – Brake Control Module, EPS – Electric Power-Assisted Steering |
| F43 | 20 Amp Yellow | Bi-directional Pump Washer |
| F47 | 20 Amp Yellow | Power Rear Window (Driver Side) |
| F48 | 20 Amp Yellow | Power Rear Window (Passenger Side) |
| F49 | 7.5 Amp Brown | Supply ParkSense, Spot Lights Front Dome, Internal Electocromic Mirror, Heated Front Seats, SGW, Sunroof Motor. |
| F50 | 7.5 Amp Brown | Supply Air Bag |
|
F51 |
7.5 Amp Brown |
Air Conditioning Compressor, Plaque Automatic Transmission, Rear Camera, Air Conditioning, LDW – Lane Departure Warning, ASS – Auxiliary Stack Switch, DSU – Drive Selector Unit, Reverse gear switch, side mirrors and rear window defrost |
| F53 | 7.5 Amp Brown | Supply IPC/Starter Device/System Keyless Enter ‘n Go™ , Brake Pedal Switch (NA), EPB – Electric Parking Brake |
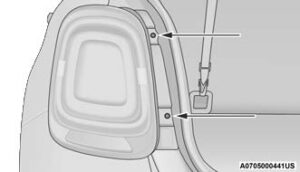
Rear Cargo Fuse/Relay Distribution Unit
To access the fuses, remove the access door from the left rear panel of the rear cargo area. Push on the left side of the access door to unhinge and remove.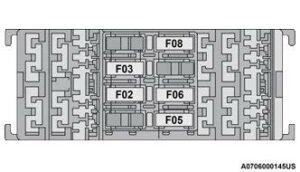
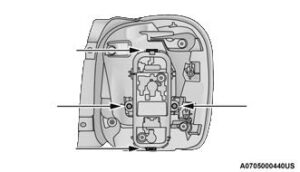
Rear Cargo Fuse Cavities
| Cavity | Mini Fuse | Description |
| F2 | 20 Amp Yellow | Audio System |
| F3 | 20 Amp Yellow | Electric Sunroof |
| F5 | 30 Amp Green | Power Seat (driver side) |
| F6 | 7.5 Amp Brown | Power Seat (driver side) Lumbar Adjustment |
| F8 | 20 Amp Yellow | Heating Front Seats |
BULB REPLACEMENT
General Information
- Before you replace a bulb, check the contacts to be sure they are not oxidized.
- Replace the bulbs with the same type and wattage.
- After replacing a light bulb, always check the correct orientation.
- Before replacing a bulb that is not functioning, check that the fuse is intact.
NOTE:
Lens fogging can occur under certain atmospheric conditions. This will usually clear as atmospheric conditions change to allow the condensation to change back into a vapor. Turning the lamps on will usually accelerate the clearing process.
Replacement Bulbs
| Interior Lamps | |
| Lamp Name | Lamp Number |
| Front Courtesy Light | C5W |
| Front Courtesy Lights (Sun Visors) | C5W |
| Rear Dome Light (Models Without Retractable Roof) | C5W |
| Rear Interior Lights (Models With Retractable Roof) | C5W |
| Interior Lights | W5W |
| Dome Light (Glove Compartment) | W5W |
| Exterior Lamps | |
| Lamp Name | Lamp Number |
| Low Beam/High Beam Headlamps | HIR2 |
| Optional Low Beam/High Bean Headlamps | LED (Serviced at an authorized dealer) |
| Front Position/Daytime Running Lights (DRL) | LED (Serviced at an authorized dealer) |
| Front Direction Indicator Lamps | WY21W |
| Fog Lamps (Halogen) | H11 |
| Fog Lamps (LED) | LED (Serviced at an authorized dealer) |
| Side Indicators (Side View Mirror) | WY5W |
| Side Marker | LED (Serviced at an authorized dealer) |
| Tail/Brake lights | LED (Serviced at an authorized dealer) |
| Turn Indicators | WY21W |
| Center High Mounted Stop Lamp (CHMSL) | LED (Serviced at an authorized dealer) |
| Reverse | P21W |
| License Plate Lamp | W5W |
Replacing Exterior Bulbs
Headlamps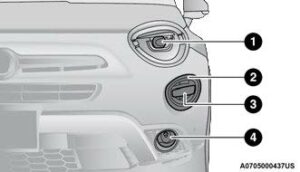
Front Lamps
- Headlamps
- Daytime Running Lamps
- Directional Indicators
- Fog Lamps — If Equipped
Hi/Lo Beam Light Halogen
See the following steps for bulb replacement:
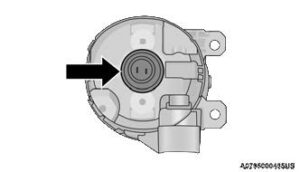
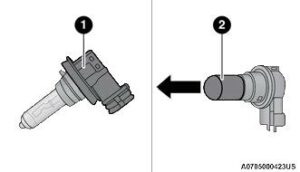
- Open the engine compartment and remove the headlamp bulb cap.
- Rotate the headlamp bulb socket counter-clockwise then pull outwards.
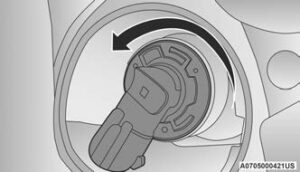
- Release the locking tab on the headlamp bulb connector and remove the bulb and socket.
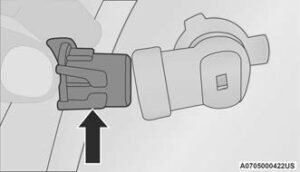
- Install the new headlamp bulb making sure it is properly locked.
- Install the headlamp bulb and socket; align the tabs and turn it clockwise making sure it is properly locked.
Headlamp Bulb Connector
WARNING
Carry out the operation of replacing lamps only with the engine off. Also make sure that the engine is cold, to avoid the danger of burns.
LED Main Beam/Dipped Beam Headlights/Fog Lights
For replacing these bulbs, contact an authorized dealership.
Side Lights/Daytime Running Lights (DRL)
The side lights/Daytime Running Lights (DRL) are LED-type. To replace them, contact an authorized dealership.
Side Marker
Side marker lights are LED-type. To replace these bulbs, contact an authorized dealer
Front Direction Indicator Lamp
See the following steps for bulb replacement:
- Turn the front wheels completely.
- Use a suitable tool to remove the access door.
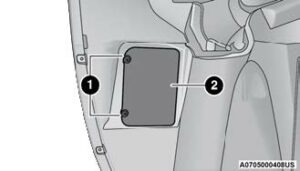
- Screws
- Access Door
- Turn the bulb and bulb holder assembly counterclockwise and then remove it sliding it outwards.
- Replace the bayonet-fitted bulb.
- Finally, refit the inspection door, fully tightening fixing screws.
Fog Lights (Halogen)
See the following steps for bulb replacement:
- Turn the front wheels completely.
- Use a suitable tool to remove the access door.
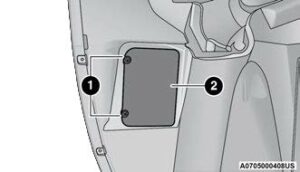 Screws
- Access Door
- Turn the bulb and bulb holder assembly counterclockwise and then remove it sliding it outwards.
- Replace the bayonet-fitted bulb.
- Finally, refit the inspection door, fully tightening fixing screws.
Side Indicators on External Rear View Mirrors – If Equipped
CAUTION
The procedure is described as a guideline. For the replacement of the lamp it is recommended that you contact an authorized dealer.
See the following steps for bulb replacement:
- Remove the mirror cap on the outside rear view mirror.
 Mirror Cap
- Mirror Cover
- Side Indicator Lens
- Side Indicator Bulb Location
- Remove the transparent lens assembly as shown.
- Remove the bulb socket and bulb from the transparent lens assembly by rotating the socket counterclockwise.
- Remove the bulb from the bulb socket by pulling the bulb straight out.
- Insert the new bulb, making sure that it is locked into place.
- Reinstall the socket in to the transparent lens assembly.
- Reinstall the cover on the outside rear view mirror, making sure it is locked into place.
Rear Tail Lamps
Tail Light
- Tail lights/Brake Lights
- Direction indicator
- REVERSE lights
Tail Lamps
The tail lights are LED-type. To replace these bulbs, contact an authorized dealership.
Brake Lights
The brake lights are LED-type. To replace these bulbs, contact an authorized dealership.
Side Marker
Side marker lights are LED-type. To replace these bulbs, contact an authorized dealer
3th Stop Lamp
The CHMSL is LED. For their replacement see an authorized dealer.
Reversing Light & Rear Direction Indicators
See the following steps for bulb replacement:
- Open liftgate
- Using a suitable tool, undo the two inboard screws, then release the light cluster from the respective pin fasteners pulling it carefully.
 Tail Light Screws
 - Disconnect the connector, then undo the two screws to access the bulbs.
- Locate faulty bulb and press slightly and turn at the same time: counterclockwise to extract; clockwise to install.
- Reposition the bulb holder assembly in the headlight body, and proceed until you hear the tabs click.
- Reinstall tail lamp assembly and close liftgate.
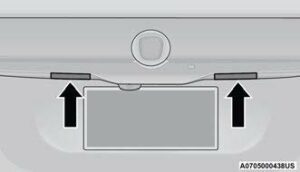
License Plate Lights
See the following steps for bulb replacement: To replace the bulbs proceed as follows:
- Using a suitable tool remove the license plate lens.
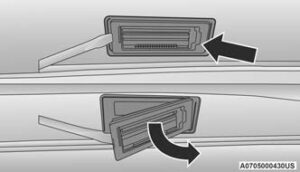
- Remove the bulbs from the individual side contacts.
- Insert the new bulbs, and ensure that they are properly locked between the contacts.
- Reinstall the license plate lens.
NOTE:
If removing the license plate lens using a suitable tool, be sure to cover the tip of the suitable with a cloth so no damage is done to the lenses or the vehicle paint.
Replacing Interior Bulbs
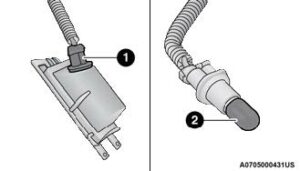
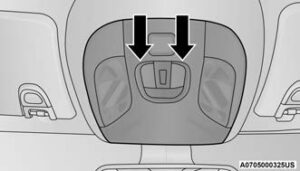
Front Courtesy Light
See the following steps for bulb replacement:
- Using a suitable tool remove the front courtesy light as shown.
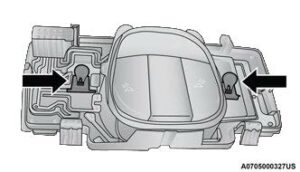
- Release the retainer clips and bulb housing as shown.
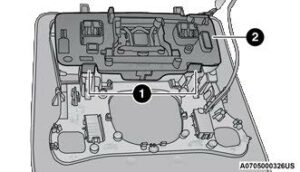
- Front Courtesy Bulb Housing
- Retaining Clips
- Bulb Housing
- Replace the bulbs by pulling them straight out of bulb housing.
- Insert the new bulbs, making sure that they are properly locked.
- Reassemble the bulb housing and courtesy light housing making sure that they are properly locked.
- Install the front courtesy light making sure that it is properly locked.
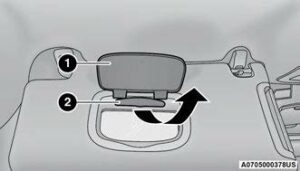
Dome Light Vanity Mirror
See the following steps for bulb replacement:
- Lift the cover of the mirror and pull out the visor mirror light cover.
- Replace the bulb, releasing it from the side contacts, and then insert the new bulb, making sure that it is properly locked between the contacts.
Visor Mirror Cover
-
- Visor Mirror Cover
- Visor Mirror Light
- Visor Mirror Cover
- Visor Mirror Light
FAQs
The 2021 Fiat 500X fuse box is intended to safeguard the vehicle’s electrical systems by preventing overloads and short circuits.
There may be additional fuses inside the vehicle’s interior. – The fuse box is typically located in the engine compartment.
To reach the fuse box in the engine compartment, lift the bonnet and look on one of the sides. Consult your owner’s manual for the precise location of interior fuses.
The 2021 Fiat 500X employs a variety of fuses, including mini-blade and micro2 fuses.
Inside a blown fuse, there is typically a fractured or melted metal strip. Additionally, a fuse tester or multimeter can be used to verify for continuity.
Replace the ruptured fuse with a fuse of the same amperage rating in order to restore electrical function.
Your owner’s manual contains a fuse chart listing the amperage ratings and systems they protect.
No, it is necessary to always use the correct amperage fuse to prevent electrical damage and fire hazards.
Frequent problems include faulty lighting, power windows, infotainment systems, and other electrical components.
The vehicle may arrive with a few spare fuses, which are typically located in or near the fuse box.
Using a fuse puller or needle-nose pliers, remove the ruptured fuse with care and replace it with a new fuse of the same amperage rating.
No, fuses are one-time protection devices that must be replaced if they are destroyed.
It is not recommended to modify or tamper with the fuse box without adequate knowledge and comprehension of the vehicle’s electrical systems in order to avoid potential damage or hazards.
Consult a qualified mechanic or Fiat service center for a comprehensive electrical diagnosis if you are unable to determine the cause of the issue.
It is essential to consult the warranty documentation for your vehicle to determine the specific coverage, but fuses and the fuse box are frequently considered wear and tear items and may not be covered.
Useful Link
View Full PDF: 2021 Fiat 500X Owner’s Manual| Auto User Guide
2021 Fiat 500X Transmission Guide