
![]()
2024 Cadillac LYRIQ Fuses and Fuse Box | Replacing a blown fuse
When it comes to electric cars, the 2024 Cadillac LYRIQ is the height of luxury and innovation. As an all-electric SUV, it combines cutting-edge technology with beautiful design in a way that looks great. Fuse boxes are an important part of the complex electrical system because they protect different parts from electrical overloads and breakdowns. The fuse box, which is the heart of these safety devices, is placed in a way that makes it easy to get to and maintain.
Once you know where the broken fuse is in the 2024 Cadillac LYRIQ, it’s easy to replace it. Most of the time, the fuse box is organized and labeled so that users can quickly find the fuse that is connected to the broken part. To change a blown fuse, make sure the car is off, look at the owner’s manual or fuse box diagram for help, and make sure you have the right tools to safely take out and put in the new fuse. This design is easy to use and shows that Cadillac wants to make owning a LYRIQ as easy as possible. Even routine maintenance jobs are made easy for the picky LYRIQ owner. As technology keeps getting better, the 2024 Cadillac LYRIQ shows that the brand is still committed to mixing style and functionality in electric vehicles.
2024 Cadillac Lyriq Review, Specs, Price, And Mileage (Brochure)
Electrical System
High Voltage Devices and Wiring
Warning
Exposure to high voltage can cause shock, burns, and even death. The high-voltage components in the vehicle can only be serviced by technicians with special training.
High-voltage components are identified by labels. Do not remove, open, take apart, or modify these components. High voltage cable or wiring has orange covering or labels. Do not probe, tamper with, cut, or modify high-voltage cables or wiring.
Electrical System Overload
The vehicle has fuses and circuit breakers to protect against an electrical system overload. When the current electrical load is too heavy, the circuit breaker opens and closes, protecting the circuit until the current load returns to normal or the problem is fixed. This greatly reduces the chance of circuit overload and fire caused by electrical problems.
Fuses and circuit breakers protect power devices in the vehicle.
If there is a problem on the road and a fuse needs to be replaced, the same amperage fuse can be borrowed. Choose some feature of the vehicle that is not needed to use and replace it as soon as possible.
To check a fuse, look at the band inside the fuse. If the band is broken or melted, replace the fuse. Be sure to replace a bad fuse with a fuse of identical size and rating.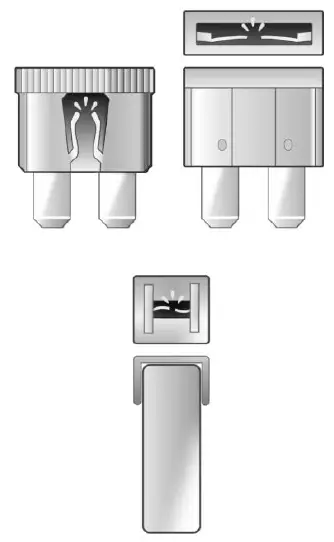
Replacing a Blown Fuse
- Turn off the ignition.
- Locate the fuse puller in the engine compartment fuse block.

- Use the fuse puller to remove the fuse from the top or side, as shown above.
- If the fuse must be replaced immediately, borrow a replacement fuse with the same amperage from the fuse block. Choose a vehicle feature that is not needed to safely operate the vehicle. Repeat Steps 2-3.
- Insert the replacement fuse into the empty slot of the blown fuse.
At the next opportunity, see your dealer to replace the blown fuse.
Headlamp Wiring
An electrical overload may cause the lamps to go on and off, or in some cases to remain off. Have the headlamp wiring checked right away if the lamps go on and off or remain off?
Windshield Wipers
If the wiper motor overheats due to heavy snow or ice, the windshield wipers will stop. The wiper function is available immediately after the wiper switch is set to off, and back to on. To protect the wiper motor from overheating, the wipers may slow down when the windshield is dry for a long period. If a period of dry operation, or little moisture, exceeds 10 minutes, the wipers may switch to intermittent operation, and remain there. When moisture is again detected on the windshield, wiper operation will return to the operator-selected speed.
Although the circuit is protected from electrical overload, overload due to heavy snow or ice may cause wiper linkage damage. Always clear ice and heavy snow from the windshield before using the windshield wipers.
If the overload is caused by an electrical problem and not snow or ice, be sure to get it fixed.
Fuses and Circuit Breakers
The wiring circuits in the vehicle are protected from short circuits by a combination of fuses and circuit breakers. This greatly reduces the chance of damage caused by electrical problems.
Danger
Fuses and circuit breakers are marked with their ampere rating. Do not exceed the specified amperage rating when replacing fuses and circuit breakers. The use of an oversized fuse or circuit breaker can result in a vehicle fire. You and others could be seriously injured or killed.
Warning
Installation or use of fuses that do not meet GM’s original fuse specifications is dangerous. The fuses could fail, and result in a fire. You or others could be injured or killed, and the vehicle could be damaged.
Underhood Compartment Fuse Block
To Access:
- Open the hood.

- The Underhood Compartment Fuse Block is under a cover and side extension/ shield in the underhood compartment. Unclip the right side of the shield and remove the right side access cover.

- Remove the bolt to access the fuse block. 4. To open the fuse block cover, press the clips at the side and back and pull the cover-up.

Caution
Spilling liquid on any electrical component of the vehicle may damage it. Always keep the covers on any electrical component.
A fuse puller is in the underhood compartment fuse block. The vehicle may not be equipped with all of the fuses and features shown.
| Fuses | Usage |
| F01 | Spare |
| F02 | – |
| F03 | Spare |
| F04 | Spare |
| F05 | Spare |
| F06 | MSM/MEMORY SEAT BOLSTER – Memory Seat Module/Memory Seat Bolster |
| F07 | PEEV/PCEV & ECFV/CHFV – Primary Evaporator Expansion Valve/Primary Chiller Expansion Valve and External Condenser Flow Valve/Condensing Heater Flow Valve |
| F08 | MTR MAIN COOL VLV – Motor Main Coolant Valve |
| F09 | Motor: PECP & Motor: ESSCP – Power Electronics Coolant Pump and Energy Storage System Coolant Pump |
| F10 | – |
| F11 | – |
| F12 | ECP_S & OBCM 2 – Electrification Control Processor (Traction Power Inverter Module 2) & On Board Charging Module 2 |
| F13 | – |
| F14 | – |
| F15 | TRLR PRK LAMPS – Trailer Park Lamps |
| F16 | TRLR REV LAMP – Trailer Reverse Lamp |
| F17 | – |
| F18 | GLBX DR RELSE – Glove Box Release |
| F19 | – |
| F20 | – |
| F21 | CHARGE PORT DR MTR – Charge Port Door Motor |
| F22 | AC/DC INV MDL – Alternate Current/Direct Current Inverter Module |
| F23 | – |
| F24 | – |
| F25 | – |
| F26 | Spare |
| F27 | – |
| F28 | ETC MDL – Electronic Toll Control Module |
| F29 | – |
| F30 | Rear Cargo APO – Rear Cargo Auxiliary Power Outlet |
| F31 | TRLR INTERFACE MDL BATT SOURCE 1 – Trailer Interface Module Battery Source 1 |
| F32 | Spare |
| F33 | Spare |
| F34 | ELM 5 – Exterior Lighting Module 5 |
| F35 | ELM 4 – Exterior Lighting Module 4 |
| F36 | – |
| F37 | – |
| F38 | ELM 7 – Exterior Lighting Module 7 |
| F39 | ELM 3 – Exterior Lighting Module 3 |
| F40 | ECP_E_Batt SOURCE 1 & ECP_E_Batt SOURCE 3 – Electrification Control Processor (Traction Power Inverter Module 1) Source 3 and 1 |
| F41 | DSP & AIR SPRINGS 2 – Door Switch Panel and Suspension Control Leveling 2 |
| F42 | SEAT POS SW & VKM SNSR/RLH SNSR – Seat Position Switch and Virtual Key Module Sensor/Rain Light Humidity Sensor |
| F43 | SCL & CHIM MDL – Steering Column Lock and Charge Interface Module |
| F44 | PSM & AERO SH – Power Sounder Module and Aero Shutter |
| F45 | RFA MDL & HFC MDL – Remote Function Actuator Module and Handsfree Closure Module |
| F46 | AFL/AHL & PFA Module – Adaptive Forward Lighting/ Automatic Headlamp Leveling and Pedestrian Friendly Alert Module |
| F47 | LIT GRILLE/FR PRK EMBLEM & SADS – Lit Grille/Front Park Emblem and Semi-Active Damping System |
| F48 | PWR T/GATE – Power Tailgate |
| F49 | – |
| F50 | MTR WDW LIFTER LT – Motor Window Lifter Left |
| F51 | AIR SPRINGS 1 – Suspension Control Leveling 1 |
| F52 | MTR WDW LIFTER RT – Motor Window Lifter Right |
| F53 | FRT WPR – Front Wiper |
| F54 | TRLR HEAVY DUTY/TRLR EUROPE – Trailer Battery |
| F55 | – |
| F56 | FOLD SEAT RT MTR – Fold Seat Right Motor |
| F57 | EBCM– Electronic Brake Control Module |
| F58 | FRT BLWR MTR – Front Blower Motor |
| F59 | – |
| F60 | Horn |
| F61 | Rear Defog |
| F62 | REAR BLWR MTR – Rear Blower Motor |
| F63 | MTR S/ROOF & SUNSHD – Motor Sunroof and Motor Sunshade |
| F64 | PWR SEAT DRVR – Power Seat Driver |
| F65 | PWR SEAT PASS – Power Seat Passenger |
| F66 | CRFM – Condenser Radiator Fan Module |
| F67 | Heated Wiper |
| F68 | Spare |
| F69 | Spare |
| F70 | RELAY’S COIL |
| F71 | REAR HTD/SEAT 2 – Rear Heated Seat 2 |
| F72 | FRT HTD/SEAT 1 – Front Heated Seat 1 |
| F73 | FOLD SEAT LT MTR – Fold Seat Left Motor |
| F74 | TRLR INTERFACE MDL BATT SOURCE 2 – Trailer Interface Module Battery Source 2 |
| F75 | Spare |
| F76 | Spare |
| F77 | Spare |
| F78 | TRLR ST/TRN LT & TRLR ST/ TRN RT – Trailer Stop Turn Left and Trailer Stop Turn Right |
| F79 | REAR HTD/SEAT 1 – Rear Heated Seat 1 |
| F80 | FRT HTD/SEAT 2 – Front Heated Seat 2 |
| F81 | OUT OF PRK DSBL – Out of Park Disable |
| F82 | Wash Pump (Front) |
| F83 | Camera Wash |
Instrument Panel Fuse Block
The instrument panel fuse block is to the right of the glove box.
To Access the Fuses:
- Remove the panel, starting at the top.
- Once the panel clips disengage, the tabs along the bottom of the door can disengage from the instrument panel to remove the door.
2024 Cadillac Lyriq Review, Specs, Price, And Mileage (Brochure)
To reinstall the door, place the bottom tabs into the slots, and rotate the door into position, engaging the clips. See your dealer if additional assistance is needed.
The vehicle may not be equipped with all of the fuses and features shown.
| Fuses | Usage |
| F1 | – |
| F2 | APO/CIGAR LTR – Auxiliary Power Outlet Instrument Panel/Cigar Lighter |
| F3 | – |
| F4 | USB PORT/APO AC 150W – Universal Serial Bus Port/ Auxiliary Power Outlet Alternating Current 150W |
| F5 | STRG COL LOCK – RUN/ CRANK Steering Column Lock |
| F6 | ELM 1– Exterior Lighting Module 1 |
| F7 | AMP BASE – Amplifier Base |
| F8 | RT DR LATCH – Right Door Latch |
| F9 | LT DR LATCH – Left Door Latch |
| F10 | STRG COL POS MDL – Steering Column Position Module |
| F11 | ACP 4 –ADAS Compute Platform 4 |
| F12 | – |
| F13 | TRLR CON & ECP_E/ECP_S/VICM – RUN/ CRANK Europe – Trailer Control and Electrification Control Processor (Traction Power Inverter 1 and 2)/ Vehicle Integration Control Module |
| F14 | HEADLAMPS – RUN/CRANK Headlamps |
| F15 | HDLP RT –Headlamp Right |
| F16 | STRG COL/CLOCK SPRING – Steering Column Lock/Clock Spring |
| F17 | SEAT FAN PASS & SEAT FAN DRVR – RUN/CRANK Seat Fan Passenger and Seat Fan Driver |
| F18 | VCD & SRR –Virtual Cockpit Display and Short Range Radar |
| F19 | MISC 2 & MISC 1 – RUN/ CRANK Miscellaneous 2 Switch Bank/Electronic Toll Collection/Interior Particulate Matter Sensor/ Reflective Light Auxiliary Display and Miscellaneous 1 Electronic Brake Control Module/Exterior Lighting Module/Sensing and Diagnostic Module/Inside Rear View Mirror |
| F20 | BCM 1 & VICM – Body Control Module 1 and Vehicle Integration Control Module |
| F21 | LRR RR & EPBS/ESM – Long Range Radar – Rear and Electric Park Brake Switch/ Electronic Transmission Range Select Shifter Module |
| F22 | VKM/VKMB/AUX JACK & ACP3 – Virtual Key Module/Virtual Key Backup Module/Auxiliary Jack and ADAS Compute Platform 3 |
| F23 | T/LAMP RT & T/LAMP LT – Tail Lamp Right and Tail Lamp Left |
| F24 | UPA/APA/SBZA & SDM/ AOS – Universal Park Assist/Automatic Park Assist/Side Blind Zone Alert and Sensing Diagnostic Module/Automatic Occupant Sensing Module |
| F25 | ACP 2/EOCM_LC/FCM/MFC & DMS/CGM/DLC/VDM – ADAS Compute Platform 2/ External Object Calculating Module/Front Camera Module/Multi-Function Control and Driver Monitoring System/Central Gateway Module/ Diagnostic Link Connector/ Vehicle Data Monitor |
| F26 | ECP_E_BATT 2/ACEC & HUD/HVAC DISPLAY – Electrification Control Processor Battery 2/Air Condition Electric Compressor and Heads Up Display/Heating, Ventilation and Air Conditioning Display |
| F27 | BCM 3 – Body Control Module 3 |
| F28 | BCM 2 – Body Control Module 2 |
| F29 | AMP UPLEVEL – Amplifier Uplevel |
| F30 | BCM 4 – Body Control Module 4 |
| F31 | VPM/SD CARD/ILSS/OHC – Video Processing Module/ SD Card/Indicator Light and Solar Sensor/Overhead Console |
| F32 | HSWM – Heated Steering Wheel Module |
| F33 | LRR FR/LIDAR – Long Range Radar Front/Light Detection and Ranging |
| F34 | ELM 2 – Exterior Lighting Module 2 |
| F35 | HDLP LT – Headlamp Left |
| F36 | VCU BATT 1 – Virtual Cockpit Unit Battery 1 |
| F37 | TCP (OnStar) – Telematics Communication Platform |
| F38 | WCM – Wireless Charger Module |
| F39 | HI VOLTAGE SYS LCKOUT – High Voltage System Lockout |
| F40 | VCU Batt 2 – Virtual Cockpit Unit Battery 2 |
| F41 | ELM 6 – Exterior Lighting Module 6 |
| F42 | – |
FAQs
Fuses in the LYRIQ serve to protect electrical components by breaking the circuit if there’s an overload or short circuit.
The LYRIQ typically has at least one main fuse box, but there might be additional ones for specific systems.
The main fuse box is usually located in the engine compartment or under the dashboard, depending on the vehicle model.
Symptoms may include loss of power to certain components, malfunctioning lights, or other electrical issues.
Check for a visibly melted or broken wire inside the fuse. Alternatively, use a multimeter to test continuity.
Typically, you’ll need a fuse puller or needle-nose pliers and replacement fuses of the correct amperage.
Some vehicles come with a spare fuse kit, but it’s always a good idea to check and purchase additional fuses if needed.
No, it’s crucial to replace a blown fuse with one of the same amperage rating to maintain proper circuit protection.
Before handling fuses, turn off the vehicle’s ignition and disconnect the battery to ensure safety.
Overloaded circuits, short circuits, or faulty electrical components can lead to blown fuses.
Yes, sometimes a blown fuse can indicate a deeper problem, and if replacement fuses continue to blow, it’s advisable to seek professional assistance.
Check with the manufacturer or authorized service centers for any recalls or known issues related to fuses.
For simple fuse replacements, it’s generally a straightforward task. However, if there are recurring issues, seeking professional help is recommended.
Contacting the dealership’s service department are good source of information.
LYRIQ may use various types of fuses, such as blade fuses or cartridge fuses, depending on the electrical system requirements.
Useful Link:
View Full PDF: 2024 Cadillac LYRIQ User Manual |Auto User Guide
2024 Cadillac Lyriq Review, Specs, Price, And Mileage (Brochure)