

2024 Chevrolet Corvette Fuses and Fuse Box | How to fix a Blown Fuse
There are fuses and a dedicated fuse box in the 2024 Chevrolet Corvette’s advanced electrical system. These are important parts that make sure the car’s different electrical features work smoothly. The fuse box is where all of these safety devices are gathered together. They are put in strategic places around the car to protect it from damage caused by electrical problems or overloads. Each fuse is meant to break the circuit if it senses too much power, protecting the electrical part that it is meant to protect from damage. If there is a blown switch, it is pretty easy to figure out what the problem is and fix it. The first thing you should do is look in the car’s instructions to find the fuse that goes to the affected part. Once the fuse is found, it can be looked at to see if there are any signs of a broken filament. You can easily find replacement fuses at stores that sell car parts and put them in the fuse box to get them working again. To keep the safety and integrity of the vehicle’s electrical system, it is important to make sure that the replacement fuse has the right amperage value. The 2024 Chevrolet Corvette is more reliable and runs better generally when the fuses and fuse box are checked and maintained properly.
2024 Chevrolet CORVETTE STINGRAY Specs, Price, Features, Mileage (Brochure)
Electrical System
Electrical System Overload
The vehicle has fuses to protect against an electrical system overload. When the current electrical load is too heavy, the circuit breaker opens and closes, protecting the circuit until the current load returns to normal or the problem is fixed.
This greatly reduces the chance of circuit overload and fire caused by electrical problems. Fuses and circuit breakers protect power devices in the vehicle.
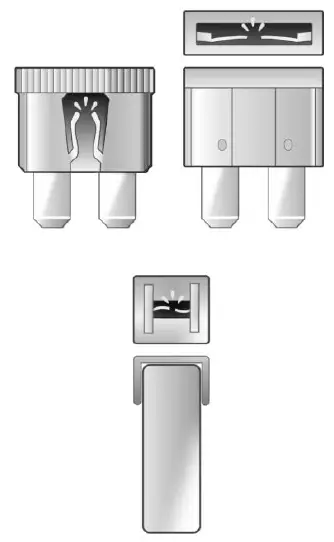
If there is a problem on the road and a fuse needs to be replaced, the same amperage fuse can be borrowed. To check a fuse, look at the band inside the fuse. If the band is broken or melted, replace the fuse. Be sure to replace a bad fuse with a fuse of identical size and rating.
Replacing a Blown Fuse
At the next opportunity, see your dealer to replace the blown fuse.
Headlamp Wiring
An electrical overload may cause the lamps to go on and off, or in some cases to remain off. Has the headlamp wiring checked right away if the lamps go on and off or remain off?
Windshield Wipers
If the wiper motor overheats due to heavy snow or ice, the windshield wipers will stop until the motor cools and will then restart. Although the circuit is protected from electrical overload, overload due to heavy snow or ice may cause wiper linkage damage. Always clear ice and heavy snow from the windshield before using the windshield wipers.
Fuses and Circuit Breakers
The wiring circuits in the vehicle are protected from short circuits by a combination of fuses and circuit breakers. This greatly reduces the chance of damage caused by electrical problems.
Danger
Fuses and circuit breakers are marked with their ampere rating. Do not exceed the specified amperage rating when replacing fuses and circuit breakers. The use of an oversized fuse or circuit breaker can result in a vehicle fire. You and others could be seriously injured or killed.
Warning
Installation or use of fuses that do not meet GM’s original fuse specifications is dangerous. The fuses could fail, and result in a fire. You or others could be injured or killed, and the vehicle could be damaged.
See Accessories and Modifications 0 231 and General Information 0 231. To check or replace a blown fuse, see Electrical System Overload 0 270.
Instrument Panel Fuse Block
The instrument panel fuse block is behind the glove box. The glove box can be accessed by unlatching the door damper and squeezing the pivot to release the damper ring. Pull the glove box bin side walls in to release the door stops. Then turn the door until the hinge hooks release from the hinge pin.
To Access:
- Open the top cover.
- Remove the top cover by pushing inward on the latch.
- Pull the cover upward.
To Install:
- Insert the tabs on the back of the cover into the slots in the instrument panel.
- Align the clip with the slots in the instrument panel.
- Press the cover into place.
See your dealer if additional assistance is needed.
 The vehicle may not be equipped with all of the fuses and relays shown.
| Fuses | Usage |
| F1 | – |
| F2 | Front Wiper |
| F3 | Cooling Fan 1 |
| F4 | – |
| F5 | Cooling Fan 2 |
| F6 | Front Blower |
| F7 | Automatic Level Control |
| F8 | Shifter Interface Board Module |
| F9 | Display IP Cluster/HVAC/ Center Stack Module |
| F10 | Traction Power Inverter Module Battery 1 |
| F11 | USB |
| F12 | Traction Power Inverter Module Battery 2 |
| F13 | Transmission Oil Pump Motor |
| F14 | Glove Box |
| F15 | – |
| F16 | – |
| Electrical Park Brake/ Automatic Occupant Sensing (E Ray) | |
| F17 | Remote Function Actuator |
| F18 | Front Trunk Release |
| F19 | Intelligent Battery Sensor |
| F20 | Exterior Lighting Module 1 |
| F21 | Exterior Lighting Module 3 |
| F22 | Exterior Lighting Module 4 |
| F23 | Body Control Module 2 |
| F24 | Exterior Lighting Module 6 |
| F25 | Amplifier |
| F26 | Automatic Occupant Sensing/Electric Park Brake |
| F27 | Video Processing Module |
| F28 | Right Headlamp |
| F29 | Clutch Actuator |
| F30 | Sensing and Diagnostic Module/Automatic Occupant Sensing |
| F31 | Body Control Module 1 |
| F32 | Driver Monitor System |
| F33 | Data Link Connection/ Wireless Charging Module |
| F34 | Telematics/Head Up Display |
| F35 | Horn |
| F36 | – |
| Shift Interface Board (E Ray) | |
| F37 | – |
| Body Control Module 1 (E Ray) | |
| F38 | Front Wash Pump |
| F39 | Rear Auxiliary Power Outlet |
| F40 | Performance Data Recorder/Center Stack Module |
| F41 | Integrated Chassis Control Module |
| F42 | Theft Deterrent |
| F43 | Left Headlamp |
| F44 | Exterior Lighting Module 2 |
| F45 | Power Steering Column Module |
| F46 | Body Control Module 3 |
| F47 | Exterior Lighting Module 5 |
| F48 | Exterior Lighting Module 7 |
| F49 | Body Control Module 4 |
| F50 | Front Auxiliary Power Outlet |
| F51 | – |
| F52 | Steering Wheel Control Switch |
| F53 | Heated Steering Wheel |
| F54 | – |
| Steering Wheel (E Ray) | |
| Relays | Usage |
| K1 | – |
| K2 | Glove Box Relay |
| K3 | Horn Relay |
| K4 | Front Wash Relay |
| K5 | Retained Accessory Power/Accessory Relay |
| K6 | Front Trunk Release Relay 1 |
| K7 | – |
| K8 | – |
| K9 | Front Trunk Release Relay 2 |
| K10 | Wiper Relay |
Rear Compartment Fuse Block
The rear compartment fuse block is in the rear of the vehicle in between the seats.
To Access:
- Open top cover.
- Remove the top cover by pushing inward on the latch.
- Pull the cover upward.
To Install:
- Insert the tabs on the back of the cover into the slots in the rear compartment.
- Align the clip with the slots in the instrument panel.
- Press the cover into place.
2024 Chevrolet CORVETTE STINGRAY Specs, Price, Features, Mileage (Brochure)
See your dealer if additional assistance is needed.
 The vehicle may not be equipped with all of the fuses, relays, and features shown.
| Fuses | Usage |
| 1 | Driver Memory Seat Module/Power Seat |
| 2 | Driver Heated Seat |
| 3 | Passenger Memory Seat Module/Power Seat |
| 4 | Passenger Heated Seat |
| 5 | Transmission Control Module |
| 6 | – |
| 7 | Power Sounder Module/ Pedestrian Friendly Alert Function |
| 8 | Side Blind Zone Alert/ Rear Park Assist |
| 9 | – |
| 10 | Engine Control Module/ Air Conditioning |
| 11 | Fuel Tank Zone Module 2 |
| 12 | Lithium Ion Battery Module |
| 13 | Active Fuel Management |
| 14 | Seat Fan |
| 15 | Integrated Chassis Control Module/Traction Power Inverter Module |
| 16 | Exterior Lighting Module |
| 17 | Instrument Panel Cluster/Shifter Interface Board/Transmission Control Module/ Electronic Brake Control Module |
| 18 | Engine Control Module |
| 19 | – |
| 20 | Sensing and Diagnostic Module/Inside Rear View Mirror |
| 21 | Exhaust Valve Solenoid |
| 22 | Fuel Pump/Fuel Tank Zone Module 1 |
| 23 | Tonneau Left |
| 24 | Tonneau Right |
| 25 | Convertible Top Right |
| 26 | Convertible Top Left |
| 27 | Electronic Suspension Control |
| 28 | Scavenge Coolant Pump Motor |
| 29 | CGM |
| 30 | O2 Sensor |
| 31 | O2 Sensor/Engine Oil/ Canister Purge/Active Fuel Management |
| 32 | Ignition Even |
| 33 | Ignition Odd |
| 34 | Engine Control Module 1 |
| 35 | Engine Control Module/ Mass Air Flow Sensor/ O2 Sensor/Air Conditioning |
| 36 | Power Front Closure Module/Front Camera Module |
| 37 | Canister Vent |
| 38 | Latch Control Module |
| 39 | Right Window Switch/ Door Lock |
| 40 | Left Window Switch/ Door Lock |
| 41 | Pedestrian Friendly Alert Module/High Voltage System Lock Out Switch |
| 42 | Engine Control Module 2 |
| 43 | Charged Air Cooler |
| 44 | Air Conditioning Compressor |
| 45 | Transmission Control Module |
| 46 | – |
| 47 | DC/DC Battery 1 |
| 48 | DC/DC Battery 2 |
| 49 | Auxiliary Cooling Fan Right |
| 50 | Virtual Key Backup Module |
| 51 | Starter Pinion |
| 52 | Auxiliary Pump |
| 53 | Starter Solenoid |
| 54 | Auxiliary Cooling Fan Left |
| 55 | Automatic Leveling Control |
| 56 | Energy Storage Coolant Pump/Power Electronics Coolant Pump |
| 57 | Rear Window Defogger |
| 58 | – |
| 59 | Left/Right Window |
| 60 | Passenger Power Seat |
| 61 | Driver Power Seat |
| Relays | Usage |
| 1 | Starter Pinion Relay |
| 2 | Powertrain Relay |
| 3 | Run/Crank Relay |
| 4 | Rear Defogger Relay |
| 5 | Air Conditioning Clutch Relay |
| 6 | – |
| 7 | – |
| 8 | – |
| 9 | – |
| 10 | – |
| 11 | – |
| 12 | – |
| 13 | – |
| 14 | Starter Solenoid Relay |
| 15 | Fuel Tank Zone Module Relay |
FAQs
The fuse box in the 2024 Chevrolet Corvette is typically located in the engine compartment or under the dashboard on the driver’s side.
The Corvette typically has at least two fuse boxes, one in the engine compartment and another inside the cabin.
Fuses protect electrical circuits by breaking the circuit if an excessive current flows through it, preventing damage to components or a fire.
A blown fuse can be identified by a visible break in the wire inside the fuse, or the metal strip inside may be melted.
Generally, you’ll only need a fuse puller or a pair of pliers to remove the blown fuse and a replacement fuse.
The amperage ratings for the fuses can vary depending on the specific electrical component.
Yes, using a fuse with a higher amperage rating than recommended can lead to damage to the electrical components and may pose a safety risk.
The owner’s manual or the fuse box cover should have a diagram indicating which fuse is associated with each electrical component.
Many vehicles come with a few spare fuses stored in the fuse box or included in the vehicle’s toolkit.
Yes, as long as the replacement fuse has the same amperage rating and meets the specifications outlined in the owner’s manual.
Regularly inspecting fuses is a good practice, especially if you notice issues with electrical components. Replace any blown fuses promptly.
Yes, a single-blown fuse can affect multiple electrical components, so it’s essential to check all relevant fuses if you’re experiencing issues.
Common issues might include problems with power windows, lights, or the stereo, which could be traced back to blown fuses.
If you’re unsure or uncomfortable with handling electrical components, it’s recommended to consult a professional mechanic for assistance.
Before replacing fuses, ensure the vehicle is turned off, and consult the owner’s manual for any specific precautions or instructions related to fuse replacement.
Useful Link:
View Full PDF: 2024 Chevrolet Corvette User Manual | Auto User Guide
2024 Chevrolet CORVETTE STINGRAY Specs, Price, Features, Mileage (Brochure)
2024 Chevrolet Corvette Instrument Cluster | How to use Dashboard