
ACURA Integra 2023 Handling Fuses and Indicators User Guide
Tools
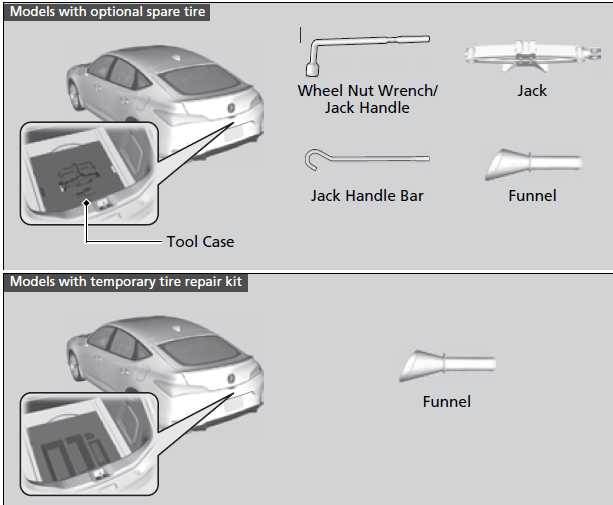
The tools are stored in the cargo area.
Types of Tools
If a Tire Goes Flat
Temporarily Repairing a Flat Tire
If the tire has a large cut or is otherwise severely damaged, you will need to have the vehicle towed. If the tire only has a small puncture, from a nail for instance, you can use the temporary tire repair kit so that you can drive to the nearest service station for a more permanent repair.
If a tire goes flat while driving, grasp the steering wheel firmly, and brake gradually to reduce speed. Then, stop in a safe place.
- Park the vehicle on a firm, level, and non-slippery surface and apply the parking brake.
- Put the transmission into (P.
- Turn on the hazard warning lights and set the power mode to VEHICLE OFF.
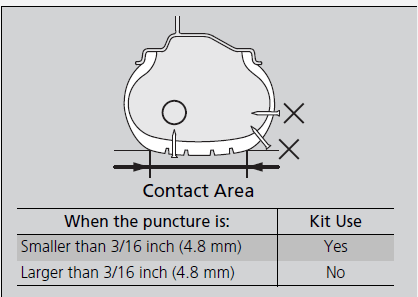
The kit should not be used in the following situations. Instead, contact a dealer or roadside assistance to have the vehicle towed.
- The tire sealant has expired.
More than one tire is punctured.
The puncture or cut is larger than 3/16 inch (4.8 mm).
The tire side wall is damaged or the puncture is outside the contact area.
Changing a Flat Tire
- Damage has been caused by driving with the tire extremely under inflated.
The tire bead is no longer seated.
The rim is damaged.
Do not remove a nail or screw that punctured the tire. If you remove it from the tire, you may not be able to repair the puncture using the kit.
Getting Ready to Temporarily Repair the Flat Tire
NOTICE
Do not use a puncture-repairing agent other than the one provided in the kit that came with your vehicle. If a different agent is used, you may permanently damage the tire pressure sensor.
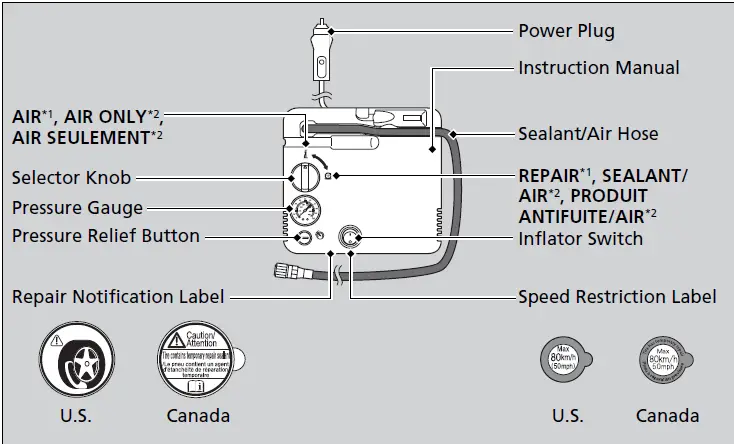
Repair notification label and speed restriction label are applied to the side of the temporary tire repair kit.
When making a temporary repair, carefully read the instruction manual provided with the kit.
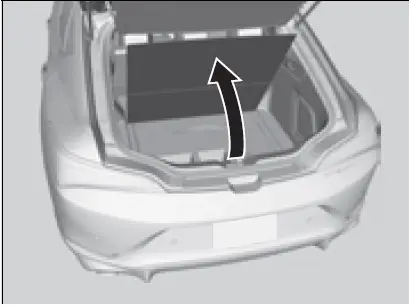
- Pull the strap on the cargo area floor lid and open the lid.
 Take the kit out of the case.
 - Place the kit face up, on flat ground near the flat tire, and away from traffic. Do not place the kit on its side.

Injecting Sealant and Air
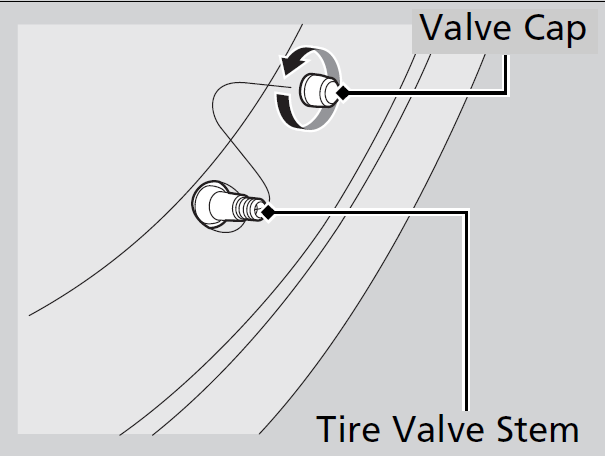
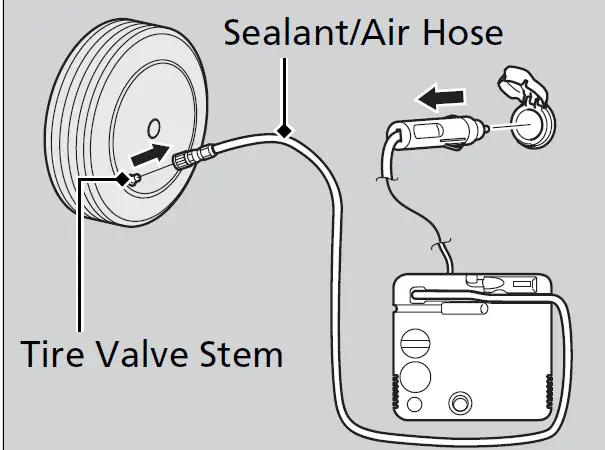
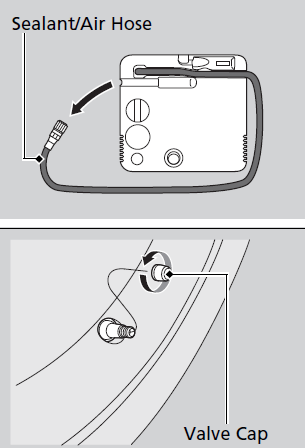
- Remove the valve cap from the tire valve stem.
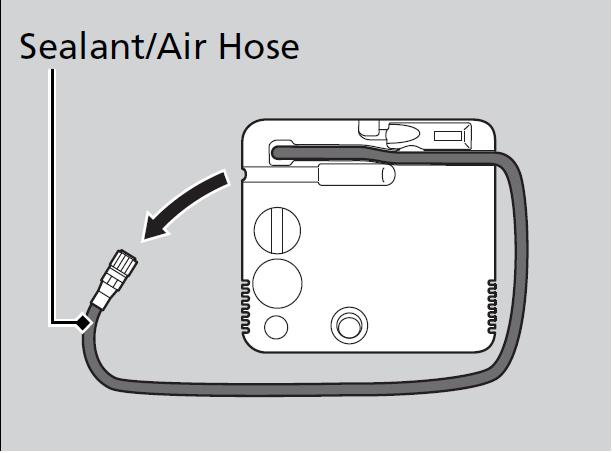
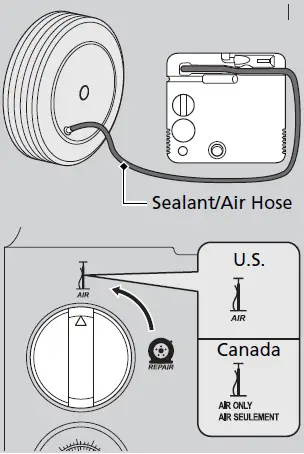
- Remove the sealant/air hose from the packaging.
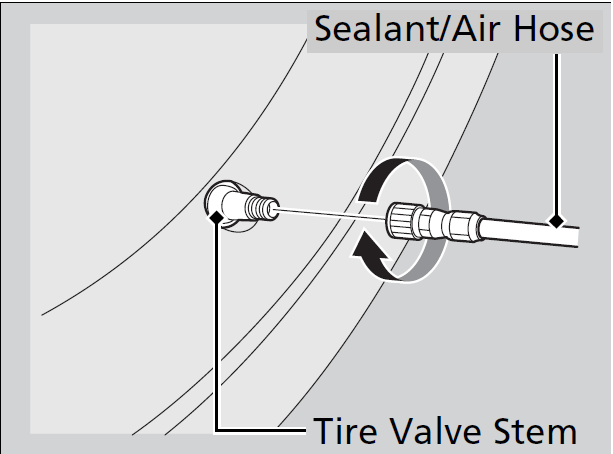
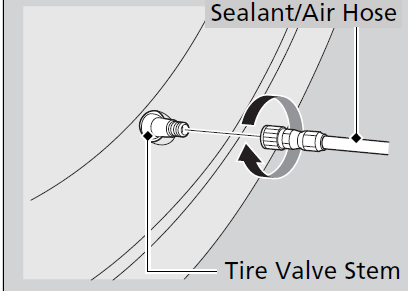
- Attach the sealant/air hose onto the tire valve stem. Screw it until it is tight.
CAUTION
Tire sealant contains substances that are harmful if inhaled, ingested or if contact is made with the eyes or skin.
Always use in a well-ventilated area and use gloves and safety glasses for protection; do not ingest.
For skin or eye contact, flush with cool water; if ingested, rinse mouth with water. In all cases, seek medical attention if necessary.
In cold temperatures, the sealant may not flow easily. In this situation, warm it up for five minutes before using.
The sealant can permanently stain clothing and other materials. Be careful during handling and wipe away any spills immediately.
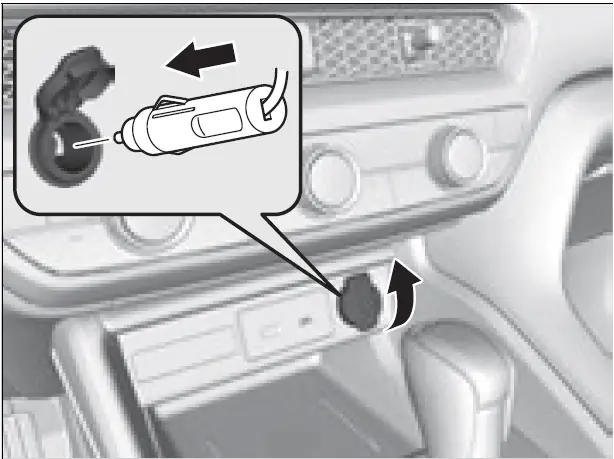
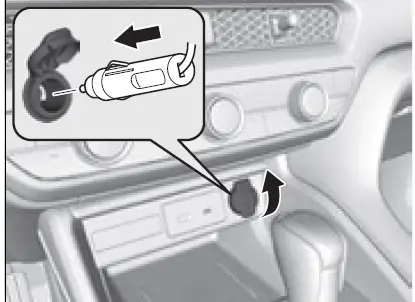
Plug in the compressor to the accessory power socket.
Be careful not to pinch the cord in a door or window.
Accessory Power Socket P. 210
 Start the engine.
Starting the Engine P. 430
Keep the engine running while injecting sealant and air.
Carbon Monoxide Gas P. 81
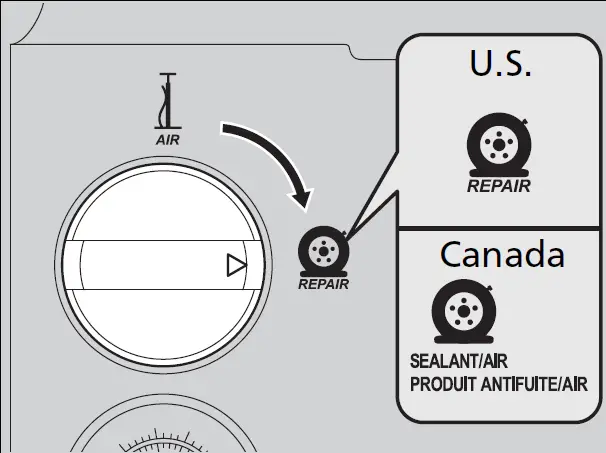
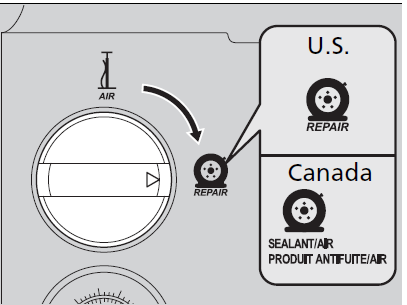
Turn the selector knob to REPAIR*1,
SEALANT/AIR*2, PRODUIT ANTIFUITE/AIR*2.
WARNING
Running the engine with the vehicle in an enclosed or even partly enclosed area can cause a rapid buildup of toxic carbon monoxide.
Breathing this colorless, odorless gas can cause unconsciousness and even death. Only run the engine to power the air compressor with the vehicle outdoors.
NOTICE
Do not operate the temporary tire repair kit compressor for more than 15 minutes. The compressor can overheat and become permanently damaged.
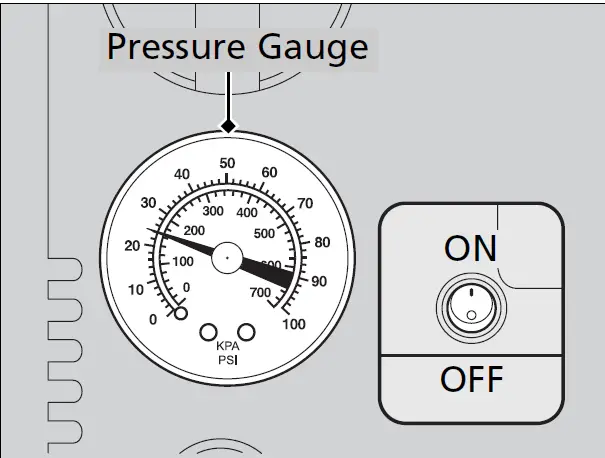
- Press the inflator switch to turn on the kit. u The compressor starts injecting sealant and air into the tire.
When the sealant injection is complete continue to add air.Models with 235/40R18 91W tires
After the air pressure reaches front: 35 psi (240 kPa)/rear: 33 psi (230 kPa), turn off the kit.
Models with 215/50R17 91H tires
After the air pressure reaches 33 psi (230 kPa), turn off the kit.
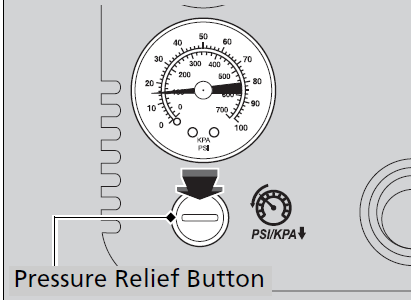
To check the pressure, occasionally turn off the compressor, and read the gauge.
Unplug the power plug from the accessory power socket.
Unscrew the sealant/air hose from the tire valve stem. Reinstall the valve cap.
Until the sealant injection is complete, the pressure shown on the pressure gauge will appear higher than actual. After the sealant injection is complete the pressure will drop and then begin to rise again as the tire is inflated with air. This is normal. To accurately measure the air pressure using the gauge, turn the air compressor off only after the sealant injection is complete.
If the required air pressure is not reached within 10 minutes, the tire may be too severely damaged for the kit to provide the necessary seal, and your vehicle will need to be towed.
See an Acura dealer for a replacement sealant bottle and proper disposal of an empty bottle.
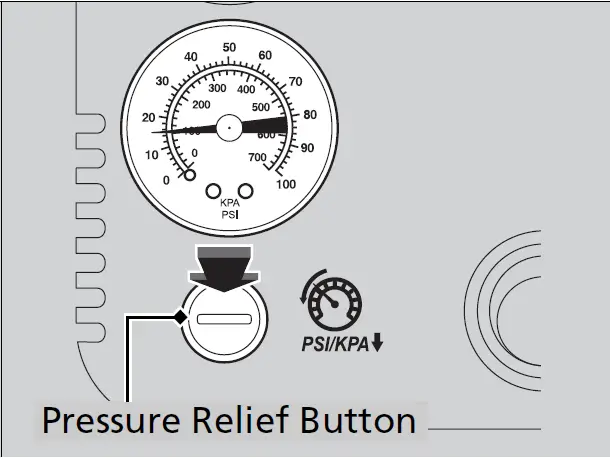
- Press the pressure relief button until the gauge returns 0 psi (0 kPa).
- Apply the repair notification label to the flat surface of the wheel.
The wheel surface must be clean to ensure the label adheres properly. 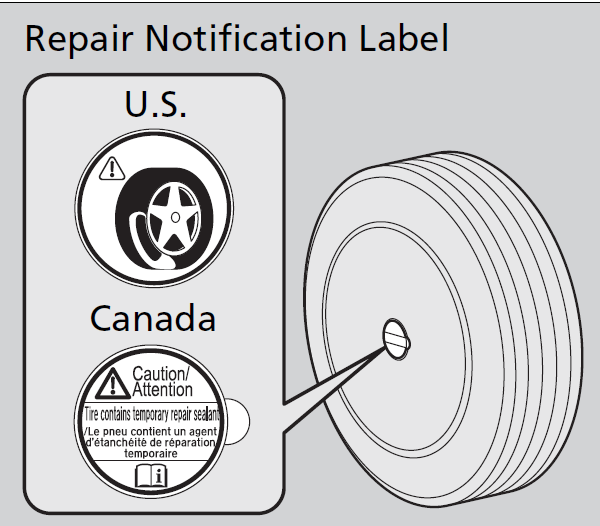
- Distributing the Sealant in the Tire
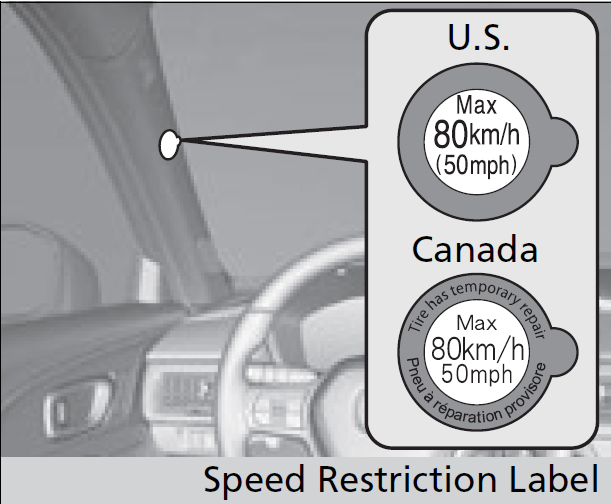
- Apply the speed restriction label to the location as shown.
- Drive the vehicle for about 10 minutes.
- Do not exceed 50 mph (80 km/h).
- Do not exceed 50 mph (80 km/h).
- Stop the vehicle in a safe place.
- Recheck the air pressure using the sealant/air hose on the compressor.
- Turn the selector knob to AIR*1, AIR ONLY*2, AIR SEULEMENT*2.
- Do not turn the air compressor on to check the pressure.
Inflating an Under-inflated Tire P. 679
- Do not turn the air compressor on to check the pressure.
- If the air pressure is
- Less than 25 psi (175 kPa):
Do not add air or continue driving. The leak is too severe. Call for help and have your vehicle towed.
Emergency Towing P. 711
- Less than 25 psi (175 kPa):
Models with 235/40R18 91W tires
Front: 35 psi (240 kPa)/rear: 33 psi (230 kPa) or more:
Models with 215/50R17 91H tires
- 33 psi (230 kPa) or more:
Continue driving for another 10 minutes or until you reach the nearest service station, whichever is sooner. Do not exceed 50 mph (80 km/h). If you have not reached a service station after 10 minutes, stop in a safe place and check the tire pressure.- If the air pressure does not go down after the 10 minute driving, you do not need to check the pressure any more.
Models with 235/40R18 91W tires
- Greater than 25 psi (175 kPa), but less than front: 35 psi (240 kPa)/rear: 33 psi (230 kPa):
Turn the air compressor on to inflate the tire until the tire pressure reaches to front: 35 psi (240 kPa)/rear: 33 psi (230 kPa).
Models with 215/50R17 91H tires
- Greater than 25 psi (175 kPa), but less than 33 psi (230 kPa):
Turn the air compressor on to inflate the tire until the tire pressure reaches to 33 psi (230 kPa).
Inflating an Under-inflated Tire P. 679 Then, drive carefully for 10 more minutes or until you reach the nearest service station. Do not exceed 50 mph (80 km/h).
- You should repeat this procedure as long as the air pressure is within this range.
WARNING
Running the engine with the vehicle in an enclosed or even partly enclosed area can cause a rapid buildup of toxic carbon monoxide.
Breathing this colorless, odorless gas can cause unconsciousness and even death. Only run the engine to power the air compressor with the vehicle outdoors.
- Unplug the kit from the accessory power socket.
Unscrew the sealant/air hose from the tire valve stem. Reinstall the valve cap.
Press the pressure relief button until the gauge returns 0 psi (0 kPa).
Repackage and properly stow the kit.
Inflating an Under-inflated Tire
You can use the kit to inflate a non-punctured under-inflated tire.
- Open the cargo area floor lid.
Getting Ready to Temporarily Repair the Flat Tire P. 668 - Remove the kit from the case.
- Place the kit, face up, on flat ground near the tire to be inflated, away from traffic. Do not place the kit on its side.
- Remove the sealant/air hose from the kit.
- Remove the valve cap.
- Attach the sealant/air hose onto the tire valve stem. Screw it until it is tight.
 NOTICE
 - Do not operate the temporary tire repair kit compressor for more than 15 minutes.
The compressor can overheat and become permanently damaged.
- Plug in the kit to the accessory power socket.
-
- Be careful not to pinch the cord in a door or window.
Accessory Power Socket P. 210
- Be careful not to pinch the cord in a door or window.
-
- Start the engine.
Starting the Engine P. 430- Keep the engine running while injecting air.
Carbon Monoxide Gas P. 81
- Keep the engine running while injecting air.
- Turnthe selector knob to AIR*1, AIR ONLY*2, AIR SEULEMENT*2.
- Press the inflator switch to turn on the kit.
- The compressor starts to inject air into the tire.
- Inflate the tire to the specified air pressure.
Changing a Flat Tire
If a tire goes flat while driving, grasp the steering wheel firmly, and brake gradually to reduce speed. Then, stop in a safe place. Replace the flat tire with a compact spare tire. Go to a dealer as soon as possible to have the full-size tire repaired or replaced.
- Park the vehicle on a firm, level, non-slippery surface and apply the parking brake.
Continuously variable transmission models
Put the transmission into (P.
Manual transmission models - Put the transmission into (R.
All models - Turn on the hazard warning lights and set the power mode to VEHICLE OFF.
Follow compact spare precautions:
Periodically check the tire pressure of the compact spare. It should be set to the specified pressure. Specified Pressure: 60 psi (420 kPa, 4.2 kgf/cm2)
When driving with the compact spare tire, keep the vehicle speed under 50 mph (80 km/h). Replace with a full-size tire as soon as possible.
The compact spare tire and wheel in your vehicle are specifically for this model. Do not use them with another vehicle. Do not use another type of compact spare tire or wheel with your vehicle.
Do not mount tire chains on a compact spare tire. If a chain-mounted front tire goes flat, remove one of the full-size rear tires and replace it with the compact spare tire. Remove the flat front tire and replace it with the full-size tire that was removed from the rear. Mount the tire chains on the front tire.
NOTICE
Do not use the jack if it doesn’t work properly. Call your dealer or a professional towing service.
Getting Ready to Replace the Flat Tire
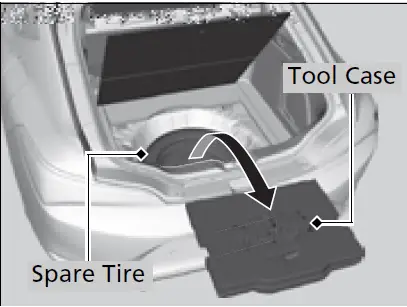
- Pull the strap on the cargo area floor lid and open the lid.
![Skip to main contentSkip to toolbar About WordPress Auto User Guide 2,3052,305 Comments in moderation New View Post SEOEnter a focus keyphrase to calculate the SEO score Howdy, Auto User Log Out Screen OptionsHelp Edit Post Add New Add title ACURA Integra 2023 Handling Fuses and Indicators User Guide Permalink: https://autouserguide.com/acura/integra/acura-integra-20…ators-user-guide/ Edit Add MediaAdd PDFVisualText ParagraphTOC OL » LI Word count: 1948 Draft saved at 10:07:13 am. Last edited by Auto User on April 11, 2023 at 11:29 am Move upMove downToggle panel: Featured image ACURA Integra 2023 Featured Image Click the image to edit or update Remove featured image Move upMove downToggle panel: Auto Cache Settings Move upMove downToggle panel: Publish Preview(opens in a new tab) Status: Draft EditEdit status Visibility: Public EditEdit visibility Revisions: 3 BrowseBrowse revisions Publish immediately EditEdit date and time SEO: Not available Readability: Needs improvement Inclusive language: Good Move to Trash Move upMove downToggle panel: LiteSpeed Options Disable Cache Disable Image Lazyload Disable VPI Viewport Images Viewport Images - Mobile Learn More Move upMove downToggle panel: Tags Add New Tag Separate tags with commas Remove term: ACURA ACURARemove term: ACURA 2023 ACURA 2023Remove term: Auto User Guide Auto User GuideRemove term: Emergency EmergencyRemove term: Fuses FusesRemove term: Handling HandlingRemove term: Indicator IndicatorRemove term: Integra IntegraRemove term: Integra 2023 Integra 2023Remove term: Overheat OverheatRemove term: TOWING TOWING Choose from the most used tags Move upMove downToggle panel: Categories All Categories Most Used ACURAMake primary Integra(Primary Category)Primary 250 EXC 250 EXC-F BR 250 EXC-F Six Days 250 SX-F 250 XC-F 3 Series 450 4WD Hunter 450 EPS SE 450 EPS SE2 450 EXC-F 450 EXC-F Six Days 450 SMR 2021 450 SX-F 450 SX-F Cairoli 50 SX 500 EXC-F 500 EXC-F Six Days 65 SX 690 Enduro R 690 SMC R 700 EPS 700 EPS 4WD SE 790 Adventure 790 Adventure R Airstream Touring Coach Travel Trailer Travel Trailer Bambi Travel Trailer International Alfa Romeo 4C Spider Giulia Giulia Quadrifoglio Stelvio Stelvio Quadrifoglio alliance RV Avenue RV paradigm RV Valor AMG GLS AR 210 Arcimoto Arkana Artura Aston Martin DB11 DBX Valkyrie Vantage Ateca Audi Blogs BMW 2 Series 2 Series Coupe 2 Series Gran Coupe 3 Series 4 Series 4Series 5 Series 7 Series 8 Series C-CLASS COUPE x1 X2 X3 X4 X5 X5 PLUG-IN HYBRID X6 X7 Bolt Buick Enclave Encore Encore GX Envision C-HR Cadillac 3.0L ATS CT4 CT5 CT6 CTS Escalade Escalade ESV LYRIQ XT4 XT5 XT6 XTS Charger Chevrolet 3500/4500 4500 5500 HD/XD 6500/7500 Blazer Bolt EUV Bolt EV Camaro Colorado Corvette Cruze Equinox Express Express EUV Impala Low Cab Malibu Silverado Silverado1500 Sonic Spark Spark 1500 Suburban Tahoe Trailblzer Traverse Trax Volt Citroen Berlingo C1 C3 C3 Aircross C4 C4 Cactus C4 Picasso C5 C5 Aircross DS 3 DS3 DS7 Crossback Jumpy CIVANTE eBikes Crosscore RC Crossonnect Cupra Formentor Dacia Duster Lodgy Sandero Dodge Challenger Charger. Durango Grand Journey Ram DOGE Ducati DesertX Monster Multistrada Panigale Panigale V2 Scrambler Streetfighter Superleggera Supersport XDiavel Dyna Eldorado Embark EX Delux Ferrari 458 ITALIA 458 SPECIALE 458 SPIDER F12 BERLINETTA FJR1300ES FJR300A Ford E-350 Genesis G70 G80 G90 GV60 GV70 GV80 GMC Acadia Canyon Duramax Hummer EV Savana Sierra Terrain Youkon Yukon GRIZZLY 90 GT Handbook Harley Davidson Boom Softail Touring Hexa Highland Ridge RV Fifth Wheels Travel Trailer Honda Accord Civic Clarity CR-V CR-V Hybrid Fit HR-V Insight Odyssey Passport Pilot Ridgeline Sedan HR-V Hyundai Accent Elantra Elantra Hybrid Elantra N kona Kona Electric Kona EV Kona-EV Kona-N Loniq 5 Loniq Electric Nexo Palisade Santa Cruz Santa Fe Santa Fe PHEV Sonata Sonata Hybrid Tucson Tucson Hybrid Veloster Ibiza Indicab Infiniti Q50 Q60 Coupe QX50 QX55 QX60 QX80 Information Jayco Alante Class A Motorhomes Class B Motorhomes Class C Motorhomes Fifth Wheels Jay Flight Pinnacle Precept Prestige Swift Li Toy Haulers Travel Trailers White Hawk Kia Cadenza Forte K5 K900 Niro Niro EV Niro Phev Optima Optima Hybrid Optima Phev Rio Sedona Seltos Sorento Soul Soul EV Sportage Stinger Telluride KTM 250 Adventure Adventure Duke EXC EXC TPI Super SX XC TPI XC-W L-TX GT EPS Leon Lexus ES250 ES300H ES350 Lotus Maserati Ghibli Grancabrio Granturismo Levante MC20 MC20 Cielo Quattroporte Mazda 3 hatchback 3 Sedan cx-30 cx-5 cx-50 cx-9 Mazda 3 Sedan mx-30 EV mx-5 Miata mx-5 Miata RF McLaren 620R Coupe And Spider Elva Legacy-12c Legacy-650S Legacy-675LT Series Speed Tail Sport Series Super And Series Ultimate series Ultimate series-p1 Mercedes-Benz A-CLASS SEDAN AMG C-CLASS AMG CLA AMG E-CLASS AMG EQS AMG G-CLASS AMG GLA AMG GLB AMG GLC AMG GLE AMG GLS C-CLASS CABRIOLET C-CLASS COUPE C-CLASS SEDAN CLA COUPE CLS COUPE E WAGON E-CLASS E-CLASS CABRIOLET E-CLASS COUPE E-CLASS SEDAN EQB SUV EQS SUV ESQ SEDAN G-CLASS SUV GLA SUV GLB SUV GLC COUPE GLC SUV GLE COUPE GLE SUV GLS SUV GT COUPE MAYBACH GLS SUV MAYBACH S-CLASS S-CLASS S-CLASS SEDAN SL ROADSTER Mii Mini Clubman CONVERTIBLE COUNTRYMAN Gohn Cooper HARDTOP 2 DOOR HARDTOP 4 DOOR HARDTOP SE ELECTRIC SE COUNTRYMAN MOUNTAIN MAX 700 MT-03 Mt-07 Mt-09 MT-09 SP Mt-10 NIKEN Nissan ALTIMA ARMADA FRONTIER GT-R KICKS LEAF MAXIMA MURANO NV Cargo NV Passenger NV200 Compact Cargo PATHFINDER ROGUE Rogue Hybrid Rogue Sport SENTRA Titan Versa Note Versa Sedan Z Coupe Opel Astra Corsa Crossland Grandland X Insignia Mokka Pilot Pleasure Way Ascent Ascent TS Lexor TS Ontour Ontour 2.0 Ontour 2.2 Plateau Plateau XLTD Tofino Porsche 911 Boxster Cayenne Macan Panamere Taycan Punch PW 50 Ram Renault Capture Clio Espace Kangoo Koleos Magane Talisman Twingo Renogy Deep Cycle Battery Seat Alhambra Arona Sequoia Skoda Enyaq Fabia Kamiq Karoq Kodiaq Octavia Scala Superb Smart Forfour fortwo fortwo Electric SMAX Snoscoot ES Sportster SRX120R SS XT-R 2023 Street Subaru Ascent BRZ Crosstrek Forester Impreza Legacy Outback Solterra WRX Super jet Super Series Supra Suzuki CARRY ERTIGA ERTIGA P12 New ERTIGA XL7 SXVENOM Tacoma Tarraco Tata Altroz Altroz BS VI Aria Connect Next Grande Harrier Harrier BS VI Indicab Vista Indigo Manza Movus Nano Nexon Punch Safari Sumo Tigor Twist TENERE 700 TENERE ES Tiago Toyota 4Runner 86 Avalon Avalon Hybrid BZ4X C-HR Camry Camry Hybrid Corolla Corolla Hatchback Corolla Hybrid Highlander Highlander Hybrid Land Cruiser Mirai Prius RAV4 Sequoia Supra Tacoma Tundra Venza TRACER 9 GT TRACER 900 GT TRANSPOTER LITE Tri Glide Trike TT-R110E TT-R125LE TT-R230 Tundra TW200 Uncategorized Urbanrush V STAR 250 Vauxhall Astra Combo Life Corsa Crossland Grandland Insignia Vista VK 540 VMAX1700 Volvo S60 S90 V60 XC40 XC60 XC90 VRSC VX Cruiser Wabash Wabash RT Winnebago Adventurer Boldt Ekko Era Forza Inspire Journey Minnie Winnie Navion Revel Roam Solis Solis pocket Spirit sunstar Travato View WR250F WR250R WR450F X2 X2 850 Hunting X4 X6 XMAX 300 XSR 700 XSR900 XT250 Yamaha 1000 LE 1000 R-SPEC 210 FSH Deluxe 210 FSH Sport EX1050A-Y Grizzly PW50 Snoscoot TT-R125LWE TT-R50E VMAX 1700 VMAX 600 ER YDX-TORC YZ125 YZ125X YDX _ MORO 05 YDX - MORO YFZ50 Yukon Yukon XL YZ250F YZ250FX YZ250X YZ450FX YZ65 YZ85 YZF-R1 YZF-R3 YZF-R6 YZF-R7 YZF450R Zest ZUMA 125 ILX MDX NSX RDX TLX + Add New Category Move upMove downToggle panel: Admania Featured Video Note : Paste youtube video url,vimeo video url,soundcloud url only. Move upMove downToggle panel: Format Move upMove downToggle panel: Admania Ad Settings Before Content Ad Content Inner Top Ad Content Nth Para Ad Content Bottom Ad After OptinBox Ad Content Bot Sticky Ad Gallery Popup Sidebar Ad Gallery Popup Top Ad Gallery Popup Bottom Ad Before Content Ad Settings Note* : Please Choose Any One Of the Following AD Settings Active the Before Content Ad Settings Enable the Before Content Ad Settings ? Html Code Ad Settings Paste the Ad Html Code Paste the Ad Html Code click to enable adrotate options Google Responsive Code Ad Settings Paste the Google Responsive Code Ad Paste the Google Responsive Code Ad click to enable adrotate options Image Link Ad Settings Choose the Ad Image Choose the Image Ad Url Image Ad Anchor Link Enter the Image Ad Anchor Link click to enable adrotate options Move upMove downToggle panel: Yoast internal linking Move upMove downToggle panel: Yoast SEO Premium SEO Readability Inclusive language Schema Social Focus keyphraseHelp on choosing the perfect focus keyphrase(Opens in a new browser tab) Get related keyphrases(Opens in a new browser window) Google preview Preview as: Mobile resultDesktop result Url preview: Auto User Guide www.autouserguide.com› acura › integra › acura-integra-2023-handling-fuses-and-indicators-user-guide SEO title preview: ACURA Integra 2023 Handling Fuses and Indicators User Guide - Auto User ... Meta description preview: Apr 11, 2023 - Please provide a meta description by editing the snippet below. If you don’t, Google will try to find a relevant part of your post to show in the search results. SEO title Insert variable Title Page Separator Site title Slug acura-integra-2023-handling-fuses-and-indicators-user-guide Meta description Insert variable Premium SEO analysisEnter a focus keyphrase to calculate the SEO score Add related keyphrase Track SEO performance Internal linking suggestions Cornerstone content Advanced Insights Move upMove downToggle panel: Slug Slug Move upMove downToggle panel: Table of Contents Move upMove downToggle panel: Revisions Auto User, 1 hour ago (April 18, 2023 @ 08:25:19) [Autosave] Auto User, 7 days ago (April 11, 2023 @ 11:29:49) Auto User, 1 week ago (April 10, 2023 @ 12:03:46) Move upMove downToggle panel: Custom Fields Add New Custom Field: Name Value — Select — Enter new Custom fields can be used to add extra metadata to a post that you can use in your theme. Thank you for creating with WordPress.Version 6.2 NotificationsLink inserted. No results found. Close dialog Add media Actions Upload filesMedia Library Filter mediaFilter by type Uploaded to this post Filter by date All dates Search Media list Showing 38 of 38 media items UPLOADING 36 / 70 – ACURA Integra 2023 Handling Fuses and Indicators User Guide 36.PNG ATTACHMENT DETAILS ACURA-Integra-2023-Handling-Fuses-and-Indicators-User-Guide-34.png April 18, 2023 78 KB 409 by 307 pixels Edit Image Delete permanently Alt Text Learn how to describe the purpose of the image(opens in a new tab). Leave empty if the image is purely decorative.Title ACURA Integra 2023 Handling Fuses and Indicators User Guide 34 Caption Description File URL: https://autouserguide.com/wp-content/uploads/2023/04/ACURA-Integra-2023-Handling-Fuses-and-Indicators-User-Guide-34.png Copy URL to clipboard ATTACHMENT DISPLAY SETTINGS Alignment Center Link To None Size Full Size – 409 × 307 Selected media actions 1 item selected Clear Insert into post](https://autouserguide.com/wp-content/uploads/2023/04/ACURA-Integra-2023-Handling-Fuses-and-Indicators-User-Guide-34.png)
- Take the tool case out of the cargo area.
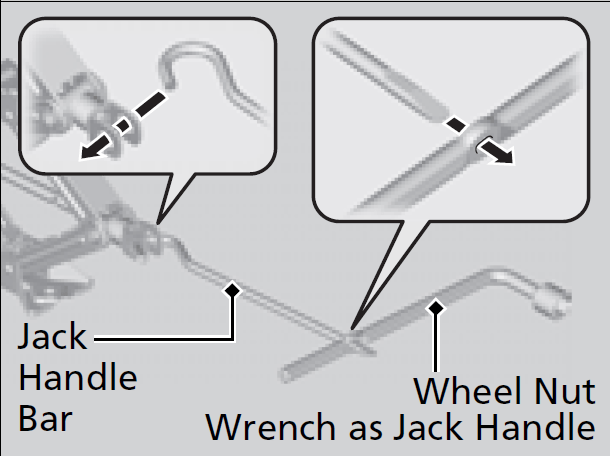
- Take the jack, wheel nut wrench, and jack handle bar out of the tool case.
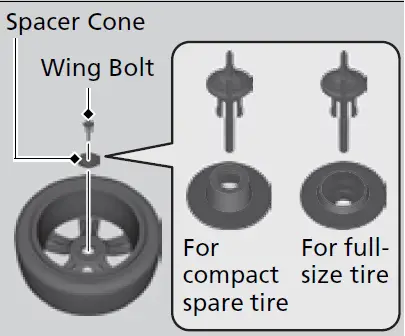
- Unscrew the wing bolt, and remove the spacer cone. Then, remove the spare tire
- Place a wheel block or rock in front and rear of the wheel diagonal to the flat tire.
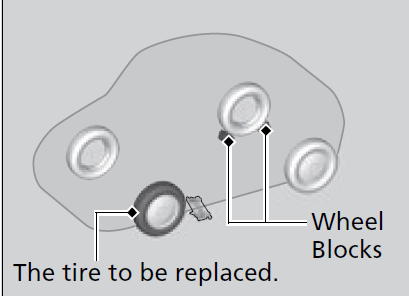
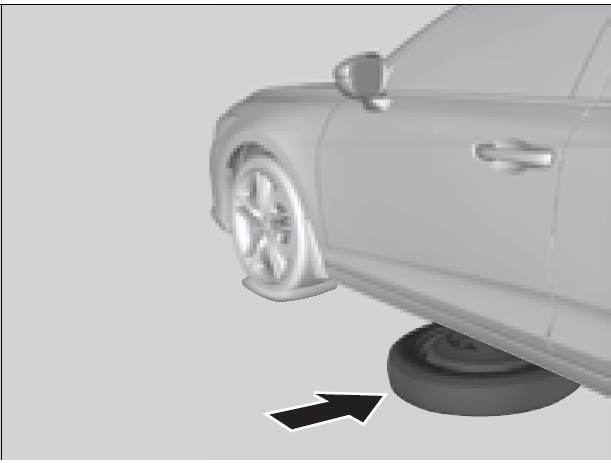
- Place the compact spare tire (wheel side up) under the vehicle body, near the tire that needs to be replaced.
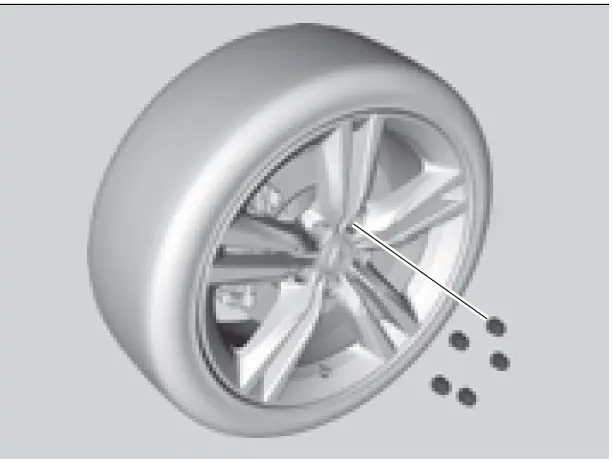
- Loosen each wheel nut about one turn using the wheel nut wrench.

How to Set Up the Jack
- Place the jack under the jacking point closest to the tire to be changed.
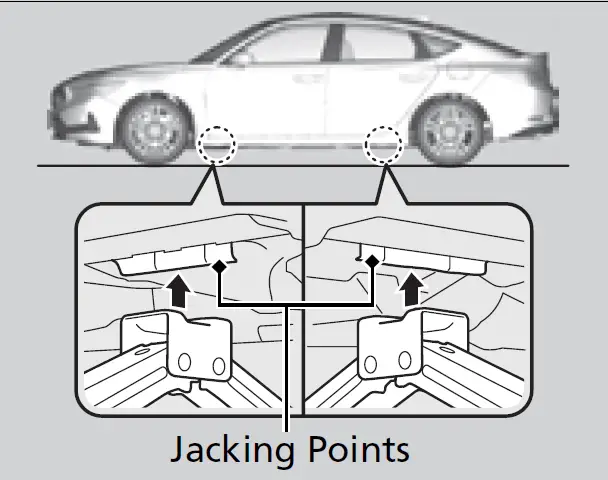
- Turn the end bracket clockwise as shown in the image until the top of the jack contacts the jacking point.
- Make sure that the jacking point tab is resting in the jack notch.
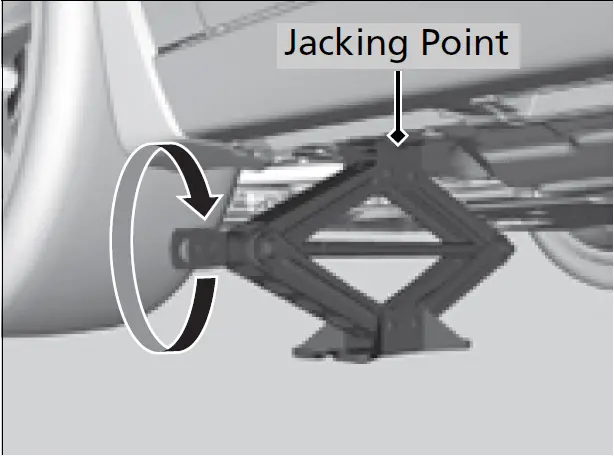
- Make sure that the jacking point tab is resting in the jack notch.
- Raise the vehicle, using the jack handle bar and the jack handle, until the tire is off the ground.
WARNING
The vehicle can easily roll off the jack, seriously injuring anyone underneath.
Follow the directions for changing a tire exactly, and never get under the vehicle when it is supported only by the jack.
The vehicle can easily roll off the jack, seriously injuring anyone underneath.
Follow the directions for changing a tire exactly, and never get under the vehicle when it is supported only by the jack.
Do not use while the engine is running.
Use only where the ground is firm and level.
Use only at the jacking points.
Do not put anything on top of or underneath the jack.
- Replacing the Flat Tire
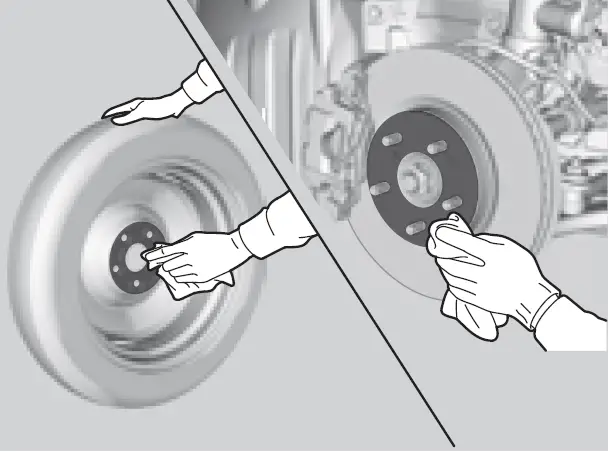
- Wipe the mounting surfaces of the wheel with a clean cloth.
- Mount the compact spare tire.
- Screw the wheel nuts until they touch the lips around the mounting holes, then stop rotating.
- Lower the vehicle and remove the jack.
Tighten the wheel nuts in the order indicated in the image. Go around, tightening the nuts, two to three times in this order.
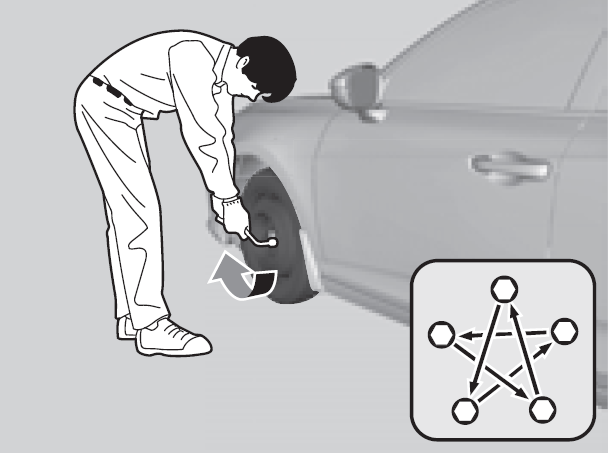 Wheel nut torque:
80 lbf∙ft (108 N∙m, 11 kgf∙m)
Do not over tighten the wheel nuts by applying extra torque using your foot or a pipe.
Storing the Flat Tire
- Remove the center cap.
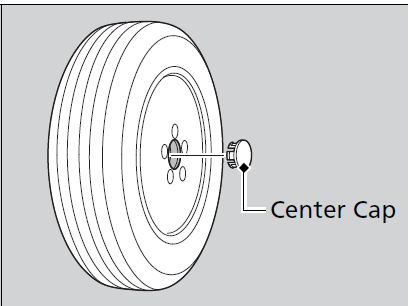
- Place the flat tire face down in the spare tire well.
- Remove the spacer cone from the wing bolt, flip it over, and insert it back on the bolt. Secure the flat tire with the wing bolt.
- Securely store the jack, wheel nut wrench, and jack handle bar back in the tool case. Store the case in the cargo area.
WARNING
Loose items can fly around the interior in a crash and can seriously injure the occupants.
Store the wheel, jack, and tools securely before driving.
TPMS and the Compact Spare Tire
If you replace a flat tire with the spare tire, the low tire pressure/TPMS indicator comes on while you are driving. After driving for a few miles (kilometers), Tire pressure monitor system problem. Check tire pressure. See your dealer. will appear on the driver information interface and the indicator will start blinking for a short time and then stay on; however, this is normal and is no cause for concern.
If you replace the tire with a full-size tire, the warning message on the driver information interface and the low tire pressure/TPMS indicator will go off after a few miles (kilometers).
The system cannot monitor the pressure of the spare tire. Manually check the spare tire pressure to be sure that it is correct.
Use the TPMS specific wheels. Each is equipped with a tire pressure sensor mounted inside the tire behind the valve stem.
Engine Does Not Start
Checking the Engine
If the engine does not start, check the starter.
If you must start the vehicle immediately, use an assisting vehicle or booster battery to jump start it.
If the Battery Is Dead P. 694
Depending on the situation, it may be possible to temporarily start the engine using the emergency start procedure.
| Starter doesn’t turn or turns over slowly.
The battery may be dead. Check each of the items on the right and respond accordingly. |
Check for a message on the driver information interface.
If the Keyless Remote Battery is Weak P. 691 2 ENGINE START/STOP Button Operating Range 174 |
| Check the battery. Have the battery checked by a dealer. 2 Battery P. 651 |
Starter condition Checklist
The starter turns over normally but the engine doesn’t start.
There may be a problem with a fuse.
Check each of the items on the right and respond accordingly.
Review the engine start procedure.
Follow its instructions, and try to start the engine again.
Starting the Engine P. 430
Check the immobilizer system indicator.
When the immobilizer system indicator is blinking, the engine cannot be started.
Immobilizer System P. 165
Check the fuel level.
There should be enough fuel in the tank.
Fuel Gauge P. 105
Check the fuses.
Check all fuses, or have the vehicle checked by a dealer.
Inspecting and Changing Fuses P. 709
If the problem continues:
Emergency Towing P. 711
If the Keyless Remote Battery is Weak
If the beeper sounds, the To start, touch start button with emblem side of remote message appears on the driver information interface, and the ENGINE START/STOP button flashes, and the engine won’t start, start the engine as follows:
- Touch the center of the ENGINE START/STOP button with the A logo on the keyless remote while the ENGINE START/STOP button is flashing. The buttons on the keyless remote should be facing you.
- The ENGINE START/STOP button flashes for about 30 seconds.
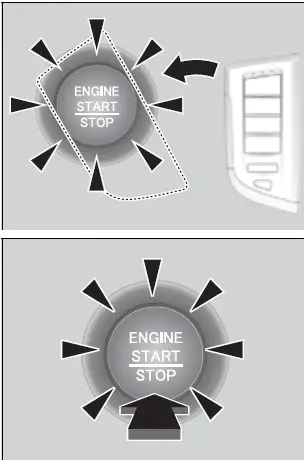
- The ENGINE START/STOP button flashes for about 30 seconds.
- Depress the brake pedal (continuously variable transmission) or clutch pedal
(manual transmission) and press the ENGINE START/STOP button within 10 seconds after the beeper sounds and the ENGINE START/STOP button changes from flashing to on.- If you don’t depress the pedal, the mode will change to ACCESSORY.
Emergency Engine Start
If the engine does not start using the normal engine starting procedure, you may be able to start it using the emergency start procedure below.
Do not use this procedure if it is not an emergency.
- Make sure the parking brake is applied.
- The parking brake and brake system indicator (red) comes on for 30 seconds when you pull up the electric parking brake switch.
- Check that the transmission is in (P, then set the power mode to ACCESSORY.
- Firmly depress the brake pedal, then press and hold the ENGINE START/STOP button for at least 15 seconds.
This should be considered a system malfunction even if you are able to start the engine using the above procedure.
Have your vehicle checked by a dealer immediately.
Refer to the following if you cannot move the shift lever out of the (P position.
2 Shift Lever Does Not Move P. 696
Emergency Engine Stop
The ENGINE START/STOP button may be used to stop the engine due to an emergency situation even while driving. If you must stop the engine, do either of the following operations:
- Press and hold the ENGINE START/STOP button for about two seconds.
Firmly press the ENGINE START/STOP button three times.
The steering wheel will not lock. However, because turning off the engine disables the power assist the engine provides to the steering and braking systems, it will require significantly more physical effort and time to steer and slow the vehicle. Use both feet on the brake pedal to slow down the vehicle and stop immediately in a safe place. With manual transmission models you can also downshift the transmission to utilize engine braking.
Continuously variable transmission models
The power mode is in ACCESSORY when the engine is stopped.
To change the mode to VEHICLE OFF, put the transmission into (P after the vehicle comes to a complete stop.
Manual transmission models
The power mode changes to VEHICLE OFF.
Do not press the ENGINE START/STOP button while driving unless it is absolutely necessary for the engine to be turned off.
If you press the ENGINE START/STOP button while driving, the beeper sounds.
If the Battery Is Dead
Jump Starting Procedure
Turn off the power to electric devices, such as audio and lights. Turn off the engine, then open the hood.
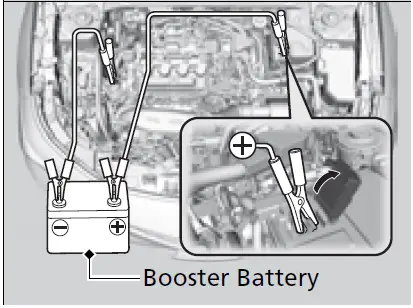
- Open the cover on the positive + terminal.
- Connect the first jumper cable to your vehicle’s battery + terminal.
- Connect the other end of the first jumper cable to the booster battery + terminal.
- Use a 12-volt booster battery only.
- When using an automotive battery charger to boost your 12-volt battery, select a lower charging voltage than 15-volt. Check the charger manual for the proper setting.
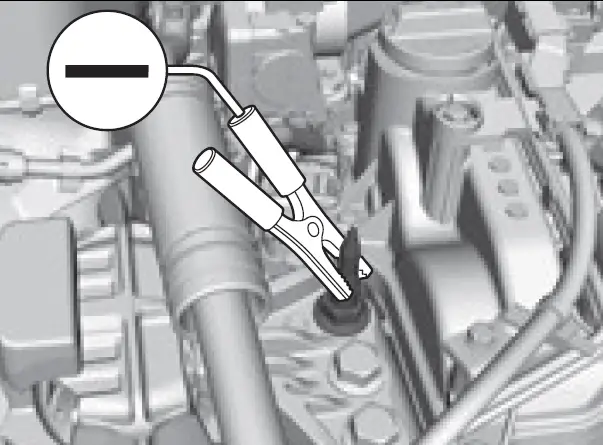
- Connect the second jumper cable to the booster battery – terminal.
- Connect the other end of the second jumper cable to the stud bolt as shown. Do not connect this jumper cable to any other part.
If your vehicle is connected to another vehicle, start the assisting vehicle’s engine and increase its rpm slightly. - Attempt to start your vehicle’s engine. If it turns over slowly, check that the jumper cables have good metal-to-metal contact.
WARNING
A battery can explode if you do not follow the correct procedure, seriously injuring anyone nearby.
Keep all sparks, open flames, and smoking materials away from the battery.
Securely attach the jumper cables clips so that they do not come off when the engine vibrates. Be careful not to tangle the jumper cables or allow the cable ends to touch each other while attaching or detaching the jumper cables.
Battery performance degrades in cold conditions and may prevent the engine from starting.
What to Do After the Engine Starts
Once your vehicle’s engine has started, remove the jumper cables in the following order.
- Disconnect the jumper cable from your vehicle’s ground.
- Disconnect the other end of the jumper cable from the booster battery -terminal.
- Disconnect the jumper cable from your vehicle’s battery + terminal.
- Disconnect the other end of the jumper cable from the booster battery + terminal.
Have your vehicle inspected by a nearby service station or a dealer.
The Vehicle Stability AssistTM (VSA®) system, Adaptive Cruise Control (ACC)*, Adaptive Cruise Control
(ACC) with Low Speed Follow*, and safety support indicators may come on in amber along with a message in the gauge when you set the power mode to ON after reconnecting the battery. Drive a short distance at more than 12 mph (20 km/h). Each indicator should go off. If any do not, have your vehicle checked by a dealer.
Shift Lever Does Not Move
Follow the procedure below if you cannot move the shift lever out of the (P position.
Releasing the Lock
- Set the parking brake.
- Set the power mode to VEHICLE OFF.
- Remove the built-in key from the keyless remote.
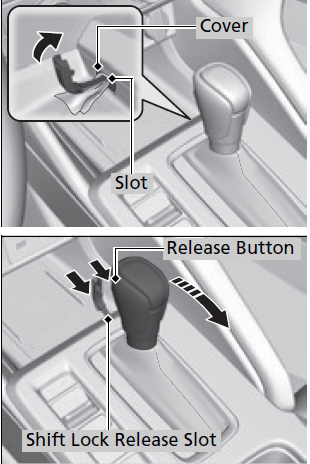
- Wrap a cloth around the tip of the built-in key. Put it into the shift lock release slot as shown in the image, and remove the cover.
- Insert the key into the shift lock release slot.
- While pushing the key in, press the shift lever release button, and place the shift lever into (N.
- The lock is now released. Have the shift lever checked by a dealer as soon as possible.
Overheating
How to Handle Overheating
Overheating symptoms are as follows:
- The temperature gauge is at the H mark or the engine suddenly loses power.
- The Engine temperature too hot. Do not drive. Allow engine to cool.
- message appears on the driver information interface.
- Steam or spray comes out of the engine compartment.
First thing to do
- Immediately park the vehicle in a safe place.
- Turn off all accessories and turn on the hazard warning lights.
- No steam or spray present: Keep the engine running and open the hood.
- Steam or spray is present: Turn off the engine and wait until it subsides. Then, open the hood.
WARNING
Steam and spray from an overheated engine can seriously scald you.
Do not open the hood if steam is coming out.
NOTICE
Continuing to drive with the temperature gauge at the H mark may damage the engine.
Continuing to drive with the Engine temperature too hot. Do not drive. Allow engine to cool. message on the driver information interface may damage the engine.
Next thing to do
- Check that the cooling fan is operating and stop the engine once the temperature gauge goes down.
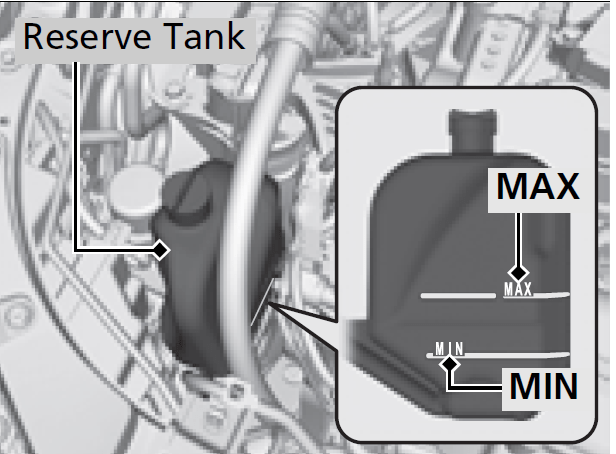
u If the cooling fan is not operating, immediately stop the engine. - Once the engine has cooled down, inspect the coolant level and check the cooling system components for leaks.
- If the coolant level in the reserve tank is low, add coolant until it reaches the MAX mark.
- If there is no coolant in the reserve tank, check that the radiator is cool. Cover the radiator cap with a heavy cloth and open the cap. If necessary, add coolant up to the base of the filler neck, and put the cap back on.
Last thing to do
Once the engine has cooled sufficiently, restart it and check the driver information interface.
If the temperature gauge goes down, resume driving. If it appears again, contact a dealer for repairs.
WARNING
Removing the radiator cap while the engine is hot can cause the coolant to spray out, seriously scalding you.
Always let the engine and radiator cool down before removing the radiator cap.
If the coolant is leaking, contact a dealer for repairs.
Use water as an emergency/temporary measure only. Have a dealer flush the system with proper antifreeze as soon as possible.
Indicator, Coming On/Blinking
If the Engine oil pressure low Warning Appears
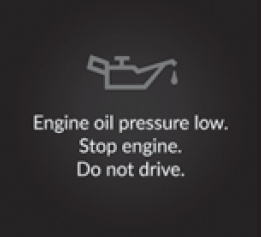
- Reasons for the warning to appear Appears when the engine oil pressure is low.
What to do as soon as the warning appears
- Immediately park the vehicle on level ground in a safe place.
- If necessary, turn the hazard warning lights on.
What to do after parking the vehicle
- Stop the engine and let it sit for approximately three minutes.
- Open the hood and check the oil level.
- Add oil as necessary.
Oil Check P. 628
- Add oil as necessary.
- Start the engine and check the Engine oil pressure low warning.
- The warning disappears: Start driving again.
- The warning does not disappear within 10 seconds: Immediately stop the engine and contact a dealer for repairs.
NOTICE
Running the engine with low oil pressure can cause serious mechanical damage almost immediately.
 If the Charging System Indicator Comes On
Reasons for the indicator to come on
Comes on when there is a problem with the charging system.
What to do when the indicator comes on
Stop in a safe place and have your vehicle checked by a dealer immediately.
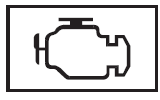 If the Malfunction Indicator Lamp Comes On or Blinks
Reasons for the indicator lamp to come on or blink
Comes on when there is a problem with the engine emissions control system.
- What to do when the indicator lamp comes on
Avoid high speeds and immediately get your vehicle inspected at a dealer. - What to do when the indicator lamp blinks
Park the vehicle in a safe place with no flammable items and wait at least 10 minutes or more with the engine stopped until it cools.
If you need to stop temporarily, do not turn off the engine. Restarting the engine may rapidly discharge the battery.
NOTICE
If you drive with the malfunction indicator lamp on, the emissions control system and the engine could be damaged.
If the malfunction indicator lamp blinks again when restarting the engine, drive to the nearest dealer at 31 mph (50 km/h) or less. Have your vehicle inspected.
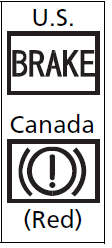
 If the Brake System Indicator (Red) Comes On or Blinks
Reasons for the indicator to come on
- The brake fluid is low.
There is a malfunction in the brake system.
What to do when the indicator comes on while driving
Depress the brake pedal lightly to check pedal pressure.
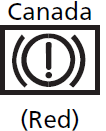
- If normal, check the brake fluid level the next time you stop.
If abnormal, take immediate action. If necessary, downshift the transmission to slow the vehicle using engine braking.
Reasons for the indicator to blink
There is a problem with the electric parking brake system.
What to do when the indicator blinks
Avoid using the parking brake and have your vehicle checked by a dealer immediately.
Have your vehicle repaired immediately.
It is dangerous to drive with low brake fluid. If there is no resistance from the brake pedal, stop immediately in a safe place. If necessary downshift the gears.
If the brake system indicator (red) and ABS indicator come on simultaneously, the electronic brake distribution system is not working. This can result in vehicle instability under sudden braking.
Have your vehicle inspected by a dealer immediately.
If the brake system indicator (red) blinks at the same time when the brake system indicator (amber) comes on, the parking brake may not work.
Avoid using the parking brake and have your vehicle checked by a dealer immediately.
If the Brake System Indicator (Red) Comes On or Blinks at the Same Time When the Brake System Indicator (Amber) Comes On P. 703
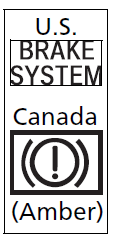
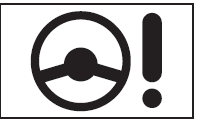 If the Brake System Indicator (Red) Comes On or Blinks at the Same Time When the Brake System Indicator (Amber) Comes On
Reasons for the indicator to come on
Comes on when there is a problem with the EPS system.
What to do when the indicator comes on
- Stop the vehicle in a safe place and restart the engine.
If the indicator comes on and stays on, immediately have your vehicle inspected by a dealer.
If Do not drive displays on the driver information interface, immediately stop in a safe place and contact a dealer.
 If the Electric Power Steering (EPS) System Indicator Comes On
If the brake system indicator (red) comes on or blinks at the same time when the brake system indicator (amber) comes on, release the parking brake manually or automatically.
Parking Brake P. 584
 If the brake system indicator (red) continuously comes on or blinks at the same time when the brake system indicator (amber) comes on, stop the vehicle in a safe place and have it inspected by a dealer immediately.
Preventing the vehicle from moving.
Continuously variable transmission models
Put the transmission into (P.
Manual transmission models
Put the transmission into (1 or (R.
If only the brake system indicator (red) is turned off, avoid using the parking brake and have your vehicle checked by a dealer immediately.
If you apply the parking brake, you may not be able to release it.
If the brake system indicator (red) and the brake system indicator (amber) come on at the same time, the parking brake is working.
If the brake system indicator (red) blinks at the same time when the brake system indicator (amber) comes on, the parking brake may not work because it is checking the system.
If you repeatedly operate the electric parking brake in a short period of time, the brake stops operating to prevent heating of the system and the indicator blinks.
It returns to its original state in approximately 1 minute.
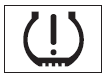 If the Low Tire Pressure/TPMS Indicator Comes On or Blinks
Reasons for the indicator to come on or blink
A tire pressure is significantly low.
If there is a problem with the TPMS, the indicator blinks for about one minute, and then stay on.
If the compact spare tire* is installed, the indicator will either come on or it will first blink for about one minute, then stay on.
What to do when the indicator comes on
Drive carefully and avoid abrupt cornering and hard braking.
Stop your vehicle in a safe place. Check the tire pressure and adjust the pressure to the specified level. The specified tire pressure is on a label on the driver side doorjamb.
If the compact spare tire* causes the indicator to come on, change the tire to a full-size tire. The indicator goes off after calibrating the TPMS.
What to do when the indicator blinks, then remains on
Have the tire inspected by a dealer as soon as possible. If the compact spare tire* causes the indicator to first blink, and then stay on, change the tire to a full-size tire. The indicator goes off after driving for a few miles (kilometers).
NOTICE
Driving on an extremely underinflated tire can cause it to overheat. An overheated tire can fail. Always inflate your tires to the prescribed level.
TPMS with Tire Fill Assist provides visual and audible assistance during tire pressure adjustment. With the power mode in ON and transmission in (P, while you adjust tire pressure up or down, the system alerts you as follows:
Below recommended pressure: The beeper sounds and exterior lights flash once every five seconds.
At recommended pressure: The beeper sounds and exterior lights flash rapidly for three seconds with five seconds intervals.
Above recommended pressure: The beeper sounds and lights flash twice every two seconds.
When a certain amount of time has passed since activation, Tire Fill Assist will be canceled until you set the power mode to OFF.
You cannot use Tire Fill Assist if the engine was started by the remote engine start, or if there is a malfunction in the system.
If Tire Fill Assist does not work, use a tire pressure gauge.
Fuses
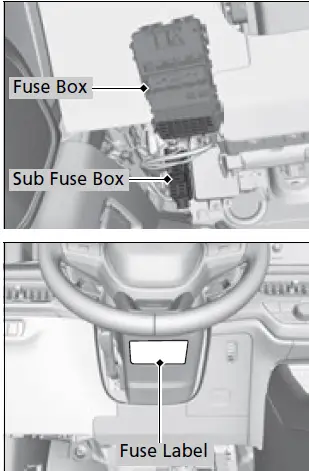
Fuse Locations
If any electrical devices are not working, set the power mode to VEHICLE OFF and check to see if any applicable fuse is blown.
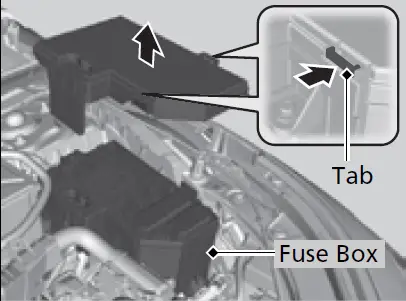
Engine Compartment Fuse Box
Located near the battery. Push the tabs to open the box.
Fuse locations are shown on the fuse box cover. Locate the fuse in question by the fuse number and box cover number.
Circuit protected and fuse rating
| Circuit Protected | Amps | 26 | TCU* | (15 A) | |||||||
| 1 | BATTERY | 125 A | 27 | LCM L | 15 A | ||||||
| – | 40 A | 28 | INJ | (15 A) | |||||||
| – | 40 A | 29 | STOP | 10 A | |||||||
| F/BOX OPTION | 60 A | 30 | LCM R | 15 A | |||||||
| 2 | – | 40 A | 31 | IG COIL | 15 A | ||||||
| F/BOX OPTION2 | 40 A | 32 | – | – | |||||||
| DC/DC2 | 30 A | 6 | SUB FAN | (30 A) | 33 | HAZARD | 15 A | ||||
| F/BOX MAIN | 60 A | 7 | IG MAIN2 | 30 A | 34 | AUDIO SUB VST | (7.5 A) | ||||
|
Han |
8 | – | (7.5 A) | 35 | – | – | |||||
|
dlin |
9 | EVP* | (30 A) | 36 | AUDIO VST MAIN | (30 A) | |||||
|
g |
10 | – | (7.5 A) | 37 | BACKUP2 | (30 A) | |||||
|
the |
11 | – | – | 38 | – | – | |||||
|
U |
12 | – | – | 39 | – | – | |||||
|
nexp |
13 | H/STRG BATT SNSR | 10 A | 40 | VBACT | (10 A) | |||||
|
ect |
14 | – | – | 41 | IGPS [LAF] | 10 A | |||||
|
ed |
– | 30 A | 15 | FR FOG* | (10 A) | 42 | IG1 MON2 | (7.5 A) | |||
| ABS/VSA MTR | 40 A | 16 | MG CLUTCH | 10 A | |||||||
| DC/DC | 30 A | 17 | WASHER | 15 A | |||||||
| 4 | – | 30 A | 18 | HORN | 15 A | ||||||
| IG MAIN | 30 A | 19 | BACK UP | 15 A | |||||||
| R/M1 | 30 A | 20 | AUDIO | (15 A) | |||||||
| R/M2 | 30 A | 21 | RFC RLY CL+ | (7.5 A) | |||||||
| 22 | DBW | 15 A | |||||||||
| 23 | – | – | |||||||||
| 24 | BACKUP FI-ECU | 10 A | |||||||||
| 25 | IGP | 15 A | |||||||||
| 706 | * Not | available on all models |
Interior Fuse Box
Located under the dashboard.
Fuse locations are shown on the label under the steering column. Locate the fuse in question by the fuse number and label number.
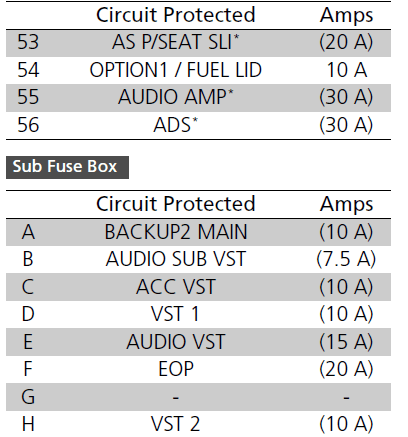
Circuit protected and fuse rating
| Circuit Protected | Amps | 26 | SRS | 10 A | ||
| 1 P/W DR | 20 A | 27 | ST CUT RLY | 10 A | ||
| 2 P/W AS | 20 A | 28 | OPTION5 | 10 A | ||
| 3 P/W RR R | 20 A | 29 | FUEL PUMP | 15 A | ||
| 4 P/W RR L | 20 A | 30 | L SIDE DOOR UNLOCK | 10 A | ||
| 5 OPTION | 10 A | 31 | R SIDE DOOR UNLOCK | 10 A | ||
| 6 SRS | 10 A | 32 | – | – | ||
| 7 T/G MTR / TRUNK ACT | 10 A | 33 | – | – | ||
| 8 IDAS / HUD | (10 A) | 34 | – | – | ||
|
Han |
9 FR ACC SOCKET | 20 A | 35 | – | – | |
|
dlin |
10 DOOR LOCK | 20 A | 36 | – | – | |
|
g |
11 METER | 10 A | 37 | – | – | |
|
the |
12 OPTION3 (ST CUT) | 10 A | 38 | – | – | |
|
Un |
13 – | – | 39 | R SIDE DOOR LOCK | 10 A | |
|
exp |
14 OPTION6 (VB SOL) | 10 A | 40 | P/SEAT REC / RR HI | 20 A | |
|
ect |
15 DR DOOR UNLOCK | 10 A | 41 | P/SEAT SLIDE / FR HI | 20 A | |
|
ed |
16 SUNROOF | 20 A | 42 | BACK LT | (7.5 A) | |
| 17 – | – | 43 | A/C | 10 A | ||
| 18 – | – | 44 | DRL | 10 A | ||
| 19 – | – | 45 | ACC | 10 A | ||
| 20 – | – | 46 | ACC KEY LOCK | 10 A | ||
| 21 – | – | 47 | L SIDE DOOR LOCK | 10 A | ||
| 22 SMART | 10 A | 48 | H/SEAT | 20 A | ||
| 23 DR DOOR LOCK | 10 A | 49 | AS P/SEAT REC* | (20 A) | ||
| 24 – | – | 50 | P/LUMBAR DR* | (10 A) | ||
| 25 IMG | 10 A | 51 | – | – | ||
| 52 | RR H/SEAT* | (20 A) | ||||
| 708 | * Not available on all models |
Inspecting and Changing Fuses
- Set the power mode to VEHICLE OFF. Turn headlights and all accessories off.
- Remove the fuse box cover.
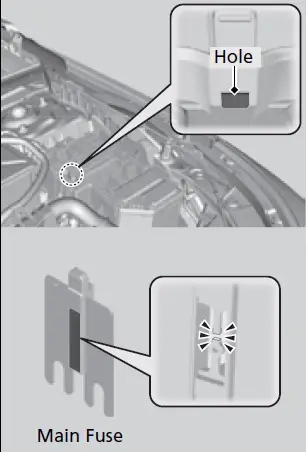
- Check the main fuse in the engine compartment fuse box.
- Look at the fuse through the hole.
- If the fuse is blown, have it replaced by a dealer.
 NOTICE
Replacing a fuse with one that has a higher rating greatly increases the chances of damaging the electrical system.
Use the charts to locate the fuse in question and confirm the specified amperage on the fuse label.
Fuse Locations P. 705
Replace a fuse with a spare fuse of the same specified amperage.
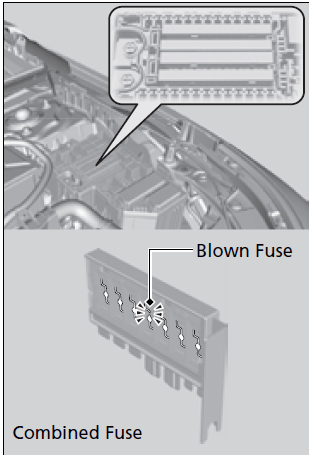
- Check the combined fuses in the engine compartment fuse box.
- Look into the space between the fuses.
- If the fuse is blown, have it replaced by a dealer.
- Inspect the small fuses in the engine compartment and the vehicle interior.
- If there is a blown fuse, remove it with the fuse puller and replace it with a new one.

There is a fuse puller on the back of the engine compartment fuse box cover.
Emergency Towing
Call a professional towing service if you need to tow your vehicle.
Flatbed equipment
The operator loads your vehicle on the back of a truck.
This is the best way to transport your vehicle.
Wheel lift equipment
The tow truck uses two pivoting arms that go under the front tires and lift them off the ground. The rear tires remain on the ground. This is an acceptable way to tow your vehicle.
NOTICE
Trying to lift or tow your vehicle by the bumpers will cause serious damage. The bumpers are not designed to support the vehicle’s weight.
Make sure the parking brake is released. If you cannot release the parking brake, your vehicle must be transported by the flatbed equipment.
Parking Brake P. 584
NOTICE
Improper towing such as towing behind a motorhome or other motor vehicle can damage the transmission.
Never tow your vehicle with just a rope or chain. It is very dangerous since ropes or chains may shift from side to side or break.
If You Cannot Unlock the Fuel Fill Door
What to Do If Unable to Unlock the Fuel Fill Door
If you cannot unlock the fuel fill door, use the following procedure.
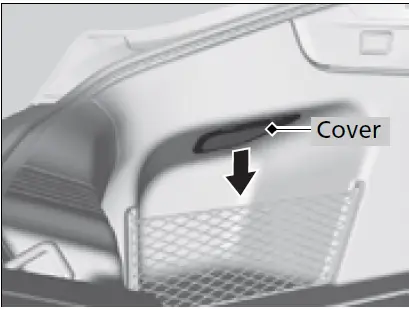
- Open the hatch and remove the cover on the left side of cargo area.
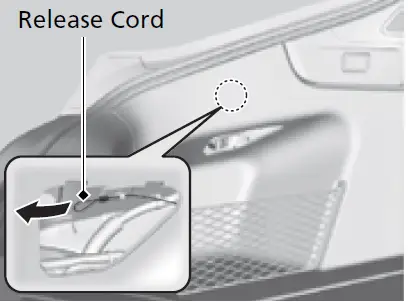
- Pull the release cord toward you.
- The release cord unlocks the fuel fill door when it is pulled.
- Open the fuel fill door.
How to Refuel P. 609
After taking these steps, contact a dealer to have the vehicle checked.
What to Do If Unable to Open the Hatch
If you cannot open the hatch, use the following procedure.
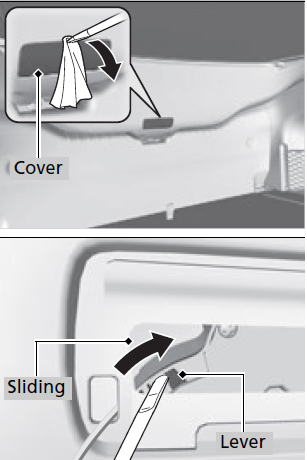
- Remove the cover on the back of the hatch by prying it off with a small flat-tip screwdriver.
- Wrap the flat-tip screwdriver with a cloth to prevent scratches.
- Wrap the flat-tip screwdriver with a cloth to prevent scratches.
- Push the release lever until the hatch unlocks. Push the hatch up to open.
When you open the hatch from inside, make sure there is enough space around the hatch, and it does not hit anyone or any object.
Following up:
After taking these steps, contact a dealer to have your vehicle checked.
Refueling
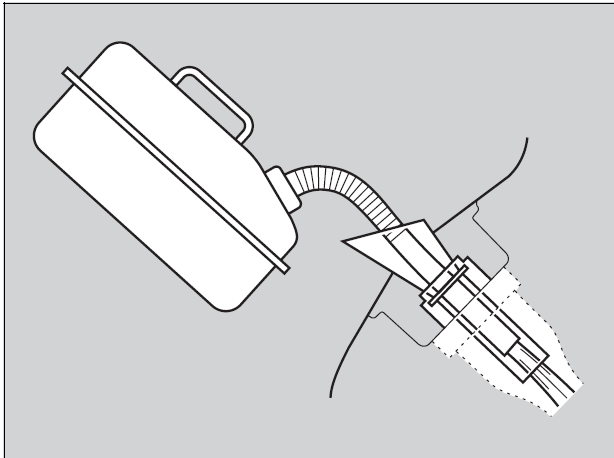
Refueling From a Portable Fuel Container
If you have run out of fuel and need to refuel your vehicle from a portable fuel container, use the funnel provided with your vehicle.
- Turn off the engine.
- Press on the edge of the fuel fill door until you hear a click when the driver’s door is unlocked.
- The fuel fill door opens.
- Take the funnel out of the tool case in the cargo area.
Types of Tools P. 666
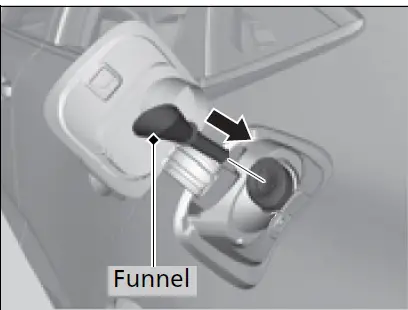
- Place the end of the funnel on the lower part of filler opening, then insert it slowly and fully.
- Make sure that the end of the funnel goes down along with the filler pipe.
- Fill the tank with fuel from the portable fuel container.
- Pour fuel carefully so you do not spill any.
- Remove the funnel from the filler neck.
- Wipe up any fuel from the funnel before storing it.
- Shut the fuel fill door by hand.
WARNING
Gasoline is highly flammable and explosive. You can be burned or seriously injured when handling fuel.
- Stop the engine, and keep heat, sparks, and flames away.
Handle fuel only outdoors.
Wipe up spills immediately.
NOTICE
Do not insert the nozzle of a portable fuel container or any funnel other than the one provided with your vehicle. Doing so can damage the fuel system.
Do not try to pry open or push open the sealed fuel tank with foreign objects. This can damage the fuel system and its seal.
Make sure the fuel in the portable fuel container is gasoline before you refuel.
Reference Links
View Full User Guide: Acura Integra 2023 User Guide
Download Manuals: Acura | Owner’s Manual & Warranty | Acura Owner’s Site
2024 Acura INTEGRA Specs, Price, Features, Mileage (Brochure)
Related Article:
2023 Acura TLX Specs, Price, Features, Mileage (Brochure)