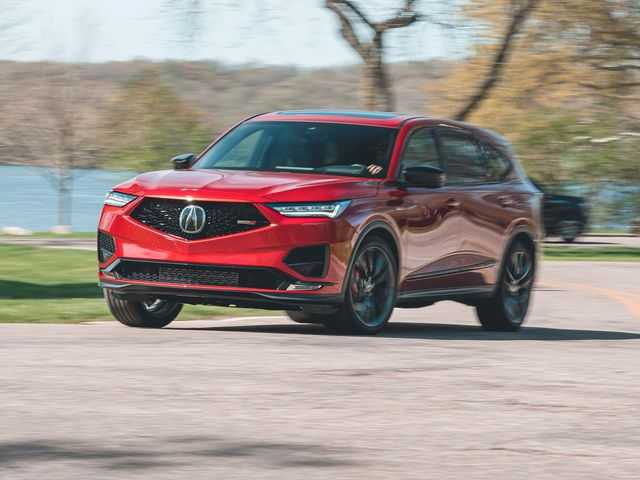
ACURA MDX 2023 Brakes and Refueling User Guide
Before Driving
Driving Preparation
Check the following items before you start driving.
Exterior Checks
- Make sure there are no obstructions on the windows, door mirrors, exterior lights, or other parts of the vehicle.
- Remove any frost, snow, or ice.
- Remove any snow on the roof, as this can slip down and obstruct your field of vision while driving. If frozen solid, remove ice once it has softened.
- When removing ice from around the wheels, be sure not to damage the wheel or wheel components.
- Make sure the hood is securely closed.
If the hood opens while driving, your front view will be blocked. - Make sure the tires are in good condition.
- Check air pressure, and check for damage and excessive wear.
- Checking and Maintaining Tires P. 636
- Make sure there are no people or objects behind or around the vehicle.
- There are blind spots from the inside.
NOTICE
When doors are frozen shut, use warm water around the door edges to melt any ice. Do not try to force them open, as this can damage the rubber trim around the doors. When done, wipe dry to avoid further freezing. Do not pour warm water into the key cylinder. You will be unable to insert the key if the water freezes in the hole. Heat from the engine and exhaust can ignite flammable materials left under the hood, causing a fire. If you’ve parked your vehicle for an extended period, inspect and remove any debris that may have collected, such as dried grass and leaves that have fallen or have been carried in for use as a nest by a small animal. Also, check under the hood for leftover flammable materials after you or someone else has performed maintenance on your vehicle.
Interior Checks
- Store or secure all items on board properly.
Carrying too much cargo, or improperly storing it, can affect your vehicle’s handling, stability, stopping distance, and tires, and make it unsafe.
Maximum Load Limit P. 427 - Adjusting the Front and Second Row Outer Head Restraint Positions P. 206
- Adjust the mirrors and steering wheel properly.
Adjust them while sitting in the proper driving position.
Adjusting the Steering Wheel P. 190
Mirrors P. 191
The headlight aim is set by the factory, and does not need to be adjusted. However, if you regularly carry heavy items in the cargo area or tow a trailer, have the aiming readjusted at a dealer or by a qualified technician.
- Be sure items placed on the floor behind the front seats cannot roll under the seats.
- They can interfere with the driver’s ability to operate the pedals, the operation of the seats, or the operation of the sensors under the seats.
- Everyone in the vehicle must fasten their seat belt.
- Fastening a Seat Belt P. 42
- Make sure that the indicators in the instrument panel come on when you start the vehicle, and go off soon after.
- Always have a dealer check the vehicle if a problem is indicated.
- Indicators P. 86
Maximum Load Limit
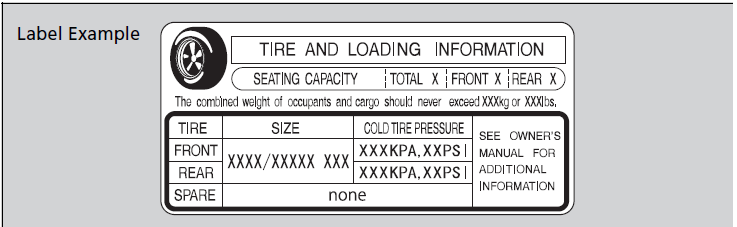
The maximum load for your vehicle is 1,173 lbs (532 kg). See the Tire and Loading Information label attached to the driver’s doorjamb.
This figure includes the total weight of all occupants, cargo, and accessories, and the tongue load if you are towing a trailer.
Steps for Determining Correct Load Limit
- Locate the statement “The combined weight of occupants and cargo should never exceed XXX kg or XXX lbs.” on your vehicle’s placard.
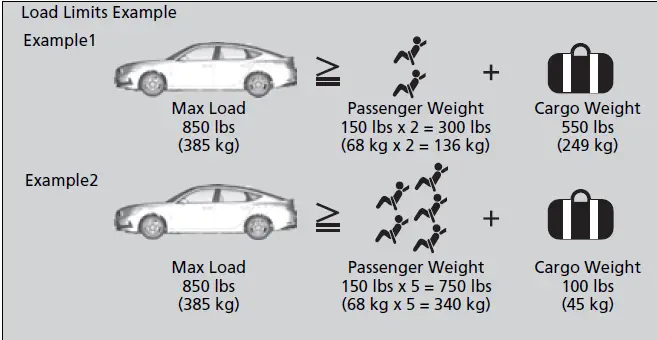
- Determine the combined weight of the driver and passengers that will be riding in your vehicle.
- Subtract the combined weight of the driver and passengers from XXX kg or XXX lbs.
Maximum Load Limit
WARNING
Overloading or improper loading can affect handling and stability and cause a crash in which you can be hurt or killed. Follow all load limits and other loading guidelines in this manual.
Gross Vehicle Weight Rating (GVWR):
The maximum allowable weight of the vehicle, all occupants, all accessories, all cargo, and the tongue load.
Specifications P. 730Gross Axle Weight Rating (GAWR):
The maximum allowable weight of the vehicle axle. - The resulting figure equals the available amount of cargo and luggage load capacity. For example, if the “XXX” amount equals 1,400 lbs. and there will be five 150 lb. passengers in your vehicle, the amount of available cargo and luggage load capacity is 650 lbs. (1,400 – 750 (5 x 150) = 650 lbs.)
- Determine the combined weight of luggage and cargo being loaded on the vehicle. That weight may not safely exceed the available cargo and luggage load capacity calculated in step 4.
- If your vehicle will be towing a trailer, load from your trailer will be transferred to your vehicle. Consult this manual to determine how this reduces the available cargo and luggage load capacity of your vehicle. In addition, the total weight of the vehicle, all occupants, accessories, cargo, and trailer tongue load must not exceed the Gross Vehicle Weight Rating (GVWR) or the Gross Axle Weight Rating (GAWR). Both are on a label on the driver’s doorjamb.
Towing a Trailer:
See Towing a Trailer to determine whether your vehicle is designed to tow a trailer.
Towing a Trailer P. 430
Towing a Trailer
Towing Preparation
Towing Load Limits
Your vehicle can tow a trailer if you carefully observe the load limits, use the proper equipment, and follow the towing guidelines. Check the load limits before driving.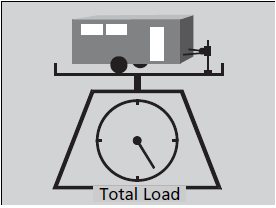
Total trailer weight
Do not exceed the maximum allowable weight of the trailer, cargo, and everything in or on it shown in the table. Towing loads in excess of this can seriously affect vehicle handling and performance and can damage the engine and drivetrain.
WARNING
Exceeding any load limit or improperly loading your vehicle and trailer can cause a crash in which you can be seriously hurt or killed. Check the loading of your vehicle and trailer carefully before starting to drive.
Check if all loads are within limits at a public scale. If a public scale is not available, add the estimated weight of your cargo load to the weight of your trailer (as quoted by the manufacturer), and then measure the tongue load with an appropriate scale or tongue gauge or estimate it based on cargo distribution. Refer to the trailer owner’s manual for additional information.
Break-in Period
Avoid towing a trailer during your vehicle’s first 600 miles (1,000 km).
Never exceed the gross weight ratings.
Gross weight information
Models without turbo charger
Each weight limit is calculated based on the following conditions:
- Occupants fill seats from the front of the vehicle to the back
- Each occupant weighs 150 lbs (68 kg)
- Each occupant has 17.6 lbs (8 kg) of cargo in the cargo area
Any additional weight, cargo or accessories reduce the maximum trailer weight and maximum tongue load.
| 2 | 5,000 lbs (2,268 kg) | 3,500 lbs (1,588 kg) | 3,500 lbs (1,588 kg) | 5,000 lbs (2,268 kg) | 3,500 lbs (1,588 kg) |
| 3 | 4,750 lbs (2,155 kg) | 3,250 lbs (1,474 kg) | 3,250 lbs (1,474 kg) | 4,750 lbs (2,155 kg) | 3,500 lbs (1,588 kg) |
| 4 | 4,500 lbs (2,041 kg) | 3,000 lbs (1,361 kg) | 3,000 lbs (1,361 kg) | 3,750 lbs (1,701 kg) | 3,500 lbs (1,588 kg) |
| 5 | 4,250 lbs (1,928 kg) | 2,750 lbs (1,247 kg) | 2,750 lbs (1,247 kg) | 2,750 lbs (1,247 kg) | 2,750 lbs (1,247 kg) |
| 6 | 2,800 lbs (1,270 kg) | 2,000 lbs (907 kg) | 2,500 lbs (1,134 kg) | 1,500 lbs (680 kg) | 1,500 lbs (680 kg) |
| 7 | Towing not recommended |
Tongue load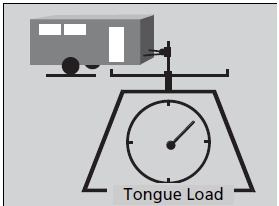
| 2 | 500 lbs (227 kg) | 350 lbs (159 kg) | 500 lbs (227 kg) | 350 lbs (159 kg) |
| 3 | 450 lbs (204 kg) | 325 lbs (147 kg) | 475 lbs (216 kg) | 350 lbs (159 kg) |
| 4 | 350 lbs (159 kg) | 300 lbs (136 kg) | 375 lbs (170 kg) | 350 lbs (159 kg) |
| 5 | 250 lbs (113 kg) | 220 lbs (100 kg) | 275 lbs (125 kg) | 275 lbs (125 kg) |
| 6 | 140 lbs (64 kg) | 100 lbs (45 kg) | 150 lbs (68 kg) | 150 lbs (68 kg) |
Towing Equipment and Accessories
Towing generally requires a variety of supplemental equipment.
To ensure the best quality, we recommend that you purchase Acura equipment whenever possible.
Make sure that all equipment is properly installed and maintained, and that it meets federal, state, province/territory, and local regulations. Consult your trailer maker for proper installation and setup of the equipment. Improper installation and setup can affect the handling, stability, and braking performance of your vehicle. Consult your trailer sales or rental agency if any other items are recommended or required for your towing situation. The lighting and wiring of trailers can vary by type and brand. If a connector is required, it should only be installed by a qualified technician. Trailer packages and products:
- Ball mount, hitch plug, hitch pin etc.
- Wiring harness kit
- Trailer hitch kit (jumper harness included)
Trailer brakes P. 435 - Are available at a dealer.
Trailer brakes
Recommended for any trailer with a total weight of 1,000 lbs (450 kg) or more: There are two common types of trailer brakes: surge and electric. Surge brakes are common for boat trailers, since the brakes will get wet. If you choose electric brakes, be sure they are electronically actuated. Do not attempt to attach trailer brakes to your vehicle’s hydraulic system, as it will lower braking effectiveness and create a potential hazard. The 4-pin gray connector installed in your vehicle has all of the circuits required to install most electric trailer brake controllers. Have a qualified mechanic install your trailer brake controller following the trailer brake controller manufacturer’s instructions. Failure to properly install the trailer brake controller may increase the distance it takes for you to stop your vehicle when towing a trailer.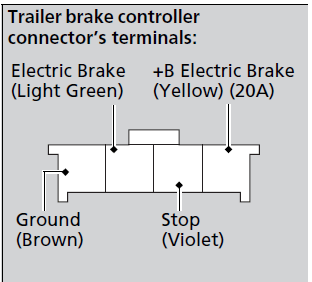
The 4-pin gray connector is located under the left side instrument panel.
Trailer light
Trailer lights and equipment must comply with federal, state, province/territory, and local regulations. Check with your local trailer sales or rental agency for the requirements in the area where you plan to tow.
We recommend that you have a dealer install a Acura wiring harness and converter. They are designed for your vehicle.
- Hitches
Read the trailer manufacturer’s instructions, and select the appropriate draw bar for the height of the trailer you will be towing. - Weight distribution hitches
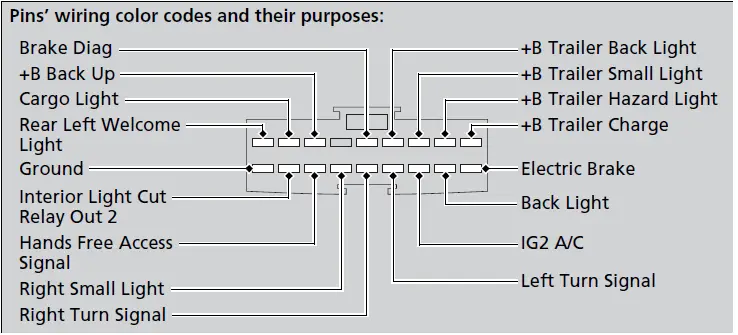
Your vehicle is designed to tow without the need for a load distributing hitch. If you wish to use one, please consult your trailer maker for proper installation and set-up. Improper set-up could degrade the handling, stability, and braking performance of your vehicle. - The trailer lighting connector is located behind the rear panel lining in the cargo area. Even if you are planning to use the non-Acura trailer lighting harness and converter, ask a dealer for the correct connector and pins.
- Safety chains
Always use safety chains when you tow a trailer. Leave enough slack to allow the trailer to turn corners easily, but do not allow the chains to drag on the ground. - Sway control
This device can be used if your trailer tends to sway. Your trailer maker can tell you what kind of sway control you need and how to install it. Improper installation could degrade the handling and stability of your vehicle. - Trailer mirrors
Many states, provinces and territories require special exterior mirrors when towing a trailer. Install special mirrors whenever you cannot clearly see behind you, or if the trailer creates a blind spot.
AWD models
Automatic transmission cooler
An additional ATF (automatic transmission fluid) cooler is required to keep the transmission from overheating when towing more than 3,500 lbs (1,588 kg). You can get the additional ATF cooler at a dealer.
The trailer lighting connector is located behind the rear panel lining in the cargo area. Even if you are planning to use the non-Acura trailer lighting harness and converter, ask a dealer for the correct connector and pins.
- Safety chains
Always use safety chains when you tow a trailer. Leave enough slack to allow the trailer to turn corners easily, but do not allow the chains to drag on the ground. - Sway control
This device can be used if your trailer tends to sway. Your trailer maker can tell you what kind of sway control you need and how to install it. Improper installation could degrade the handling and stability of your vehicle. - Trailer mirrors
Many states, provinces and territories require special exterior mirrors when towing a trailer. Install special mirrors whenever you cannot clearly see behind you, or if the trailer creates a blind spot.
Automatic transmission cooler
An additional ATF (automatic transmission fluid) cooler is required to keep the transmission from overheating when towing more than 3,500 lbs (1,588 kg). You can get the additional ATF cooler at a dealer.
Trailer Stability Assist
Helps to stabilize the vehicle and trailer when the trailer severely sways.
How trailer stability assist works
When the vehicle and trailer become unstable while driving, trailer stability assist determines the cause. If the trailer oscillation is detected as the cause, and the swaying increases, the system applies the brakes or controls engine output to reduce vehicle speed. Both the vehicle and trailer brake lights come on automatically if you brake to reduce vehicle speed.
Trailer stability assist is not a function that prevents the vehicle and trailer from swaying. Avoid high speeds, abrupt steering, improper trailer load, and sudden braking to keep the trailer from swaying. When swayed too severely, the system becomes ineffective, and you may lose control of your vehicle, causing the trailer to roll over or get damaged.2 Driving Safely with a Trailer P. 439
- Crosswinds
- Improper towbar down load
- Excessive Speed
The VSA® system indicator blinks during the trailer stability assist operation.
VSA® Operation P. 479
Driving Safely with a Trailer
Things You Need To Know Before Towing a Trailer
- Have the trailer properly serviced and keep it in good condition.
- Make sure that all the weights and load in the vehicle and trailer are within limits. 2 Towing Load Limits P. 430
- When towing more than 3,500 lbs (1,590 kg), use of gasoline with a pump octane number of 91 or higher is recommended.
- Towing performance can be affected by high altitude, high temperature, or steep uphill.
- Securely attach the hitch, safety chains, and other necessary parts to the trailer.
- Securely store all the items in and on the trailer so that they do not shift while driving.
- Check if the lights and brakes on the trailer are working properly.
- Check the pressures of the trailer tires.
- Turn off the Auto Idle Stop system using the Auto Idle Stop OFF button. The trailer weight can affect your vehicle’s brake effectiveness if Auto Idle Stop is activated on a hill while towing a trailer.
Models with parking sensor system
- Turn off the rear parking sensor system.
Turning off All Rear Sensors P. 581
Models with Low Speed Braking Control
- Turn off the Low Speed Braking Control system. It may activate if it detects the towed object as an obstacle.
System On and Off P. 509
Models with Electronic Air Suspension (EAS)
- Before hitching a trailer, set the EAS Leveling Control setting to Towing mode. When hitching the trailer, set the power mode to OFF.
Leveling Control P. 472
Operating speed when towing a trailer must not exceed 62 mph (100 km/h). Parking In addition to the normal precautions, place wheel chocks at each of the trailer’s tires. Remember to unhitch the trailer before changing a flat tire. Ask the trailer sales or rental agency where and how to store the trailer’s spare tire.
Towing Speeds and Gears
- Drive slower than normal.
Obey posted speed limits for vehicles with trailers.
Use the (D position when towing a trailer on level roads.
Turning and Braking
- Turn more slowly and with a wider turning arc than normal.
- Allow more time and distance for braking.
- Do not brake or turn suddenly.
Driving in Hilly Terrain
- Monitor your temperature gauge. If it nears the red (H) mark, turn off the climate control system and reduce speed. Pull to the side of the road safely to cool down the engine if necessary.
- Change the shift position to (S position if the transmission shifts frequently.
Retrieving a Boat
If the vehicle tires slip when retrieving a boat from the water, keep the transmission in (D and do not use the sequential shift mode in (S. This prevents damage to the transmission.
Towing Behind a Motorhome
Your vehicle is not designed to be towed behind a motor home. If your vehicle needs to be towed in an emergency, refer to the emergency towing information.
Emergency Towing P. 725
If the automatic transmission fluid temperature exceeds the specified limit, the transmission will also automatically up shift, even in the sequential shift mode.
Driving in Hilly Terrain
If the automatic transmission fluid temperature exceeds the specified limit, the transmission will also automatically up shift, even in the sequential shift mode.
Off-Highway Driving Guidelines
General Information
Your vehicle has been designed primarily for use on pavement, however, its higher ground clearance allows you to occasionally travel on unpaved roads. It is not designed for trail-blazing, or other challenging off-highway activities.
If you decide to drive on unpaved roads, you will find that it requires somewhat different driving skills and that your vehicle will handle somewhat differently than it does on pavement. Pay attention to the precautions and tips in this section, and get acquainted with your vehicle before leaving the pavement.
Important Safety Precautions
To avoid loss of control or rollover, be sure to follow all precautions and recommendations:
- Be sure to store cargo properly and do not exceed your cargo load limits.
- Maximum Load Limit P. 427
- Whenever you drive, make sure you and your passengers always wear seat belts.
- Keep your speed low, and never go faster than the conditions allow.
- It’s up to you to continually assess the situation and drive within the limits.
WARNING
Improperly operating this vehicle on or off-pavement can cause a crash or rollover in which you and your passengers could be seriously injured or killed.
- Follow all instructions and guidelines in this owner’s manual.
- Keep your speed low, and don’t drive faster than conditions permit.
Failure to operate your vehicle correctly might result in a crash or a rollover.
Important Handling Information P. 36
Precautions While Driving P. 449
AWD models
Spinning the tires can also damage the SH-AWD® system.
Avoiding Trouble
- Check Out Your Vehicle before you leave the pavement and make sure that all scheduled maintenance has been completed. Pay special attention to the condition of the tires, and check the tire pressures.
- Remember the route you choose presents limits (too steep or bumpy), you have limits (driving skill and comfort), and your vehicle has limits (traction, stability, and power). Failing to recognize these limits will likely put you and your passengers in a hazardous situation.
- Accelerating and Braking should be done slowly and gradually. Trying to start or stop too fast can cause a loss of traction and you could lose control.
- Avoiding Obstacles and Debris in the road reduces the likelihood of a rollover or damage to your suspension or other components.
- Driving on Slopes increases your risk of a rollover, particularly if you attempt to drive across a slope that is too steep. Going straight up or down a slope is usually the safest. If you can’t clearly see all conditions or obstacles on a slope, walk it before you drive it. If there is any doubt whether you can safely pass, don’t try it. Find another route. If you get stuck when climbing, do not try to turn around. Back down slowly following the same route you took up the hill.
- Crossing a Stream
Avoid driving through deep water. If you encounter water in your route (a small stream or large puddle, for example), evaluate it carefully before going ahead. Make sure it is shallow, flowing slowly, and has firm ground underneath. If you are not sure of the depth or the ground, turn around and find another route. Driving through deep water can also damage your vehicle. The water can get into the transmission and differential, diluting the lubricant and causing an eventual failure. It can also wash the grease out of the wheel bearings. - If You Get Stuck, carefully go in the direction that you think will get you unstuck. Do not spin the tires as this will only make things worse and could damage the transmission. If you are unable to free yourself, your vehicle will need to be towed. Front tow hook is provided for this purpose.
When Driving
Starting the Engine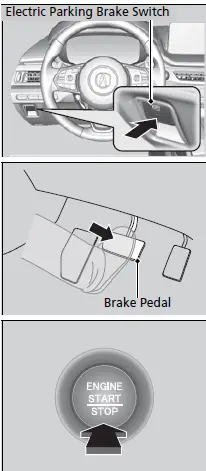
- Make sure the parking brake is applied.
The parking brake and brake system indicator (red) comes on for 30 seconds when you press the electric parking brake switch. - Depress the brake pedal.
- Press the ENGINE START/STOP button without depressing the accelerator pedal.
Keep your foot firmly on the brake pedal when starting the engine.
The engine is harder to start in cold weather and in thinner air found at altitudes above 8,000 feet (2,400 meters).
When starting the engine in cold weather, turn off all electrical accessories such as the lights, climate control system, and rear defogger in order to reduce battery drain.
If you live in a region where winter is extremely cold, an engine block heater will improve starting and warming of the engine. Consult a dealer for details.
If the exhaust system sounds abnormal or you can smell exhaust gas inside the vehicle, have your vehicle checked by a dealer. There may be a problem with the engine or exhaust system.
Bring the keyless access remote close to the ENGINE START/STOP button if the battery in the keyless access remote is weak.
If the Keyless Access Remote Battery is
Weak P. 697
The engine may not start if the keyless access remote is subjected to strong radio waves.
Remote Engine Start
You can remotely start the engine using the two-way keyless access remote from extended distances.
To start the engine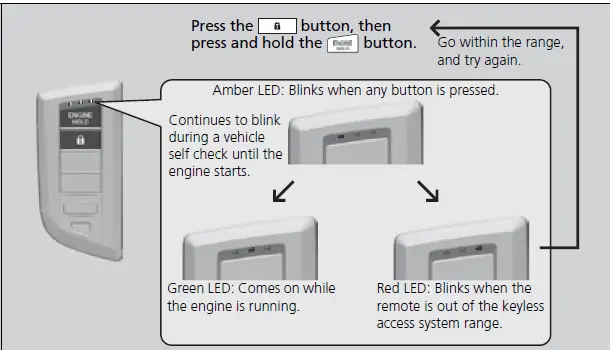
The engine runs for up to 10 minutes without you starting the vehicle. To extend the run time for another 10 minutes during the first run, press the ![]() button, then press and hold the button. The amber LED blinks, then the green LED comes back on if a 10-minute extension request was transmitted successfully.
button, then press and hold the button. The amber LED blinks, then the green LED comes back on if a 10-minute extension request was transmitted successfully.
After pressing the ![]() button, wait for the green LED to blink. This indicates that the all the doors and the tailgate are locked.
button, wait for the green LED to blink. This indicates that the all the doors and the tailgate are locked.
* Not available on all models
WARNING
Carbon monoxide gas is toxic and can rapidly accumulate in closed or even partly enclosed areas. Breathing it can cause unconsciousness and even kill you. Never use the remote engine starter with the vehicle parked in a garage or other areas with limited ventilation.
The remote engine start may violate local laws. Before using the remote engine start, check your local laws. If there are buildings and obstacles between your vehicle and the remote, the range will be reduced. This distance may vary by external electrical interference.
To stop the engine
The engine may not start by the remote engine start if:
- You have disabled a remote engine start setting using the audio/information screen.
Customized Features P. 351 - The power mode is not in VEHICLE OFF (LOCK).
- The transmission is in a position other than (P.
- The hood is open, or any door or the tailgate is unlocked.
- The 12-volt battery temp is too low or the 12-volt battery charge is too low.
- You have already used the remote twice to start the engine.
- Another registered keyless access remote is in the vehicle.
- There is any antenna failure.
- The door is unlocked with the built-in key.
- The engine oil pressure is low.
- The engine coolant temperature is extremely high.
- The telematics unit malfunctions.
- The security system alarm is not set.
Before starting the engine, make sure to check the door lock status using the remote. When you press the button, wait for the green LED to blink. If the red LED turns on, ![]() the doors and tailgate did not lock, and the engine does not start.
the doors and tailgate did not lock, and the engine does not start.
While the engine is running, the vehicle will automatically precondition inside the vehicle. When it is warm outside:
- The climate control system is activated in recirculation mode.
- The seat ventilation* is activated.
When it is cold outside:
The defroster is activated at a moderately warm temperature. - The rear defogger and door mirror heaters are activated.
- The seat heaters* and heated steering wheel* are activated.
Heated Steering Wheel* P. 230
Front Seat Heaters and Ventilation
Starting to Drive
When the engine was started using the keyless access remote.
- Depress and hold the brake pedal, then press the ENGINE START/STOP button.
When the engine was started in any case - Keeping your right foot on the brake pedal, put the transmission into (D. Select (R when reversing.
- With the parking brake applied, release the brake pedal and gently depress the accelerator pedal.
Make sure the parking brake and brake system indicator (red) goes off.
Parking Brake P. 567
Hill start assist system
Hill start assist keeps the brake engaged briefly to help prevent the vehicle from rolling on inclines as you move your foot from the brake pedal to the accelerator. Put the transmission into (D or (S when facing uphill, or (R when facing downhill, then release the brake pedal.
When the engine was started using the keyless access remote
You can also release the parking brake by pulling the electric parking brake switch while depressing the brake pedal. When facing downhill, you can start your vehicle more smoothly by manually releasing it with the electric parking brake switch than by releasing it with the accelerator pedal. The engine stops when the transmission is taken out of (P before the ENGINE START/STOP button is pressed. Follow step 1 when starting to drive.
The power mode will automatically turn to VEHICLE OFF (LOCK) about 20 minutes after the following conditions have been met:
- A door has been opened, such as when leaving the vehicle.
- The transmission is in (P.
- The driver’s seat belt is not fastened.
Driving Guidelines for Your Utility Vehicle
Utility vehicles have a significantly higher rollover rate than other types of vehicles. To prevent rollovers or loss of control:
- Take corners at slower speeds than you would with a passenger vehicle.
- Avoid sharp turns and abrupt maneuvers whenever possible.
- Do not modify your vehicle in any way that you would raise the center of gravity.
- Do not carry heavy cargo on the roof.
- Never carry more than 165 lbs (75 kg) of cargo on the roof rack (Acura accessory).
In Rain
Avoid driving in deep water and on flooded roads. This can damage the engine or driveline, or cause electrical component failure.
NOTICE
Do not change the shift position while pressing the accelerator pedal. You could damage the transmission.
NOTICE
If you repeatedly turn the steering wheel at an extremely low speed, or hold the steering wheel in the full left or right position for a while, the electric power steering (EPS) system heats up. The system goes into a protective mode, and limits its performance. The steering wheel becomes harder and harder to operate. Once the system cools down, the EPS system is restored. Repeated operation under these conditions can eventually damage the system. If the power mode is set to ACCESSORY while driving, the engine will shut down and all steering and brake power assist functions will stop, making it difficult to control the vehicle. Do not select (N while driving as you will lose engine braking (and acceleration) performance. During the first 600 miles (1,000 km) of operation, avoid sudden acceleration or full throttle operation so as not to damage the engine or powertrain. Avoid hard braking for the first 200 miles (300 km) after purchasing your new vehicle or replacing the brake pads or rotors, to allow for proper break-in.
Other Precautions
If there is a strong impact with something under the vehicle, stop in a safe location. Check the underside of the vehicle for damage or any fluid leaks.
Automatic Transmission
Creeping
When the engine runs at higher idle speeds, the creeping force increases. Keep the brake pedal firmly depressed when stopped.
Kickdown
Quickly depressing the accelerator pedal while driving uphill may cause the transmission to drop to a lower gear, unexpectedly increasing vehicle speed. Depress the accelerator pedal carefully, especially on slippery roads and curves.
Failure to operate your vehicle correctly might result in a crash or a rollover.
Important Handling Information P. 36
Precautions While Driving P. 449
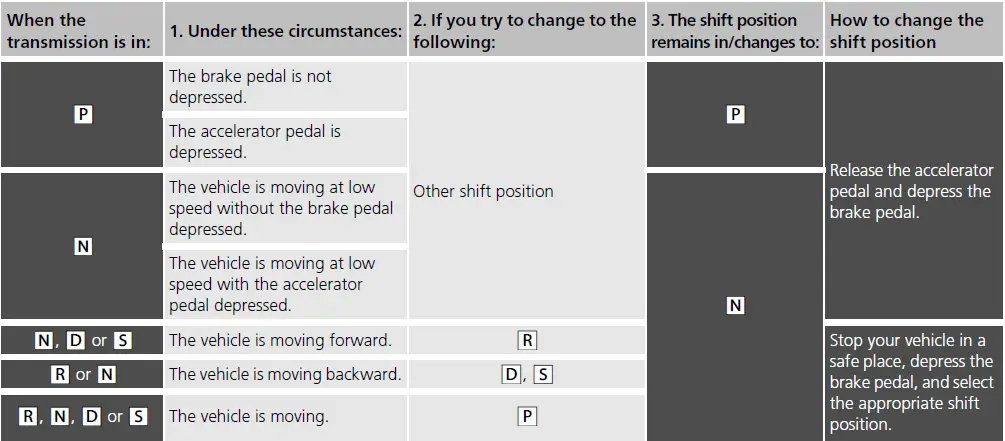
Shifting
Change the shift position in accordance with your driving needs.
Shift positions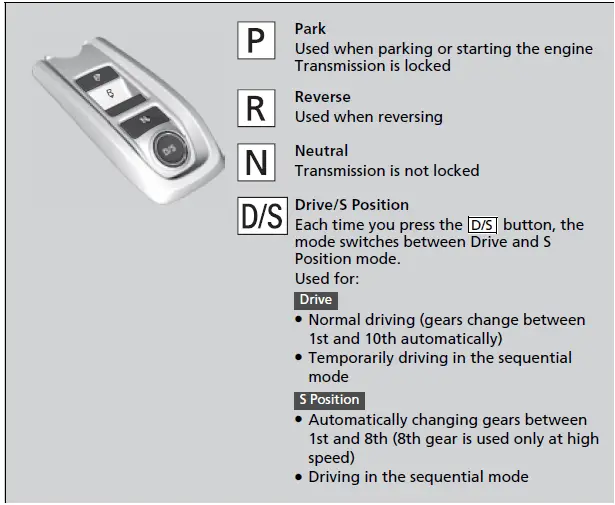
WARNING
The vehicle can roll away if left unattended without confirming that Park is engaged. A vehicle that rolls away could cause a crash resulting in serious injury or death. Always keep your foot on the brake pedal until you have confirmed that (P is shown on the gear position indicator.
To prevent malfunction and unintended engagement:
- Do not spill any liquids on or around shift buttons.
- Do not place or drop any objects on or around shift buttons.
- Do not let passengers or children operate the shift buttons.
The beeper sounds and the message appears on the driver information interface when you depress the accelerator pedal with the shift position in (N. Change the shift position to (D or (R with the brake pedal depressed.
(P (parking) button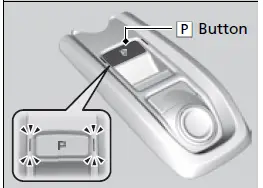
Park your vehicle in a safe place with the power mode in ON, then apply the brakes and press the (P button to put the transmission in Park. The indicators on the sides of the (P button come on.
Shift Operation

NOTICE
When you change (D to (R and vice versa, come to a complete stop and keep the brake pedal depressed. Operating the shift button before the vehicle has come to a complete standstill can damage the transmission. Use the gear position indicator and the shift button indicator to check the shift position before selecting a shift button. If the indicator of the currently selected shift position, or all the gear position indicators are blinking simultaneously, there is a problem with the transmission. Avoid sudden acceleration and have the transmission checked by a dealer as soon as possible. The fuel supply may be cut off if you drive at engine speeds in or over the tachometer red zone (engine speed limit). If this happens, you may experience a slight jolt. When the engine speed is increased while the transmission is in (N, (P or (R, the fuel supply may be cut off even without the engine speed entering the tachometer red zone. When shifting positions in extremely low temperatures (−22°F/−30°C), there may be a short delay before the shift is indicated in the display. Always confirm you are in the correct shift position before driving. The beeper sounds once when you change to (R).
When opening the driver’s door
If you open the driver’s door under the following conditions, the shift position automatically changes to (P.
- The vehicle is stationary with the engine running, or moving at 1 mph (2 km/h) or slower.
- The transmission is in other than (P.
- You have unfastened the driver side seat belt.
- If you manually change the shift position from (P with the brake pedal depressed, the shift position will automatically return to (P once you release the brake pedal.
- When turning off the power mode
If you turn the engine off while the vehicle is stationary, and the transmission is in other than (P, the shift position automatically changes to (P).
While the system is designed to automatically change the shift position to (P under the described conditions, in the interest of safety you should always select (P before opening the driver’s door.
Make sure to park the vehicle in a safe place.
When Stopped
If you want to drive the vehicle after the shift position has automatically changed to (P under the described conditions, close the door, fasten the seat belt, depress the brake pedal, then change the shift position. If you leave the vehicle, turn off the engine and lock the doors.
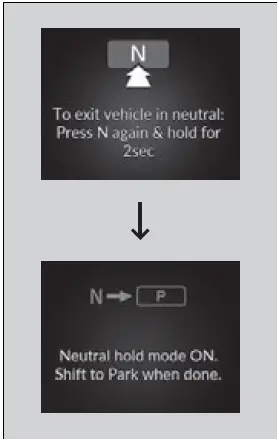
If you want to keep the transmission in (N position [car wash mode] With the engine running:
- Press and hold the brake pedal.
- Select (N, then release the button to display (N (Neutral) hold mode on the driver information interface.
- Press and hold (N again for two seconds.
- This puts the vehicle in car wash mode which must be used when your vehicle is pulled through a conveyor type automatic car wash where you or an attendant do not remain in the vehicle.
If the ENGINE START/STOP button is pressed after car wash mode has been activated, the power mode will change to ACCESSORY and a message will be displayed on the driver information interface.
For 15 minutes the shift position remains in (N with the power mode in ACCESSORY. After that, the position automatically changes to (P and the power mode changes to OFF.
Manually changing to (P cancels ACCESSORY mode. The (P indicator comes on and the power mode changes to OFF. You must always shift to (P when car wash mode is no longer needed.
Note that the transmission may not stay in (N position while any of the following indicators is on:
- Press and hold the brake pedal.
- Select (N, then release the button to display (N (Neutral) hold mode on the driver information interface.
- Press and hold (N again for two seconds.
This puts the vehicle in car wash mode which must be used when your vehicle is pulled through a conveyor type automatic car wash where you or an attendant do not remain in the vehicle.
For 15 minutes the shift position remains in (N with the power mode in ACCESSORY. After that, the position automatically changes to (P and the power mode changes to OFF.
Manually changing to (P cancels ACCESSORY mode. The (P indicator comes on and the power mode changes to OFF. You must always shift to (P when car wash mode is no longer needed.
If you want to keep the transmission in (N position [car wash mode]
- Malfunction indicator lamp
- Transmission system indicator
- Charging system indicator
- The Charging System Problem message on the driver information interface.
Restrictions on selecting a shift position
You cannot select a shift position under certain circumstances that may lead to a crash.
Sequential Mode
Use the paddle shifters to change between 1st and 10th gears without releasing your hands from the steering wheel. The transmission will switch to the sequential mode.
When the transmission is in (D:
The vehicle will go into the sequential mode momentarily, and the sequential mode gear selection indicator will come on. When the vehicle goes into the sequential mode by (- paddle shifter and the lower gear is available, the transmission properly selects single or double gear change.
Once you start traveling at a constant speed, the sequential mode will automatically switch off, and the sequential mode gear selection indicator will go off.
Hold the (+ paddle shifter for two seconds or push the normal drive Hold the (+ paddle shifter for two seconds or push the normal drive).
When the transmission is in (S)
The vehicle will go into the sequential mode, and the M (sequential mode) indicator and sequential mode gear selection indicator will come on. If the vehicle speed increases and the engine speed reaches near the tachometer red zone, the transmission automatically shifts up to the next gear. You can cancel this mode by holding the (+ paddle shifter for two seconds or pushing the D/S button. When the sequential mode is canceled, the sequential mode indicator and sequential mode gear selection indicator go off.
The sequential mode may be canceled if the Dynamic Mode is changed to another dynamic mode.
Sequential Mode Operation
 Each paddle shift operation makes a single or double gear change. To change gears continuously, release the paddle shifter before pulling it again for the next gear. If the sequential mode gear selection indicator blinks when you try to shift up or down, this means your vehicle speed is not in its allowable gear range or the protection of transmission system is necessary. Slightly accelerate to shift up and decelerate to shift down while the indicator is blinking.
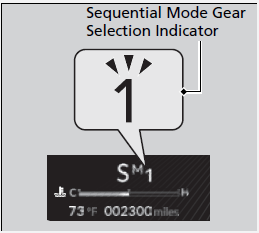
When the transmission is in (S and SPORT, SPORT+* or INDIVIDUAL mode, to prioritize the engine performance enhancement, the transmission may not allow for shifting up while the engine speed is low.
Acura Integrated Dynamics System
Modifies the dynamic character of the vehicle. Turn the Dynamic Mode switch to select LIFT*, SNOW, COMFORT, NORMAL, SPORT or SPORT+*. Press the button to select INDIVIDUAL. The mode you have selected appears on the audio/information screen.
The mode may not be able to be change when:
- The vehicle is turning
- The VSA® system is activating
- There is a problem with the engine, transmission, the brake system, the VSA®, the EPS, the Active Damper System*, the Electronic Air Suspension (EAS)*, or the SH-AWD®*

- Selecting the Dynamic Mode
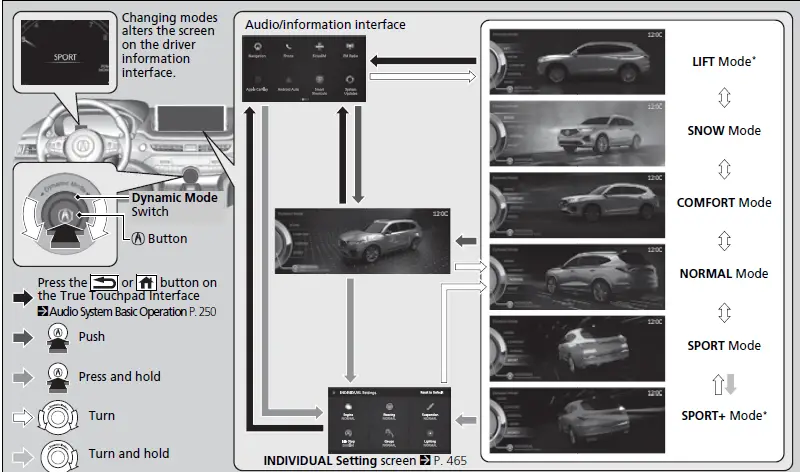
Not available on all models
Mode descriptions
Each mode has been crafted for different driving styles according to the following chart.
| Mode | Function | Accent Light Color*1 | Instrument Panel Gauges Shown*2 |
| LIFT* | Maximum ride height selected to provide additional clearance for occasional obstacles
2 Electronic Air Suspension (EAS)* P. 467 When in Lift, the Auto Idle Stop System will stay disabled regardless of the Auto Idle Stop OFF button |
White | Tachometer, Speedometer |
| SNOW | Maximizes controllability through powertrain settings. When in Snow, the Auto Idle Stop System will stay disabled regardless of the Auto Idle Stop OFF button
2 Auto Idle Stop P. 473 |
White | Tachometer, Speedometer |
| COMFORT | Maximizes driver comfort through decreased steering effort, decreased active sound control, and reduced ride firmness (if Active Damper System and EAS is equipped) | Blue | No analog gauges |
| NORMAL | Balanced response for everyday use | White | Tachometer, Speedometer |
- Interior accent light only available if equipped. Interior accent light changes with Dynamic Mode only when Accent Light Theme is
set to Dynamic Mode. - Customized Features P. 351
- Lighting area of the accent light P. 464
- Different gauges will display based on the Acura Integrated Dynamics System mode.
- Instrument Panel P. 13
| Mode | Function | Accent Light Color*1 | Instrument Panel Gauges Shown*2 |
| SPORT | Enhances vehicle response through increased steering effort, heightened throttle response, increased active sound control, more responsive ride and handling with Active Damper System*, EAS*, and SH-AWD®*.
When in SPORT, the Auto Idle Stop System will stay |
Red | Power Monitor or Boost Gauge, Tachometer, Speedometer |
| SPORT+* | Further enhances vehicle response for performance driving through increased throttle response and maximized active sound control. | Red | Enhanced Boost Gauge, Tachometer, Speedometer |
| INDIVIDUAL | Each category can be customized separately to suit the driver’s preference
2 Customizing the INDIVIDUAL Settings P. 465 |
Blue, white, or red
Customizing the INDIVIDUAL Settings P. 465 |
Follows COMFORT, NORMAL,
or SPORT and is customized in the INDIVIDUAL Settings Customizing the INDIVIDUAL Settings P. 465 |
- Interior accent light only available if equipped. Interior accent light changes with Dynamic Mode only when Accent Light Theme is
set to Dynamic Mode. - Customized Features P. 351
- Lighting area of the accent light P. 464
- Different gauges will display based on the Acura Integrated Dynamics System mode.
- Instrument Panel P. 13
Next start-up mode
The mode for the next start-up is saved according to the following chart. Each keyless access remote has its own mode saved
| Last Dynamic Mode | Next Dynamic Mode | Welcome Accent Light Color*1 |
| COMFORT | COMFORT | Blue |
| LIFT*, SNOW, NORMAL, SPORT or
SPORT+* |
NORMAL | White |
| INDIVIDUAL (via COMFORT) | COMFORT | Blue |
| INDIVIDUAL (via LIFT*, SNOW, NORMAL, SPORT or SPORT+*) | NORMAL | White |
- Interior accent light only available if equipped. Interior accent light changes with Dynamic Mode only when Accent Light Theme is set to Dynamic Mode.
- Customized Features P. 351
- Lighting area of the accent light P. 464
Lighting area of the accent light
Interior accent light only available if equipped. Interior accent light changes with Dynamic Mode only when Accent Light Theme is set to Dynamic Mode.
Customized Features P. 351
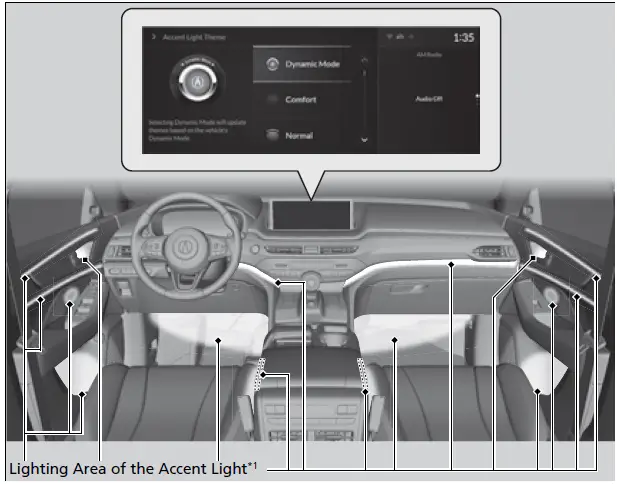
Accent lighting area may vary by model trim.
Customizing the INDIVIDUAL Settings
You can customize the INDIVIDUAL settings linked to your current keyless access remote. Each keyless access remote has its own settings.
- Push and hold the button to enter INDIVIDUAL mode and open the INDIVIDUAL settings. 2 Selecting the Dynamic Mode P. 460
- Highlight the setting category icon and click the A-zone touchpad to display the setting screen.
- Highlight the desired setting and click the A-zone touchpad to change the setting. button to return to INDIVIDUAL settings screen. button to return to the audio/information screen. button to return to INDIVIDUAL settings screen. button to return to the audio/information screen.
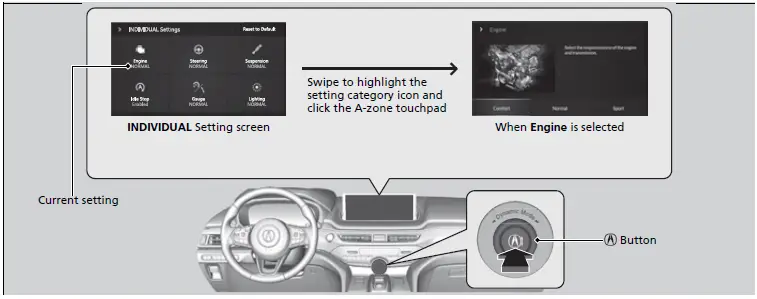
| Category | Description |
| Engine | Select COMFORT, NORMAL, or SPORT for the engine throttle response and transmission shift response |
| Steering | Select COMFORT, NORMAL, or SPORT for the steering effort |
|
Select COMFORT, NORMAL, or SPORT for ride and/or handling:
|
| Idle Stop | Set the Auto Idle Stop system to Enabled or Disabled. While Idle Stop is Disabled in INDIVIDUAL mode, the Auto Idle Stop System will stay disabled regardless of the Auto Idle Stop OFF button
Auto Idle Stop P. 473 |
| Gauge | Select COMFORT, NORMAL or SPORT to set the gauges to be displayed |
| Lighting*1 | Set the interior accent lighting. COMFORT for blue, NORMAL for white, and SPORT for red |
| Reset to Default | Engine, Steering, Suspension, Gauge, and Lighting is set to Normal, and Idle Stop is set to Enabled |
- Interior accent light only available if equipped. Interior accent light changes with Dynamic Mode only when Accent Light Theme is set to Dynamic Mode.
- Customized Features P. 351
- Lighting area of the accent light P. 464
- Suspension category only available if Active Damper System, EAS, or SH-AWD® is equipped.
Electronic Air Suspension (EAS)
Improves passenger comfort and driving performance by adjusting the vehicle height while driving. You can also improve the ease of entering and exiting the vehicle and change its appearance when parked by customizing the parked height.
- Auto Leveling
- Driving Vehicle Height Adjustment
- Parked Height
NOTICE
When parking or changing Dynamic Mode, Parked Height settings, or Leveling Control settings, make sure there are no obstacles above or under the vehicle.
A message will display when the vehicle height has been lowered significantly. If you drive while this message is displayed, you may damage the underside of the vehicle when driving on uneven pavement such as curbs and potholes. It may take at least 10 minutes after starting the engine to return to a vehicle height within the normal operating range. If you enter the vehicle or load luggage while this message is displayed, it may take longer for it to return. If your vehicle is parked for an extended period, the EAS will lose some air. The vehicle height when parked may naturally change in the following situations:
- The ambient temperature has changed.
- When loading and unloading luggage.
- The EAS has lost some air.
When the engine is started, the EAS automatically moves your vehicle to the target vehicle height.
If the vehicle height is changed repeatedly, the system will turn off temporarily as a protective measure. If it turns off frequently, contact your Acura dealer. You may hear noises coming from the lower part of the vehicle and the engine compartment while the vehicle height is being adjusted or the system is being maintained. Vehicle height adjustment may stop temporarily if the doors or the tailgate are opened during operation. The EAS may continue to operate even after the engine is turned off.
Vehicle Height Display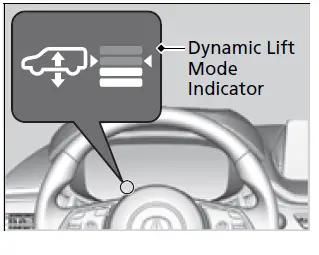 The current vehicle height is displayed as follows:
- High: Approx. 50mm higher than base height
- Mid: Approx. 30 mm higher that base height Base: Base height
- Low: Approx. 15mm lower than base height
The Dynamic Lift Mode Indicator turns on while the suspension is being adjusted. The target vehicle height is shown using the arrows.
Auto Leveling
When the engine is started, the vehicle automatically adjusts the vehicle height to the target height so that it stays level when entering or exiting the vehicle, loading luggage, or when the fuel level is low.
The Dynamic Lift Mode Indicator remains on when in LIFT mode. Auto Leveling status is not displayed on the driver information interface. Auto Leveling will not activate while the engine is turned off by the Auto Idle Stop.
Driving Vehicle Height Adjustment
The vehicle height changes when the Dynamic Mode is changed. The vehicle height is automatically adjusted to maintain the target height according to the speed of the vehicle.
Acura Integrated Dynamics System P. 459
| Dynamic Mode | Vehicle Height |
| LIFT | The vehicle height is set to High when stopped. As the vehicle speed increases, the vehicle height will decrease in stages. Once the vehicle exceeds a certain speed, the vehicle height will reach Low. As the vehicle’s speed decreases, it will gradually return to the original height. |
| SNOW COMFORT NORMAL | The vehicle height is set to Base when stopped. Once the vehicle exceeds a certain speed, the vehicle height changes to Low. It then returns to the original height once the speed of the vehicle decreases. |
| SPORT SPORT+ | The vehicle height is set to Low in all conditions. |
When the power mode is set to ON, the target vehicle height is set to the base height even if SPORT+, SPORT, or LIFT mode was previously selected. Once you begin to drive, the vehicle height is adjusted. If you don’t want the vehicle height to change, you need to change Dynamic Mode to the mode previously selected.
When INDIVIDUAL mode is selected, the vehicle height set in Suspension settings is used.
Parked Height
You can change the parked vehicle height to improve the ease of entry and exit into the vehicle and customize the appearance of the vehicle when parked. The vehicle height will change to the set height when the shift position is set to (P).
Customized Features P. 351
| Setting | Explanation |
| High | The vehicle height is about 50mm higher than base height when parked. |
| Auto | The vehicle height adjusts based on the Integrated Dynamic System mode. |
| Low | The vehicle height is about 15mm lower than base height when parked. |
Leveling Control
You should change the system settings depending on the situation.
Customized Features P. 351
| Setting | Explanation |
| ON | Used when driving normally. The vehicle height changes depending on the Dynamic Mode. |
| OFF | Used when raising the vehicle with a jack, such as during a tire change, or when emergency towing is required. Changing a Flat Tire P. 661 Emergency Towing P. 725 The vehicle height is locked to the one in use when the setting is changed and turns off Auto Leveling. |
| Towing Mode | Used when towing a trailer. The vehicle height is locked to the base height regardless of Dynamic Mode. |
EAS Conditions and Limitations
The system may not operate correctly in the following conditions:
- There is not enough air in the suspension.
- Movement of the suspension is restricted by snow, ice, etc.
- The vehicle is tilting heavily.
- When driving on an uneven or very bumpy road.
- The vehicle is moving or turning at a high speed.
- The battery is too low.
Leveling Control automatically changes from OFF to ON when the vehicle is moving at a speed of 6 mph (10 km/h) or higher. To set leveling control to Towing Mode before attaching the trailer to ensure proper trailer setup.
Auto Idle Stop
To help maximize fuel economy, the engine automatically stops when the vehicle comes to a stop, depending on environmental and vehicle operating conditions. The indicator (green) comes on at this time.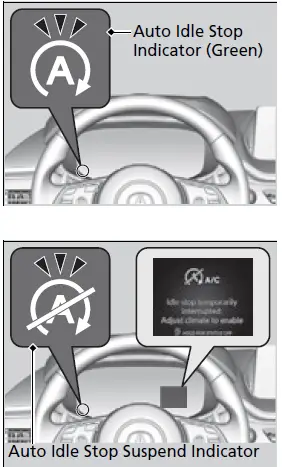
The environmental and vehicle conditions that Auto Idle Stop impact Auto Idle Stop system operation are Indicator (Green) varied.
2 Auto Idle Stop Activates When: P. 475, 476
The engine then restarts once the vehicle is about to move again, and the indicator (green) goes off.2 The Engine Automatically Restarts When: P. 477
The Auto Idle Stop suspend indicator comes on and a message appears on the driver information interface when the Auto Idle Stop system cannot be activated.
Indicators P. 86
Auto Idle Stop System ON/OFF P. 474
If the driver’s door is opened while the indicator (green) comes on, a buzzer sounds to notify you that the Auto Idle Stop function is in operation. A message associated with Auto Idle Stop appears on the driver information interface. The 12-volt battery installed in this vehicle is specifically designed for a model with Auto Idle Stop. Using a 12-volt battery other than this specified type may shorten the 12-volt battery life, and prevent Auto Idle Stop from activating. If you need to replace the 12-volt battery, make sure to select the specified type. Ask a dealer for more details.
Auto Idle Stop System ON/OFF

To turn the Auto Idle Stop system off, press this button. The Auto Idle Stop system stops.
Auto Idle Stop system will stop, the indicator will come on and a message appears on the driver information interface.
The Auto Idle Stop system is turned on every time you start the engine, even if you turned it off the last time you drove the vehicle.
If you turn off the Auto Idle Stop system while it is activated, the engine will restart. Auto Idle Stop Activates When: P. 475
If you hold the Auto Idle Stop OFF button, you can disable idle stop messages.2 Indicators P. 86
Auto Idle Stop Activates When
The vehicle stops with the shift position in (D and the brake pedal depressed. When you put the transmission into (P, the Auto Idle Stop continues to operate, even if the brake pedal is released. If you depress the brake pedal, the engine may automatically restart.
Auto Idle Stop does not activate when
- The Auto Idle Stop OFF button is pressed.
- The driver’s seat belt is not fastened.
- The engine is not adequately warmed up or coolant temperature is high.
- The transmission fluid temperature is low or high.
- The vehicle comes to a stop again before the vehicle speed reaches 3 mph (5 km/h) after the engine starts.
- The vehicle is stopped on a steep incline.
- The transmission is in a position other than (D.
- The engine is started with the hood open.
Turn off the engine. Close the hood before you restart the engine to activate Auto Idle Stop. - The battery charge is low.
- The internal temperature of the battery is 14°F (−10°C). or less.
- The climate control system is in use, and the outside temperature is below −4°F (−20°C) or over 104°F (40°C).
- The climate control system is in use, and the temperature is set to the Hi or Lo. • is ON (indicator on).
- The Integrated Dynamics System mode is changed to LIFT*, SNOW, SPORT or SPORT+* mode.
- The Auto Idle Stop is set to off on INDIVIDUAL setting screen.
- Customizing the INDIVIDUAL Settings P. 465
Do not open the hood while the Auto Idle Stop function is activated. If the hood is opened, the engine will not restart automatically.
In this case, restart the engine with the ENGINE START/STOP button.
Starting the Engine P. 443
When ACC with Low Speed Follow is in operation, the vehicle stops without depressing the brake pedal and Auto Idle Stop may activate. In such cases, the engine may restart if you change the shift position other than (D.
Pressing the ENGINE START/STOP button causes the engine to no longer restart automatically. Follow the standard procedure to start the engine.
Starting the Engine
Auto Idle Stop may not activate when
- The vehicle is stopped by braking suddenly.
- The steering wheel is operated.
- The fan speed is high.
- The climate control system is in use, and there is a significant difference between the set temperature and the actual interior temperature.
- The climate control system is in use, and humidity in the interior is high.
The Engine Automatically Restarts When
- The brake pedal is released (without the automatic brake hold system activated).
The accelerator pedal is depressed (with the automatic brake hold system activated).
Automatic Brake Hold P. 572
The engine restarts even if the brake pedal is depressed*1 when
- The Auto Idle Stop OFF button is pressed.
- The steering wheel is operated.
- The transmission is put into (R or (S, or when it is set from (N to (D.
- If you put the transmission into (P after the Auto Idle Stop activates, the Auto Idle Stop continues to operate. In this case, the engine restarts when you depress the brake pedal.
- The pressure on the brake pedal is reduced and the vehicle starts moving while stopped on an incline.
- The brake pedal is released slightly during a stop.
- The battery charge becomes low.
- The accelerator pedal is depressed.
- The driver’s seat belt is unlatched.
- is ON (indicator on).
- The climate control system is in use, and the difference between the set temperature and actual interior temperature becomes significant.
- The climate control system is being used to dehumidify the interior.
- The vehicle ahead of you starts again when your vehicle stops automatically with ACC with Low Speed Follow.
- The Integrated Dynamics System mode is changed to LIFT*, SNOW, SPORT or SPORT+* mode.
- The Auto Idle Stop is set to off on INDIVIDUAL setting screen.
- Customizing the INDIVIDUAL Settings P. 465
Not available on all models
If you are using an electronic device during Auto Idle Stop, the device may temporarily be turned off when the engine restarts.
The engine restarts even if the brake pedal is depressed*1 when:
With the automatic brake hold system activated, you can release the brake pedal while Auto Idle Stop is in operation.
If the automatic brake hold system has been turned off, or if there is a problem with the system, the engine will restart automatically when you release the brake pedal.
With the automatic brake hold system activated, you can release the brake pedal while Auto Idle Stop is in operation.
If the automatic brake hold system has been turned off, or if there is a problem with the system, the engine will restart automatically when you release the brake pedal.
Automatic Brake Hold P. 572
Starting Assist Brake Function
Briefly keeps the brake applied after releasing the brake pedal to restart the engine. This can keep your vehicle from unexpectedly moving while on an incline.
Vehicle Stability Assist TM (VSA®), aka Electronic Stability Control (ESC), System
VSA® helps to stabilize the vehicle during cornering if the vehicle turns more or less than what was intended. It also assists in maintaining traction on slippery surfaces. It does so by regulating engine output and selectively applying the brakes.
VSA® Operation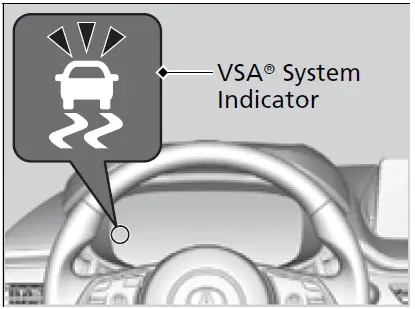
When VSA® activates, you may notice that the engine does not respond to the accelerator. You may also notice some noise from the hydraulic brake system. You will also see the indicator blink.
The VSA® may not function properly if tire type and size are mixed. Make sure to use the same size and type of tire, and the air pressures as specified. When the VSA® system indicator comes on and stays on while driving, there may be a problem with the system. While this may not interfere with normal driving, have your vehicle checked by a dealer immediately. VSA® cannot enhance stability in all driving situations and does not control the entire braking system. You still need to drive and corner at speeds appropriate for the conditions and always leave a sufficient margin of safety. The main function of the VSA® system is generally known as Electronic Stability Control (ESC). The system also includes a traction control function. The vehicle stability assist TM (VSA®) system, adaptive cruise control (ACC) with low speed follow, safety support and low tire pressure/TPMS indicators may come on in amber along with a message in the driver information interface when you set the power mode to ON after reconnecting the battery. Drive a short distance at more than 12 mph (20 km/h). Each indicator should go off. If any do not, have your vehicle checked by a dealer.
VSA® On and Off This button is on the driver side control panel. To partially disable VSA® functionality/features, press and hold it until you hear a beep. Your vehicle will have normal braking and cornering ability, but traction control function will be less effective. To restore VSA® functionality/features, press the (VSA® OFF) button until you hear a beep. VSA® is turned on every time you start the engine, even if you turned it off the last time you drove the vehicle.
This button is on the driver side control panel. To partially disable VSA® functionality/features, press and hold it until you hear a beep. Your vehicle will have normal braking and cornering ability, but traction control function will be less effective. To restore VSA® functionality/features, press the (VSA® OFF) button until you hear a beep. VSA® is turned on every time you start the engine, even if you turned it off the last time you drove the vehicle. This button is on the driver side control panel. To partially disable VSA® functionality/features, press and hold it until you hear a beep. Your vehicle will have normal braking and cornering ability, but traction control function will be less effective. To restore VSA® functionality/features, press the (VSA® OFF) button until you hear a beep. VSA® is turned on every time you start the engine, even if you turned it off the last time you drove the vehicle.
Agile Handling Assist
Lightly brakes each of the front and rear wheels, as needed, when you turn the steering wheel, and helps support the vehicle’s stability and performance during cornering. The agile handling assist cannot enhance stability in all driving situations. You still need to drive and corner at speeds appropriate for the conditions and always leave a sufficient margin of safety. When the VSA® system indicator comes on and stays on while driving, the agile handling assist does not activate. You may hear a sound coming from the engine compartment while the agile handling assist is activated. This is normal.
Super Handling-All Wheel Drive TM (SH-AWD®)
The system controls and transfers varying amounts of engine torque to each wheel in accordance with the driving conditions. SH-AWD® helps to enhance driving stability, and lets you handle situations like slippery surfaces, such as on wet, icy, or snowy roads, better than when driving with two wheel drive. However, the system does not help to enhance braking. Be precautious about the following:
- It is still your responsibility to drive safely when you steer, accelerate, and apply brakes.
Leave a sufficient margin when braking on slippery surfaces.
- The SH-AWD® system may not function properly if tire type and size are mixed. Make sure to use the same size and type of tire, and the air pressures as specified.
Tire and Wheel Replacement P. 642
Do not continuously spin the front tires of your vehicle. Continuously spinning the front tires can cause damage to the transmission and SH-AWD® unit.
If AWD temperature too hot. Do not drive. Idle engine to allow system to cool. message appears on the driver information interface while driving, it indicates the differential temperature is too high. If this happens, pull to the side of the road when it is safe, change the shift position to (P, and idle the engine until the indicator goes out.Monitors the tire pressure while you are driving. If your vehicle’s tire pressure becomes significantly low, the low tire pressure/TPMS indicator comes on and a message appears on the driver information interface.
Tire Pressure Monitoring System (TPMS) with Tire Fill Assist
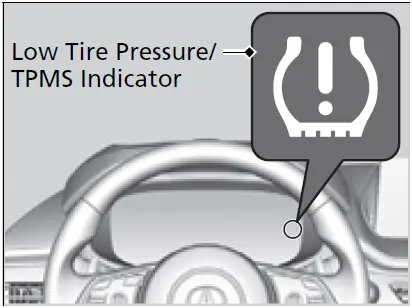
Conditions such as low ambient temperature and altitude change directly affect tire pressure and can trigger the low tire pressure/TPMS indicator to come on. If the Low Tire Pressure/TPMS Indicator Monitors the tire pressure while you are driving. If your vehicle’s tire pressure becomes significantly low, the low tire pressure/TPMS indicator comes on and a message appears on the driver information interface.
Tire pressure checked and inflated in:
- Warm weather can become under-inflated in colder weather.
- Cold weather can become overinflated in warmer weather.
The low tire pressure/TPMS indicator will not come on as a result of overinflection.
Only use genuine TPMS specified wheels since your vehicle’s wheels are equipped with the low tire pressure/TPMS sensor.
If you drive your vehicle without the genuine TPMS specified wheels, the low tire pressure/TPMS indicator blinks for one minutes and then stays on.
Tire and Wheel Replacement P. 642
The TPMS audibly and visually informs you of changes in tire pressure of the individual tire that you are adjusting using audible and visual indications. If a change in tire pressure has been significant, the system beeps and the hazard lights flash continuously for five seconds when the specified tire pressure is reached. Stop filling the tire.
Tire Pressure MonitorTo select the tire pressure monitor, set the power mode to ON, and roll the right selector wheel until you see the tire pressure screen. Tire pressure for each tire is displayed in psi.
Tire pressures low is displayed when a tire has significantly low pressure. The specific tire is displayed on the screen. The pressure displayed on the driver information interface can be slightly different from the actual pressure as measured by a gauge. If there is a significant difference between the two values, or if the low tire pressure/TPMS indicator and the message on the driver information interface do not go off after you have inflated the tire to the specified pressure, have the system checked by a dealer. Tire pressure monitor system problem. Check tire pressure. See your dealer. may appear if you drive with the compact spare tire*, or there is a problem with the TPMS.
Tire Pressure Monitoring System (TPMS) – Required Federal Explanation
Each tire, including the spare (if provided), should be checked monthly when cold and inflated to the inflation pressure recommended by the vehicle manufacturer on the vehicle placard or tire inflation pressure label. (If your vehicle has tires of a different size than the size indicated on the vehicle placard or tire inflation pressure label, you should determine the proper tire inflation pressure for those tires.) As an added safety feature, your vehicle has been equipped with a tire pressure monitoring system (TPMS) that illuminates a low tire pressure telltale ![]()
when one or more of your tires is significantly under-inflated. Accordingly, when the low tire pressure telltale illuminates, you should stop and check your tires as soon as possible, and inflate them to the proper pressure. Driving on a significantly under-inflated tire causes the tire to overheat and can lead to tire failure. Under-inflation also reduces fuel efficiency and tire tread life, and may affect the vehicle’s handling and stopping ability. Please note that the TPMS is not a substitute for proper tire maintenance, and it is the driver’s responsibility to maintain correct tire pressure, even if under-inflation has not reached the level to trigger illumination of the TPMS low tire pressure telltale. Your vehicle has also been equipped with a TPMS malfunction indicator to indicate when the system is not operating properly. The TPMS malfunction indicator is combined with the low tire pressure telltale. When the system detects a malfunction, the telltale will flash for approximately one minute and then remain continuously illuminated. This sequence will continue upon subsequent vehicle start-ups as long as the malfunction exists.
When the malfunction indicator is illuminated, the system may not be able to detect or signal low tire pressure as intended. TPMS malfunctions may occur for a variety of reasons, including the installation of replacement or alternate tires or wheels on the vehicle that prevent the TPMS from functioning properly. Always check the TPMS malfunction telltale after replacing one or more tires or wheels on your vehicle to ensure that the replacement or alternate tires and wheels allow the TPMS to continue to function properly.
Blind spot information System
Is designed to detect vehicles in specified alert zones adjacent to your vehicle, particularly in harder to see areas commonly known as “blind spots.”
When the system detects vehicles approaching from behind in adjacent lanes, the appropriate indicator comes on for a few seconds, providing assistance when you change lanes.
How the system works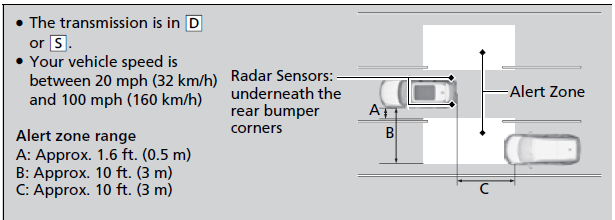
WARNING
Failure to visually confirm that it is safe to change lanes before doing so may result in a crash and serious injury or death. Do not rely only on the blind spot information system when changing lanes. Always look in your mirrors, to either side of your vehicle, and behind you for other vehicles before changing lanes.
Important Safety Reminder
Like all assistance systems, blind spot information system has limitations. Overreliance on blind spot information system may result in a collision. The blind spot information system alert indicator may not come on under the following conditions:
- A vehicle does not stay in the alert zone for more than two seconds.
- A vehicle is parked in a side lane.
- The speed difference between your vehicle and the vehicle you are passing is greater than 6 mph (10 km/h).
- An object not detected by the radar sensors approaches or passes your vehicle.
- A vehicle running in the adjacent lane is a motorcycle or other small vehicle.
When the system detects a vehicle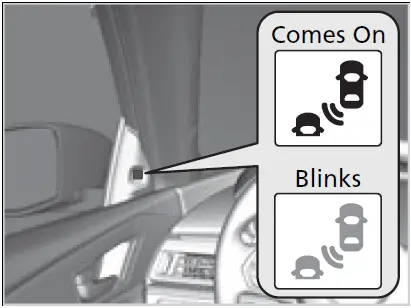
Blind spot information System Alert Indicator: Located near the pillar on both sides.
Comes on when:
- A vehicle enters the alert zone from behind to overtake you with a speed difference of no more than 31 mph (50 km/h) from your vehicle.
- You pass a vehicle with a speed difference of no more than 12 mph (20 km/h).
Blinks and the beeper sounds when
You move the turn signal lever in the direction of the detected vehicle. The beeper sounds three times.
The system is for your convenience only. Even if an object is within the alert zone, the following situations may occur.
- The blind spot information system alert indicator may not come on due to obstruction (splashes, etc.) even without the Blind spot information system not available driver information interface appearing.
- The blind spot information system alert indicator may come on even with the message appearing.
You can change the setting for the blind spot information system.
Customized Features P. 351
Turn the system off when towing a trailer.
The system may not work properly for the following reasons:
- The added mass tilts the vehicle and changes the radar coverage.
- The trailer itself can be detected by the radar sensors, causing the blind spot information system alert indicators to come on.
Blind spot information System On and Off When you turn the blind spot information system on and off, do the following.
- Press the safety support switch.
- Roll the right selector wheel to the symbol and push it.
A message appears on the driver information interface when the system turns on or off.
A check mark appears in the box and the color of the symbol changes green when the system is on. The check mark disappears and the color of the symbol changes gray when the system is off.
The blind spot information system is in the previously selected on (checked) or off (unchecked) setting each time you start the engine. You can also select the safety support content from the driver information interface.
Driver Information Interface (Right Side Area) P. 111
Blind spot information system may be adversely affected when
- Objects (guard rails, poles, trees, etc.) are detected.
- An object that does not reflect radio waves well, such as a motorcycle, is in the alert zone.
- Driving on a curved road.
- A vehicle is moving from a far lane to the adjacent lane.
- The system picks up external electrical interference.
- The rear bumper or the sensors have been improperly repaired or the rear bumper has been deformed.
- The orientation of the sensors has been changed.
- In bad weather (Heavy rain, snow, and fog).
- Making a turn at an intersection.
- Driving on a bumpy road.
- Making a short turn that slightly tilts the vehicle.
For a proper blind spot information system operation
- Always keep the rear bumper corner area clean.
- Do not cover the rear bumper corner area with labels or stickers of any kind.
- Take your vehicle to a dealer if you need the rear bumper corner area or the radar sensors to be repaired, or the rear bumper corner area is strongly impacted.
Models without Low Speed Braking Control
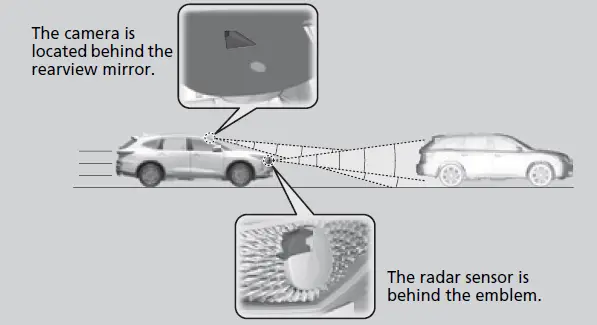
Acura Watch TM is a driver support system which employs the use of two distinctly different kinds of sensors, a radar sensor located behind the emblem, and a front sensor camera mounted to the interior side of the windshield, behind the rearview mirror.
Models with Low Speed Braking Control
Acura Watch TM is a driver support system which employs the use of three distinctly different kinds of sensors, a radar sensor located behind the emblem, a front sensor camera mounted to the interior side of the windshield, behind the rearview mirror, and the sonar sensors located in the front and rear bumpers. Acura Watch TM has the following functions.
The functions which do not require switch operations to activate
- Collision Mitigation Braking System TM (CMBSTM)
P. 495 - Low Speed Braking Control*
P. 506 - Road Departure Mitigation System
P. 550 - Traffic Sign Recognition System
P. 556
The functions which require switch operations to activate
- Adaptive Cruise Control (ACC) with Low Speed Follow
P. 512 - Lane Keeping Assist System (LKAS)
P. 529 - Traffic Jam Assist
P. 538
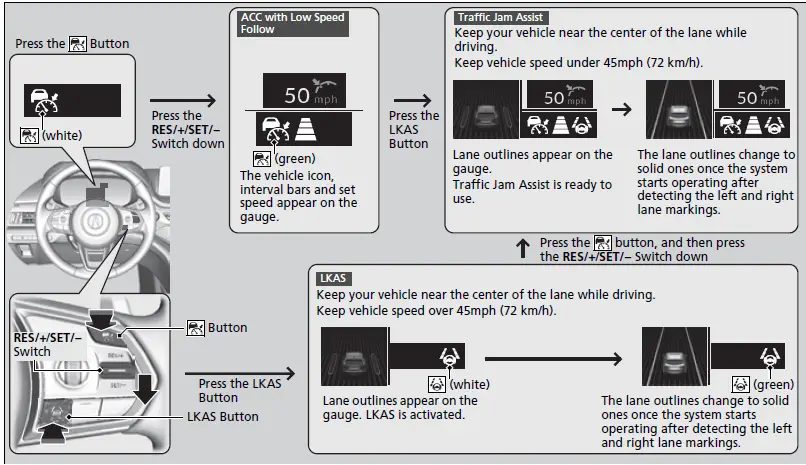
Operation Switches for the ACC with Low Speed Follow/LKAS/Traffic Jam Assist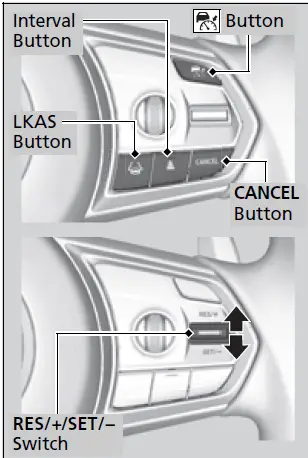
Button
Press to activate standby mode for ACC with Low Speed Follow and Traffic Jam Assist. Or press to cancel these systems.
LKAS Button
Press to activate standby mode for LKAS and Traffic Jam Assist. Or press to cancel these systems.
Interval Button
Press to change the ACC with Low Speed Follow following-interval.
CANCEL Button
Press to cancel ACC with Low Speed Follow.
RES/+/SET/− Switch
Press the RES/+/SET/– switch up to set or resume the ACC with Low Speed Follow or increase the vehicle speed.
Press the RES/+/SET/– switch down to set the ACC with Low Speed Follow or decrease the vehicle speed.
Gauge Content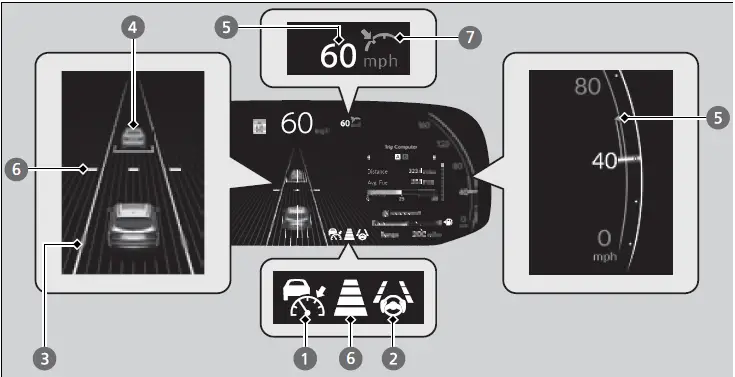 You can see the current state of ACC with Low Speed Follow, LKAS and Traffic Jam Assist. When both of a and b indicates, Traffic Jam Assist is ready to be activated. a Indicates that ACC with Low Speed Follow is ready to be activated.
- White: The system is in standby.
- Green: The system is on.
- Amber: There is a problem with the system.
Indicates that LKAS is ready to be activated
- White: The system is in standby.
- Green: The system is on.
- Amber: There is a problem with the system.
- Indicates that LKAS or Traffic Jam Assist is activated and whether or not traffic lane lines are detected.
Solid line: The system is on. - Lane outline: The system is in standby.
- Indicates whether or not ACC with Low Speed Follow detected the vehicle ahead. e Shows vehicle set speed in ACC with Low Speed Follow.
- Shows set vehicle interval in ACC with Low Speed Follow.
- Indicates that ACC with Low Speed Follow shows the setting status.
Green: The system is on.
Outlined: The system is not activated.
Models with Head-up display
You can have the head-up display show you the current state of each function.
Head-Up Display* P. 125
How to Operate the Buttons on the Steering Wheel
To activate ACC with Low Speed Follow, LKAS, and Traffic Jam Assist, carry out the following steps:
Collision Mitigation Braking System TM (CMBSTM)
The system can assist you when it determines there is a possibility of your vehicle colliding with a vehicle or a pedestrian detected in front of your vehicle. The CMBSTM is designed to alert you when the potential for a collision is determined, as well as to reduce your vehicle speed to help minimize collision severity when a collision is deemed unavoidable.
For directions on the proper handling of the radar sensor, refer to the following page.
Radar Sensor P. 564
You can read about handling information for the camera equipped with this system.
Front Sensor Camera P. 562
Important Safety Reminder
The CMBSTM is designed to reduce the severity of an unavoidable collision. It does not prevent a collision nor stop the vehicle automatically. It is still your responsibility to operate the brake pedal and steering wheel appropriately according to the driving conditions.
The CMBSTM may not activate or may not detect a vehicle in front of your vehicle under certain conditions:
CMBSTM Conditions and Limitations P. 500
The CMBSTM is not activated for about 15 seconds after the power system is turned on.
How the System Works
 The system starts monitoring the roadway ahead when your vehicle speed is about 3 mph (5 km/h) or above and will search for a vehicle in front of you.
The CMBSTM activates when:
- The speed difference between your vehicle and a vehicle or pedestrian detected in front of you becomes about 3 mph (5 km/h) and over with a chance of a collision.
- Your vehicle speed is about 62 mph (100 km/h) or less and the system determines there is a chance of a collision with:
- Vehicles detected in front of you that are stationary, oncoming, or traveling in your same direction.
- A pedestrian who is detected in front of you.
- Your vehicle speed is above 62 mph (100 km/h), and the system determines there is a chance of a collision with a vehicle detected in front of you traveling in your same direction.
When the CMBSTM activates, it may automatically apply the brake. It will be canceled when your vehicle stops or a potential collision is not determined.
When the system activates
The system provides visual and audible alerts of a possible collision, and stops if the collision is avoided. Take appropriate action to prevent a collision (apply the brakes, change lanes, etc.)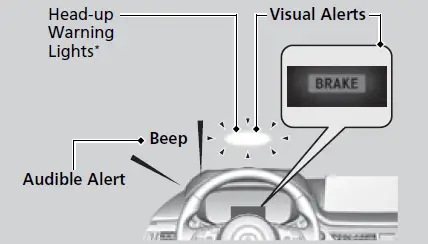 You can change the distance (Long/Normal/Short) between vehicles at which the system’s earliest collision alert will come on through driver information interface setting options.
List of customizable options P. 360
The camera in the CMBSTM is also designed to detect pedestrians. However, this pedestrian detection feature may not activate or may not detect a pedestrian in front of your vehicle under certain conditions. Refer to the ones indicating the pedestrian detection limitations from the list.
CMBSTM Conditions and Limitations P. 500
The head-up warning* uses a lens located at the front end of the dashboard. Do not cover the lens or spill any liquid on it.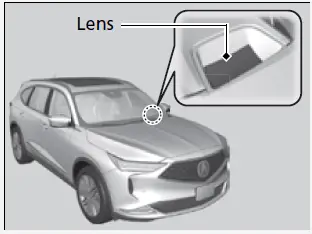 Collision Alert Stages
The system has three alert stages for a possible collision. However, depending on circumstances, the CMBSTM may not go through all of the stages before initiating the last stage.
|
Distance between vehicles |
CMBSTM | |||
| The sensors detect a vehicle | Audible & Visual WARNINGS | Braking | ||
|
Stage one |
Normal Long Short
Your Vehicle Vehicle Ahead |
There is a risk of a collision with the vehicle ahead of you.
|
When in Long, visual and audible alerts come on at a longer distance from a vehicle ahead than in Normal setting, and in Short, at a shorter distance than in Normal. |
— |
|
Stage two |
Your Vehicle Vehicle Ahead
|
The risk of a collision has increased, time to respond is reduced. |
Visual and audible alerts. | Lightly applied |
|
Stage three |
Your Vehicle Vehicle Ahead
|
The CMBSTM determines that a collision is unavoidable. |
Forcefully applied | |
CMBSTM On and Off When you turn the CMBSTM on and off, do the following.
- Press the safety support switch.
- Roll the right selector wheel to the
 symbol and push it.
A message appears on the driver information interface when the system turns on or off.
A check mark appears in the box and the color of the symbol changes green when the system is on. The check mark disappears and the color of the symbol changes gray when the system is off.
The CMBSTM is turned on every time you start the engine, even if you turned it off the last time you drove the vehicle.
The CMBSTM may automatically shut off, and the safety support indicator (amber) will come and stay on under certain conditions:
CMBSTM Conditions and Limitations P. 500
You can also select the safety support content from the driver information interface.
Driver Information Interface (Right Side Area) P. 111
When the CMBSTM is activated, it will continue to operate even if the accelerator pedal is partially depressed. However, it will be canceled if the accelerator pedal is fully depressed. The vehicle stability assist TM (VSA®) system, adaptive cruise control (ACC) with low speed follow, safety support and low tire pressure/TPMS indicators may come on in amber along with a message in the driver information interface when you set the power mode to ON after reconnecting the battery. Drive a short distance at more than 12 mph (20 km/h). Each indicator should go off. If any do not, have your vehicle checked by a dealer. Have your vehicle checked by a dealer if you find any unusual behavior of the system (e.g., the warning message appears too frequently).
CMBSTM Conditions and Limitations
The system may automatically shut off and the safety support indicator (amber) will come on under certain conditions. Some examples of these conditions are listed below. Other conditions may reduce some of the CMBSTM functions.
Front Sensor Camera P. 562
Radar Sensor P. 564
Environmental conditions
- Driving in bad weather (rain, fog, snow, etc.).
- Sudden changes between light and dark, such as an entrance or exit of a tunnel.
- There is little contrast between objects and the background.
- Driving into low sunlight (e.g., at dawn or dusk).
- Strong light is reflected onto the roadway.
- Driving in the shadows of trees, buildings, etc.
- Roadway objects or structures are misinterpreted as vehicles and pedestrians.
- Reflections on the interior of the windshield.
- Driving at night or in a dark condition such as a tunnel.
Roadway conditions
- Driving on a snowy or wet roadway (obscured lane marking, vehicle tracks, reflected lights, road spray, high contrast).
Driving on curvy, winding, or undulating roads.
The road is hilly or the vehicle is approaching the crest of a hill.
Vehicle conditions
- Headlight lenses are dirty or the headlights are not properly adjusted.
- The outside of the windshield is blocked by dirt, mud, leaves, wet snow, etc.
- The inside of the windshield is fogged.
- An abnormal tire or wheel condition (incorrect sizes, varied sizes or construction, improperly inflated, compact spare tire*, etc.).
- When tire chains are installed.
- The vehicle is tilted due to a heavy load or suspension modifications.
- The camera temperature gets too high.
- Driving with the parking brake applied.
- When the radar sensor behind the emblem gets dirty.
- The vehicle is towing a trailer.
Models with Electronic Air Suspension (EAS)
- The EAS is malfunctioning.
Detection limitations
- A vehicle or pedestrian suddenly crosses in front of you.
- The distance between your vehicle and the vehicle or pedestrian ahead of you is too short.
- A vehicle cuts in front of you at a slow speed, and it brakes suddenly.
- When you accelerate rapidly and approach the vehicle or pedestrian ahead of you at high speed.
- The vehicle ahead of you is a motorcycle, bicycle, mobility scooter or other small vehicle.
When there are animals in front of your vehicle. - When you drive on a curved, winding or undulating road that makes it difficult for the sensor to properly detect a vehicle in front of you.
- The speed difference between your vehicle and a vehicle or pedestrian in front of you is significantly large.
- An oncoming vehicle suddenly comes in front of you.
- Another vehicle suddenly comes in front of you at an intersection, etc.
- Your vehicle abruptly crosses over in front of an oncoming vehicle.
- When driving through a narrow iron bridge.
- When the lead vehicle suddenly slows down.
Limitations applicable to pedestrian detection only
- When there is a group of people in front of your vehicle walking together side by side.
- Surrounding conditions or belongings of the pedestrian alter the pedestrian’s shape, preventing the system from recognizing that the person is a pedestrian.
- When the pedestrian is slouching or squatting.
- When the pedestrian is shorter than about 3.3 feet (1 meter) or taller than about 6.6 feet (2 meter) in height.
- When a pedestrian blends in with the background.
- When a pedestrian is bent over or squatting, or when their hands are raised or they are running.
- When several pedestrians are walking ahead in a group.
- When the camera cannot correctly identify that a pedestrian is present due to an unusual shape (holding luggage, body position, size).
Automatic shutoff
The CMBSTM may automatically shut itself off and the safety support indicator (amber) comes and stays on when:
The temperature inside the system is high.
You drive off-road or on a mountain road, or curved and winding road for an extended period.
An abnormal tire condition is detected (incorrect tire size, flat tire, etc.).
The camera behind the rearview mirror, or the area around the camera, including the windshield, gets dirty.
Once the conditions that caused CMBSTM to shut off improve or are addressed (e.g., cleaning), the system comes back on.
With Little Chance of a Collision
The CMBSTM may activate even when you are aware of a vehicle ahead of you, or when there is no vehicle ahead. Some examples of this are:
When Passing
Your vehicle approaches another vehicle ahead of you and you change lanes to pass.
At an intersection
Your vehicle approaches or passes another vehicle that is making a left or right turn.
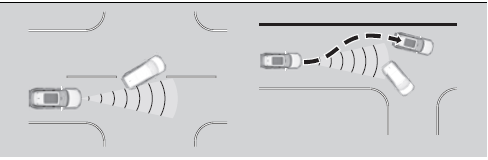
On a curve
When driving through curves, your vehicle comes to a point where an oncoming vehicle is right in front of you.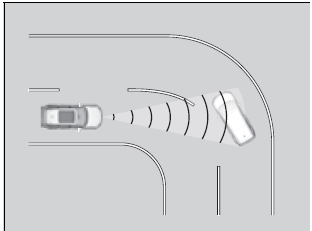
Through a low bridge at high speed
You drive under a low or narrow bridge at high speed.
- Speed bumps, road work sites, train tracks, roadside objects, etc.
You drive over speed bumps, steel road plates, etc., or your vehicle approaches train tracks or roadside objects [such as a traffic sign and guard rail] on a curve or, when parking, stationary vehicles and walls.
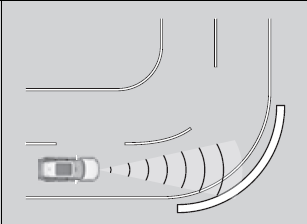
Low Speed Braking Control
Using sonar sensors located on the front and rear bumpers, this system can detect if there is danger of a potential collision with a wall or other obstacle during normal driving or when the accelerator pedal is depressed with too much force. The system then assists in avoiding collisions and reducing damage from impact through assistive braking and/or assistive driving power suppression.
WARNING
The Low Speed Braking Control System cannot avoid all collisions and may not reduce damage in each situation where the accelerator is mistakenly or aggressively pressed. Overreliance on the system may result in a collision with serious injury or death. Always check your surroundings, your shift position, and your pedal use. Driver remains responsible for safely operating the vehicle. If the Low Speed Braking Control activates in a situation where you do not want automatic brake application (such as when the vehicle is between two railroad crossing gates), simply press the brake pedal to deactivate the system and then continue to drive as intended.
How the System Works
Assistive braking
Assistive braking provides a visual and audible alert when the vehicle is moving between approximately 1 and 6 mph (2 and 10 km/h) and there is the possibility of a collision with a detected wall or other obstacles, as well as providing assistance with braking.
Leveling Control
You should change the system settings depending on the situation.
Customized Features P. 351
| Setting | Explanation |
| ON | Used when driving normally. The vehicle height changes depending on the Dynamic Mode. |
| OFF | Used when raising the vehicle with a jack, such as during a tire change, or when emergency towing is required.
2 Changing a Flat Tire P. 661 2 Emergency Towing P. 725 The vehicle height is locked to the one in use when the setting is changed and turns off Auto Leveling. |
| Towing Mode | Used when towing a trailer. The vehicle height is locked to the base height regardless of Dynamic Mode. |
EAS Conditions and Limitations
The system may not operate correctly in the following conditions:
- There is not enough air in the suspension.
- Movement of the suspension is restricted by snow, ice, etc.
- The vehicle is tilting heavily.
- When driving on an uneven or very bumpy road.
- The vehicle is moving or turning at a high speed.
- The battery is too low.
Leveling Control automatically changes from OFF to ON when the vehicle is moving at a speed of 6 mph (10 km/h) or higher.
To set leveling control to Towing Mode before attaching the trailer to ensure proper trailer setup.
Auto Idle Stop
To help maximize fuel economy, the engine automatically stops when the vehicle comes to a stop, depending on environmental and vehicle operating conditions. The indicator (green) comes on at this time.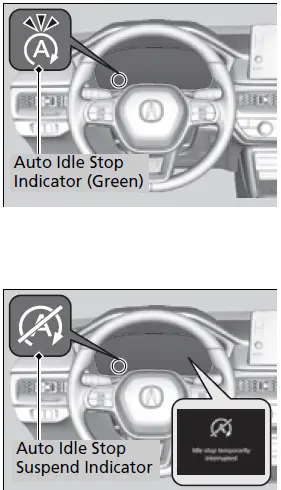 The environmental and vehicle conditions that impact Auto Idle Stop system operation are varied.
Auto Idle Stop Activates When: P. 475, 476
The engine then restarts once the vehicle is about to move again, and the indicator (green) goes off.
The Engine Automatically Restarts When: P. 477
The Auto Idle Stop suspend indicator comes on and a message appears on the driver information interface when the Auto Idle Stop system cannot be activated.
Indicators P. 86
Auto Idle Stop System ON/OFF P. 474
If the driver’s door is opened while the indicator (green) comes on, a buzzer sounds to notify you that the Auto Idle Stop function is in operation.
A message associated with Auto Idle Stop appears on the driver information interface.
Indicators P. 86
The 12-volt battery installed in this vehicle is specifically designed for a model with Auto Idle Stop. Using a 12-volt battery other than this specified type
may shorten the 12-volt battery life, and prevent Auto Idle Stop from activating. If you need to replace the 12-volt battery, make sure to select the specified
type. Ask a dealer for more details.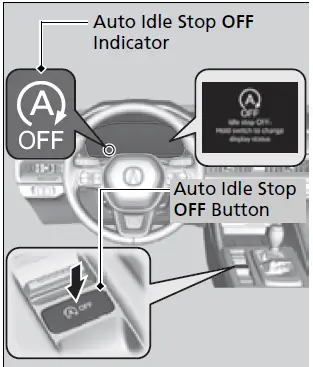 To turn the Auto Idle Stop system off, press this button. The Auto Idle Stop system stops. Auto Idle Stop system will stop, the indicator will come on and a message appears on the driver information interface. The Auto Idle Stop system is turned on every time you start the engine, even if you turned it off the last time you drove the vehicle.
If you turn off the Auto Idle Stop system while it is activated, the engine will restart.
Auto Idle Stop Activates When: P. 475
If you hold the Auto Idle Stop OFF button, you can disable idle stop messages.
Indicators P. 86
Auto Idle Stop Activates When
The vehicle stops with the shift position in (D and the brake pedal depressed. When you put the transmission into (P, the Auto Idle Stop continues to operate, even if the brake pedal is released.
If you depress the brake pedal, the engine may automatically restart.
Auto Idle Stop does not activate when
- The Auto Idle Stop OFF button is pressed.
- The driver’s seat belt is not fastened.
- The engine is not adequately warmed up or coolant temperature is high.
- The transmission fluid temperature is low or high.
- The vehicle comes to a stop again before the vehicle speed reaches 3 mph (5 km/h) after the engine starts.
- The vehicle is stopped on a steep incline.
- The transmission is in a position other than (D.
- The engine is started with the hood open.
Turn off the engine. Close the hood before you restart the engine to activate Auto Idle Stop. - The battery charge is low.
- The internal temperature of the battery is 14°F (−10°C). or less.
- The climate control system is in use, and the outside temperature is below −4°F (−20°C) or over 104°F (40°C).
- The climate control system is in use, and the temperature is set to the Hi or Lo. • is ON (indicator on).
- The Integrated Dynamics System mode is changed to LIFT*, SNOW, SPORT or SPORT+* mode.
- The Auto Idle Stop is set to off on INDIVIDUAL setting screen.
- Customizing the INDIVIDUAL Settings P. 465
Do not open the hood while the Auto Idle Stop function is activated. If the hood is opened, the engine will not restart automatically.
In this case, restart the engine with the ENGINE START/STOP button.
Starting the Engine P. 443
When ACC with Low Speed Follow is in operation, the vehicle stops without depressing the brake pedal and Auto Idle Stop may activate. In such cases, the engine may restart if you change the shift position other than (D. Pressing the ENGINE START/STOP button causes the engine to no longer restart automatically. Follow the standard procedure to start the engine.
Auto Idle Stop may not activate when
- The vehicle is stopped by braking suddenly.
- The steering wheel is operated.
- The fan speed is high.
- The climate control system is in use, and there is a significant difference between the set temperature and the actual interior temperature.
- The climate control system is in use, and humidity in the interior is high.
The Engine Automatically Restarts When
- The brake pedal is released (without the automatic brake hold system activated).
- The accelerator pedal is depressed (with the automatic brake hold system activated).
The engine restarts even if the brake pedal is depressed*1 when
- The Auto Idle Stop OFF button is pressed.
- The steering wheel is operated.
- The transmission is put into (R or (S, or when it is set from (N to (D.
- If you put the transmission into (P after the Auto Idle Stop activates, the Auto Idle Stop continues to operate. In this case, the engine restarts when you depress the brake pedal.
- The pressure on the brake pedal is reduced and the vehicle starts moving while stopped on an incline.
- The brake pedal is released slightly during a stop.
- The battery charge becomes low.
- The accelerator pedal is depressed.
- The driver’s seat belt is unlatched is ON (indicator on).
- The climate control system is in use, and the difference between the set temperature and actual interior temperature becomes significant.
- The climate control system is being used to dehumidify the interior.
- The vehicle ahead of you starts again when your vehicle stops automatically with ACC with Low Speed Follow.
- The Integrated Dynamics System mode is changed to LIFT*, SNOW, SPORT or SPORT+* mode.
- The Auto Idle Stop is set to off on INDIVIDUAL setting screen.
- Customizing the INDIVIDUAL Settings P. 465
If you are using an electronic device during Auto Idle Stop, the device may temporarily be turned off when the engine restarts.*1: With the automatic brake hold system activated, you can release the brake pedal while Auto Idle Stop is in operation. If the automatic brake hold system has been turned off, or if there is a problem with the system, the engine will restart automatically when you release the brake pedal.
Starting Assist Brake Function
Briefly keeps the brake applied after releasing the brake pedal to restart the engine. This can keep your vehicle from unexpectedly moving while on an incline.
Vehicle Stability Assist (VSA), aka Electronic Stability Control (ESC), System
VSA® helps to stabilize the vehicle during cornering if the vehicle turns more or less than what was intended. It also assists in maintaining traction on slippery surfaces. It does so by regulating engine output and selectively applying the brakes.
VSA OperationWhen VSA® activates, you may notice that the engine does not respond to the accelerator. You may also notice some noise from the hydraulic brake system. You will also see the indicator blink.
The VSA® may not function properly if tire type and size are mixed. Make sure to use the same size and type of tire, and the air pressures as specified.
When the VSA® system indicator comes on and stays on while driving, there may be a problem with the system. While this may not interfere with normal driving, have your vehicle checked by a dealer immediately. VSA® cannot enhance stability in all driving situations and does not control the entire braking system. You still need to drive and corner at speeds appropriate for the conditions and always leave a sufficient margin of safety. The main function of the VSA® system is generally known as Electronic Stability Control (ESC). The system also includes a traction control function. The vehicle stability assist TM (VSA®) system, adaptive cruise control (ACC) with low speed follow, safety support and low tire pressure/TPMS indicators may come on in amber along with a message in the driver information interface when you set the power mode to ON after reconnecting the battery. Drive a short distance at more than 12 mph (20 km/h). Each indicator should go off. If any do not, have your vehicle checked by a dealer.
VSA On and Off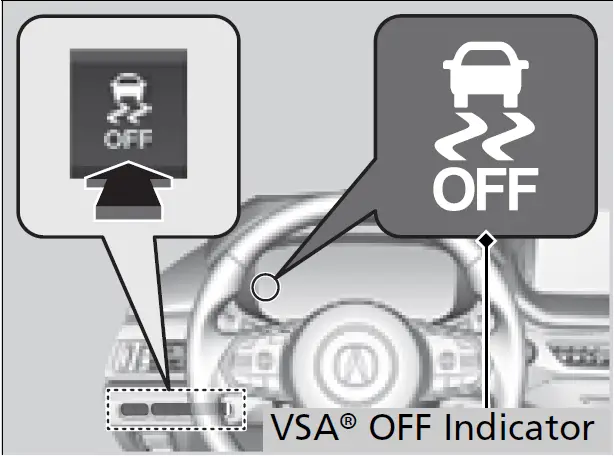
This button is on the driver side control panel. To partially disable VSA® functionality/features, press and hold it until you hear a beep. Your vehicle will have normal braking and cornering ability, but traction control function will be less effective. To restore VSA® functionality/features, press the (VSA® OFF) button until you hear a beep. VSA® is turned on every time you start the engine, even if you turned it off the last time you drove the vehicle. In certain unusual conditions when your vehicle gets stuck in shallow mud or fresh snow, it may be easier to free it with the VSA® temporarily switched off. When the button is pressed, the traction control function becomes less effective. This allows for the wheels to spin more freely at low speed. You should only attempt to free your vehicle with the VSA® off if you are not able to free it when the VSA® is on. Immediately after freeing your vehicle, be sure to switch VSA® on again. We do not recommend driving your vehicle with the VSA® system switched off. You may hear a motor sound coming from the engine compartment while system checks are being performed immediately after starting the engine or while driving. This is normal.
Agile Handling Assist
Lightly brakes each of the front and rear wheels, as needed, when you turn the steering wheel, and helps support the vehicle’s stability and performance during cornering.
The agile handling assist cannot enhance stability in all driving situations. You still need to drive and corner at speeds appropriate for the conditions and always leave a sufficient margin of safety. When the VSA® system indicator comes on and stays on while driving, the agile handling assist does not activate.
You may hear a sound coming from the engine compartment while the agile handling assist is activated. This is normal.
Super Handling-All Wheel Drive TM (SH-AWD)
The system controls and transfers varying amounts of engine torque to each wheel in accordance with the driving conditions. SH-AWD® helps to enhance driving stability, and lets you handle situations like slippery surfaces, such as on wet, icy, or snowy roads, better than when driving with two wheel drive. However, the system does not help to enhance braking. Be precautious about the following:
- It is still your responsibility to drive safely when you steer, accelerate, and apply brakes.
- Leave a sufficient margin when braking on slippery surfaces.
The SH-AWD® system may not function properly if tire type and size are mixed. Make sure to use the same size and type of tire, and the air pressures as specified.
Tire and Wheel Replacement P. 642
Do not continuously spin the front tires of your vehicle. Continuously spinning the front tires can cause damage to the transmission and SH-AWD® unit.
If AWD temperature too hot. Do not drive. Idle engine to allow system to cool. message appears on the driver information interface while driving, it indicates the differential temperature is too high. If this happens, pull to the side of the road when it is safe, change the shift position to (P, and idle the engine until the indicator goes out.
Tire Pressure Monitoring System (TPMS) with Tire Fill AssistMonitors the tire pressure while you are driving. If your vehicle’s tire pressure becomes significantly low, the low tire pressure/TPMS indicator comes on and a message appears on the driver information interface.
Conditions such as low ambient temperature and altitude change directly affect tire pressure and can trigger the low tire pressure/TPMS indicator to come on. If the Low Tire Pressure/TPMS Indicator Comes On or Blinks P. 712
Tire pressure checked and inflated in:
- Warm weather can become under-inflated in colder weather.
- Cold weather can become overinflated in warmer weather.
The low tire pressure/TPMS indicator will not come on as a result of over inflation.
Only use genuine TPMS specified wheels since your vehicle’s wheels are equipped with the low tire pressure/TPMS sensor.
If you drive your vehicle without the genuine TPMS specified wheels, the low tire pressure/TPMS indicator blinks for one minutes and then stays on.
Tire and Wheel Replacement P. 642
The TPMS audibly and visually informs you of changes in tire pressure of the individual tire that you are adjusting using audible and visual indications.
If a change in tire pressure has been significant, the system beeps and the hazard lights flash continuously for five seconds when the specified tire pressure is reached. Stop filling the tire.
Tire Pressure Monitor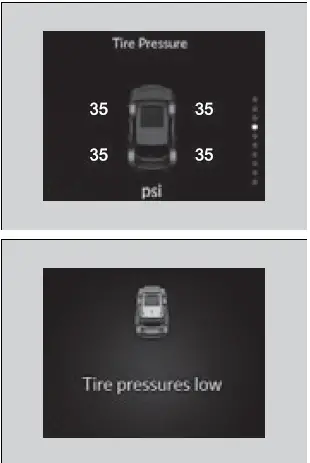
To select the tire pressure monitor, set the power mode to ON, and roll the right selector wheel until you see the tire pressure screen.
Tire pressure for each tire is displayed in psi. Tire pressures low is displayed when a tire has significantly low pressure. The specific tire is displayed on the screen.
The pressure displayed on the driver information interface can be slightly different from the actual pressure as measured by a gauge. If there is a significant difference between the two values, or if the low tire pressure/TPMS indicator and the message on the driver information interface do not go off after you have inflated the tire to the specified pressure, have the system checked by a dealer. Tire pressure monitor system problem. Check tire pressure. See your dealer. may appear if you drive with the compact spare tire*, or there is a problem with the TPMS.
Tire Pressure Monitoring System (TPMS) – Required Federal Explanation
Each tire, including the spare (if provided), should be checked monthly when cold and inflated to the inflation pressure recommended by the vehicle manufacturer on the vehicle placard or tire inflation pressure label. (If your vehicle has tires of a different size than the size indicated on the vehicle placard or tire inflation pressure label, you should determine the proper tire inflation pressure for those tires.) As an added safety feature, your vehicle has been equipped with a tire pressure monitoring system (TPMS) that illuminates a low tire pressure telltale when one or more of your tires is significantly under-inflated. Accordingly, when the low tire pressure telltale illuminates, you should stop and check your tires as soon as possible, and inflate them to the proper pressure. Driving on a significantly under-inflated tire causes the tire to overheat and can lead to tire failure. Under-inflation also reduces fuel efficiency and tire tread life, and may affect the vehicle’s handling and stopping ability. Please note that the TPMS is not a substitute for proper tire maintenance, and it is the driver’s responsibility to maintain correct tire pressure, even if under-inflation has not reached the level to trigger illumination of the TPMS low tire pressure telltale.
Your vehicle has also been equipped with a TPMS malfunction indicator to indicate when the system is not operating properly. The TPMS malfunction indicator is combined with the low tire pressure telltale. When the system detects a malfunction, the telltale will flash for approximately one minute and then remain continuously illuminated. This sequence will continue upon subsequent vehicle start-ups as long as the malfunction exists. When the malfunction indicator is illuminated, the system may not be able to detect or signal low tire pressure as intended. TPMS malfunctions may occur for a variety of reasons, including the installation of replacement or alternate tires or wheels on the vehicle that prevent the TPMS from functioning properly. Always check the TPMS malfunction telltale after replacing one or more tires or wheels on your vehicle to ensure that the replacement or alternate tires and wheels allow the TPMS to continue to function properly.
Blind spot information System
Is designed to detect vehicles in specified alert zones adjacent to your vehicle, particularly in harder to see areas commonly known as “blind spots.”
When the system detects vehicles approaching from behind in adjacent lanes, the appropriate indicator comes on for a few seconds, providing assistance when you change lanes.
How the system works
WARNING
Failure to visually confirm that it is safe to change lanes before doing so may result in a crash and serious injury or death. Do not rely only on the blind spot information system when changing lanes. Always look in your mirrors, to either side of your vehicle, and behind you for other vehicles before changing lanes.
Important Safety Reminder
Like all assistance systems, blind spot information system has limitations. Overreliance on blind spot information system may result in a collision.
The blind spot information system alert indicator may not come on under the following conditions:
- A vehicle does not stay in the alert zone for more than two seconds.
- A vehicle is parked in a side lane.
- The speed difference between your vehicle and the vehicle you are passing is greater than 6 mph (10 km/h).
- An object not detected by the radar sensors approaches or passes your vehicle.
- A vehicle running in the adjacent lane is a motorcycle or other small vehicle.
When the system detects a vehicle
Blind spot information System Alert Indicator: Located near the pillar on both sides.
Comes on when:
- A vehicle enters the alert zone from behind to overtake you with a speed difference of no more than 31 mph (50 km/h) from your vehicle.
- You pass a vehicle with a speed difference of no more than 12 mph (20 km/h).
Blinks and the beeper sounds when
You move the turn signal lever in the direction of the detected vehicle. The beeper sounds three times.
The system is for your convenience only. Even if an object is within the alert zone, the following situations may occur.
- The blind spot information system alert indicator may not come on due to obstruction (splashes, etc.) even without the Blind spot information system not available driver information interface appearing.
- The blind spot information system alert indicator may come on even with the message appearing.
You can change the setting for the blind spot information system.
Customized Features P. 351
Turn the system off when towing a trailer. The system may not work properly for the following reasons:
- The added mass tilts the vehicle and changes the radar coverage.
- The trailer itself can be detected by the radar sensors, causing the blind spot information system alert indicators to come on.
Blind spot information System On and OffWhen you turn the blind spot information system on and off, do the following.
- Press the safety support switch.
- Roll the right selector wheel to the symbol and push it.
A message appears on the driver information interface when the system turns on or off.
A check mark appears in the box and the color of the symbol changes green when the system is on. The check mark disappears and the color of the symbol changes gray when the system is off.
The blind spot information system is in the previously selected on (checked) or off (unchecked) setting each time you start the engine. You can also select the safety support content from the driver information interface.
Driver Information Interface (Right Side Area) P. 111
Blind spot information system may be adversely affected when:
- Objects (guard rails, poles, trees, etc.) are detected.
- An object that does not reflect radio waves well, such as a motorcycle, is in the alert zone.
- Driving on a curved road.
- A vehicle is moving from a far lane to the adjacent lane.
- The system picks up external electrical interference.
- The rear bumper or the sensors have been improperly repaired or the rear bumper has been deformed.
- The orientation of the sensors has been changed.
- In bad weather (Heavy rain, snow, and fog).
- Making a turn at an intersection.
- Driving on a bumpy road.
- Making a short turn that slightly tilts the vehicle.
- For a proper blind spot information system operation:
- Always keep the rear bumper corner area clean.
- Do not cover the rear bumper corner area with labels or stickers of any kind.
- Take your vehicle to a dealer if you need the rear bumper corner area or the radar sensors to be repaired, or the rear bumper corner area is strongly impacted.
Acura Watch
Models without Low Speed Braking Control
Acura Watch TM is a driver support system which employs the use of two distinctly different kinds of sensors, a radar sensor located behind the emblem, and a front sensor camera mounted to the interior side of the windshield, behind the rearview mirror.
Models with Low Speed Braking Control
Acura Watch TM is a driver support system which employs the use of three distinctly different kinds of sensors, a radar sensor located behind the emblem, a front sensor camera mounted to the interior side of the windshield, behind the rearview mirror, and the sonar sensors located in the front and rear bumpers.
Acura Watch TM has the following functions
- Collision Mitigation Braking System (CMBS) P. 495
- Low Speed Braking Control* P. 506
- Road Departure Mitigation System P. 550
- Traffic Sign Recognition System P. 556
The functions which do not require switch operations to activate.
The functions which require switch operations to activate
- Adaptive Cruise Control (ACC) with Low Speed Follow P. 512
- Lane Keeping Assist System (LKAS) P. 529
- Traffic Jam Assist P. 538
Operation Switches for the ACC with Low Speed Follow/LKAS/Traffic Jam Assist
Button
Press to activate standby mode for ACC with Low Speed Follow and Traffic Jam Assist. Or press to cancel these systems.
LKAS Button
Press to activate standby mode for LKAS and Traffic Jam Assist. Or press to cancel these systems.
Interval Button
Press to change the ACC with Low Speed Follow following-interval.
CANCEL Button
Press to cancel ACC with Low Speed Follow.
RES/+/SET/− Switch
Press the RES/+/SET/– switch up to set or resume the ACC with Low Speed Follow or increase the vehicle speed. Press the RES/+/SET/– switch down to set the ACC with Low Speed Follow or decrease the vehicle speed.
Gauge Content
You can see the current state of ACC with Low Speed Follow, LKAS and Traffic Jam Assist. When both of a and b indicates, Traffic Jam Assist is ready to be activated. a Indicates that ACC with Low Speed Follow is ready to be activated.
- White: The system is in standby.
- Green: The system is on.
- Amber: There is a problem with the system.
Indicates that LKAS is ready to be activated
- White: The system is in standby.
- Green: The system is on.
- Amber: There is a problem with the system.
indicates that LKAS or Traffic Jam Assist is activated and whether or not traffic lane lines are detected. - Solid line: The system is on.
- Lane outline: The system is in standby.
- Indicates whether or not ACC with Low Speed Follow detected the vehicle ahead.
- Shows vehicle set speed in ACC with Low Speed Follow.
- Shows set vehicle interval in ACC with Low Speed Follow.
- Indicates that ACC with Low Speed Follow shows the setting status.
- Green: The system is on.
- Outlined: The system is not activated.
Models with Head-up display
You can have the head-up display show you the current state of each function.
Head-Up Display* P. 125
How to Operate the Buttons on the Steering Wheel
To activate ACC with Low Speed Follow, LKAS, and Traffic Jam Assist, carry out the following steps:
Collision Mitigation Braking System (CMBSTM)
The system can assist you when it determines there is a possibility of your vehicle colliding with a vehicle or a pedestrian detected in front of your vehicle. The CMBSTM is designed to alert you when the potential for a collision is determined, as well as to reduce your vehicle speed to help minimize collision severity when a collision is deemed unavoidable.
For directions on the proper handling of the radar sensor, refer to the following page.
Radar Sensor P. 564
You can read about handling information for the camera equipped with this system.
Front Sensor Camera P. 562
Important Safety Reminder
The CMBSTM is designed to reduce the severity of an unavoidable collision. It does not prevent a collision nor stop the vehicle automatically. It is still your responsibility to operate the brake pedal and steering wheel appropriately according to the driving conditions. The CMBSTM may not activate or may not detect a vehicle in front of your vehicle under certain conditions:
CMBSTM Conditions and Limitations P. 500
The CMBSTM is not activated for about 15 seconds after the power system is turned on.
How the System Works
The system starts monitoring the roadway ahead when your vehicle speed is about 3 mph (5 km/h) or above and will search for a vehicle in front of you.
The CMBSTM activates when:
- The speed difference between your vehicle and a vehicle or pedestrian detected in front of you becomes about 3 mph (5 km/h) and over with a chance of a collision.
- Your vehicle speed is about 62 mph (100 km/h) or less and the system determines there is a chance of a collision with:
- Vehicles detected in front of you that are stationary, oncoming, or traveling in your same direction.
- A pedestrian who is detected in front of you.
- Your vehicle speed is above 62 mph (100 km/h), and the system determines there is a chance of a collision with a vehicle detected in front of you traveling in your same direction.
When the CMBSTM activates, it may automatically apply the brake. It will be canceled when your vehicle stops or a potential collision is not determined.
When the system activatesYou can change the distance (Long/Normal/Short) between vehicles at which the system’s earliest collision alert will come on through driver information interface setting options.
List of customizable options P. 360
The camera in the CMBSTM is also designed to detect pedestrians. However, this pedestrian detection feature may not activate or may not detect a pedestrian in front of your vehicle under certain conditions. Refer to the ones indicating the pedestrian detection limitations from the list.
CMBSTM Conditions and Limitations P. 500
The head-up warning* uses a lens located at the front end of the dashboard. Do not cover the lens or spill any liquid on it.
Collision Alert Stages
The system has three alert stages for a possible collision. However, depending on circumstances, the CMBSTM may not go through all of the stages before initiating the last stage.
| Distance between vehicles | CMBSTM | |||
| The sensors detect a vehicle | Audible & Visual WARNINGS | Braking | ||
|
Stage one |
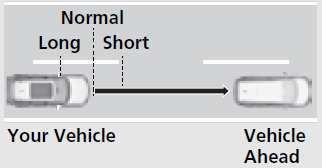 |
There is a risk of a collision with the vehicle ahead of you. | When in Long, visual and audible alerts come on at a longer distance from a vehicle ahead than in Normal setting, and in Short, at a shorter distance than in Normal. |
— |
| Stage two | 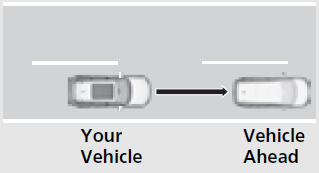 |
The risk of a collision has increased, time to respond is reduced. | Visual and audible alerts. | Lightly applied |
| Stage three | 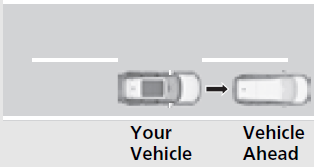 |
The CMBSTM determines that a collision is unavoidable. | Forcefully applied | |
CMBSTM On and Off
When you turn the CMBSTM on and off, do the following.
- Press the safety support switch.
- Roll the right selector wheel to the symbol and push it.
A message appears on the driver information interface when the system turns on or off.
A check mark appears in the box and the color of the symbol changes green when the system is on. The check mark disappears and the color of the symbol changes gray when the system is off.
The CMBSTM is turned on every time you start the engine, even if you turned it off the last time you drove the vehicle.
The CMBSTM may automatically shut off, and the safety support indicator (amber) will come and stay on under certain conditions:
CMBSTM Conditions and Limitations P. 500
You can also select the safety support content from the driver information interface.
Driver Information Interface (Right Side Area) P. 111
When the CMBSTM is activated, it will continue to operate even if the accelerator pedal is partially depressed.
However, it will be canceled if the accelerator pedal is fully depressed. The vehicle stability assist TM (VSA®) system, adaptive cruise control (ACC) with low speed follow, safety support and low tire pressure/TPMS indicators may come on in amber along with a message in the driver information interface when you set the power mode to ON after reconnecting the battery. Drive a short distance at more than 12 mph (20 km/h). Each indicator should go off. If any do not, have your vehicle checked by a dealer. Have your vehicle checked by a dealer if you find any unusual behavior of the system (e.g., the warning message appears too frequently).
CMBSTM Conditions and Limitations
The system may automatically shut off and the safety support indicator (amber) will come on under certain conditions. Some examples of these conditions are listed below. Other conditions may reduce some of the CMBSTM functions.
- Front Sensor Camera P. 562
Radar Sensor P. 564 - Driving in bad weather (rain, fog, snow, etc.).
- Sudden changes between light and dark, such as an entrance or exit of a tunnel.
- There is little contrast between objects and the background.
- Driving into low sunlight (e.g., at dawn or dusk).
- Strong light is reflected onto the roadway.
- Driving in the shadows of trees, buildings, etc.
- Roadway objects or structures are misinterpreted as vehicles and pedestrians.
- Reflections on the interior of the windshield.
- Driving at night or in a dark condition such as a tunnel.
Roadway conditions
- Driving on a snowy or wet roadway (obscured lane marking, vehicle tracks, reflected lights, road spray, high contrast).
- Driving on curvy, winding, or undulating roads.
- The road is hilly or the vehicle is approaching the crest of a hill.
Vehicle conditions
- Headlight lenses are dirty or the headlights are not properly adjusted.
- The outside of the windshield is blocked by dirt, mud, leaves, wet snow, etc.
- The inside of the windshield is fogged.
- An abnormal tire or wheel condition (incorrect sizes, varied sizes or construction, improperly inflated, compact spare tire*, etc.).
- When tire chains are installed.
- The vehicle is tilted due to a heavy load or suspension modifications.
- The camera temperature gets too high.
- Driving with the parking brake applied.
- When the radar sensor behind the emblem gets dirty.
- The vehicle is towing a trailer.
Models with Electronic Air Suspension (EAS)
- The EAS is malfunctioning.
Detection limitations
- A vehicle or pedestrian suddenly crosses in front of you.
- The distance between your vehicle and the vehicle or pedestrian ahead of you is too short.
- A vehicle cuts in front of you at a slow speed, and it brakes suddenly.
- When you accelerate rapidly and approach the vehicle or pedestrian ahead of you at high speed.
- The vehicle ahead of you is a motorcycle, bicycle, mobility scooter or other small vehicle.
- When there are animals in front of your vehicle.
- When you drive on a curved, winding or undulating road that makes it difficult for the sensor to properly detect a vehicle in front of you.
- The speed difference between your vehicle and a vehicle or pedestrian in front of you is significantly large.
- An oncoming vehicle suddenly comes in front of you.
- Another vehicle suddenly comes in front of you at an intersection, etc.
- Your vehicle abruptly crosses over in front of an oncoming vehicle.
- When driving through a narrow iron bridge.
- When the lead vehicle suddenly slows down.
Limitations applicable to pedestrian detection only
- When there is a group of people in front of your vehicle walking together side by side.
- Surrounding conditions or belongings of the pedestrian alter the pedestrian’s shape, preventing the system from recognizing that the person is a pedestrian.
- When the pedestrian is slouching or squatting.
- When the pedestrian is shorter than about 3.3 feet (1 meter) or taller than about 6.6 feet (2 meter) in height.
- When a pedestrian blends in with the background.
- When a pedestrian is bent over or squatting, or when their hands are raised or they are running.
- When several pedestrians are walking ahead in a group.
- When the camera cannot correctly identify that a pedestrian is present due to an unusual shape (holding luggage, body position, size).
Automatic shutoff
The CMBSTM may automatically shut itself off and the safety support indicator (amber) comes and stays on when:
- The temperature inside the system is high.
- You drive off-road or on a mountain road, or curved and winding road for an extended period.
- An abnormal tire condition is detected (incorrect tire size, flat tire, etc.).
- The camera behind the rearview mirror, or the area around the camera, including the windshield, gets dirty.
Once the conditions that caused CMBSTM to shut off improve or are addressed (e.g., cleaning), the system comes back on.
With Little Chance of a Collision
The CMBSTM may activate even when you are aware of a vehicle ahead of you, or when there is no vehicle ahead. Some examples of this are:
- When Passing
Your vehicle approaches another vehicle ahead of you and you change lanes to pass. - At an intersection
Your vehicle approaches or passes another vehicle that is making a left or right turn.
On a curve
When driving through curves, your vehicle comes to a point where an oncoming vehicle is right in front of you.
- Through a low bridge at high speed
You drive under a low or narrow bridge at high speed. - Speed bumps, road work sites, train tracks, roadside objects, etc.
You drive over speed bumps, steel road plates, etc., or your vehicle approaches train tracks or roadside objects [such as a traffic sign and guard rail] on a curve or, when parking, stationary vehicles and walls.
Low Speed Braking Control
Using sonar sensors located on the front and rear bumpers, this system can detect if there is danger of a potential collision with a wall or other obstacle during normal driving or when the accelerator pedal is depressed with too much force. The system then assists in avoiding collisions and reducing damage from impact through assistive braking and/or assistive driving power suppression.
WARNING
The Low Speed Braking Control System cannot avoid all collisions and may not reduce damage in each situation where the accelerator is mistakenly or aggressively pressed. Overreliance on the system may result in a collision with serious injury or death. Always check your surroundings, your shift position, and your pedal use. Driver remains responsible for safely operating the vehicle.
The Low Speed Braking Control System cannot avoid all collisions and may not reduce damage in each situation where the accelerator is mistakenly or aggressively pressed. Overreliance on the system may result in a collision with serious injury or death. Always check your surroundings, your shift position, and your pedal use. Driver remains responsible for safely operating the vehicle.
How the System Works
Assistive braking
Assistive braking provides a visual and audible alert when the vehicle is moving between approximately 1 and 6 mph (2 and 10 km/h) and there is the possibility of a collision with a detected wall or other obstacles, as well as providing assistance with braking.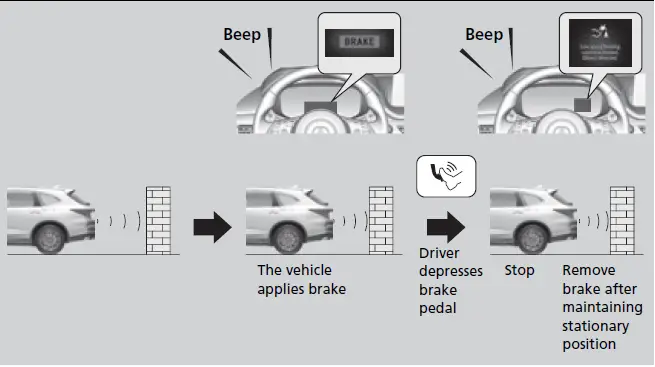
If the only rear sensors are turned off using the parking sensor system, the assistive
braking will not work when reversing.
Turning off All Rear Sensors P. 581
For directions on the proper handling of the sonar sensors, please refer to the following page.
Sonar Sensors* P. 565
The vehicle will release the brake and start moving a few seconds after the system is activated. To keep the vehicle stopped, keep the brake pedal depressed or put the transmission into (P.
In order to prevent the system from activating when not needed, always turn it off during vehicle maintenance, when loading on ships, trucks, and so on, or when using a chassis dynamometer, free rollers for inspection or when washing the car in conveyor type car wash machine. If you put any accessories on or around the rear sensors, the Low Speed Braking Control System may activate if it detects these accessories as an obstacle. In this case, turn off the rear sensor.
Turning off All Rear Sensors P. 581
Assistive driving power suppression
When the vehicle is stopped or moving at less than 6 mph (10 km/h) and there is an obstacle such as a wall detected near the front of or back of the vehicle, if the accelerator pedal is depressed more than necessary, the system will inform you with a visual and audible alert. At the same time, the system will prevent sudden forward or backwards movement by limiting the output of the engine, then assistive braking will activate when you get closer to the obstacle.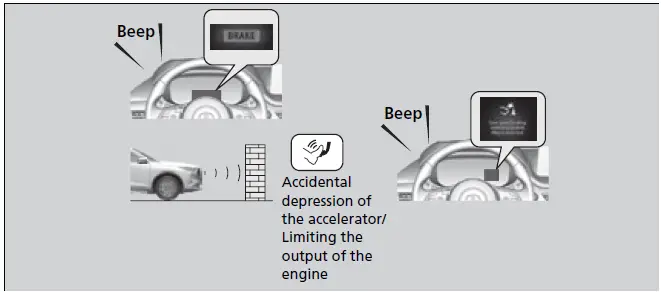
Assistive driving power suppression will not activate in the following situations. When moving forward: When on a steep slope or the shift position is in (P, (R, or (N. When reversing: When on a steep slope or the shift position is in a position other than (R. If the only rear sensors are turned off using the parking sensor system, the assistive driving power suppression will not work when reversing.
Turning off All Rear Sensors P. 581
System On and Off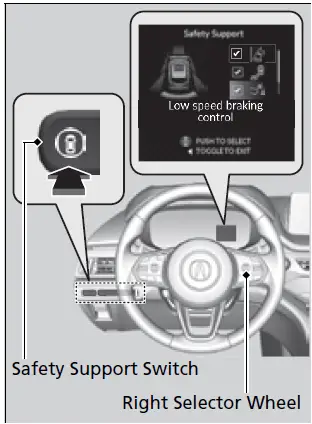
When you turn the system on and off, do the following.
- Press the safety support switch.
- Roll the right selector wheel to the symbol and push it.
- A message appears on the driver information interface when the system turns on or off.
- A check mark appears in the box and the color of the symbol changes green when the system is on. The check mark disappears and the color of the symbol changes gray when the system is off.
The system is turned on every time you start the power system, even if you turned it off the last time you drove the vehicle.
You can also select the safety support content from the driver information interface.
Driver Information Interface (Right Side Area) P. 111
The Low Speed Braking Control system may temporarily turn off after reconnecting the 12-volt battery. The system will automatically turn ON after the vehicle has been moving at over 12 mph (20 km/h) for some time. If the system does not turn on, have your vehicle checked by a dealer.
Conditions for Cancellation
Conditions for assistive driving power suppression.
- When the accelerator is no longer depressed.
- When the accelerator is depressed for approximately four seconds.
- When the brake pedal is depressed.
- When the steering wheel is turned and a collision avoided.
Conditions for assistive braking cancellation
A certain amount of time has passed since activation.
Low Speed Braking Control System Conditions and Limitations
The system may not operate correctly in the following conditions:
Examples of obstacles the sonar sensor cannot detect
- Obstacles that do not reflect sound waves well, such as people, snow, cloth, sponges, etc.
- Thin obstacles such as fences, bicycles, sign posts, etc.
- Short or small obstacles.
- Obstacles immediately in front of the bumper.
- Moving objects or obstacles that suddenly enter the road.
- Obstacles that are not perpendicular to the ground.
After Low Speed Braking Control has activated once, it will not activate again for the same obstacle. They can be activated again after driving for a certain distance after last activation. Low Speed Braking Control activates separately when moving forward and reversing. (For example, if it activates when moving forward, it can be activated again immediately if reversing.) However, if assistive braking has been activated, in order to activate assistive driving power suppression again, it is necessary to drive for a certain distance to reset the system.
Examples of situations where the sonar sensor cannot detect obstacles
- The sonar sensor is dirty (covered by snow, water, mud, etc.).
- The vehicle is too hot or cold.
- The steering wheel is turned sharply when approaching the obstacle at an angle.
Examples of other cases where the system may not work correctly
- The vehicle is tilted due to heavy load or suspension modifications.
- An abnormal tire or wheel condition (wrong size, varied size or construction, improperly inflated, compact spare tire*, etc.).
- Bad weather conditions such as heavy rain, fog, snow, sandstorms, etc.
- The ambient temperature/humidity is too high or low.
- When going down a very steep slope.
- When close to other vehicles with sonar sensors or other objects that emit ultrasonic waves.
Models with Electronic Air Suspension (EAS)
- The EAS is malfunctioning.
Situations where the system may activate even without risk of a collision
- When passing through short or narrow gates.
- When driving on uneven surfaces, grassy areas, or places with steps.
- When a sloped pillar or wall is protruding from a high position.
- When there are obstacles next to the road.
- When driving toward flags, curtains, tree branches, railroad crossing bars, etc.
When driving on flooded roads.
Adaptive Cruise Control (ACC) with Low Speed Follow
Helps maintain a constant vehicle speed and a set following-interval behind a vehicle detected ahead of yours and, if the detected vehicle comes to a stop, can decelerate and stop your vehicle, without you having to keep your foot on the brake or the accelerator. When ACC with Low Speed Follow slows your vehicle by applying the brakes, your vehicle’s brake lights will illuminate.
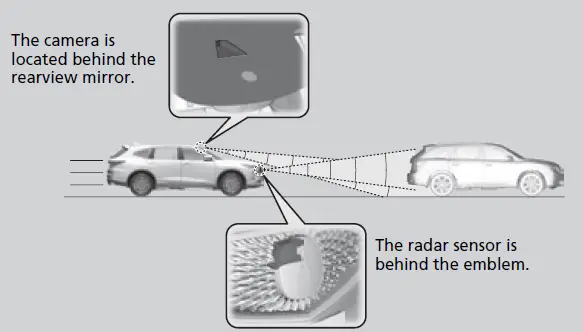
- Vehicle speed for ACC with Low Speed Follow: A vehicle is detected ahead within ACC with Low Speed Follow range – ACC with Low Speed Follow operates at speeds up to 90 mph (145 km/h).
No vehicle is detected within ACC with Low Speed Follow range – ACC with Low Speed Follow operates at the speed of about 25 mph (40 km/h) or above. - Shift position for ACC with Low Speed Follow: In (D or (S.
WARNING
Improper use of ACC with Low Speed Follow can lead to a crash. Use ACC with Low Speed Follow only when driving on expressways or freeways and in good road and weather conditions.
WARNING
ACC with Low Speed Follow has limited braking capability and may not stop your vehicle in time to avoid a collision with a vehicle that quickly stops in front of you. Always be prepared to apply the brake pedal if the conditions require.
Important Reminder
As with any system, there are limits to ACC with Low Speed Follow. Use the brake pedal whenever necessary, and always keep a safe interval between your vehicle and other vehicles.
How to activate the system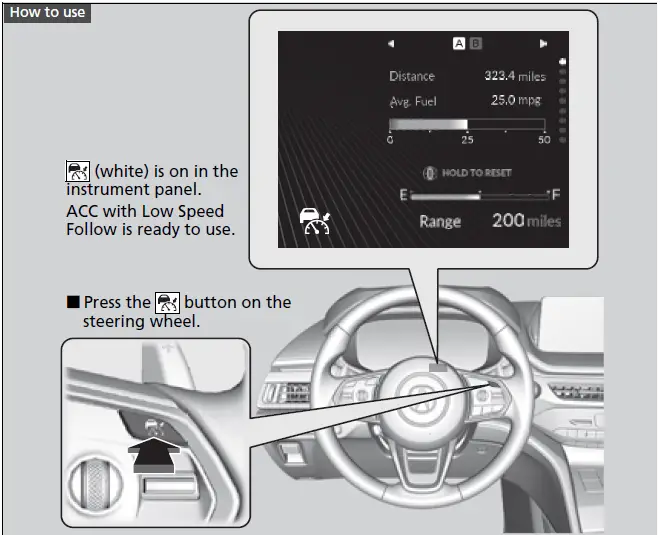
For directions on the proper handling of the radar sensor, refer to the following page.
Radar Sensor P. 564
You can read about handling information for the camera equipped with this system.
Front Sensor Camera P. 562
ACC with Low Speed Follow may not work properly under certain conditions.
ACC with Low Speed Follow Conditions
and Limitations P. 519
When not using ACC with Low Speed Follow: Turn off adaptive cruise by pressing the button.
Do not use ACC with Low Speed Follow under the following conditions.
- Driving in continuous stop and go traffic.
- On roads with sharp turns.
- On roads with steep downhill sections, as the set vehicle speed can be exceeded by coasting. In such cases, ACC with Low Speed Follow will not apply the brakes to maintain the set speed.
- On roads with toll collection facilities or other objects between lanes of traffic, or in parking areas, or facilities with drive through access.
To Set the Vehicle Speed
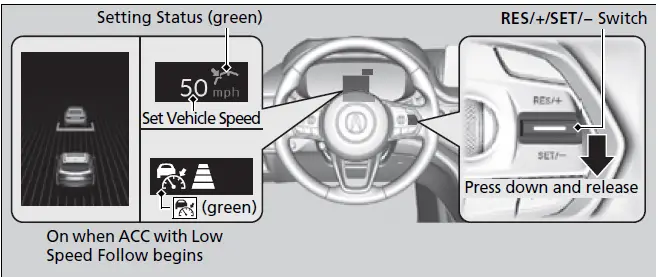
When driving at about 25 mph (40 km/h) or above: Take your foot off the pedal and press down the RES/+/SET/– switch when you reach the desired speed. The moment you release the switch, the set speed is fixed, and ACC with Low Speed Follow begins. The vehicle stability assist TM (VSA®) system, adaptive cruise control (ACC) with low speed follow, safety support and low tire pressure/TPMS indicators may come on in amber along with a message in the driver information interface when you set the power mode to ON after reconnecting the battery. Drive a short distance at more than 12 mph (20 km/h). Each indicator should go off. If any do not, have your vehicle checked by a dealer.
You can switch the displayed set speed measurements on the gauge between mph and km/h.
Gauge Settings P. 116
Customized Features P. 351
When driving slower than about 25 mph (40 km/h): If the vehicle is moving and the brake pedal is not depressed, pressing the switch fixes the set speed to about 25 mph (40 km/h) regardless of current vehicle speed. While stationary and a vehicle is ahead of you, the vehicle speed can be set, even with the brake pedal depressed.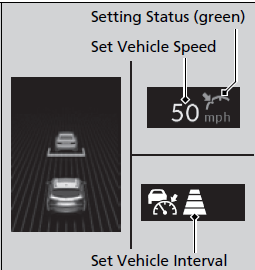
When ACC with Low Speed Follow starts operating, the vehicle icon, interval bars and set speed appear on the gauge. When you use ACC with Low Speed Follow, Straight Driving Assist (a feature of the Electric Power Steering system) is activated. By enabling the steering system to automatically compensate for natural steering pull, Straight Driving Assist makes it easier for you to keep your vehicle in a straight line.
When in Operation
There is a vehicle ahead
ACC with Low Speed Follow monitors if a vehicle ahead of you enters the ACC with Low Speed Follow range. If a vehicle is detected doing so, the ACC with Low Speed Follow system maintains or decelerates your vehicle’s set speed in order to keep the vehicle’s set following-interval from the vehicle ahead.
To Set or Change Following-interval P. 523
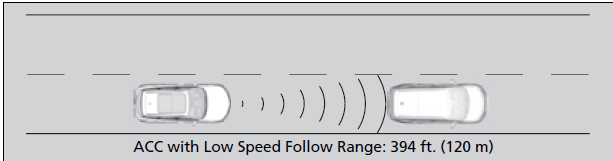
When a vehicle whose speed is slower than your set speed is detected in front of you, your vehicle starts to slow down.
If the vehicle detected ahead of you slows down abruptly, or if another vehicle is detected cutting in front of you, a beeper sounds and a message appears on the multi-information display, and the head-up warning lights* flash.
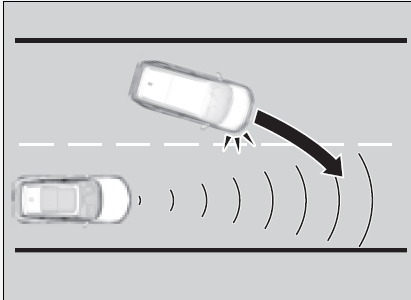
Depress the brake pedal, and keep an appropriate interval from the vehicle ahead.
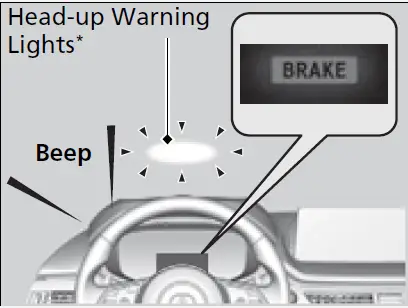
There is no vehicle ahead.
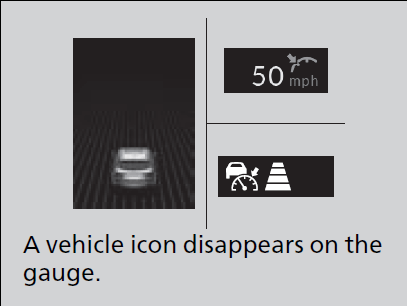
Your vehicle maintains the set speed without having to keep your foot on the brake or accelerator pedal.
If there previously was a vehicle detected ahead that kept your vehicle from traveling at the set speed, ACC with Low Speed Follow accelerates your vehicle to the set speed, and then maintains it.
When you depress the accelerator pedal
You can temporarily increase the vehicle speed. In this case, there is no audible or visual alert even if a vehicle is in the ACC with Low Speed Follow range.
ACC with Low Speed Follow stays on unless you cancel it. Once you release the accelerator pedal, the system resumes an appropriate speed for keeping the following interval while a vehicle ahead is within the ACC with Low Speed Follow range.
Even if the interval between your vehicle and the vehicle detected ahead is short, ACC with Low Speed Follow may start accelerating your vehicle under the following circumstances:
- The vehicle ahead of you is going at almost the same speed as, or faster than, your vehicle.
A vehicle that cuts in front of you is going faster than your vehicle, gradually increasing the interval between the vehicles.
You can also set the system to beep when a vehicle in front of you comes in and goes out of the ACC with Low Speed Follow detecting range. A vehicle detect beep on and off can be selected.
Customized Features P. 351
You may need to use the brake to maintain a safe interval when using ACC with Low Speed Follow. Additionally, ACC with Low Speed Follow may not work properly under certain conditions.
ACC with Low Speed Follow Conditions and Limitations P. 519
A vehicle detected ahead is within ACC with Low Speed Follow range and slows to a stop
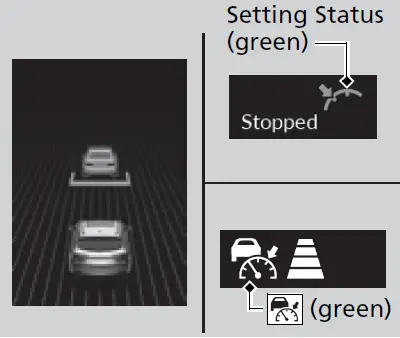
 Your vehicle also stops, automatically. The Stopped message appears on the multi-information display.
When the vehicle ahead of you starts again, if you press the RES/+/SET/– switch up or down, or depress the accelerator pedal, ACC with Low Speed Follow will operate again within the previously set speed.
If no vehicle is ahead of you before you resume driving, depressing the accelerator pedal will resume operation of ACC with Low Speed Follow within the prior set speed.
WARNING
Exiting a vehicle that has been stopped while the ACC with Low Speed Follow system is operating can result in the vehicle moving without operator control.
A vehicle that moves without operator control can cause a crash, resulting in serious injury or death.
Never exit a vehicle when the vehicle is stopped by ACC with Low Speed Follow.
ACC with Low Speed Follow Conditions and Limitations
The system may automatically shut off under certain conditions. Some examples of these conditions are listed below. Other conditions may reduce some of the ACC with Low Speed Follow functions.
Front Sensor Camera P. 562
Radar Sensor P. 564
Environmental conditions
Driving in bad weather (rain, fog, snow, etc.).
Roadway conditions
Driving on a snowy or wet roadway (obscured lane marking, vehicle tracks, reflected lights, road spray, high contrast).
Vehicle conditions
- The outside of the windshield is blocked by dirt, mud, leaves, wet snow, etc.
An abnormal tire or wheel condition (incorrect sizes, varied sizes or construction, improperly inflated, compact spare tire*, etc.).
The camera temperature gets too high.
The parking brake is applied.
The radar sensor cover is dirty.
The vehicle is tilted due to a heavy load or suspension modifications.
Tire chains are installed.
The vehicle is towing a trailer.
The EAS is malfunctioning.
Not available on all models
The radar sensor for ACC with Low Speed Follow is shared with the Collision Mitigation Braking SystemTM (CMBSTM).
Collision Mitigation Braking SystemTM
(CMBSTM) P. 495
Detection limitations
- A vehicle suddenly crosses in front of you.
The interval between your vehicle and the vehicle ahead of you is too short.
A vehicle cuts in front of you at a slow speed, and it brakes suddenly.
You accelerate rapidly and approach the vehicle ahead of you at high speed.
The vehicle ahead of you is a motorcycle, bicycle, mobility scooter, or other small vehicle.
There are animals in front of your vehicle.
You drive on a curved or winding or undulating road that makes it difficult for the sensor to properly detect a vehicle in front of you.

- The speed difference between your vehicle and a vehicle in front of you is significantly large.
An oncoming vehicle suddenly comes in front of you. - Your vehicle abruptly crosses over in front of an oncoming vehicle.
If you need the radar sensor to be repaired, or removed, or the radar sensor cover is strongly impacted, turn off the system by pressing the button and take your vehicle to a dealer.
Have your vehicle checked by a dealer if you find any unusual behavior of the system (e.g., the warning message appears too frequently).
-
- Driving through a narrow metal bridge.
- The vehicle ahead of you brakes suddenly.
The vehicle ahead of you has a unique shape.
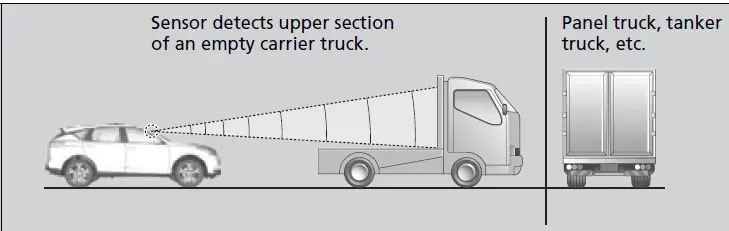
- Your vehicle or the vehicle ahead of you is driving on one edge of the lane.
To Adjust the Vehicle Speed
Increase or decrease the vehicle speed using the RES/+/SET/– switch on the steering wheel.
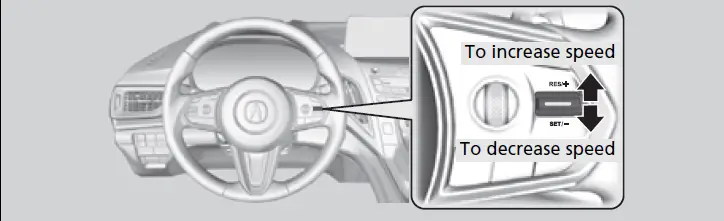
- Each time you press the switch up or down, the vehicle speed is increased or decreased by about 1 mph or 1 km/h accordingly.
- If you keep the switch pressed up or down, the vehicle speed increases or decreases by about 5 mph or 5 km/h accordingly.
If a vehicle detected ahead is going at a speed slower than your increased set speed, ACC with Low Speed Follow may not accelerate your vehicle. This is to maintain the set interval between your vehicle and the vehicle ahead.
When you depress the accelerator pedal and then press down and release the SET/– switch, the current speed of the vehicle is set.
To Set or Change Following-interval
Press the interval button to change the ACC with Low Speed Follow following-interval. Each time you press the button, the following-interval (the interval behind a vehicle detected ahead of you) setting cycles through extra long, long, middle, and short following-intervals.
Determine the most appropriate following-interval setting based on your specific driving conditions. Be sure to adhere to any following-interval requirements set by local regulation.
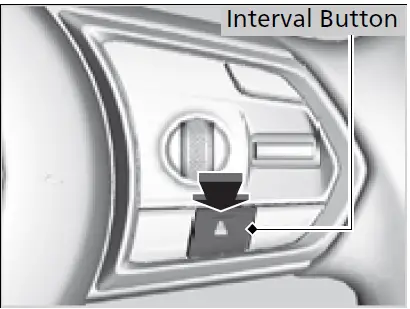
The higher your vehicle following-speed is, the longer the short, middle, long or extra long following-interval becomes. See the following examples for your reference.
| Following-interval | When the Set Speed is: | ||
| 50 mph (80 km/h) | 65 mph (104 km/h) | ||
| Short |  |
83 feet
25 meters 1.1 sec |
100 feet
31 meters 1.1 sec |
| Middle |  |
110 feet
33 meters 1.5 sec |
137 feet
42 meters 1.5 sec |
| Long |  |
154 feet
47 meters 2.1 sec |
200 feet
61 meters 2.1 sec |
| Extra Long |  |
213 feet
63 meters 2.9 sec |
282 feet
83 meters 2.9 sec |
When your vehicle stops automatically because a vehicle detected ahead of you has stopped, the interval between the two vehicles will vary based on the ACC with Low Speed Follow interval setting.
To Cancel
To cancel ACC with Low Speed Follow, do any of the following:
- Press the CANCEL button.
- The
 indicator (green) on the multi- information display changes to the indicator (white).
- The
- Press the indicator (green) goes off.
- Depress the brake pedal while the vehicle is moving forward.
- The indicator (green) on the multi- information display changes to the indicator (white).
- The
Resuming the prior set speed: After you have canceled ACC with Low Speed Follow, you can activate the ACC with Low Speed Follow with the prior set speed displayed on the multi-information display (in gray) by pressing the RES/+/SET/– switch up even if the vehicle is stopped.
When you turn the ACC with Low Speed Follow off by pressing the CANCEL button or depressing the brake pedal, the prior set speed is displayed on the multi-information display in gray.
When pressing the RES/+/SET/– switch, the ACC with Low Speed Follow is activated with displayed speed.
If the indicator ![]() (white) is displayed and you press the RES/+/SET/– switch up, but no prior set speed (in gray) is displayed, the speed will be set to your vehicle’s current speed.
(white) is displayed and you press the RES/+/SET/– switch up, but no prior set speed (in gray) is displayed, the speed will be set to your vehicle’s current speed.
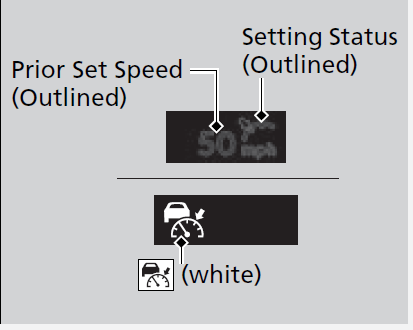
The set speed cannot be set or resumed when ACC with Low Speed Follow has been turned off using the ![]() button. Press the
button. Press the ![]() button to activate the system, then set the desired speed.
button to activate the system, then set the desired speed.
Automatic cancellation
The beeper sounds and a message appears on the driver information interface when ACC is automatically canceled. Any of these conditions may cause the ACC to automatically cancel:
- Bad weather (rain, fog, snow, etc.)
The vehicle ahead of you cannot be detected.
An abnormal tire condition is detected, or the tires are skidding.
Driving on a mountainous road, or driving off road for extended periods.
Abrupt steering wheel movement.
When the ABS, VSA®, CMBSTM, or Low Speed Braking Control is activated.
When the VSA® system indicator comes on.
When you manually apply the parking brake.
When vehicle speed is less than 22 mph (35 km/h).
Water is sprayed by or snow blown from a vehicle ahead.
Driving into low sunlight (e.g., at dawn or dusk).
When the detected vehicle within the ACC range is too close to your vehicle.
When accelerating rapidly.
The front of the camera is covered by dirt, fog, rain, mud, wet snow, seals, accessories, stickers, or film on the windshield.
The engine is turned off.
The vehicle is loaded heavy load in the cargo area or rear seats.
When passing through a dark place, such as tunnel.
When the parking brake and brake system indicator (amber) comes on.
The vehicle has repeatedly applied the brakes to maintain the set speed (for example, you are descending a long slope).
The ACC with Low Speed Follow automatic cancellation can be also triggered by the following causes. In these cases, the parking brake will be automatically applied.
- The driver’s seat belt is unfastened when the vehicle is stationary.
The vehicle stops for more than 10 minutes.
The engine is turned off.
Not available on all models
To Switch ACC with Low Speed Follow to Cruise Control

Press and hold the Interval button for one second. Cruise mode selected appears on the driver information interface for two seconds, and then the mode switches to Cruise.
The![]() indicator comes on.
indicator comes on.
- Green: The system is on.
White: The system is standby.
To switch back to ACC, press and hold the Interval button again for one second.
When to use
Desired speed in a range above roughly 25 mph (40 km/h).
To Set the Vehicle Speed
Take your foot off the pedal and press the RES/+/SET/− switch up or down when you reach the desired speed.
The moment you release the RES/+/SET/− switch, the set speed is fixed, and cruise control begins. The color of ![]() indicator changes from white to green.
indicator changes from white to green.
When you use cruise control, Straight Driving Assist (a feature of the Electric Power Steering system) is activated.
By enabling the steering system to automatically compensate for natural steering pull, Straight Driving Assist makes it easier for you to keep your vehicle in a straight line.
Always be aware which mode you are in. When you are driving in Cruise mode, the system will not assist you to maintain a following-interval from a vehicle ahead of you.
You can switch the displayed set speed measurements on the multi-information display or audio/information screen between mph and km/h.
Gauge Settings P. 116
Customized Features P. 351
To Adjust the Vehicle Speed
- Each time you press the RES/+/SET/– switch up or down, the vehicle speed is increased or decreased by about 1 mph (1.6 km/h).
If you keep the RES/+/SET/– switch pressed up or down, the vehicle speed increases or decreases until you release it. This speed is then set.
To Cancel
To cancel cruise control, do any of the following:
- Press the CANCEL
 button.
- The indicator (green) on the gauge changes to the indicator (white).
- The indicator (green) on the gauge changes to the
- Press the button.
- The indicator (green) goes off.
- The
- Depress the brake pedal.
- The indicator (green) on the gauge changes to the indicator (white).
Resuming the prior set speed: After you have canceled cruise control, you can activate the cruise control with the prior set speed displayed on the gauge (in gray) by pressing the RES/+/SET/− switch up while driving at a speed of at least 25 mph (40 km/h) or more.
When you turn the cruise control off by pressing the CANCEL button or depressing the brake pedal, the prior set speed is displayed on the gauge in gray. When pressing the RES/+/SET/− switch up, the cruise control is activated with displayed speed.
If the![]() indicator (white) is displayed and you press the RES/+/SET/− switch up, but no prior set speed (in gray) is displayed, the speed will be set to your vehicle’s current speed.
indicator (white) is displayed and you press the RES/+/SET/− switch up, but no prior set speed (in gray) is displayed, the speed will be set to your vehicle’s current speed.
You cannot set or resume in the following situations:
- When vehicle speed is less than 25 mph (40 km/h)
- When the button is turned off
At vehicle speeds of 22 mph (35 km/h) or less, cruise mode is canceled automatically.
Lane Keeping Assist System (LKAS)
Provides steering input to help keep the vehicle in the middle of a detected lane and provides tactile and visual alerts if the vehicle is detected drifting out of its lane.
Steering input assist
The system applies torque to the steering to keep the vehicle between the left and right lane lines. The applied torque becomes stronger as the vehicle gets closer to either of the lane lines.
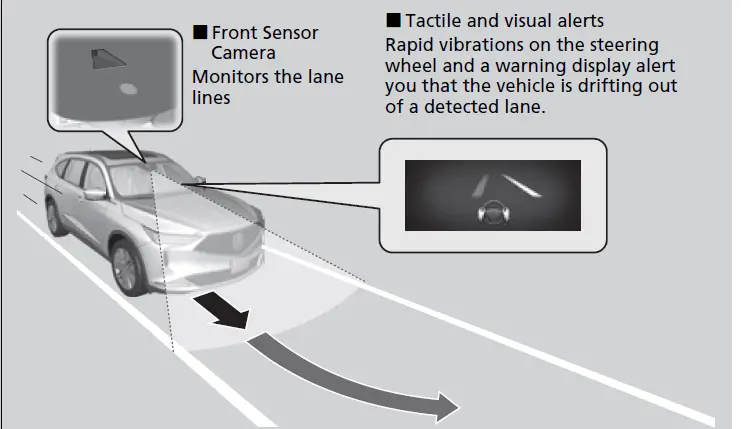
- When you operate the turn signals to change lanes, the system is suspended, and resumes after the signals are off.
If you make a lane change without operating the turn signals, the LKAS alerts activate, and torque is applied to the steering.
Important Safety Reminders
The LKAS is for your convenience only. It is not an autonomous driving system and always requires driver attention and control. The system does not work if you take your hands off the steering wheel or fail to steer the vehicle.
The LKAS is convenient when it is used on expressways or freeways.
Do not place objects on the instrument panel. Objects may reflect on the windshield and prevent correct detection of the traffic lanes.
The LKAS only alerts you when lane drift is detected without a turn signal in use. The LKAS may not detect all lane markings or lane departures; accuracy will vary based on weather, speed, and lane marker condition.
It is always your responsibility to safely operate the vehicle and avoid collisions.
The LKAS may not work properly or may work improperly under the certain conditions:
LKAS Conditions and Limitations P. 535
You can read about handling information for the camera equipped with this system.
Front Sensor Camera P. 562
Lane Keep Support Function
Provides assistance to keep the vehicle in the center of the lane. When the vehicle nears a white or yellow line, steering force of the electric power steering will become stronger.
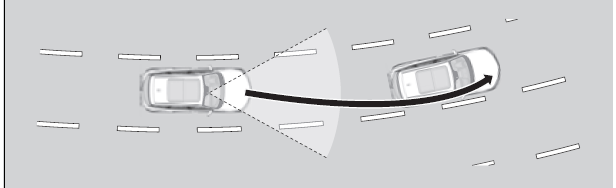
Lane Departure Warning Function
When the vehicle enters the warning area, the LKAS alerts you with slight steering wheel vibration as well as a warning display.
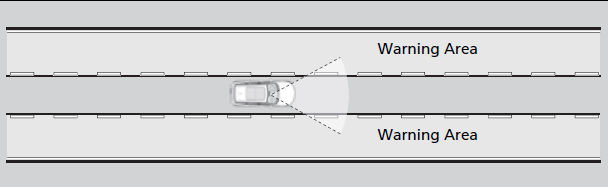
The LKAS may not function as designed while driving in frequent stop and go traffic, or on roads with sharp curves.
When it fails to detect lanes, the system will temporarily be canceled. When a lane is detected, the system will recover automatically.
When the System can be Used
The system can be used when the following conditions are met.
- The lane in which you are driving has detectable lane markers on both sides, and your vehicle is in the center of the lane.
The vehicle is traveling between about 45 and 90 mph (72 and 145 km/h).
You are driving on a straight or slightly curved road.
The turn signals are off.
The brake pedal is not depressed.
The wipers are not in high speed operation.
How to activate the system
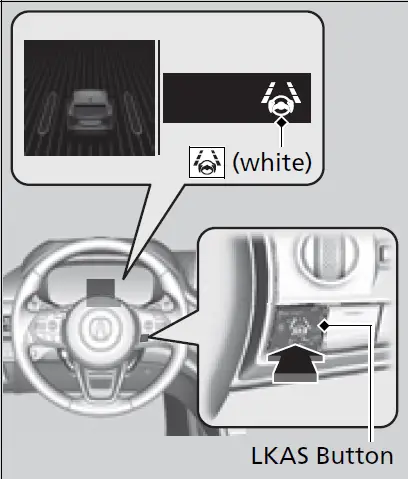
- Press the LKAS button.
- LKAS indicator (white) appears on the gauge.
The system is standby. - If traffic lane lines are detected, white lines appear on the gauge.
If the vehicle drifts toward either left or right lane line due to the system applying torque, turn off the LKAS and have your vehicle checked by a dealer.
- LKAS indicator (white) appears on the gauge.
- Keep your vehicle near the center of the lane while driving.
- The LKAS indicator changes from white to green, and white lines change to green once the system starts operating after detecting the left and right lane markings.

To Cancel
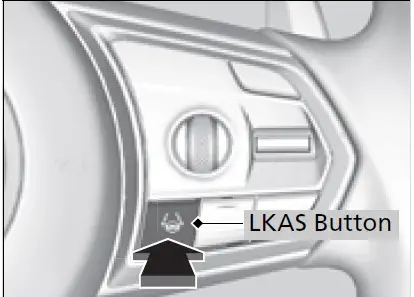
Press the LKAS button.
The LKAS is turned off every time you stop the engine, even if you turned it on the last time you drove the vehicle.
The system operation is suspended if you:
- Set the wipers to HI.
- Turning the wipers off or setting it to LO resumes the LKAS.
Models with automatic intermittent wipers
- Turning the wipers off or setting it to LO resumes the LKAS.
- Set the wiper switch to AUTO and the wipers operate at high speed.
- The LKAS resumes when the wipers stop or operate at low speed.
- Decrease the vehicle speed to about 40 mph (64 km/h) or less.
- Increasing the vehicle speed to about 45 mph (72 km/h) or more resumes the LKAS.
- Depress the brake pedal.
- The LKAS resumes and starts detecting the lane lines again once you release the brake pedal.
- The LKAS resumes and starts detecting the lane lines again once you release the brake pedal.
Your vehicle is driving to the right or the left of the lane.
You can change the setting for the LKAS.
LKAS suspended beep on and off can be selected.
Customized Features P. 351
The LKAS may be automatically suspended when:
- The system fails to detect lane lines.
The steering wheel is quickly turned.
You fail to steer the vehicle.
Driving through a sharp curve.
Driving at a speed in excess of approximately 90 mph (145 km/h). Once these conditions no longer exist, the LKAS automatically resumes.
The LKAS may be automatically canceled when:
The camera temperature gets extremely high or low.
The camera behind the rearview mirror, or the area around the camera, including the windshield, gets dirty.
The ABS or VSA® system engages.
The beeper sounds if the LKAS is automatically canceled.
LKAS Conditions and Limitations
The system may not detect lane markings and therefore may not keep the vehicle in the middle of the lane under certain conditions, including the following:
Environmental conditions
- Driving in bad weather (rain, fog, snow, etc.).
Sudden changes between light and dark, such as an entrance or exit of a tunnel.
There is little contrast between lane lines and the roadway surface.
Driving into low sunlight (e.g., at dawn or dusk).
Strong light is reflected onto the roadway.
Driving in the shadows of trees, buildings, etc.
Shadows of adjacent objects are parallel to lane markings.
Roadway objects or structures are misinterpreted as lane markers.
Reflections on the interior of the windshield.
Driving at night or in a dark condition such as a tunnel.
Roadway conditions
- Driving on a road with temporary lane markings.
Faint, multiple, or varied lane markings are visible on the roadway due to road repairs or old lane markings.

- The roadway has merging, split, or crossing lines, such as at an intersection or crosswalk.
The lane markings are extremely narrow, wide, or changing.

- The vehicle in front of you is driving near the lane lines.
The road is hilly or the vehicle is approaching the crest of a hill.
Driving on rough or unpaved roads, or over bumpy surfaces. - When objects on the road (curb, guard rail, pylons, etc.) are recognized as white (or yellow) lines.
Driving on roads with double lines. 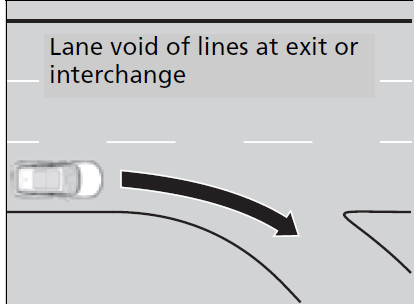
- Vehicle conditions
Headlight lenses are dirty or the headlights are not properly adjusted.
The outside of the windshield is streaked or blocked by dirt, mud, leaves, wet snow, etc.
The inside of the windshield is fogged.
The camera temperature gets too high.
An abnormal tire or wheel condition (incorrect sizes, varied sizes or construction, improperly inflated, compact spare tire*, etc.).
The vehicle is tilted due to a heavy load or suspension modifications.
The vehicle is towing a trailer.
Traffic Jam Assist
The Traffic Jam Assist system uses a radar sensor mounted inside the front grille and a camera mounted to the upper portion of the windshield to detect and monitor left and right white or yellow traffic lane lines as well as any vehicle ahead. Based on inputs from the radar sensor and camera, the system can adjust the speed of your vehicle to maintain a set interval between your vehicle and the one detected ahead. It also can apply steering torque to keep your vehicle in the center of the detected lane when you are driving in heavy traffic.
How Traffic Jam Assist works
If you are in heavy traffic and Adaptive Cruise Control with Low Speed Follow is active, the Traffic Jam Assist system, upon detecting the traffic lane lines and a vehicle ahead, will apply steering torque to help keep your vehicle in the center of the lane.
The system adjusts the speed of your vehicle to maintain a set interval between your vehicle and the one detected ahead.
WARNING
Improper reliance on Traffic Jam Assist can cause a crash resulting in injury or death. Always maintain full control over your vehicle even when this system is active. and only use when on expressways or freeways. Traffic Jam Assist is not an autonomous driving system.
WARNING
Failure to securely park vehicle when stopped while Adaptive Cruise Control with Low Speed Follow is active can allow the vehicle to roll away, resulting in a crash causing injury or death.
Never stop the vehicle and exit it without placing it in Park and setting the parking brake.
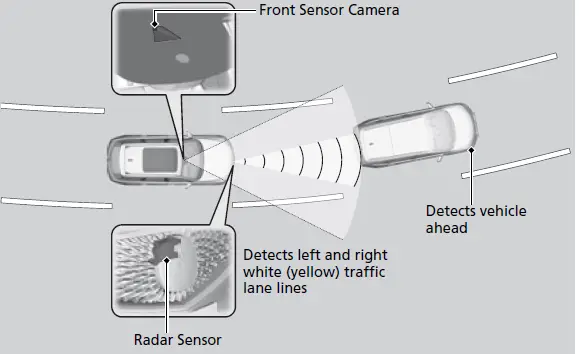 When you use the turn signal to indicate a lane change, Traffic Jam Assist is temporarily deactivated. It is reactivated once the vehicle is traveling in the center of the lane and the system has detected the traffic lane lines and a vehicle ahead.
When the driver takes direct control of steering, the steering assist function is temporarily canceled.
The torque applied to steering may not be noticeable when the driver has direct control of steering, or when the surface of the road is rough or uneven.
You can read about handling information for the camera equipped with this system.
Front Sensor Camera P. 562
Traffic Jam Assist may not always be able to detect lane division lines or a vehicle traveling ahead. Depending on weather and road conditions and other factors, Traffic Jam Assist may not function normally. Always be aware of your surroundings and the road conditions, and conduct yourself in a manner conducive to safe driving. Traffic Jam Assist may not function properly when you are driving through a sharp curve or repeatedly accelerating and decelerating.
Traffic Jam Assist may not work properly under the certain conditions:
Traffic Jam Assist: Conditions and limitations P. 545
Traffic Jam Assist Activation
Traffic Jam Assist is activated when all of the following circumstances exist:
- LKAS is active.
ACC with Low Speed Follow is active.
The vehicle speed is between 0 and 45mph (0 and 72km/h) and there is a vehicle detected traveling ahead.
The lane in which you are driving has detectable lane markers on both sides, and your vehicle is in the center of the lane.
You are driving on a straight or slightly curved road.
The driver is gripping the steering wheel. - Do not use Traffic Jam Assist in any of the following situations:
- You are traveling on a road with sharp curves.
- The system may not allow your vehicle to respond in a manner best suited for the road conditions.
- You are entering a toll booth, interchange, service area, or parking area.
- If the vehicle ahead disappears from the travel path of your vehicle, your vehicle may suddenly accelerate to resume the set speed.
- You are driving in adverse weather (rain, fog, snow, etc.).
- The system may not be able to correctly determine the interval between your vehicle and the one ahead.
- The surface of the road is slippery, for example, it is icy or covered with snow.
- The tires may slip, causing you to lose control of the vehicle.
- You are driving in a HOV lane and motorcycles are passing you to the side, or you are required to keep your vehicle to the right or the left of the lane.
- The system may not be able to correctly determine the vehicle ahead.
Refer to the following page for proper handling of the Adaptive Cruise Control with Low Speed Follow:
Adaptive Cruise Control (ACC) with Low
Speed Follow P. 512
Refer to the following page for proper handling of the Lane Keeping Assist System (LKAS):
Lane Keeping Assist System (LKAS) P. 529
Refer to the following page for steering buttons and displays:
Operation Switches for the ACC with Low Speed Follow/LKAS/Traffic Jam Assist P. 491
How Traffic Jam Assist Works
When a vehicle is traveling ahead
When a vehicle ahead of yours is detected entering the Traffic Jam Assist detection area, Traffic Jam Assist adjusts the speed of your vehicle to maintain the selected interval between your vehicle and the one ahead. It also applies steering torque to keep your vehicle in the center of the detected lane.
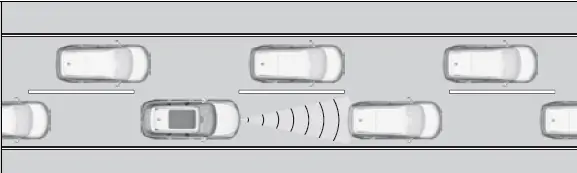
If your vehicle veers too far to the right or the left of the white (yellow) traffic lane lines while Traffic Jam Assist is active, deactivate Traffic Jam Assist and have an authorized Acura dealer inspect your vehicle.
In some cases the system cannot properly detect the traffic lane lines and, as a result, will not provide steering assistance.
Traffic Jam Assist: Conditions and limitations P. 545
If the driver takes his or her hands off the steering wheel or does not adequately maintain control of steering, the warning below will appear.
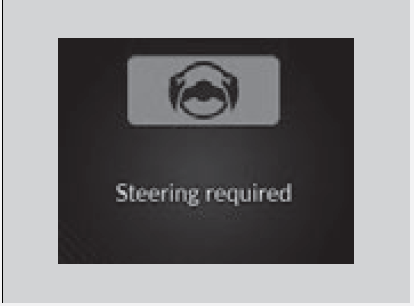
If the driver does not grip the steering wheel after the warning above has repeatedly appeared, a warning buzzer will sound and Traffic Jam Assist will be canceled.
You can have the head-up display* show you the current state of Traffic Jam Assist.
Head-Up Display* P. 125
Keep your vehicle near the center of the lane while driving.
- Traffic Jam Assist will be activated once the camera has detected the white
(yellow) traffic lane lines on either side of the lane and the radar sensor and camera have detected a vehicle driving ahead.
The lane outlines change to solid ones and a vehicle icon appears on the gauge. 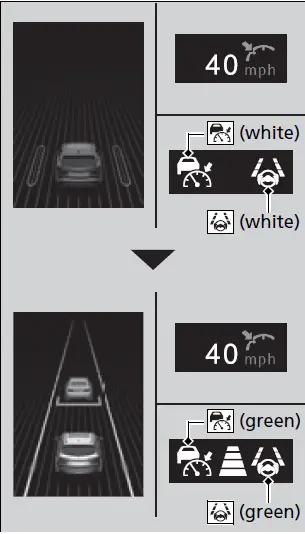
- When no vehicle is traveling ahead
If the vehicle detected ahead disappears from the travel path of your vehicle (for example, it changes lanes), Traffic Jam Assist will be deactivated temporarily and your vehicle will gradually accelerate until it reaches the set speed, after which it will maintain that speed. - If the vehicle detected ahead suddenly slows down, or if another vehicle is detected cutting in front of yours, a warning buzzer will sound, and a warning in the driver information interface and head-up warning* will appear.
- Depress the brake pedal and take direct control of steering.
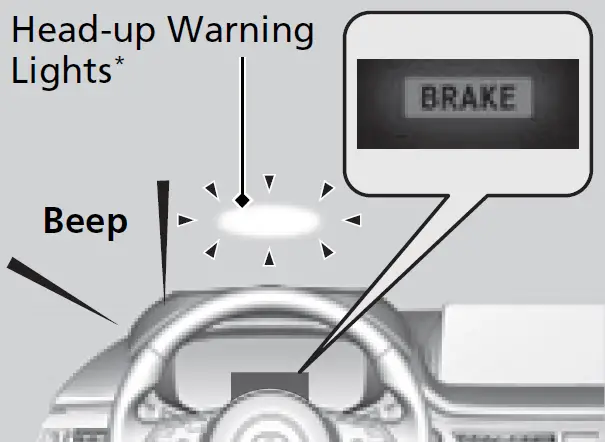
- Canceling Traffic Jam Assist
- To cancel Traffic Jam Assist, you can do any of the following:
- Press the button.
- Press the LKAS button.
When the ACC with Low Speed Follow is deactivated.
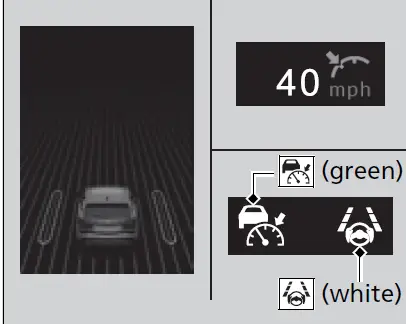
When Traffic Jam Assist may automatically be suspended when:
The system is temporarily canceled automatically under the following circumstances.
- The system fails to detect lane lines.
The vehicle ahead of you cannot be detected.
The steering wheel is turned quickly.
You fail to steer the vehicle.
The vehicle in front of you is driving near the lane lines.
- The wipers are set to high.
The interval between your vehicle and the one traveling ahead is over 197 feet (60m).
If you are traveling slower than the vehicle detected ahead or a vehicle that is detected cutting in front of you and the interval between your vehicle and the detected vehicle gradually increases, your vehicle will continue to follow that vehicle without emitting any warning, even if the interval between the vehicle is minimal.
You are traveling over 45mph (72km/h). When the speed of the vehicle reaches 45mph (72km/h), Traffic Jam Assist is deactivated and LKAS is activated instead. Once the speed of the vehicle drops to under 40mph (64 km/h), Traffic Jam Assist is reactivated.
When Traffic Jam Assist may automatically be canceled when:
It is possible that under any of the following circumstances, lane outlines representing traffic lane lines will appear in the gauge, a buzzer will sound, and Traffic Jam Assist will be canceled.
- The temperature of the camera is too high.
The camera behind the rearview mirror, or the area around the camera, including the windshield, is dirty.
Traffic Jam Assist: Conditions and limitations
Under the following circumstances, some features of Traffic Jam Assist may not work.
Vehicle conditions
- The front grille is dirty.
Headlight lenses are dirty or the headlights are not properly adjusted.
The outside of the windshield is streaked or blocked by dirt, mud, leaves, wet snow, etc.
The inside of the windshield is fogged up.
Your vehicle is fitted with tires or wheels of differing size, type, or structure, or the tires are not properly inflated.
The vehicle is tilted due to a heavy load or suspension modifications.
The interval between your vehicle and the detected vehicle ahead of you is too short.
Snow chains are installed on the tires.
The vehicle is towing a trailer.
Environmental conditions
- Bad weather (rain, fog, snow, etc.).
You are driving into low sunlight (e.g., at dawn or dusk).
Strong light is reflected onto your vehicle or the roadway.
Brightness in the immediate are suddenly changes between light and dark, such as at the an entrance or exit of a tunnel.
The road has puddles or the surface of the road is shiny due to recent rainfall.
Shadows are cast across the lane lines (e.g., trees, buildings, guardrails, vehicle, etc.).
Spray or snow coming off the vehicle ahead.
Driving at night or in a dark condition such as a tunnel.
Roadway conditions
Certain features of the road can interfere with proper camera operation. Here are some examples:
- The lines are not very distinguishable from the surface of the road.
The section of the road has lane restrictions or temporarily marked lanes.
The lines are faded, removed lines remain visible next to newer lines (duplicate lines), or the road is marked with tire tracks.
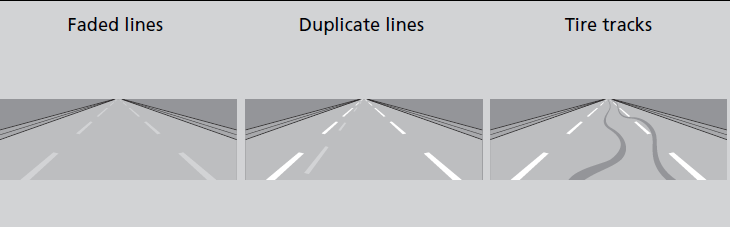
- The roadway has merging, split, or crossing lines (e.g., such as at an intersection or crosswalk).
The lane markings are extremely narrow, wide, or of inconsistent width.
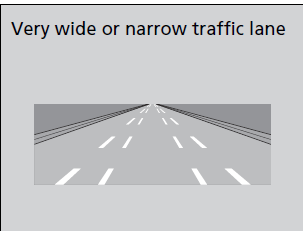
- The lane lines are partly concealed by your vehicle or another vehicle.
The road is hilly or the vehicle is approaching the crest of a hill.
The vehicle is shaking considerably because of an uneven road surface, etc.
Objects on the road (curb, guard rail, pylons, etc.) are recognized as white lines (or yellow lines).
The lines appear distorted or they briefly disappear out of the camera detection range due to an uneven road surface.
The road is unpaved, or has a rough or bumpy surface.
The roads has double lines.
The surface of the road is slippery due to icy or snowy conditions.
Sections of the paved road are obscured by puddles or snow.
The road has ruts. - The section of the road branches off or merges with another road.
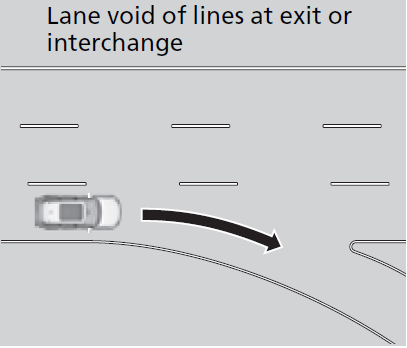
Certain features of the road can interfere with proper radar sensor operation. Here are some examples:
- The road has curves, undulations, slopes, etc.

- The radar beam is reflecting off multiple items that are within close proximity of your vehicle. This can happen when you are driving, for example, across a narrow truss bridge.
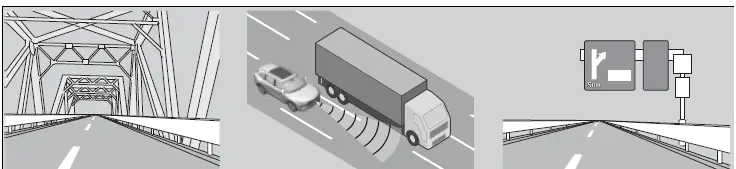
Detection limitations
- The vehicle ahead suddenly accelerates.
The vehicle ahead is a panel truck or a vehicle whose shape is not of standard dimensions.

- The vehicle ahead of you is a motorcycle, bicycle, mobility scooter, or other small vehicle.
The ground clearance of the vehicle ahead is unusually high.
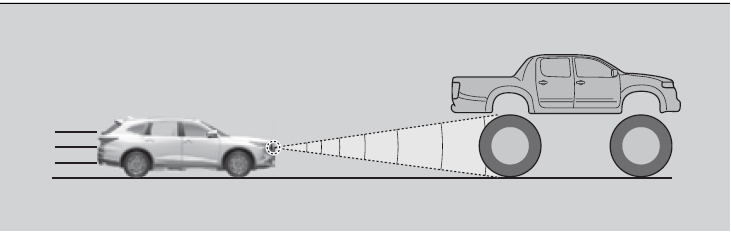
- A vehicle suddenly cuts in front of yours.
Road Departure Mitigation System
Alerts and helps to assist you when the system detects a possibility of your vehicle unintentionally crossing over detected lane markings and/or leaving the roadway altogether.
How the System Works
The front camera behind the rearview mirror monitors left and right lane markings (in white or yellow). If your vehicle is getting too close to detected lane markings without a turn signal activated, the system, in addition to a visual alert, applies steering torque and alerts you with rapid vibrations on the steering wheel, to help you remain within the detected lane.
Customized Features P. 351
As a visual alert, the Lane Departure message appears on the multi-information display.
If the system determines that its steering input is insufficient to keep your vehicle on the roadway, it may apply braking.
-
- Braking is applied only when the lane markings are solid continuous lines.
The system cancels assisting operations when you turn the steering wheel to avoid crossing over detected lane markings.
If the system operates several times without detecting driver response, the system beeps to alert you.
When you use the turn signal to indicate a lane change, Traffic Jam Assist is temporarily deactivated. It is reactivated once the vehicle is traveling in the center of the lane and the system has detected the traffic lane lines.
The system cancels assisting operations when you turn the steering wheel to avoid crossing over detected lane markings.
If the system operates several times without detecting driver response, the system beeps to alert you.
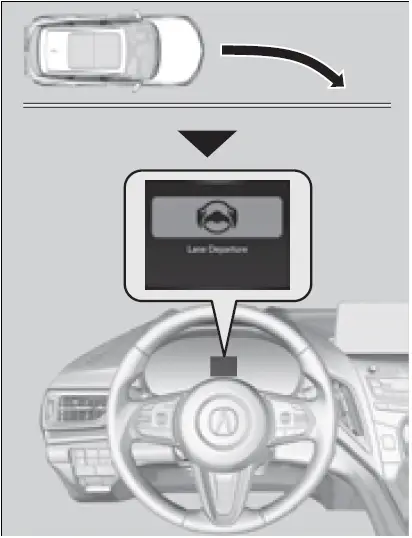 Important Safety Reminder
Like all assistance systems, the Road Departure Mitigation system has limitations.
Overreliance on the Road Departure Mitigation system may result in a collision. It is always your responsibility to keep the vehicle within your driving lane.
The Road Departure Mitigation system only alerts you when lane drift is detected without a turn signal in use. The Road Departure Mitigation system may not detect all lane markings or lane or roadway departures; accuracy will vary based on weather, speed and lane marker condition. It is always your responsibility to safely operate the vehicle and avoid collisions.
You can read about handling information for the camera equipped with this system.
Front Sensor Camera P. 562
The Road Departure Mitigation system may not work properly or may work improperly under the certain conditions:
Road Departure Mitigation Conditions and Limitations P. 554
There are times when you may not notice the Road Departure Mitigation functions due to your operation of the vehicle, or road surface conditions.
The system cancels assisting operations when you turn the steering wheel to avoid crossing over detected lane markings.
If the system operates several times without detecting driver response, the system beeps to alert you.
If LKAS is off and you have selected Narrow from the customized options using the audio/information screen, the message below will appear in case the system determines a possibility of your vehicle crossing over detected lane markings.
Customized Features P. 351
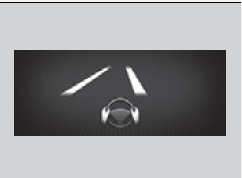
In the following case, a beeper sounds, a message related to the ACC with Low Speed Follow/ACC appears on the driver information interface, and the braking function controlled by the Road Departure Mitigation system is canceled.
- The vehicle has repeatedly applied the brakes to maintain the set speed (for example, you are descending a long slope).
How the System Activates
The system activates when all of the following conditions are met:
- The vehicle is traveling between about 45 and 90 mph (72 and 145 km/h).
The vehicle is on a straight or slightly curved road.
The turn signals are off.
The brake pedal is not depressed.
The wipers are not in high speed operation.
The system makes a determination that the driver is not actively accelerating, braking, or steering.
The Road Departure Mitigation system may automatically shut off and the indicator comes and stays on.
Indicators P. 86
Road Departure Mitigation system function can be impacted when the vehicle is:
Not driven within a traffic lane.
Driven on the inside edge of a curve, or outside of a lane.
Driven in a narrow lane.
Road Departure Mitigation On and Off
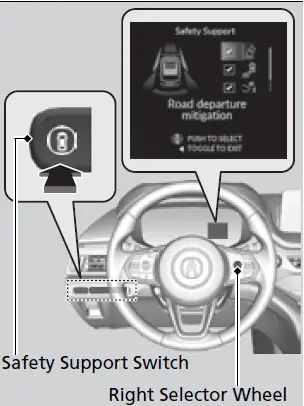 When you turn the Road Departure Mitigation on and off, do the following.
- Press the safety support switch.
- Roll the right selector wheel to the
 symbol and push it.
- The message appears on the multi-information display when the system turns on or off.
- A check mark appears in the box and the color of the symbol changes green when the system is on. The check mark disappears and the color of the symbol changes gray when the system is off.
When you have selected Warning Only from the customized options using the audio/information screen, the system does not operate the steering wheel and braking.
Customized Features P. 351
You can also select the safety support content from the driver information interface.
Driver Information Interface (Right Side
Area) P. 111
The vehicle stability assistTM (VSA®) system, adaptive cruise control (ACC) with low speed follow, safety support and low tire pressure/TPMS indicators may come on in amber along with a message in the driver information interface when you set the power mode to ON after reconnecting the battery.
Drive a short distance at more than 12 mph (20 km/h).
Each indicator should go off. If any do not, have your vehicle checked by a dealer.
Road Departure Mitigation Conditions and Limitations
The system may not properly detect lane markings and the position of your vehicle under certain conditions. Some examples of these conditions are listed below.
Environmental conditions
- Driving in bad weather (rain, fog, snow, etc.).
Sudden changes between light and dark, such as an entrance or exit of a tunnel.
There is little contrast between lane lines and the roadway surface.
Driving into low sunlight (e.g., at dawn or dusk).
Strong light is reflected onto the roadway.
Driving in the shadows of trees, buildings, etc.
Shadows of adjacent objects are parallel to lane markings.
Roadway objects or structures are misinterpreted as lane markers.
Reflections on the interior of the windshield.
Driving at night or in a dark condition such as a tunnel.
Roadway conditions
- Driving on a snowy or wet roadway (obscured lane marking, vehicle tracks, reflected lights, road spray, high contrast).
Driving on a road with temporary lane markings.
Faint, multiple, or varied lane markings are visible on the roadway due to road repairs or old lane markings.
The roadway has merging, split, or crossing lines (e.g., such as at an intersection or crosswalk).
The lane markings are extremely narrow, wide, or changing.
The vehicle in front of you is driving near the lane lines.
The road is hilly or the vehicle is approaching the crest of a hill.
Driving on rough or unpaved roads, or over bumpy surfaces.
When objects on the road (curb, guard rail, pylons, etc.) are recognized as white (or yellow) lines.
Driving on roads with double lines.
Vehicle conditions
- Headlight lenses are dirty or the headlights are not properly adjusted.
The outside of the windshield is streaked or blocked by dirt, mud, leaves, wet snow, etc.
The inside of the windshield is fogged.
The camera temperature gets too high.
An abnormal tire or wheel condition (incorrect sizes, varied sizes or construction, improperly inflated, compact spare tire*, etc.).
The vehicle is tilted due to a heavy load or suspension modifications.
When tire chains are installed.
The vehicle is towing a trailer.
Models with Electronic Air Suspension (EAS)
- The EAS is malfunctioning.
Not available on all models
Traffic Sign Recognition System
Reminds you of road sign information of the current speed limit your vehicle has just passed through, showing it on the multi-information display and the head-up display*.
Not all signs may be displayed, but any signs posted on roadsides should not be ignored. The system does not work on the designated traffic signs of all the countries you travel, nor in all situations.
Do not rely too much on the system. Always drive at speeds appropriate for the road conditions.
Never apply a film or attach any objects to the windshield that could obstruct the camera’s field of vision and cause the system to operate abnormally. Scratches, nicks, and other damage to the windshield within the camera’s field of vision can cause the system to operate abnormally. If this occurs, we recommend that you replace the windshield with a genuine Acura replacement windshield. Making even minor repairs within the camera’s field of vision or installing an aftermarket replacement windshield may also cause the system to operate abnormally. After replacing the windshield, have a dealer recalibrate the camera. Proper calibration of the camera is necessary for the system to operate properly.
To help reduce the likelihood that high interior temperatures will cause the camera’s sensing system to shut off, when parking, find a shady area or face the front of the vehicle away from the sun. If you use a reflective sun shade, do not allow it to cover the camera housing. Covering the camera can concentrate heat on it.
You can read about handling information for the camera equipped with this system.
Front Sensor Camera P. 562
How the System Works
Shows the current speed limit based on either information compiled through the navigation system* or speed limit signs captured by the front sensor camera. The system displays the ones that are recognized as designated for your vehicle. The sign icon will be displayed until the vehicle reaches a predetermined time and distance. If the system does not detect any traffic signs while you are driving, the sign icon will not be displayed.
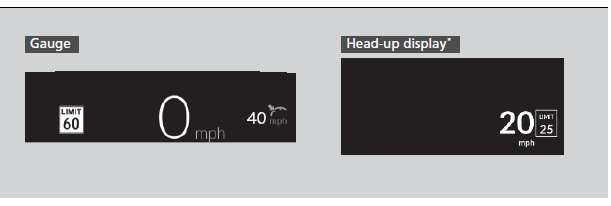
- The sign icon also may switch to another one or disappear when:
- The other designated limit is detected.
You make a turn with a turn signal at an intersection.
You can select whether the source of the speed limit information is the front sensor camera or the navigation system.
You can also turn off speed limit information.
Customized Features P. 351
You can turn on or off the speed limit information.
Customized Features P. 351
Traffic Sign Assist Conditions and Limitations
The Traffic Sign Recognition system may incorrectly recognize, be slow to identify, or fail to recognize the traffic sign in the following cases.
Vehicle conditions
- Headlight lenses are dirty or the headlights are not properly adjusted.
The outside of the windshield is blocked by dirt, mud, leaves, wet snow, etc.
The inside of the windshield is fogged.
There are portions remaining to be wiped.
An abnormal tire or wheel condition (incorrect sizes, varied sizes or construction, improperly inflated, compact spare tire*, etc.).
The vehicle is tilted due to a heavy load or suspension modifications.
Environmental conditions
- Driving into low sunlight (e.g., at dawn or dusk).
Strong light is reflected onto the roadway.
Sudden changes between light and dark, such as an entrance or exit of a tunnel.
When you drive in the shadows of trees, buildings, etc.
Driving at night, in dark areas such as long tunnels.
Driving in bad weather (rain, fog, snow, etc.).
A vehicle in front of you is kicking up spray or snow.
When the Traffic Sign Recognition system malfunctions, appears on the multi-information display and the head-up display*. If this message does not disappear, have your vehicle checked by a dealer.
 The position or the condition of the traffic sign
- A sign is hard to be found since it is in a complicated area.
A sign is located far away from your vehicle. - A sign is located where the beam of the headlight is hard to reach.
- A sign is on a corner or bend in the road.
- Faded or bent signs.
- Rotated or damaged signs.
- A sign is covered with mud, snow, or frost.
- A part of the sign is hidden by the trees, or the sign itself is hidden by a vehicle and others.
- Light (a streetlight) or a shadow is reflected on the surface of the sign.
- A sign is too bright or too dark (an electric sign).
- A sign of a small size.
Other conditions
- When you are driving at a high speed.
The Traffic Sign Recognition system may not operate correctly, such as displaying a sign that does not follow the actual regulation for the roadway or does not exist at all in the following cases.
- A speed limit sign may display at a higher or lower speed than the actual speed limit.
- There is a supplementary sign with further information such as weather, time, vehicle type, school zone, etc.
- Figures on the sign are hard to read (electric signs, numbers on the sign are blurred, etc.).
- The sign is in the vicinity of the lane you are driving in, even though it is not for the lane, such as a speed limit sign situated at an exit or an intersection between the side road and the main road.
- There are things that look similar to the color or shape of the recognition object (similar sign, electric sign, signboard, structure, etc.).
- A truck or another large vehicle with a sticker of the speed limit sign on the back is traveling in front of you.
Signs Displayed on the Multi-Information Display and Head-up Display*
Gauge
The speed limit sign icon is displayed on the right half of the screen.
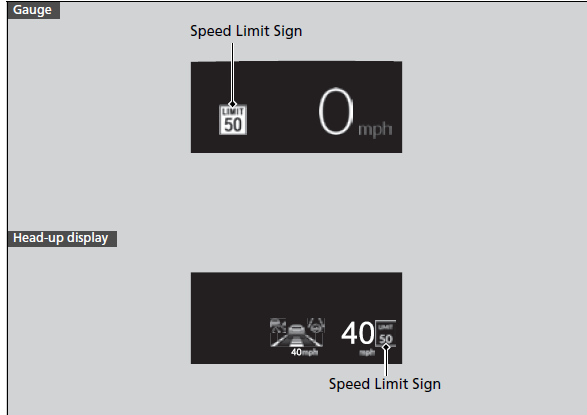
Head-up Display
The speed limit sign icon is displayed on the right half of the screen.
Front Wide View Camera
The camera, used in systems such as Lane Keeping Assist System (LKAS), Road Departure Mitigation system, Adaptive Cruise Control (ACC) with Low Speed Follow, Traffic Sign Recognition system, and Collision Mitigation Braking SystemTM (CMBSTM), is designed to detect an object that triggers any of the systems to operate their functions.
Camera Location and Handling Tips
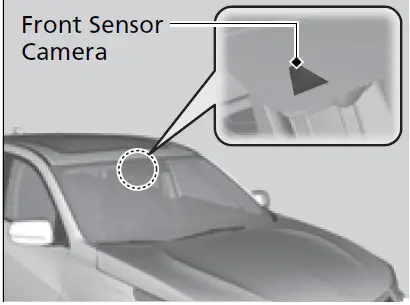 This camera is located behind the rearview mirror.
To help reduce the likelihood that high interior temperatures will cause the camera’s sensing system to shut off, when parking, find a shady area or face the front of the vehicle away from the sun. If you use a reflective sun shade, do not allow it to cover the camera housing. Covering the camera can concentrate heat on it.
Never apply a film or attach any objects to the windshield, the hood, or the front grille that could obstruct the camera’s field of vision and cause the system to operate abnormally.
Scratches, nicks, and other damage to the windshield within the camera’s field of vision can cause the system to operate abnormally. If this occurs, we recommend that you replace the windshield with a genuine Acura replacement windshield. Making even minor repairs within the camera’s field of vision or installing an aftermarket replacement windshield may also cause the system to operate abnormally. After replacing the windshield, have a dealer recalibrate the camera. Proper calibration of the camera is necessary for the system to operate properly.
Do not place an object on the top of the instrument panel. It may reflect onto the windshield and prevent the system from detecting lane lines properly.
If the Some driver assist systems cannot operate: Camera temperature too high message appears:
- Use the climate control system to cool down the interior and, if necessary, also use defroster mode with the airflow directed towards the camera.
Start driving the vehicle to lower the windshield temperature, which cools down the area around the camera.
If the Some driver assist systems cannot operate: Clean front windshield or poor viewing condition. message appears:
- Park your vehicle in a safe place, and make sure the windshield is clean.
Clean the windshield if it is dirty. If the message does not disappear after driven for a while, have your vehicle checked by a dealer.
Radar Sensor
The radar sensor is behind the emblem.
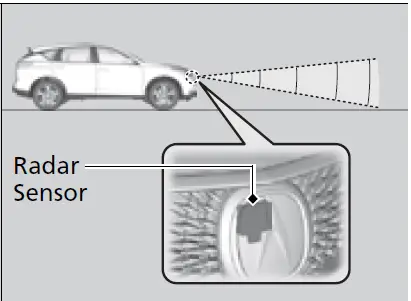
Avoid strong impacts to the radar sensor cover.
For the system to work properly, observe the following precautions.
- Always keep the emblem and front grille clean.
Never use chemical solvents or polishing powder for cleaning the emblem and front grille. Clean it with water or a mild detergent.
Do not put a sticker on the radar sensor cover or replace the radar sensor cover.
If you need the radar sensor to be repaired, or removed, or the radar sensor cover is strongly impacted, turn off the system by using the safety support switch and take your vehicle to a dealer.
CMBSTM On and Off P. 499
If the vehicle is involved in any of the following situations, the radar sensor may not work properly. Have your vehicle checked by a dealer:
Your vehicle is involved in a frontal collision
Your vehicle drives through deep water or is submerged in deep water
Your vehicle strongly strikes a bump, curb, chock, slope, or embankment that could jar the radar sensor
Sonar Sensors
Location and range of sensors
The sonar sensors are situated in the front and rear bumpers.
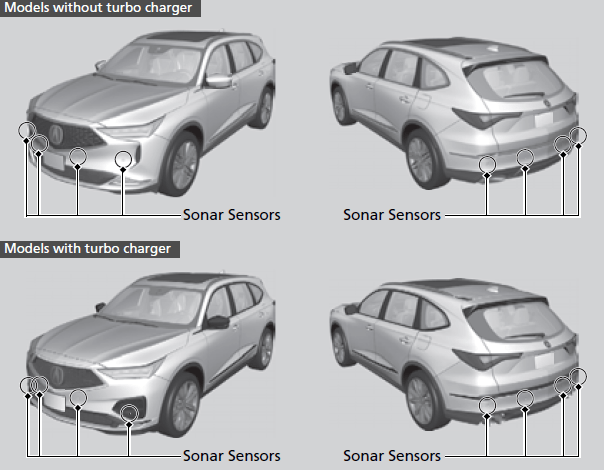
For the sonar sensors to work properly, do not:
- Place stickers or other objects on or around the sensors.
Hit the area around the sensors.
Attempt to take apart any sensor.
Put any accessories on or around the sensors.
Consult with a dealer if:
- A sensor has been subjected to shock.
Work needs to be done to the area around a sensor.
In the following cases, the sonar sensors may not work properly. Have your vehicle checked by a dealer.
- The front or rear bumper has made contact with a hill, parking block, curb, embankment, etc.
The vehicle has been involved in frontal or rear collision.
The vehicle has been driven through a deep puddle. 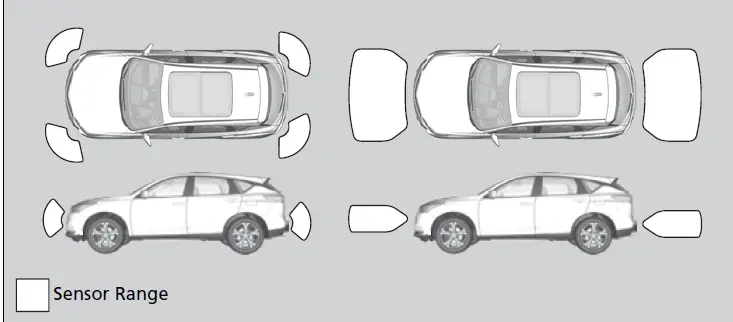
Braking
Brake System
Parking Brake
Use the parking brake to keep the vehicle stationary when parked. When the parking brake is applied, you can manually or automatically release it.
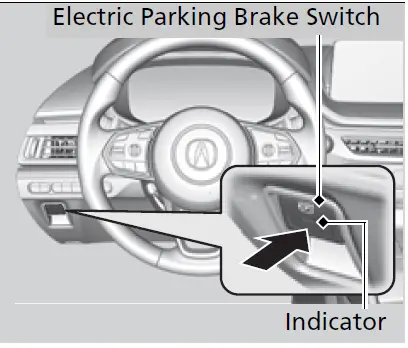
To apply
The electric parking brake can be applied any time the vehicle has battery, no matter which position the power mode is in.
Press the electric parking brake switch gently and securely.
- The indicator in the switch comes on.
The Parking Brake and Brake System indicator (red) comes on.
The indicator in the switch comes on.
The parking brake and brake system indicator (red) comes on.
When you depress the brake pedal, you may hear a whirring sound coming from the engine compartment. This is because the brake system is in operation, and it is normal.
You may hear the electric parking brake system motor operating from the rear wheel area when you apply or release the parking brake. This is normal.
The brake pedal may slightly move due to the electric parking brake system operation when you apply or release the parking brake. This is normal.
You cannot apply or release the parking brake if the battery goes dead.
If the Battery Is Dead P. 700
If you press and hold the electric parking brake switch while driving, the brakes on all four wheels are applied by the electric servo brake system until the vehicle come to a stop. The electric parking brake then applies, and the switch should be released.
To release
The power mode must be in ON in order to release the electric parking brake.
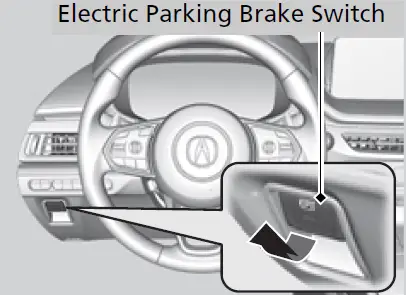
- Depress the brake pedal.
- Pull the electric parking brake switch up gently and securely.
- The indicator in the switch goes off.
- The Parking Brake and Brake System indicator (red) goes off.
Manually releasing the parking brake using the switch helps your vehicle start slowly and smoothly when facing downhill on steep hills.
In the following situations, the parking brake automatically operates.
- When the vehicle stops more than 10 minutes while ACC with Low Speed Follow is activated.
- When the driver’s seat belt is unfastened while your vehicle is stopped automatically by ACC with Low Speed Follow.
When the engine is turned off, except by Auto Idle Stop system, while ACC with Low Speed Follow is activated.
When the vehicle stops with the automatic brake hold system activated for more than 10 minutes.
When the driver’s seat belt is unfastened while your vehicle is stopped and automatic brake hold is applied.
When the engine is turned off, except by Auto Idle Stop system, while automatic brake hold system is applied.
When there is a problem with the automatic brake hold system while Automatic Brake Hold is applied. - Automatic parking brake feature operation
If the automatic parking brake feature has been activated:
The parking brake is applied automatically when you set the power mode to VEHICLE OFF.
To confirm that the parking brake is applied, check if the Parking Brake and Brake System indicator (red) is on.
Activating and deactivating the automatic parking brake feature P. 548
To release automatically
Depressing the accelerator pedal releases the parking brake.
Use the accelerator pedal to release the brake when you are starting the vehicle facing uphill, or in a traffic jam.
Gently depress the accelerator pedal. When on a hill, it may require more accelerator input to release.
The Parking Brake and Brake System indicator (red) goes off.
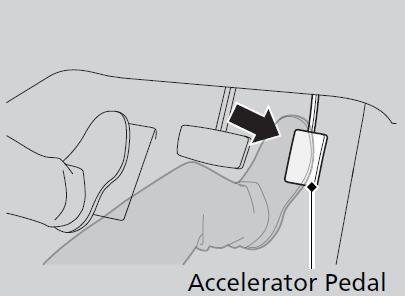
You can release the parking brake automatically when:
- You are wearing the driver’s seat belt.
The engine is running.
The transmission is not in (P or (N.
If the parking brake cannot be released automatically, release it manually.
When the vehicle is traveling uphill, the accelerator pedal may need to be pressed farther to automatically release the electric parking brake.
The parking brake cannot be released automatically while the following indicators are on:
- Malfunction indicator lamp
Transmission system indicator
The parking brake may not be released automatically while the following indicators are on:
- Parking brake and brake system indicator (amber)
VSA® system indicator
ABS indicator
Supplemental restraint system indicator
Activating and deactivating the automatic parking brake feature
With the power mode is in ON, carry out the following steps to either activate or deactivate the automatic parking brake feature.
- Put the transmission into (P.
- Without depressing the brake pedal, pull up and release the electric parking brake switch.
- Check that the parking brake and brake system indicator (red) has come on.
- Pull up and hold the electric parking brake switch. When you hear a beeping sound, release the switch and within 3 seconds pull up and hold the switch again.
- When you hear a sound indicating that the procedure is completed, release the switch.
- Two beeps indicates that the feature has been activated.
- One beep indicates that the feature has been deactivated.
- When you have completed activating the feature, the parking brake will remain applied after you turn off the engine.
- To confirm that the parking brake is applied, check if the parking brake and brake system indicator (red) is on.
- If you need to temporarily deactivate the feature while putting your vehicle through a conveyor type car wash, you can follow the procedure explained below.
- Depress the brake pedal and bring the vehicle to a stop.
- Set the power mode to VEHICLE OFF and then within 2 seconds pull up the parking brake switch.
- Activation and deactivation settings for the feature will not be affected.
- Before temporarily deactivating the feature, make sure to first turn off both ACC with Low Speed Follow and the automatic brake hold system.
- To confirm that the parking brake is applied, check if the Parking Brake and Brake System indicator (red) is on.
In cold climates, the parking brake may freeze in place if applied.
When parking the vehicle, chock the wheels and make sure the automatic parking brake feature is deactivated.
Also, when putting your vehicle through a conveyor-type car wash or when having your vehicle towed, deactivate the automatic parking brake feature and leave the parking brake released.
- To confirm that the parking brake is applied, check if the parking brake and brake system indicator (red) is on.
Foot Brake
Your vehicle is equipped with disc brakes at all four wheels. A vacuum power assist helps to reduce the effort needed on the brake pedal. The brake assist system increases the stopping force when you depress the brake pedal hard in an emergency situation. The anti-lock brake system (ABS) helps you retain steering control when braking very hard.
Brake Assist System P. 575
Anti-lock Brake System (ABS) P. 574
Brake squeal
To satisfy the performance under a wide range of driving conditions, a high performance braking system is equipped on your vehicle. You may hear the brake squeal under certain conditions, such as vehicle speed, deceleration, humidity, and so on. This is not a malfunction.
Check the brakes after driving through deep water, or if there is a buildup of road surface water. If necessary, dry the brakes by lightly depressing the pedal several times.
If you hear a continuous metallic friction sound when applying the brakes, this is caused by the brake wear indicator rubbing on the brake rotor and indicates that the brake pads need to be replaced. Have the vehicle checked by a dealer. If you hear only an occasional squeak or squeal when you initially apply the brake pedal, this may be normal and caused by high frequency vibration of the brake pads against the rotating brake disc.
Constantly using the brake pedal while going down a long hill builds up heat, which reduces the brake effectiveness. Apply engine braking by taking your foot off the accelerator pedal and downshifting to a lower gear/speed position. With manual transmission use a lower gear for greater engine braking.
Do not rest your foot on the brake pedal while driving, as it will lightly apply the brakes and cause them to lose effectiveness over time and reduce pad life. It will also confuse drivers behind you.
Whenever the brakes are activated by CMBSTM or another system that automatically controls braking, the brake pedal is depressed and released in accordance with braking function.
Automatic Brake Hold
Keeps the brake applied after releasing the brake pedal until the accelerator pedal is pressed. You can use this system while the vehicle is temporarily stopped, like at traffic lights and in heavy traffic.

Turning on the system
Fasten your seat belt properly, then start the engine. Press the automatic brake hold button.
- The automatic brake hold system indicator comes on. The system is turned on.
Activating the system
Depress the brake pedal to come to a complete stop. The transmission must not be in (P or(R.
- The automatic brake hold indicator comes on. Braking is kept for up to 10 minutes.
Release the brake pedal after the automatic brake hold indicator comes on.
WARNING
Activating the automatic brake hold system on steep hills or slippery roads may still allow the vehicle to move if you remove your foot from the brake pedal.
If a vehicle unexpectedly moves, it may cause a crash resulting in serious injury or death.
Never activate the automatic brake hold system or rely on it to keep a vehicle from moving when stopped on a steep hill or slippery roads.
WARNING
Using the automatic brake hold system to park the vehicle may result in the vehicle unexpectedly moving.
If a vehicle moves unexpectedly, it may cause a crash, resulting in serious injury or death.
Never leave the vehicle when braking is temporarily kept by automatic brake hold and always park the vehicle by putting the transmission in (P and applying the parking brake.
The system automatically cancels when:
- You engage the parking brake.
You depress the brake pedal and put the transmission into (P or (R.
The system automatically cancels and the parking brake is applied when:
- Braking is kept for more than 10 minutes.
The driver’s seat belt is unfastened.
The engine is turned off.
There is a problem with automatic brake hold system.
- WARNING
When using the automatic brake hold, keep your foot on the brake pedal until the automatic brake hold indicator comes on. If the vehicle unexpectedly moves, it may cause a crash resulting in serious injury or death.
Release your foot from the brake pedal after the automatic brake hold indicator comes on.
While the system is activated, you can turn off the engine or park the vehicle through the same procedure as you normally do.
When Stopped P. 555
Whether the system is on, or the system is activated, the automatic brake hold turns off once the engine is off.
You may hear an operating noise if the vehicle moves while the automatic brake hold system is in operation.
Turning off the automatic brake hold system
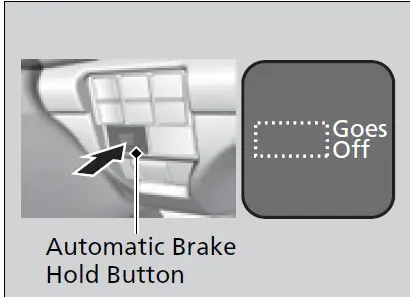
While the system is on, press the automatic brake hold button again.
- The automatic brake hold system indicator goes off.
If you want to turn off automatic brake hold while the system is in operation, press the automatic brake hold button with the brake pedal depressed.
Make sure to turn off the automatic brake hold system before using an automated car wash.
Anti-lock Brake System (ABS)
Helps prevent the wheels from locking up, and helps you retain steering control by pumping the brakes rapidly, much faster than you can.
The electronic brake distribution (EBD) system, which is part of the ABS, also balances the front-to-rear braking distribution according to vehicle loading.
You should never pump the brake pedal. Let the ABS work for you by always keeping firm, steady pressure on the brake pedal. This is sometimes referred to as “stomp and steer.”
ABS operation
The brake pedal may pulsate slightly when the ABS is working. Depress the brake pedal and keep holding the pedal firmly down. On dry pavement, you will need to press on the brake pedal very hard before the ABS activates. However, you may feel the ABS activate immediately if you are trying to stop on snow or ice.
ABS may activate when you depress the brake pedal when driving on:
Wet or snow covered roads.
Roads paved with stone.
Roads with uneven surfaces, such as potholes, cracks, manholes, etc.
When the vehicle speed goes under 6 mph (10 km/h), the ABS stops.
NOTICE
The ABS may not function correctly if you use a tire of the incorrect size or type.
If the ABS indicator comes on while driving, there may be a problem with the system.
While normal braking will not be affected, there is a possibility that the ABS will not be operating. Have your vehicle checked by a dealer immediately.
The ABS is not designed for the purpose of reducing the time or distance it takes for a vehicle to stop: It is designed to limit brake lockup which can lead to skidding and loss of steering control.
In the following cases, your vehicle may need more distance to stop than a vehicle without the ABS:
- You are driving on rough or uneven road surfaces, such as gravel or snow.
The tires are equipped with tire chains.
The following may be observed with the ABS system:
- Motor sounds coming from the engine compartment when the brakes are applied, or when system checks are being performed after the engine has been started and while the vehicle accelerates.
Brake pedal and/or the vehicle body vibration when ABS activates. - These vibrations and sounds are normal to ABS systems and are no cause for concern.
Brake Assist System
Designed to assist the driver by generating greater braking force when you depress the brake pedal hard during emergency braking.
Brake assist system operation
Press the brake pedal firmly for more powerful braking.
When brake assist operates, the pedal may wiggle slightly and an operating noise may be heard. This is normal. Keep holding the brake pedal firmly down.
Parking Your Vehicle
When Stopped
- Depress the brake pedal firmly and come to a complete stop.
- With the brake pedal depressed, press the electric parking brake switch slowly, but fully.
- Change the shift position to (P.
- Do not release the brake pedal until you have confirmed that (P is shown on the shift position indicator.
- Turn off the engine.
- The Parking Brake and Brake System indicator (red) goes off in about 30 seconds.
Always set the parking brake, in particular if you are parked on an incline.
WARNING
The vehicle can roll away if left unattended without confirming that Park is engaged.
A vehicle that rolls away could cause a crash resulting in serious injury or death.
Always keep your foot on the brake pedal until you have confirmed that (P is shown on the shift position indicator.
Do not park your vehicle near flammable objects, such as dry grass, oil, or timber.
Heat from the exhaust can cause a fire.
NOTICE
The following can damage the transmission:
- After shutting off the engine, you may hear certain noises coming from the vehicle. Here’s the lowdown:
- Noise from Under Vehicle: This noise is caused by the vacuum pump inside the fuel evaporation leakage check module (ELCM).
Depending on conditions, the pump will come on for about 15 minutes about 5 to 10 hours after engine shutoff. This noise is just normal vehicle operation and don’t indicate a vehicle problem.
Parking Sensor System*
The corner and center sensors monitor obstacles around your vehicle, and the beeper, driver information interface and audio/information screen let you know the approximate distance between your vehicle and the obstacle.
The sensor location and range
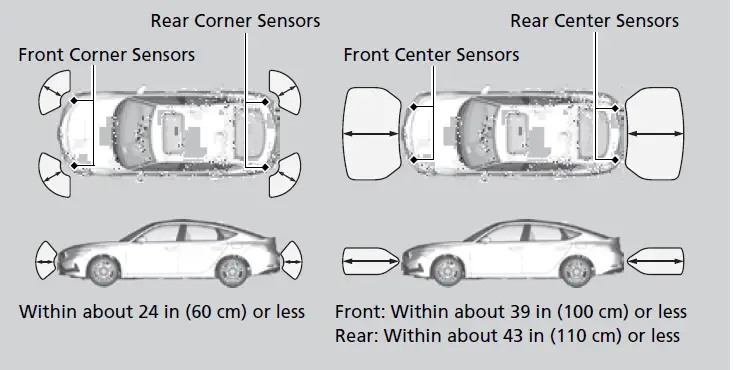 Even when the system is on, always confirm if there is no obstacle near your vehicle before parking.
The system may not work properly when:
- The sensors are covered with snow, ice, mud, or dirt.
- The vehicle has been out in hot or cold weather.
There is something nearby that emits ultrasonic waves or high frequency sounds.
Driving in bad weather (rain, fog, snow, etc.).
Any accessories have been put on or around the sensors.- If you put any accessories on or around the rear sensors, the system may activate if it detects these accessories as an obstacle. In this case, turn off the rear sensor.
Turning off All Rear Sensors P. 581
- If you put any accessories on or around the rear sensors, the system may activate if it detects these accessories as an obstacle. In this case, turn off the rear sensor.
The system may not sense:
- Thin or low objects.
Sonic-absorptive materials, such as snow, cotton, or sponge - Objects directly under the bumper.
Do not put any accessories on or around the sensors.
Parking sensor system on and off
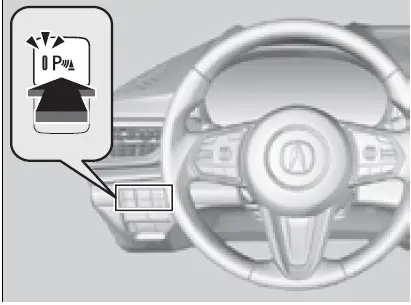 With the power mode in ON, press the parking sensor system button to turn on or off the system. The indicator in the button comes on when the system is on.
The front center and front corner sensors start to detect an obstacle when the transmission is in any position other than (Por (R, and the vehicle speed is less than 5 mph (8 km/h).
The front corner, rear center and rear corner sensors start to detect an obstacle when the transmission is in (R, and the vehicle speed is less than 5 mph (8 km/h).
When you set the power mode to ON, the system will be in the previously selected condition.
| Interval between beeps | Distance between the Bumper and Obstacle | Indicator | Multi-Information Display Audio/information Screen | |
| Corner Sensors | Center Sensors | |||
| Moderate |
— |
Rear: About 43-24 in (110-60 cm) Front: About 39-24 in (100-60 cm) |
Blinks in Yellow*1 | 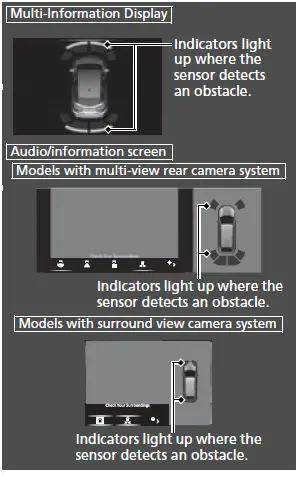 |
| Short | About 24-18 in (60-45 cm) |
About 24-18 in (60-45 cm) |
Blinks in Amber | |
| Very short | About 18-14 in (45-35 cm) |
About 18-14 in (45-35 cm) |
||
| Continuous | About 14 in (35 cm) or less | About 14 in (35 cm) or less | Blinks in Red | |
Turning off All Rear Sensors
To deactivate the rear sensors, please take the following steps:
- Make sure that the parking sensor system is not activated.
- The indicator in the button turns off.
- Set the power mode to VEHICLE OFF.
- Press and hold the parking sensor system button, and set the power mode to ON.
- Keep pressing the button for 10 seconds. Release the button when the indicator in the button flashes.
- The beeper sounds once.
- While the indicator is flashing, press the button again. The indicator in the button turns off.
- The beeper sounds twice. The rear sensors are now turned off. They will remain turned off until manually turned back on again. To turn the rear sensors on again, follow the above procedure. The beeper sounds three times when the rear sensors come back on.
When you shift to (R, the indicator in the parking sensor system button blinks as a reminder that the rear sensors have been turned off.
If the rear sensors are turned off when using the parking sensor system, the Low Speed Braking Control System will not activate while reversing.
Low Speed Braking Control* P. 506
Cross Traffic Monitor
Monitors the rear corner areas using the radar sensors when reversing, and alerts you if a vehicle approaching from a rear corner is detected.
The system is convenient when you are backing out of a parking space.
CAUTION
Cross Traffic Monitor cannot detect all approaching vehicles and may not detect an approaching vehicle at all.
Failure to visually confirm that it is safe to back up the vehicle before doing so may result in a collision.
Do not solely rely on the system when reversing; always also use your mirrors, and look behind and to the sides of your vehicle before reversing.
Models with Parking Sensor System
The parking sensor system’s alerting buzzer overrides the Cross Traffic Monitor buzzer when the sensors are detecting obstacles at the closest range.
How the System Works
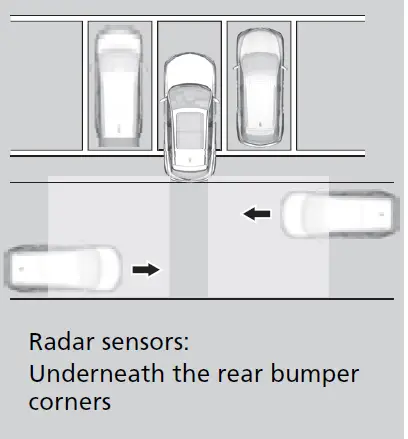
The system activates when:
- The power mode is in ON.
The Cross Traffic Monitor is turned on.
Cross Traffic Monitor On and Off P. 585
The transmission is in (R.
Your vehicle is moving at 3 mph (5 km/h) or lower.
When a vehicle is detected approaching from a rear corner, Cross Traffic Monitor alerts you with a buzzer and a displayed warning.
The system will not detect a vehicle that approaches from directly behind your vehicle, nor will it provide alerts about a detected vehicle when it moves directly behind your vehicle.
The system does not provide alerts for a vehicle that is moving away from your vehicle, and it may alert for pedestrians, bicycles, or stationary objects.
Cross traffic monitor may not detect or may delay alerting an approaching vehicle, or may alert without an approaching vehicle under the following conditions:
- An obstacle, such as another vehicle and a wall, near your vehicle’s rear bumper, is blocking the radar sensor’s scope.
Your vehicle is moving at the speed of about 3 mph (5 km/h) or higher.
A vehicle is approaching at the speed other than between about 6 mph (10 km/h) and 16 mph (25 km/h). - The system picks up external interference such as other radar sensors from another vehicle or strong radio wave transmitted from a facility nearby. Either corner of the rear bumper is covered with snow, ice, mud or dirt.
- When there is bad weather.
Your vehicle is on an incline.
Your vehicle is tilted due to a heavy load in the rear.
Your vehicle is reversing towards a wall, a pole, a vehicle, and so on.
The rear bumper or the sensors have been improperly repaired or the rear bumper has been deformed. Have your vehicle checked by a dealer.
For proper operation, always keep the rear bumper corner area clean.
Do not cover the rear bumper corner area with labels or stickers of any kind.
When the System Detects a Vehicle

An arrow icon appears on the side a vehicle is approaching on the audio/information screen.
If the on the lower right changes to in amber when the gear position is in (R, mud, snow or ice, etc. may have accumulated in the vicinity of the sensor. The system is temporarily canceled. Check the bumper corners for any obstructions, and thoroughly clean the area if necessary.
If the comes on when the gear position is in (R, there may be a problem with the Cross Traffic Monitor system. Do not use the system and have your vehicle checked by a dealer.
If the display remains the same with the transmission in (R, there may be a problem with the rear camera system and the Cross Traffic Monitor system.
Do not use the system and have your vehicle checked by a dealer.
Cross Traffic Monitor On and Off
You can switch the system on and off using the audio/information screen.
Customized Features P. 351
The system can also be turned on and off on the audio/information screen by pressing the Cross Traffic Monitor icon.

-
Multi-View Rear Camera
- About Your Multi-View Rear Camera
The audio/information screen can display your vehicle’s rear view.
The display automatically changes to the rear view when the transmission is put into (R.
Multi-View Rear Camera Display Area
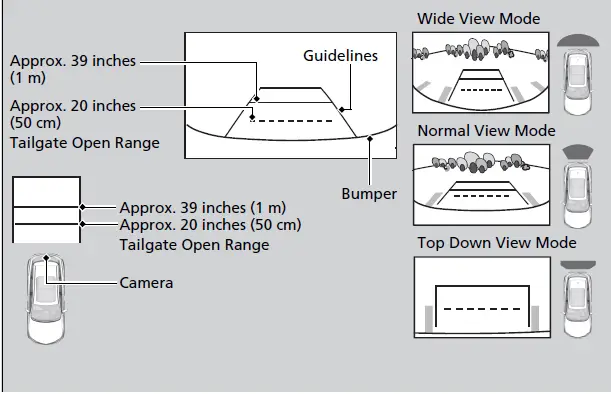
The rear camera view is restricted. You cannot see the corner ends of the bumper or what is underneath the bumper. Its unique lens also makes objects appear closer or farther than they actually are.
Visually confirm that it is safe to drive before backing up. Certain conditions (such as weather, lighting, and high temperatures) may also restrict the rear view. Do not rely on the rearview display which does not give you all information about conditions at the back of your vehicle.
The rear camera view is displayed prior to the audio/information screen.
If the camera lens is covered with dirt or moisture, use a soft, moist cloth to keep the lens clean and free of debris.
Rear Wiper/Washers P. 183
You can change the Fixed
Guideline and Dynamic Guideline settings.
Customized Features P. 351
Fixed Guideline
ON: Guidelines appear when you put the transmission into (R.
OFF: Guidelines do not appear.
Dynamic Guideline
ON: Guidelines move according to the steering wheel direction.
OFF: Guidelines do not move.
You can view three different camera modes on the rearview display. Touch the appropriate icon to switch the mode.
True Touchpad Interface P. 251
Wide view mode
Normal view mode
Top down view mode
- If you were last using Wide view mode or Normal view mode, the same view mode will be activated the next time you put the transmission into (R.
If you were using Top down view mode before turning off the engine, the next time you set the power mode to ON and put the transmission into (R, the view mode you were using just before using Top down view mode (Wide view mode or Normal view mode) will be activated.
If you were using Top down view mode and 10 seconds elapsed after you took the transmission out of (R, the view mode you were using just before selecting Top down view mode (Wide view mode or Normal view mode) will be activated the next time you put the transmission into (R. -
Surround View Camera System*
- Is a four camera system that views areas commonly known as “blind spots” from different angles, then displays the images on the audio/information screen. This system can be used to:
- Check the right and left sides of the vehicle while crossing at intersections with poor visibility (fog, heavy rain, obstructed view, etc.).
Check the right and left sides of the vehicle while crossing at intersections with poor visibility (obstructed view, etc.).
C2 Checking from the front wide view at intersections P. 594 - Check for obstacles in front of the vehicle when parking or maneuvering in confined areas.
Checking the sides of your vehicle P. 594 - Check for obstacles when you are moving in (R.
Using the Surround View Camera System P. 592
WARNING
Failure to visually assess the area around the vehicle (directly or by use of the mirrors) may result in a crash causing serious injury or death.
The areas shown in the surround view camera system display are limited. The display may not show all pedestrians or other objects around your vehicle.
Do not solely rely only on the surround view camera system display to assess whether it is safe to move your vehicle.
WARNING
Failure to pay proper attention to your surroundings while driving may result in a crash causing serious injury or death.
To help mitigate the chances of a collision, only look at the surround view camera system display when it is safe to do so.
Displaying an Image From the Surround View Cameras
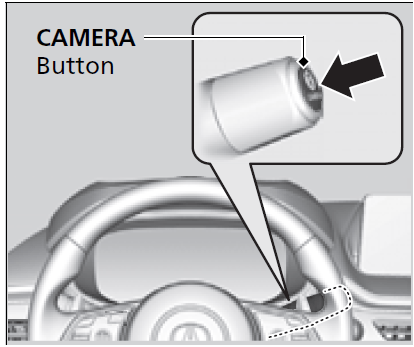
For frontal views:
Press the CAMERA button when the vehicle is stationary or moving at 12 mph (20 km/h) or slower. Press the button again to switch camera views.
For rear reviews:
Change the gear position to (R when the vehicle is stationary. Press the CAMERA button to switch to rear view mode.
You can customize the display setting.
Customized Features P. 351
The surround view camera system does not eliminate all blind spots. The system is for your convenience only.
Always keep the camera lenses clean and free from debris.
If the rear camera lens is covered with dirt or moisture, activate the rearview camera washer or use a soft, moist cloth to keep the lens clean and free of debris.
Rear Wiper/Washers P. 183
The navigation system is disabled when the gear position is in (R.
Pressing the (home) or (back) button while the surround view camera system screen is displayed cancels the front view screen of the surround view camera system.
If you press the CAMERA button while the vehicle speed is more than 16 mph (25 km/h), the standby screen appears.
When the vehicle speed is reduced below 12 mph (20 km/h), the screen switches to a surround view camera system image.
Camera Locations and Images
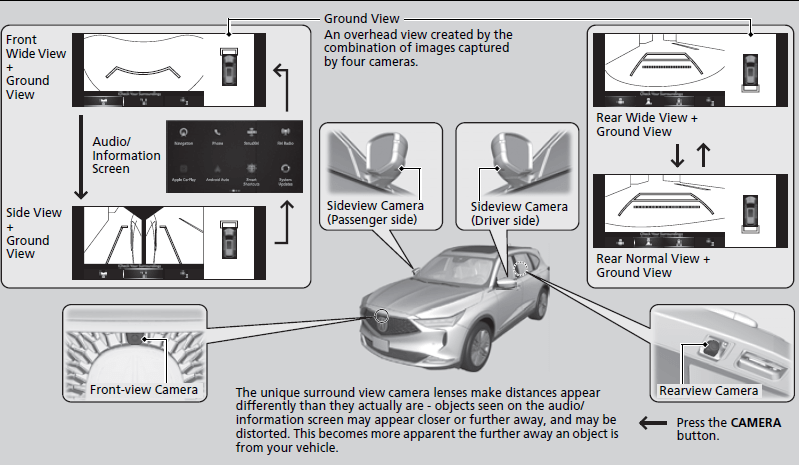
Reference Lines and Guides
Following can be displayed when the system is on.
Guidelines: Help you to get a sense of a distance between your vehicle and the rear surroundings. The distance may appear differently than the actual distance.
Projection lines: Indicate vehicle direction while the steering wheel is in the current position.
The positions/distances indicated by the guidelines and camera views on the display may differ from the actual positions/distances due to the changes in the vehicle height, road conditions, and other factors. The guidelines should be used as a reference only.
The guidelines can be turned on and off using the audio/information screen.
Customized Features P. 351
If you turn the guidelines off, they remain off until you turn them back on.
Using the Surround View Camera System
Checking for Obstacles at the Back of Your Vehicle
The display automatically changes to the rear view when the gear position is changed to (R.
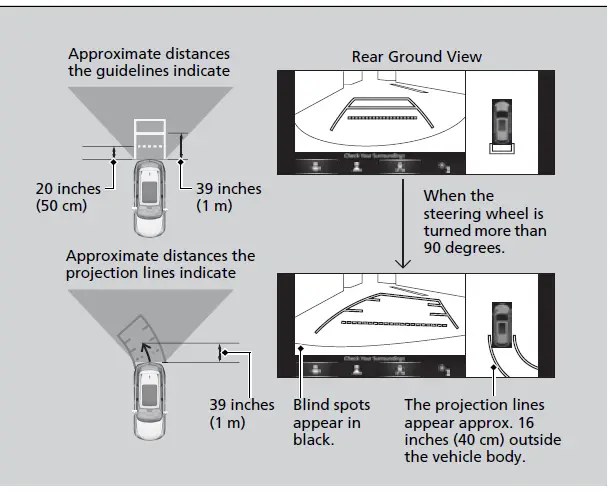
The ground view can be displayed even with the door mirrors folded. However, the viewable angle and blind spot change.
Do not refer to the surround view camera system when the door mirrors are folded.
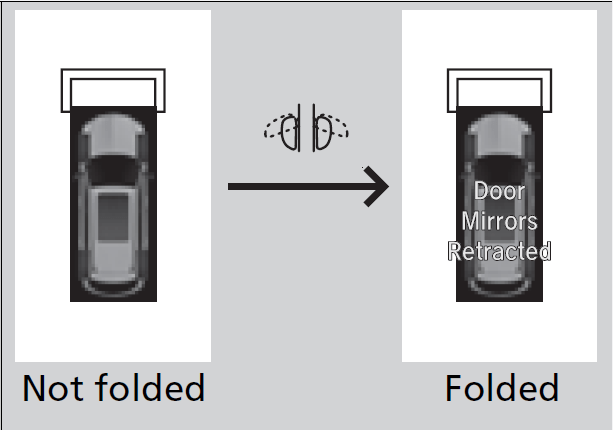
When changing the gear position from/to (R, you may experience a delay in switching between the audio/information screen and a rear view image.
Checking for the sides of your vehicle
You can display the front ground view screen using all the four cameras for the system. Pressing the CAMERA button when the vehicle speed is at below 12 mph (20 km/h) changes the image as follows.
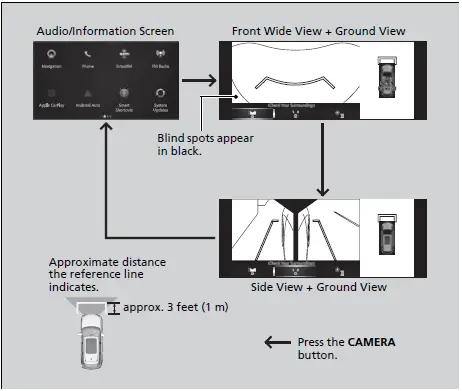
If the vehicle speed exceeds 16 mph (25 km/h) while the front or side view image from the multi-view camera is displayed, the screen automatically switches to the audio/information screen.
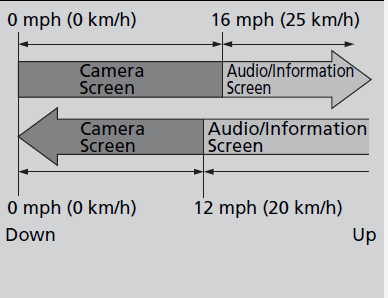
Checking from the front wide view at intersections
The front wide view screen is useful when you need to check for vehicles crossing from either direction at an intersection with poor visibility.
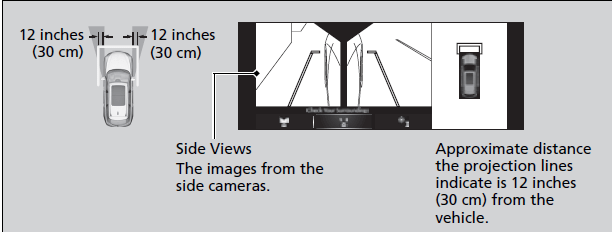
Checking the sides of your vehicle
The side view screens are convenient when you pull over at a curb or tollbooth, or slowly pass by oncoming vehicles on a narrow road.
The front wide view image is a wide-angled view. The displayed image will be largely distorted, and objects may appear closer or more distant than they actually are.
When the door mirrors are folded, the side views cannot be displayed.
Surround View Camera System Limitations
| Conditions | Solutions | |
| The images may not appear clearly when: |
|
Do not use the surround view camera system but rely only on visual confirmation until the conditions allow the system to work properly. |
| A camera lens is covered with dirt, moisture, or debris.
A camera lens is scratched. |
Clean rear camera lenses with the rearview camera washer or a soft cloth moisturized with water, mild detergent or glass cleaner.
2 Rear Wiper/Washers P. 183 |
|
| The audio/information screen is dirty. | Wipe off the screen using a soft dry cloth. | |
| A camera angle is altered. | A camera or the area around the camera has been severely impacted. | Do not use the surround view camera system and contact a dealer. |
| An error message is displayed while the surround view camera system is in use. | ||
Refueling
Fuel recommendation
Unleaded premium gasoline, pump octane number 91 or higher
Use of a lower octane gasoline can cause occasional metallic knocking noise in the engine and will result in decreased engine performance.
Use of a gasoline with a pump octane less than 87 can lead to engine damage.
WARNING
Failure to pay proper attention to your surroundings while driving may result in a crash causing serious injury or death.
To help mitigate the chances of a collision, only look at the surround view camera system display when it is safe to do so.
Top tier detergent gasoline
Because the level of detergency and additives in gasoline vary in the market, Acura endorses the use of “TOP TIER Detergent Gasoline” where available to help maintain the performance and reliability of your vehicle. TOP TIER Detergent Gasoline meets a new gasoline standard jointly established by leading automotive manufacturers to meet the needs of today’s advanced engines.
Qualifying gasoline retailers will, in most cases, identify their gasoline as having met “TOP TIER Detergent Gasoline” standards at the retail location. This fuel is guaranteed to contain the proper level of detergent additives and be free of metallic additives. The proper level of detergent additives, and absence of harmful metallic additives in gasoline, help avoid buildup of deposits in your engine and emission control system.
For further important fuel-related information for your vehicle, or on information on gasoline that does not contain MMT, visit Acura Owners at owners.acura.com. In Canada, visit www.acura.ca for additional information on gasoline. For more information on top tier gasoline, visit www.toptiergas.com.
Fuel tank capacity: 18.5 US gal (70.0 L)
NOTICE
We recommend quality gasoline containing detergent additives that help prevent fuel system and engine deposits. In addition, in order to maintain good performance, fuel economy, and emissions control, we strongly recommend the use of gasoline that does NOT contain harmful manganese-based fuel additives such as MMT, if such gasoline is available.
Use of gasoline with these additives may adversely affect performance, and cause the malfunction indicator lamp on your instrument panel to come on. If this happens, contact a dealer for service.
Some gasoline today is blended with oxygenates such as ethanol. Your vehicle is designed to operate on oxygenated gasoline containing up to 15% ethanol by volume. Do not use gasoline containing methanol. If you notice any undesirable operating symptoms, try another service station or switch to another brand of gasoline.
How to Refuel
Your fuel tank is not equipped with a fuel filler cap. You can insert the filler nozzle directly into the filler neck. The tank seals itself again when you pull out the filler nozzle.
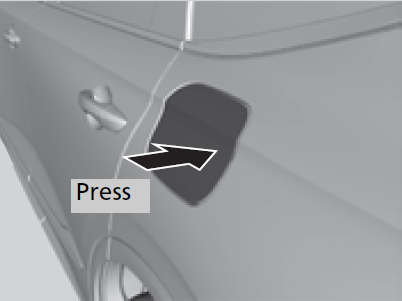
- Stop your vehicle with the service station pump on the left side of the vehicle in the rear.
- Turn off the engine.
- Unlock the driver’s door.
- The fuel fill door on the outer side of the vehicle will unlock.
- Press the area indicated by the arrow to release the fuel fill door. You will hear a click.
- Manually pull the fuel fill door to a fully open position.
- WARNING
Gasoline is highly flammable and explosive. You can be burned or seriously injured when handling fuel.
Stop the engine, and keep heat, sparks, and flames away.
Handle fuel only outdoors.
Wipe up spills immediately.
The fuel filler opening is designed to accept only service station filler nozzles for refueling. Use of smaller diameter tubes (e.g., those used to siphon fuel for other uses) or other non-service station devices can damage the area in and around the filler opening.
Use the master door lock switch to unlock the fuel fill door.
The vehicle doors and fuel fill door automatically relock if the remote unlock function is used. This can be deactivated by briefly opening then closing the driver’s door.
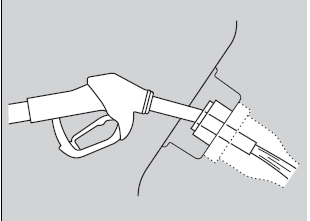
- Place the end of the filler nozzle on the lower part of filler opening, then insert it slowly and fully.Make sure that the end of the filler nozzle goes down along with the filler pipe.
- Keep the filler nozzle level.
- When the tank is full, the filler nozzle will click off automatically.
- If you do not fill up the tank to full, always add a minimum of 2.6 US gal (10.0 L) of fuel.
- After filling, wait about five seconds before removing the filler nozzle.
- Shut the fuel fill door by hand.
If the filler nozzle keeps turning off when the tank is not full, there may be a problem with the pump’s fuel vapor recovery system. Try filling at another pump. If this does not fix the problem, consult a dealer.
The filler nozzle automatically stops to leave space in the fuel tank so that fuel does not overflow as a result of changes in air temperature.
Do not continue to add fuel after the filler nozzle has automatically stopped. Additional fuel can exceed the full tank capacity.
If you repeatedly fill the tank with less than the specified minimum amount of fuel, the malfunction indicator lamp may come on. If this happens, have your vehicle checked by a dealer.
If you have to refuel your vehicle from a portable container, use the funnel provided with your vehicle.
Refueling From a Portable Fuel Container
P. 728
Fuel Economy and CO2 Emissions
Improving Fuel Economy and Reducing CO2 Emissions
Achieving fuel economy and reducing CO2 emissions is dependent on several factors, including driving conditions, load weight, idling time, driving habits, and vehicle condition. Depending on these and other factors, you may not achieve the rated fuel economy of this vehicle.
Maintenance and Fuel Economy
You can optimize your fuel economy with proper maintenance of your vehicle. Always maintain your vehicle in accordance with the messages displayed on the driver information interface.
Use engine oil with the viscosity recommended.
2 Recommended Engine Oil P. 595
Maintain the specified tire pressure.
Do not load the vehicle with excess cargo.
Keep your vehicle clean. A buildup of snow or mud on your vehicle’s underside adds weight and increases wind resistance. Direct calculation is the recommended method to determine actual fuel consumed while driving.
Direct calculation is the recommended method to determine actual fuel consumed while driving.
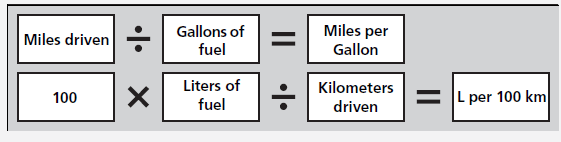
In Canada, posted fuel economy numbers are established following a simulated test. For more information on how this test is performed, please visit https://www.nrcan.gc.ca and search for “fuel consumption testing” in the search field at the top of the page.
Turbo Engine Vehicle
Handling Precautions
The turbocharger is a high-precision device to obtain greater horsepower by delivering a large volume of compressed air into the engine using a turbine driven by the engine’s exhaust gas pressure.
- When the engine is cold just after starting, avoid revving the engine or sudden acceleration.
Always replace the engine oil and engine oil filter according to the Maintenance Minder. The turbine rotates at very high speeds over 100,000 rpm and its temperature reaches over 1,292°F (700°C). It is lubricated and cooled by engine oil. If you fail to replace the engine oil and filter at the scheduled distance or interval, deteriorated engine oil may cause failure such as sticking and abnormal noise of the turbine bearing.
The scheduled maintenance intervals for replacing the filter is indicated on the driver information interface. Follow the information on replacement timing.
Maintenance MinderTM P. 605
The Engine temperature too hot. Do not drive. Allow engine to cool. or Engine temperature near limit. Avoid heavy acceleration and high speed. message may appear on the driver information interface when you restart the engine after driving under high load conditions such as at high speed or in hilly terrain.
This is normal. The message goes off after you idle or drive the vehicle for about one minute.
The temperature gauge pointer is at the H mark when you restart the engine after driving under high load conditions such as at high speed or in hilly terrain. This is normal. The gauge goes down after you idle or drive the vehicle for about one minute.
Reference Links
View Full User Guide: ACURA MDX 2023 User Guide
Download Manuals: Acura | Owner’s Manual & Warranty | Acura Owner’s Site
2023 Acura MDX Specs, Price, Features, Mileage (Brochure)
Related Articles:
2024 Acura INTEGRA Specs, Price, Features, Mileage (Brochure)