
ACURA MDX 2023 Features User Guide
Audio System
About Your Audio System
The audio system features AM/FM radio and SiriusXM® Radio service. It can also play USB flash drives, iPod, iPhone, iPad and Bluetooth® devices.
You can operate the audio system from the True Touchpad Interface, buttons and knobs on the panel, or the remote controls on the steering wheel.
State or local laws may prohibit the operation of handheld electronic devices while operating a vehicle.
SiriusXM® Radio is available on a subscription basis only. For more information on SiriusXM® Radio, contact a dealer.2 General Information on the Audio System P. 328
SiriusXM® Radio is available in the United States and Canada, except Hawaii, Alaska, and Puerto Rico.
SiriusXM® is a registered trademark of SiriusXM Radio, Inc.
After you turn the power mode to VEHICLE OFF (LOCK) with the driver’s door closed, you can use the audio system for up to 30 minutes per driving cycle. However, whether you can continue using the audio system depends on the battery condition. Repeatedly using this feature may drain the battery.
The audio system turns off when you open the driver’s door.
USB Ports
Install the USB connector or the USB flash drive to the USB port.
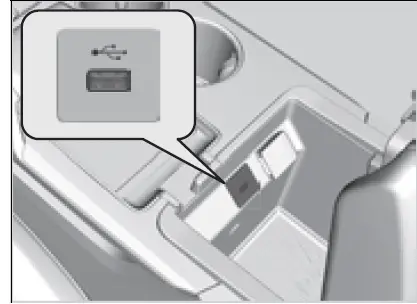
In the console compartment
The USB port (2.5A) is for charging devices, playing audio files and connecting compatible phones with Apple CarPlay or Android Auto.
To prevent any potential issues, be sure to use an Apple MFi Certified Lightning Connector for Apple CarPlay, and for Android Auto, the USB cables should be certified by USB-IF to be compliant with USB 2.0 Standard.
- Do not leave the iPod or USB flash drive in the vehicle. Direct sunlight and high temperatures may damage it.
We recommend that you use a USB cable if you are attaching a USB flash drive to the USB port.
Do not connect the iPod or USB flash drive using a hub.
Do not use a device such as a card reader or hard disk drive, as the device or your files may be damaged.
We recommend backing up your data before using the device in your vehicle.
Displayed messages may vary depending on the device model and software version.
If the audio system does not recognize the iPod, try reconnecting it a few times or reboot the device. To reboot, follow the manufacturer’s instructions provided with the iPod or visit www.apple.com/ipod.
The USB port can supply up to 2.5A/3.0A of power. It does not output 2.5A/3.0A unless the device requests.
For amperage details, read the operating manual of the device that needs to be charged.
Under certain conditions, a device connected to the port may generate noise to the radio station you are listening to.
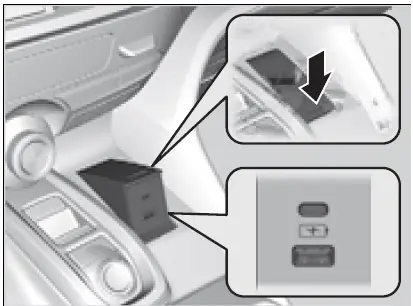
On the front panel
To use the USB ports, push and release the indent. To close, push it again until it latches.
The USB ports (upper: 3.0A, lower: 2.5A) are only for charging devices.
- You cannot play music even if you have connected music players to them.
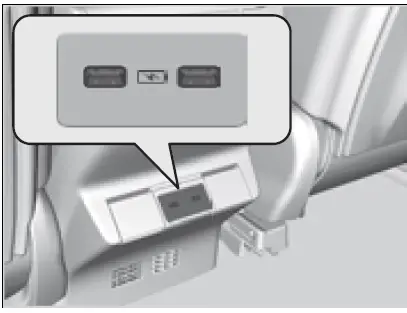
- On the back of the console compartment
The USB ports (2.5A) are only for charging devices. - You cannot play music even if you have connected music players to them.
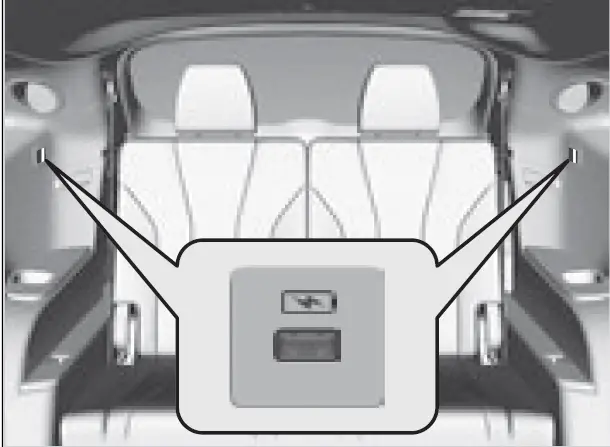
On the both sides of the third row seats*
The USB ports (2.5A) are only for charging devices.
You cannot play music even if you have connected music players to them.
Audio System Theft Protection
The audio system is disabled when it is disconnected from the power source, such as when the battery is disconnected or goes dead. In certain conditions, the system may display a code entry screen. If this occurs, reactivate the audio system.
Reactivating the audio system
- Set the power mode to ON. ystem
- Turn on the audio system.
- Press and hold the audio system power knob for more than two seconds.
- The audio system is reactivated when the audio control unit establishes a connection with the vehicle control unit. If the control unit fails to recognize the audio unit, you must go to a dealer and have the audio unit checked.
Audio Remote Controls
Allow you to operate the audio system while driving. The information is shown on the driver information interface or the head-up display*.

VOL(+/VOL(- (Volume) Switch Press Up:
To increase the volume. Press Down:
To decrease the volume.
 (Power) Button
Press to turn the audio system on and off.
Left Selector Wheel
- When selecting the audio mode
Press the APPS button, then roll up or down to select an item on the driver information interface or the head-up display*, and then press the left selector wheel.
Push the left selector wheel to the right to display the Recents list, then scroll to an item selected in the past and press the wheel.
Some modes appear only when an appropriate device or medium is used.
Depending on the Bluetooth® device you connect, some functions may not be available.
Press the![]() (back) button for the driver information interface or the head-up display* to go back to the previous screen or cancel a command.
(back) button for the driver information interface or the head-up display* to go back to the previous screen or cancel a command.
Press the APPS button to go back to the menu screen of the driver information interface or the head-up display*.
Recents list is available when the following audio mode is selected.
FM Radio
AM Radio
SiriusXM
USB Audio
Roll up or down:
To cycle through each modes, roll up or down and then press the left selector wheel:
After an audio mode is selected, the left selector wheel can be operated for the following functions.
- When listening to the radio
Move to the right: To select the next favorite radio station or channel. Move to the left: To select the previous favorite radio station or channel. - When listening to an iPod, USB flash drive, Bluetooth® Audio, or Smartphone Connection
Move to the right: To skip to the next song.
Move to the left: To go back to the beginning of the current or previous song.
You can customize the items on the driver information interface or the head-up display*.
Customizing the Meter or Head-Up Display* P. 266
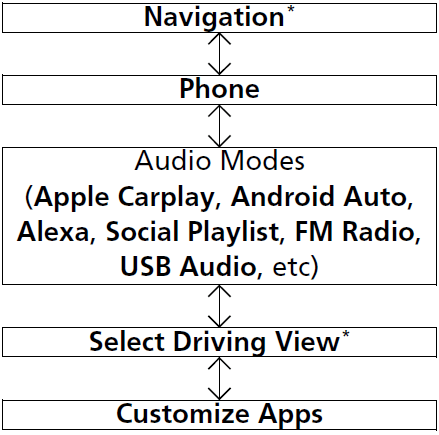
You cannot operate the audio functions while the following functions are being operated on the driver information interface or the head-up display*.
- Mode selection by pressing APPS button
Navigation*
Phone
Select Driving View*
Customize Apps
If Audio off message is shown on the driver information interface, we recommend connecting a device to the active source and trying again.
Audio System Basic Operation
You can use the audio system for 30 minutes when the power mode to VEHICLE OFF (LOCK) with the driver’s door closed, the system will then turn off automatically. If you want to keep using it, we recommend that you turn the power mode to ACCESSORY or ON.
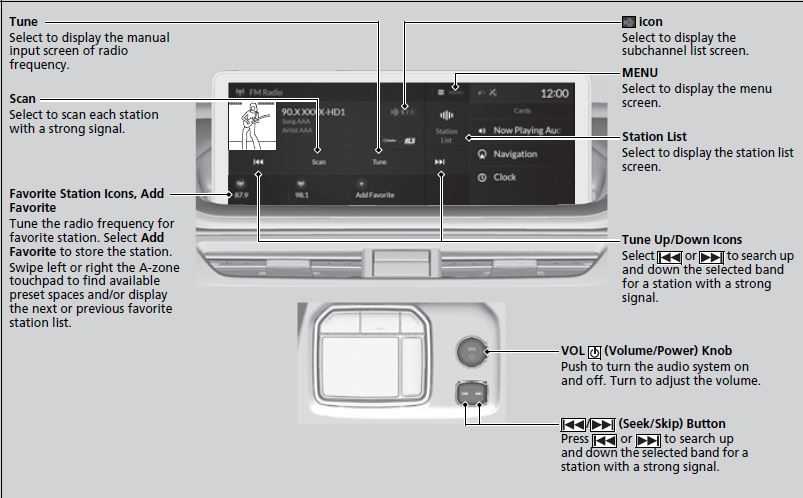
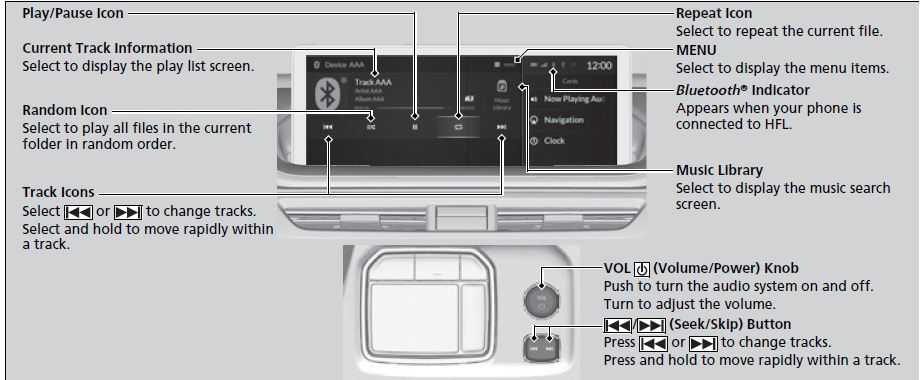
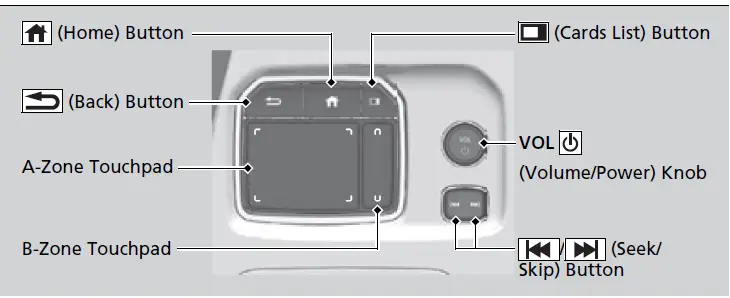 VOL (Volume/Power) Knob: Push to turn the audio system on and off. Turn to adjust the volume when audio system is on.
![]() / (Seek/Skip) Buttons: Press to change station, channel, song or file.
/ (Seek/Skip) Buttons: Press to change station, channel, song or file.
 (Back) Button: Press to go back to the previous display when it is displayed. (Home) Button: Press to go to the home screen.
 (Cards List) Button: Press to display the cards list of the B-zone on the audio/information screen.
B-Zone P. 257
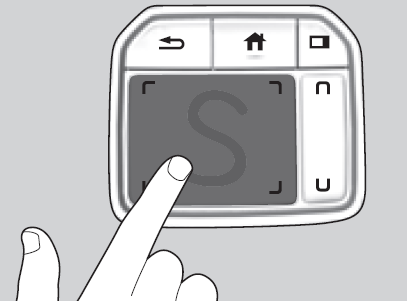
A- Zone Touchpad: Click or swipe the pad with your finger, or move your finger along the pad to operate the A-zone on the audio/information screen.
B- Zone Touchpad: Click or slide the pad with your finger to operate the B-zone on the audio/information screen.
True Touchpad Interface
True Touchpad Interface P. 251
A- Zone
A-Zone
B- Zone2 B-Zone
True Touchpad Interface
You can operate the system using the True Touchpad Interface.
A-Zone Touchpad Operation
Click
Lightly press the A-zone touchpad to select an item.
Press and hold
Press and hold to initiate edit mode throughout the system.
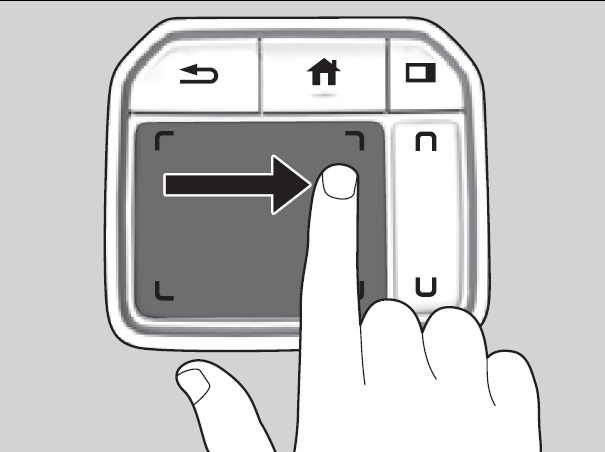
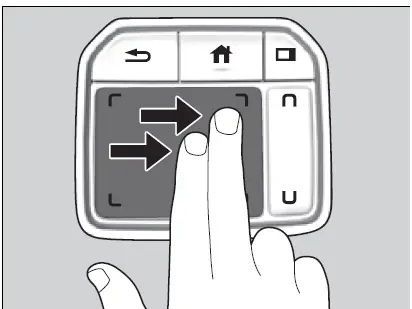
Swipe
Swipe or drag your finger in various directions to operate each screen.

True Touchpad Interface Operation
- Some items may be grayed out during driving to reduce the potential for distraction.
You can select them when the vehicle is stopped or use voice commands.
Wearing gloves may limit or prevent the True Touchpad Interface response.
Some electronics like inverters may cause slow response while using the True Touchpad Interface.
You can operate the True Touchpad Interface using gloves when you set the Touchpad Sensitivity setting to High. However, the True Touchpad Interface cannot be operated with insulated gloves.
You can operate the True Touchpad Interface using gloves when you set the Touchpad Sensitivity setting to High. However, the True Touchpad Interface cannot be operated with insulated gloves.
Customized Features P. 351
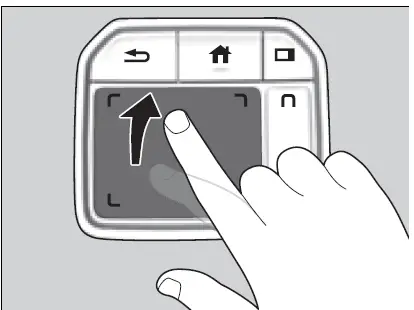
Flick
Flick your finger up/down or left/right to scroll in lists or change pages throughout the system.
Press and hold
Press and hold to initiate edit mode throughout the system.
Swipe
Swipe or drag your finger in various directions to operate each screen.
B-Zone Touchpad Operation

Click
Lightly press (click) the B-zone touchpad to select a card.
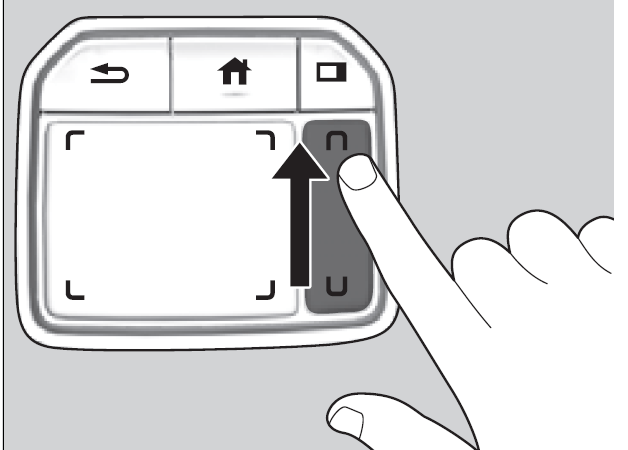
Slide
Slide your finger up or down to highlight what you would like to select, such as a card or the status bar.
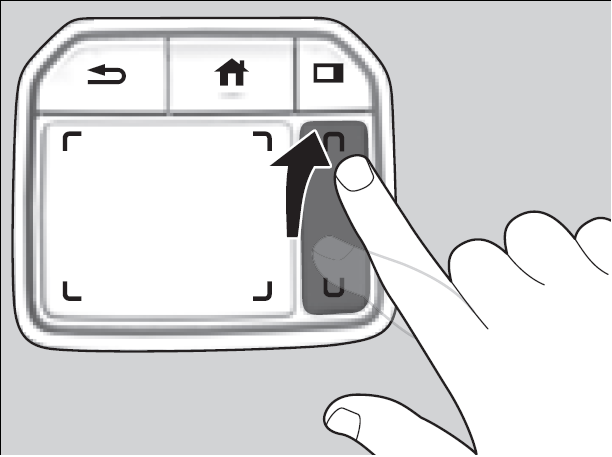
Flick
Flick up or down to cycle through card displayed in the B-zone.
Audio/Information Screen
Displays each mode status. From this display, you can go to various setup options.
A-Zone
Switching the display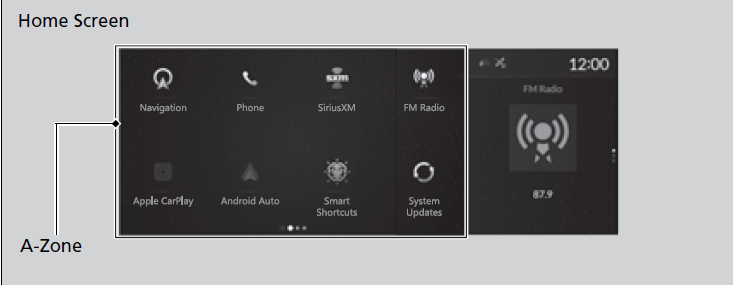
Press the (home) button to go to the home screen. Select the following icons on the home screen or All Apps list.
Navigation*
Displays the navigation screen.
Refer to the Navigation System Manual
Phone
Displays the HFL information.
Bluetooth® HandsFreeLink® P. 383
FM Radio/AM Radio/SiriusXM/USB Audio/Bluetooth Audio/Social Playlist
Displays the audio information for each.
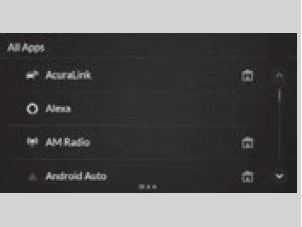
All Apps list
You can select any of the apps from the All Apps list. To display the All Apps list, place your finger on the
A-zone touchpad and swipe right.
Home Screen P. 259
You can add or remove any of the apps in the home screen through the All Apps list.
To add app icons to the home screen and the head-up display* 260
Settings
Enters the customizing menu screen.
Customized Features P. 351
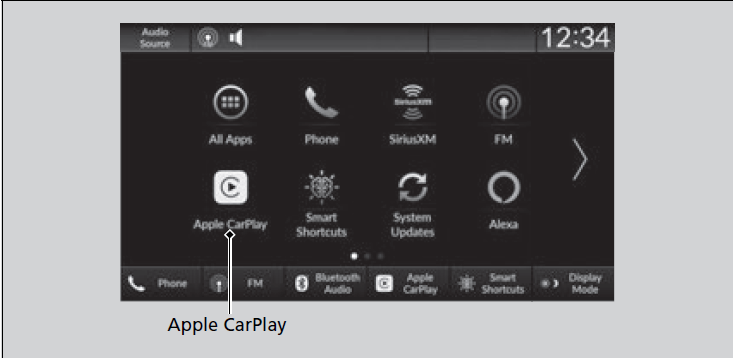
Apple CarPlay
Displays the Apple CarPlay screen.
Apple CarPlay P. 314
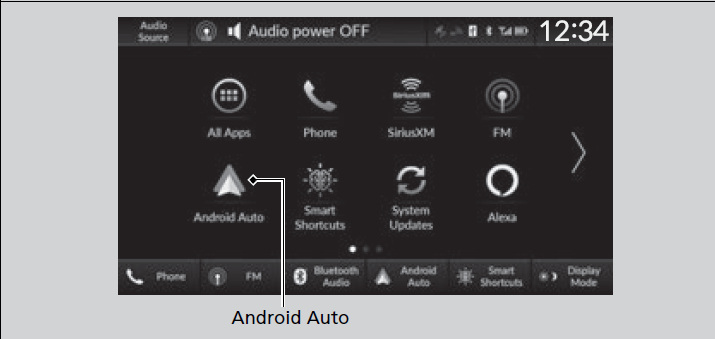
Android Auto
Displays the Android Auto screen.
Android AutoTM P. 319
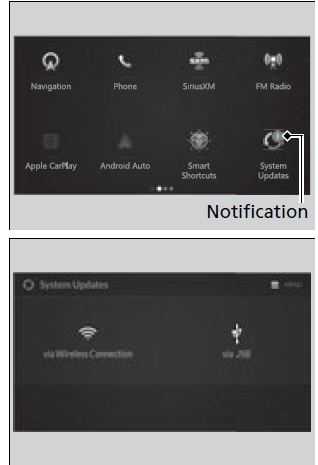
System Updates
Updates the software version of the audio system.
System Updates P. 271
Messages
Displays the text message screen.
Text Message P. 401
AT&T HotSpot
Displays the AT&T Hotspot screen.
AT&T Hotspot P. 313
AcuraLink
Displays the AcuraLink screen.
AcuraLink® P. 412
CabinTalk*
Displays the CabinTalk screen.
CabinTalk®* P. 421
Smart Shortcuts
Displays the Smart Shortcuts screen.
Smart Shortcuts P. 268
Alexa
Displays the Alexa screen.
Alexa Built-In P. 279
B-Zone
You can see the audio, HFL information, navigation mini map*, and clock information on the B-Zone using the B-zone touchpad.
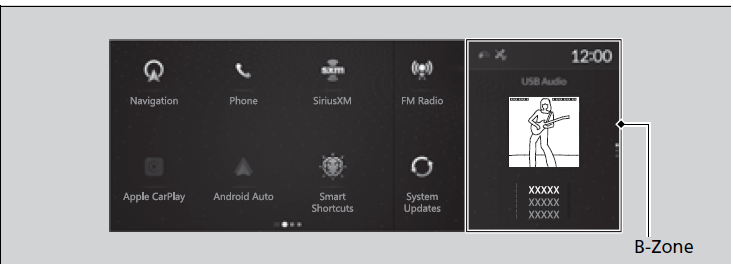
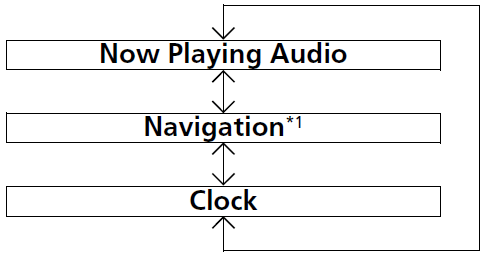
Switching the card
Slide up or down the B-zone touchpad to cycle through the following screen.
SiriusXM® radio service notifications are displayed in the B-zone.
The card in the B-zone will change depending on the screen displayed in the A-zone.
- Appears only when you set a destination on the Apple CarPlay or Android Auto navigation function.
Apple CarPlay P. 314
Android AutoTM P. 319
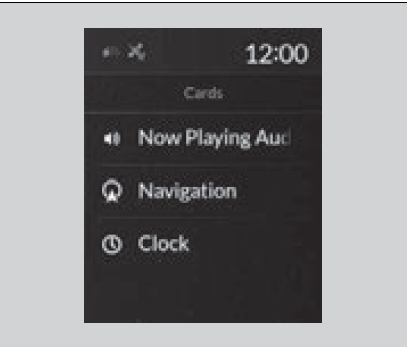
You can also switch the screen by following procedure.
- Press the (cards list)
 button.
 - Select an item then press the B-zone touchpad.
Home Screen
To move to the next screen
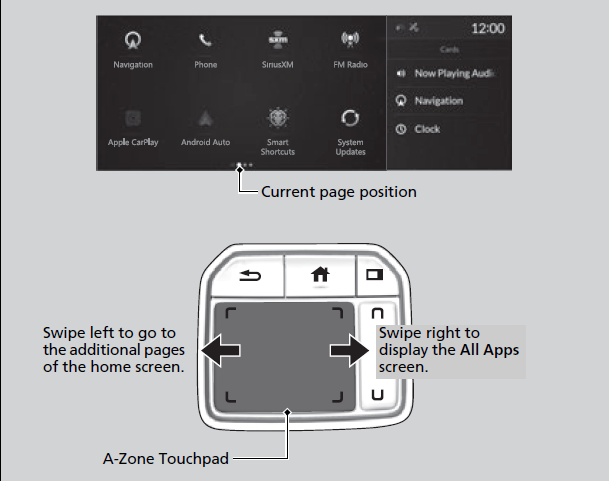
The home screen has 3 pages. You can add up to 8 pages.
Press the  (home) button to go directly back to the first page of the home screen from any page.
To add app icons to the home screen and the head-up display
You can add app icons to the home screen and the head-up display*.
- Press the (home) button
- Swipe right to display the All Apps screen.
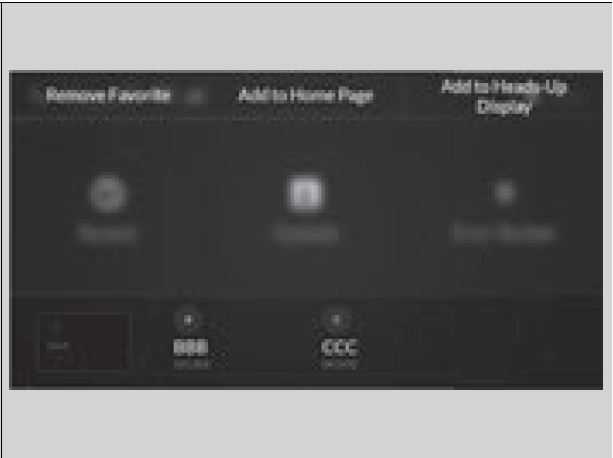
- Go to an app on the list, then press and hold A-zone touchpad.
- From the pop-up menu, select Add to Home Page or Add to Heads-Up Display*.
- The icon or HUD* appears next to the app on the list when the corresponding icon has been added to the home screen or the head-up display*.
- The icon
Pre-installed apps may not start up normally. If this occurs, you need to reset the system.
Defaulting All the Settings P. 379
If you perform Factory Data Reset, it may reset all the settings to their factory default.
Defaulting All the Settings P. 379
In case those apps still do not startup normally, even after Factory Data Reset, contact your dealer.
Each item with HUD is listed on the head-up display menu.
If you want to hide the item from the head-up display menu, select Remove from Heads-Up Display.
To add shortcut icons to the home screen and the head-up display*
Shortcut icons for items stored in Favorite can be added to the home screen and the head-up display*.
- Select a favorite item, then press and hold
A- zone touchpad.- A pop-up menu will appear on the screen.
- Select Add to Home Page or Add to Heads-Up Display*.
- A short cut icon will be added to the home screen or the head-up display*.
You can add an icon to the head-up display directly from the home screen. Select an icon on the home screen, then press and hold the A-zone touchpad. After that, select Add to Heads-Up Display, and
then press the (back) button or the (home) button to confirm the change.
Note that icons for Messages, Settings, System Updates, AT&T Hotspot, AcuraLink, Cabin Talk and Smart Shortcuts cannot be added to the head-up display.
To move icons on the home screen
You can change the location of the icons on the home screen.
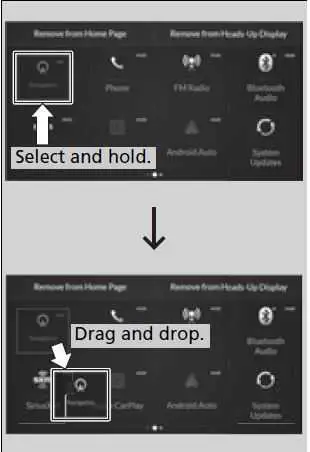 Select the icon you want to move, then press and hold A-zone touchpad.
- The screen will change to the customization screen.
- Drag the icon to where you want it to be and then press and hold the A-zone touchpad.
- The icon will be repositioned and the screen will remain in the customization mode.
- After you drag the icon, keep your finger on the A-zone touchpad and then press down. If you release your finger before pressing the A-zone touchpad, the icon will remain in its original place.
- If you want to reposition the icon on another page of the home screen, swipe the A-zone touchpad.
- Press the (back) button or the
(home) button to confirm the change.
Press and hold (home) button to switches to the customization screen.
To remove icons from the home screen and the head-up display*
You can remove icons from the home screen and the head-up display*.
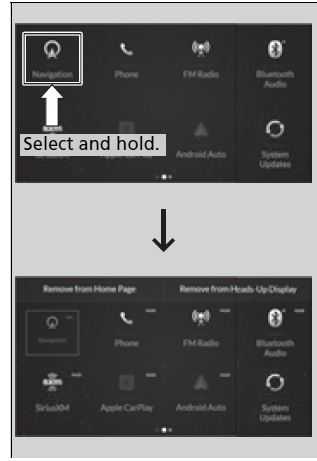
- From the home screen, select the icon that you want to remove, then press and hold A-zone touchpad.
- The screen will switch to the customization screen.
- Go to Remove from Home Page or Remove from Heads-Up Display* and press the A-zone touchpad.
- The icon will be removed from the home screen or the head-up display*, and the screen will remain in the customization mode.
- Press the (back) button or the (home) button to confirm the change.
You can also remove an icon from the home screen or the head-up display* directly from the All Apps list.
- Go to an item you want to remove, then press and hold the A-zone touchpad.
- Go to Remove from Home Page or Remove from Heads-Up Display* and press the A-zone touchpad.
- The icon will be removed from the home screen or the head-up display*.
- Press the (back) button or the (home) button to confirm the change.
Removing an icon from the home screen does not result in the deletion of the corresponding app.
Press and hold (home) button to switches to the customization screen.
Models with head-up display
If you remove a shortcut icon from the home screen, the function of selected icon also remove from the head-up display.
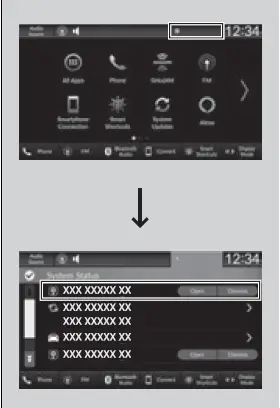
Status Area
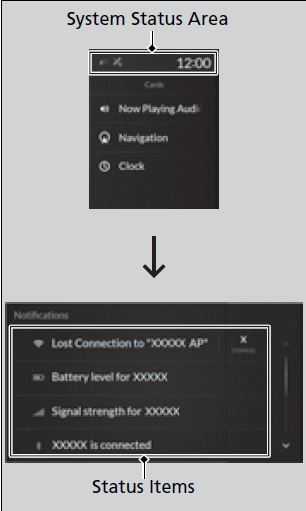
- Select the system status area, then press B-zone touchpad.
- The status items will appear in the A-zone.
- Select an item to see the details.
- Select Dismiss to delete the detail.
- Press the (back) button or select status area again to close the status list.
Searching Screen
You can use the hand-writing input feature by using the A-zone touchpad when searching for various items of the audio system (e.g., music, route of the navigation, phonebook contact).
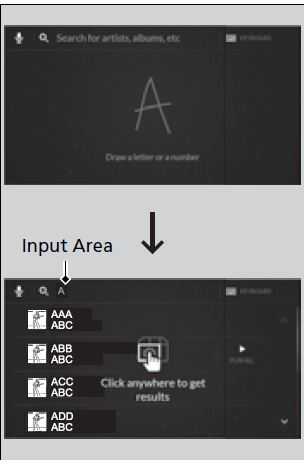
- Write letters or numbers using the A-zone touchpad.
- Search results appear on the screen.
- Press the A-zone touchpad.
- If you re-enter letters or numbers, select the input area on the upper side of the screen.
Select a desired item, and then press the A-zone touchpad.
- If you re-enter letters or numbers, select the input area on the upper side of the screen.
Delete a letter or number
Swipe left the A-zone touchpad to delete a letter or a number.
Input a space
Swipe right the A-zone touchpad to input a space.
You can inputting letters or numbers by using on screen keyboard. Select KEYBOARD on the upper right of the screen.
When you return to hand-writing input screen, select HANDWRITING.
You can inputting letters or numbers by using voice control operation. Select the icon on the upper left of screen.
Customizing the Meter or Head-Up Display*
You can edit, show, or hide the audio, phone, navigation* contents on the driver information interface or the head-up display*.
To add or remove an items
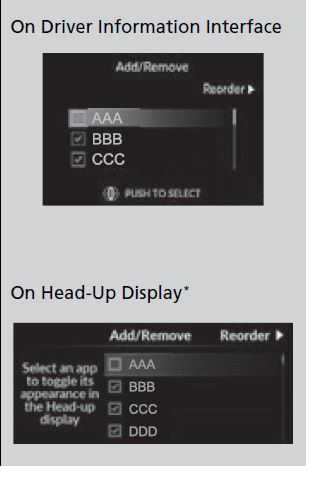
- Press the APPS button on the steering wheel.
Roll down the left selector wheel to select Customize Apps and then press the selector wheel. - Push the left selector wheel left to select Add/Remove.
- Select an item then press the left selector wheel.
- The checked items are displayed on the driver information interface or the head-up display*.
Editing order
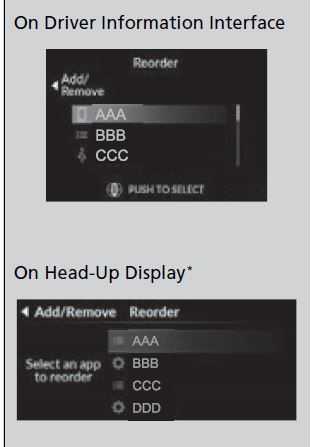
- Press the APPS button on the steering wheel.
- Using the left selector wheel, scroll to Customize Apps and then press the selector wheel.
- Push the selector wheel to the right to go to the Reorder screen.
- Scroll to an item you want to move, then press the left selector wheel.
Scroll to where you want to move the contents, then press the left selector wheel.
Smart Shortcuts
By observing and learning driver behaviors, patterns, and preferences, the system anticipates driver actions and presents on-screen suggestions to help perform desired actions quicker and with fewer steps.
- The app will suggest actions based on what it learns you do often, and occasionally make recommendations based on your learned preferences.
The system will take some time to learn. The more you interact with the system, the more suggestion you will see, and the more accurate they will become.
Suggestions will automatically refresh periodically to provide updated content for each profile.
You can also provide feedback on whether a suggestion is helpful by pressing and holding on it. This can help the app grow smarter over time. 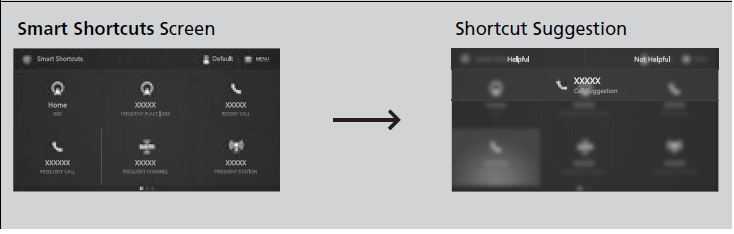
To change the notifications behavior for Smart Shortcuts:
- Select MENU on the Smart Shortcuts screen.
- Select Suggestion Settings.
- Select an option.
- All data used for Smart Shortcuts can be erased by a Factory Data Reset. 2 Defaulting All the Settings P. 379
The app also supports different profiles for each user, with customized learning for each profile. The app will also learn to associate a profile to a user over time based on key fob and connected phone data.
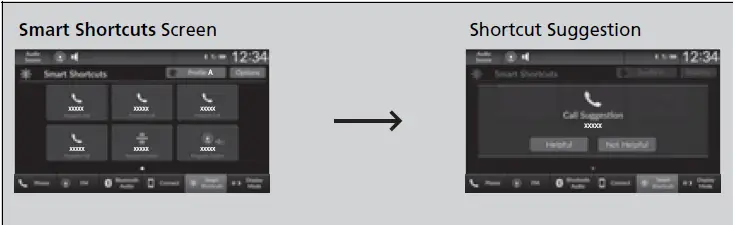
How to Use
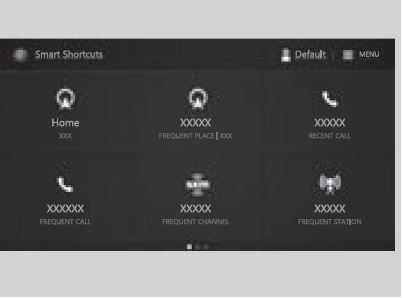
- Press the (home) button.
- Select Smart Shortcuts.
- Select a shortcut to take the action suggested.
- Call Suggestions: When selected, a call to the contact or number suggested will be placed and shown in the B-zone. Based on your calling patterns, contacts will be suggested for you to call.
Connect your smartphone through Bluetooth® to get contact suggestions.- Call suggestions will not be displayed when you are connected to Apple Carplay.
- • Navigation Suggestions*: When selected, a route will be started to the suggested destination and the embedded navigation app will open.
- When a long route is set in your navigation system, you can receive recommendations for gas stations and places to stop at along the way.
- The places you frequently navigate to while using the embedded navigation system will be suggested as shortcuts.
- Save your home location in the embedded navigation app to have a shortcut suggestion for it when you’re away from home.
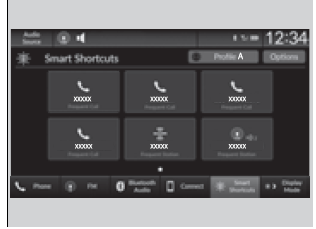
You can change the profile by selecting on the top of the Smart Shortcuts screen.
You can customize the following items by selecting MENU on the top of the Smart Shortcuts screen.
- Profiles: Create, change, and manage profiles.
View App Walkthrough: View the Smart Shortcuts walkthrough.
Suggestion Settings: Change where suggestions can appear.
To create a profile:
- Select MENU on the Smart Shortcuts screen.
- Select Profiles.
- Select Manage Profiles.
- Select + Add New Profile.
- Enter name for your profile.
- Click on the A-zone touchpad to confirm. uA new profile has been created and the Smart App will automatically switch to that profile.
To change a profile:
- Select MENU on the Smart Shortcuts screen.
- Select Profiles.
- Select Change Current Profile.
- Select a profile from the list.
- The change to the selected profile has been
- Radio Suggestions: When selected, the corresponding radio app (FM, AM, or SiriusXM®) will open and it will start playing the station.
- From radio apps you can receive:
- FM, AM, SiriusXM®: Most frequently listened stations.
- FM, SiriusXM®: Genre-based suggestions.
- Considerations:
- FM suggestions will appear only when they are within range, according to your vehicle’s tuner signal.
- SiriusXM® suggestions will be available as long as there is an active account in the vehicle.
- From radio apps you can receive:
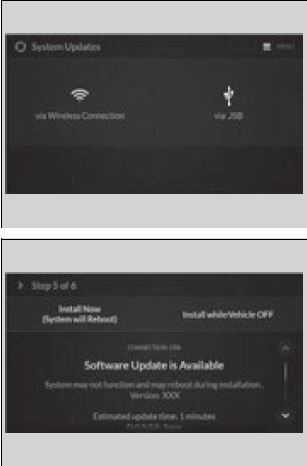
System Updates
The audio system’s firmware can be updated with the telematics control unit (TCU) through the subscription-based service.
How to Update Wirelessly
Wireless connection mode setup
- Press the (home) button.
- Select System Updates.
- Select MENU.
- Select Connection Setup.
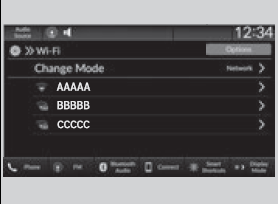
- Select Change Mode.
Select Network.- The display will return to the network list.
- Select an access point from the network list, then select OK.
- If the audio system requires a password, enter a password.
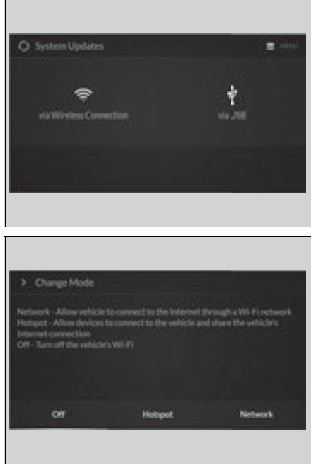
How to update
When the audio system update is available, the notification is shown on the audio/information screen. Use the following procedure to update the system.
- Press the (home) button.
- Select System Updates.
- Select via Wireless Connection.
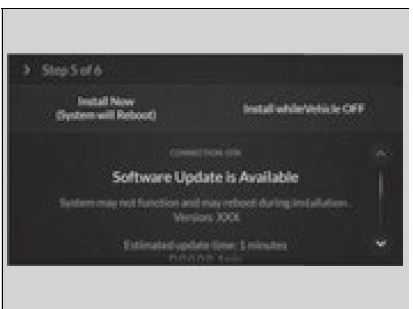
- When the download is complete, the screen for step 5 will be displayed.
- Select Download Now.
- A notification will appear on the screen.
- A notification will appear on the screen.
- Select Install Now or Install while Vehicle OFF.
- A notification appears on the screen if the update is successful when Install Now is selected.
- If you select Install while Vehicle OFF, proceed to steps 6 and 7.
- Set the power mode to VEHICLE OFF (LOCK).
- A notification will appear on the screen. If you select Postpone Update, the update will be postponed.
- Exit from your vehicle.
- The system will start the firmware update.
- If the update is successful, a notification informing you of this fact will appear on the screen the next time you set the power mode to ON.
The system may cancel the firmware update if the battery is low on power, even if you have selected Install while Vehicle OFF. If you want to install the updated data, recharge the battery or select Install Now.
If you select Install Now, the system may reboot.
Automatic download settings
Use the following procedure to change to the automatic download setting.
- Press the (home) button.
- Select System Updates.
- Select MENU.
- Select Auto Download.
- Select the access point, then Allow.
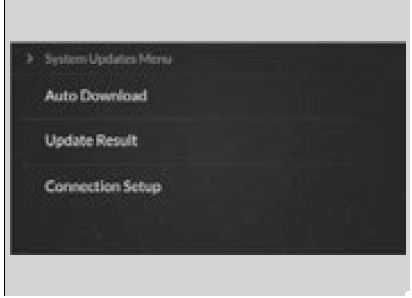
View update status
Use the following procedure to confirm the update status.
- Press the (home) button.
- Select System Updates.
- Select MENU.
- Select Update Result.
How to Update with a USB Device
Download the update files from the server
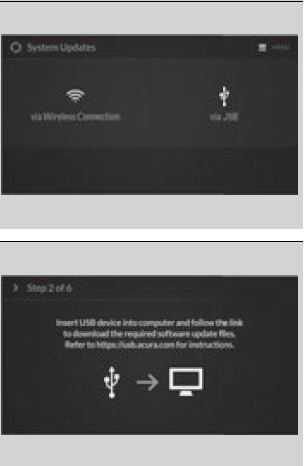
- Press the (home) button.
- Select System Updates.
- Select via USB.
- A notification appears on the screen.
- Connect a USB device into the USB port in the console compartment.
- The inventory data is copied into the USB device
USB Ports P. 245
- The inventory data is copied into the USB device
- Remove the USB device from the USB port.
- Connect the USB device into your computer, and then download the update files.
- Follow the link to download the required software update files. Refer to https://usb.acura.com for instructions.
A USB device with a minimum of 8 GB of free space or more is recommended.
Be sure to delete any previous inventory or update files from the USB device before starting the USB update process.
Update the audio system
- Press the (home) button.
- Select System Updates.
- Select via USB.
- A notification appears on the screen.
- Connect the USB device with the update files into the USB port.
- A notification appears on the screen. 2 USB Ports P. 245
- Select Install Now or Install while Vehicle OFF.
- A notification appears on the screen if the update is successful when Install Now is selected.
- When you select Install while Vehicle OFF go to step 6.
- Set the power mode to VEHICLE OFF (LOCK).
- A notification appears on the screen. If you select Postpone Update, the update is postponed.
- Exit from your vehicle.
- The system will start the firmware update.
- A notification appears on the screen if the update is successful at the next time you set the power mode to ON.
The system may stop the firmware update when battery is low on power, even when you selected Install while Vehicle OFF.
If you want to install the updated data, recharge the battery or select Install Now.
Adjusting the Sound
- Press the (home) button.
- Select an audio source icon.
USB Audio, Social Playlist mode
Select SOUND.
Select the setting you want.
FM Radio, AM Radio, SiriusXM, Bluetooth Audio mode - Select MENU.
- Select Sound Settings.
- Select the setting you want.
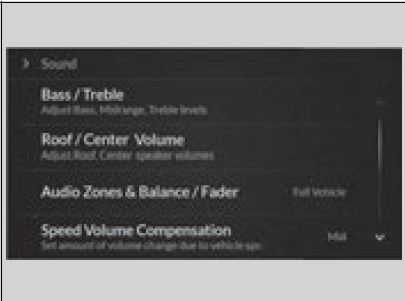
Select an item from the following choices:
- Bass / Treble: Treble, Midrange, Bass
Roof / Center Volume*: Roof speaker, center speaker
Audio Zones & Balance / Fader*: Driver Only, Front Only, Rear Only, Full Vehicle, Balance, Fader
Balance / Fader*: Balance, Fader
Speed Volume Compensation: Speed Volume Compensation (SVC)
DTS Neural Surround*: DTS Neural SurroundTM
Compressed Audio Enhancement*: Enhancement for compressed audio quality
The SVC adjusts the volume level based on the vehicle speed. As you go faster, audio volume increases. As you slow down, audio volume decreases.
You can also adjust the sound the following procedure.
- Press the (home) button.
- Select Settings.
- Select Sound.
Audio Zones & Balance / Fader*
You can change where the sound comes from by selecting one of the speaker options below:
- Full Vehicle: All the speakers emit sound.
Driver Only: Only the speaker by the driver’s seat emits sound.
Front Only: Only the front speakers emit sound.
Rear Only: Only the rear speakers emit sound.
Reset to Default
Select to reset the following settings from the pop-up menu to their factory default.
Changing the Screen Brightness
- Press the (home) button.
- Select Settings.
- Select Display.
- Select Day Mode or Night Mode.
- Select the setting you want.
- When you adjust the Contrast and Black Level, select More Settings.
Limitations for Manual Operation*
Certain manual functions are disabled or inoperable while the vehicle is in motion. You cannot select a grayed-out option until the vehicle is stopped.
You can change the Contrast and Black Level settings in the same manner.
To reset the settings, select Reset to Default. Reset to Default is only applicable to the settings in the current mode.
-
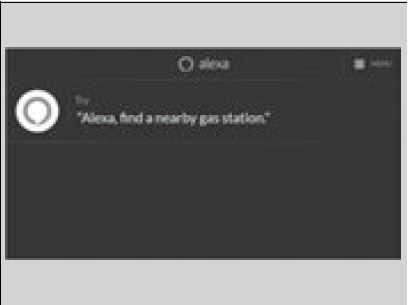
Alexa Built-In
You can talk to Amazon Alexa through the audio system. With Alexa, you can:
- Stream music
Check the weather
Answer questions
Control smart home devices
And more with supported Alexa skills - Using Alexa
- Once you sign into Alexa in the vehicle, you can use Alexa without opening the app.You can trigger Alexa by doing any of the following:
- Say the wake word “Alexa” from anywhere in the audio system.
- Press the
 (Talk) button on the steering wheel.
 - Select the Alexa icon from inside the app.
- Support Resources
For more information or client support:
- Go to https://www.amazon.com/gp/help/ customer/contact-us.
Troubleshooting Tips:
Make sure you are connected to Alexa via either Wi-Fi Network or AT&T Vehicle Data Plan.
If using an AT&T Vehicle Data Plan, confirm that your subscription is active.
Make sure you are logged into your Amazon account.
If Alexa Built-in is using your phone’s Wi-Fi Network, connecting CarPlay/Android Auto by wireless will disable Alexa Built-In. To enable Alexa Built-In and Carplay or Android Auto at the same time, connect your phone with an Apple or Android OEM cable.
Deleting Your Alexa Settings from the Vehicle
For your privacy and security, if you transfer the vehicle to a third party, reset all vehicle settings to default and delete all personal data. Also, remove the vehicle from the list of devices in your phone’s Alexa app.
2 Defaulting All the Settings P. 379
Voice Control Operation
Your vehicle has a voice control system that allows hands-free operation. The voice control system uses the ![]() (talk) and
(talk) and ![]() (back) buttons on the steering wheel and a microphone near the map lights on the ceiling.
(back) buttons on the steering wheel and a microphone near the map lights on the ceiling.
Voice Recognition
To achieve optimum voice recognition when using the voice control system:
- The system recognize a natural language and accept your free form voice command.
An example of voice commands:
Voice Recognition Screen P. 281 - Close the windows and panoramic roof.
Adjust the dashboard and side vents so air does not blow onto the microphone on the ceiling.
Speak clearly in a clear, natural speaking voice without pausing between words.
Reduce any background noise if possible. The system may misinterpret your command if more than one person is speaking at the same time.
When you press the![]() button, the system beeps and the display changes to the voice recognition screen.
button, the system beeps and the display changes to the voice recognition screen.
Press the (home) button, (back) ![]() button on the True Touchpad Interface or APPS button on the steering wheel to cancel a voice recognition function.
button on the True Touchpad Interface or APPS button on the steering wheel to cancel a voice recognition function.
Voice Recognition Screen
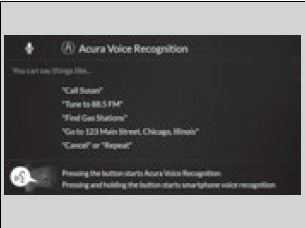
When the (talk)![]() button is pressed, the voice control screen appears.
button is pressed, the voice control screen appears.
For a complete list of commands, say “Help” after the beep.
The system accepts free form voice commands.
See the following examples for recommended voice commands.
Phone Commands
This can be only used when the phone is connected
Phone Commands Dial by number
- Call <Phone Number>
Dial <Phone Number> please
Phone <Phone Number>
Redial
- Redial
Redial last number
Call last number
Contact by voice
- Call <your contact name>
Call <your contact name> on his/her <category name> please
Make a call to <your contact name>
Make a call to <your contact name> on her/his <category name>
The system recognizes an only contact name in the stored phonebook of your phone.
Phone commands are not available if using Apple CarPlay.
Audio Commands
FM Commands
- Play FM radio
Tune to <87.7-107.9> FM
I want to listen to FM <87.7-107.9>
Play FM <87.7-107.9>
AM Commands
- Play AM radio
Tune to <530-1710> AM
I want to listen to AM <530-1710>
Play AM <530-1710>
Sirius XM Commands
- Play XM radio
Play XM <channel number>
Listen to <channel name> on XM
Play XM Channel <channel number>
Tune to <channel name>
Listen to <channel number> on the satellite radio
USB Commands
- Play USB
Play iPod
Play genre <genre name>
Play <artist name>
Play <album name>
Play <song name>
Play <playlist name>
Bluetooth® Audio Commands
- Play Bluetooth
Navigation Commands*1
Refer to the Navigation System Manual
Standard Commands
- Help
Cancel
Repeat
Voice Help are readout voice guidance for Help on current screen.
Letter Input Commands
You can search for the desired item on each search screen with your voice.
List Commands
Next Page
Previous Page
Back
Go to <number>
Select <number>
Amazon Alexa Commands 2 Alexa Built-In P. 279
Apple CarPlay Commands 2 Apple CarPlay P. 314
Android Auto Commands 2 Android AutoTM P. 319
Playing AM/FM Radio
To Change the Tune Mode
- Select MENU.
- Select SiriusXM Settings.
- Select Tune Mode.
- Select All Channels or Within Category.
In the channel mode, all available channels are selectable. In the category mode, you can select a channel within a category (Jazz, Rock, Classical, etc.).
There may be instances when SiriusXM® Radio does not broadcast all the data fields (artist name, title). This does not indicate a problem with your audio system.
SiriusXM® Radio stations load in ascending order, which can take about a minute. Once they have loaded you will be able to scroll up or down to make your selections.
Switching the Audio Mode
Press the APPS button on the steering wheel, then select an item or select the audio source icon on the home screen.
Audio Remote Controls P. 248
Tune Start:
When you change to a favorite channel, a song being played on that channel restarts from the beginning with this function. This can be turned on or off by the following procedure.
- Select MENU.
- Select SiriusXM Settings.
- Select Tune Start.
- Select On or Off.
To change a category, select Category icons, or select Channels and then select category item.
Favorite Channel
To add a favorite channel:
- Tune to the selected channel.
- Select Add Favorite, then select CURRENT CHANNEL.
- When you select From Channels, you can store a channel from the channel list.
Editing a favorite channel
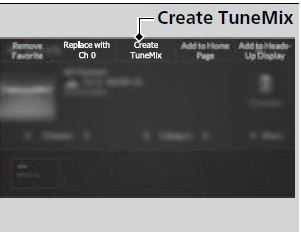
Select and hold to desired favorite channel.
The following items are available:
- Remove Favorite: Delete the favorite channel from the favorite channel list.
Replace with Ch (number): Replace the stored favorite channel.
Create TuneMix: Create a favorite multi-channel.
Add to Home Page: Add the shortcut icon of the stored favorite channel to the home screen.
Add to Heads-Up Display*: Add the shortcut item of the stored favorite channel to the head-up display menu.
You can store 12 SiriusXM® channels in the favorite channel list.
Create a TuneMix (for music channels only)
A TuneMix is a group of channels saved in one preset. You can store up to 20 of your preferred music channels per TuneMix channel.
To create a favorite multi-channel:
- Tune a channel.
- Select and hold a number that you want to use as a favorite multi-channel.
- Select Create TuneMix.
- The number you have selected will be registered as a favorite multi-channel number, and the channel that you have tuned will be registered with this number.
To add a channel to a favorite multi-channel:
- Tune a channel.
- Select and hold a favorite multi-channel number.
- Select Edit TuneMix.
- Select Add Channel.
- Current channel is added to the TuneMix.
- A message appears if the current channel cannot be added to the TuneMix.
When you want to replace the channel, select Replace with Ch (number).
If you want to delete a channel, select Edit TuneMix, and then select the channel you want to delete.
Listening to Featured Channels
Suggested channel listing received from SiriusXM® can be displayed and selected.
- Select Channels.
- Select featured channel category.
- Select featured channel.
Up to eight featured channels by SiriusXM® can be displayed.
Select SEARCH LIST, then trace the letters and/or numbers of the channel on the A-zone touchpad. When KEYBOARD is selected, the on-screen keyboard appears.
Replay Function
The system can record up to the last 60 minutes broadcast of your currently tuned channel as well as the last 30 minutes broadcast of favorite channels, starting from the moment you turn the vehicle on. If you tuned to favorite channel, the system records up to 60 minutes of a broadcast instead of up to 30 minutes. You can rewind and replay the last 30 or 60 minutes of a broadcast.
- Select More.

- Move the position you want to replay by selecting or
To play or pause on playback mode, select the play/pause icon.
Returning to real-time broadcast Select and hold or select Live.
The system starts storing broadcast in memory when the power mode is turned ON. You can go back to the program from that point.
You can no longer replay any program once the power mode is turned off as it erases memory. You can check how long the program has been stored in memory from the audio/information screen.
After 30 or 60 minutes of recording the system will automatically start deleting the oldest data.
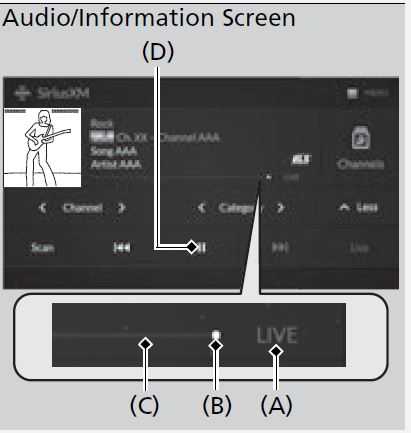
- Shows how much time the replayed segment is behind the real-time broadcast or if it is live audio content.(B): Replayed segment
- Length stored in memory
Play/Pause icon
Live Sports Alert
While listening to other channel, you can receive sports alerts such as scores from your favorite teams.
To set up a favorite team
- Select MENU.
- Select SiriusXM Settings.
- Select Sports Notification Setup.
- Select Edit Favorite Teams.
- Select Add Favorite Team.
- Select a team.

To set up an alert message
- Select MENU.
- Select SiriusXM Settings.
- Select Sports Notification Setup.
- Select SportsFlash Game Play Notifications.
- Select Notifications.
- Select On.
- Select Select SportsFlash Teams.
- Select a registered team.
- Press the (back) button, the screen returns to the previous screen.
The Pop-up appears and notifies you of a sports alert function.
Game Start Notification
You can receive a sports channel notification when registered sports team start playing.
To set up a game start notification
- Select MENU.
- Select SiriusXM Settings.
- Select Sports Notification Setup.
- Select Game Notifications.
- Select On.
Receiving a game start notification
- A pop-up appears on the B-zone and notifies you of a game start notification.
- Select the system status area then press the B-zone touchpad.
- The status items appear on the A-zone.
- Select a SiriusXM® notification item using A-zone touchpad to see the details.
Before receiving a game start notification, register a favorite sports team.
To set up a favorite team P. 293
Traffic and Weather Information
You can receive traffic and weather information.
- Select MENU.
- Select SiriusXM Settings.
- Select Traffic & Weather Setup.
- Select Selected City.
- Select the region.
Receiving a traffic and weather information
- A pop-up will appear in the B-zone to notify you that new traffic and weather information is available.
- Select the system status area, then press B-zone touchpad.
- The status area will appear in the A-zone.
- To see the details, select an item using A-zone touchpad.
- The traffic and weather information will appear in the B-zone.
- Select Keep Listening to continue receiving traffic and weather information.
- Select Return to Ch (channel number) to stop viewing traffic and weather information.
When traffic and weather information is received, a notification is displayed in the B-zone.
2 B-Zone P. 257
Channel Schedule
You can view a channel schedule or receive an alert when your favorite program is about to start.
To view a channel schedule
- Select MENU.
- Select Channel Schedule.
To set up an alert message
- Select MENU.
- Select Channel Schedule.
- Select a program.
- Select Set Program Alert.
- Select One Time or Every Time.
Select SEARCH LIST, then trace the letters and/or numbers of the channel on the A-zone touchpad. When KEYBOARD is selected, the on-screen keyboard appears.
The Pop-up appears and notifies you of an alert function.
Selecting One Time disables the alert feature next time you turn the power mode to ON.
If you want to delete the alert, select Remove Alert.
To enable an alert message, change settings for the alert function.
To enable the alert function P. 297
Manage Program Alert
You can change settings for the alert function.
- Select MENU.
- Select SiriusXM Settings.
- Select Manage Program Alerts.
- Select Notifications.
- Select On or Off.
To remove an alert
- Select MENU.
- Select SiriusXM Settings.
- Select Manage Program Alerts.
- Select Alerts Set.
- Select an item you want to delete.
A confirmation message appears on the screen. Select Delete.
Scan
Sample each channel on the selected mode for 10 seconds.
- Select More.
- Select Scan.
You can change a scan mode by the following procedure.
- Select MENU.
- Select SiriusXM Settings.
- Select Scan Mode.
- Select Channels or Favorites.
The favorites scan function is based on TuneScanTM technology of SiriusXM®.
The “Featured Channels” function is based on Featured FavoritesTM technology of SiriusXM®.
TuneScanTM and Featured FavoritesTM are registered trademarks of SiriusXM® Radio, Inc.
SiriusXM Settings
Change the SiriusXM® settings.
- Select MENU.
- Select SiriusXM Settings.
- Select an option.
- Tune Mode: Choose whether to group by category or channel number when
changing channels. - To Change the Tune Mode
- Scan Mode: Select the scan mode from all channels or favorites.
- Scan
- Tune Start: Start the currently playing song at the beginning when you switch to
music channel favorite.
Tune Start: - Sports Notification Setup: Set to receive sports alerts such as scores from your
favorite teams.- Live Sports Alert
• Traffic & Weather Setup: Set to receive traffic and weather information. - Traffic and Weather Information
- Manage Program Alerts: Change settings for the alert function.
Manage Program Alert
- Live Sports Alert
- Tune Mode: Choose whether to group by category or channel number when
- Playing an iPod
Using your USB connector, connect the iPod to the USB port (2.5A), then select the iPod mode.
USB Port(s)ts P. 245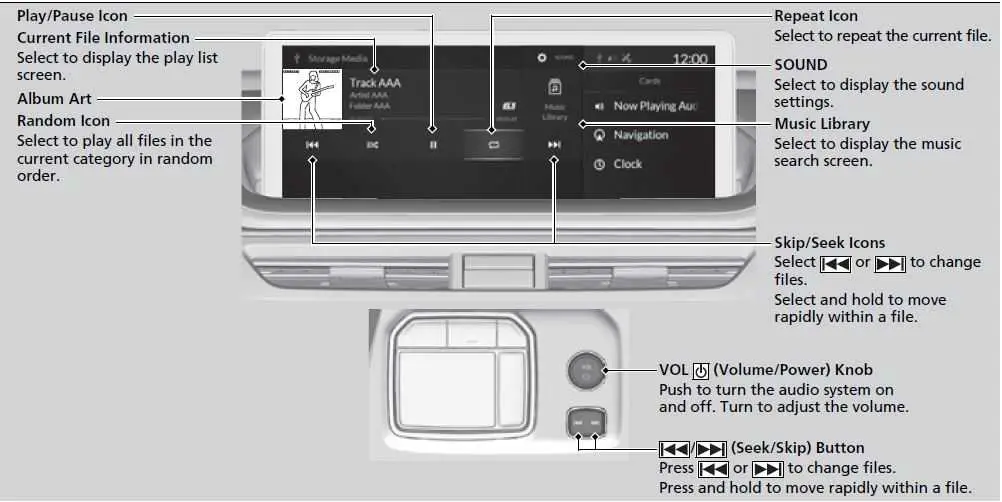
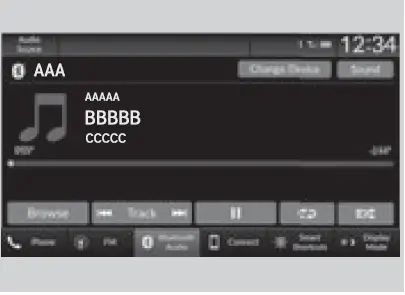
How to Select a Song from the Music Search List
- Select Browse.
- Select a search category (e.g., Artists, Albums, etc.).
- Continue making selections until you find the song of your choice.
Available operating functions vary on models or versions. Some functions may not be available on the vehicle’s audio system.
If there is a problem, you may see an error message on the audio/information screen.
iPod/USB Flash Drive P. 324
If you operate the music app on your iPhone/iPod while the phone is connected to the audio system, you may no longer be able to operate the same app on the audio/information screen.
Reconnect the device if necessary.
If an iPhone or a smartphone is connected via Apple CarPlay or Android Auto, the iPod/USB source will be unavailable and audio files on the phone will be playable only within Apple CarPlay or Android Auto.
How to Select a Play Mode
You can change the playback mode for a song.
 Shuffle/Repeat
Select shuffle or repeat icon repeatedly until a desired mode.
Play Mode Menu Items
Shuffle
![]() Shuffle off: Shuffle mode to off.
Shuffle off: Shuffle mode to off.
![]() Shuffle All Songs:
Shuffle All Songs:
Plays all available songs in a selected list in random order.
Repeat
![]() Repeat off: Repeat mode to off.
Repeat off: Repeat mode to off.
![]() Repeat Song: Repeats the current song.
Repeat Song: Repeats the current song.
![]() repeat all): Repeats the all songs in current playlist.
repeat all): Repeats the all songs in current playlist.
Playing a USB Flash Drive
Your audio system reads and plays audio files on a USB flash drive in either format of MP3, WMA, AAC*1, etc.
Playable audio file P. 330
Connect your USB flash drive to the USB port, then select the USB mode.
How to Select a File from the Music Search List
- Select Browse.
- Select a search category (e.g., Artists, Albums, etc.).
- Continue making selections until you find the song of your choice.
Use the recommended USB flash drives.
2 General Information on the Audio System
P. 328
WMA files protected by digital rights management (DRM) cannot be played.
The audio system skips to the next file.
If there is a problem, you may see an error message on the audio/information screen.
iPod/USB Flash Drive P. 324
Select SEARCH or SEARCH LIST, then trace the letters and/or numbers of the song on the A-zone touchpad. When KEYBOARD is selected, the on-screen keyboard appears.
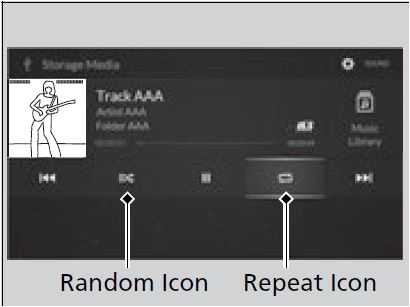
How to Select a Play Mode
You can select repeat and random modes when playing a file.
Random/Repeat
Select random or repeat icon repeatedly until a desired mode.
Play Mode Menu Items
Random
Random off: Random mode to off.
Random All Tracks: Plays all files in random order.
Random in Folder: Plays all files in the current folder in random order.
Repeat
Repeat off: Repeat mode to off.
Repeat track: Repeats the current file. Repeat folder: Repeats all files in the current folder.
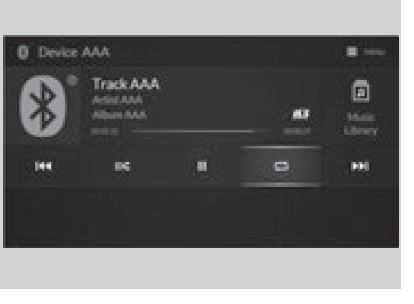
Playing Bluetooth® Audio
Your audio system allows you to listen to music from your Bluetooth-compatible phone.
This function is available when the phone is paired and connected to the vehicle’s Bluetooth® HandsFreeLink® (HFL) system.
Phone Setup P. 389
Not all Bluetooth-enabled phones with streaming audio capabilities are compatible with the system. For a list of compatible phones:
- U.S.: Visit www.handsfreelink.com/Acura or call 1- 888- 528-7876.
Canada: For more information on smartphone compatibility, call 1-855-490-7351.
It may be illegal to perform some data device functions while driving.
To play or pause a file
Select the play/pause icon.
- Select Browse.
- Select a search category (e.g., Albums).
- Select an item.
- The selection begins playing.
To Play Bluetooth® Audio Files
- Make sure that your phone is paired and connected to the system.
Phone Setup P. 389 - Select the Bluetooth® Audio mode.
If the phone is not recognized, another HFL-compatible phone, which is not compatible for Bluetooth® Audio, may already be connected.
To play or pause a file
Select the play/pause icon.
Only one phone can be used with HFL at a time. When there are more than two paired phones in the vehicle, the first paired phone the system finds is automatically connected.
Different devices can be connected respectively to Bluetooth® hands-free phone and Bluetooth® Audio functions.
If more than one phone is paired to the HFL system, there may be a delay before the system begins to play.
In some cases, the name of the artist, album, or track may not appear correctly.
Some functions may not be available on some devices.
If a phone is currently connected via Apple CarPlay or Android Auto, Bluetooth® Audio from that phone will be unavailable. However, you can have a second previously paired phone stream Bluetooth® Audio by selecting from the Bluetooth® device list.
Phone Setup P. 389
To play the audio files, you may need to operate your phone. If so, follow the phone maker’s operating instructions.
Switching to another mode pauses the music playing from your phone.
You can change the connected phone by selecting MENU and Change Device.
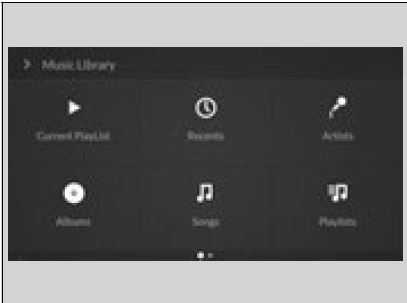
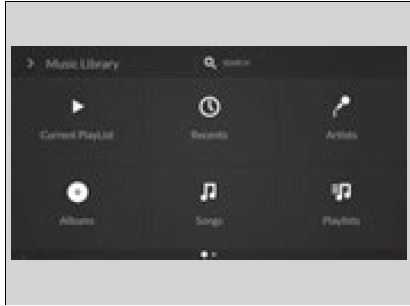
Searching for Music
Depending on the Bluetooth® device you connect, some or all of the lists may not be displayed.
- Select Music Library.
- Select a search category (e.g., Albums).
- Select an item.
- The selection begins playing.
Only one phone can be used with HFL at a time. When there are more than two paired phones in the vehicle, the first paired phone the system finds is automatically connected.
Different devices can be connected respectively to Bluetooth® hands-free phone and Bluetooth® Audio functions.
If more than one phone is paired to the HFL system, there may be a delay before the system begins to play.
In some cases, the name of the artist, album, or track may not appear correctly.
Some functions may not be available on some devices.
If a phone is currently connected via Apple CarPlay or Android Auto, Bluetooth® Audio from that phone will be unavailable. However, you can have a second previously paired phone stream Bluetooth® Audio by selecting from the Bluetooth® device list
Phone Setup P. 389
To play the audio files, you may need to operate your phone. If so, follow the phone maker’s operating instructions.
Switching to another mode pauses the music playing from your phone.
You can change the connected phone by selecting MENU and Change Device.
Playing Social Playlist
The Acura CabinControl® smartphone and tablet app allows users to share audio files from their devices to Social Playlist.
Unfortunately, the driver cannot select the audio files from the audio/information screen. The driver can play in order of their choice only if they individually select each song in the queue. The driver cannot rearrange the order of the playlist.
Once the smartphone app has been downloaded onto a device, the device can be added to the vehicle by going to Connections in the Settings. The device will need to be connected to the vehicle’s network to use.
2 Wi-Fi Connection P. 311
For more information, check the Acura CabinControl smartphone app instruction manual.
To turn off a play mode
Select the mode you want to turn off.
Shuffle/Repeat
Select shuffle or repeat icon repeatedly until a desired mode.
How to Edit the Playlist
Select Queue.
To play a file on the playlist:
Select the file.
AcuraLink®
AcuraLink® connects you to the latest information from Acura. You can connect your phone wirelessly through Wi-Fi or Bluetooth®.
Wi-Fi Connection P. 312
Phone Setup P. 408
AcuraLink® Menu
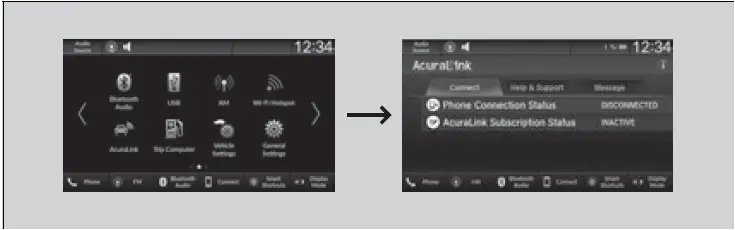
Connect
- Select General Settings.
- Select System.
- Select Data Sharing Setting.
- Select ON.
To link with AcuraLink®
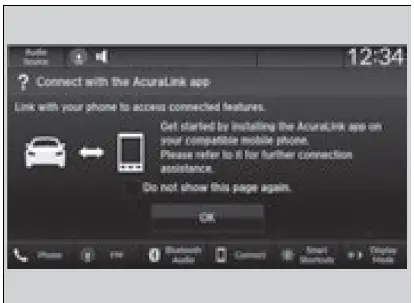
You can see the connection guide screen after launching AcuraLink® when there is no connection to a network. If you do not need this guide, select check-box and select OK.
Vehicle Information and Message from Acura Tips
You can check the messages that are received quickly in the shortcut operation.
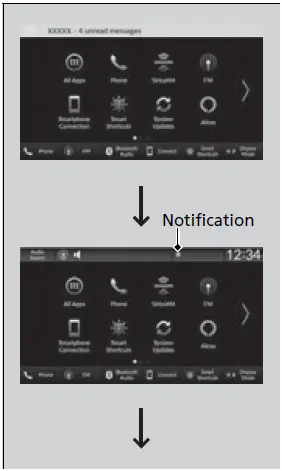
- A notification appears and notifies you of a new message on the header area.
- A notification icon is continuously displayed in the header area until the new message is read.
- Select the system status icon to see the messages.
- Select a new message to open.
Smart Shortcuts
By observing and learning driver behaviors, patterns, and preferences, the system anticipates driver actions and presents on-screen suggestions to help perform desired actions quicker and with fewer steps.
- The app will suggest actions based on what it learns you do often, and occasionally make recommendations based on your learned preferences.
The system will take some time to learn. The more you interact with the system, the more suggestion you will see, and the more accurate they will become.
Suggestions will automatically refresh periodically to provide updated content for each profile.
You can also provide feedback on whether a suggestion is helpful by pressing and holding on it. This can help the app grow smarter over time.
- To change the notifications behavior for Smart Shortcuts:
- Select Options on the Smart Shortcuts screen.
- Select Suggestion Settings.
- Select an option.
- All data used for Smart Shortcuts can be erased by a Factory Data Reset. 2 Defaulting All the Settings P. 382
The app also supports different profiles for each user, with customized learning for each profile. The app will also learn to associate a profile to a user over time based on key fob and connected phone data..
How to Use
- Press the button.
- Select Smart Shortcuts.
- Select a shortcut to take the action suggested.
- • Call Suggestions: When selected, a call to the contact or number suggested will be placed and shown. Based on your calling patterns, contacts will be suggested for you to call.
- Connect your smartphone through Bluetooth® to get contact suggestions.
- Call suggestions will not be displayed when you are connected to Apple Carplay.
You can change the profile by selecting top of the Smart Shortcuts screen.
You can customize the following items by selecting Options on the top of the Smart Shortcuts screen.
- Profiles: Create, change, and manage profiles.
View App Walkthrough: View the Smart Shortcuts walkthrough.
Suggestion Settings: Change where suggestions can appear.
To create a profile:
- Select Options on the Smart Shortcuts screen.
- Select Profiles.
- Select Manage Profiles.
- Select + Add New Profile.
- Enter name for your profile.
- Select Done.
- A new profile has been created and the Smart App will automatically switch to that profile.
To change a profile:
-
- Select Options on the Smart Shortcuts screen.
- Select Profiles.
- Select Change Current Profile.
- Select a profile from the list.
- The change to the selected profile has been made.
- Radio Suggestions: When selected, the corresponding radio app (FM, AM, or SiriusXM®) will open and it will start playing the station.
- From radio apps you can receive:
- FM, AM, SiriusXM®: Most frequently listened stations you may like to play next.
- FM, SiriusXM®: Genre-based suggestions.
- Considerations:
- FM suggestions will appear only when they are within range, according to your vehicle’s tuner signal.
- SiriusXM® suggestions will be available as long as there is an active account in the vehicle.
Wi-Fi Connection
This vehicle is equipped with Wi-Fi connectivity. You can connect to an external Wi-Fi hotspot or communication device.
Connect the vehicle to a Wi-Fi hotspot
- Press the button.
- Select General Settings.
- Select Connections.
- Select Wi-Fi.
- Select OK.
- Select Change Mode.
- Select Network.
- If the data sharing settings is to OFF, the message will be displayed on the screen. You need to change to ON.
- If you want to turn off the Wi-Fi mode, select OFF.
Wi-Fi and Wi-Fi Direct are registered trademarks of Wi-Fi Alliance®.

You cannot go through the setting procedure while the vehicle is moving. Park in a safe place to set the audio system in Wi-Fi mode.
Some cell phone carriers charge for tethering and smartphone data use. Check your phone’s data subscription package.
Check your phone manual to find out if the phone has Wi-Fi connectivity.
You can confirm whether Wi-Fi connection is on or off with the![]() icon on the system status area. Transmission speed and others will not be displayed on this screen.
icon on the system status area. Transmission speed and others will not be displayed on this screen.
Select the access point you want to connect to the system.
To add a new network or select the saved networks, select Options.
If Options is selected, Add Network and Saved Networks can be registered.
AT&T Hotspot
If you have subscribed to AT&T hotspot services, your vehicle will provide data to connect your mobile devices to the Internet. You can use the AT&T Hotspot app to turn on/off vehicle data and monitor data usage left on your subscription.
AT&T Hotspot Menu
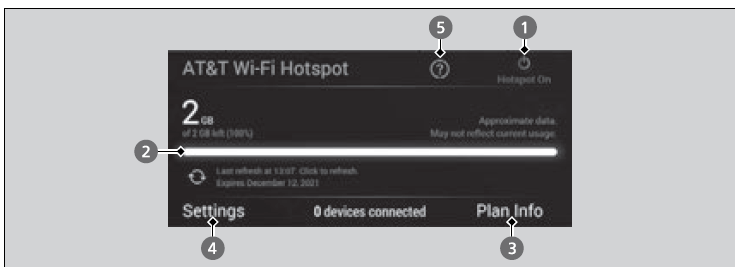
- Hotspot Enable
Turn on/off AT&T Hotspot.
Data Usage Bar
Check the current status of your data plan. This Usage Bar will show your current plan and how much data remains on your plan. Subscription plans for AT&T Hotspot can be added/modified at www.att.com/acura.
Plan Info
Shows your current AT&T subscription plan for the vehicle.
Settings
Shows the current username and password for vehicle Hotspot. Settings can be changed while the vehicle is not in motion.
- Help
To use AT&T Hotspot services, your vehicle must be subscribed to a data plan. If your vehicle is not subscribed to a data plan, you can visit www.att.com/acura to add vehicle data services.
Hotspot username and password can be changed in the Settings of the AT&T Hotspot app. Settings cannot be accessed while driving. Park in a safe place to adjust Hotspot settings.
Alternatively, you can use your mobile hotspot to connect the vehicle and other mobile devices to the Internet.
Apple CarPlay
If you connect an Apple CarPlay-compatible iPhone to the system via the 2.5A USB port or wirelessly, you can use the audio/information screen, instead of the iPhone display, to make a phone call, listen to music, view maps (navigation), and access messages.
USB Port(s)
We recommend that you update iOS to the latest version when using Apple CarPlay.
Park in a safe place before connecting your iPhone to Apple CarPlay and when launching any compatible apps.
While connected to Apple CarPlay, calls are only made through Apple CarPlay. If you want to make a call with the HandsFreeLink® (HFL) system, turn Apple CarPlay off.
Setting Up Apple CarPlay
When your iPhone is connected to Apple CarPlay, it is not possible to use the Bluetooth® Audio or Bluetooth® HandsFreeLink®. However, other previously paired phones can stream audio via Bluetooth® while Apple CarPlay is connected.
Phone Setup
Apple CarPlay and Android Auto cannot run at the same time.
For details on countries and regions where Apple CarPlay is available, as well as information pertaining to function, refer to the Apple homepage.
Apple CarPlay Menu
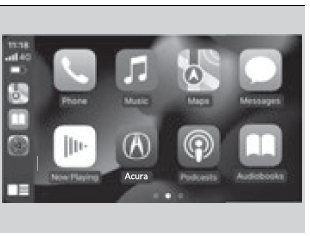
- Phone
Access the contact list, make phone calls, or listen to voicemail.
Messages
Check and reply to text messages, or have messages read to you.
- Music
Play music stored on your iPhone.
Maps
Display Apple Maps and use the navigation function just as you would on your iPhone.
Acura
Select the Acura icon to go back to the home screen.
 Go back to the Apple CarPlay Dashboard screen.
![]() Go back to the Apple CarPlay menu screen.
Go back to the Apple CarPlay menu screen.
Apple CarPlay Operating Requirements & Limitations
Apple CarPlay requires a compatible iPhone with an active cellular connection and data plan. Your carrier’s rate plans will apply.
Changes in operating systems, hardware, software, and other technology integral to providing Apple CarPlay functionality, as well as new or revised governmental regulations, may result in a decrease or cessation of Apple CarPlay functionality and services. Acura cannot and does not provide any warranty or guarantee of future Apple CarPlay performance or functionality.
It is possible to use 3rd party apps if they are compatible with Apple CarPlay. Refer to the Apple homepage for information on compatible apps.
Setting Up Apple CarPlay
After you have connected your iPhone to the system via the 2.5A USB port or wirelessly, use the following procedure to set up Apple CarPlay. Use of Apple CarPlay will result in the transmission of certain user and vehicle information (such as vehicle location, speed, and status) to your iPhone to enhance the Apple CarPlay experience. You will need to consent to the sharing of this information on the audio/information screen.
Connecting Apple CarPlay Using the USB Cable to the USB Port
- Connect the iPhone to the 2.5A USB port using the USB cable. 2 USB Port(s) P. 227
- The confirmation screen will be displayed.
- Select Yes.
- If you do not want to connect Apple CarPlay, select No.
You may change the consent settings under the Smartphone Connection settings menu.
Only initialize Apple CarPlay when you are safely parked.
When Apple CarPlay first detects your iPhone, you will need to set up your iPhone. Refer to the instruction manual that came with your iPhone.
You can use the following procedure to disconnect or delete the devices connecting Apple CarPlay:
Press the button Select General Settings Smartphone Connection Apple CarPlay Select device
Use of user and vehicle information
The use and handling of user and vehicle information transmitted to/from your iPhone by Apple CarPlay is governed by the Apple iOS terms and conditions and Apple’s Privacy Policy.
Connect Apple CarPlay Wirelessly
Connect Apple CarPlay wirelessly on the home screen
- Press
 the button.
 - Select Smartphone Connection.
- Select + Connect New Device.
- Pair the iPhone to the vehicle’s Bluetooth® HandsFreeLink® (HFL) system.
Phone Setup P. 408 - Select Yes.
- If your iPhone asks to accept for connecting Apple CarPlay, accept for connection. A confirmation message for AcuraLink Assist appears.
- Select Yes or No.
Connect Apple CarPlay wirelessly on the Apple CarPlay device list
- Pressthe button.
- Select General Settings.
- Select Smartphone Connection.
- Select Apple CarPlay.
- Select + Connect New Device.
- Pair the iPhone to the vehicle’s Bluetooth® HandsFreeLink® (HFL) system. 2 Phone Setup P. 408
- Select Yes.
- If your iPhone asks to accept for connecting Apple CarPlay, accept for connection. A confirmation message for AcuraLink Assist appears.
- Select Yes or No.
Connect Apple CarPlay wirelessly on the Bluetooth® device list
- Pressthe button.
- Select General Settings.
- Select Connections.
- Select Bluetooth.
- Select + Connect New Device.
- Pair the iPhone to the vehicle’s Bluetooth® HandsFreeLink® (HFL) system. 2 Phone Setup P. 408
- Check the box on Apple CarPlay.
- If you select Apple CarPlay, you cannot select Audio and Phone.
- Select Connect.
- Select Yes.
- If your iPhone asks to accept for connecting Apple CarPlay, accept for connection. A confirmation message for AcuraLink Assist appears.
- Select Yes or No.
Connect Apple CarPlay wirelessly with the steering wheel
- Press and hold (Talk) button on the steering wheel.
- Pair the iPhone to the vehicle’s Bluetooth® HandsFreeLink® (HFL) system. 2 Phone Setup P. 408
- Check the box on Apple CarPlay.
- If you select Apple CarPlay, you cannot select Audio and Phone.
- Select Connect.
- Select Yes.
- If your iPhone asks to accept for connecting Apple CarPlay, accept for connection. A confirmation message for AcuraLink Assist appears.
- Select Yes or No.
Connect Apple CarPlay wirelessly at start-up (when there is no phone paired to the system)
- Set the power mode to ACCESSORY or ON.
- Select OK.
-
- If there is no registered device, the Bluetooth® pairing screen will be displayed.
- If you check the box with Do not show this again, this screen will not be displayed.
-
- Pair the iPhone to the vehicle’s Bluetooth® HandsFreeLink® (HFL) system.
Phone Setup P. 408 - Check the box on Apple CarPlay.
- If you select Apple CarPlay, you cannot select Audio and Phone.
- Select Connect.
- Select Yes.
If your iPhone asks to accept for connecting Apple CarPlay, accept for connection. A confirmation message for AcuraLink Assist appears. - Select Yes or No.
Operating Apple CarPlay with Siri
Press and hold the(Talk) button to activate Siri.
(Talk) Button:
Press and hold to activate Siri.
Press again to deactivate Siri.
Press and release to activate standard voice recognition system.
Below are examples of questions and commands for Siri:
- What movies are playing today?
Call dad at work.
What song is this?
How’s the weather tomorrow?
Read my latest email.
For more information, please visit www.apple.com/ios/siri.
Android AutoTM
When you connect an Android phone to the audio system via the USB port or wirelessly, Android Auto is automatically initiated. When connected via Android Auto, you can use the audio/information screen to access the Phone, Google Maps (Navigation), and Google Now functions. When you first use Android Auto, a tutorial will appear on the screen.
We recommend that you complete this tutorial while safely parked before using Android Auto.
USB Port(s) P. 227
Auto Pairing Connection P. 324
Android Auto connection requires the following:
- Depending on the phone manufacturer, Android 8.0, 9.0 or 10.0.
Android Auto app version 4.7 or higher. - For Wireless Android Auto
A Google-branded or Samsung-branded phone with Android 10.0, or;
A smartphone with Android 11.0+ and with 5 GHz WiFi. Can be any smartphone brand.
Park in a safe place before connecting your Android phone to Android Auto and when launching any compatible apps.
To use Android Auto, connect the USB cable to the USB port located in the console compartment. The USB ports located on the front panel and the back of the console compartment* are used only for charging.
USB Ports P. 255
When your Android phone is connected to Android Auto, it is not possible to use the Bluetooth® Audio. However, other previously paired phones can stream audio via Bluetooth® while Android Auto is connected.
Phone Setup P. 395
Apple CarPlay and Android Auto cannot run at the same time.
Android Auto is a trademark of Google LLC.
Android AutoTM
When you connect an Android phone to the audio system via the USB port or wirelessly, Android Auto is automatically initiated. When connected via Android Auto, you can use the audio/information screen to access the Phone, Google Maps (Navigation), and Google Now functions. When you first use Android Auto, a tutorial will appear on the screen.
We recommend that you complete this tutorial while safely parked before using Android Auto.
USB Port(s) P. 227
Auto Pairing Connection P. 324
Android Auto is a trademark of Google LLC.
We recommend that you update Android OS to the latest version when using Android Auto. Bluetooth A2DP cannot be used while your phone is connected to Android Auto.
To use Android Auto on a smartphone with Android 9.0 (Pie) or earlier, you need to download the Android Auto app from Google Play to your smartphone.
Park in a safe place before connecting your Android phone to Android Auto and when launching any compatible apps.
When your Android phone is connected to Android Auto, it is not possible to use the Bluetooth® Audio. However, other previously paired phones can stream audio via Bluetooth® while Android Auto is connected.
Phone Setup P. 389
Apple CarPlay and Android Auto cannot run at the same time.
Android Auto Features

- Maps
Display Google Maps and use the navigation function just as you would with your Android phone. When the vehicle is in motion, it is not possible to make keyboard entries. Stop the vehicle in a safe location to undertake a search or provide other inputs. - Phone
Make and receive phone calls as well as listen to voicemail. - Acura
Select the Acura icon to go back to the home screen. Operate Android Auto with your voice. 
You can check Android notifications.
 (Android Auto Home)
Display useful information organized by Android Auto into simple cards that appear just when they’re needed.
For details on countries and regions where Android Auto is available, as well as information pertaining to function, refer to the Android Auto homepage.
Screens may differ depending on the version of the Android Auto app you are using.
Android Auto Operating Requirements & Limitations
Android Auto requires a compatible Android phone with an active mobile connection and data plan. Your carrier’s rate plans will apply.
Changes in operating systems, hardware, software, and other technology integral to providing Android Auto functionality, as well as new or revised governmental regulations, may result in a decrease or cessation of Android Auto functionality and services. Acura cannot and does not provide any warranty or guarantee of future Android Auto performance or functionality.
It is possible to use 3rd party apps if they are compatible with Android Auto. Refer to the Android Auto homepage for information on compatible apps.
Android Auto Setup
When you connect an Android phone to the unit via the USB port or wirelessly, Android Auto is automatically initiated.
Before setting up a connection, ensure that the Android Auto app is closed on the phone.
Connecting Android Auto using the USB cable to the USB port
To enable Android Auto after connecting an Android phone to the system, select Enable Android Auto on the screen.
You may change the consent settings under the Connections settings menu.
Set up Android Auto wirelessly by Bluetooth® pairing
- Pair and connect the Android phone to the vehicle’s Bluetooth® HandsFreeLink®.
Phone Setup P. 389 - A privacy policy statement will appear. Select Change to Android Auto.
- Your phone will display various screens that request your permissions needed for Android Auto. Accept the requests to complete setup.
Only initialize Android Auto when you safely parked. When Android Auto first detects your phone, you will need to set up your phone so that auto pairing is possible. Refer to the instruction manual that came with your phone.
You can use the method below to change Android Auto settings after you have completed the initial setup:
Use of user and vehicle information
The use and handling of user and vehicle information transmitted to/from your phone by Android Auto is governed by the Google’s Privacy Policy.
Set up Android Auto wirelessly on the home screen
- Select Android Auto on the home screen, then select Connect Phone.
- Select + Connect New Device.
- Start Bluetooth® pairing.
- A privacy policy statement will appear. Select Enable Android Auto.
- Your phone will display various screens that request your permissions needed for Android Auto. Accept the requests to complete setup.
Operating Android Auto with Voice Recognition
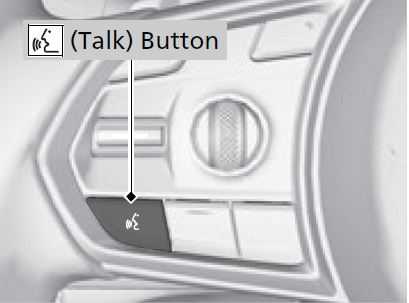
Press and hold the (Talk) button to operate Android Auto with your voice.
- (Talk) Button:
Press and hold to operate Android Auto with your voice. Press and release to activate standard voice recognition system.
Below are examples of commands you can give with voice recognition:
- Reply to text.
Call my wife.
Navigate to Acura.
Play my music.
Send a text message to my wife.
Call flower shop.
For more information, please refer to the Android Auto homepage.
You can also activate the voice recognition function by selecting the icon in the lower-right corner of the screen.
Audio Error Messages
iPod/USB Flash Drive
If an error occurs while playing an iPod or USB flash drive, you may see the following error messages. If you cannot clear the error message, contact a dealer.
| Error Message | Solution |
| USB Error | Appears when an incompatible device is connected. Disconnect the device. Then, turn the audio system off and turn it on again. Do not reconnect the device that caused the error.
iPod USB flash drive |
| The selected file cannot be played on this system | Appears when the files in the USB flash drive are copyright protected or an unsupported format. |
| No Data | iPod Appears when the iPod is empty. USB flash drive Appears when the USB flash drive is empty. iPod and USB flash drive Check that compatible files are stored on the device. |
| USB Hub Error | Appears when the USB hub with plural USB devices is connected. Disconnect the USB hubs and directly connect the device to the USB port using the extension cable. |
Android/Apps
If an error occurs while using the audio system or apps, you may see the following error messages. If you cannot clear the error message, contact a dealer.
| Error Message | Solution |
| Unfortunately, **** has stopped.*1 | Error has occurred within app, select OK on the screen to close the app. |
| **** isn’t responding. Do you want to close it?*1 | App is not responding. Select Wait if you can wait for a response from app a little longer. If it does not respond even if you keep waiting, select OK to close the app and start it up. If the error message continues, perform Factory Data Reset.2 Defaulting All the Settings P. 379 |
Apple CarPlay/Android Auto
If an error occurs while using the Apple CarPlay or Android Auto, you may see the following error messages. If you cannot clear the error message, contact a dealer.
| Error Message | Solution |
| Error | Appears when Apple CarPlay or Android Auto fails to recognize your device. Check if your device is compatible with Apple CarPlay or Android Auto, or the latest version of the app is installed on your device. |
| Maximum Number of Apple CarPlay Devices Exceeded | Appears when the number of stored Apple CarPlay devices or Android Auto devices exceeds the limitation. Select Replace and Continue and delete a registered device to connect a new device for the Apple CarPlay connection or Android Auto connection. |
| Maximum Number of Android Auto Devices Exceeded | |
| Phone Call Active | Appears when the Android Auto device becomes connected to USB during an active Bluetooth® hands-free phone call. |
| (connected device name) Disconnected | Appears when the paired device is disconnected from the HFL function. Reconnect device and try again. |
| Maximum Number of Bluetooth Devices Exceeded | Appears when the number of stored Bluetooth® devices exceeds the limitation. Select Replace and Continue and delete a registered device to connect a new device for the Bluetooth® connection. |
| Bluetooth Connection Error | Appears when Bluetooth® connection is failed. Check the Bluetooth® connection of this audio system and your connected device. |
| Error Message | Solution |
| Android Auto – SSL Authentication Failure Set the vehicle date and time to match the device. | Set the vehicle date to match the device. |
| Wireless connection problem in Android Auto – Android Auto Connection Unstable |
Temporarily connect the device to the USB data port or try and bring the device to front of the vehicle. |
| Wireless connection problem in Android Auto – Temporarily connect the device to the USB data port. | Failing to connect or disconnects randomly. Temporarily connect the device to the USB data port. |
| Android Auto – Bluetooth Connection Error | Reconnect Android Auto device and try again. |
| Unable to start Android Auto from the connected device. | There could be many possible reasons for this error but updating Android Auto app on the phone and google play services could solve the problem. Other solution include deleting saved phone information from the vehicle and deleting vehicle information from the phone’s Bluetooth® list and setting up a new connection. |
General Information on the Audio System
SiriusXM® Radio Service*
Subscribing to SiriusXM® Radio
- You need your radio ID ready before registering for subscription. To see the ID on the screen, select Channel 0.
- Have your radio ID ready, and either call or visit the SiriusXM® website to subscribe.
Receiving SiriusXM® Radio
Switch to the SiriusXM® mode by using the audio remote controls on the steering wheel, or through the audio/information screen, and stay in this mode for about 30 minutes until the service is activated. Make sure your vehicle is in an open area with good reception.
SiriusXM® Radio Display Messages
Channel **** is not subscribed. Call SiriusXM to subscribe.*1 You are not subscribed to the channel selected.
Subscription Updated:
SiriusXM® radio is receiving information update from the network. Channel Not Available:
No such channel exists, or the artist or title information is unavailable. No Signal:
The signal is too weak in the current location.
Check Tuner:
There is a problem with the SiriusXM® tuner. Contact a dealer.
Antenna Disconnected, Antenna Shorted:
There is a problem with the SiriusXM® antenna. Contact a dealer.
Contact Information for SiriusXM® Radio:
- U.S.: SiriusXM® Radio at www.siriusxm.com/subscribenow, or 1-866-635-2349
Canada: SiriusXM® Canada at www.siriusxm.ca/subscribe-now, or 1-877-209-0079
The SiriusXM® satellites are in orbit over the equator; therefore, objects south of the vehicle may cause satellite reception interruptions. Satellite signals are more likely to be blocked by tall buildings and mountains the farther north you travel from the equator.
You may experience reception problems under the following circumstances:
- In a location with an obstruction to the south of your vehicle.
- In tunnels
On the lower level of a multi-tiered road
Large items carried on the roof rack
Compatible iPod, iPhone, and USB Flash Drives
iPod and iPhone Model Compatibility
iPod and iPhone Model Compatibility
Made for iPod touch (6th to 7th generation) released between 2015 and 2019
Made for iPhone 5s/iPhone 6/iPhone 6 Plus/iPhone 6s/iPhone 6s Plus/iPhone SE/iPhone 7/iPhone 7 Plus/iPhone 8/iPhone 8 Plus/iPhone X/iPhone XS/iPhone XS Max/iPhone XR/iPhone 11/iPhone 11 Pro/iPhone 11 Pro Max /iPhone SE (2nd generation)
Models with 9-in. Color Touchscreen
Model
Made for iPod touch (5th to 6th generation) released between 2012 and 2015
USB Flash Drives
- A USB flash drive of 256 MB or higher is recommended.
Some digital audio players may not be compatible.
Some USB flash drives (e.g., a device with security lockout) may not work.
Some software files may not allow for audio play or text data display.
Some versions of MP3, WMA, AAC, FLAC, or WAV formats may be unsupported.
This system may not work with all software versions of these devices.
The Lightning connector works with iPhone SE (2nd generation), iPhone 11 Pro Max, iPhone 11 Pro, iPhone 11, iPhone XS Max, iPhone XS, iPhone XR, iPhone X, iPhone 8 Plus, iPhone 8, iPhone 7 Plus, iPhone 7, iPhone SE (1st generation), iPhone 6s Plus, iPhone 6s, iPhone 6 Plus, iPhone 6, iPhone 5s, iPad Pro (10.5-inch), iPad Pro 12.9-inch (2nd generation), iPad Pro (12.9-inch), iPad Pro (9.7-inch), iPad Air (3rd generation), iPad Air 2, iPad Air, iPad (7th generation), iPad (6th generation), iPad (5th generation), iPad mini (5th generation), iPad mini 4, iPad mini 3, iPad mini 2, iPod touch (7th generation), iPod touch (6th generation).
USB works with iPhone SE (2nd generation), iPhone 11 Pro Max, iPhone 11 Pro, iPhone 11, iPhone XS Max, iPhone XS, iPhone XR, iPhone X, iPhone 8 Plus, iPhone 8, iPhone 7 Plus, iPhone 7, iPhone SE (1st generation), iPhone 6s Plus, iPhone 6s, iPhone 6 Plus, iPhone 6, iPhone 5s, iPad Pro (10.5-inch), iPad Pro 12.9-inch (2nd generation), iPad Pro (12.9-inch), iPad Pro (9.7-inch), iPad Air (3rd generation), iPad Air 2, iPad Air, iPad (7th generation), iPad (6th generation), iPad (5th generation), iPad mini (5th generation), iPad mini 4, iPad mini 3, iPad mini 2, iPod touch (7th generation), iPod touch (6th generation).
USB Flash Drives
- A USB flash drive of 256 MB or higher is recommended.
- Some digital audio players may not be compatible.
- Some USB flash drives (e.g., a device with security lockout) may not work.
- Some software files may not allow for audio play or text data display.
- Some versions of playable file formats may be unsupported.
Playable audio file
USB Flash Drives
Format/Codec File Type(s)
AAC LC : 3GPP (.3gp), MPEG-4 (.mp4, .m4a),
ADTS raw AAC : (.aac, decode in Android
3.1+, encode in Android 4.0+, ADIF not supported), MPEG-TS (.ts, not seekable, Android 3.0+)
HE-AACv1 (AAC+)
HE-AACv2 (enhanced AAC+)
AAC ELD (enhanced low delay AAC)
AMR-NB : 3GPP (.3gp)
AMR-WB
FLAC : FLAC (.flac) only
MIDI : Type 0 and 1 (.mid, .xmf, .mxmf), RTTTL/
RTX (.rtttl, .rtx), OTA (.ota), iMelody
(.imy)
MP3 :MP3 (.mp3)
Opus Matroska (.mkv)
PCM/WAVE : WAVE (.wav)
Vorbis : Ogg (.ogg), Matroska (.mkv, Android 4.0+)
Files on the USB flash drive are played in their stored order. This order may be different from the order displayed on your PC or device.
Honda App License Agreement
END USER LICENSE AGREEMENT
PLEASE CAREFULLY READ THIS END USER LICENSE AGREEMENT (THIS “AGREEMENT”) WHICH GOVERNS YOUR USE OF THE SOFTWARE INSTALLED ON YOUR HONDA OR ACURA VEHICLE (YOUR “VEHICLE”) AS WELL AS THE APPLICATIONS, SERVICES, FUNCTIONS, AND CONTENT PROVIDED THROUGH THE SOFTWARE (COLLECTIVELY, THE “SERVICES”). YOUR USE OF THE SOFTWARE OR SERVICES WILL SERVE AS YOUR CONSENT TO THE TERMS OF THIS AGREEMENT. THE SOFTWARE IS OWNED (OR LICENSED), PROVIDED, AND/OR OPERATED BY AMERICAN HONDA MOTOR CO. INC., (“HONDA,” “US,” “WE,” OR “OUR”), WITH ITS BUSINESS ADDRESS AT 1919 TORRANCE BLVD., TORRANCE, CA 90501. REFERENCE TO “HONDA” IN THIS AGREEMENT INCLUDES HONDA’S PARENT COMPANY AND ITS AFFILIATES AND DESIGNATED AGENTS. THE SERVICES ARE OWNED (OR LICENSED), PROVIDED, AND/OR OPERATED BY HONDA OR A THIRD-PARTY SERVICE PROVIDER (A “PROVIDER”). REFERENCE TO A “PROVIDER” IN THIS AGREEMENT INCLUDES SUCH PROVIDER’S PARENT COMPANY, AFFILIATES, AND DESIGNATED AGENTS.
- Description of the Software. The SOFTWARE includes the software, firmware and the like, installed and executing on your VEHICLE during manufacture, and thereafter updated from time to time by HONDA, you or an authorized HONDA dealer (a “DEALER”). The SOFTWARE allows you to access and use a variety of SERVICES, including but not limited to: (a) HONDA applications, services, and content provided through the SOFTWARE (together, “HONDA SERVICES”); and (b) PROVIDER applications, services, and content provided through the SOFTWARE (together, “PROVIDER SERVICES”), each of which may provide access to various information, media, content, and services.
SOFTWARE Licensing and Intellectual Property. - SOFTWARE. This AGREEMENT grants you a non-exclusive, limited, and revocable license to use the SOFTWARE and SERVICES solely (a) as installed on your VEHICLE by HONDA, (b) as updated on your Vehicle by HONDA, you (but only as and when directed by HONDA), or a DEALER and (c) as permitted under the terms of this AGREEMENT.
- HONDA Services. The SOFTWARE may provide you with access to various HONDA SERVICES. Installation, activation, or use of HONDA SERVICES may require your consent to additional terms, conditions, and privacy policies applicable to those HONDA SERVICES (the “HONDA TERMS”). You acknowledge and agree that any collection, use, sharing of data generated by your VEHICLE or your use of your VEHICLE, and your use of the HONDA SERVICES shall be subject to this AGREEMENT and any additional HONDA TERMS that may be specifically applicable to such HONDA SERVICES or data generation. The HONDA SERVICES may collect, use, and share such data while you are using the SOFTWARE.
- Open-Source Software. The SOFTWARE and SERVICES may incorporate software licensed to HONDA under free or open-source licenses which govern HONDA’s distribution and your use of such software. HONDA and the third-party authors, licensors, and distributors of such software disclaim all warranties and all liability arising from any and all use or distribution of the software. To the extent such software is provided under terms that differ from the applicable free or open-source licenses, those terms are offered by HONDA alone. Additional information regarding free and open-source software incorporated in the SOFTWARE and SERVICES is available in this manual or within the SOFTWARE.
- Provider Services. The SOFTWARE may provide you with access to various PROVIDER SERVICES. Installation or use of such PROVIDER SERVICES may require your consent to additional terms, conditions, and privacy policies of the applicable PROVIDER (the “PROVIDER TERMS”). This AGREEMENT restricts the manner in which you can install and use PROVIDER SERVICES but does not grant you a license or permission to use such PROVIDER SERVICES. Your permission to use PROVIDER SERVICES is limited and subject to any license grants, conditions, and limitations included in the PROVIDER TERMS. You acknowledge that any collection, use, sharing of your information, targeted advertising practices by PROVIDERS, and your use of the PROVIDER SERVICES shall be subject to both this AGREEMENT and any applicable PROVIDER TERMS. The PROVIDER SERVICES may collect, use, and share such information while you are using the SOFTWARE.
- License Limitations and Restrictions on Use.
(a) Limited License. You understand and agree that the SOFTWARE and SERVICES are licensed, not sold, to you solely for use in accordance with this AGREEMENT and any applicable PROVIDER TERMS, and any documentation for the VEHICLE made available to you by HONDA (any “DOCUMENTATION”). HONDA and its licensors reserve all rights in the SOFTWARE and HONDA SERVICES not expressly granted to you under this AGREEMENT. PROVIDERS and their licensors reserve all rights in the PROVIDER SERVICES not expressly granted to you under the applicable PROVIDER TERMS.- Restrictions on Use. The licenses granted under this AGREEMENT do not permit you to use the SOFTWARE or SERVICES on a device other than your VEHICLE. As a condition of using the SOFTWARE and SERVICES, you agree that you may not and will not:
- copy, download, distribute, modify, publish, sell, rent, lease, lend, license, sublicense, reuse, or create derivative works of the SOFTWARE or SERVICES or any of the content or other material within the SOFTWARE or SERVICES, including without limitation, HONDA or PROVIDER names, logos, or any other trademarks of HONDA or PROVIDERS or used in association with the SOFTWARE or any SERVICES, except as required to use the SOFTWARE or SERVICES in accordance with this AGREEMENT, any applicable PROVIDER TERMS, and the DOCUMENTATION;
- access or use the SOFTWARE or SERVICES in any manner intended to damage or impair the operation of the SOFTWARE or SERVICES or interfere with anyone else’s use and enjoyment of the SOFTWARE or SERVICES;
- access or attempt to access any system or server on which the SOFTWARE or SERVICES is hosted or modify or alter the SOFTWARE or SERVICES in any way;
- use the SOFTWARE or SERVICES for any unlawful purpose, or in violation of any third party rights;
- use the SOFTWARE or SERVICES in violation of any applicable traffic regulations, rules or laws, including but not limited to any driver distraction laws, rules or regulations;
- violate the terms of this AGREEMENT, any HONDA TERMS, any PROVIDER TERMS or other applicable third-party terms, conditions, and privacy policies; or
- reverse engineer, decompile, disassemble, attempt to derive the source code of, nor permit others to reverse engineer, decompile, or disassemble, or attempt to derive the source code of the SOFTWARE or SERVICES, except and only to the extent that such activity is expressly permitted (a) by applicable law notwithstanding this limitation or (b) the terms of applicable free or opensource software licenses.
- Restrictions on Use. The licenses granted under this AGREEMENT do not permit you to use the SOFTWARE or SERVICES on a device other than your VEHICLE. As a condition of using the SOFTWARE and SERVICES, you agree that you may not and will not:
- Intellectual Property Rights. All title and intellectual property rights in and to the SOFTWARE and SERVICES, the accompanying DOCUMENTATION, and all copies of the SOFTWARE or SERVICES are owned by HONDA, PROVIDERS, or their suppliers or licensors. This AGREEMENT does not grant you any rights in connection with any trademarks or service marks of HONDA, PROVIDERS, or their licensors, affiliates, or suppliers.
- Export Restrictions: You acknowledge that the SOFTWARE and SERVICES are subject to U.S., European Union, and other export jurisdictions. You agree to comply with all applicable international and national laws that apply to the SOFTWARE and SERVICES, including the U.S. Export Administration Regulations, as well as end-user, end-use, and destination restrictions issued by the U.S. and other governments.
- SOFTWARE Operation
- HONDA reserves the right to suspend or terminate your access to and use of the SOFTWARE or SERVICES if you are found to be in violation of this AGREEMENT or as reasonably deemed necessary by HONDA.
- Eligibility/Registration/Activation. The SOFTWARE is intended for and available to individuals who (a) are of legal age of majority in their jurisdiction of residence (and at least 18 years of age), or are younger than 18 years of age and possess a valid driver’s license issued by their jurisdiction of residence, and (b) own or have permissive access to a compatible VEHICLE. We do not knowingly collect any information, including personal information, from children under 13. If we learn or are notified that we have collected personal information of a child under 13, we will immediately take steps to delete such information.
- Use of PROVIDER SERVICES through the SOFTWARE. Certain PROVIDER SERVICES made available through the SOFTWARE may require that you register or otherwise have an account with the PROVIDER and agree to PROVIDER TERMS. Any use of any of such PROVIDER SERVICES within the SOFTWARE is subject to this AGREEMENT and the applicable PROVIDER TERMS. HONDA does not exercise control over such PROVIDER SERVICES and is not responsible or liable for the availability, security, or content of such PROVIDER SERVICES, and the inclusion of any PROVIDER SERVICES does not imply a referral from, the approval of, or the endorsement by HONDA of such PROVIDER SERVICES. HONDA is not responsible or liable, directly or indirectly, for any damage relating to or resulting from your use of the PROVIDER SERVICES.
- Links to Third Party Sites: The SOFTWARE may provide you with the ability to access third-party sites and content through the use of the SOFTWARE or SERVICES. The third-party sites and content are not under the control of HONDA. HONDA is not responsible or liable, directly or indirectly, for such third-party websites and their content or for any damage relating to or resulting from your access or use of such websites and content.
- Unauthorized Use and Abuse. You are responsible for ensuring your (and any authorized third parties’) use of the SOFTWARE and SERVICES remains in compliance with this AGREEMENT and all other applicable HONDA TERMS and PROVIDER TERMS. You acknowledge and agree that any use of the SOFTWARE or SERVICES occurring through your VEHICLE will be deemed your actions and that HONDA and PROVIDERS may rely upon such actions. You agree to immediately notify us if you suspect fraudulent or abusive activity involving the SOFTWARE or SERVICES. If you so notify us or if we otherwise suspect fraudulent or abusive activity, you agree to cooperate with us in any fraud investigation and to use any fraud prevention measures we prescribe. Your failure to immediately notify us or cooperate to use such measures will result in your liability for all fraudulent usage or abusive activity associated with your VEHICLE.
- SOFTWARE Updates. The SOFTWARE and SERVICES may be updated when your VEHICLE is serviced by a DEALER or remotely, over-the-air, by HONDA from time to time; such updates may occur with or without further notice or your future consent. The SOFTWARE may be updated at HONDA’s discretion and for any purpose including, without limitation, to patch or otherwise improve the SOFTWARE or SERVICES functionality, security, or stability. All updates to the SOFTWARE and SERVICES are subject to this AGREEMENT and any other applicable HONDA TERMS and PROVIDER TERMS.
- Uninstalling, Removing, and Replacing the SOFTWARE. Replacing SOFTWARE or HONDA SERVICES with software or firmware not provided and installed by HONDA or a DEALER will render all representations and warranties for the SOFTWARE, HONDA SERVICES, and VEHICLE functionality reliant upon the SOFTWARE or HONDA SERVICES null and void.
- SOFTWARE Operational Notices and Warnings
- Vehicle Geolocation Information. You acknowledge that your VEHICLE may be equipped with certain traffic and map features. The traffic feature will automatically collect and transmit, through GPS technology, your Vehicle’s current location (longitude and latitude), travel direction and speed (“VEHICLE GEOLOCATION INFORMATION”) to HONDA and PROVIDERS. The VEHICLE GEOLOCATION INFORMATION is used by HONDA and PROVIDERS to provide traffic and navigation-related information to you, but may also be used to provide other SERVICES or offers to you. HONDA will not use such VEHICLE GEOLOCATION INFORMATION for its own marketing efforts, or provide such information to unaffiliated third parties for their own purposes, without your express consent.
- Potential Map Inaccuracy and Route Safety. Maps used by this system may be inaccurate because of changes in roads, traffic controls, routing, or driving conditions. Always use good judgment and common sense when following suggested routes. Do not follow the route suggestions if doing so would result in an unsafe or illegal driving maneuver, if you would be placed in an unsafe situation, or if you would be directed into an area that you consider unsafe. Do not rely on any navigation features included in the system to route you to emergency services. Not all emergency services such as police, fire stations, hospitals, or clinics are likely to be contained in the map database for such navigation features. Ask local authorities or an emergency services operator for such locations and routes. The driver is ultimately responsible for the safe operation of the vehicle and therefore, must evaluate whether it is safe to follow the suggested directions. Any navigation features are provided only as an aid. Make your driving decisions based on your observations of local conditions and existing traffic regulations. Navigation features are not a substitute for your personal judgment. Any route suggestions made by the SOFTWARE or SERVICES should never replace any local traffic regulations or your personal judgment or knowledge of safe driving practices.
- Speech Recognition: You acknowledge and understand that HONDA and PROVIDERS may record, retain, and use voices commands when you use the speech recognition components of the SOFTWARE or SERVICES. You and all VEHICLE operators and passengers (a) consent to the recording and retention of voice commands in support of providing speech recognition components and (b) release HONDA and PROVIDERS from all claims, liabilities, and losses that may result from any use of such recorded voice commands. Recognition errors are inherent in speech recognition. It is your responsibility to monitor any speech recognition functions included in the system and address any errors. Neither HONDA nor PROVIDERS will be liable for any damages arising out of errors in the speech recognition process.
- Distraction Hazards. Navigation features may require manual (non-verbal) input or setup. Attempting to perform such set-up or insert data while driving can seriously distract your attention and could cause a crash or other serious consequences; the ability to undertake such interactions may also be limited by state or local law, which laws you are responsible to know and follow. Even occasional short scans of the screen may be hazardous if your attention has been diverted away from your driving at a critical time. Pull over and stop the vehicle in a safe and legal manner before attempting to access a function of the system requiring prolonged attention. Do not raise the volume excessively. Keep the volume at a level where you can still hear outside traffic and emergency signals while driving. Driving while unable to hear these sounds could result in a crash.
- Information Collection and Storage
- Information Collection, Use, Transmission and Storage of Data. Consent to Use of Data: You agree that HONDA and PROVIDERS may collect and use your information gathered in any manner as part of product support services related to the SOFTWARE or related services. HONDA may share such information with third parties, including, without limitation, PROVIDERS, third party software and services suppliers, their affiliates and/or their designated agents, solely to improve their products or to provide services or technologies to you. HONDA, third party software and systems suppliers, their affiliates and/or their designated agent may disclose this information to others, but not in a form that personally identifies you.
- Information Storage. Depending on the type of multimedia system you have in your VEHICLE, certain information may be stored for ease of use of the SOFTWARE including, without limitation, search history, location history in certain applications, previous and saved destinations, map locations within certain applications, and device numbers and contact information.
- Vehicle Health Information. Your VEHICLE may remotely transmit information regarding the status and health of your VEHICLE
(“VEHICLE INFORMATION”) to HONDA without notification to you. VEHICLE INFORMATION may contain VEHICLE maintenance and malfunction status that is derived from VEHICLE diagnostic data and includes, but is not limited to, status of powered doors and windows, battery life data, battery charging data, VEHICLE speed, coolant temperature, air compressor revolution, output power, warning codes, diagnostic trouble codes, fuel injection volume, and engine rotations per minute. VEHICLE HEALTH INFORMATION may be used by HONDA for research and development, to deliver HONDA SERVICES and information to you, and to contact you, and is retained only for a period of time necessary to fulfill these goals. - VEHICLE Geolocation Data (non-navigation/map based). If you opt-in to geolocation-based SERVICES, your vehicle’s geolocation data (latitude and longitude) will be automatically sent from your VEHICLE to HONDA and PROVIDERS.
- You understand that the inputting or uploading of information to your VEHICLE’s multimedia system or the SOFTWARE or SERVICES is at your own risk and that HONDA is not responsible for unauthorized access to or use of any personal or other information. All information uploaded to the SOFTWARE and SERVICES may be stored on your VEHICLES’s multimedia system and you understand that the security and safety of your VEHICLE’s multimedia system is your sole responsibility.
- Vehicle Health Information. Your VEHICLE may remotely transmit information regarding the status and health of your VEHICLE
- NO WARRANTY. You understand and agree that your use of the SOFTWARE and SERVICES are solely at your own risk and that you will be solely responsible for any damage to your VEHICLE’s multimedia system or any other equipment or any loss of data that may result from your use of the SOFTWARE or SERVICES. THE SOFTWARE AND SERVICES ARE PROVIDED ON AN “AS IS” AND “AS AVAILABLE” BASIS WITHOUT ANY WARRANTY OF ANY KIND, EXPRESSED, IMPLIED OR STATUTORY. WE SPECIFICALLY DISCLAIM ANY IMPLIED WARRANTIES OF MERCHANTABILITY, FITNESS FOR A PARTICULAR PURPOSE, AND NON-INFRINGEMENT. HONDA makes no warranties that the SOFTWARE or SERVICES will meet your requirements, or that the SOFTWARE or SERVICES will be uninterrupted, timely, secure, non-infringing or error free. You understand and agree that you are responsible for any and all charges, costs or expenses associated with your use of the SOFTWARE or SERVICES. Advice or information, whether oral or written, obtained by you from us or through the SOFTWARE or SERVICES are provided for informational purposes only and will not create any warranty not expressly made herein. You should not rely on any such information or advice. We assume no liability or responsibility for any errors or omissions in the SOFTWARE or SERVICES. We do not make any warranty or representation that your use of the material displayed on, or obtained through, the SOFTWARE or SERVICES is non-infringing of any rights of any third party. Any decision or action taken by you on the basis of information or content provided via the application is at your sole discretion and risk. HONDA and PROVIDERS are not responsible or liable for any such decision, or for the accuracy, completeness, usefulness, or availability of any content or information displayed, transmitted, or otherwise made available via the SOFTWARE or SERVICES. To the extent jurisdictions do not allow the exclusion of certain warranties, some of the above exclusions may not apply to you.
- LIMITATIONS ON LIABILITY. You and HONDA are each waiving important rights.
- Limitations on YOUR liability. HONDA cannot recover from you any consequential, indirect, incidental, or special damages, or attorney’s fees in connection with your use of the SOFTWARE or HONDA SERVICES. HONDA WAIVES TO THE FULLEST EXTENT ALLOWED BY LAW ANY CLAIM FOR DAMAGES OTHER THAN DIRECT, COMPENSATORY DAMAGES AS LIMITED IN THIS AGREEMENT.
- Limitation on HONDA and PROVIDER liability. Neither HONDA nor PROVIDERS will be liable to you or any other party for consequential, indirect, incidental, special, or punitive damages (including without limitation lost profits) in connection with your use of the SOFTWARE or SERVICES, even if HONDA or PROVIDERS are aware of the possibility of such damages. These limitations apply to all claims, including, without limitation, claims in contract and tort (such as negligence, product liability and strict liability). To the extent that a jurisdiction does not permit the exclusion or limitation of liability as set forth herein our liability is limited to the maximum extent permitted by law in such states. If HONDA or PROVIDERS are found liable to you for any reason, you agree that the aggregate liability of all these parties to you for any claim is limited to ten U.S. dollars (US $10.00). Neither HONDA nor any PROVIDER would have agreed to provide the SOFTWARE or SERVICES to you if you did not agree to this limitation. This amount is the sole and exclusive liability of HONDA and PROVIDERS to you, and is payable as liquidated damages and not as a penalty. Except where prohibited by law, you may not bring any claim against HONDA or any third-party beneficiary more than two (2) years after the claim arises. We do not have any liability for SOFTWARE or SERVICES interruptions of any length.
(a) Release of HONDA and PROVIDERS For yourself and anyone else claiming under you, you agree to release and discharge HONDA, PROVIDERS, their respective officers, directors, and employees, and each third-party beneficiary from all claims, liabilities and losses in connection with the SOFTWARE or SERVICES, including, but not limited to claims for personal injury or property damage arising from the total or partial failure of performance of the SOFTWARE or SERVICES, even if caused by or based upon the negligence, gross negligence, strict products liability, Deceptive Trade Practices Act violations, bad faith, or breach of warranty of us or the malfunction of the SOFTWARE or SOFTWARE SERVICES. YOU AGREE TO WAIVE TO THE FULLEST EXTENT ALLOWED BY LAW, ANY CLAIM FOR DAMAGES OTHER THAN DIRECT, COMPENSATORY DAMAGES AS LIMITED IN THIS AGREEMENT. YOU HEREBY RELEASE AND DISCHARGE HONDA AND ITS LICENSORS AND CONTRACTORS (INCLUDING ANY THIRD PARTIES PROVIDING ALL OR PART OF THE SOFTWARE OR SERVICES) FROM AND AGAINST ANY CLAIMS, DAMAGES, EXPENSES AND LIABILITY ARISING FROM OR RELATED TO ANY INJURIES, DAMAGES, OR LOSSES TO ANY PERSON (INCLUDING DEATH) OR PROPERTY OF ANY KIND RESULTING IN WHOLE OR PART, DIRECTLY OR INDIRECTLY, FROM YOUR USE OF THE SOFTWARE OR SERVICES.
H. Survival. You agree that the limitations of liability and indemnities in this AGREEMENT will survive even after the AGREEMENT has ended. These limitations of liability apply not only to you, but to anyone using the SOFTWARE or SERVICES via your VEHICLE, to anyone making a claim on your behalf, and to any claims made by your family, employees, customers, or others arising out of or relating to your VEHICLE, the SOFTWARE, or SERVICES.
- Availability/Interruption. The SOFTWARE and certain SERVICES are made available through your VEHICLE’s compatible multimedia system when the VEHICLE is turned on. Certain SERVICES may be available only through your compatible mobile device when it is within the operating range of the VEHICLE and a wireless carrier. The availability of the SOFTWARE and SERVICES may be subject to transmission limitation or interruption, including but not limited to technical obsolesce or sunsetting of the hardware, software or firmware, inside of or external to the Vehicle, required for data transmission or receipt. HONDA does not guarantee that the SOFTWARE, SERVICES, or any portion thereof will be available at all times or in all areas. You acknowledge and agree that HONDA is not responsible for performance degradation, interruption or delays. You acknowledge that HONDA shall not be liable to you if the SOFTWARE or SERVICES in a given location are not available. If the SOFTWARE or SERVICES are not available within your intended location, you agree that your sole remedy shall be to cease using the SOFTWARE and SERVICES.
- PRODUCT SUPPORT: Product support for the SOFTWARE is provided by HONDA. For product support, please refer to HONDA instructions provided in the DOCUMENTATION. Should you have any questions concerning this AGREEMENT, or if you desire to contact HONDA for any other reason, please refer to the HONDA contact information provided in the DOCUMENTATION.
- Termination and Transfer.
-
- Termination. This AGREEMENT is effective until terminated by you or US. WE may terminate this AGREEMENT for any or no reason, and with or without notice to you. Your rights under this AGREEMENT will terminate automatically without notice from US if you fail to comply with any term of this AGREEMENT. Upon termination of this AGREEMENT, you shall cease all use of the SOFTWARE and SERVICES.
- Transfer: You may permanently transfer your rights under this AGREEMENT only as part of a sale or transfer of the VEHICLE, provided you retain no copies, you transfer all of the SOFTWARE and HONDA SERVICES (including all component parts, the media and printed materials, and any upgrades), and the recipient agrees to the terms of this AGREEMENT. You agree to notify HONDA upon the sale or transfer of the VEHICLE. To contact HONDA, please refer to the HONDA contact information provided in the DOCUMENTATION.
-
- Changes to the SOFTWARE or SERVICES. WE may change, modify, or update the SOFTWARE or SERVICES from time to time. Unless explicitly stated otherwise, any new features or services that augment or enhance the SOFTWARE or SERVICES in the future shall respectively be considered part of the SOFTWARE or SERVICES and subject to this AGREEMENT. WE reserve the right at any time and from time to time to interrupt, restrict, modify, suspend, discontinue, temporarily or permanently, the SOFTWARE or SERVICES (or any portion thereof), with or without notice to you, and you agree that HONDA shall not be liable to you or to any third party for any modification, suspension or discontinuance of the SOFTWARE or SERVICES.
- M. ARBITRATION:
PLEASE READ THIS ARBITRATION PROVISION CAREFULLY TO UNDERSTAND YOUR RIGHTS. YOU AGREE THAT ANY CLAIM THAT YOU MAY HAVE IN THE FUTURE MUST BE RESOLVED THROUGH BINDING ARBITRATION. YOU WAIVE THE RIGHT TO HAVE YOUR DISPUTE HEARD IN COURT AND WAIVE THE RIGHT TO BRING CLASS CLAIMS. YOU UNDERSTAND THAT DISCOVERY AND APPEAL RIGHTS ARE MORE LIMITED IN ARBITRATION.
Arbitration is a method of resolving a claim, dispute or controversy without filing a lawsuit. By agreeing to arbitrate, the right to go to court is waived and instead claims, disputes or controversies are submitted to binding arbitration. This provision sets forth the terms and conditions of our agreement. YOU and HONDA agree and acknowledge that this Agreement affects interstate commerce and the Federal Arbitration Act (“FAA”) applies. By using the Software, Vehicle, or Services, YOU elect to have disputes resolved by arbitration. YOU, HONDA or any involved third party may pursue a Claim. “Claim” means any dispute between YOU, HONDA, or any involved third party relating to your use of the Software, the Vehicle, or the Services, this Agreement, or our relationship, including any representations, omissions or warranties. “Claim” does not include personal injury or wrongful death claims. YOU or HONDA may seek remedies in small claims court or provisional judicial remedies without arbitrating. In addition, notwithstanding anything herein to the contrary, YOU or HONDA may seek equitable relief in a court of competent jurisdiction.
YOU or HONDA may select arbitration with American Arbitration Association, JAMS or National Arbitration and Mediation. Contact these sponsors for their rules. The hearing will be in the federal district where YOU reside. If agreed, it may be by telephone or written submissions. Filing and arbitrator fees to be paid per the sponsor rules. You may contact the sponsor for a fee waiver. If no fee waivers, HONDA will pay filing and arbitrator fees up to $5,000, unless law requires more. Each party is responsible for other fees. Arbitrator may award costs or fees to prevailing party, if permitted by law. HONDA will not seek fees, unless the claims are frivolous.
Arbitrator shall be an attorney or current or retired judge familiar with automotive or consumer software. The arbitrator shall follow substantive law, statute of limitations and decide all issues relating to the interpretation, construction, enforceability and applicability of this provision. The arbitrator may order relief permitted by law. This provision is governed and enforceable by the FAA. An award shall include a written opinion and be final, subject to appeal by the FAA.
This provision survives termination of this Agreement or relationship, bankruptcy, assignment or transfer. If part of this provision is unenforceable, the remainder remains in effect. If unenforceability allows arbitration as a class action, then this provision is entirely unenforceable. YOU may opt out within 30 days of your initial use of the Software by sending a signed, written notice to HONDA at Honda Financial Services, P.O. Box 165007, Irving, TX 75016. HONDA reserves the right to make changes to this provision after providing written notice and an opportunity to opt out. - Miscellaneous: You may not assign this AGREEMENT without HONDA’s prior written consent. This AGREEMENT and any additional HONDA TERMS and PROVIDER TERMS represents the entire agreement between you and US. HONDA may amend the terms of this AGREEMENT by providing you with notices of such updated terms. If you do not consent to be bound by the updated terms, your sole remedy will be to cease using the SOFTWARE and SERVICES. If any part of this AGREEMENT is found invalid, void, or unenforceable, the balance of the AGREEMENT will remain valid and enforceable according to its terms. To the fullest extent permitted by law, and except as explicitly provided otherwise, this AGREEMENT and any disputes arising out of or relating to it will be governed by the laws of the State of California, except that California laws concerning choice of law or conflicts shall not apply if they would cause the substantive law of another jurisdiction to apply. Notwithstanding the foregoing, Section M shall be governed by the Federal Arbitration Act and the laws of the State of California, as applicable, as set forth therein. The failure to enforce any term of this AGREEMENT on one occasion shall not prevent enforcement on any other occasion or the enforcement of any other term. Headings and captions shall not be considered included for purposes of interpretation or application hereof, but are for convenience only.
- SOFTWARE Operation
Legal Information on Apple CarPlay/Android Auto
OWNER’S MANUAL LICENSE/LIABILITY STATEMENTS
USE OF APPLE CARPLAY IS SUBJECT TO YOUR AGREEMENT TO THE CARPLAY TERMS OF USE, WHICH ARE INCLUDED AS PART OF THE APPLE iOS TERMS OF USE. IN SUMMARY, THE CARPLAY TERMS OF USE DISCLAIM APPLE AND ITS SERVICE PROVIDERS’ LIABILITY IF THE SERVICES FAIL TO PERFORM CORRECTLY OR ARE DISCONTINUED, STRICTLY LIMIT APPLE AND ITS SERVICE PROVIDERS’ OTHER LIABILITIES, DESCRIBE THE KINDS OF USER INFORMATION (INCLUDING, FOR EXAMPLE, VEHICLE LOCATION, VEHICLE SPEED, AND VEHICLE STATUS) BEING GATHERED AND STORED BY APPLE AND ITS SERVICE PROVIDERS, AND DISCLOSE CERTAIN POSSIBLE RISKS ASSOCIATED WITH THE USE OF CARPLAY, INCLUDING THE POTENTIAL FOR DRIVER DISTRACTION. SEE APPLE’S PRIVACY POLICY FOR DETAILS REGARDING APPLE’S USE AND HANDLING OF DATA UPLOADED BY CARPLAY.
USE OF ANDROID AUTO IS SUBJECT TO YOUR AGREEMENT TO THE ANDROID AUTO TERMS OF USE WHICH MUST BE AGREED TO WHEN THE ANDROID AUTO APPLICATION IS DOWNLOADED TO YOUR ANDROID PHONE. IN SUMMARY, THE ANDROID AUTO TERMS OF USE DISCLAIM GOOGLE AND ITS SERVICE PROVIDERS’ LIABILITY IF THE SERVICES FAIL TO PERFORM CORRECTLY OR ARE DISCONTINUED, STRICTLY LIMIT GOOGLE AND ITS SERVICE PROVIDERS’ OTHER LIABILITIES, DESCRIBE THE KINDS OF USER INFORMATION (INCLUDING, FOR EXAMPLE, VEHICLE LOCATION, VEHICLE SPEED, AND VEHICLE STATUS) BEING GATHERED AND STORED BY GOOGLE AND ITS SERVICE PROVIDERS, AND DISCLOSE CERTAIN POSSIBLE RISKS ASSOCIATED WITH THE USE OF ANDROID AUTO, INCLUDING THE POTENTIAL FOR DRIVER DISTRACTION. SEE GOOGLE’S PRIVACY POLICY FOR DETAILS REGARDING GOOGLE’S USE AND HANDLING OF DATA UPLOADED BY ANDROID AUTO.
DISCLAIMER OF WARRANTIES; LIMITATION ON LIABILITY
YOU EXPRESSLY ACKNOWLEDGE AND AGREE THAT USE OF APPLE CARPLAY OR ANDROID AUTO (“THE APPLICATIONS”) IS AT YOUR SOLE RISK AND THAT THE ENTIRE RISK AS TO SATISFACTORY QUALITY, PERFORMANCE, ACCURACY AND EFFORT IS WITH YOU TO THE MAXIMUM EXTENT PERMITTED BY APPLICABLE LAW, AND THAT THE APPLICATIONS AND INFORMATION ON THE APPLICATIONS IS PROVIDED “AS IS” AND “AS AVAILABLE,” WITH ALL FAULTS AND WITHOUT WARRANTY OF ANY KIND, AND HONDA HEREBY DISCLAIMS ALL WARRANTIES AND CONDITIONS WITH RESPECT TO THE APPLICATIONS AND INFORMATION ON THE APPLICATIONS, EITHER EXPRESS, IMPLIED OR STATUTORY, INCLUDING, BUT NOT LIMITED TO, THE IMPLIED WARRANTIES AND/OR CONDITIONS OF MERCHANTABILITY, SATISFACTORY QUALITY, FITNESS FOR A PARTICULAR PURPOSE, ACCURACY, QUIET ENJOYMENT, AND NON-INFRINGEMENT OF THIRD PARTY RIGHTS. NO ORAL OR WRITTEN INFORMATION OR ADVICE GIVEN BY HONDA OR AN AUTHORIZED REPRESENTATIVE SHALL CREATE A WARRANTY. AS EXAMPLES, AND WITHOUT LIMITATION, HONDA DISCLAIMS ANY WARRANTY REGARDING THE ACCURACY OF DATA PROVIDED BY THE APPLICATIONS, SUCH AS THE ACCURACY OF DIRECTIONS, ESTIMATED TRAVEL TIME, SPEED LIMITS, ROAD CONDITIONS, NEWS, WEATHER, TRAFFIC, OR OTHER CONTENT PROVIDED BY APPLE, GOOGLE, THEIR AFFILIATES, OR THIRD PARTY PROVIDERS; HONDA DOES NOT GUARANTEE AGAINST LOSS OF APPLICATION DATA, WHICH MAY BE LOST AT ANY TIME; HONDA DOES NOT GUARANTEE THAT THE APPLICATIONS OR ANY SERVICES PROVIDED THROUGH THEM WILL BE PROVIDED AT ALL TIMES OR THAT ANY OR ALL SERVICES WILL BE AVAILABLE AT ANY PARTICULAR TIME OR LOCATION. FOR EXAMPLE, SERVICES MAY BE SUSPENDED OR INTERRUPTED WITHOUT NOTICE FOR REPAIR, MAINTENANCE, SECURITY FIXES, UPDATES, ETC., SERVICES MAY BE UNAVAILABLE IN YOUR AREA OR LOCATION, ETC. IN ADDITION, YOU UNDERSTAND THAT CHANGES IN THIRD PARTY TECHNOLOGY OR GOVERNMENT REGULATION MAY RENDER THE SERVICES AND/OR APPLICATIONS OBSOLETE AND/OR UNUSABLE.
TO THE EXTENT NOT PROHIBITED BY LAW, IN NO EVENT SHALL HONDA OR ITS AFFILIATES BE LIABLE FOR PERSONAL INJURY, OR ANY INCIDENTAL, SPECIAL, INDIRECT OR CONSEQUENTIAL DAMAGES WHATSOEVER, INCLUDING, WITHOUT LIMITATION, DAMAGES FOR LOSS OF PROFITS, CORRUPTION OR LOSS OF DATA, FAILURE TO TRANSMIT OR RECEIVE ANY DATA, BUSINESS INTERRUPTION OR ANY OTHER COMMERCIAL DAMAGES OR LOSSES, ARISING OUT OF OR RELATED TO THE APPLICATIONS OR YOUR USE OF OR INABILITY TO USE THE APPLICATIONS OR INFORMATION ON THE APPLICATIONS, HOWEVER CAUSED, REGARDLESS OF THE THEORY OF LIABILITY
(CONTRACT, TORT OR OTHERWISE) AND EVEN IF HONDA WERE ADVISED OF THE POSSIBILITY OF SUCH DAMAGES. SOME STATES AND JURISDICTIONS DISALLOW THE EXCLUSION OR LIMITATION OF LIABILITY FOR DAMAGES, SO THESE LIMITATIONS AND EXCLUSIONS MAY NOT APPLY TO YOU. IN NO EVENT SHALL HONDA’S TOTAL LIABILITY TO YOU FOR ALL DAMAGES (OTHER THAN AS MAY BE REQUIRED BY APPLICABLE LAW IN CASES INVOLVING PERSONAL INJURY) EXCEED THE AMOUNT OF FIVE DOLLARS ($5.00). THE FOREGOING LIMITATIONS WILL APPLY EVEN IF THE ABOVE STATED REMEDY FAILS OF ITS ESSENTIAL PURPOSE.
About Open Source Licenses
To see the open source license information, follow these steps.
Models with 7-in. Color Touchscreen
- Press the MENU button.
- Select License.
Models with 9-in. Color Touchscreen
- Press the button.
- Select General Settings.
- Select System.
- Select About.
- Select Legal Information.
- Select License.
License Information
DTS Neural Surround
For DTS patents, see http://patents.dts.com. Manufactured under license from DTS Licensing Limited. DTS, the Symbol, & DTS and the Symbol together are registered trademarks, and DTS Neural Surround is a trademark of DTS, Inc. © DTS, Inc. All Rights Reserved.

DTS Enhance
**For DTS patents, see http://patents.dts.com. Manufactured under license from DTS, Inc. DTS, the Symbol, DTS and the Symbol together and DTS Enhance are registered trademarks or trademarks of DTS, Inc. in the United States and/or other countries © DTS, Inc. All Rights Reserved.

Apple
“Made for iPod,” and “Made for iPhone,” mean that an electronic accessory has been designed to connect specifically to iPod, or iPhone, respectively, and has been certified by the developer to meet Apple performance standards. Apple is not responsible for the operation of this device or its compliance with safety and regulatory standards. Please note that the use of this accessory with iPod, or iPhone, may affect wireless performance.
Apple, the Apple Logo, iPhone, iPod touch are trademarks of Apple Inc., registered in the U.S. and other countries. Apple CarPlay, iPod, iPhone, iTunes, Siri and Lightning are trademarks of Apple Inc. App Store is a service mark of Apple Inc.

Bluetooth
The Bluetooth® word mark and logos are registered trademarks owned by Bluetooth SIG, Inc. and any use of such marks by PANASONIC CORPORATION is under license. Other trademarks and trade names are those of their respective owners.
 Windows Media
This product is protected by certain intellectual property rights of Microsoft. Use or distribution of such technology outside of this product is prohibited without a license from Microsoft.
MPEG
Mpeg4 Visual
THIS PRODUCT IS LICENSED UNDER THE MPEG-4 VISUAL PATENT PORTFOLIO LICENSE FOR THE PERSONAL AND NON-COMMERCIAL USE OF A CONSUMER FOR (i) ENCODING VIDEO IN COMPLIANCE WITH THE MPEG-4 VISUALA STANDARD (“MPEG-4 VIDEO”) AND/OR (ii) DECODING MPEG-4 VIDEO THAT WAS ENCODED BY A CONSUMER ENGAGED IN A PERSONAL AND NONCOMMERCIAL ACTIVITY AND/OR WAS OBTAINED FROM A VIDEO PROVIDER LICENSED BY MPEG LA TO PROVIDE MPEG-4 VIDEO. NO LICENSE IS GRANTED OR SHALL BE IMPLIED FOR ANY OTHER USE. ADDITIONAL INFORMATION INCLUDING THAT RELATING TO PROMOTIONAL, INTERNAL AND COMMERCIAL USES AND LICENSING MAY BE OBTAINED FROM MPEG LA, LLC.
SEE http://www.mpegla.com
VC-1
THIS PRODUCT IS LICENSED UNDER THE VC-1 PATENT PORTFOLIO LICENSE FOR THE PERSONAL AND NON-COMMERCIAL USE OF A CONSUMER TO (i) ENCODE VIDEO IN COMPLIANCE WITH THE VC-1 STANDARD (“VC-1 VIDEO”) AND/OR (ii) DECODE VC-1 VIDEO THAT WAS ENCODED BY A CONSUMER ENGAGED IN A PERSONAL AND NON-COMMERCIAL ACTIVITY AND/OR WAS OBTAINED FROM A VIDEO PROVIDER LICENSED TO PROVIDE VC-1 VIDEO. NO LICENSE IS GRANTED OR SHALL BE IMPLIED FOR ANY OTHER USE.
ADDITIONAL INFORMATION MAY BE OBTAINED FROM MPEG LA, L.L.C. SEE http://www.mpiegla.com.
AVC/H.264
THIS PRODUCT IS LICENSED UNDER THE AVC PATENT PORTFOLIO LICENSE FOR THE PERSONAL AND NONCOMMERCIAL USE OF A CONSUMER TO (i) ENCODE VIDEO IN COMPLIANCE WITH THE AVC STANDARD (“AVC VIDEO”) AND/OR (ii) DECODE AVC VIDEO THAT WAS ENCODED BY A CONSUMER ENGAGED IN A PERSONAL AND NON-COMMERCIAL ACTIVITY AND/OR WAS OBTAINED FROM A VIDEO PROVIDER LICENSED TO PROVIDE AVC VIDEO. NO LICENSE IS GRANTED OR SHALL BE IMPLIED FOR ANY OTHER USE.
ADDITIONAL INFORMATION MAY BE OBTAINED FROM MPEG LA, L.L.C. SEE: http://www.mpegla.com
Customized Features
How to customize
With the power mode in ON, select Settings, then select a setting item.
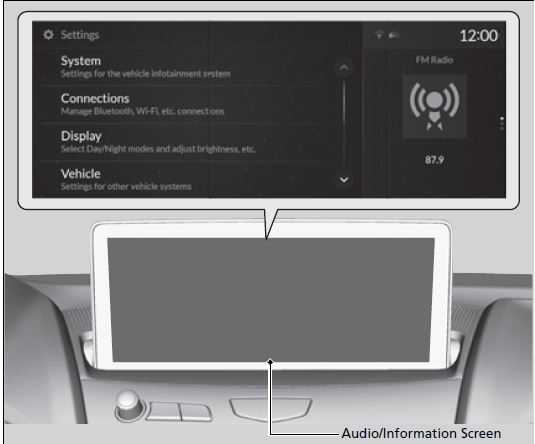
When you customize settings:
- Make sure that the vehicle is at a complete stop.
Shift to (P.
To customize features detail, refer to the following.
Customization flow P. 352
List of customizable options P. 360
Customization Flow
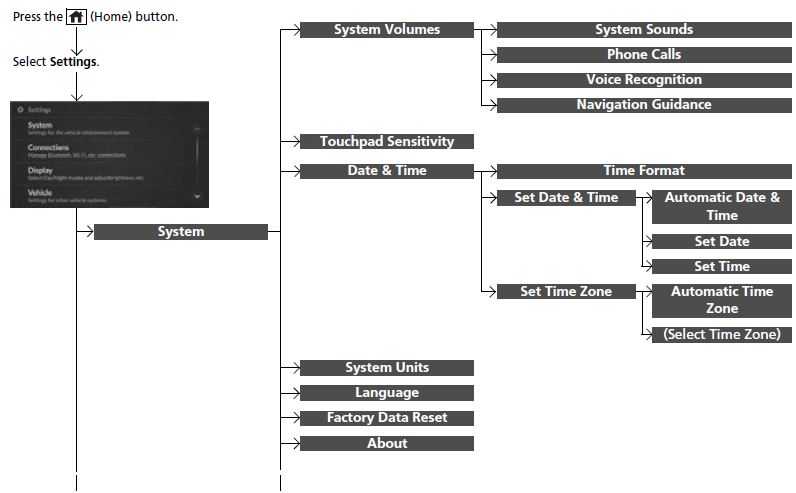
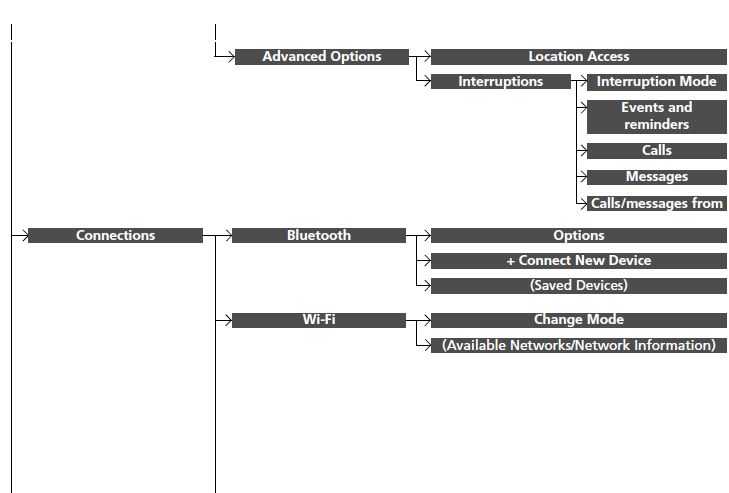
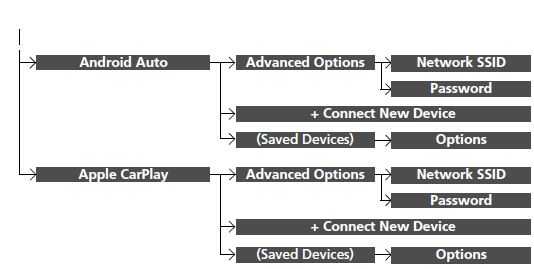
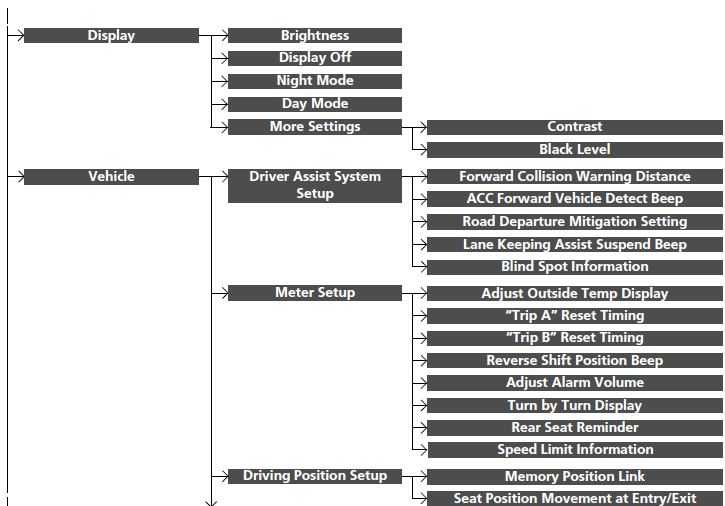
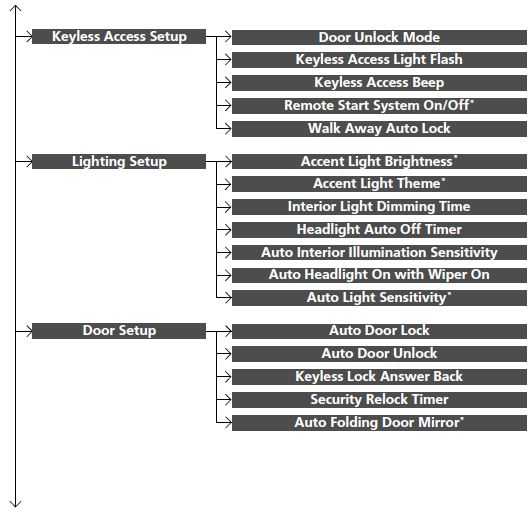
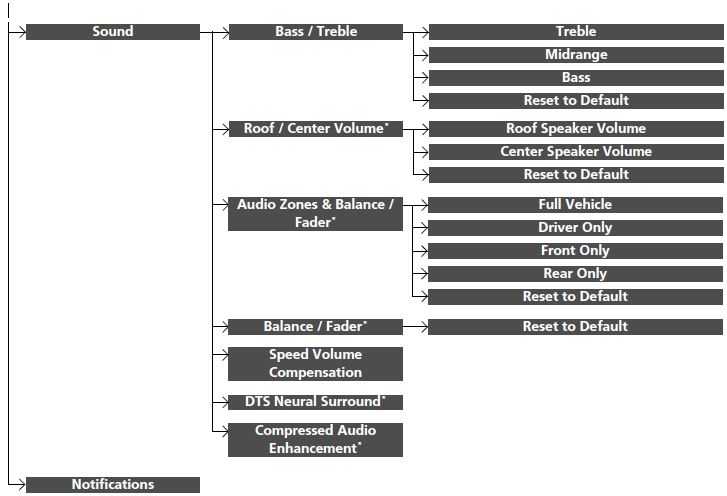
List of customizable options
| System | System Volumes | System Sounds | Changes the system sounds volume. | — | |
| Phone Calls | Changes the phone call volume. | — | |||
| Voice Recognition | Changes the voice recognition volume. | — | |||
| Navigation Guidance | Changes the navigation guidance volume. | — | |||
| Touchpad Sensitivity | Sets the sensitivity of the True Touchpad Interface. | High/Low*1 | |||
| Date & Time | Time Format | Selects the digital clock display from 12H to 24H. | 12 Hour*1/24 Hour | ||
| Set Date & Time | Automatic Date & Time | Selects On to have the GPS automatically adjust the clock. Select Off to cancel this function. |
On*1/Off |
||
| Set Date | Adjusts date. Adjusting the Clock P. 132 |
— | |||
| Set Time | Adjusts clock. Adjusting the Clock P. 132 |
— | |||
| System | Date & Time Set Time
Zone |
Automatic Time Zone | Sets the audio system to automatically adjust the clock when driving through different time zones. | On*1/Off | |
| (Select time zone) | Changes the time zone manually. | — | |||
| System Units | Changes the speed/distance unit on the multi-information display, head-up display* and audio/information screen. | Miles*1/KM (U.S.)
Miles/KM*1 (Canada) |
|||
| Language | Changes the display language. | English*1/Français/ Español | |||
| Factory Data Reset | Resets all the settings to their factory default. Defaulting All the Settings P. 379 |
Continue/Cancel |
|||
| About | Displays the Android setting items. | — | |||
| Advanced
Options Location Access |
Selects Off not to allow apps including the navigation system* to access the vehicle’s location. |
On*1/Off |
|||
| System Advanced Interruptions
Options |
Sets the interruption mode for Always interrupt*1/ Interruption allowing to notify when calls and Don’t interrupt/ Mode notifications arrive. Allow only priority
interruptions |
| Events and Sets priority interruptions of events On*1/Off reminders and reminders. | |
| Calls Sets priority interruptions of calls. On*1/Off | |
| Messages Sets priority interruptions of messages. On/Off*1 | |
| Calls/ Anyone/Contacts messages Sets priority interruptions of from who. only*1/Starred from contacts only |
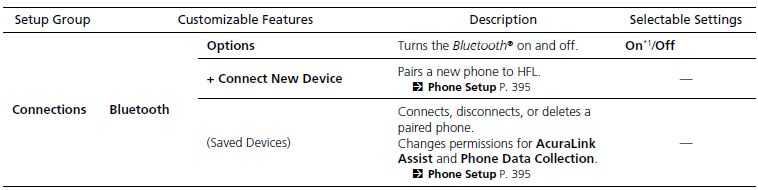
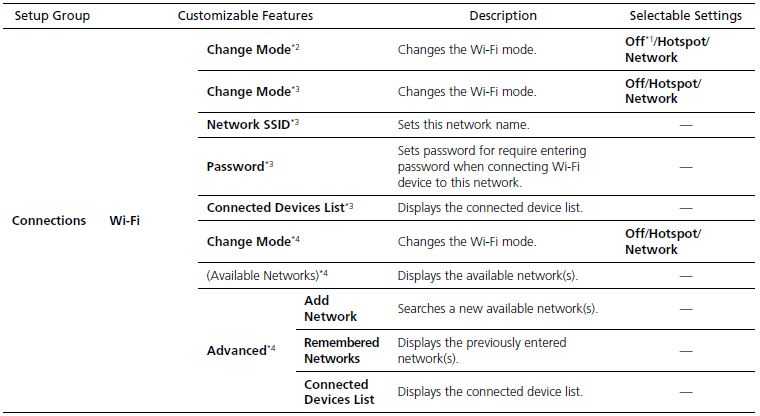
- Default Setting
- Appears when Wi-Fi mode is Off.
- Appears when Wi-Fi mode is Hotspot.
- Appears when Wi-Fi mode is Network.
| Display | Brightness | Changes the brightness of the audio/ information screen. | — | |
| Display Off | Turns the audio/information screen brightness off. | — | ||
| Night Mode | Changes between the daytime mode and nighttime mode. 2 Display Setup P. 278 |
— |
||
| Day Mode | ||||
|
More Settings |
Contrast | Changes the contrast of the audio/ information screen. | — | |
| Black Level | Changes the black level of the audio/ information screen. | — | ||
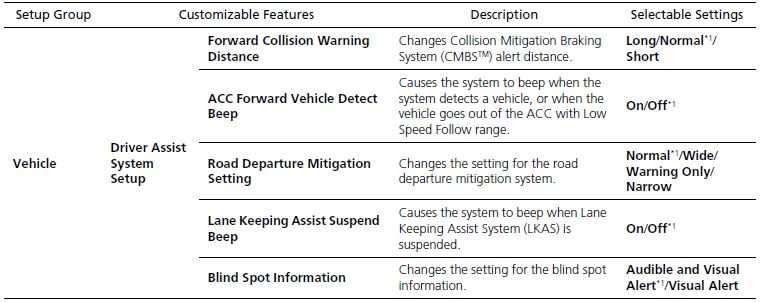
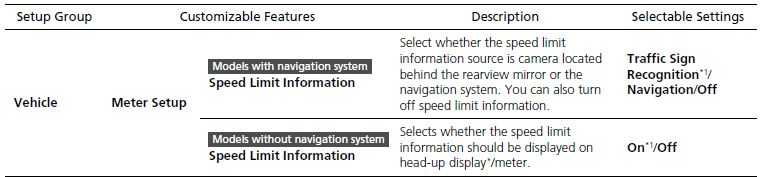
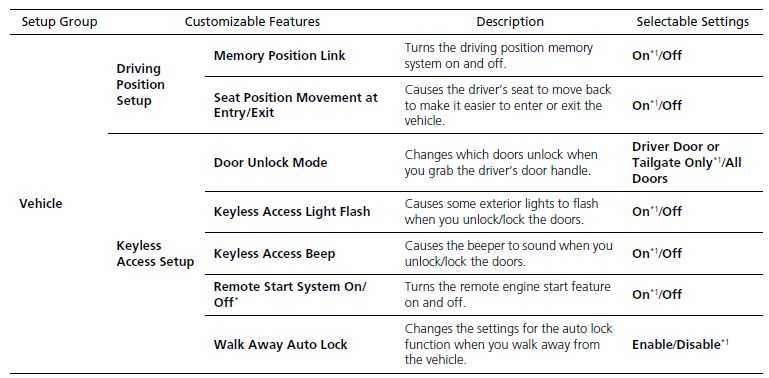
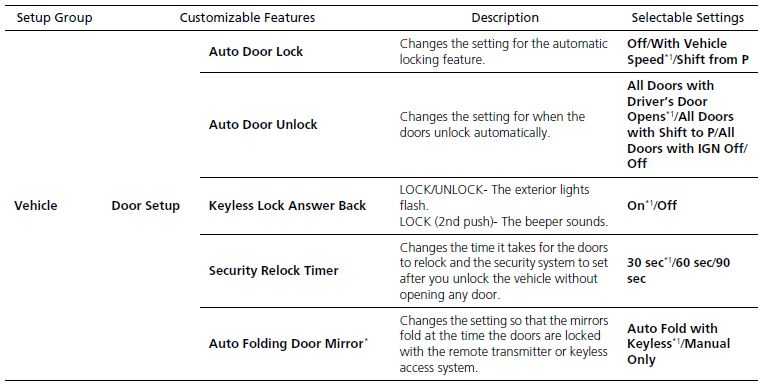
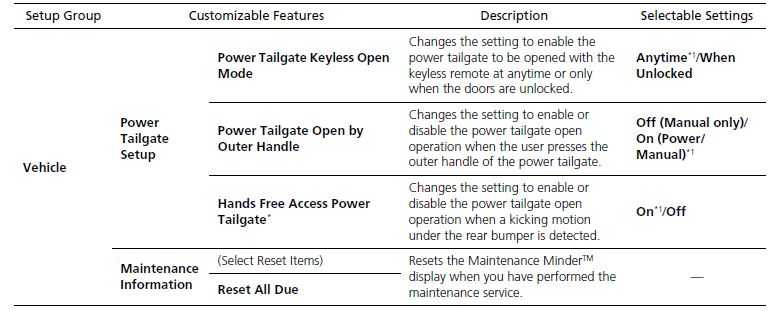
| Camera | Rear Camera* | Guidelines | Selects whether the guidelines come on the rear camera monitor.
Multi-View Rear Camera* P. 586 |
Dynamic/Fixed/ Both*1/Off |
| Cross Traffic Monitor | Turns the cross traffic monitor feature on and off. | On*1/Off | ||
| Surround View Camera* | Guidelines | Selects whether the guidelines come on the rear camera monitor.
Surround View Camera System* |
Dynamic/Fixed/ Both*1/Off | |
| Cross Traffic Monitor | Turns the cross traffic monitor feature on and off. | On*1/Off | ||
| Show after Shifting from Reverse | Sets the rear view to be automatically switched to the front view when the transmission is out of (R. |
On/Off*1 |
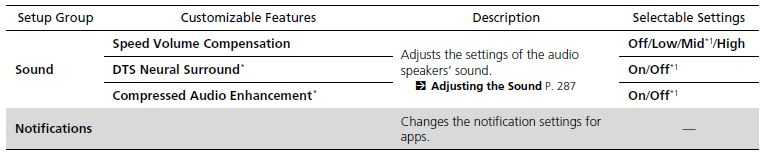 Defaulting All the Settings
Reset all the menu and customized settings as the factory defaults.
Defaulting System Settings
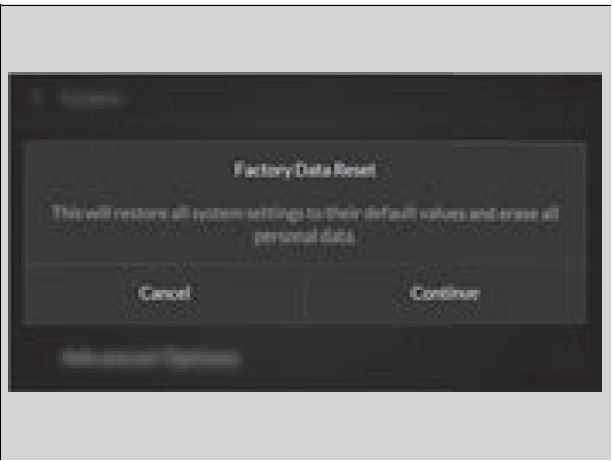
- 1. Press the (home) button.
- Select Factory Data Reset.
- A confirmation message appears on the screen.
- Select Yes to reset the settings.
- Select Yes again to reset the settings.
- The system will reboot.
When you transfer the vehicle to a third party, reset all settings to default and delete all personal data.
If you perform Factory Data Reset, it will reset the preinstalled apps to their factory default.
Defaulting Vehicle Settings
- Press the (homebutton.
- Select Settings.
- Select Vehicle
- Select Reset to Default.
- Select Reset.

HomeLink® Universal Transceiver
The HomeLink® Universal Transceiver can be programmed to operate up to three remote controlled devices around your home, such as garage doors, lighting, or home security systems.
Important Safety Precautions
Refer to the safety information that came with your garage door opener to test that the safety features are functioning properly. If you do not have the safety information, contact the manufacturer.
Before programming HomeLink, make sure that people and objects are out of the way of the garage or gate to prevent potential injury or damage.
When programming a garage door opener, park just outside the garage door’s path.
Before programming HomeLink to operate a garage door opener, confirm that the opener has an external entrapment protection system, such as an “electronic eye,” or other safety and reverse stop features. If it does not, HomeLink may not be able to operate it.
NOTE:
Some LED lightbulbs installed in the garage door opener can interfere with the training and consistent operation of your HomeLink device. Please consider use of Low RF interference bulbs in your garage door opener.
Training HomeLink
If it is necessary to erase a previously entered learned code:
- Press and hold the I and III HomeLink buttons for about 10 seconds, until the green indicator blinks. Release the buttons, and proceed to step 1.
If you are training the second or third button, go directly to step 1 - The instructions on the next page should work for most gate or garage openers, but may not work for all. For detailed instructions about your specific remote opener, visit http://www.homelink.com or call (800) 355-3515.
- Bluetooth® HandsFreeLink®

Programming a Button
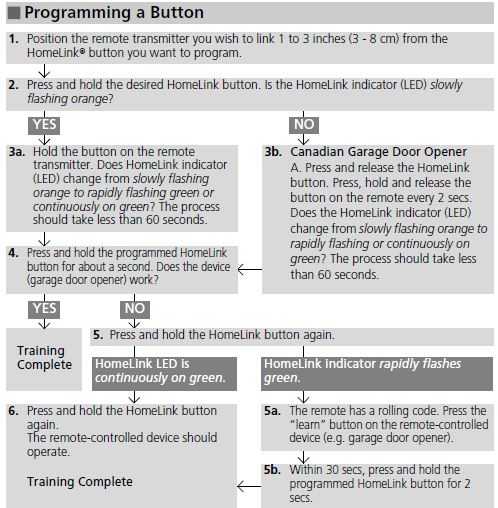
Reprogramming a Button
If you want to retrain a programmed button for a new device, you do not have to erase all button memory. You can replace the existing memory code using this procedure:
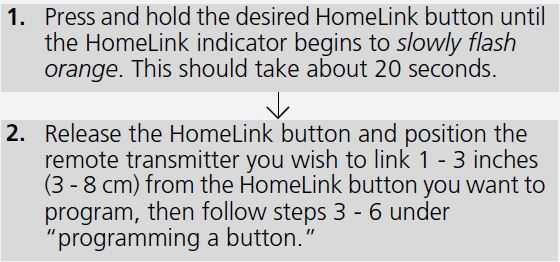
Erasing Button Memory
To erase programming from the buttons, press and hold the two outside HomeLink buttons until the HomeLink indicator changes from orange to rapidly flashing green. This should take about 10 seconds. You should erase all programming before selling the vehicle.
Operating
To operate, simply press and release the programmed HomeLink button. Activation will now occur for the trained device.
Questions
For questions or comments, visit
www.HomeLink.com, www.youtube.com/HomeLinkGentex, or by calling the HomeLink Hotline (North America only) at (800) 355-3515.
HomeLink® is a registered trademark of Gentex Corporation.
Bluetooth® HandsFreeLink®
Bluetooth® HandsFreeLink® (HFL) allows you to place and receive phone calls using your vehicle’s audio system, without handling your cell phone.
Using HFL
HFL Buttons
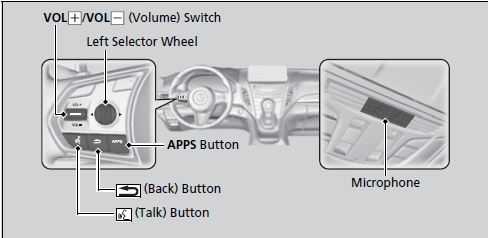
Place your phone where you can get good reception.
To use HFL, you need a Bluetooth-compatible cell phone. For a list of compatible phones, pairing procedures, and special feature capabilities:
- U.S.: Visit www.handsfreelink.com/Acura, or call 1- 888- 528-7876.
Canada: For more information on smartphone compatibility, call 1-855-490-7351.
To use the system, the Bluetooth® setting must be On.
2 Phone Setup P. 389
- Aim the vents away from the ceiling and close the windows, as noise coming from them may interfere with the microphones.
Press the button when you want to call a number using a phonebook name or a number. Speak clearly and naturally after a beep. - If the microphone picks up voices other than yours, the command may be misinterpreted.
To change the volume level, the volume level is able to change by the audio system’s volume.
Left Selector Wheel:
- Incoming call: Move the selector wheel to the right to answer the call. Move it to the left to decline the call.
- During a call: Move the selector wheel to the right to display the call options menu. Move it to the left to end the call.
- (back) button: Press the button to go back to the previous screen or to cancel a command.
- (talk) button: Press the button to start voice recognition.
To go to the phone screen of the multi-information display or the head-up display*:
- Press the APPS button on the steering wheel.
- Using the selector wheel, scroll to Phone on the multi-information display or the head-up display*, and then press the left selector wheel.
- You can select Favorites or Recents by moving the selector wheel to the left or the right.
The Bluetooth® word mark and logos are registered trademarks owned by Bluetooth SIG, Inc., and any use of such marks by Honda Motor Co., Ltd., is under license. Other trademarks and trade names are those of their respective owners.
HFL Status Display
The audio/information screen notifies you when there is an incoming call.
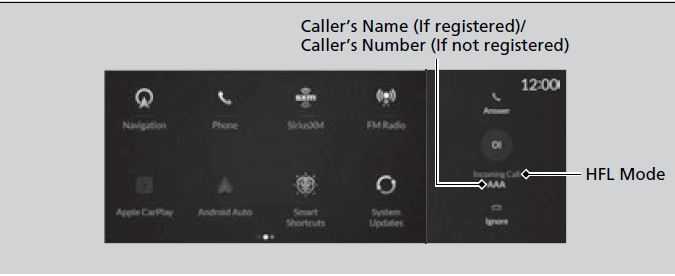
Bluetooth® connection status is displayed in the B-zone.
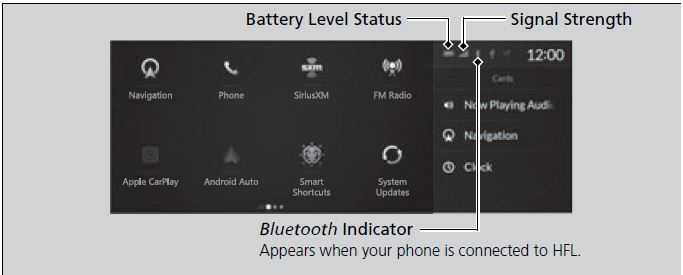
The information that appears on the audio/information screen varies between phone models.
Limitations for Manual Operation*
Certain manual functions are disabled or inoperable while the vehicle is in motion. You cannot select a grayed-out option until the vehicle is stopped.
HFL Menus
The power mode must be in ACCESSORY or ON to use the system.
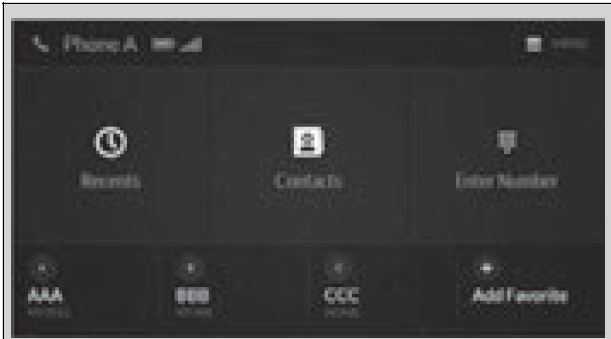
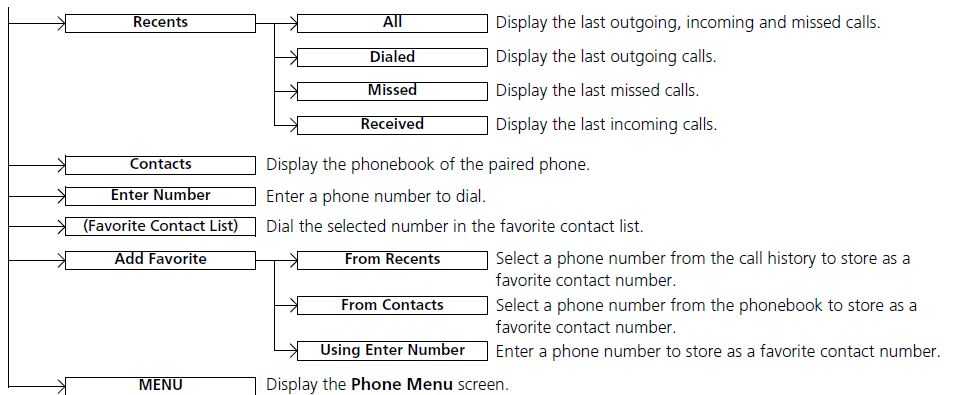
To use HFL, you must first pair your Bluetooth-compatible cell phone to the system while the vehicle is parked.
Some functions are limited while driving.
Phone Menu screen
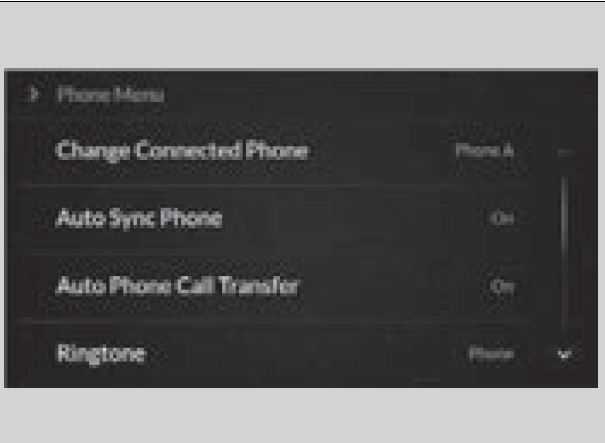
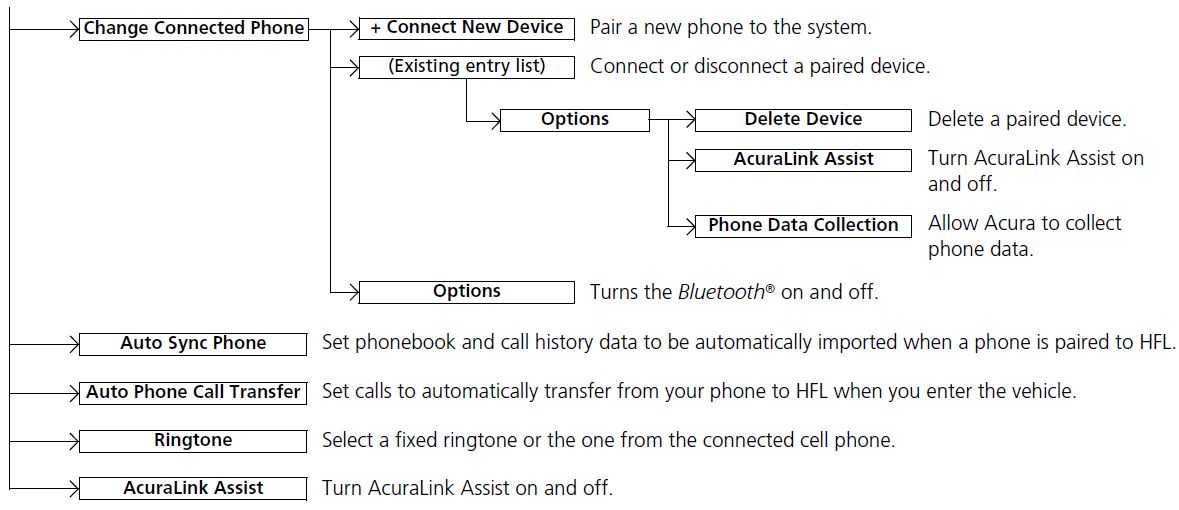
Phone Setup
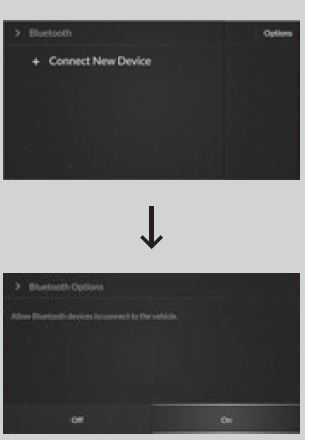
Bluetooth® setup
You can turn Bluetooth® function on and off.
- Press the (home) button.
- Select Settings.
- Select Connections.
- Select Bluetooth.
- Select Options.
- Select On.
If there is an active connection to Apple CarPlay or Android Auto, this setting is unavailable.
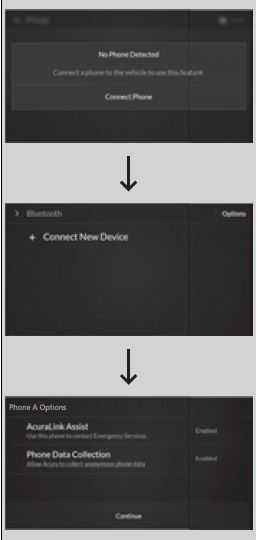
Bluetooth® connection status is displayed in the B-zone.
To pair a cell phone (No phone has been paired to the system)
- Press the PHONE button.
- Make sure your phone is in search or discoverable mode.
- Select Yes.
The audio system will enter a waiting mode for pairing.
- Select Acura Integra from your phone.
- If you want to pair a phone from this audio system, select Search from car and follow the prompts.
When your phone appears on the list, select it.
- If you want to pair a phone from this audio system, select Search from car and follow the prompts.
- The system gives you a pairing code on the audio/information screen.
- Confirm if the pairing code on the screen and your phone match.
This may vary by phone.
- Confirm if the pairing code on the screen and your phone match.
- A notification appears on the screen if pairing is successful.
Your Bluetooth-compatible phone must be paired to HFL before you can make and receive hands-free calls.
Phone Pairing Tips:
- You cannot pair your phone while the vehicle is moving.
- Up to six phones can be paired.
- Your phone’s battery may drain faster when it is connected to HFL.
- If your phone is not ready to be paired or is not paired within three minutes, the system will time out and return to the Bluetooth Settings screen.
- Once you have paired a phone, you can see it displayed on the screen with one or two icons on the right side.
- These icons indicate the following:
- The phone is compatible with Bluetooth® Audio.
- If there is an active connection to Apple CarPlay or
Android Auto, pairing of additional Bluetooth® compatible devices is unavailable. - Enable Smart Sharing pop-up
Smart Sharing to share phone data with Acura. You can change the AcuraLink Assist and Phone Data Collection settings later by selecting the device in the Phone Menu screen and then Options.
For detailed information of all data shared visit https://acuralink.acura.com/#/acuralinkLegalTerms
To pair a cell phone (when a phone has already been paired to the system)
- Press the PHONE button.
- If a prompt appears asking to connect to a phone, select No and proceed with step 2.
- Select Settings.
- Select Bluetooth Settings.
- Select Connect New Device.
- The audio system will enter a waiting mode for pairing.
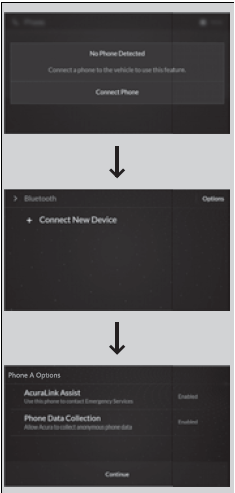
- The audio system will enter a waiting mode for pairing.
To change the currently paired phone
- Go to the Phone Menu screen. 2 Phone Menu screen P. 394
- Select Change Connected Phone.
- When connecting to another phone: 3. Select a phone to connect.
- Select
- Select Apply Changes.
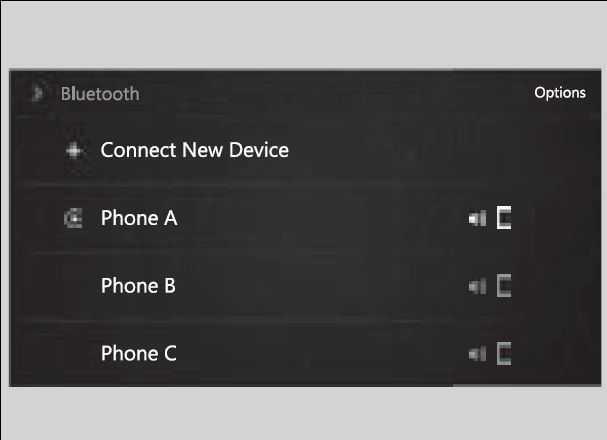
If there is an active connection to Android Auto, this setting is unavailable.
If no other phones are found or paired when trying to switch to another phone, HFL will continue to connect an original phone.
To pair other phones, select + Connect New Device from the Bluetooth screen.
To delete a paired phone
- Go to the Phone Menu screen. 2 Phone Menu screen P. 394
- Select Change Connected Phone.
- Select a phone you want to delete.
- Select Options.
- Select Delete Device.
- A confirmation message appears on the screen. Select Delete.
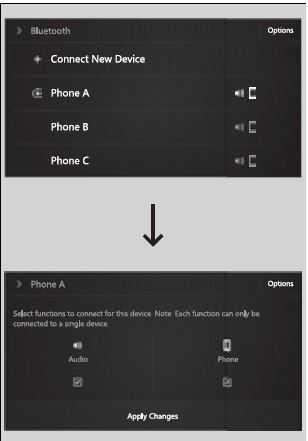
You can also delete a paired phone by the following procedure.
- Press the (home) button.
- Select Settings.
- Select Connections.
- Select Bluetooth.
- Select a phone you want to delete.
- Select Options.
- Select Delete Device.
- A confirmation message appears on the screen. Select Delete.
If there is an active connection to Android Auto, you cannot delete a paired phone.
Ring Tone
You can change the ring tone setting.
- Press the PHONE button.
- Select Settings.
- Select Ringtone.
- Select Phone or Vehicle.
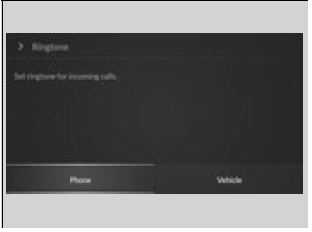
Automatic Transferring
If you get into the vehicle while you are on the phone, the call can be automatically transferred to HFL.
- Go to the Phone Menu screen.
Phone Menu screen P. 394 - Select Auto Phone Call Transfer.
- Select On or Off.
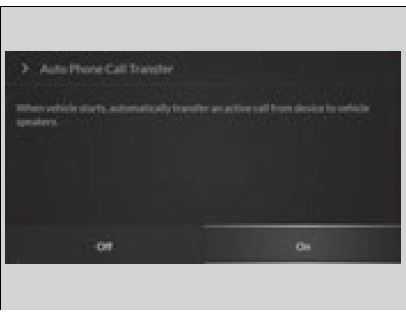
Vehicle: The fixed ringtone sounds from the speakers.
Phone: Depending on the make and model of the cell phone, the ringtone stored in the phone will sound if the phone is connected.
Automatic Import of Cellular Phonebook and Call History
When your phone is paired, the contents of its phonebook and call history are automatically imported to HFL.
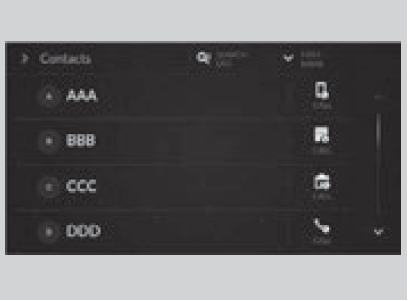
When you select a person from the list in the cellular phonebook, you can see up to five category icons. The icons indicate what types of numbers are stored for that name.
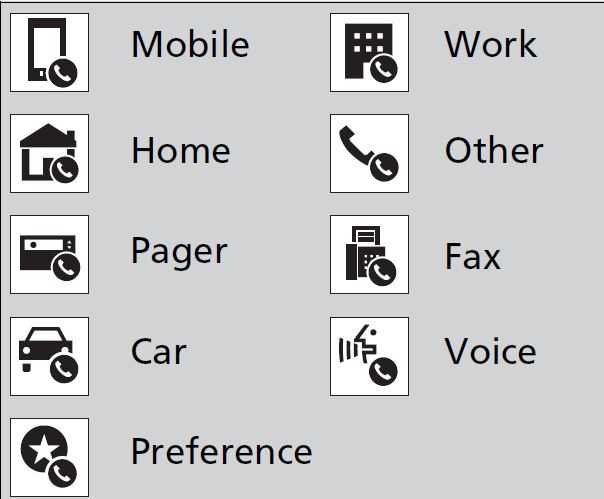
On some phones, it may not be possible to import the category icons to HFL.
The phonebook is updated after every connection. Call history is updated after every connection or call.
Favorite Contacts
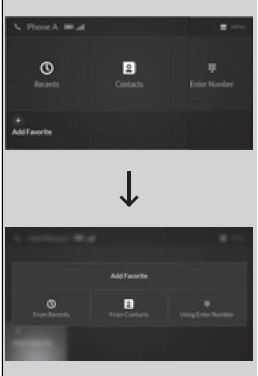
To add a favorite contacts
- Go to the phone screen.
- Phone screen P. 393
Select and hold a desired favorite contact. - Select the following options:
- Remove Favorite: Delete the favorite contact.
- Add to Home Page: Add a favorite contact shortcut icon to the home screen.
- Add to Heads-Up Display*: Add a favorite contact shortcut icon to the head-up display menu.
- Press the (back) button on the True Touchpad Interface.
- The screen will return to the previous screen.
To delete a favorite contact
- Press the PHONE button.
- Select Favorite Contacts.
- Select the star icon.
- A confirmation message appears on the screen. Select Yes.
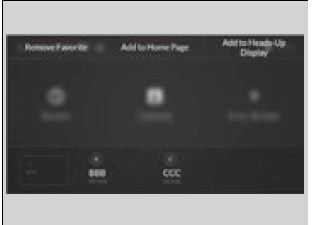
Making a Call
You can make calls by inputting any phone number, or by using the imported Recent Calls, Favorite Contacts, and Contacts entries.
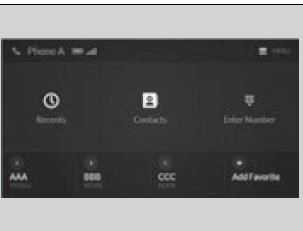
To make a call using the imported phonebook
When your phone is paired, the contents of its phonebook are automatically imported to HFL.
- Press the PHONE button.
- Select Contacts.
- The phonebook is stored alphabetically. Select a name.
- Select a number.
- Dialing starts automatically.
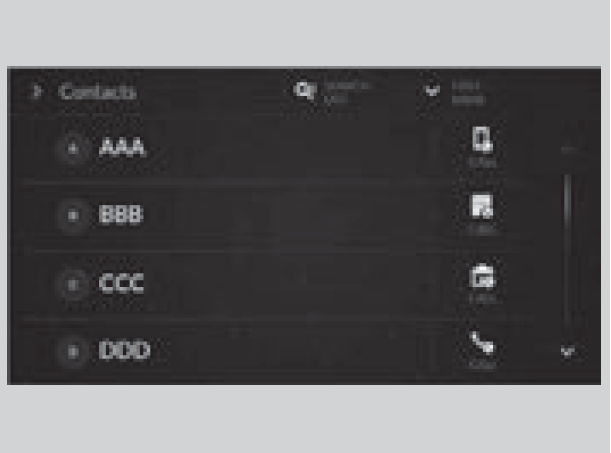
- Dialing starts automatically.
To make a call using a phone number
- Press the PHONE button.
- Select Keypad.
- Select a number.
- Select Call.
- Dialing starts automatically.
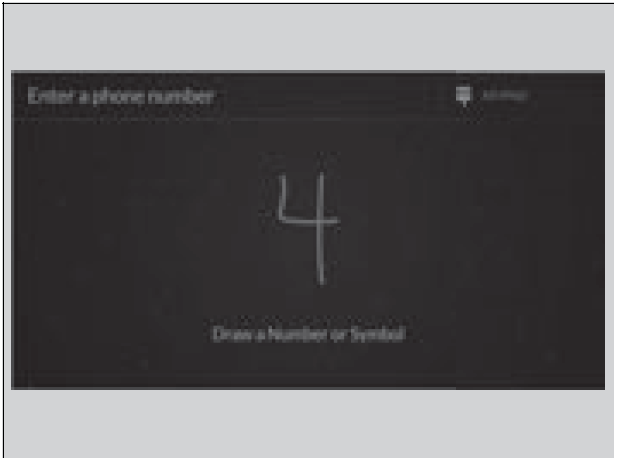 To make a call using the call history Call history is stored by All, Dialed, Missed, and Received.
 - Go to the phone screen.
Phone screen P. 393 - Select Recents.
- You can sort by All, Dialed, Missed, or Received. Select the icon on the upper right of the screen.
- Select a number.
- Dialing starts automatically.
To make a call using a phone number
- Go to the phone screen.
Phone screen P. 393 - Select Enter Number.
- Trace the number on the A-zone touchpad, then press it.
- You can enter the number using the on-screen keyboard. Select KEYPAD located to the upper right of the screen.
- Press the A-zone touchpad.
- Dialing starts automatically.
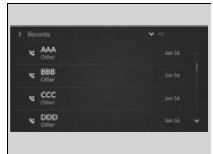
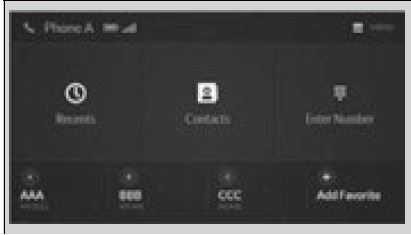
Receiving a Call
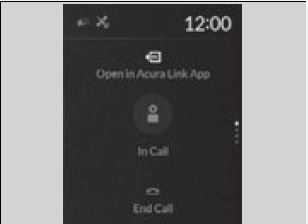
When there is an incoming call, an audible notification sounds (if activated) and the Incoming Call… screen appears.
Move the left selector wheel to the right to answer the call. Move it to the left to decline or end the call.
- You can also select Answer or Ignore on the audio/information screen to use hands-free calling.
Call Waiting
To put a call on hold so that you can answer an incoming call, move the left selector wheel to the right.
Move the left selector wheel to the right to resume the call.
Select Ignore to ignore the incoming call if you do not want to answer it.
Move the left selector wheel to the left to end a call.
Instead of using the selector wheel, you can use the icons on the audio/information screen to perform the above mentioned functions.
When a screen other than the phone screen is displayed in the A-zone, the incoming call screen is displayed in the B-zone.
Options During a Call
The following options are available during a call.
MUTE: Mute your voice.
TRANSFER TO MOBILE: Transfer a call from the system to your phone.
ENTER NUMBER: Send numbers during a call. This is useful when you call a menu-driven phone system.
The available options are shown on the lower half of the screen.
Select the option.
- UNMUTE is displayed when the mute function is on. Select UNMUTE to turn it off.
TRANSFER TO VEHICLE is displayed when the hands-free mode is off. Select TRANSFER TO VEHICLE to turn the hands-free mode is on.

You can select the icons on the audio/information screen.
Text Message
You can operate the various options of the text message function from the message box.
- Press the
 (home) button.
 - Select Messages.
The following options are available:
Inbox: Shows received messages.
Send Message to Contact: Sends a message to your contact on the list.
2 Send Message to Contact P. 418
Add Favorite: Adds the favorite contact to the message box.- You can add a shortcut to the home screen that will take you directly to your favorite contact. Select and hold the contact, then select Add to Home Page.
MENU: Sets the message option for changing the connected device, turning on or off message notifications, or editing replies.
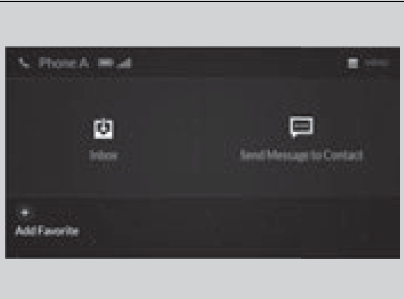
The text message features may not be available depending on the cellular phone.
To edit a Favorite Contact
- Press the (home) button.
- Select Messages.
- Select and hold a desired favorite contact.
- Select following options.
- Remove Favorite: Delete a favorite contact.
- Add to Home Page: Add the shortcut icon of a favorite contact to the home screen.
- Press the (back) button on the True Touchpad Interface.
- The screen will return to the previous screen.
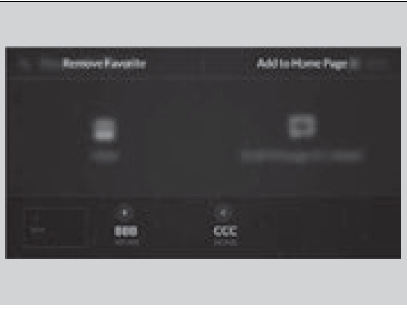
To Set Up Text Message Options
To turn on or off the text message notice
- Press the (home) button.
- Select Messages.
- Select MENU.
- Select Notifications.
- Select On or Off.
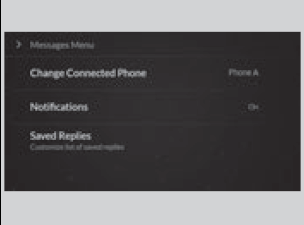
To use the text message function, it may be necessary to set up on your phone.
On: A pop-up notification comes on every time you receive a new message.
Off: The message you receive is stored in the system without notification.
When a screen other than the Messages function screen is displayed in the A-zone, a text message notification is displayed in the B-zone.
Receiving a Text Message
HFL can display newly received text messages as well as the last 20 messages received on a linked cell phone. Each received message can be read aloud and replied to using a fixed common phrase.
- A pop-up appears and notifies you of a new text message.
- Select Open.
- Select to listen to the message. To stop listening to the message, select
- Select to hear the message from the beginning.
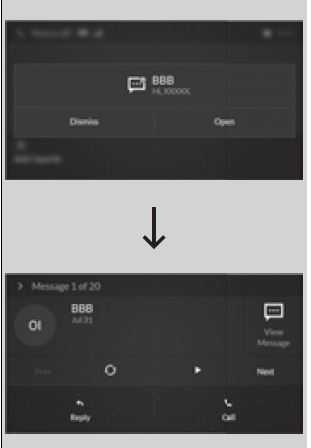
Some cell phones might not be able to read the transmission log of data sent and data received.
The system does not display any received messages while you are driving. You can only hear them read aloud.
The system can only receive messages that are sent as text (SMS) messages. Messages sent using the data services will not be displayed in the list.
With some phones, you may be able to display up to 20 of the last text messages received.
State or local laws may limit your use of the HFL text message feature. Only use the text message feature when conditions allow you to do so safely.
Depending on the status of the A-zone, the received message screen may be displayed on the B-zone.
Selecting a Phone
You can select one from the Bluetooth® device list to be active and receive notifications.
- Press the (home) button.
- Select Messages.
- Select MENU.
- Select Change Connected Phone.
- Change a desired phone.
To change the currently paired phone
P. 397

You can only receive notifications from one phone at a time.
You can only connect one device to use both text message function and Bluetooth® hands-free phone function.
If there is a connection to Apple CarPlay or Android Auto, a message will appear if this setting is selected allowing the user to end the Apple CarPlay or Android Auto session and continue with the setting.
Displaying Messages
- Press the (home) button.
- Select Messages.
- Select Inbox.
- Select a message.
- The message information is displayed.
- Select View Message.
- The text message is displayed.
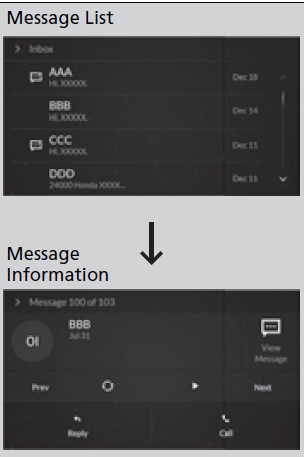
If you delete a message on the phone, the message will also be deleted from the system. If you send a message from the system, the message goes to your phone’s outbox.
To see the previous or next message, select Pre or Next on the message screen.
Read or Stop reading a message
- Display the message information.
- Select
- The system starts reading the message aloud.
- Select to stop reading.
- Select again to start reading the message.
- While listening to the message, select to start reading the message from the beginning.
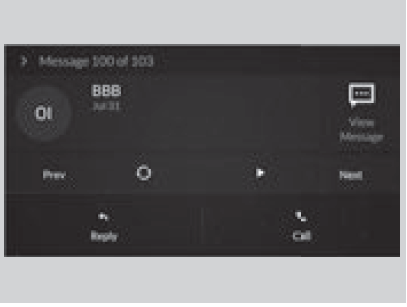
Reply to a message
- Display the message information.
- Select Reply.
- Select the reply message.
- The pop-up menu appears on the screen.
- Select Send to send the message.
- Message sent appears on the screen when the reply message was successfully sent.
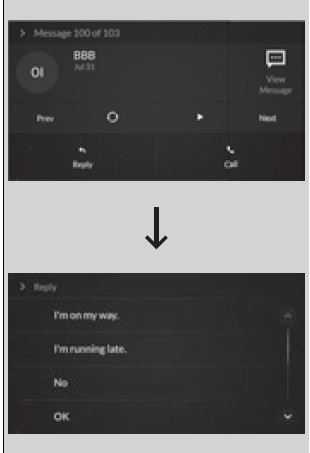
The available reply messages are as follows:
- I’m on my way.
- I’m running late.
- No
- OK
- Talk to you later, I’m driving.
- Yes
The display language of the default reply message depends on the connected phone.
To edit a reply message P. 415
You can add or delete a reply message by selecting Saved Replies.
To edit a reply message P. 415
To delete a reply message P. 415
Only certain phones receive and send messages when paired and connected. For a list of compatible phones:
- U.S.: Visit www.handsfreelink.com/Acura, or call 1-888-528-7876.
- Canada: For more information on smartphone compatibility, call 1-855-490-7351.
To edit a reply message
- Press the (home) button.
- Select Messages.
- Select MENU.
- Select Saved Replies.
- Select Create New Message.
- Use the A-zone touchpad to write a reply. When you finish writing you message, press the A-zone touchpad.
- You can enter the number using the on-screen keyboard. Select KEYBOARD located to the upper right of the screen.
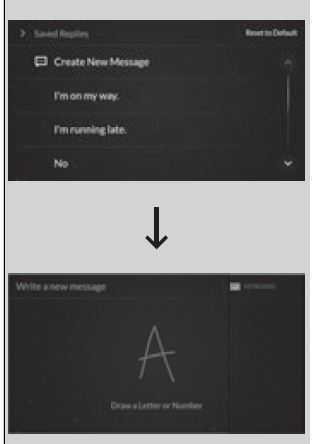
- You can enter the number using the on-screen keyboard. Select KEYBOARD located to the upper right of the screen.
To delete a reply message
- Press the (home) button.
- Select Messages.
- Select MENU.
- Select Saved Replies.
- Select a reply message you want to delete.
- A confirmation screen appears on the screen. Select Delete.
- To cancel the delete, press the (back) button.
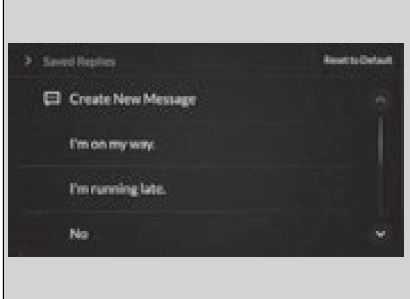
Reset to Default
Select to reset all reply messages to their factory default.
Making a call to a sender
- Display the message information.
- Select Call.
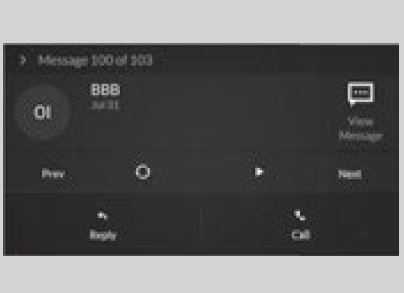
Displaying message on the head-up display
You can read a text message on the head-up display only when a text message is received.
- Move right the left selector wheel to select Open.
- Roll up or down the left selector wheel to select Reply, and then press the left selector wheel.
- Select Call to dial a call.
- Select Repeat to start reading the message from the beginning.
- Roll up or down the left selector wheel to select a message, and then press the left selector wheel.
- Roll up or down the left selector wheel to select Send, and then press the left selector wheel.
- Message sent appears on the head-up display when the reply message was successfully sent.
Send Message to Contact
- Press the (home) button.
- Select Messages.
- Select Send Message to Contact.
- Select a contact name.
- You can sort by First Name or Last Name. Select the icon on the upper right of the screen.
- Select a number.
- Select the reply message.
- The pop-up menu appears on the screen.
- Select Send to send the message.
- Message sent appears on the screen when the reply message was successfully sent.
This feature also allows you to send a message or set a navigation route* to a contact’s address.
AcuraLink®
Is a subscription-based service that provides convenient features such as voice communication in case of emergency, online security, one-on-one operator assistance, and the transmission of important messages regarding your vehicle’s status.
To Connect to AcuraLink
Use the following procedure to connect to AcuraLink.
To enable the AcuraLink
You need to allow the consent of the location service to enable the AcuraLink.
- Press the (home) button.
- Select AcuraLink.
- The confirmation message appears on the screen for the first time, then select Allow.
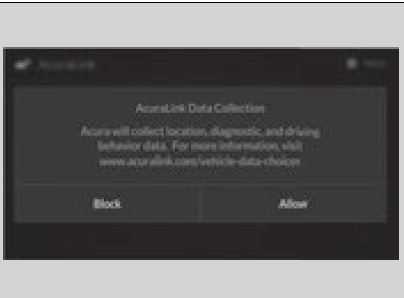
AcuraLink also provides services you can operate from the Internet or your smartphone.
To subscribe to AcuraLink, or to get more information about all of its features, contact an Acura dealer, or visit owners.acura.com (U.S.) or www.acura.ca/owners/acuralink (Canada).
You can also set up a Vehicle Data Collection by the following procedure.
- Press the (home) button.
- Select AcuraLink.
- Select MENU.
- Select Vehicle Data Collection.
- Select Allow or Block.
- Allow: Sends the vehicle location data, diagnostic information, driving behavior data and phone data when you have previously allowed it when you connect a phone with Bluetooth®
- Block: Does not send the vehicle location data, diagnostic information, driving behavior data.
For detail information of all data shared visit https://acuralink.acura.com/#/acuralinkLegalTerms
To link with AcuraLink
You may see the connection guide screen after launching AcuraLink when there is no phone connection available.
Continue Without Connecting: Displays the AcuraLink menu screen without phone connection.
Connect Phone: Displays the Bluetooth® setup screen.
To change the currently paired phone P. 397
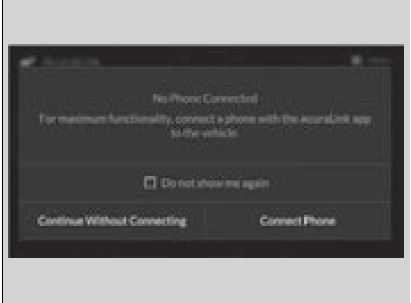
AcuraLink
- Press the (home) button.
- Select AcuraLink.
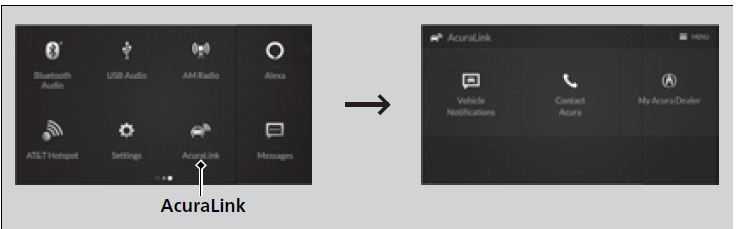
We recommend that you install the AcuraLink app in your smartphone to make AcuraLink more functional. Contact an Acura dealer, or visit owners.acura.com (U.S.) or www.acura.ca/owners/acuralink (Canada).
If you do not connect a phone to AcuraLink, Last Mile function of AcuraLink app is disabled.
You can also select AcuraLink from the All Apps screen.
2 Audio/Information Screen P. 254
Vehicle Notifications
Displays the diagnostic information, recall or important safety information*1, or general information by connecting to the Acura server using HFL.
Contact Acura
Connect to the AcuraLink operator when trying to find a destination or for roadside assistance.
My Acura Dealer
Calls your Acura dealer using HFL or sets a destination of the navigation* to the dealer.
MENU
Displays the AcuraLink menu screen.
- Vehicle Data Collection: Displays the AcuraLink connection setting screen.
To enable the AcuraLink P. 412 - AcuraLink Subscriptions: Displays your current AcuraLink subscription status.
Connect Bluetooth Device: Displays the Bluetooth® setup screen.
To change the currently paired phone P. 391
Some messages can be deleted manually; some others will automatically disappear when the malfunction is fixed, contact a dealer if necessary.
AcuraLink Message
You can check the messages that are received quickly in the shortcut operation.
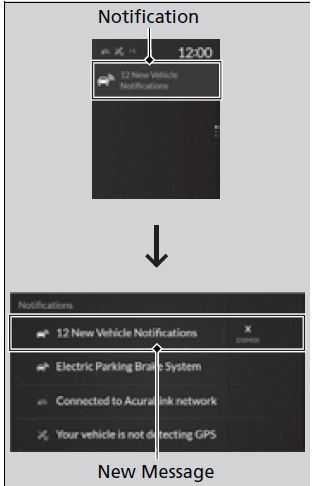
- A notification appears and notifies you of a new message on the B-zone.
- Select the system status icon then press the
B- zone touchpad.- The status area list appears on the A-zone.
- A notification is continuously displayed in the header area until the new message is read.
- Select a new message to open.
- If you have selected the update option for AcuraLink, follow the directions on the screen to complete the process.
When you update AcuraLink, you must keep the engine running and maintain a constant connection with AcuraLink.
If the update is interrupted, the system will automatically resume the process. If, however, a week has elapsed since the process was first interrupted, you must repeat the process from the beginning.
In Case of Emergency
Automatic collision notification
If your vehicle’s airbags deploy or if the unit detects that the vehicle is severely impacted, your vehicle automatically will attempt to connect to an E911 operator through your connected cellular phone. If connected, information about your vehicle and its location can be sent to the operator*1; you also can speak to the operator when connected.
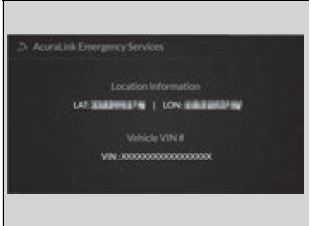
IMPORTANT: For the vehicle equipped with AcuraLink Assist, owner activation constitutes authorization for Acura to collect information from your vehicle needed to provide the service. In a crash, AcuraLink Assist will attempt to notify emergency services but ACURA CANNOT GUARANTEE THAT SUCH NOTIFICATION WILL OCCUR.
Acura reserves the right to terminate AcuraLink services at any time or for any reason, and in the future may not be able to provide services due to changes in, or obsolescence of, technology integral to the service or changes in governmental regulation.
*1: Depending on your phone and its cellular coverage, your vehicle’s location may not be sent to the operator.
Your vehicle may not be able to connect to the operator if its, or your cellular phone, battery level is low, the line is disconnected, or you do not have adequate cellular coverage.
You cannot use this emergency services when:
- You travel outside your cellular provider’s coverage areas.
There is a problem with the connecting devices, such as the microphones or speakers, or your connected phone itself.
You cannot operate other phone-related functions using the screen while talking to the operator. Only the operator can terminate the connection to your vehicle.
If the unit fails to connect to the operator, it repeatedly tries until it succeeds.
Manual operator connection
If you need to talk to the AcuraLink operator in a situation where no airbag has deployed, you can manually connect to them by pressing the ASSIST button with the power mode in ACCESSORY or ON.
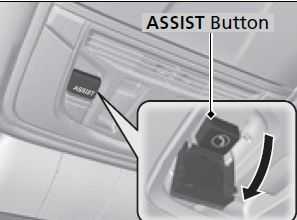
- Open the cover attached to the ceiling console.
- Press the ASSIST button.
- You are connected to the AcuraLink operator.
Do not press the button while driving. When you need to contact the operator, park the vehicle in a safe place.
If the unit fails to connect to the operator, it automatically cancels the action after three minutes.
If necessary, the cover can be broken to access the ASSIST button.
Operator Assistance
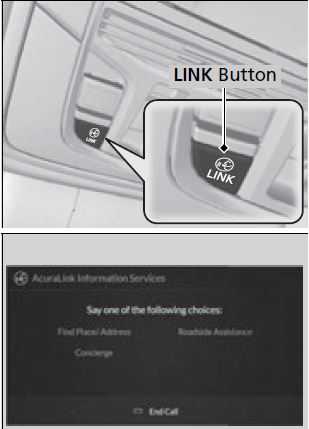
- Press the LINK button.
- Connection to the operator begins.
- Talk to the operator.
- To disconnect, select End Call on the audio/information screen or move to left the left selector wheel.
Remain attentive to road conditions and driving during operator assistance.
If you want to add or renew a subscription, call the Operator Assistance.
- Press the (home) button.
- Select AcuraLink.
- Select MENU.
- Select AcuraLink Subscriptions.
- Select Call AcuraLink Support.
Connection Features
Your subscribed telematics service provider can check your vehicle condition. For maximum functionality, download AcuraLink app in your smartphone and connect it with the vehicle.
Automatic Collision Notifications
A live agent will reach out and check on you and request that help be sent in the event of a crash.
Send Destination
Search for destinations on your phone and instantly beam turn-by-turn directions to your navigation system*. Requires In-vehicle Navigation System*.
Stolen Vehicle Locator
In the event of a stolen vehicle, your vehicle will help local authorities recover it.
Remote Start & Stop
Arrive at your vehicle with the engine warmed up and the interior set to a comfortable temperature.
Remote Lock & Unlock
Lock and unlock your vehicle with your smartphone.
Find My Car
Find your parked vehicle and flash/sound your horns remotely using your smartphone.
The contact information of your provider, your user ID and PIN will be given when you subscribe to AcuraLink. If you forget any of the above, contact a Acura dealer, or go to owners.acura.com (U.S.) or www.acura.ca/owners/acuralink (Canada).
You can also activate the remote door lock/unlock and vehicle finder features from the Internet or using your smartphone app. Ask a dealer, or visit owners.acura.com (U.S.) or www.acura.ca/owners/acuralink (Canada) for details.
The lights will stop flashing and horn will stop sounding under the following:
- When conditions 30 seconds have elapsed.
You unlock the doors using the remote transmitter.
You unlock the doors using the keyless access system.
You unlock the doors using the built-in key.
The power mode is set to ACCESSORY or ON.
Vehicle Status
Get door and lock status as well as mileage, fuel, oil life, and tire pressure readings on your phone.
Emergency Call
A live agent will stay on the call with you and request that help be sent in the event of an emergency.
Security Alarm Alert
Receive alerts if vehicle security alarm is triggered.
Destination by Voice
Talk to a live assistant who will search and send turn by turn directions to your vehicle’s navigation system*. Requires In-vehicle Navigation System*.
Last Mile
Receive walking directions to your final destination right when you get out of your Acura. Requires In-vehicle Navigation System*.
Geofence Alert
Receive a notification anytime your vehicle enters or leaves a region set by you.
Speed Alert
Receive a notification when your vehicle has exceeded a speed limit set by you.
CabinTalk
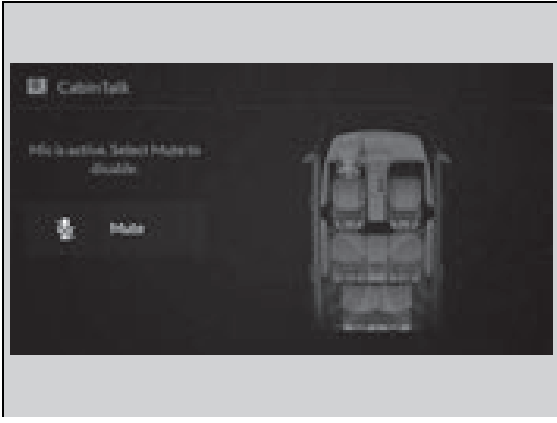
Your audio system allows your, or the front passenger’s voice to be broadcast to the second and third row seat’s passengers using the rear speakers
How to use
- Display the All Apps screen.
- Select CabinTalk.
- Select to mute your voice.
You can adjust the speaker volume by turning the volume knob.
Reference Links
View Full User Guide: ACURA MDX 2023 User Guide
Download Manuals: Acura | Owner’s Manual & Warranty | Acura Owner’s Site
2023 Acura MDX Specs, Price, Features, Mileage (Brochure)
Related Articles:
2024 Acura INTEGRA Specs, Price, Features, Mileage (Brochure)