
ACURA RDX 2023 Controls User Manual
Clock
Adjusting the Clock
You can adjust the time in the clock display with the power mode in ON.
The clock is automatically updated through the audio system.
Adjusting the Time
You can adjust the time using the A-zone touchpad.
True Touchpad Interface P. 261
- Press the
 (home) button.
 - Select Settings.
- Select System.
- Select Date & Time.
- Select Set Date & Time.
- Select Automatic Date & Time.
- Select Off.
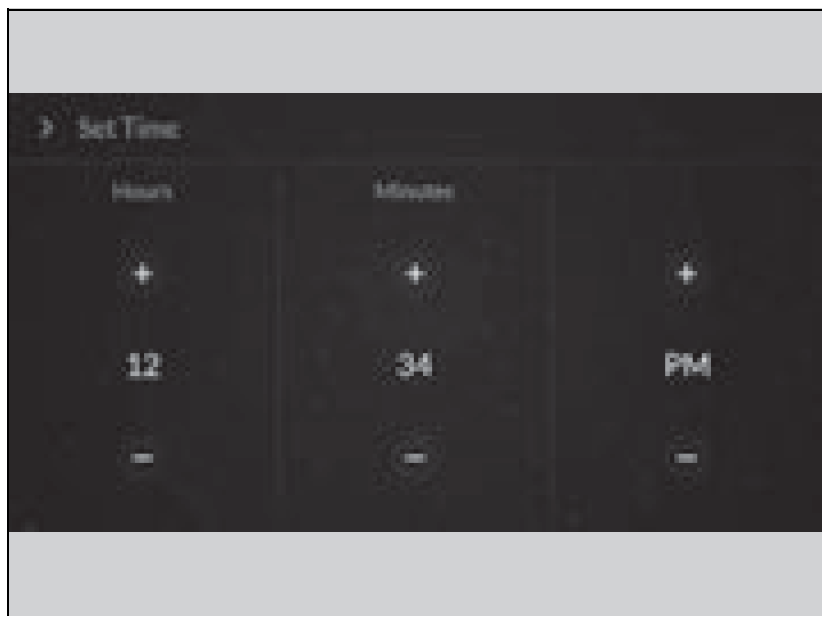 To adjust time:
- Select Set Time.
- Select
 .
.
- When you customize the clock display to 24 hour clock, AM/PM icon is not displayed.
- Customized Features P. 359
- When you customize the clock display to 24 hour clock, AM/PM icon is not displayed.
- Press the
 (back) button to set the time.
1. Press the
2. Select Clock using the B-zone touchpad.
3. Press the B-zone touchpad.
4. Select Set Date & Time using the A-zone touchpad.
5. Select Automatic Date & Time.
6. Select Off.
7. Select Set Date or Set Time.
8. Select
9. Press the
To adjust date:

You can customize the clock display to show the 12 hour clock or 24 hour clock.
Customized Features P. 359
![]()
Locking and Unlocking the Doors
Key
This vehicle comes with the following keys:
Use the keys to start and stop the engine, lock and unlock all the doors and the fuel fill door, and open the tailgate.
All the keys have an immobilizer system. The immobilizer system helps to protect against vehicle theft.
Immobilizer System P. 183
Follow the advice below to prevent damage to the keys:
- Do not leave the keys in direct sunlight, or in locations with high temperature or high humidity.
Do not drop the keys or set heavy objects on them.
Keep the keys away from liquids, dust and sand.
Do not take the keys apart except for replacing the battery.
If the circuits in the keys are damaged, the engine may not start, and the remote transmitter may not work.
If the keys do not work properly, have them inspected by a dealer.
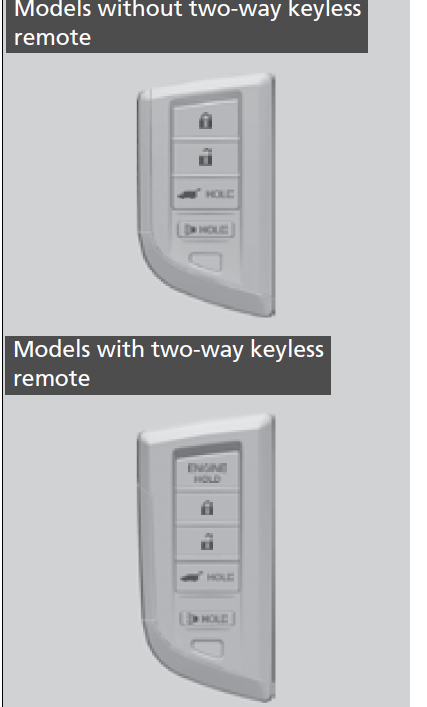
Models with two-way keyless remote
You can remotely start the engine using the remote engine start.
Remote Engine Start* P. 445
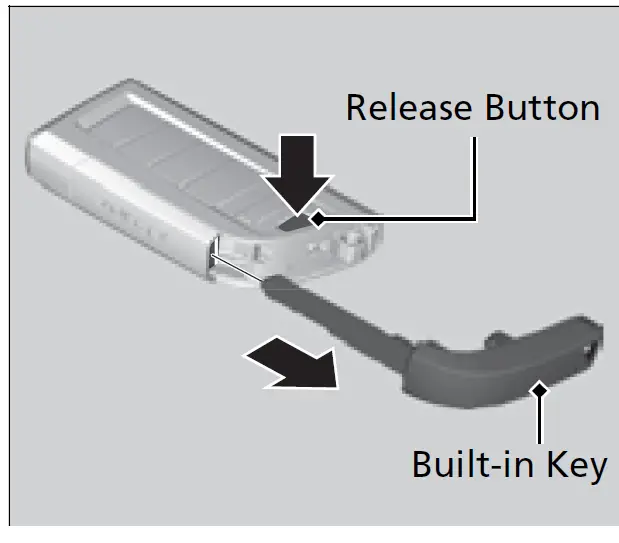
Built-in Key
The built-in key can be used to unlock the doors when the keyless remote battery becomes weak and the power door unlock operation is disabled.
To remove the built-in key, push the release button and then pull out the key. To reinstall the built-in key, push the built-in key into the keyless remote until it clicks.
Key Number Tag
Contains a number that you will need if you purchase a replacement key.

Keep the key number tag separate from the key in a safe place outside of your vehicle.
If you wish to purchase an additional key, contact a dealer.
If you lose your key and you cannot start the engine, contact a dealer.
Low Keyless Remote Signal Strength
The vehicle transmits radio waves to locate the keyless remote to start the engine, lock and unlock all the doors, hatch and the fuel fill door.
In the following cases, starting the engine, locking/unlocking the doors, hatch and fuel fill door may be inhibited or operation may be unstable:
- Strong radio waves are being transmitted by nearby equipment.
You are carrying the keyless remote together with telecommunications equipment, laptop computers, cell phones, or wireless devices.
A metallic object is touching or covering the keyless remote.
Communication between the keyless remote and the vehicle consumes the keyless remote’s battery. Battery life is about two years, but this varies depending on regularity of use.
The battery is consumed whenever the keyless remote is receiving strong radio waves. Avoid placing it near electrical appliances such as televisions and personal computers.
Locking/Unlocking the Doors from the Outside
Using the Keyless Access System
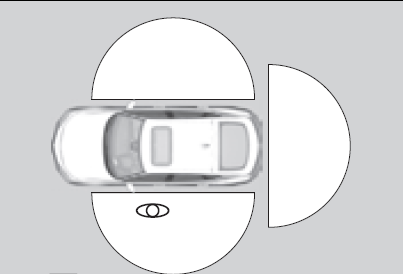
When you carry the keyless remote, you can lock/unlock the doors and fuel fill door, and open the tailgate.
You can lock/unlock the doors, fuel fill door, and tailgate within a radius of about 32 inches (80 cm) of the outside door handle or tailgate outer handle.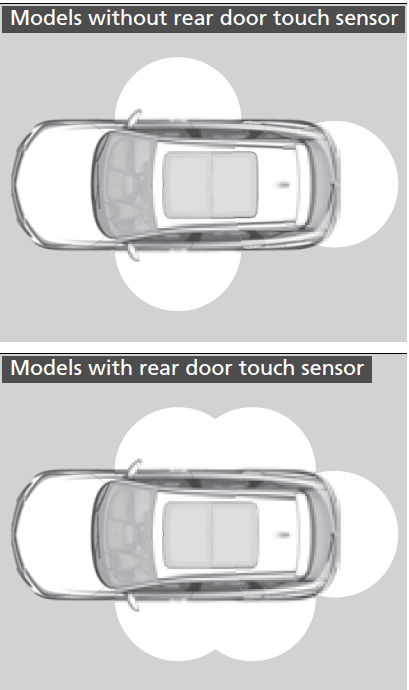
If the interior light switch is in the door activated position, the interior lights come on when you unlock the doors and hatch.
No doors opened: The lights fade out after 30 seconds. Doors and hatch relocked: The lights go off immediately.
Interior Lights P. 230
If you do not open a door or the hatch within 30 seconds of unlocking the vehicle with the keyless access system, the doors and hatch will automatically relock.
You can lock or unlock doors using the keyless access system only when the power mode is in VEHICLE OFF.
The keyless access system will not lock the vehicle when a door is open.
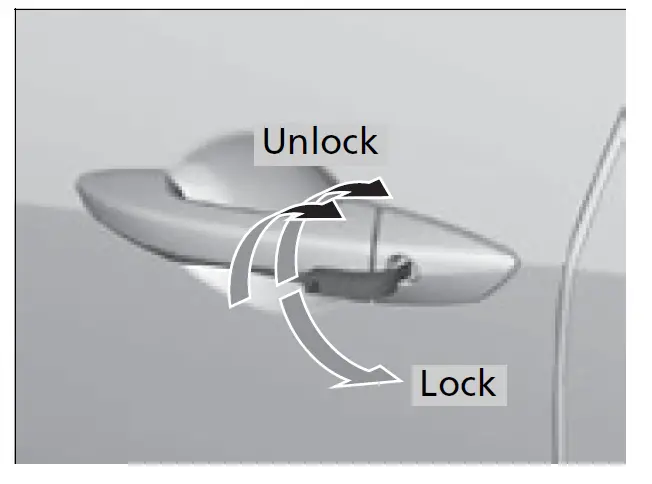
Locking the doors and tailgate
Touch the door lock sensor on the front or rear* door, or press the lock button on the tailgate.
u Some exterior lights flash; the beeper sounds; all the doors, fuel fill door, and tailgate lock; and the security system sets.
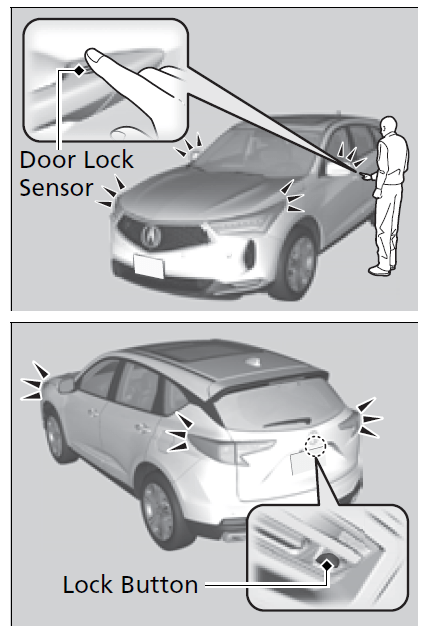
- Do not leave the keyless remote in the vehicle when you get out. Carry it with you.
- Even if you are not carrying the keyless remote, you can lock/unlock the doors and tailgate while someone else with the remote is within range.
- The door may be unlocked if the door handle is covered with water in heavy rain or in a car wash if the keyless remote is within range.
- If you grip a door handle or touch a door lock sensor wearing gloves, the door sensor may be slow to respond or may not respond by unlocking or locking the doors.
- After locking the door, you have up to 2 seconds during which you can pull the door handle to confirm whether the door is locked. If you need to unlock the door immediately after locking it, wait at least 2 seconds before gripping the handle, otherwise the door will not unlock.
- The door might not open if you pull it immediately after gripping the door handle. Grip the handle again and confirm that the door is unlocked before pulling the handle.
- Even within the 32 inches (80 cm) radius, you may not be able to lock/unlock the doors and tailgate with the keyless remote if it is above or below the outside handle.
- The keyless remote may not operate if it is too close to the door, door glass and tailgate.
Unlocking the doors and tailgate
Grab the driver’s door handle:
- The driver’s door and fuel fill door unlock.
Some exterior lights flash twice and the beeper sounds twice.
Grab the front passenger’s door or rear* door handle:
- All doors, fuel fill door, and the tailgate unlock.
Some exterior lights flash twice and the beeper sounds twice.
Press the tailgate outer handle: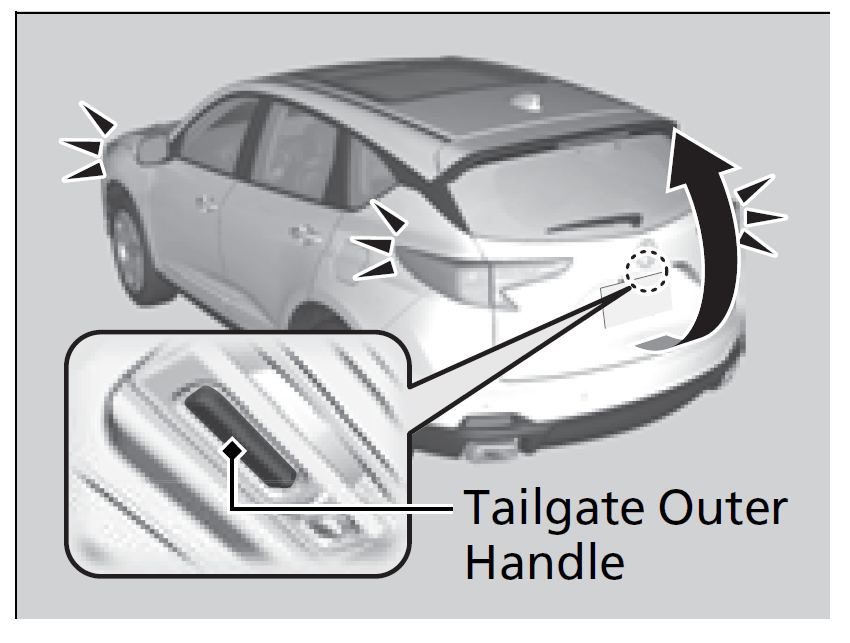
The tailgate unlocks.
Some exterior lights flash twice and the beeper sounds.
Opening/Closing the Tailgate P. 182
The light flash, beep and door unlock mode settings can be customized using the audio/information screen.
Customized Features P. 359
When you go into the keyless access system working range with all the doors locked, the puddle lights come on for 30 seconds.
The lights do not come on if you have previously stayed within the range for more than two minutes, or the doors have been locked for a few days. The feature activates again after you open and close any door, then lock the doors.
You can also unlock and open with the power tailgate.
Using the Tailgate Outer Handle P. 178
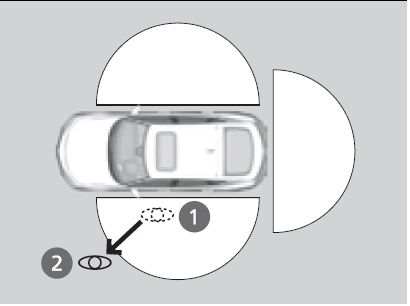
Locking the doors and tailgate (Walk away auto lock®)
When you walk away from the vehicle with all doors and tailgate closed and while carrying the keyless remote, the doors will automatically lock.
The auto lock function activates when all doors and tailgate are closed, or all doors are closed and tailgate begins power close operation, and the keyless remote is within about 5 feet (1.5 m) radius of the outside door handle or tailgate outer handle.
Exit vehicle while carrying keyless remote and close door(s).
- While within about 5 feet (1.5 m) radius of the vehicle.
- The beeper sounds; the auto lock function will be activated.
- Carry the keyless remote beyond about 5 feet (1.5 m) from the vehicle and remain outside this range for 2 or more seconds.
- Some exterior lights flash; the beeper sounds; all doors and hatch will then lock.
The activation range of the auto lock function is about 5 feet (1.5 m)
The auto lock function is set to OFF as the factory default setting. The auto lock function can be set to ON using the audio/information screen or driver information interface.
If you set the auto lock function to ON using the audio/information screen or driver information interface, only the remote transmitter that was used to unlock the driver’s door prior to the setting change can activate auto lock.
Customized Features P. 359
After the auto lock function has been activated, when you stay within the locking/unlocking operation range, the indicator on the keyless remote will continue to flash until the doors are locked.
When you stay beside the vehicle within the operation range, the doors will automatically lock approximately 30 seconds after the auto lock function activating beeper sounds.
When you open a door after the auto lock function activating beeper sounds, the auto lock function will be canceled.
Under the following circumstances, the auto-lock function will not activate:
- The keyless remote is inside the vehicle.
The beeper will not sound.
The keyless remote is taken out of its operational range before all the doors are closed. - The beeper will sound.
To temporarily deactivate the function:
- Set the power mode to OFF.
- Open the driver’s door.
- Using the master door lock switch, operate the lock as follows:
Lock →Unlock → Lock → Unlock.- The beeper sounds, and the function is deactivated.
To restore the function:
- Set the power mode to ON.
Lock the vehicle without using the auto lock function.
With the keyless remote on you, move out of the auto lock function operation range.
Open any door.
You must wait until the power tailgate fully closes before the auto lock function will be activated.
The auto lock function does not operate when any of the following conditions are met.
- The keyless remote is inside the vehicle.
A door or the hood is not closed.
The power mode is set to any mode other than OFF.
The keyless remote is not located within a radius of about 5 feet (1.5 m) from the vehicle when you get out of the vehicle and close the doors.
Auto lock function operation stop beeper
After the auto lock function has been activated, the auto lock operation stop beeper sounds for approximately two seconds in the following cases.
- The keyless remote is put inside the vehicle through a window.
You are located too close to the vehicle.
The keyless remote is put inside the tailgate.
If the warning beeper sounds, check that you are carrying the keyless remote. Then, open/close a door and confirm the auto lock activation beeper sounds once.
Using the Remote Transmitter
 Checking Door Lock Status* P. 168
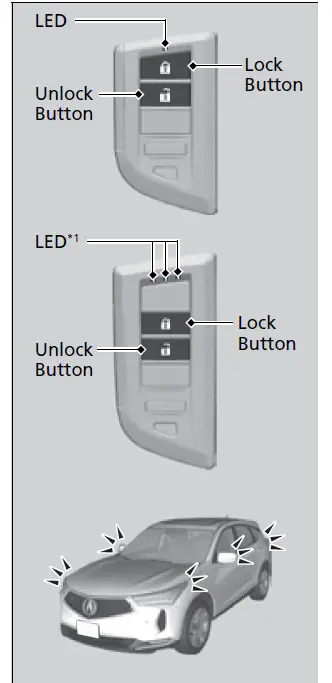
Locking the doors and hatch
Press the lock button.
Once:
Some exterior lights flash, all the doors, hatch, and fuel fill door lock, and the security system sets.
Twice (within five seconds after the first push):
Some exterior lights flash, the beeper sounds, and verifies the security system is set.
- Unlocking the doors and hatch
Press the unlock button. - Once:
Some exterior lights flash twice, and the driver’s door and fuel fill door unlock.
Twice:
The remaining doors and hatch unlock.
If you do not open a door or the hatch within 30 seconds of unlocking the vehicle with the remote transmitter, the doors and hatch will automatically relock.
You can change the relock timer setting.
Customized Features P. 359
You can lock or unlock doors using the remote transmitter only when the power mode is in VEHICLE OFF.
The remote transmitter uses low-power signals, so the operating range may vary depending on the surroundings.
The remote will not lock the vehicle when a door is open.
If the distance at which the remote transmitter works varies, the battery is probably low.
If the LED does not come on when you press a button, the battery is dead.
Replacing the Remote Battery P. 625
Locking/Unlocking the Doors Using a Key
If the lock or unlock button of the keyless remote does not work, use the key instead.
Replacing the Remote Battery P. 625
Fully insert the key and turn it.
When you lock the driver’s door with a key, all the other doors, tailgate and fuel fill door lock at the same time. When unlocking, the driver’s door unlocks first. Turn the key a second time within a few seconds to unlock the remaining doors, fuel fill door and the tailgate.
Locking a Door Without Using a Key
If you do not have the key on you, or if for some reason you cannot lock a door using the key, you can lock the door without it.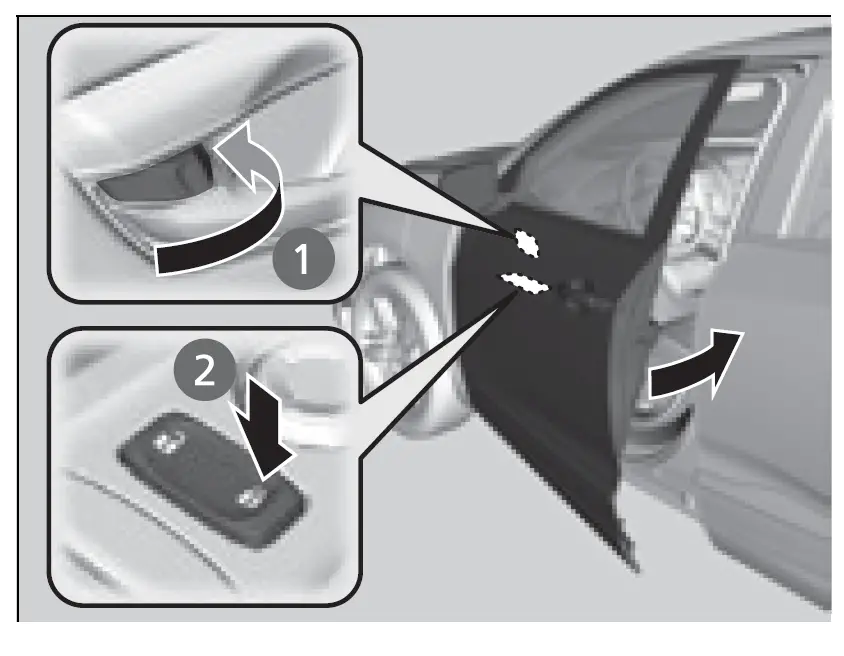
Locking the front doors
Push the lock tab forward a or push the master door lock switch in the lock direction b, and close the door.
Locking the rear doors
Push the lock tab forward and close the door.
Lockout prevention system
The doors and the tailgate cannot be locked when the keyless remote is inside the vehicle.
When you lock the driver’s door, all the other doors, tailgate and fuel fill door lock at the same time. Before locking a door, make sure that the key is not inside the vehicle.
Checking Door Lock Status* You can remotely check if your vehicle’s doors are all locked or any are unlocked using the keyless remote from extended distances.
Press the lock button, the Amber (LEFT) LED blinks once. After three seconds, one of the following feedback will come:
- Green (center) comes on: Acknowledges that the doors are locked.
Red (right) comes on: Acknowledges that doors are not locked, or any door is not completely closed.
Red (right) blinks three times: The remote does not receive the door lock status from the vehicle.
Operate the remote in an open space. If there are buildings or other obstacles between your vehicle and the remote, the remote may not work even within the operable range. However, the range required for unlocking the hatch and all the doors as well as activating the panic function is the same as that required for operating the standard keyless remote.
Using the Remote Transmitter P. 165
When checking the door lock status, you can also start or stop the engine.
Remote Engine Start* P. 445
Locking/Unlocking the Doors from the Inside
Using the Lock Tab
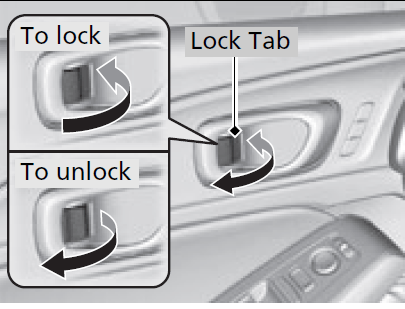
- Locking a door
Push the lock tab forward. - Unlocking a door
Pull the lock tab rearward. - When you lock the door using the lock tab on the driver’s door, all of the other doors, hatch and fuel fill door lock at the same time.
When you unlock the door using the lock tab on the driver’s door, only the driver’s door and fuel fill door will unlock.
Unlocking Using the Front Door Inner Handle
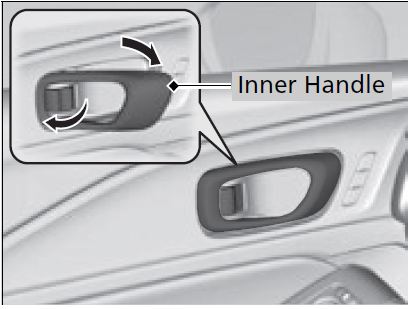
Pull the front door inner handle.
The door unlocks and opens in one motion.
Unlocking and opening the driver’s door from the inner handle unlocks all the other doors.
To avoid all the doors unlocking, use the lock tab on the driver’s door to unlock, then lock again before opening the door.
This setting works for one time only.
If you do not want all the doors to be unlocked all the time, customize the Auto Door Unlock*1/Auto door unlock*2 setting to OFF using the driver information interface or audio/information screen.
- The front door inner handles are designed to allow front seat occupants to open the door in one motion. However, this feature requires that front seat occupants never pull a front door inner handle while the vehicle is in motion.
Children should always ride in a rear seat where childproof door locks are provided.
Childproof Door Locks P. 171
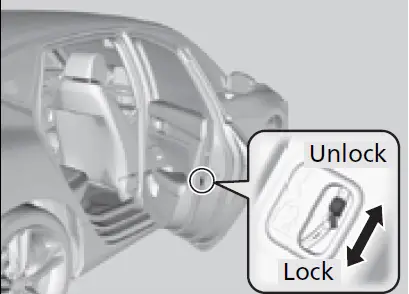
Using the Master Door Lock Switch
Press the master door lock switch in as shown to lock or unlock all doors, hatch and fuel fill door.
 When you lock/unlock either of the front doors using the master lock switch, all the other doors, hatch and fuel fill door lock/unlock at the same time.
Childproof Door Locks
The childproof door locks prevent the rear doors from being opened from the inside regardless of the position of the lock tab.
Setting the Childproof Door Locks
Slide the lever in the rear door to the lock position, and close the door.
When opening the door
Open the door using the outside door handle.
To open the door from the inside when the childproof door lock is on, put the lock tab in the unlock position, lower the rear window, put your hand out of the window, and pull the outside door handle.
Auto Door Locking/Unlocking
Your vehicle locks or unlocks all doors automatically when a certain condition is met.
Auto Door Locking
Drive lock mode
All doors and the hatch lock when the vehicle’s speed reaches about 10 mph (15 km/h).
Auto Door Unlocking
Driver’s door open mode
All doors and the hatch unlock when the driver’s door is opened.
You can turn off or change to another auto door locking/unlocking setting using the driver information interface or audio/information screen.
Customized Features P. 359
Tailgate
Precautions for Opening/Closing the Hatch
Always make sure individuals and objects are clear of the hatch before opening or closing it.
Keep the hatch closed while driving to:
- Avoid possible damage.
- Prevent exhaust gas from leaking into the vehicle.
Carbon Monoxide Gas P. 77
- Prevent exhaust gas from leaking into the vehicle.
WARNING
Anyone caught in the path of a hatch that is being opened or closed can be seriously injured.
Make sure that all people are clear of the hatch before opening or closing it.
Be careful not to hit your head on the hatch or to put your hands between the hatch and the cargo area when closing the hatch.
When you are storing or picking up luggage from the cargo area while the engine is idling, do not stand in front of the exhaust pipe. You may get burned.
Do not allow any passenger in the cargo space. They may get hurt during hard braking, a sudden acceleration, or a crash.
The power tailgate can be operated by pressing the power tailgate button on the remote transmitter, pressing the power tailgate button on the driver’s door, pressing the outer handle on the tailgate, or by using a forward and back kicking motion under the center of the rear bumper for hands free access*.
The power tailgate can be opened/closed when the transmission is in (P.
NOTICE
Do not push or pull on the power tailgate when it is being automatically opened or closed.
Forcibly opening or closing the power tailgate while in operation can deform the tailgate frame.
When operating the power tailgate, make sure there is enough space around your vehicle. People near the tailgate may be seriously hurt if the tailgate hits or closes on their heads. Be especially cautious if children are around.
The power tailgate may not open or close under the following conditions:
You start the engine while the tailgate is automatically opening or closing.
The vehicle is parked on a steep hill.
The vehicle is swayed in a strong wind.
The tailgate or the roof is covered with snow or ice.
Opening/Closing the Power Tailgate
Using the Hands Free Access*
Use a forward and back kicking motion for about 1 second under the center of the rear bumper to open or close the power tailgate while carrying the keyless remote.
- Some exterior lights will flash and a beeper will sound, then the tailgate begins to move.
WARNING
Opening or closing a power tailgate while any part of a passenger is in the tailgate’s operating path can cause serious injury.
Make sure all passengers or objects are clear of the tailgate operating range before opening or closing the tailgate.
During rain or in other instances when the vehicle becomes wet, the sensor may not properly detect your foot motion.
When performing work on or around the rear section of the vehicle, you may inadvertently open or close the tailgate.
To prevent this from happening, select Customized Features on the audio/information screen and then select OFF for the feature.
Customized Features P. 359
If you hold your foot under the bumper for too long or sweep your foot from side to side, the power tailgate does not open or close.
This function will not operate if you don’t have the keyless remote on you. Please make sure you have the keyless remote on you.

Using the Remote Transmitter
Press the hatch unlock button to unlock the hatch.
Some exterior lights flash and the beeper sounds.
If you press the button again while the power tailgate is moving, it will stop.
Press the button for more than one second, and the power tailgate will reverse direction.
Customizing when to open the tailgate
Anytime: The power tailgate unlocks and opens at the same time. This is the default setting.
When Unlocked: The tailgate opens when all doors are unlocked.
Customized Features P. 359
If you close the power tailgate when all the doors are locked, the power tailgate locks automatically.
If you replace the battery or the power tailgate fuse while the tailgate is open, the power tailgate may be disabled. The power tailgate resumes once you manually close the tailgate.
Installing aftermarket components other than Acura genuine accessories on the power tailgate may prevent it from fully opening or closing.
Make sure the power tailgate is fully open before you get your luggage in and out.
The beeper sounds when you start driving while the power tailgate is still open, or closing.
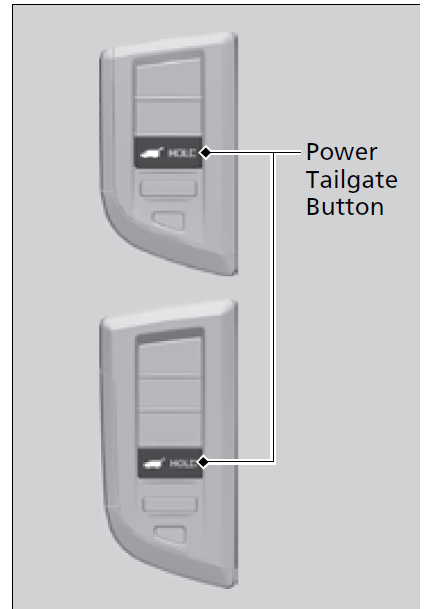
Using the Power Tailgate Button
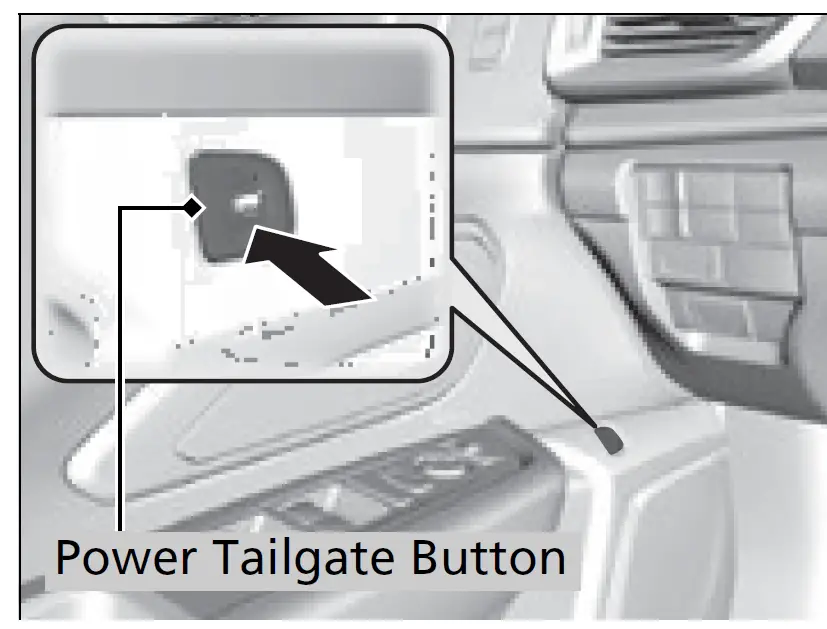
To open or close the power tailgate, press the power tailgate button for about one second.
Some exterior lights flash and the beeper sounds.
If you press the button again while the power tailgate is moving, it will stop.
Press the button for about one second, and the power tailgate will reverse direction.
If the power tailgate meets resistance while opening or closing, the auto reverse feature reverses the direction. The beeper sounds three times.
The auto reverse function stops sensing when the tailgate is almost closed to make sure that it fully closes.
Do not touch the sensors located on both sides of the tailgate. The power tailgate does not close if you touch either sensor when you are trying to close the tailgate.
Be careful not to scratch the sensors with a sharp object. If scratched, they can be damaged, and the power tailgate closing feature malfunctions.
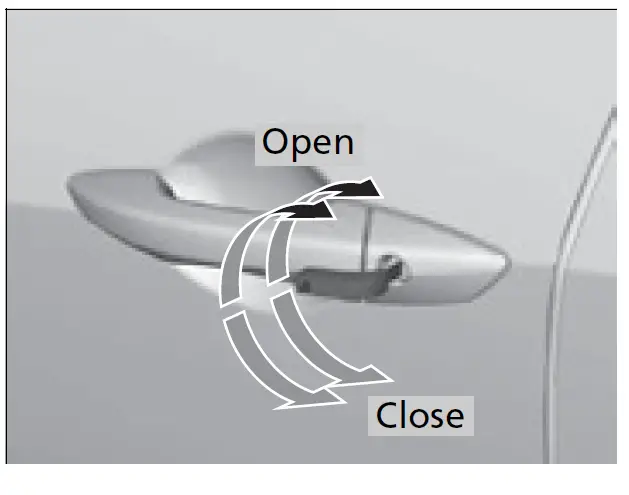
Using the Tailgate Outer Handle
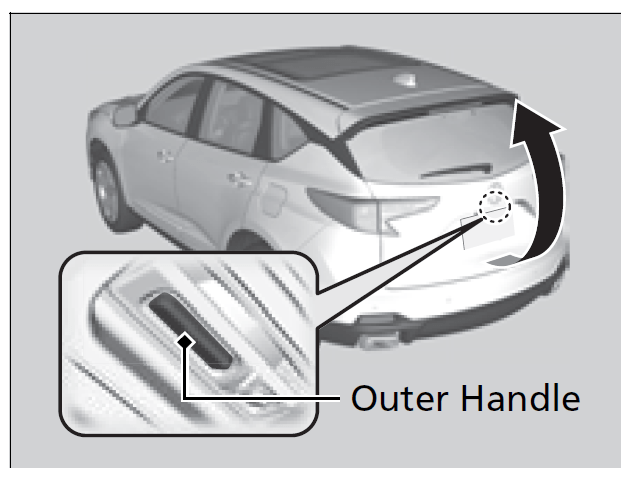
If you press the outer handle of the tailgate for no longer than one second, the tailgate opens automatically.
- The beeper sounds.
If you want to open the tailgate manually, press the button for more than one second and wait until you hear beeps.
Opening/Closing the Tailgate P. 182
If you are carrying the keyless remote, you do not have to unlock the tailgate before opening it.
If you press the outer handle again while the power tailgate is moving, it will stop.
Press the outer handle, and the power tailgate will reverse direction.
- Do not leave the keyless remote in the vehicle when you get out. Carry it with you.
Even if you are not carrying the keyless remote, you can unlock the tailgate while someone else with the remote is within range.• Do not leave the keyless remote inside the cargo area and close the tailgate. The beeper sounds and the tailgate cannot be closed.
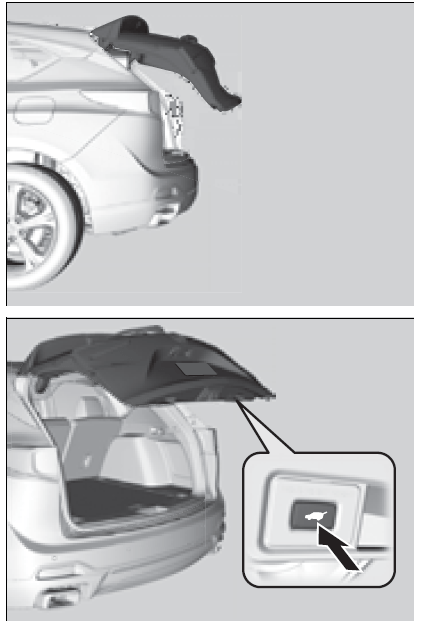
Using the Tailgate Inner Button
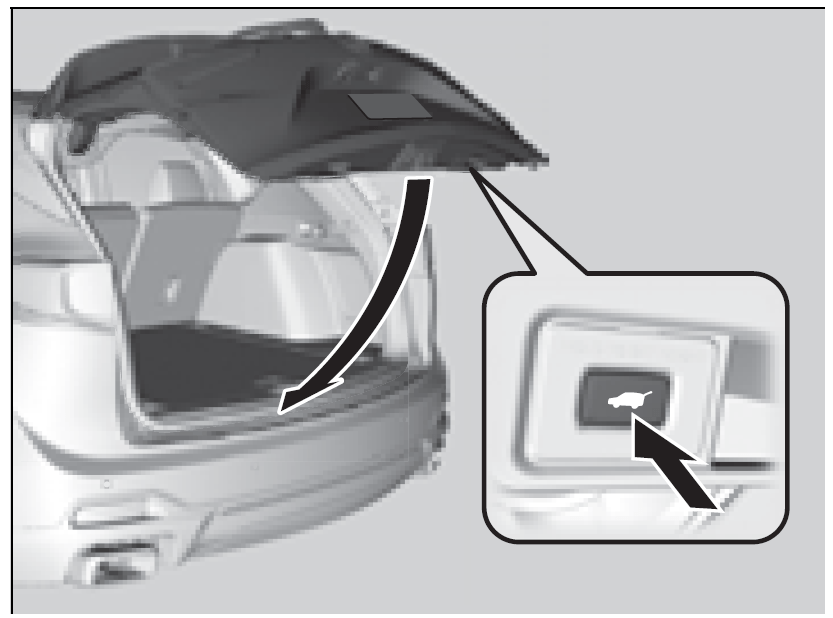 Press the button on the tailgate to close the power tailgate.
- The beeper sounds.
If you press the button again while the power tailgate is moving, it will stop. Press and release the button again, and the power tailgate will reverse direction.
Programming Tailgate Position
The extent to which the power tailgate automatically opens can be programed.
To program:
- Open the tailgate to the desired position.
- Press and hold the tailgate inner button. You will hear one long beep, followed by two short beeps.
If the tailgate is only slightly opened, the position cannot be programmed, even if you push the inner button.
If you want to reprogram the power tailgate to open all the way, manually raise the tailgate to its upper most position and follow the directions step 2.
Auto-Closer
If you manually close the power tailgate, it latches automatically.
Power Tailgate Fall Detection
Automatically lowers the power tailgate when there is a possibility that the fully opened power tailgate can fall down by its own weight (for example, by snow on the tailgate). The beeper sounds while the power tailgate lowers.
The auto-closer feature does not activate if you press and hold the tailgate outer handle while the power tailgate is closing.
Do not put any force on the tailgate while the power tailgate is latching.
Keep your hands away from the tailgate when you manually close the tailgate and let it latch automatically. It is dangerous to put your hands around the tailgate as it starts to latch itself.
If you try to manually close the power tailgate immediately after it fully opens, the power tailgate fall detection may activate.
Once the power tailgate fall detection activates, wait until the power tailgate fully closes. Keep away from the power tailgate when it is in motion.
If the power tailgate fall detection constantly activates, consult at a dealer.
Opening/Closing the Tailgate
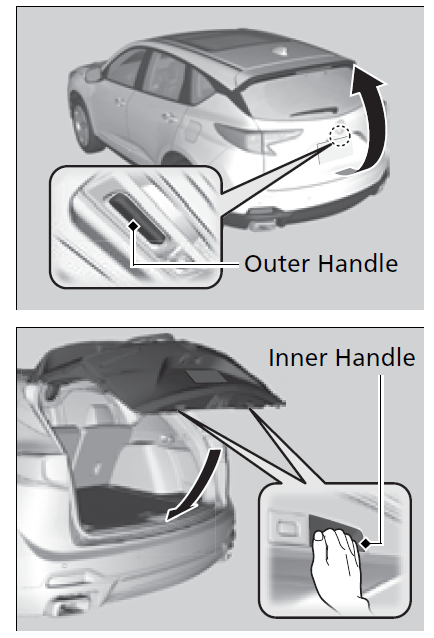 When all the doors are unlocked, the tailgate is unlocked.
Press the outer handle of the tailgate and lift open the tailgate.
If you are carrying the keyless remote, you do not have to unlock the tailgate before opening it.
To close the tailgate, grab the inner handle, pull the tailgate down, and push it closed from outside.
If you close the tailgate when the driver’s door is locked, the tailgate locks automatically.
- Do not leave the keyless remote in the vehicle when you get out. Carry it with you.
Even if you are not carrying the keyless remote, you can unlock the tailgate while someone else with the remote is within range.
Do not leave the keyless remote inside the cargo area and close the tailgate. The beeper sounds and the tailgate cannot be closed.
Security System
Immobilizer System
This system prevents a key that has not been pre-registered from starting the engine.
Pay attention to the following when pressing the ENGINE START/STOP button:
- Do not allow objects that emit strong radio waves near the ENGINE START/STOP button.
Make sure the key is not covered by or touching a metal object. - Do not bring a key from another vehicle’s immobilizer system near the ENGINE START/STOP button.
- Do not put the key near magnetic items. Electronic devices, such as televisions and audio systems emit strong magnetic fields. Note that even a key chain can become magnetic.
Security System Alarm
The security system alarm activates when the hatch, hood or doors are forcibly opened. The alarm does not activate if the hatch or doors are opened with the key, remote transmitter or keyless access system.
However, the alarm activates if a door is opened with the key and then the transmission is taken out of (P (continuously variable transmission models) or the hood is opened before the power mode is set to ON.
NOTICE
Leaving the key in the vehicle can result in theft or accidental movement of the vehicle.
Always take the key with you whenever you leave the vehicle unattended.
Do not alter the system or add other devices to it. Doing so may damage the system and make your vehicle inoperable.
Canadian models
Apply and hold the brake pedal before turning the vehicle on the first time after the battery has been disconnected.
Do not alter the system or add other devices to it. Doing so may damage the system and make your vehicle inoperable.
The security system alarm continues for a maximum of two minutes until the security system alarm deactivates.
- When the security system alarm activates
The horn sounds intermittently, and some exterior lights flash. - To deactivate the security system alarm
Unlock the vehicle using the key, remote transmitter or keyless access system, or set the power mode to ON. The system, along with the horn and flashing lights, is deactivated. - Setting the security system alarm
The security system alarm automatically sets when the following conditions have been met: - The power mode is set to VEHICLE OFF.
The hood is closed. - All doors and hatch are locked from outside with the remote transmitter or keyless access system.
When the security system alarm sets
The security system alarm indicator in the instrument panel blinks and the blinking interval changes after about 15 seconds.
To cancel the security system alarm
The security system alarm is canceled when the vehicle is unlocked using the remote transmitter or keyless access system, or when the power mode is set to ON. The security system alarm indicator goes off at the same time.
Do not set the security system alarm when someone is in the vehicle or a window is open. The system can accidentally activate when:
- Unlocking the door with the lock tab.
Opening the hood with the hood release.
Continuously variable transmission models
Taking the transmission out of (P.
If the battery goes dead after you have set the security system alarm, the security alarm may go off once the battery is recharged or replaced.
If this occurs, deactivate the security system alarm by unlocking a door using the key, remote transmitter or keyless access system.
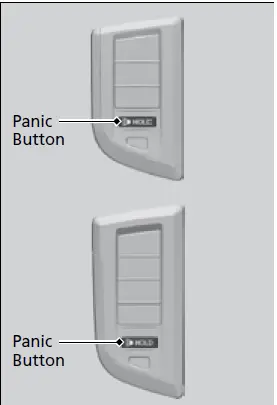
Panic Mode
The panic button on the remote transmitter
If you press the panic button for approximately one second, the following will occur for about 30 seconds:
- Canceling panic mode
- Press any button on the remote transmitter.
Set the power mode to ON.
Windows
Opening/Closing the Power Windows
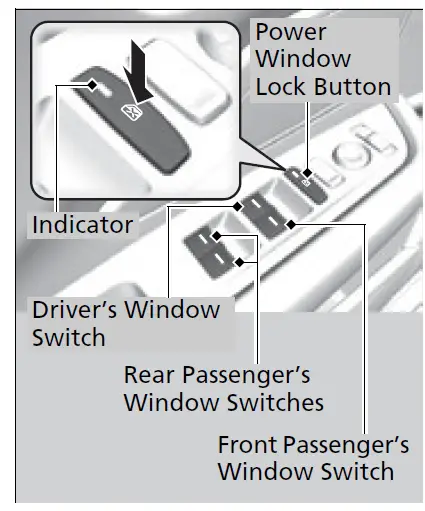
The power windows can be opened and closed when the power mode is in ON, using the switches on the doors.
The driver’s side switches can be used to open and close all the windows. The power window lock button on the driver’s side must be switched off (indicator off) to open and close the windows from anywhere other than the driver’s seat.
When the power window lock button is pressed, the indicator comes on and you can only operate the driver’s window. Turn the power window lock button on if a child is in the vehicle.
Opening/Closing the Windows with Auto-Open/Close Function
Manual operation
To open: Push the switch down lightly, and hold it until the desired position is reached. To close: Pull the switch up lightly, and hold it until the desired position is reached.
Automatic operation
To open: Push the switch down firmly.
To close: Pull the switch up firmly.
The window opens or closes completely. To stop the window at any time, push or pull the switch briefly.
WARNING
Closing a power window on someone’s hands or fingers can cause serious injury.
Make sure your passengers are away from the windows before closing them.
The power windows can be operated for up to 10 minutes after you set the power mode to VEHICLE OFF.
Opening either front door cancels this function.
Auto Reverse
If a power window senses resistance when closing automatically, it will stop closing and reverse direction.
The driver’s window auto reverse function is disabled when you continuously pull up the switch.
The auto reverse function stops sensing when the window is almost closed to ensure that it fully closes.
Opening/Closing the Windows without Auto-Open/Close Function
To open: Push the switch down.
To close: Pull the switch up.
Release the switch when the window reaches the desired position.
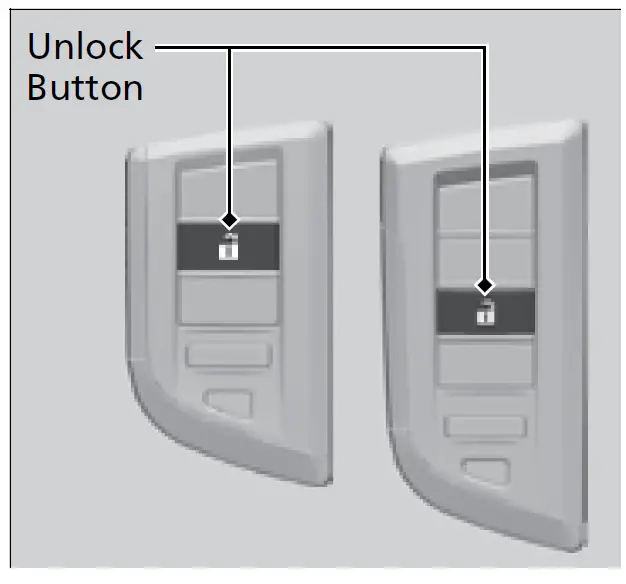
Opening the Windows with the Remote
To open: Press the unlock button, and then within 10 seconds, press it again and hold it.
If the windows stop midway, repeat the procedure.
While driving with any of the windows open, you may hear a booming, throbbing, or helicopter-type noise or pressure. This is called wind buffeting. This is a normal occurrence that can be minimized.
If you hear a wind buffeting noise with any of the windows open, lower all of the other windows slightly or open the moonroof.
If you open the windows with the remote, the moonroof will open automatically along with them.
You can turn off or on to open the windows with the keyless remote setting using the driver information interface or audio/information screen.
Vehicle Settings* P. 126
Customized Features P. 359
Opening the Windows with the Key
Pull and hold the outer handle. Insert the key into the key cylinder completely from below the handle.
To open: Unlock the driver’s door with the key. Within 10 seconds of returning the key to the central position, turn the key in the unlock direction and hold it there.
Release the key to stop the windows at the desired position. If you want further adjustment, repeat the same operation.
If you open the windows with the key, the moonroof will open automatically along with them.
Panoramic Roof
Opening/Closing the Panoramic Roof
WARNING
Opening or closing the panoramic roof and sunshade on someone’s hands or fingers can cause serious injury.
Make sure all hands and fingers are clear of the panoramic roof and sunshade before opening or closing it.
NOTICE
Opening the panoramic roof in below freezing temperature or when it is covered with snow or ice can damage the panoramic roof panel or motor.
The panoramic roof and sunshade can be operated for up to 10 minutes after you set the power mode to VEHICLE OFF.
Opening either front door cancels this function.
When resistance is detected, the auto reverse function causes the panoramic roof and sunshade to change directions, then stop. Auto reverse stops sensing when the panoramic roof and sunshade are almost closed to ensure that it fully closes. Make sure that all objects, including fingers, are clear of the panoramic roof and sunshade.
You can operate the panoramic roof and sunshade when the power mode is in ON. Use the switch in the front of the ceiling to open and close the panoramic roof and sunshade.
Operating the Switches Around the Steering Wheel
You can operate the moonroof when the power mode is in ON. Use the switch in the front of the ceiling to open and close the moonroof.
Using the Moonroof Switch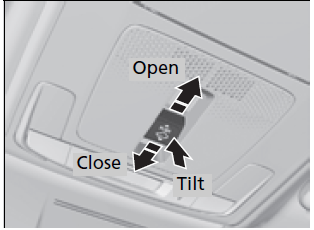
- Automatic operation
To open: Pull the switch back firmly. To close: Push the switch forward firmly.
The moonroof automatically opens or closes all the way. To stop the moonroof midway, pull or push the switch briefly.
- Manual operation
To open: Pull the switch back lightly, and hold it until the desired position is reached. To close: Push the switch forward lightly, and hold it until the desired position is reached. - Tilting the moonroof up
To tilt: Push on the center of the moonroof switch.
To close: Push the switch forward firmly, then release.
The panoramic roof cannot be fully opened in a single operation. The panoramic roof has a
“comfort” position or wind noise reduction position at which the roof first stops. To open fully, pull the switch back again after the roof has stopped at this position.
Whenever the panoramic roof is opening, the sunshade moves along with it. However, when the panoramic roof is closing, the sunshade does not move.
When you tilt open the panoramic roof, the sunshade opens slightly to let in fresh air. When you close the panoramic roof from this position, the sunshade returns to its closed position.
NOTICE
Opening the panoramic roof in below freezing temperature or when it is covered with snow or ice can damage the panoramic roof panel or motor.
The panoramic roof and sunshade can be operated for up to 10 minutes after you set the power mode to VEHICLE OFF.
Opening either front door cancels this function.
When resistance is detected, the auto reverse function causes the panoramic roof and sunshade to change directions, then stop. Auto reverse stops sensing when the panoramic roof and sunshade are almost closed to ensure that it fully closes. Make sure that all objects, including fingers, are clear of the panoramic roof and sunshade.
Using the Sunshade Switch
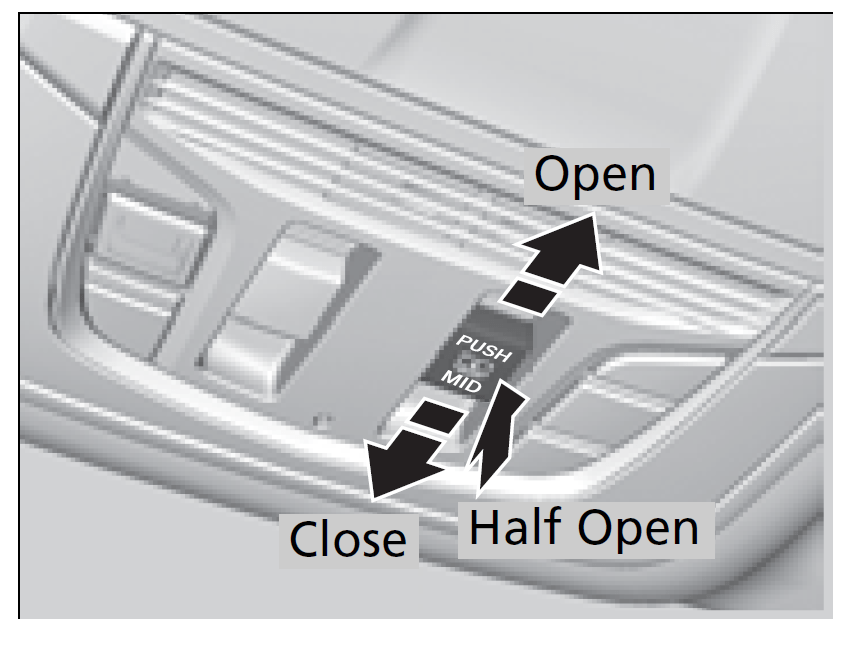
Automatic operation
To open: Pull the switch back firmly. To open half: Push on the center of the sunshade switch.
To close: Push the switch forward firmly.
he sunshade automatically opens or closes all the way. To stop the sunshade midway, pull or push the switch briefly Manual operation
To open: Pull the switch back lightly, and hold it until the desired position is reached. To close: Push the switch forward lightly, and hold it until the desired position is reached.
The sunshade automatically opens or closes all the way. To stop the sunshade midway, pull or push the switch briefly.
Manual operation
To open: Pull the switch back lightly, and hold it until the desired position is reached. To close: Push the switch forward lightly, and hold it until the desired position is reached.Manual operation
To open: Pull the switch back lightly, and hold it until the desired position is reached. To close: Push the switch forward lightly, and hold it until the desired position is reached.
The sunshade can be opened or closed to adjust the amount of light that enters the cabin.
When you use the sunshade switch to open the sunshade, the panoramic roof does not move.
The sunshade cannot be fully closed if the panoramic roof is open. When you close the sunshade with the panoramic roof opened, the sunshade stops slightly before the panoramic roof glass. When you push the switch forward again, the sunshade and the panoramic roof close together.
Operating the Switches Around the Steering Wheel
ENGINE START/STOP Button
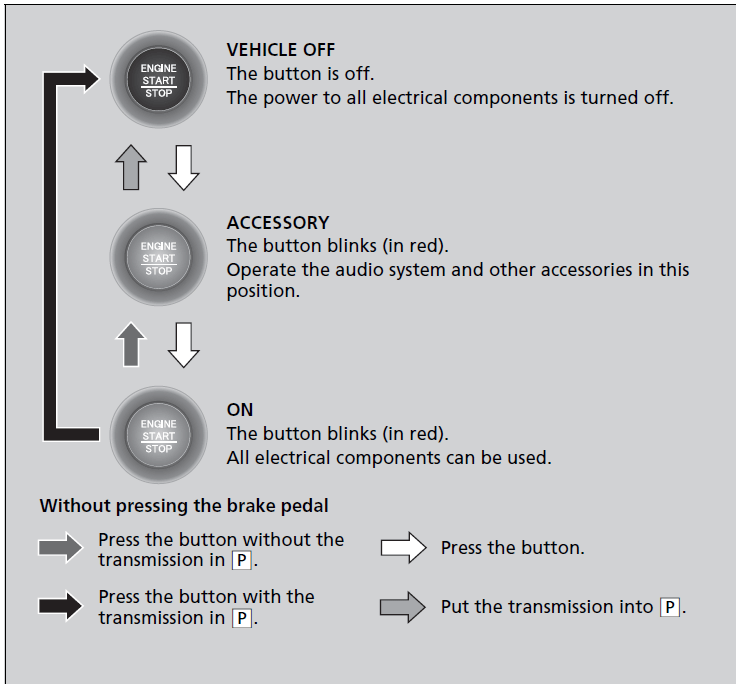
Changing the Power Mode
ENGINE START/STOP Button Operating Range
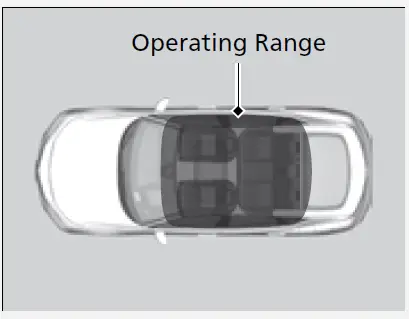 You can start the engine when the keyless remote is inside the vehicle.
The engine may also start if the keyless remote is close to the door or window, even if it is outside the vehicle.
ON mode:
The ENGINE START/STOP button is on (in red), if the engine is running.
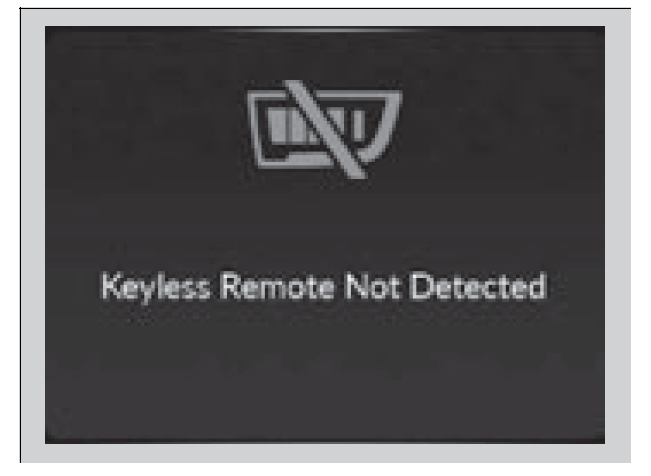
If the battery of the keyless remote is getting low, the engine may not start when you push the ENGINE START/STOP button. If the engine does not start, refer to the following link.
If the Keyless Remote Battery is Weak P. 665
Do not leave the power mode in ACCESSORY or ON when you get out.
Automatic Power Off
If you leave the vehicle for 30 to 60 minutes with the transmission in (P (continuously variable transmission) and the power mode in ACCESSORY, the vehicle automatically goes into the mode similar to VEHICLE OFF (LOCK) to avoid draining the battery.
Power Mode Reminder
If you open the driver’s door when the power mode is in ACCESSORY, a warning beep sounds
Keyless Remote Reminder
 When the power mode is set to any mode other than OFF and you remove the keyless remote from the vehicle and shut the door, an alarm will sound. If the alarm continues to sound, place the keyless remote in another location.
When the power mode is in ACCESSORY
The alarm will sound from outside the vehicle.
When the power mode is in ON
An alarm will sound both inside and outside the vehicle. In addition, a warning indicator will appear on the instrument panel.
When the keyless remote is within the system’s operational range, and all the doors are closed, the warning function cancels.
If the keyless remote is taken out of the vehicle after the engine has been started, you can no longer change the ENGINE START/STOP button mode or restart the engine. Always make sure if the keyless remote is in your vehicle when you operate the ENGINE START/STOP button.
Removing the keyless remote from the vehicle through a window does not activate the warning buzzer.
Do not put the keyless remote on the dashboard or in the glove box. It may cause the warning buzzer to go off. Under some other conditions that can prevent the vehicle from locating the keyless remote, the warning buzzer may also go off even if the keyless remote is within the system’s operational range.
Turn Signals
The turn signals can be used when the power mode is in ON.
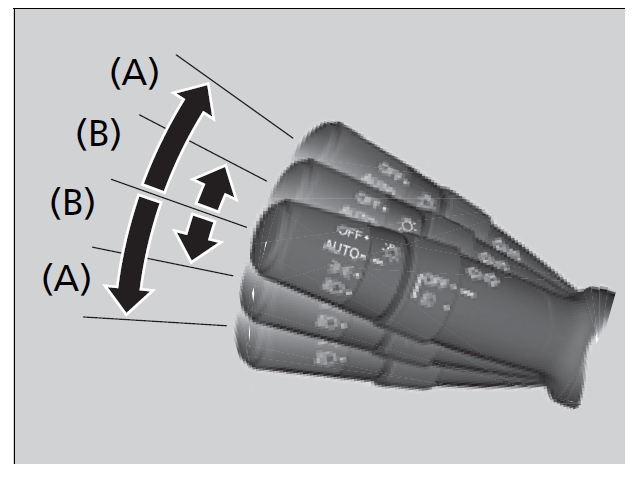
- (A): Turn signal
Push the lever up or down based on the direction you want to turn, and the turn signal will blink. - (B): One-touch turn signal
When you lightly push the lever up or down and release it, the turn signal will blink 3 times.
If you lightly push the lever in the opposite direction while it is blinking, the blinking will stop.
The turn signal indicator on the instrument panel will blink when the external turn signal blinks.
Turn Signal and Hazard Warning Indicators P. 80
Light Switches
Manual Operation
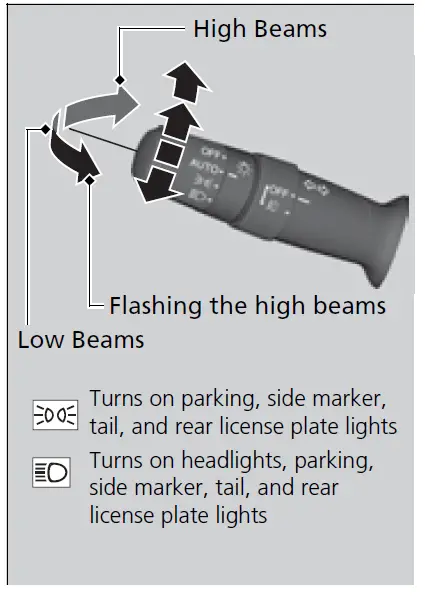
Rotating the light switch turns the lights on and off, regardless of the power mode setting.
- High beams
Push the lever forward until you hear a click. - Low beams
When in high beams, pull the lever back to return to low beams. - Flashing the high beams
Pull the lever back, and release it. - Lights off
Turn the lever to OFF either when: - The shift lever is in (P (continuously variable transmission).
The parking brake is applied.
To turn the lights on again, turn the lever to OFF to cancel the lights off mode. Even if you do not cancel the lights off mode, the lights come on automatically when:
The transmission is taken out of (P (continuously variable transmission) and the parking brake is released.
The vehicle starts to move.
If you leave the power mode in VEHICLE OFF while the lights are on, a chime sounds when the driver’s door is opened.
When the lights are on, the lights on indicator in the instrument panel will be on.
Lights On Indicator P. 98
Do not leave the lights on when the engine is off because it will cause the battery to discharge.
If you sense that the level of the headlights is abnormal, have the vehicle inspected by a dealer.
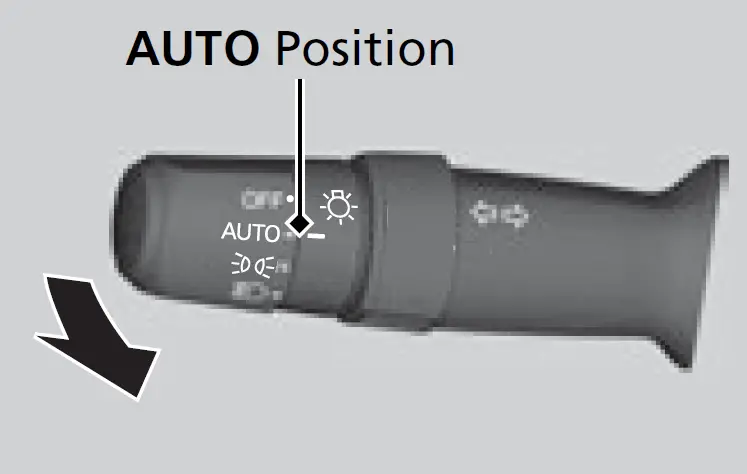
- Automatic Operation (automatic lighting control)

- Automatic lighting control can be used when the power mode is in ON.
When the light switch is in AUTO, the headlights and other exterior lights will switch on and off automatically depending on the ambient brightness. - The headlights come on when you unlock a door in dark areas with the headlight switch in AUTO.
- Once you lock the door, the headlights will go off.
We recommend that you turn on the lights manually when driving at night, in a dense fog, or in dark areas such as long tunnels or parking facilities.
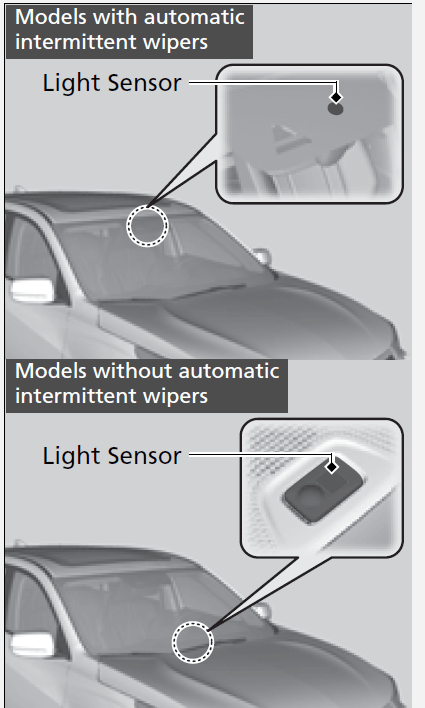
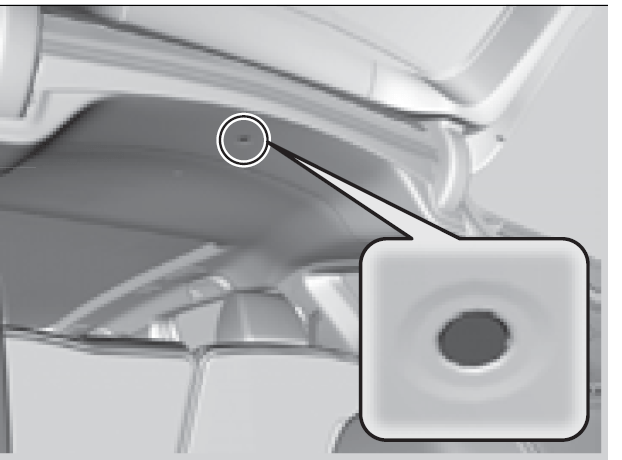
The light sensor is in the location shown below. Do not cover this light sensor with anything; otherwise, the automatic lighting system may not work properly.
Headlight Integration with Wipers
The headlights automatically come on when the wipers are used several times within a certain number of intervals with the headlight switch in AUTO.
The headlights automatically go off a few minutes later if the wipers are stopped.
Automatic Lighting Off Feature
The headlights, all other exterior lights, and the instrument panel lights turn off 15 seconds after you set the power mode to VEHICLE OFF, and close the driver’s door.
If you set the power mode to VEHICLE OFF with the headlight switch on, but do not open the door, the lights turn off after 10 minutes (3 minutes, if the switch is in the AUTO position).
The lights turn on again when you unlock or open the driver’s door. If you unlock the door, but do not open it within 15 seconds, the lights go off. If you open the driver’s door, you will hear a reminder chime alerting you that the lights are on.
U.S. models
You can adjust the auto light sensitivity as follows: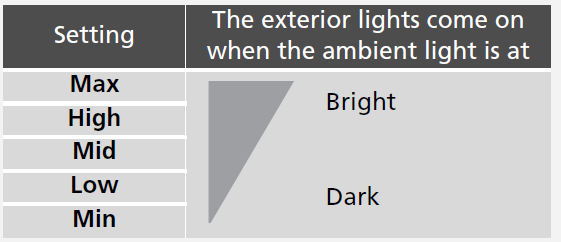 Customized Features P. 359
Headlight Integration with Wiper
This feature activates while the headlights are off in AUTO.
The instrument panel brightness does not change when the headlights come on.
At dark ambient light levels, the automatic lighting control feature turns on the headlights, regardless of the number of wiper sweeps.
You can change the headlight auto off timer setting.
Customized Features P. 359
Fog Lights
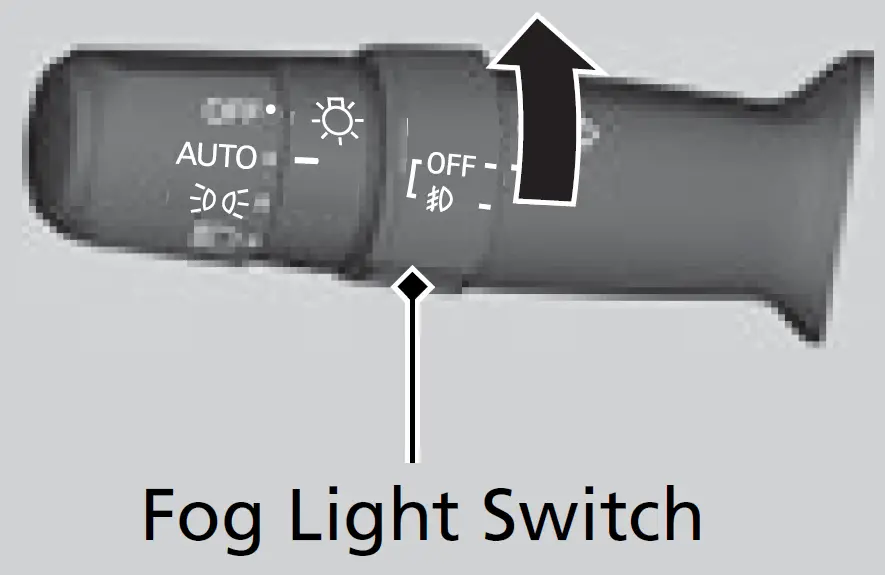
When the low beam headlights are on, turn the fog light switch on to use the fog lights.
ChicaneTM Daytime Running Lights
The parking/daytime running lights come on when the following conditions have been met:
The lights remain on even if you set the parking brake. Setting the power mode to VEHICLE OFF will turn off the daytime running lights.
The daytime running lights are off once the headlight switch is turned on, or when the headlight switch is in AUTO and it is getting darker outside.
- The power mode is in ON.
The headlight switch is AUTO or
The parking brake is released.
Auto High-Beam
The front wide view camera detects the light sources ahead of the vehicle such as the lights of a preceding or oncoming vehicle, or street lights. When you are driving at night, the system automatically switches the headlights between low beam and high beam depending on the situation.

How to Use the Auto High-Beam
When all of the following conditions have been met, the auto high-beam indicator comes on and the auto high-beam is activated.
- The power mode is in ON.
The light switch is in AUTO.
The lever is in the low beam position.
The headlights have been automatically activated.
It is dark outside the vehicle. 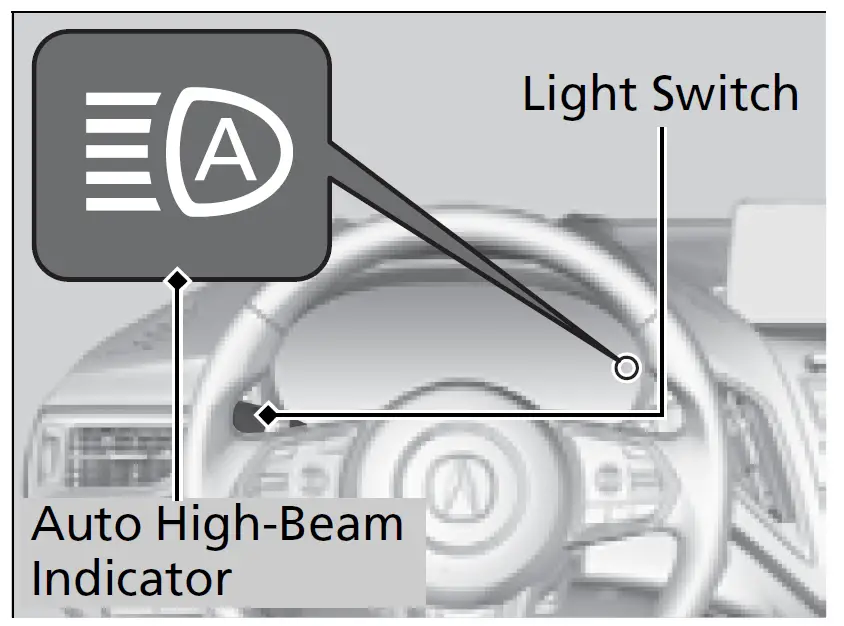
If the auto high-beam indicator does not come on even when all the conditions have been met, carry out the following procedure and the indicator will come on.
Pull the lever toward you for flashing the high beams then release it while driving.
The auto high-beam system does not always operate in every situation. This system is just for assisting the driver. Always observe your surroundings and switch the headlights between high beam and low beam manually if necessary.
If you find the timing of beam changes inconvenient for driving, change the headlight beams manually.
The range and the distance at which the camera can recognize varies depending on conditions surrounding your vehicle.
Regarding the handling of the camera mounted to the inside of the windshield, refer to the following.
For the auto high-beam to work properly:
- Do not place an object that reflects light on the dashboard.
Keep the windshield around the camera clean.
When cleaning the windshield, be careful not to apply the windshield cleanser to the camera lens.
Do not attach an object, sticker or film to the area around the camera.
Do not touch the camera lens.
If the camera receives a strong impact, or repairing of the area near the camera is required, consult a dealer.
Automatic switching between high-beam and low-beam
When auto high-beam is active, the headlights switch between high beam and low beam based on the following conditions.
Switching to high beam:
All of the following conditions must be met before the high beams turn on.
Your vehicle speed is 25 mph (40 km/h) or more.
There are no preceding or oncoming vehicle with headlights or taillights turned on.
There are few street lights on the road ahead.
Switching to low beam:
One of the following conditions must be met before the low beams turn on.
- Your vehicle speed is 15 mph (24 km/h) or less.
There is a preceding or oncoming vehicle with headlights or taillights turned on.
There are many street lights on the road ahead.
In the following cases, the auto high-beam system may not switch the headlights properly or the switching timing may be changed. In case of the automatic switching operation does not fit for your driving habits, please switch the headlights manually.
- The brightness of the lights from the preceding or oncoming vehicle is intense or poor.
Visibility is poor due to the weather (rain, snow, fog, windshield frost, etc.).
Surrounding light sources, such as street lights, electric billboards and traffic lights are illuminating the road ahead.
The brightness level of the road ahead constantly changes.
The road is bumpy or has many curves.
A vehicle suddenly appears in front of you, or a vehicle in front of you is not in the preceding or oncoming direction.
Your vehicle is tilted with a heavy load in the rear.
A traffic sign, mirror, or other reflective object ahead is reflecting strong light toward the vehicle.
The oncoming vehicle frequently disappears under roadside trees or behind median barriers.
The preceding or oncoming vehicle is a motorcycle, bicycle, mobility scooter, or other small vehicle.
The auto high-beam system keeps the headlight low beam when:
- Windshield wipers are operating at a high speed.
The camera has detected a dense fog.
How to Turn Off the Auto High-Beam
To turn the system off:
With the light switch is in AUTO, pull the lever toward you and hold it for at least 40 seconds. After the auto high-beam indicator light blinks twice, release the lever.
To turn the system on:
With the light switch is in AUTO, pull the lever toward you and hold it for at least 30 seconds. After the auto high-beam indicator light blinks once, release the lever.
If the Some Driver Assist Systems Cannot Operate: Camera Temperature Too High message appears:
- Use the climate control system to cool down the interior and, if necessary, also use defroster mode with the airflow directed toward the camera.
- Start driving the vehicle to lower the windshield temperature, which cools down the area around the camera.
If the Some Driver Assist Systems Cannot Operate: Clean Front Windshield message appears:
- Park your vehicle in a safe place, and clean the windshield. If the message does not disappear after you have cleaned the windshield and driven for a while, have your vehicle checked by a dealer.
If you turn the auto high-beam system off, the system does not operate until you turn the system on.
Park in a safe place before turning the system off or on.
- Wipers and Washer
- Windshield Wiper/Washer
 The windshield wipers and washers can be used when the power mode is in ON.
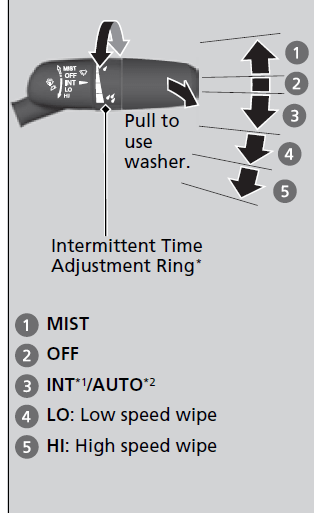
- MIST
The wipers run at high speed until you release the lever. - Wiper switch (OFF, INT*1/AUTO*2, LO, HI)
Move the lever up or down to change the wiper settings.
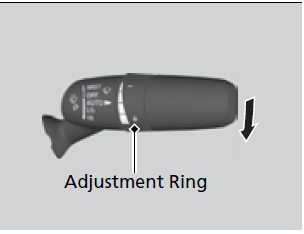
Adjusting wiper operation*
Turn the adjustment ring to adjust the wiper operation.
Lower speed, fewer sweeps
![]()
Higher speed, more sweeps
Washer
Sprays while you pull the lever toward you. When you release the lever for more than one second, the spray stops, the wipers sweep two or three more times to clear the windshield, then stop.
NOTICE
Do not use the wipers when the windshield is dry. The windshield will get scratched, or the rubber blades will get damaged.
NOTICE
Turn the washers off if no washer fluid comes out. The pump may get damaged.
NOTICE
In cold weather, the blades may freeze to the windshield.
Operating the wipers in this condition may damage the wipers. Use the defogger to warm the windshield, then turn the wipers on.
Automatic Intermittent Wipers*
When you push the lever down to AUTO, the windshield wipers sweep once, and go into the automatic mode.
The wipers operate intermittently, at low speed, or at high speed and stop in accordance with the amount of rainfall the rainfall sensor detects.
Auto sensitivity adjustment
When the wiper function is set to AUTO, you can adjust the sensitivity of the rainfall sensor (using the adjustment ring) so that wipers will operate in accordance with your preference.
Sensor sensitivity
Low sensitivity

High sensitivity
The rainfall sensor is in the location shown below.

NOTICE
AUTO should always be turned OFF before the following situations in order to prevent severe damage to the wiper system:
- Cleaning the windshield
Driving through a car wash
No rain present
Rear Wiper/Washer
The rear wiper and washer can be used when the power mode is in ON.
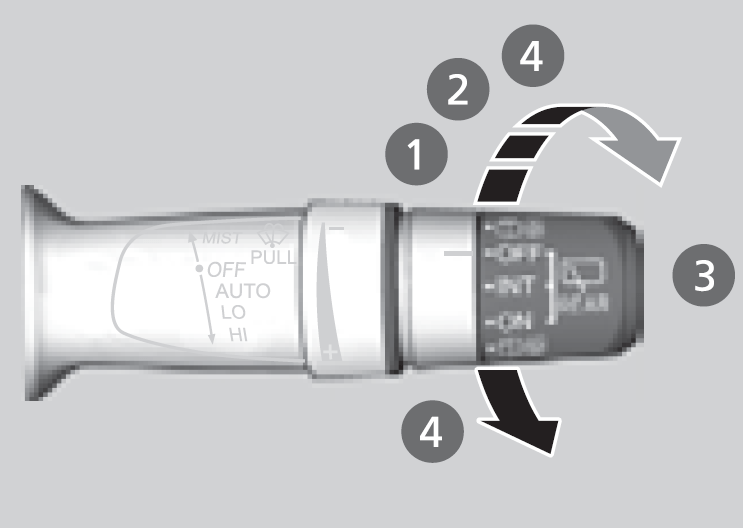
INT: Intermittent
ON: Continuous wipe
OFF
Washer
Wiper switch (OFF, INT, ON)
Change the wiper switch setting according to the amount of rain.
Washer ( *)
Sprays on the rear window and rearview camera* while you rotate the switch to this position.
Hold it to activate the rear wiper and to spray the washer. Once released, the washer spray will stop and the rear wiper will return to its selected switch setting after a few sweeps.
Operating in reverse
When you select the transmission to (R with the windshield wipers activated, the rear wiper operates automatically as follows even if its switch is off.
Rear Defogger/Heated Door Mirror Button
Press the rear defogger and heated door mirror button to defog the rear window and mirrors* when the power mode is in ON.
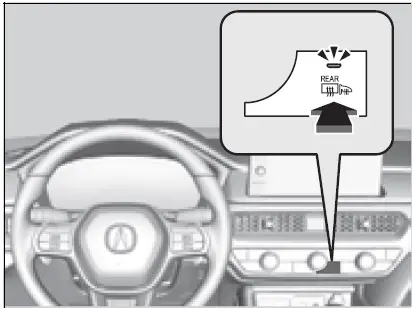 The rear defogger and heated door mirror automatically switch off after 10-30 minutes depending on the outside temperature. However, if the outside temperature is 32°F (0°C) or below, it does not automatically switch off.
This system consumes a lot of power, so turn it off when the window has been defogged.
Also, do not use the system for a long time while the engine is idling. This may weaken the battery, making it difficult to start the engine.
When the power mode is set to ON and the outside temperature is below 41°F (5°C), the heated door mirror may automatically activate for 10 minutes.
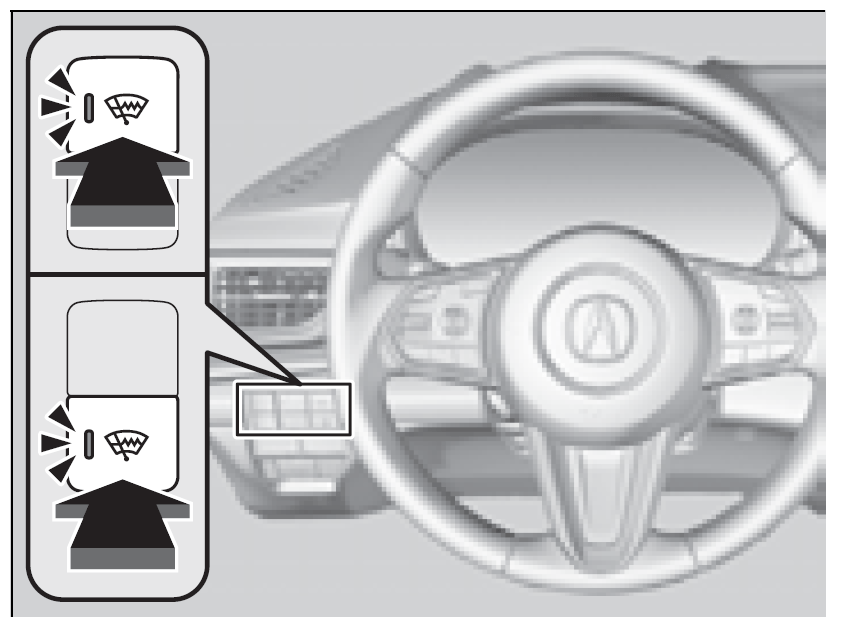
Heated Windshield Button*
Press the heated windshield button to deice the windshield at the wiper park area and along the driver side edge of the windshield when the power mode is in ON.
The heated windshield will automatically switch off after 15 minutes.
This system consumes a lot of power, so turn it off when the window has been deiced. Also, do not use the system for a long period when the engine is idling. This may weaken the battery, making it difficult to start the engine.
When the power mode is set to ON and the outside temperature is below 39°F (4°C), the heated windshield may automatically activate for up to 15 minutes.
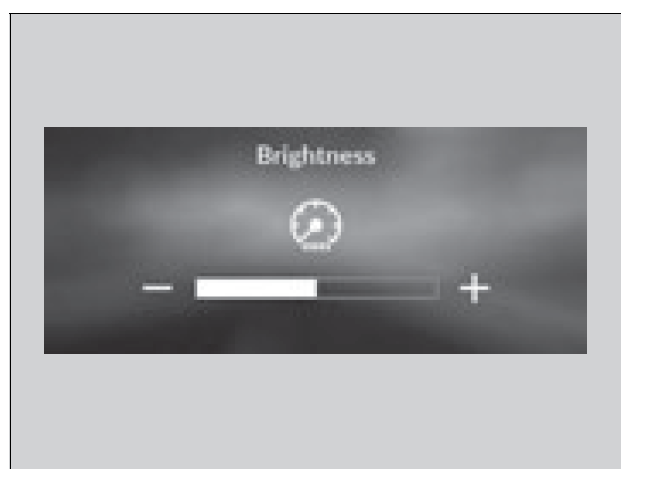
Brightness Control
Adjusting the Instrument Panel Brightness
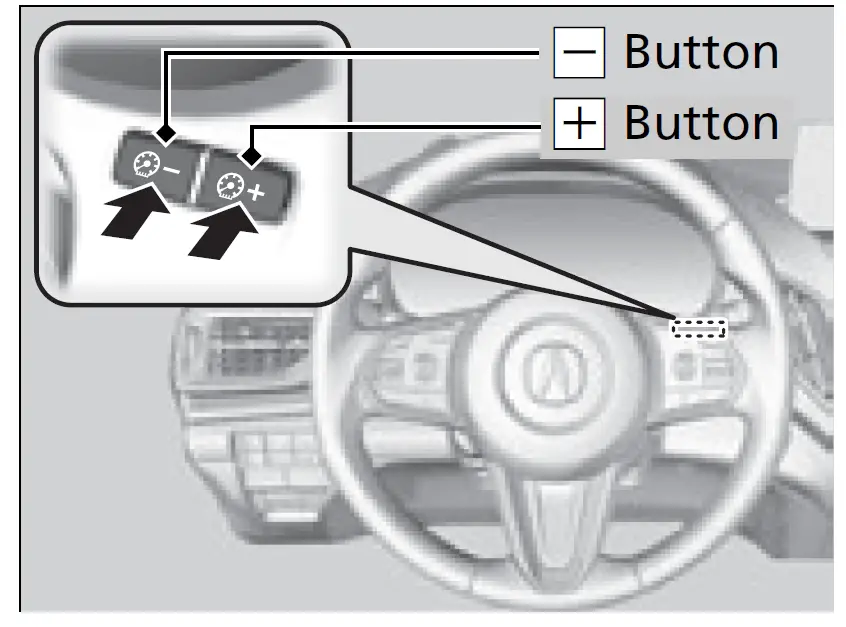
When the power mode is in ON, you can use the (+ or (- button to adjust instrument panel brightness.
Brighten: Press the (+ button.
Dim: Press the (- button.
You will hear a beep when the brightness reaches minimum or maximum. Several seconds after adjusting the brightness, you will be returned to the previous screen.
Brightness level indicator
The brightness level is shown on the display while you are adjusting it.

The brightness of the instrument panel will be reduced when the following conditions:
- The power mode is in ON.
The light switch is in any position other than off and it is dark outside.
The brightness can be set differently for when the exterior lights are on, and when they are off.
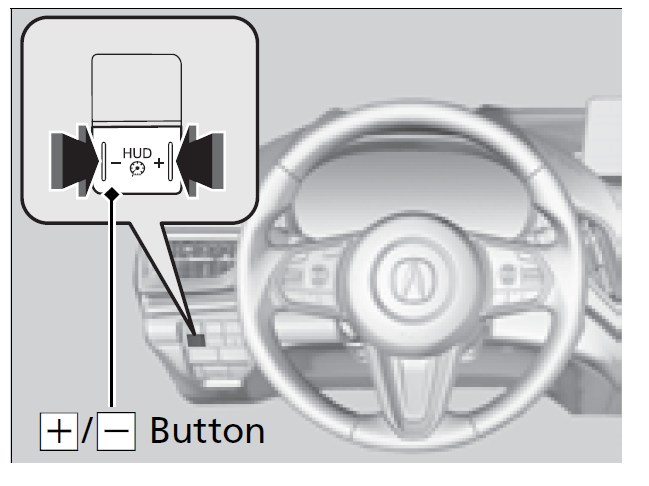
Adjusting the Head-Up Display Brightness*
When the power mode is in ON, you can use the (+/(- button to adjust head-up display brightness.
Brighten: Press the (+ button.
Dim: Press the (- button.
The head-up display will return to its original state several seconds after adjusting the brightness.
Brightness level indicator
The brightness level is shown on the display while you are adjusting it.
Driving Position Memory System
You can store two driver’s seat positions (except for power lumbar) with the driving position memory system.
When you unlock and open the driver’s door with a keyless remote, or keyless access system, the seat adjusts to retracted positions of one of the two preset positions automatically.
The seat will move to the stored position when you set the power mode to ACCESSORY.
- DRIVER 1 transmitter is linked to memory button 1.
DRIVER 2 transmitter is linked to memory button 2. 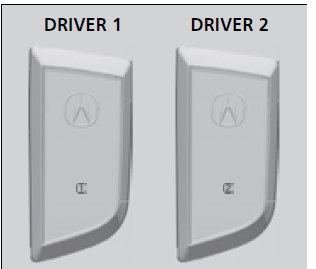
The driver’s seat moves rearward depending on the set seating position once you
- Stop the vehicle.
Put the transmission in (P (continuously variable transmission).
Turn the engine off.
Open the driver’s door.
Once the power mode is in the ACCESSORY position, the driver’s seat moves forward to the DRIVER 1 or 2 preset position. - Using the audio/information screen, you can disable the automatic seat adjustment function.
Customized Features P. 359
The driver’s seat easy exit feature can be turned ON/OFF.
Customized Features P. 359
System Operation
The system will not operate if:
-
- Either memory button is pressed while the seat is in motion.
- The seat positions are adjusted while in operation.
- Either of the memorized positions is set fully to the rear.
The system may not recognize a key if:
- The key is in close proximity to a cell phone or other wireless device.
Both keys are in the vehicle at the same time.
The Driving Position Memory System is disabled in customized features.
Opening driver’s door without fully grabbing door handle.
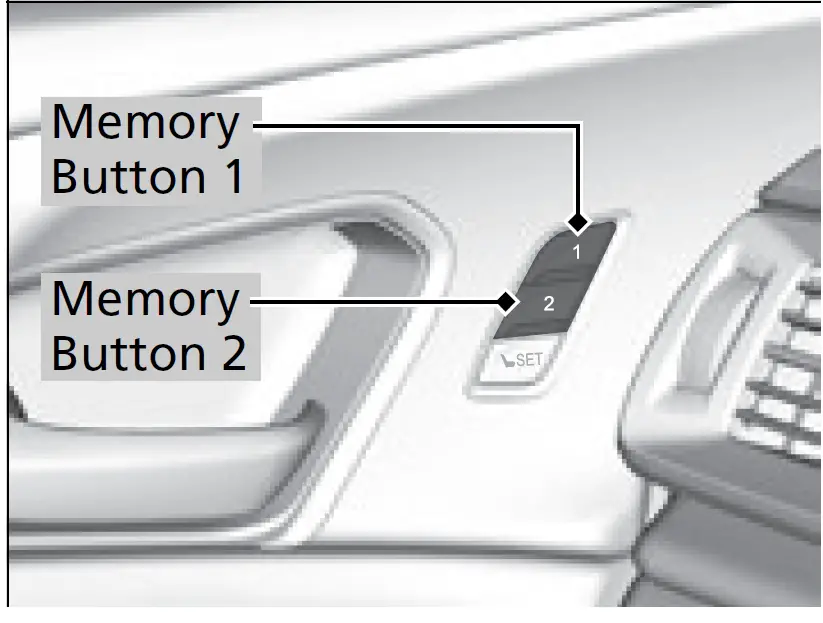
Storing a Position in Memory
- Set the power mode to ON. Adjust the driver’s seat to the desired position.
- Press the SET button.
- The memory button indicator lights will come on.
- Press the memory button (1 or (2 within five seconds of pressing the SET button.
- Once the se

- After you press the SET button, the storing operation will be canceled when:
- You do not press the memory button within five seconds.
You readjust the seat position before the double-beep.
You set the power mode to any position except ON.
- You do not press the memory button within five seconds.
Recalling the Stored Position
 Continuously variable transmission models
- Put the transmission into (P.
- Press a memory button ((1 or (2).
Manual transmission models
- Apply the parking brake.
- Press a memory button ((1 or (2).
The seat will automatically move to the memorized position.
The seat will stop moving if you:
- Press the SET button or memory button (1 or (2.
Adjust the seat position.
Put the transmission into a position other than (P (continuously variable transmission).
Release the parking brake (manual transmission).
Adjusting the Steering Wheel
The steering wheel height and distance from your body can be adjusted so that you can comfortably grip the steering wheel in an appropriate driving posture.
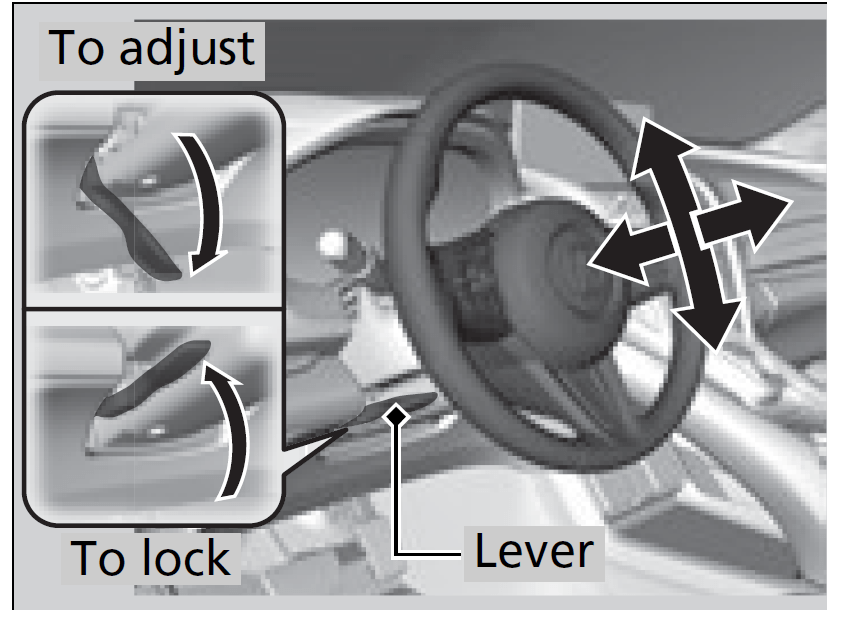
- While the vehicle is stopped, push the steering wheel adjustment lever down.
- The steering wheel adjustment lever is under the steering column.
- Move the steering wheel up or down, and in or out.
- Make sure you can see the instrument panel gauges and indicators.
- Pull the steering wheel adjustment lever up to lock the steering wheel in position.
- After adjusting the position, make sure you have securely locked the steering wheel in place by trying to move it up, down, in, and out.
WARNING
Adjusting the steering wheel position while driving may cause you to lose control of the vehicle and be seriously injured in a crash.
Adjust the steering wheel only when the vehicle is stopped.
Mirrors
Interior Rearview Mirror
Adjust the angle of the rearview mirror when you are sitting in the correct driving position.
Keep the inside and outside mirrors clean and adjusted for best visibility.
Adjust the mirrors before you start driving.
Front Seats P. 216
Automatic Dimming Rearview Mirror
When you are driving after dark, the automatic dimming rearview mirror reduces the glare from headlights behind you. Press ![]() the button to turn this function on and off.
the button to turn this function on and off.
When activated, the indicator ![]() comes on.
comes on.
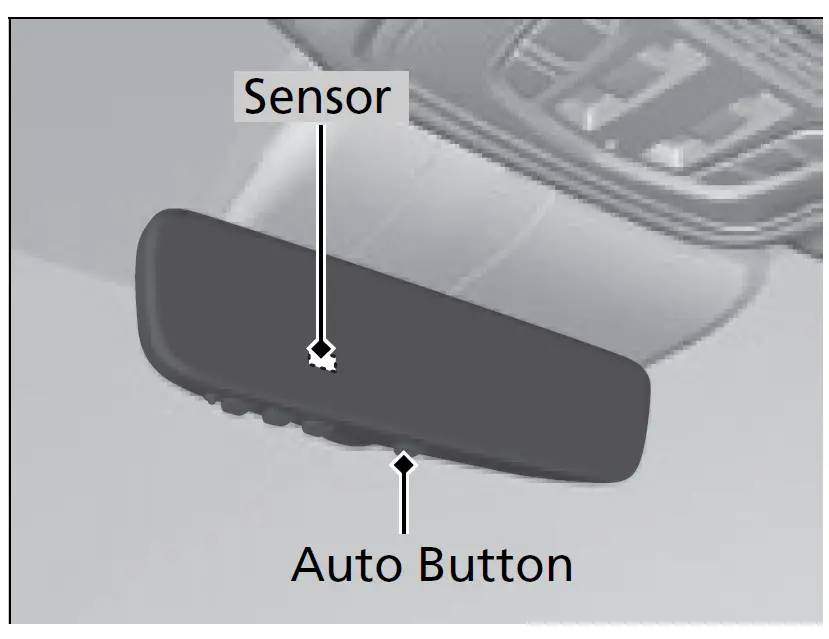
The auto dimming function cancels when the transmission is in (R.
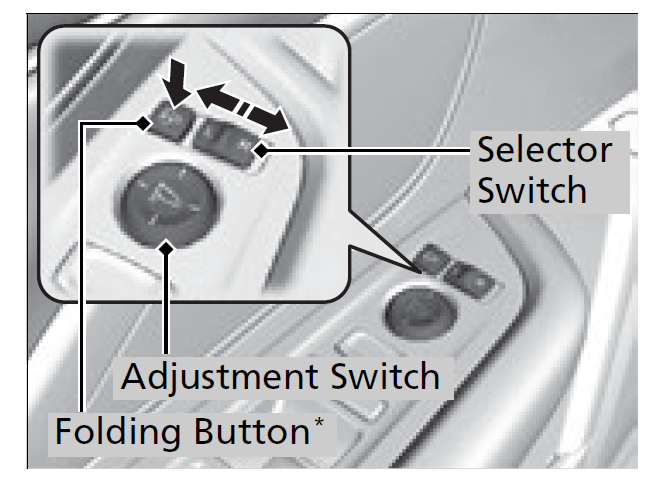
Power Door Mirrors
You can adjust the door mirrors when the power mode is in ON.
Mirror position adjustment
L/R selector switch: Select the left or right mirror. After adjusting the mirror, return the switch to the center position.
Mirror position adjustment switch: Press the switch left, right, up, or down to move the mirror.
Reverse Tilt Door Mirror*
If activated, the passenger side door mirror automatically tilts downward when you put the transmission into (R; this improves close-in visibility on the passenger side of the vehicle when backing up. The mirror automatically returns to its original position when you take the transmission out of (R.
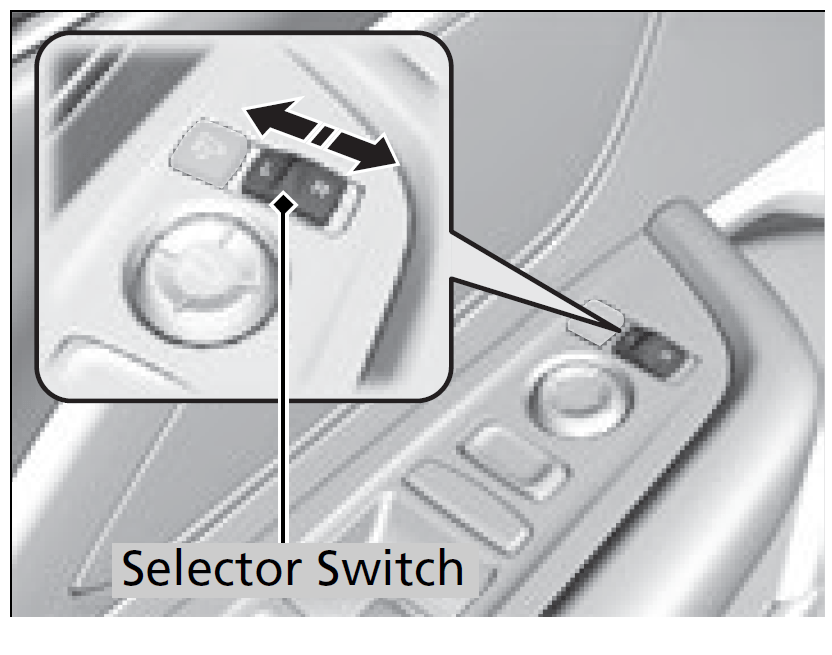 If activated, either side door mirror automatically tilts downward when you put the transmission into (R; this improves close-in visibility on the selected side of the vehicle when backing up. The mirror automatically returns to its original position when you take the transmission out of (R.
To activate this feature, set the power mode to ON and slide the selector switch to the left or right side.
Automatic Folding Door Mirror Function*
Folding in the door mirrors
Lock the driver’s door with the key, press the lock button on the keyless remote, touch the door lock sensor on any door, or press the lock button on the tailgate outer handle.
The mirrors start folding in automatically.
Folding out the door mirrors
Unlock the driver’s door using the key, keyless remote or keyless access system.
The mirrors start folding out automatically.
You cannot turn the automatic folding out automatically if they have been folded in using the folding button.
You can turn the automatic folding door mirror function on and off.
2 Customized Features P. 359
Door mirrors will not fold automatically when locking from inside the vehicle using lock tab or master door lock switch.
Seats
Front Seats
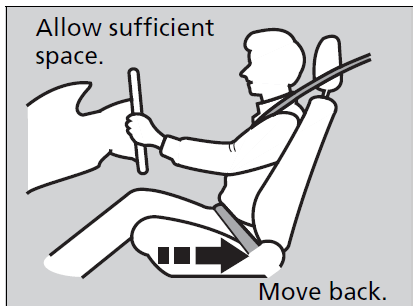
Adjust the driver’s seat as far back as possible while allowing you to maintain full control of the vehicle. You should be able to sit upright, well back in the seat and be able to adequately press the pedals without leaning forward, and grip the steering wheel comfortably. The passenger’s seat should be adjusted in a similar manner, so that it is as far back from the front airbag in the dashboard as possible.
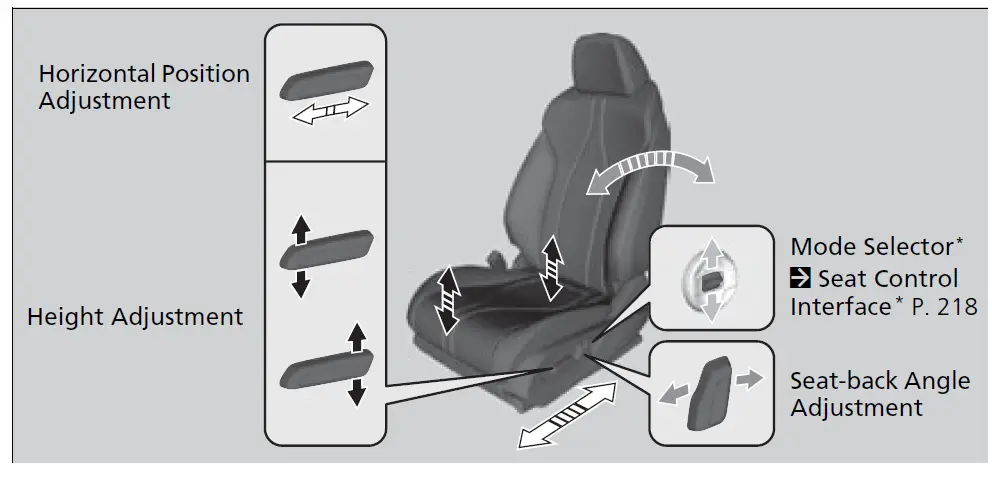
Adjusting the Seat Positions
Adjusting the front power seat(s*)
Always make seat adjustments before driving.
WARNING
Sitting too close to a front airbag can result in serious injury or death if the front airbags inflate.
Always sit as far back from the front airbags as possible while maintaining control of the vehicle.
The National Highway Traffic Safety Administration and Transport Canada recommend that drivers allow at least 10 inches (25 cm) between the center of the steering wheel and the chest.
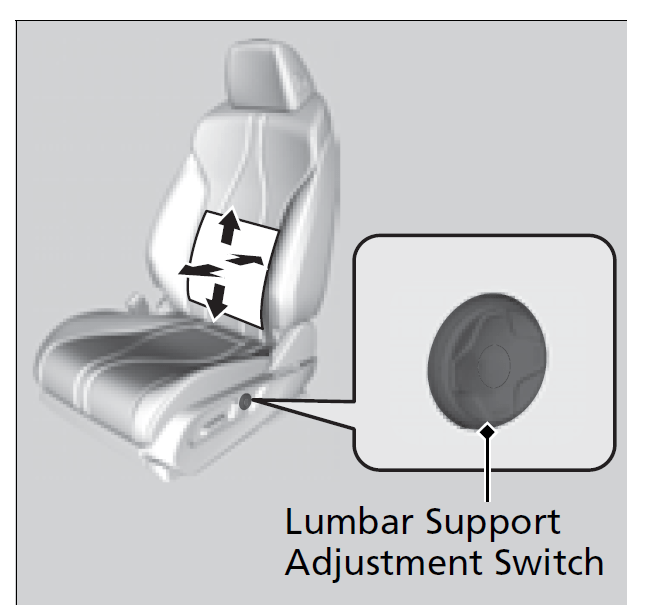
Lumbar Support Adjustment Switch* Press the top: To move the lumbar support up.
Press the bottom: To move the lumbar support down.
Press the front: To increase the entire lumbar support.
Press the rear: To decrease the entire lumbar support.
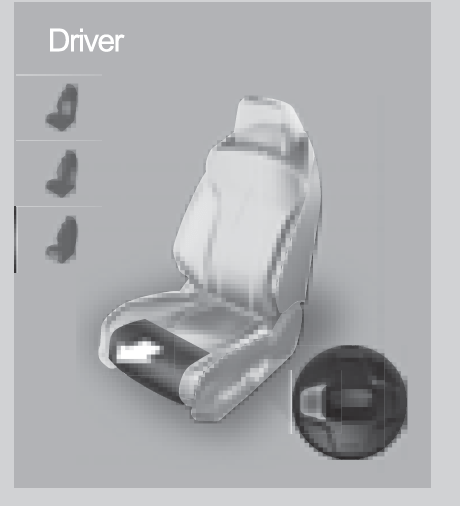
Seat Control Interface*
Press the mode selector up or down to display seat adjustment information on the audio/information screen, and then use the adjustment switch to adjust the lumbar support, bolster support or thigh support.
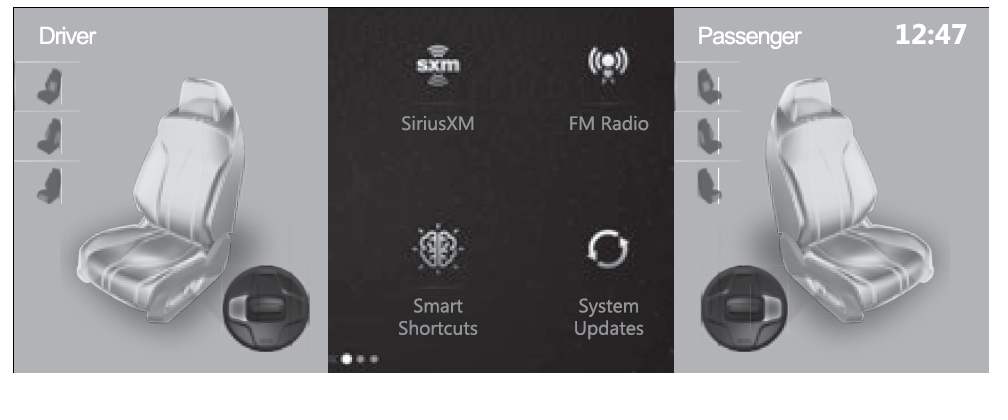
The image of each adjustment mode displayed on the audio/information screen:
Lumbar support

Thigh support
 Thigh support
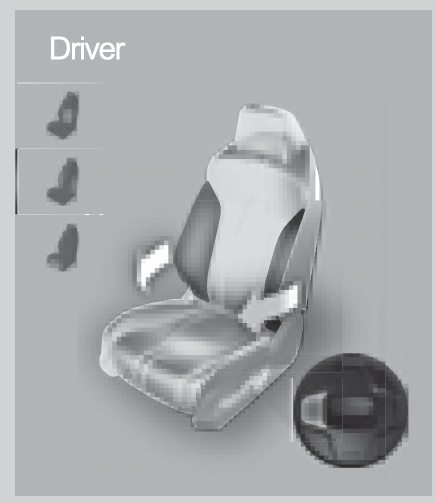
- Press the mode selector up or down to select the lumbar support adjustment mode, bolster support adjustment mode or thigh support adjustment mode.
- Press the adjustment switch as follow.
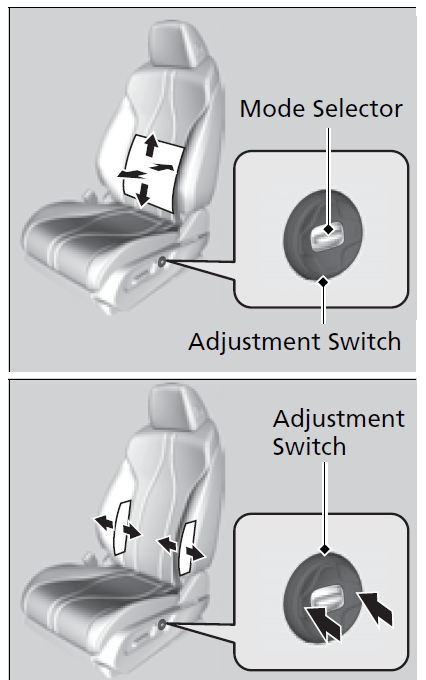
To adjust the lumbar support:
Press the top: To move the lumbar support up.
Press the bottom: To move the lumbar support down.
Press the front: To increase the entire lumbar support.
Press the rear: To decrease the entire lumbar support.
To adjust the bolster support:
Press the front: To increase the bolster support.
Press the rear: To decrease the bolster support.
The lumbar support, bolster support and thigh support can be adjusted even when the power mode is in VEHICLE OFF. However, the adjusting mode display does not come on with the power mode in VEHICLE OFF.
To adjust the thigh support:
Press the front: The tucked-down seat cushion end rolls out to support your thighs. Press the rear: The tucked-down seat cushion end rolls in to support your thighs.

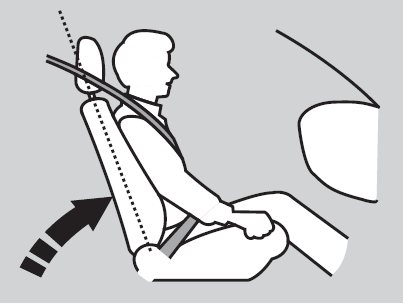
Adjusting the Seat-Backs
Adjust the driver’s seat-back to a comfortable, upright position, leaving ample space between your chest and the airbag cover in the center of the steering wheel.
The front seat passenger should also adjust their seat-back to a comfortable, upright position.
Reclining a seat-back so that the shoulder part of the belt no longer rests against the occupant’s chest reduces the protective capability of the belt. It also increases the chance of sliding under the belt in a crash and being seriously injured. The farther a seat-back is reclined, the greater the risk of injury.
WARNING
Reclining the seat-back too far can result in serious injury or death in a crash.
Adjust the seat-back to an upright position, and sit well back in the seat.
Do not put a cushion, or other object, between the seat-back and your back.
Doing so may interfere with proper seat belt or airbag operation.
If you cannot get far enough away from the steering wheel and still reach the controls, we recommend that you investigate whether some type of adaptive equipment may help.
Rear Seats
Folding Down the Rear Seats
Separately fold down the left and right halves of the rear seat to make room for cargo.
To fold down the seat
- Lower the head restraints to their lowest position. Put the armrest back into the seat-back.
From the rear door side
Pull the release lever.
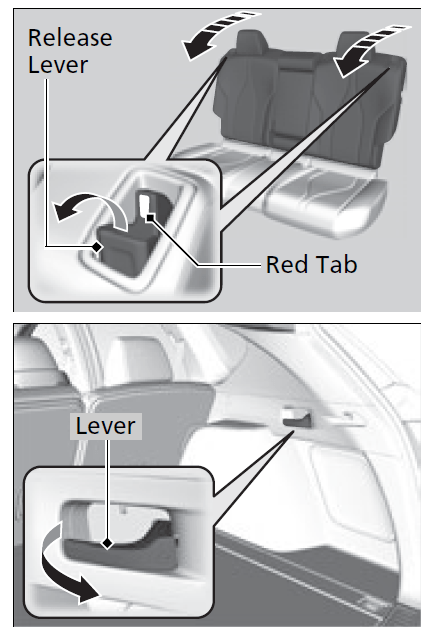 From the cargo area side
Pull the release lever.
Make sure all items in the cargo area or items extending to the rear seats are properly secured. Loose items can fly forward if you have to brake hard.
Remove any items from the rear seat cushion and floor before you fold down the rear seat.
The rear seat-back(s) can be folded down to accommodate bulkier items in the cargo area.
When you fold down one side of the rear seats and use the non-recessed part of the cargo area, make sure to secure the cargo. Loose items can fly forward and cause injury if you have to brake hard.
Make sure that the folded seat-back does not press against the front passenger seat, as this can cause the weight sensors in the front passenger seat to work improperly.
Passenger Airbag Off Indicator P. 61
The front seat(s) must be far enough forward so they do not interfere with the rear seats as they fold down.
To return the seat to the original position
Pull up the seat-back in the upright position.
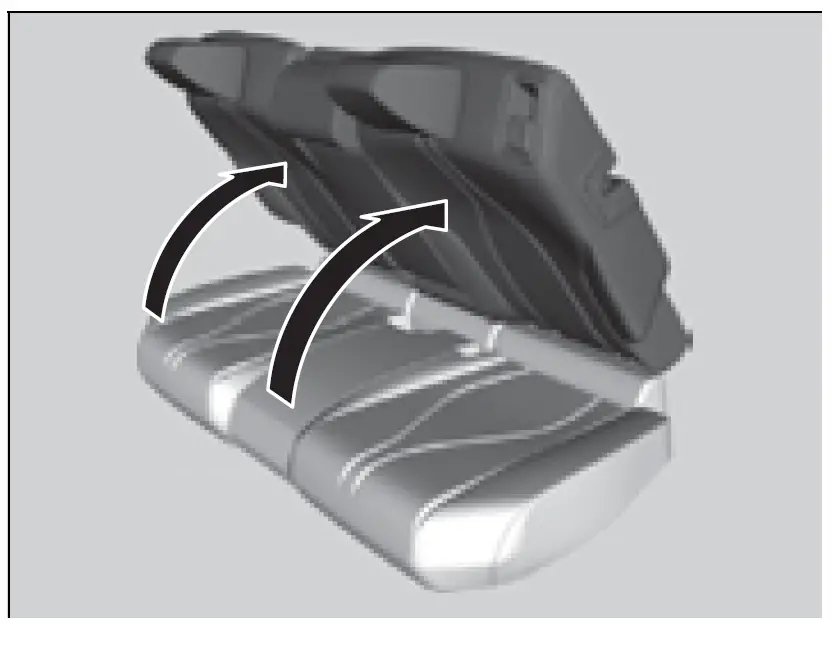
Make sure the seat-back, head restraints and seat cushion are securely latched back into place before driving. Also, make sure all rear shoulder belts are positioned in front of the seat-back.
To lock a seat-back upright, push it backwards until it locks, so that the red tabs in the release lever go down.
When returning the seat-back to its original position, push it firmly back.
Rear Seat Reminder
This feature alerts you to the possible presence of passengers or items in the rear seats before you exit the vehicle. It activates when the power mode is set to VEHICLE OFF if the rear doors were opened shortly before or after the power mode was set to ON. A reminder appears on the driver information interface and an alert will sound when the power mode is set to VEHICLE OFF
When the power mode is set to VEHICLE OFF, the reminder comes on briefly, then the function is deactivated.
The reminder will not work if the power mode has not been set to ON within 10 minutes of operating the rear doors.
The system does not detect passengers in the rear seats. Instead, it can detect when a rear door is opened and closed, indicating that there may be something in the rear seats.
You can turn off the notification setting.
Customized Features P. 359
Head Restraints
Your vehicle is equipped with head restraints in all seating positions.
Adjusting the Front and Rear Outer Head Restraint Positions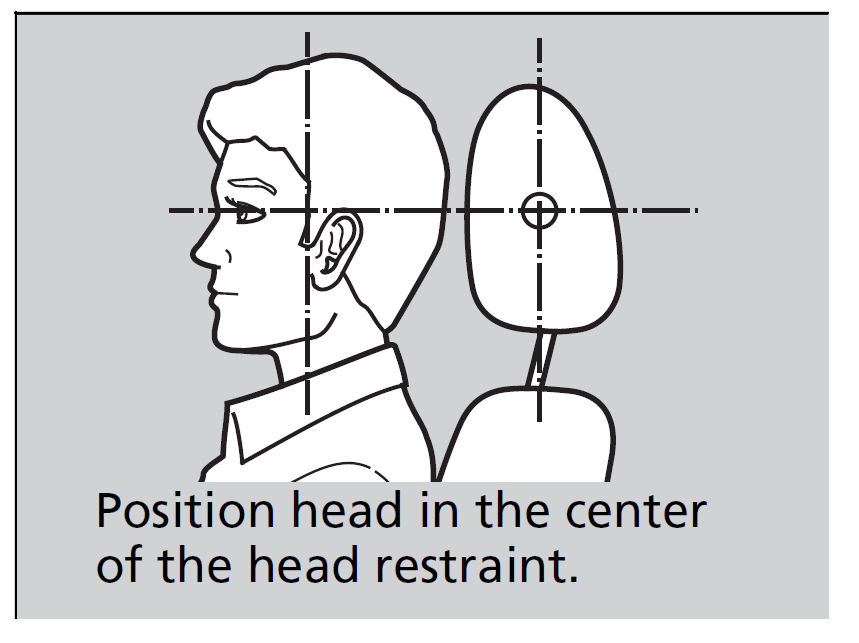
Head restraints are most effective for protection against whiplash and other rear-impact crash injuries when the center of the back of the occupant’s head rests against the center of the restraint. The tops of the occupant’s ears should be level with the center height of the restraint.
WARNING
Improperly positioning head restraints reduces their effectiveness and increases the likelihood of serious injury in a crash.
Make sure head restraints are in place and positioned properly before driving.
In order for the head restraint system to work properly:
- Do not hang any items on the head restraints, or from the restraint legs.
- Do not place any objects between an occupant and the seat-back.
- Install each restraint in its proper location.
To raise the head restraint: Pull it upward.
To lower the head restraint: Push it down while pressing the release button.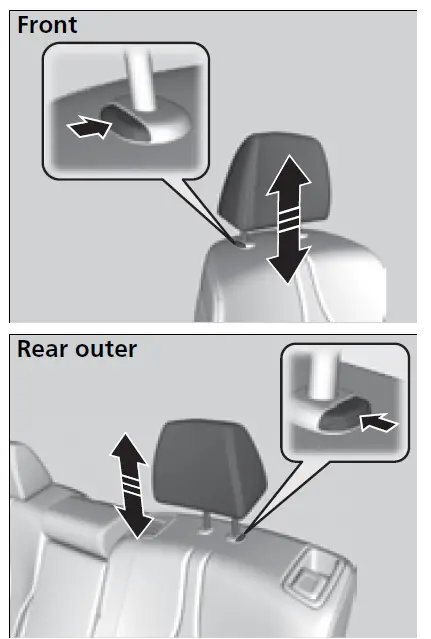
To adjust the front head restraint forward:
Push the back of it forward.
To return the front head restraint to the original position:
Press the release button. 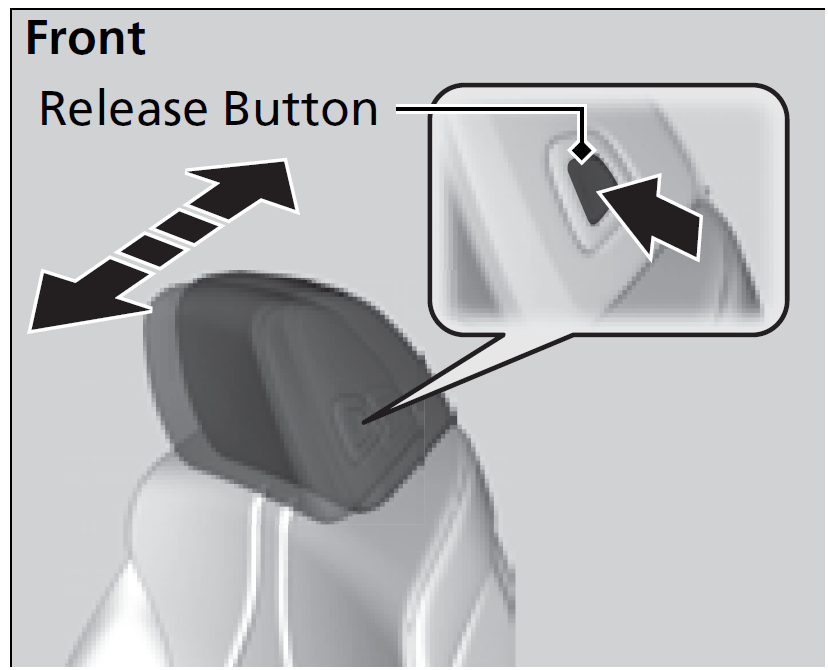
Changing the Rear Center Seat Head Restraint Position
A passenger sitting in a center back seating position should adjust the height of their head restraint to an appropriate position before the vehicle begins moving.
To raise the head restraint:
Pull it upward.
To lower the head restraint:
Push it down while pressing the release button. 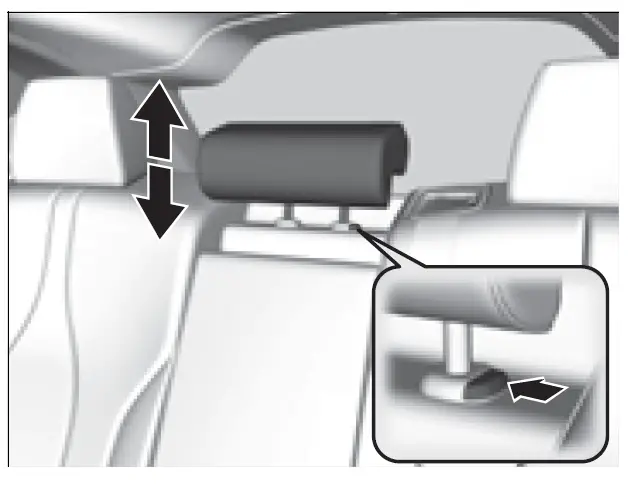
Removing and Reinstalling the Head Restraints
Head restraints can be removed for cleaning or repair.
To remove a head restraint:
Pull the restraint up as far as it will go. Then, push the release button and pull the restraint up and out.
To reinstall a head restraint:
Insert the legs back in place, then adjust the head restraint to an appropriate height while pressing the release button. Pull up on the restraint to make sure it is locked in position.
WARNING
Failure to reinstall or correctly reinstall, the head restraints can result in severe injury during a crash.
Always replace the head restraints before driving.
Maintain a Proper Sitting Position
After all occupants have adjusted their seats and head restraints*, and put on their seat belts, it is very important that they continue to sit upright, well back in their seats, with their feet on the floor, until the vehicle is safely parked and the engine is off.
Sitting improperly can increase the chance of injury during a crash. For example, if an occupant slouches, lies down, turns sideways, sits forward, leans forward or sideways, or puts one or both feet up, the chance of injury during a crash is greatly increased.
In addition, an occupant who is out of position in the front seat can be seriously or fatally injured in a crash by striking interior parts of the vehicle or being struck by an inflating front airbag.
WARNING
Sitting improperly or out of position can result in serious injury or death in a crash.
Always sit upright, well back in the seat, with your feet on the floor.
Armrest
Using the Front Seat Armrest
 The console lid can be used as an armrest.
To adjust:
Pull the handle and slide the armrest to desired position.
Using the Rear Seat Armrest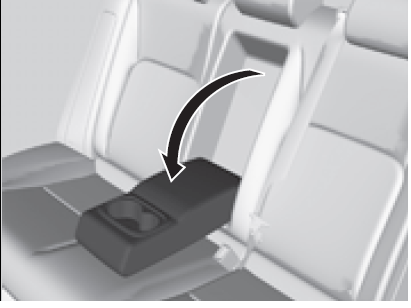
Pull down the armrest in the center backrest.
Interior Convenience Items
Interior Lights
Interior Light Switches
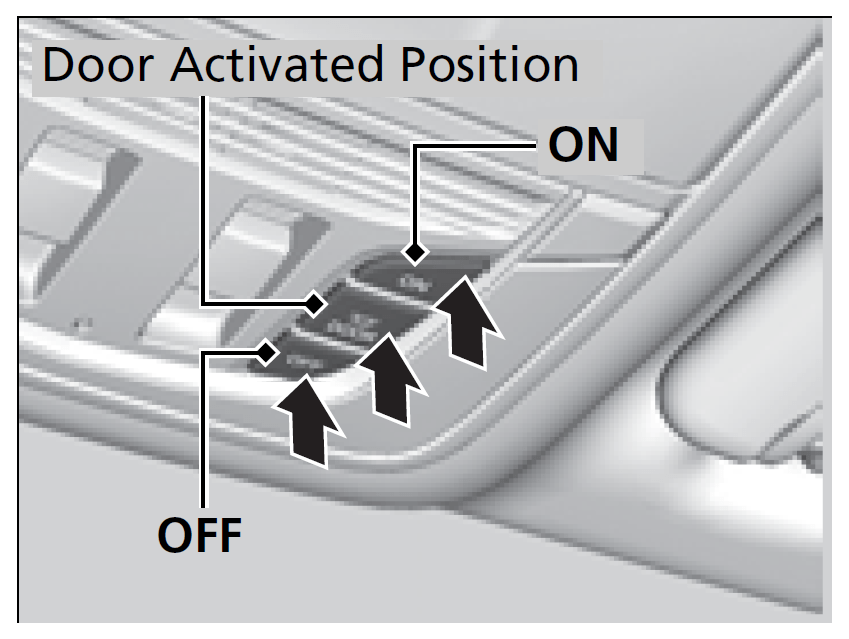
ON
The interior lights come on regardless of whether the doors are open or closed.
Door activated
The interior lights come on in the following situations:
- When any doors are opened.
You unlock the driver’s door.
When the power mode is set to VEHICLE OFF.
OFF
The interior lights remain off regardless of whether the doors are open or closed.
In the door activated position, the interior lights fade out and go off about 30 seconds after the doors are closed.
The lights go off after about 30 seconds in the following situations:
- When you unlock the driver’s door but do not open it.
When you set the power mode to VEHICLE OFF but do not open a door.
You can change the interior lights dimming time.
Customized Features P. 359
The interior lights go off immediately in the following situations:
- When you lock the driver’s door.
When you close the driver’s door in ACCESSORY mode. - When you set the power mode to ON.
To avoid draining the battery, do not leave the interior light on for an extended length of time when the engine is off.
If you leave any of the doors open in VEHICLE OFF mode, the interior lights go off after about 15 minutes.
Map Light Switches
Front
The map lights can be turned on and off by pressing the ![]() buttons.
buttons.
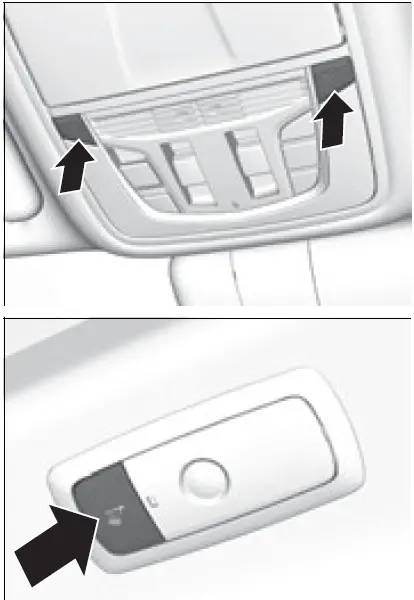
Rear
The map lights can be turned on and off by pressing the ![]() button when the interior light switch is in the door activated position.
button when the interior light switch is in the door activated position.
When the front interior light switch is in the door activated position and any door is open, the map light will not go off when you press the ![]() buttons.
buttons.
Cargo Area Light
The cargo area light comes on when you open the tailgate.
The cargo area light does not have an on/off switch. In case the tailgate is left open for an extended period of time, they automatically go out in 30 minutes.
Storage Items
Glove Box
Press the button to open the glove box. You can lock the glove box with the built-in key.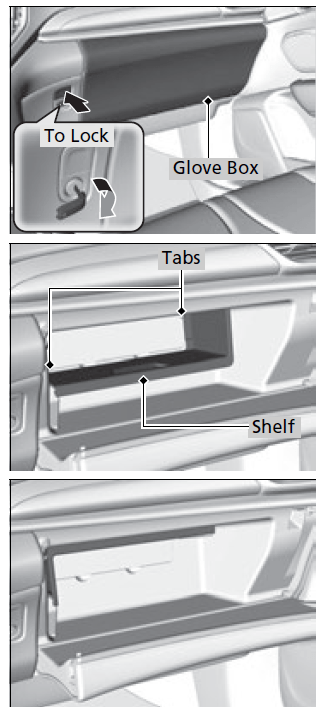 Removable shelf
The shelf in the glove box is detachable. To remove it, disengage the tabs.
The removable shelf can be stored upside down in the glove box.
WARNING
An open glove box can cause serious injury to your passenger in a crash, even if the passenger is wearing the seat belt.
Always keep the glove box closed while driving.
The glove box light comes on when the parking lights are on.
Console Compartment
Slide the armrest to the rearmost position. Pull the handle to open the console compartment.
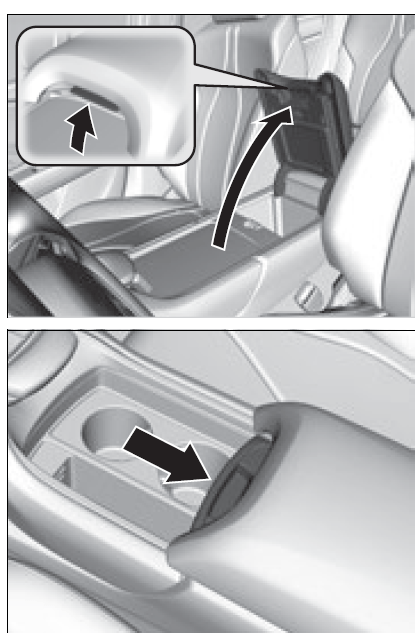 Slide the lid using the release knob to open or close the console compartment.
Beverage Holders
Front seat beverage holders
Are located in the console between the front seats.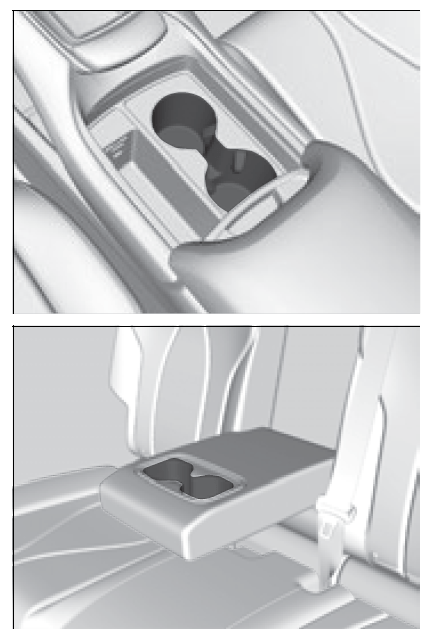
Rear seat beverage holders*
Fold the armrest down to use the rear seat beverage holders.
NOTICE
Spilled liquids damage the upholstery, carpeting, and electrical components in the interior.
Be careful when you are using the beverage holders. Hot liquid can scald you.
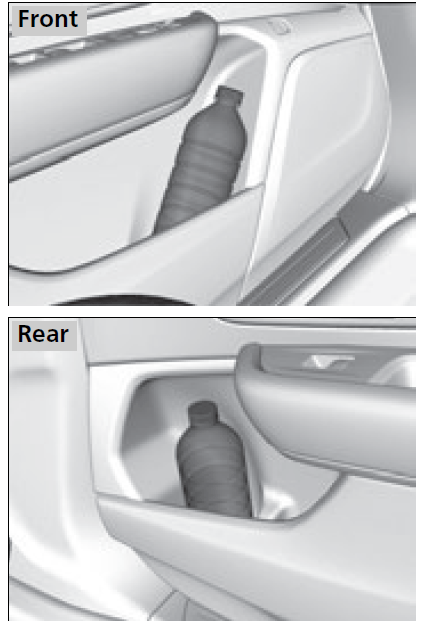
Door side beverage holders
Are located on the both of front and rear door side pockets.
Coat Hook
There are coat hooks on the rear grab handle of both sides. Pull it down to use it.
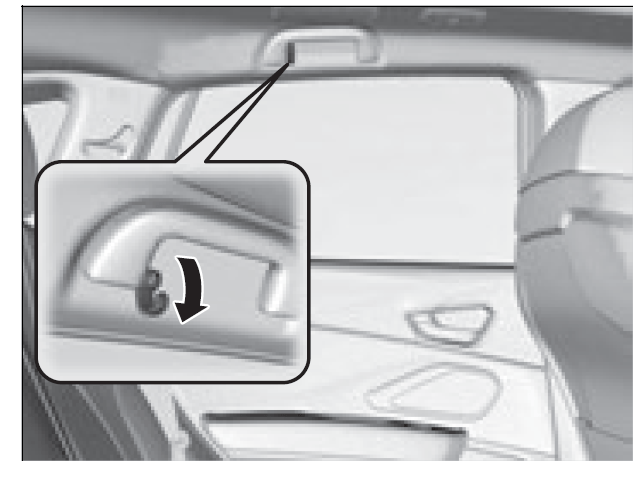 The coat hook is not designed for large or heavy items.
Tie-down Anchors
The tie-down anchors on the cargo area floor can be used to install a net for securing items.
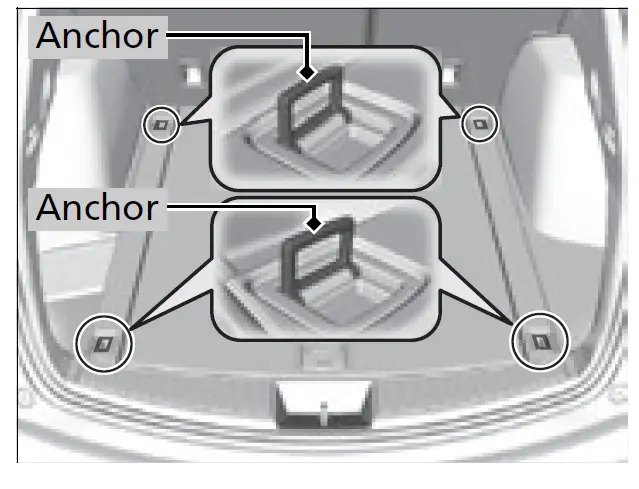
Do not let anyone access items in the cargo area while driving. Loose items can cause injury if you have to brake hard.
Under-Floor Storage Area
Pull the strap and open the lid.
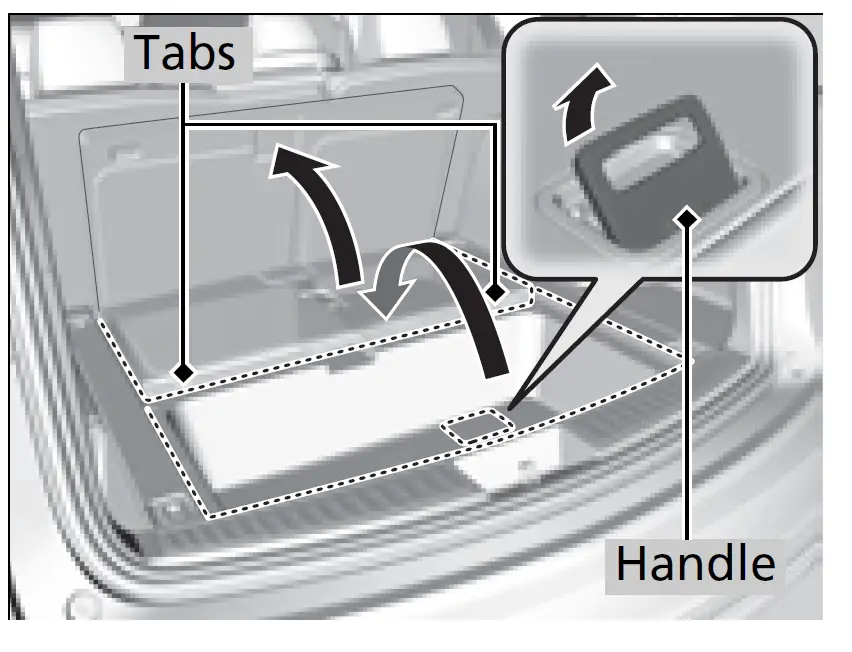 Sunglasses Holder
To open the sunglasses holder, press and release the indent. To close, press it again until it latches.
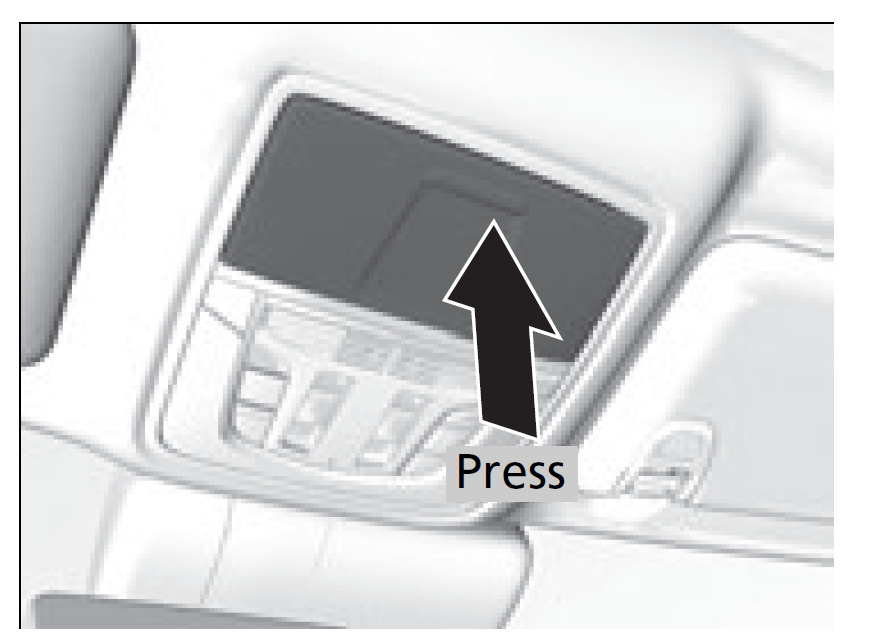
You can store eyeglasses and other small items in this holder.
Keep the holder closed while driving except when accessing stored items.
Other Interior Convenience Items
Accessory Power Socket
The accessory power socket can be used when the power mode is in ACCESSORY or ON.
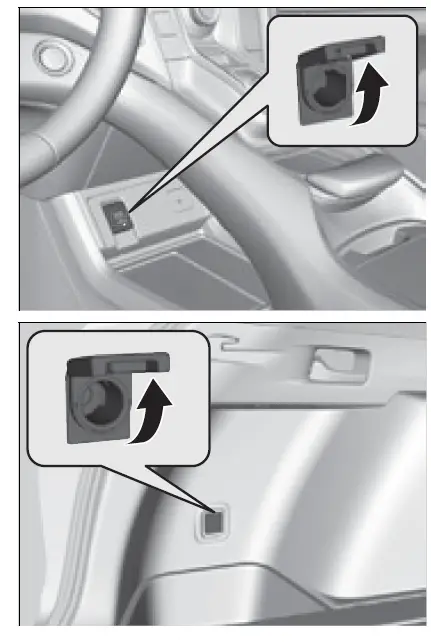 Accessory power socket (front panel)
- Open the cover to use it.
- Accessory power socket (cargo area)*
Open the cover to use it.
NOTICE
Do not insert an automotive type cigarette lighter element. This can overheat the accessory power socket.
The accessory power socket is designed to supply power for 12-volt DC accessories that are rated 180 watts (15 amps) or less.
To prevent battery drain, only use the accessory power socket with the engine running.
When the accessory power socket is not in use, close the cover to prevent any small foreign objects from getting into the accessory power socket.
Wireless Charger*
To use the wireless charger, the power mode must be in ACCESSORY or ON. Charge any devices compatible with Qi wireless charging on the area indicated by the![]() mark as follows:
mark as follows:
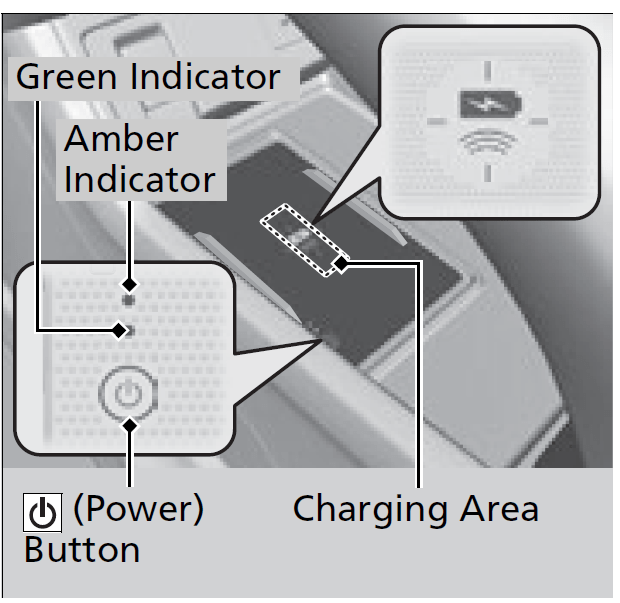
- To turn the system on and off, press and hold the
 (power) button.
- When the system is activated, the green indicator light comes on.
- Place the device you want to charge on the charging area.
- The system will automatically start charging the device and the amber indicator light will come on.
- Make sure that the device is compatible with the system and placed with the chargeable side in the center of the charging area.
- When charging is completed, the green indicator light will come on.
- Depending on the device, the amber indicator light will stay on.
RF Radiation Exposure Statement:
This equipment complies with FCC RF Radiation exposure limits set forth for an uncontrolled environment.
This device and its antenna must not be co-located or operating in conjunction with any other antenna or transmitter.
In order to use safely:
- Remove any metal objects from the charge pad before charging a device.
Do not open the charger case.
Do not use the charger if it malfunctions. Contact your dealer.
If the charger interferes with radio communications, attempt to correct the interference:
- Press and hold the switch on the charger for a few seconds to turn off the charger.
 appears on the audio/information screen when the device is being charged by the wireless charger.
When charging does not start
Perform one of the solutions in the following table.
| Indicator | Cause | Solution | |
| Green & Amber | Blinking simultaneously | There is an obstacle(s) between the charging area and the device. | Remove the obstacle(s). |
| The device is not within the charging area. | Pick up and reset the device to the center of the charging area where |
||
| The temperature of the wireless charger pad increases. | Temporarily suspend charging the device. Wait for the temperature to drop and attempt to charge the device again. | ||
| Amber | Blinking | The wireless charger is faulty. | Contact a dealer for repairs. |
CAUTION
Metal objects between the charge pad and the device to be charged will get hot and can burn you.
- Always remove foreign objects from the charge pad before charging the device. Be sure the surface is clear of dust and other debris before charging.
Do not spill liquids (i. e. water, drinks, etc.) on the charger and the device. - Do not use oil, grease, alcohol, benzine or thinner for cleaning the charge pad.
- Do not cover the system with towels, clothing, or other objects while charging etc.
Avoid spraying aerosols which may come in contact with the charge pad surface.
This system consumes a lot of power. Do not use the system for a long time when the engine is not running. This may weaken the battery, making it difficult to start the engine.
When using the wireless charger, check the user’s manual that came with the compatible device you want to charge.
The wireless charger can support up to 15 W, but the charging rate varies based on the device and other conditions.
NOTICE
Do not place any magnetic recording media or precision machines within the charging area while charging.
The data on your cards such as credit cards can be lost because of the magnetic effect. Also, precision machines such as watches can be affected.
“Qi” and marks are the registered trademarks owned by Wireless Power Consortium (WPC).
In the following cases, charging may stop or not start:
- The device is already fully charged.
The temperature of the device is extremely high while charging.
You are at a place that emits strong electromagnetic waves or noises, such as a TV station, electric power plant, or gas station.
The device has a cover, case or accessories which are not compatible with wireless charging.
A device may not charge if the size or shape of its chargeable side is not appropriate for use with the charging area.
Not all devices are compatible with the system.
During the charging phase, it is normal for the charging area and device to heat up.
Charging may be briefly interrupted when:
- All the doors and the hatch are closed
- To avoid interference with the proper functioning of the keyless access system.
- The position of the device is altered.
Do not charge more than one device at a time on a charging area.
If the device becomes too hot and its battery protection function activates, it may charge extremely slowly or no longer charge.
The temperature at which the battery protection function activates depends on the device.
Heated Steering Wheel
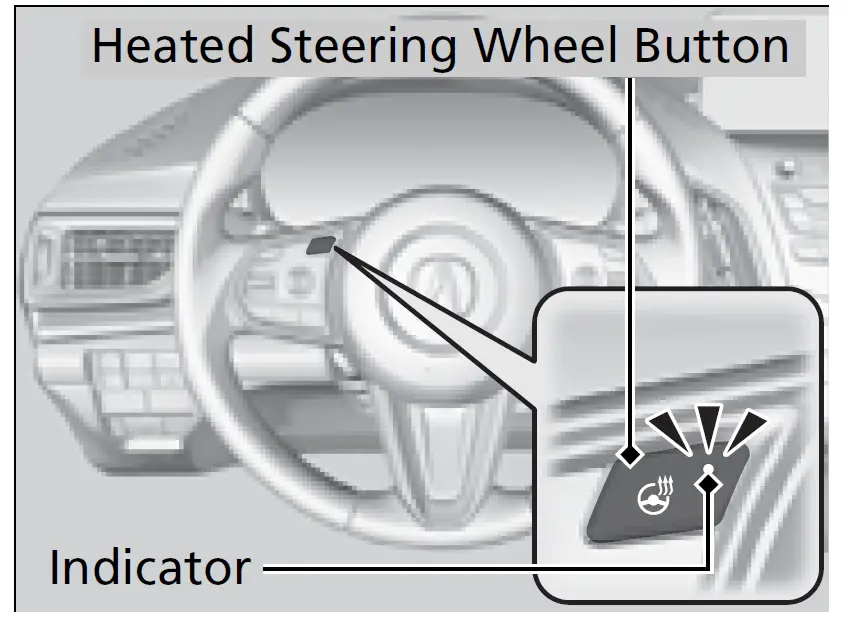
The power mode must be in ON to use the heated steering wheel.
Press the button on the lower side of the steering wheel.
When a comfortable temperature is reached, press the button again to turn it off.
The heated steering wheel is turned off every time you start the engine, even if you turned it on the last time you drove the vehicle.
Do not use the heated steering wheel continuously when the engine is off. Under such conditions, the battery may be weakened, making the engine difficult to start.
Front Seat Heaters/Ventilators*
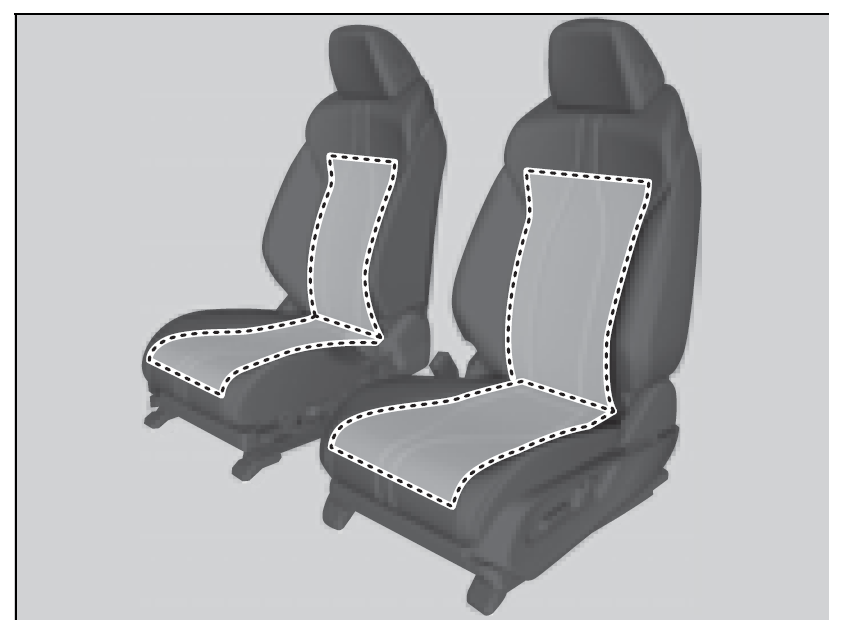
The seat heaters can be used when the power mode is in ON.
The seat heaters: Use them to warm up the seat.
The seat ventilators*: Use them when you want to ventilate the surface of the seats. The lower you set the air conditioning temperature, the more you will feel the effect of the seat ventilation.
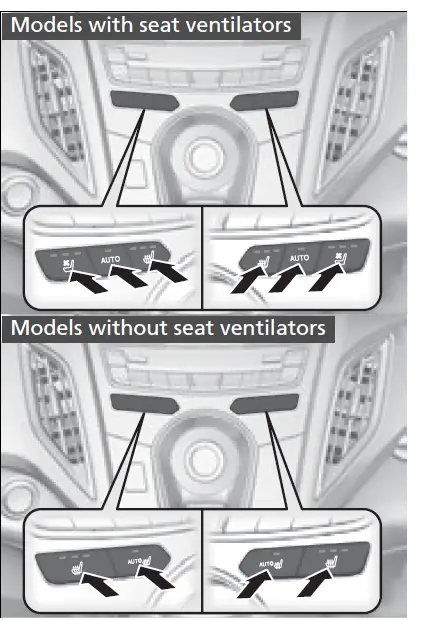 Press the seat heater or the seat ventilator* button:
Once – The HI setting (three indicators on)
Twice – The MID setting (two indicators on)
Three times – The LO setting (one indicator on)
Four times – The OFF setting (no indicators on)
Press the AUTO button:
The system automatically selects the setting most suitable to the ambient environment.
When the power mode is turned on after it is turned off, the previous setting is maintained.
WARNING
Heat induced burns are possible when using seat heaters.
Persons with a diminished ability to sense temperature (e.g., persons with diabetes, lower limb nerve damage, or paralysis) or with sensitive skin should not use seat heaters.
Do not use the seat heaters even in LO when the engine is off. Under such conditions, the battery may be weakened, making the engine difficult to start.
After a certain period of time, the strength setting for the rear seat heaters will automatically be reduced by one level at a time until the rear seat heaters shuts off. The elapsed time varies according to the interior environment.
Rear Seat Heaters*
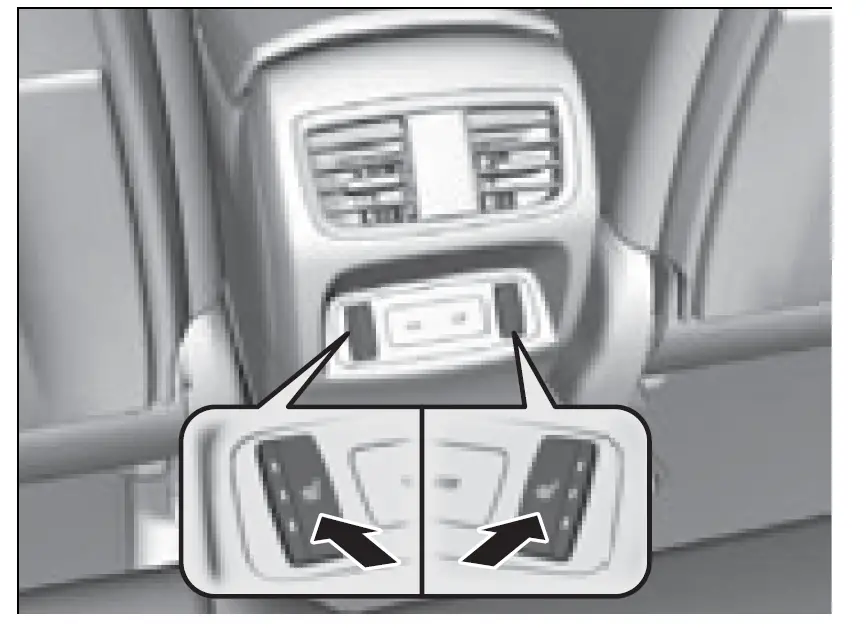
The seat heaters can be used when the power mode is in ON.
There is no heater in the rear center seating position.
Press the seat heater button:
Once – The HI setting (three indicators on) Twice – The MID setting (two indicators on) Three times – The LO setting (one indicator on) Four times – The OFF setting (no indicators on)
WARNING
Heat induced burns are possible when using seat heaters.
Persons with a diminished ability to sense temperature (e.g., persons with diabetes, lowerlimb nerve damage, or paralysis) or with sensitive skin should not use seat heaters.
Do not use the seat heaters even in LO when the engine is off. Under such conditions, the battery may be weakened, making the engine difficult to start.
Climate Control System
Using Automatic Climate Control
The automatic climate control system maintains the interior temperature you select. The system also selects the proper mix of heated or cooled air that raises or lowers the interior temperature to your preference as quickly as possible.

Use the system when the engine is running.
- Press the AUTO button.
- Adjust the interior temperature using the driver’s side or passenger’s side temperature control buttons.
- Press the
 (ON/OFF) button to cancel.
If any buttons are pressed while using the climate control system in auto, the function of the button that was pressed will take priority.
The AUTO indicator will go off, but functions unrelated to the button that was pressed will be controlled automatically.
During idle-stops, air-conditioning is suspended, and only the blower remains active.
If you do not want air-conditioning suspended, press the Auto Idle Stop OFF button to cancel idle-stop.
To prevent cold air from blowing in from outside, the fan may not start immediately when the AUTO button is pressed.
If the interior is very warm, you can cool it down more rapidly by partially opening the windows, turning the system on auto, and setting the temperature to low. Change the fresh air mode to recirculation mode until the temperature cools down.
When you set the temperature to the lower or upper limit, Lo or Hi is displayed.
Pressing the![]() button switches the climate control system between on and off. When turned on, the system returns to your last selection.
button switches the climate control system between on and off. When turned on, the system returns to your last selection.
Switching between the recirculation and fresh air modes
Press the![]() (recirculation) button and switch the mode depending on environmental conditions.
(recirculation) button and switch the mode depending on environmental conditions.
Recirculation mode (indicator on): Recirculates air from the vehicle’s interior through the system.
Fresh air mode (indicator off): Maintains outside ventilation. Keep the system in fresh air mode in normal situations.
When you unlock the doors with your remote, the driver’s ID (DRIVER 1 or DRIVER 2) is detected, and the climate control settings are turned to the respective mode automatically when you set the power mode to ON.
Defrosting the Windshield and Windows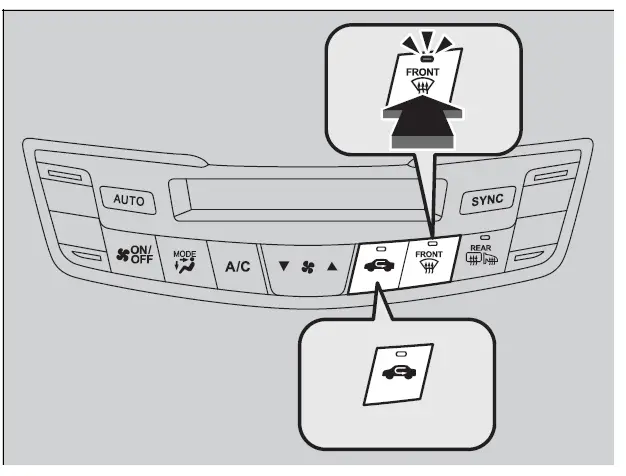
Pressing the![]() (windshield defroster) button turns the air conditioning system on and automatically switches the system to fresh air mode.
(windshield defroster) button turns the air conditioning system on and automatically switches the system to fresh air mode.
Press the ![]() button again to turn off, the system returns to the previous settings.
button again to turn off, the system returns to the previous settings.
For your safety, make sure you have a clear view through all the windows before driving.
Do not set the temperature near the upper or lower limit.
When cold air hits the windshield, the outside of the windshield may fog up.
If you press the![]() button during Auto Idle Stop, the engine restarts automatically.
button during Auto Idle Stop, the engine restarts automatically.
To rapidly defrost the windows
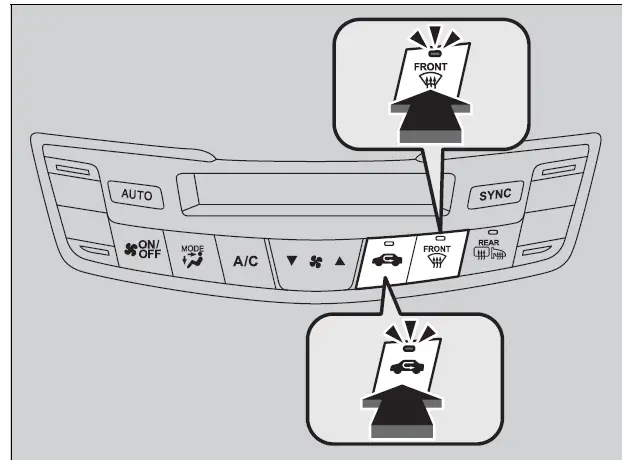
- Press the
 button.
 - Press the
 button
After defrosting the windows, switch over to fresh air mode. If you keep the system in recirculation mode, the windows may fog up from humidity. This impedes visibility.
Synchronization Mode*
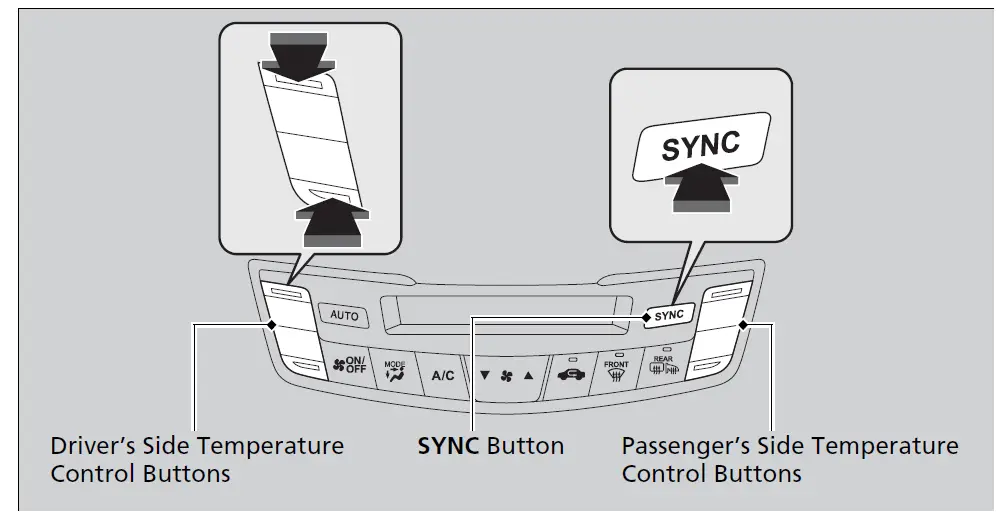
You can set the temperature synchronously for the driver’s side and the passenger’s side in synchronization mode.
- Press the SYNC button.
- The system switches to synchronization mode.
- Adjust the temperature using the driver’s side temperature control dial.
Press the SYNC button or adjust the interior temperature using the passenger’s side temperature control dial to return to dual mode.
When the system is in dual mode, the driver’s side temperature and the passenger’s side temperature can be set separately.
Rear Temperature Control Dial*
You can set the rear passenger compartment temperature different than the driver’s, using the rear temperature control dial.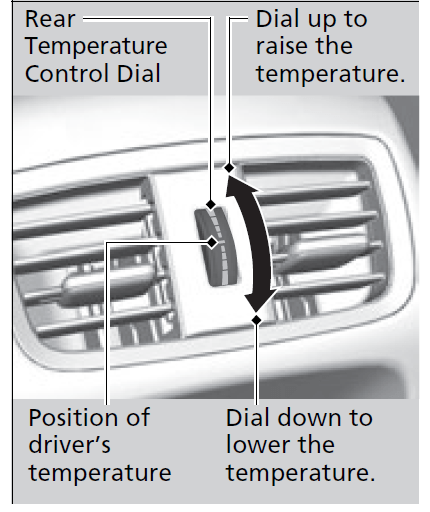
The rear temperature can be adjusted when the climate control system is on.
Automatic Climate Control Sensors
The automatic climate control system is equipped with sensors. Do not cover or spill any liquid on them.
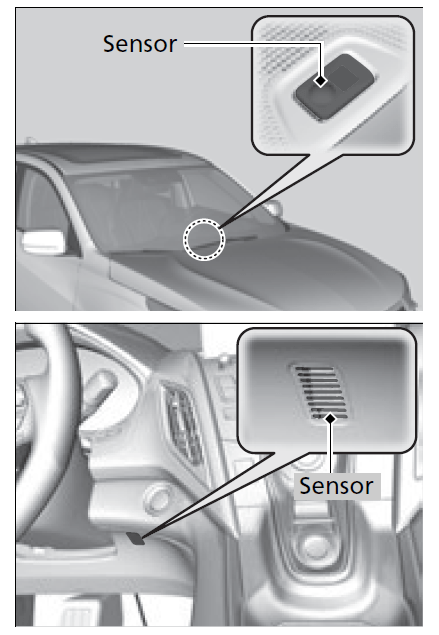
The automatic climate control system is equipped with sensors. Do not cover or spill any liquid on them.
Reference Links
View Full User Guide: ACURA RDX 2023 User Manual
Download Manuals: Acura | Owner’s Manual & Warranty | Acura Owner’s Site
2023 Acura RDX Specs, Price, Features, Mileage (Brochure)
Related Articles:
2024 Acura INTEGRA Specs, Price, Features, Mileage (Brochure)