
ACURA RDX 2023 Handling Fuses and Indicators User Guide
The 2023 Acura RDX is the pinnacle of modern car engineering. It has great handling, an advanced electrical system that is protected by fuses, and a variety of helpful indicators that work together to give you an unbeatable driving experience. The RDX’s agile handling, which comes from its finely tuned suspension and available Super-Handling All-Wheel Drive (SH-AWD), gives you confidence and precision from the moment you get behind the wheel. This is true whether you’re driving on city streets or going off the beaten path. This great performance is made possible by a well-protected electrical system with carefully placed fuses that act as sentinels and keep important circuits safe. These fuses, which are kept in the car’s fuse box, protect important parts from electricity problems. Lastly, the RDX’s dashboard comes to life with a group of indicators, each of which is a key way to tell the state and performance of the vehicle. From checking the pressure in the tires to advanced safety systems, these signs give drivers important information and make sure they have a safe and enjoyable trip. In this thorough introduction, we look at how the Acura RDX handles, how the electrical fuses protect the car, and how the informational lights all work together to take the driving experience to a whole new level of greatness.
Tools
Types of Tools
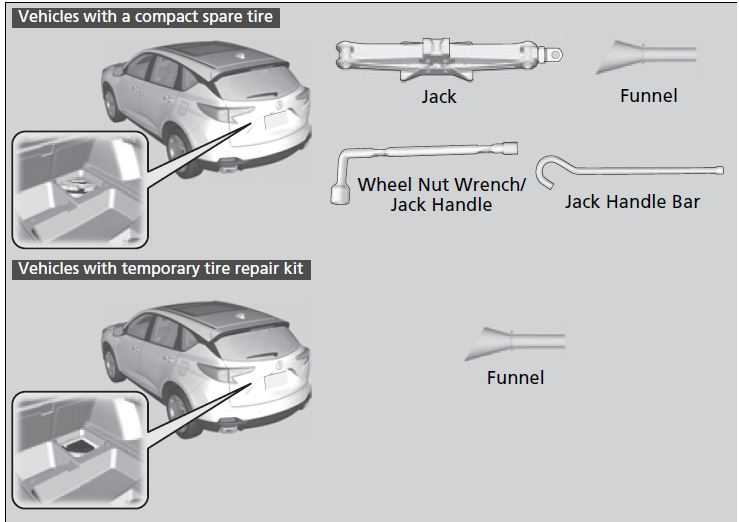
The tools are stored in the cargo area.
If a Tire Goes Flat
Changing a Flat Tire
If a tire goes flat while driving, grasp the steering wheel firmly, and brake gradually to reduce speed. Then, stop in a safe place. Replace the flat tire with a compact spare tire. Go to a dealer as soon as possible to have the full-size tire repaired or replaced.
- Park the vehicle on firm, level, non-slippery surface and apply the parking brake.
- Put the transmission into (P.
- Turn on the hazard warning lights and set the power mode to VEHICLE OFF .
Follow compact spare precautions:
Periodically check the tire pressure of the compact spare. It should be set to the specified pressure. Specified Pressure: 60 psi (420 kPa, 4.2 kgf/cm2)
When driving with the compact spare tire, keep the vehicle speed under 50 mph (80 km/h). Replace with a full-size tire as soon as possible.
The compact spare tire and wheel in your vehicle are specifically for this model. Do not use them with another vehicle. Do not use another type of compact spare tire or wheel with your vehicle.
Do not mount tire chains on a compact spare tire. If a chain-mounted front tire goes flat, remove one of the full-size rear tires and replace it with the compact spare tire. Remove the flat front tire and replace it with the full-size tire that was removed from the rear. Mount the tire chains on the front tire.
Do not use a puncture-repairing agent on a flat tire, as it can damage the tire pressure sensor.
Getting Ready to Replace the Flat Tire
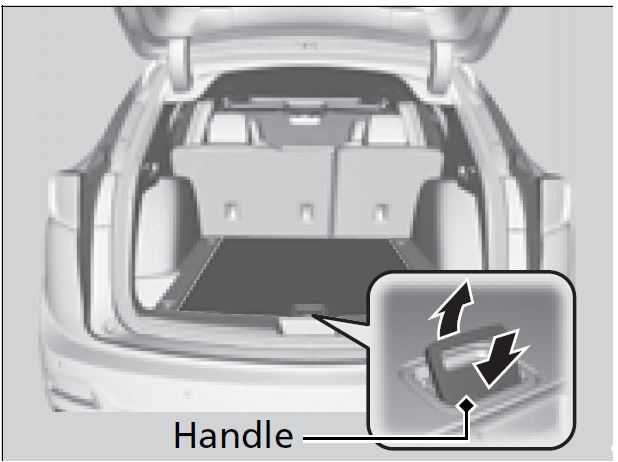
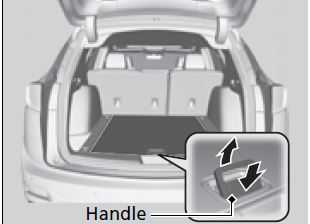
- Push the rear edge of the handle on the floor lid and open the lid.
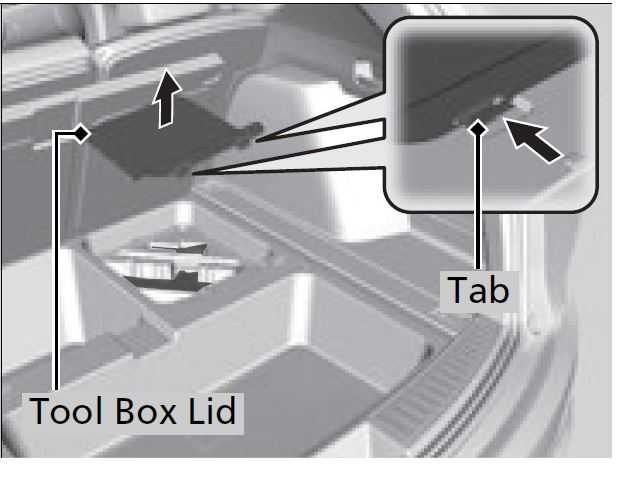
- Push the tabs to open the tool box lid.
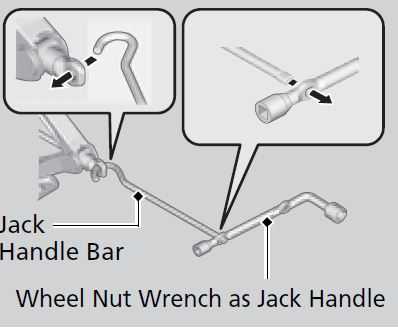
- Take the jack, wheel nut wrench, and jack handle bar out of the tool box.
NOTICE
Do not use the jack if it doesn’t work properly. Call your dealer or a professional towing service.
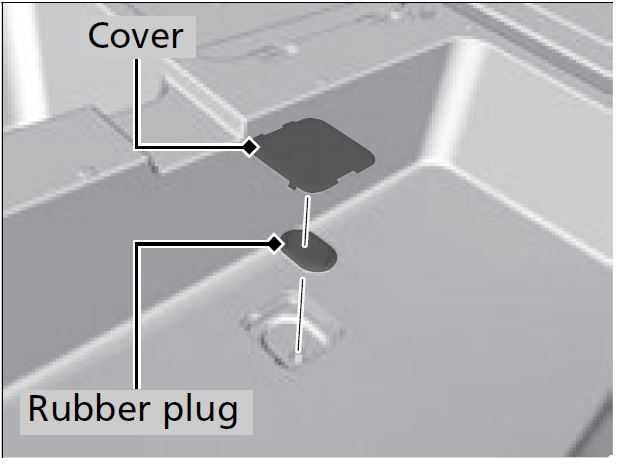
The wheel nut wrench supplied with your vehicle is specially adapted to fit the holder shaft. Do not use any other tool. - Remove the cover and the rubber plug on the cargo area lining to access the shaft for the spare tire hoist.
- Put the wheel nut wrench with the jack handle bar on the hoist shaft.
Turn the wrench to the left to lower the spare tire to the ground.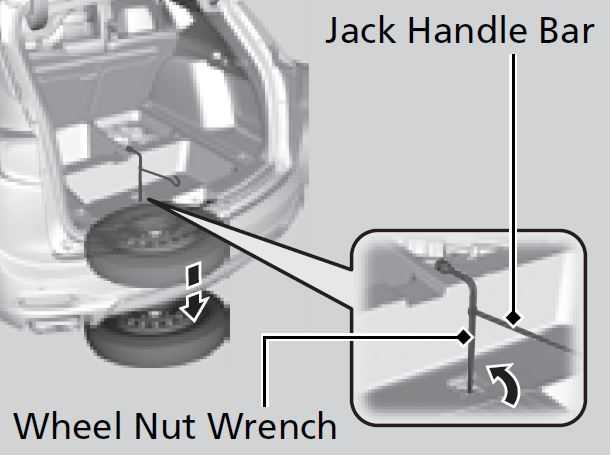
- Keep turning the wheel nut wrench to create slack in the cable.
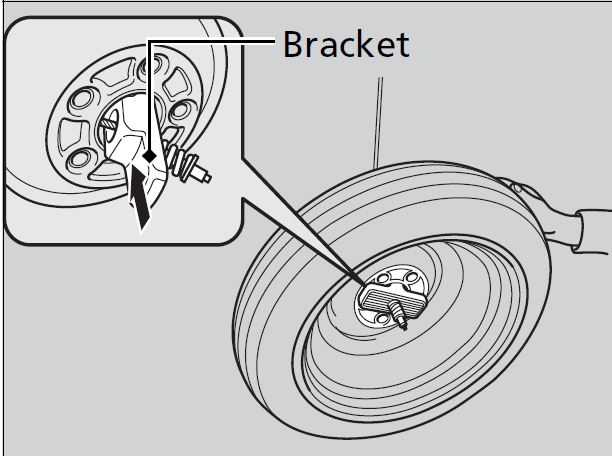
- Remove the bracket from the spare tire.
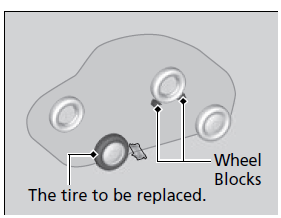
- Place a wheel block or rock in front and rear of the wheel diagonal to the flat tire.
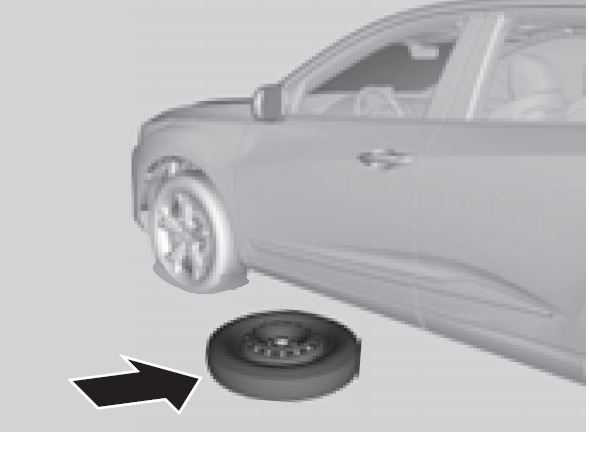
- Place the compact spare tire (wheel side up) under the vehicle body, near the tire that needs to be replaced.
 Loosen each wheel nut about one turn using the wheel nut wrench.
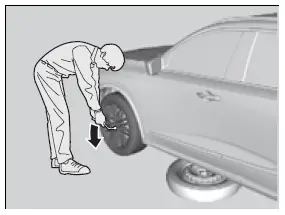
How to Set Up the Jack
- Place the jack under the jacking point closest to the tire to be changed.
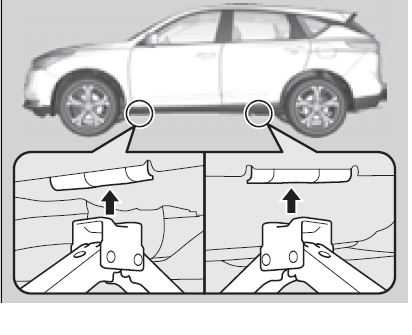
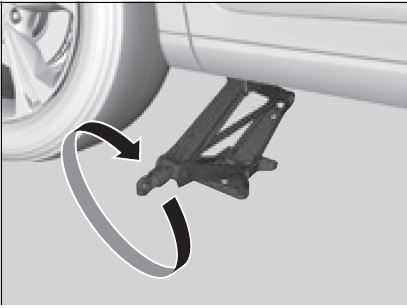
- Turn the end bracket clockwise as shown in the image until the top of the jack contacts the jacking point.
- Make sure that the jacking point tab is resting in the jack notch.
- Make sure that the jacking point tab is resting in the jack notch.
- Raise the vehicle, using the jack handle bar and the jack handle, until the tire is off the ground.
WARNING
The vehicle can easily roll off the jack, seriously injuring anyone underneath.
Follow the directions for changing a tire exactly, and never get under the vehicle when it is supported only by the jack.
Do not use the jack with people or luggage in the vehicle.
Use the jack provided in your vehicle.
Other jacks may not support the weight (“load”) or may not fit the jacking point.
The following instructions must be followed to use the jack safely:
- Do not use while the engine is running.
- Use only where the ground is firm and level.
- Use only at the jacking points.
- Do not get in the vehicle while using the jack.
- Do not put anything on top of or underneath the jack.
Replacing the Flat Tire
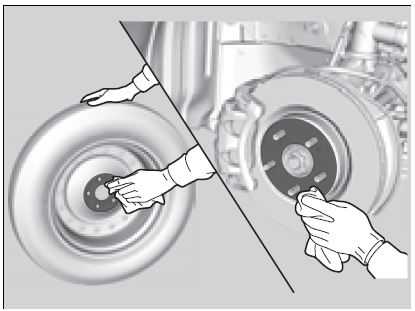
- Remove the wheel nuts and flat tire.
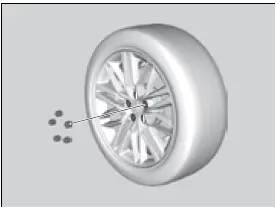
- Wipe the mounting surfaces of the wheel with a clean cloth.
- Mount the compact spare tire.
- Screw the wheel nuts until they touch the lips around the mounting holes, then stop rotating.
- Lower the vehicle and remove the jack.
Tighten the wheel nuts in the order indicated in the image. Go around tightening the nuts two to three times in this order.
Wheel nut torque:
80 lbf∙ft (108 N∙m, 11 kgf∙m)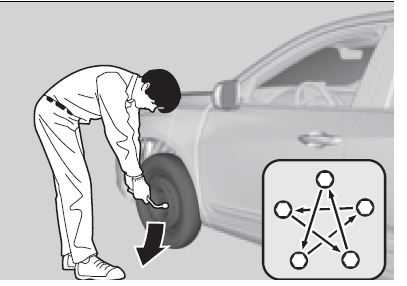 Do not over tighten the wheel nuts by applying extra torque using your foot or a pipe.
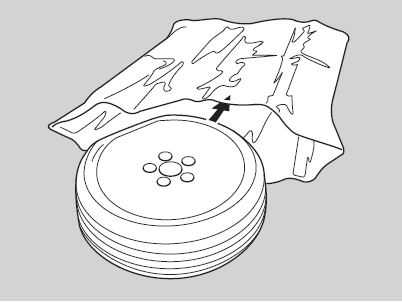
Storing the Flat Tire
- Put the flat tire in the storage bag provided with your vehicle.
- The storage bag is in the tool box.
- Knot the top of the storage bag.
- Securely put the jack, jack handle bar, and wheel nut wrench back in the tool box.
- Bore through the bag, and pass the holding belt through the hole of the bag and the wheel of the flat tire as shown.
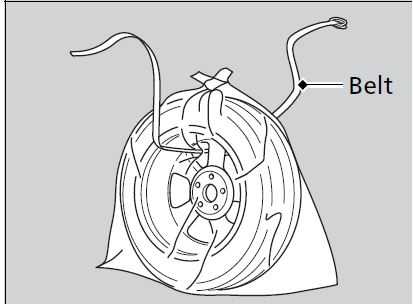
- Place the flat tire in the cargo area, and thread the belt through the tie-down anchor as shown.
- Pass the belt through the ring, and tighten the belt to secure the flat tire in place.

WARNING
Loose items can fly around the interior in a crash and can seriously injure the occupants.
Store the jack and tools securely before driving.
TPMS and the Compact Spare Tire
If you replace a flat tire with the spare tire, the low tire pressure/TPMS indicator comes on while you are driving. After driving for a few miles (kilometers), Tire pressure monitor system problem. Check tire pressure. See your dealer. will appear on the driver information interface and the indicator will start blinking for a short time and then stay on; however, this is normal and is no cause for concern.
If you replace the tire with a full-size tire, the warning message on the driver information interface and the low tire pressure/TPMS indicator will go off after a few miles (kilometers).
The system cannot monitor the pressure of the spare tire. Manually check the spare tire pressure to be sure that it is correct.
Use the TPMS specific wheels. Each is equipped with a tire pressure sensor mounted inside the tire behind the valve stem.
Temporarily Repairing a Flat Tire
If the tire has a large cut or is otherwise severely damaged, you will need to have the vehicle towed. If the tire only has a small puncture, from a nail for instance, you can use the temporary tire repair kit so that you can drive to the nearest service station for a more permanent repair.
If a tire goes flat while driving, grasp the steering wheel firmly, and brake gradually to reduce speed. Then, stop in a safe place.
- Park the vehicle on a firm, level, and non-slippery surface and apply the parking brake.
- Change the gear position to (P.
- Turn on the hazard warning lights and set the power mode to VEHICLE OFF.
The kit should not be used in the following situations. Instead, contact a dealer or roadside assistance to have the vehicle towed.
- The tire sealant has expired.
- More than one tire is punctured.
- The puncture or cut is larger than 3/16 inch (4.8 mm).
- The tire side wall is damaged or the puncture is outside the contact area.

- Damage has been caused by driving with the tire extremely under inflated.
- The tire bead is no longer seated.
- The rim is damaged.
Do not remove a nail or screw that punctured the tire. If you remove it from the tire, you may not be able to repair the puncture using the kit.
Getting Ready to Temporarily Repair the Flat Tire
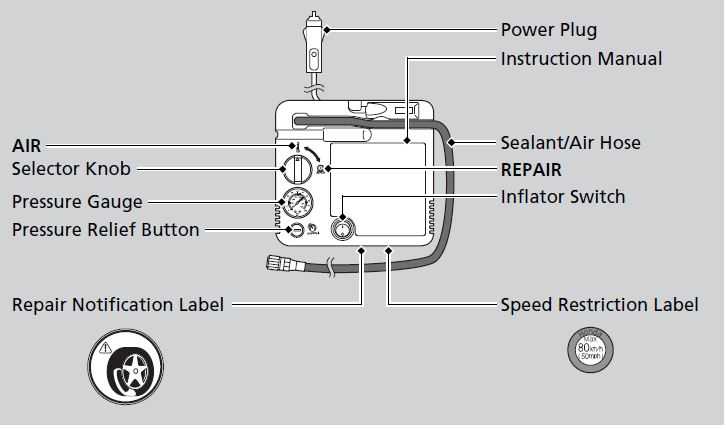
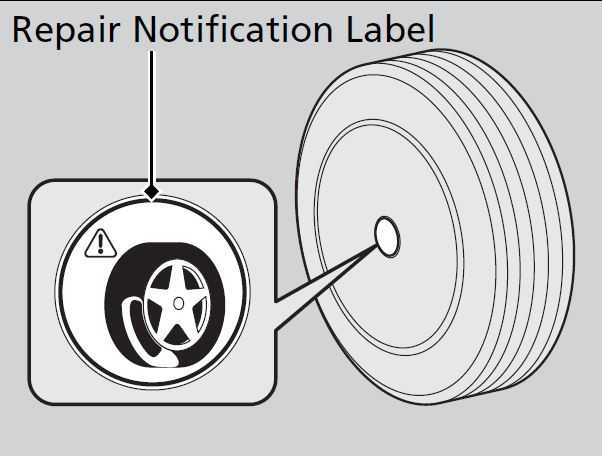
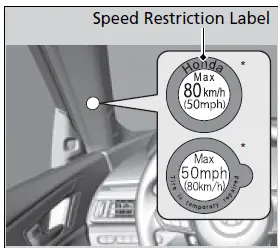
Repair notification label and speed restriction label are applied to the side of the temporary tire repair kit.
When making a temporary repair, carefully read the instruction manual provided with the kit.
- Pull the handle on the cargo area floor lid and open the lid.
 NOTICE
Do not use a puncture-repairing agent other than the one provided in the kit that came with your vehicle. If a different agent is used, you may permanently damage the tire pressure sensor.
Repair notification label and speed restriction label are applied to the side of the temporary tire repair kit.
When making a temporary repair, carefully read the instruction manual provided with the kit.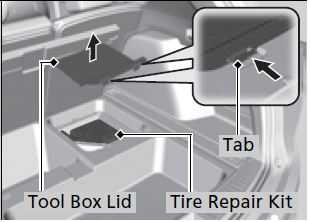
- Push the tabs to open the tool box lid.
- Take the kit out of the tool box.
- Place the kit face up, on flat ground near the flat tire, and away from traffic. Do not place the kit on its side..
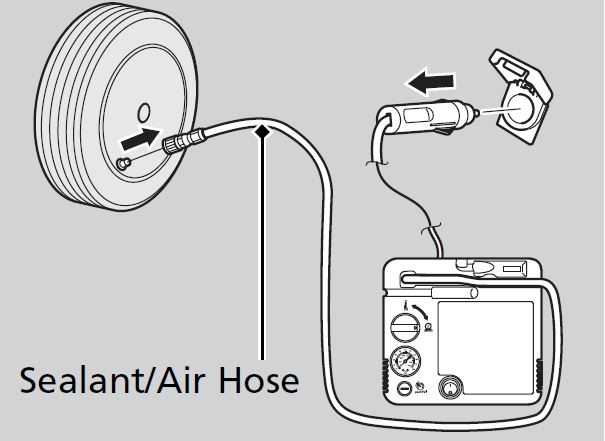
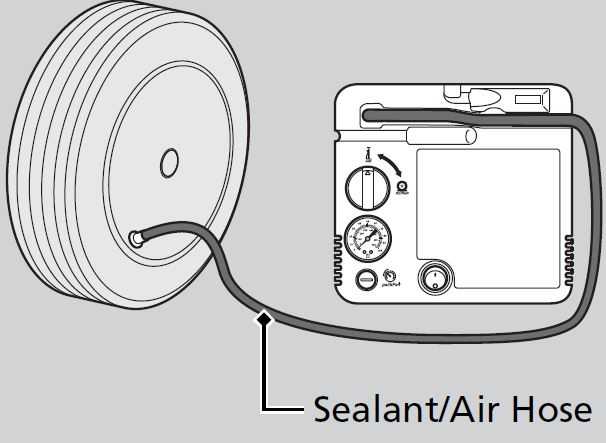
Injecting Sealant and Air
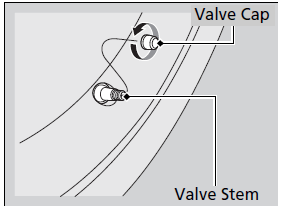
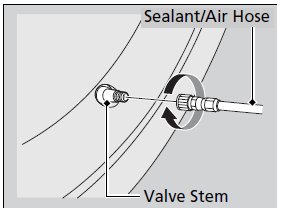
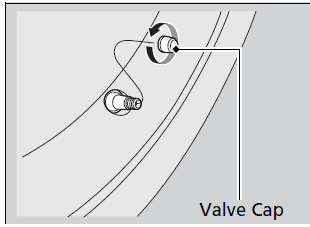
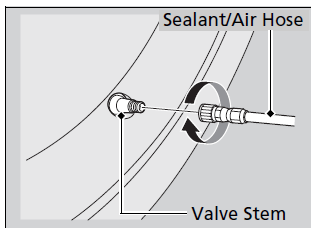
- Remove the valve cap from the tire valve stem.
- Remove the sealant/air hose from the packaging.
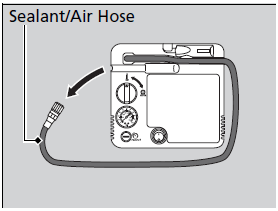
- Attach the sealant/air hose onto the tire valve stem. Screw it until it is tight.
- Plug in the compressor to the accessory power socket.
- Be careful not to pinch the cord in a door or window.
- Do not plug any other electric devices into other accessory power sockets.
Accessory Power Sockets P. 239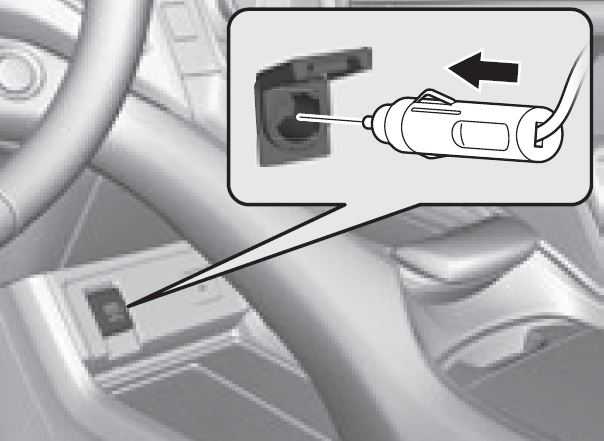
- Start the engine.
Starting the Engine P. 443- Keep the engine running while injecting sealant and air.
Carbon Monoxide Gas P. 77
- Keep the engine running while injecting sealant and air.
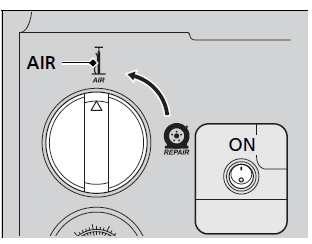
- Turn the selector switch to REPAIR.
 CAUTION
Running the engine with the vehicle in an enclosed or even partly enclosed area can cause a rapid buildup of toxic carbon monoxide.
Breathing this colorless, odorless gas can cause unconsciousness and even death.
Only run the engine to power the air compressor with the vehicle outdoors…
NOTICE
Do not operate the temporary tire repair kit compressor for more than 15 minutes. The compressor can overheat and become permanently damaged.
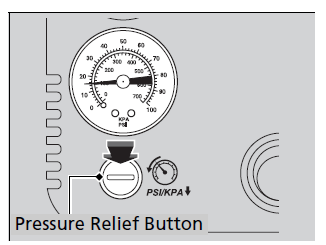
Until the sealant injection is complete, the pressure shown on the pressure gauge will appear higher than actual. After the sealant injection is complete the pressure will drop and then begin to rise again as the tire is inflated with air. This is normal. To accurately measure the air pressure using the gauge, turn the air compressor off only after the sealant injection is complete. - Press the inflator switch to turn on the compressor.
- The compressor starts injecting sealant and air into the tire.
- When the sealant injection is complete continue to add air.
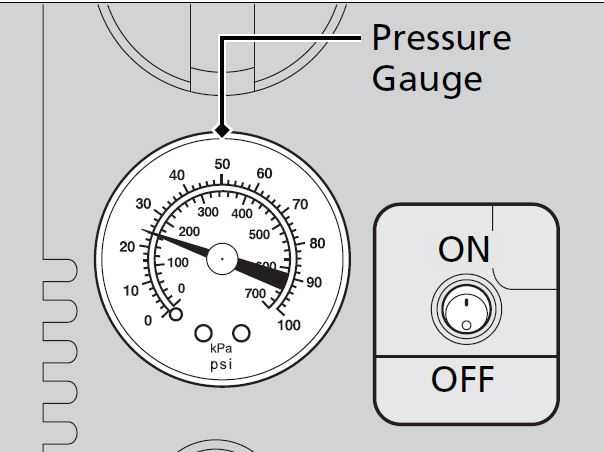
- .After the air pressure reaches 33 psi (230 kPa), turn off the kit.
After the air pressure reaches 36 psi (250 kPa), turn off the kit.- To check the pressure, occasionally turn
off the compressor and read the gauge. Unplug the power plug from the accessory power socket.
- To check the pressure, occasionally turn
- Unscrew the sealant/air hose from the tire valve stem. Reinstall the valve cap.
 If the required air pressure is not reached within 10 minutes, the tire may be too severely damaged for the kit to provide the necessary seal, and your vehicle will need to be towed.
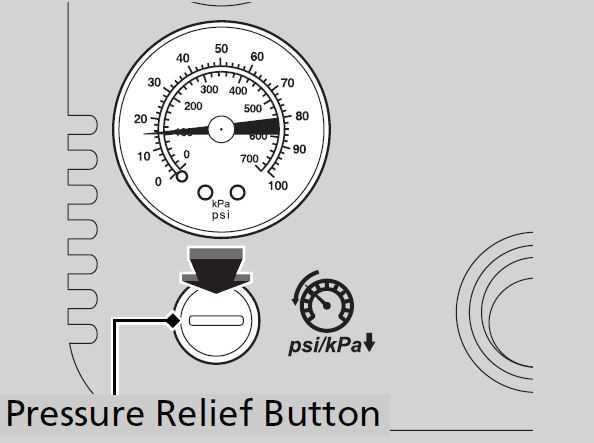
See an Acura dealer for a replacement sealant bottle and proper disposal of an empty bottle. - Press the pressure relief button until the gauge returns 0 psi (0 kPa).
- Apply the repair notification label to the flat surface of the wheel.
- The wheel surface must be clean to ensure the label adheres properly.
Distributing the Sealant in the Tire
- Apply the speed restriction label to the location as shown.
- Drive the vehicle for about 10 minutes.
- Do not exceed 50 mph (80 km/h).
- Do not exceed 50 mph (80 km/h).
- Stop the vehicle in a safe place.
- Recheck the air pressure using the sealant/ air hose on the compressor.
- Turn the selector switch to AIR.
- Do not turn the air compressor on to check the pressure.
Inflating an Under-inflated Tire P. 660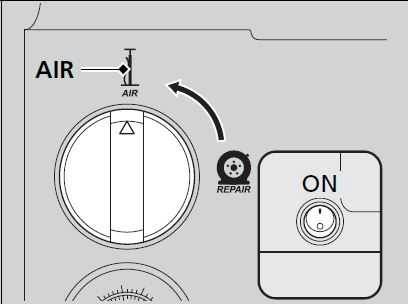
- Do not turn the air compressor on to check the pressure.
- If the air pressure is
- Less than 25 psi (175 kPa):
Do not add air or continue driving. The leak is too severe. Call for help and have your vehicle towed.
Emergency Towing P. 685
Models with 235/55R19 101H tires33 psi (230 kPa) or more:
Models with 255/45R20 101V tires
36 psi (250 kPa) or more:
Continue driving for another 10 minutes or until you reach the nearest service station, whichever is sooner.
Do not exceed 50 mph (80 km/h). If you have not reached a service station, stop and check the tire pressure.
If the air pressure does not go down after the 10 minute driving, you do not need to check the pressure any more.
Models with 235/55R19 101H tires - Greater than 25 psi (175 kPa), but less than 33 psi (230 kPa):
Turn the air compressor on to inflate the tire until the tire pressure reaches 33 psi (230 kPa). - Greater than 25 psi (175 kPa), but less than 36 psi (250 kPa):
Models with 255/45R20 101V tires
Turn the air compressor on to inflate the tire until the tire pressure reaches 36 psi (250 kPa).
Inflating an Under-inflated Tire P. 680
Then, drive carefully for 10 more minutes or until you reach the nearest service station, whichever is sooner. Do not exceed 50 mph (80 km/h). If you have not reached a service station, stop and check the tire pressure.
You should repeat this procedure as long as the air pressure is within this range.
- Less than 25 psi (175 kPa):
- Unplug the kit from the accessory power socket.
- Unscrew the sealant/air hose from the tire valve stem. Reinstall the valve cap.
WARNING
Running the engine with the vehicle in an enclosed or even partly enclosed area can cause a rapid buildup of toxic carbon monoxide.
Breathing this colorless, odorless gas can cause unconsciousness and even death. Only run the engine to power the air compressor with the vehicle outdoors. - Press the pressure relief button until the gauge returns to 0 psi (0 kPa).
- Repackage and properly stow the kit.
Inflating an Under-inflated Tire
You can use the kit to inflate a non-punctured under-inflated tire.
- Open the cargo area floor lid.
Getting Ready to Temporarily Repair the the Flat Tire P. 650
- Push the tabs to open the tool box lid.
- Remove the kit from the box.
- Place the kit, face up, on flat ground near the tire to be inflated, away from traffic. Do not place the kit on its side.
- Remove the sealant/air hose from the kit.
- Remove the valve cap.
- Attach the sealant/air hose onto the tire valve stem. Screw it until it is tight.
NOTICE
Do not operate the temporary tire repair kit compressor for more than 15 minutes. The compressor can overheat and become permanently damaged. - Plug in the kit to the accessory power socket.
- Be careful not to pinch the cord in a door or window.
- Do not plug any other electronic devices into other accessory power sockets.
Accessory Power Sockets P. 239
- Start the engine.
- Keep the engine running while injecting air.
Carbon Monoxide Gas . 77
- Keep the engine running while injecting air.
- Turn the selector switch to AIR.
- Press the inflator switch to turn on the kit.
- The compressor starts to inject air into the tire.
- Inflate the tire to the specified air pressure.
WARNING
Running the engine with the vehicle in an enclosed or even partly enclosed area can cause a rapid buildup of toxic carbon monoxide.
Breathing this colorless, odorless gas can cause unconsciousness and even death. Only run the engine to power the air compressor with the vehicle outdoors. - Turn off the kit.
- Check the pressure gauge on the air compressor.
- If overinflated, press the pressure relief button.
- Unplug the kit from the accessory power socket.
- Unscrew the sealant/air hose from the tire valve stem. Reinstall the valve cap.
- Press the pressure relief button until the gauge returns to 0 psi (0 kPa).
- Repackage and properly stow the kit.
Handling of the Jack
Models with temporary tire repair kit
Your vehicle has jacking points as shown. When replacing your tires, consult a dealer.
Engine Does Not Start
Checking the Engine
If the engine does not start, check the starter.
| Starter doesn’t turn or turns over slowly.
The battery may be dead. Check each of the items on the right and respond accordingly. |
Check for a message on the multi-information display. If the To Start, Hold Remote Near Start Button message appears If the Keyless Remote Battery is Weak P. 665 Make sure the keyless remote is in its operating range. 2 ENGINE START/STOP Button P. 193 Check the fuses. Check all fuses, or have your vehicle checked by a dealer. 2 Inspecting and Changing Fuses P. 684 |
The starter turns over normally but the engine doesn’t start. There may be a problem with a fuse. Check each of the items on the right and respond accordingly.
Review the engine start procedure.
Follow its instructions, and try to start the engine again.Starting the Engine P. 443
Check the immobilizer system indicator.
When the immobilizer system indicator is blinking, the engine cannot be started.
Immobilizer System Indicator P. 99
Check the fuel level.
There should be enough fuel in the tank. Fuel Gauge P. 136
Check the fuses.
Check all fuses, or have the vehicle checked by a dealer.
Inspecting and Changing Fuses P. 684
If the problem continues:
Emergency Towing P. 685
If you cannot start the engine after checking all the items in the list above, have your vehicle checked by a dealer.
If you must start the vehicle immediately, use an assisting vehicle or booster battery to jump start it.
If the Battery Is Dead P. 667
If the Keyless Access Remote Battery is Weak
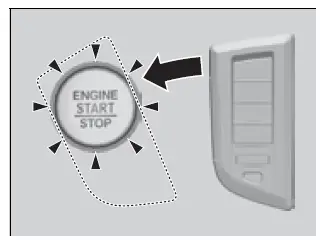
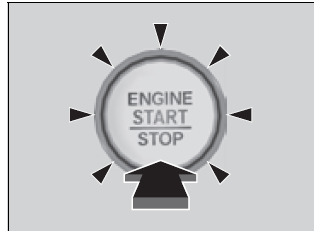
If the beeper sounds, the To start, touch start button with emblem side of remote message appears on the driver information interface, and the ENGINE START/STOP button flashes, and the engine won’t start, start the engine as follows:
- Touch the center of the ENGINE START/STOP button with the A logo on the keyless access remote while the ENGINE START/STOP button is flashing. The buttons on the keyless access remote should be facing you.
- The ENGINE START/STOP button flashes for about 30 seconds.
- The ENGINE START/STOP button flashes for about 30 seconds.
- Depress the brake pedal and press the ENGINE START/STOP button within 10 seconds after the beeper sounds and the ENGINE START/STOP button changes from flashing to on.
- If you don’t depress the pedal, the mode will change to ACCESSORY.
- If you don’t depress the pedal, the mode will change to ACCESSORY.
Emergency Engine Start
If the engine does not start using the normal engine starting procedure, you may be able to start it using the emergency start procedure below.
Do not use this procedure if it is not an emergency.
- Make sure the parking brake is applied.
- The parking brake and brake system indicator (red) comes on for 30 seconds when you press the electric parking brake switch.
- Check that the transmission is in (P, then set the power mode to ACCESSORY.
- Firmly depress the brake pedal and press and hold the ENGINE START/STOP button for at least 15 seconds.
This should be considered a system malfunction even if you are able to start the engine using the above procedure.
Have your vehicle checked by a dealer immediately.
Emergency Engine Stop
The ENGINE START/STOP button may be used to stop the engine due to an emergency situation even while driving. If you must stop the engine, do either of the following operations:
- Press and hold the ENGINE START/STOP button about for two seconds.
- Firmly press the ENGINE START/STOP button three times.
The steering wheel will not lock. However, because turning off the engine disables the power assist the engine provides to the steering and braking systems, it will require significantly more physical effort and time to steer and slow the vehicle. Use both feet on the brake pedal to slow down the vehicle and stop immediately in a safe place.
The gear position automatically changes to (P after the vehicle comes to a complete stop. Then, the power mode changes to VEHICLE OFF.
Do not press the ENGINE START/STOP button while driving unless it is absolutely necessary for the engine to be turned off.
If you press the ENGINE START/STOP button while driving, the beeper sounds.
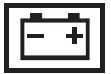
If the Battery Is Dead
Jump Starting Procedure
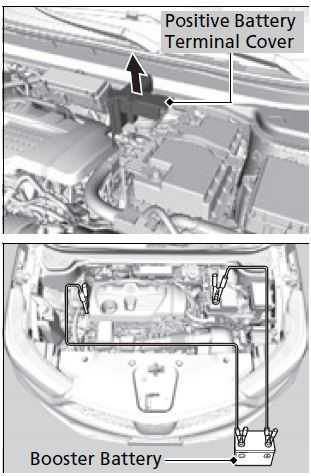
Turn off the power to electric devices, such as audio and lights. Turn off the engine, then open the hood.
- Open the cover on the positive + terminal.
- Connect the first jumper cable to your vehicle’s battery + terminal.
- Connect the other end of the first jumper cable to the booster battery + terminal.
- Use a 12-volt booster battery only.
- When using an automotive battery charger to boost your 12-volt battery, select a lower charging voltage than 15-volt. Check the charger manual for the proper setting.
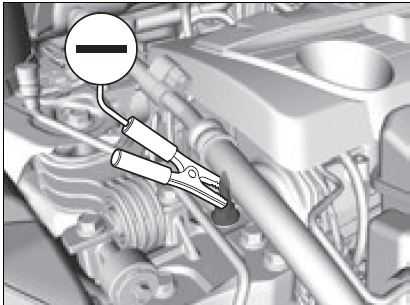
- Connect the second jumper cable to the booster battery – terminal.
WARNING
A battery can explode if you do not follow the correct procedure, seriously injuring anyone nearby.
Keep all sparks, open flames, and smoking materials away from the battery.
Securely attach the jumper cables clips so that they do not come off when the engine vibrates. Be careful not to tangle the jumper cables or allow the cable ends to touch each other while attaching or detaching the jumper cables.
Battery performance degrades in cold conditions and may prevent the engine from starting.
- Connect the second jumper cable to the booster battery – terminal.
You cannot use the terminals to jump start another vehicle. - Connect the other end of the second jumper cable to the ground bolt as shown. Do not connect this jumper cable to any other part.
- If your vehicle is connected to another vehicle, start the assisting vehicle’s engine and increase its rpm slightly.
- Attempt to start your vehicle’s engine. If it turns over slowly, check that the jumper cables have good metal-to-metal contact.
What to Do After the Engine Starts
Once your vehicle’s engine has started, remove the jumper cables in the following order.
- Disconnect the jumper cable from your vehicle’s ground.
- Disconnect the other end of the jumper cable from the booster battery -terminal.
- Disconnect the jumper cable from your vehicle’s battery + terminal.
- Disconnect the other end of the jumper cable from the booster battery + terminal.
Have your vehicle inspected by a nearby service station or a dealer.
The Vehicle Stability AssistTM (VSA®) system, Adaptive Cruise Control (ACC) with Low Speed Follow, safety support, and low tire pressure/TPMS indicators may come on along with a message in the driver information interface when you set the power mode to ON after reconnecting a battery.
Drive a short distance at more than 12mph (20 km/h). Each indicator should go off. If any do not, have your vehicle checked by a dealer.
Overheating
How to Handle Overheating
Overheating symptoms are as follows:
- The temperature gauge is at the mark or the engine suddenly loses power.
- The Engine temperature too hot. Do not drive. Allow engine to cool. message appears on the driver information interface.
- Steam or spray comes out of the engine compartment.
First thing to do
- Immediately park the vehicle in a safe place.
- Turn off all accessories and turn on the hazard warning lights.
- No steam or spray present: Keep the engine running and open the hood.
- Steam or spray is present: Turn off the engine and wait until it subsides.
Then, open the hood.
WARNING
Steam and spray from an overheated engine can seriously scald you.
Do not open the hood if steam is coming out.
Continuing to drive with the temperature gauge at the H mark may damage the engine.
Continuing to drive with the Engine temperature too hot. Do not drive. Allow engine to cool. message on the driver information interface may damage the engine.
Next thing to do
- Check that the cooling fan is operating and stop the engine once the temperature gauge goes down.
- If the cooling fan is not operating, immediately stop the engine.
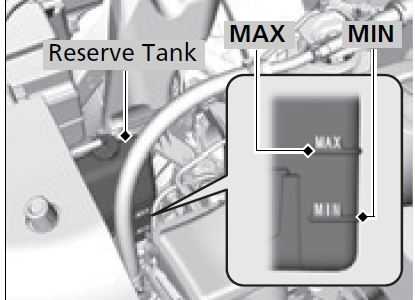
- Once the engine has cooled down, inspect the coolant level and check the cooling system components for leaks.
- If the coolant level in the reserve tank is low, add coolant until it reaches the MAX mark.
- If there is no coolant in the reserve tank, check that the radiator is cool. Cover the radiator cap with a heavy cloth and open the cap. If necessary, add coolant up to the base of the filler neck, and put the cap back on.
WARNING
Removing the radiator cap while the engine is hot can cause the coolant to spray out, seriously scalding you.
Always let the engine and radiator cool down before removing the radiator cap.
Last thing to do
Once the engine has cooled sufficiently, restart it and check the temperature gauge. If the temperature gauge has gone down, resume driving. If it has not gone down, contact a dealer for repairs.
WARNING
Removing the reserve tank cap while the engine is hot can cause the coolant to spray out, seriously scalding you.
Always let the engine and radiator cool down before removing the reserve tank cap.
If the coolant is leaking, contact a dealer for repairs.
Use water as an emergency/temporary measure only. Have a dealer flush the system with proper antifreeze as soon as possible.
Continuing to drive with the Engine Temperature Too Hot. Do Not Drive. Allow Engine To Cool. message on the multi-information display may damage the engine.
Indicator, Coming On/Blinking
If the Engine oil pressure low Warning Appears
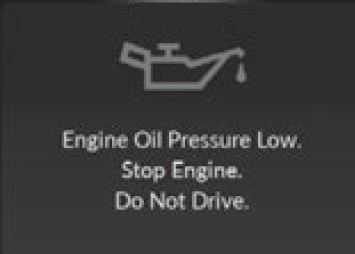
- Reasons for the warning to appear Appears when the engine oil pressure is low.
What to do as soon as the warning appears
- Immediately park the vehicle on level ground in a safe place.
- If necessary, turn the hazard warning lights on.
What to do after parking the vehicle
- Stop the engine and let it sit for approximately three minutes.
- Open the hood and check the oil level.
- Add oil as necessary.
Oil Check P. 596
Start the engine and check the Engine oil pressure low warning.
- The warning disappears: Start driving again.
- The warning does not disappear within 10 seconds: Immediately stop the engine and contact a dealer for repairs.
- Add oil as necessary.
NOTICE
Running the engine with low oil pressure can cause serious mechanical damage almost immediately.
 If the Charging System Indicator Comes On
- Reasons for the indicator to come on
Comes on when there is a problem with the charging system. - What to do when the indicator comes on
Stop in a safe place and have your vehicle checked by a dealer immediately.
If the Malfunction Indicator Lamp Comes On or Blinks
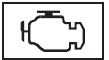 Reasons for the indicator lamp to come on or blink
Comes on when there is a problem with the engine emissions control system.
Blinks when engine misfiring is detected.- What to do when the indicator lamp comes on
Avoid high speeds and immediately get your vehicle inspected at a dealer. - What to do when the indicator lamp blinks
Park the vehicle in a safe place with no flammable items and wait at least 10 minutes or more with the engine stopped until it cools.
If you drive with the malfunction indicator lamp on, the emissions control system and the engine could be damaged.
If the malfunction indicator lamp blinks again when restarting the engine, drive to the nearest dealer at 31 mph (50 km/h) or less. Have your vehicle inspected.
If the Brake System Indicator (Red) Comes On or Blinks
Reasons for the indicator to come on
- The brake fluid is low.
- There is a malfunction in the brake system.
What to do when the indicator comes on while driving
Depress the brake pedal lightly to check pedal pressure.
- If normal, check the brake fluid level the next time you stop.
- If abnormal, take immediate action. If necessary, downshift the transmission to slow the vehicle using engine braking.
Reasons for the indicator to blink
- There is a problem with the electric parking brake system.
What to do when the indicator blinks
- Avoid using the parking brake and have your vehicle checked by a dealer immediately.
Have your vehicle repaired immediately.
It is dangerous to drive with low brake fluid. If there is no resistance from the brake pedal, stop immediately in a safe place. If necessary, downshift the gears.
If the brake system indicator (red) and ABS indicator come on simultaneously, the electronic brake distribution system is not working. This can result in vehicle instability under sudden braking.
Have your vehicle inspected by a dealer immediately.
If the brake system indicator (red) blinks at the same time when the brake system indicator (amber) comes on, the parking brake may not work.
Avoid using the parking brake and have your vehicle checked by a dealer immediately.
If the Brake System Indicator (Red) Comes On or Blinks at the Same Time When the Brake System Indicator (Amber) Comes
If the Brake System Indicator (Red) Comes On or Blinks at the Same Time When the Brake System Indicator (Amber) Comes On
If the brake system indicator (red) comes on or blinks at the same time when the brake system indicator (amber) comes on, release the parking brake manually or automatically
P. 675
 If the Electric Power Steering (EPS) System Indicator Comes On
Reasons for the indicator to come on
- Comes on when there is a problem with the EPS system.
 What to do when the indicator comes on
- Stop the vehicle in a safe place and restart the engine.
If the indicator comes on and stays on, immediately have your vehicle inspected by a dealer. - If Do not drive displays on the driver information interface, immediately stop in a safe place and contact a dealer.
 If the Low Tire Pressure/TPMS Indicator Comes On or Blinks
- Reasons for the indicator to come on or blink
A tire pressure is significantly low. If there is a problem with the TPMS with Tire Fill Assist, the indicator blinks for about one minute, and then stays on.
If the compact spare tire* is installed, the indicator will either come on or it will first blink for about one minute, then stay on. - What to do when the indicator comes on
Stop the vehicle in a safe place and restart the engine.
If the indicator comes on and stays on, immediately have your vehicle inspected by a dealer.
If Do Not Drive displays on the multi-information display,
immediately stop in a safe place and contact a dealer.
If the Brake System Indicator (Red) Comes On or Blinks at the Same Time When the Brake System Indicator (Amber) Comes OnIf the brake system indicator (red) comes on or blinks at the same time when the brake system indicator (amber) comes on, release the parking brake manually or automatically2 Parking Brake P. 545
- If the brake system indicator (red) continuously comes on or blinks at the same time when the brake system indicator (amber) comes on, stop the vehicle in a safe place and have it inspected by a dealer immediately.
- To prevent the vehicle from moving, put the transmission into (P.
If only the brake system indicator (red) is turned off, avoid using the parking brake and have your vehicle checked by a dealer immediately.
- To prevent the vehicle from moving, put the transmission into (P.
If you apply the parking brake, you may not be able to release it.
If the brake system indicator (red) and the brake system indicator (amber) come on at the same time, the parking brake is working.
If the brake system indicator (red) blinks at the same time when the brake system indicator (amber) comes on, the parking brake may not work because it is checking the system.
If you repeatedly operate the electric parking brake in a short period of time, the brake stops operating to prevent heating of the system and the indicator blinks.
It returns to its original state in approximately 1 minute.
 If the Low Tire Pressure/TPMS Indicator Comes On or Blinks
Reasons for the indicator to come on or blink
A tire pressure is significantly low.
If there is a problem with the TPMS, the indicator blinks for about one minute, and then stays on.
If the compact spare tire* is installed, the indicator will either come on or it will first blink for about one minute, then stay on.
What to do when the indicator comes on
Drive carefully and avoid abrupt cornering and hard braking.
Stop your vehicle in a safe place. Check the tire pressure and adjust the pressure to the specified level. The specified tire pressure is on a label on the driver side doorjamb.
If the compact spare tire* causes the indicator to come on, change the tire to a full-size tire.
What to do when the indicator blinks
Have the tire inspected by a dealer as soon as possible. If the compact spare tire* causes the indicator to first blink, and then stay on, change the tire to a full-size tire. The indicator goes off after driving for a few miles (kilometers).
NOTICE
Driving on an extremely underinflated tire can cause it to overheat. An overheated tire can fail. Always inflate your tires to the prescribed level.
TPMS with Tire Fill Assist provides visual and audible assistance during tire pressure adjustment. With the power mode in ON and transmission in (P, while you adjust tire pressure up or down, the system alerts you as follows:
Below recommended pressure: The beeper sounds and exterior lights flash once every five seconds.
At recommended pressure: The beeper sounds and exterior lights flash rapidly for three seconds with five seconds intervals.
Above recommended pressure: The beeper sounds and lights flash twice every two seconds.
When a certain amount of time has passed since activation, Tire Fill Assist will be canceled until you set the power mode to OFF.
You cannot use Tire Fill Assist if the engine was started by the remote engine start, or if there is a malfunction in the system.
If Tire Fill Assist does not work, use a tire pressure gauge.
If the Transmission System Indicator Blinks along with the Warning Message
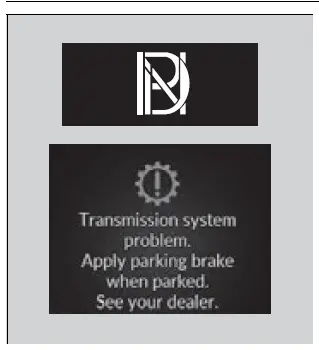
- Reasons for the indicator to blink The transmission is malfunctioning.
- What to do when the indicator blinks
- Immediately have your vehicle inspected by a dealer.
- Select (N after starting the engine.
- Check if the (N position in the instrument panel and the indicator on the (N button light/blink.
- The engine cannot be turned on unless the parking brake is set.
Starting the Engine P. 443
You may not be able to start the engine.
Make sure to set the parking brake when parking your vehicle.
Call a professional towing service if you need to tow your vehicle.
Emergency Towing P. 685
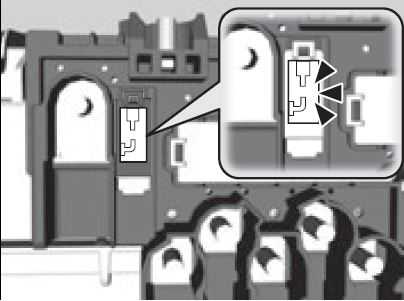
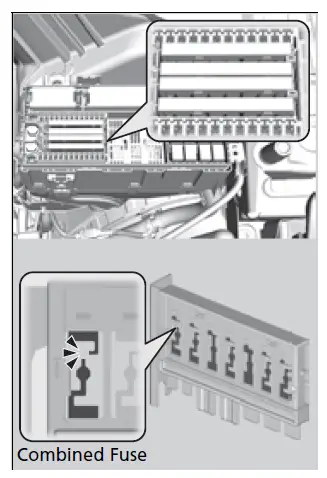
Fuses
Fuse Locations
If any electrical devices are not working, set the power mode to VEHICLE OFF (LOCK) and check to see if any applicable fuse is blown.
Fuse locations are shown on the fuse box cover. Locate the fuse in question by the fuse number and box cover number.
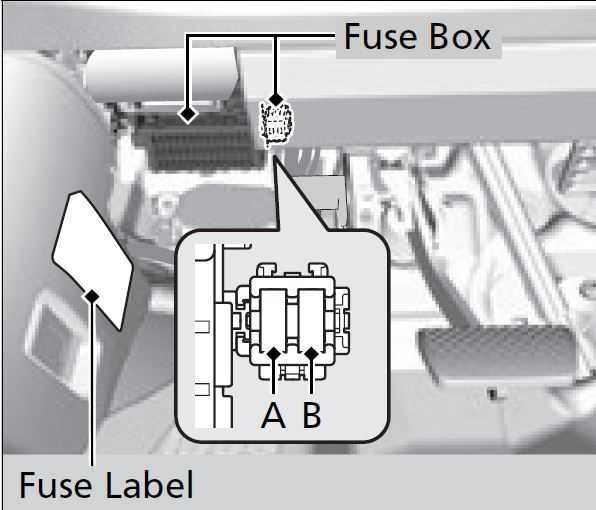
Engine Compartment Fuse Box Type A
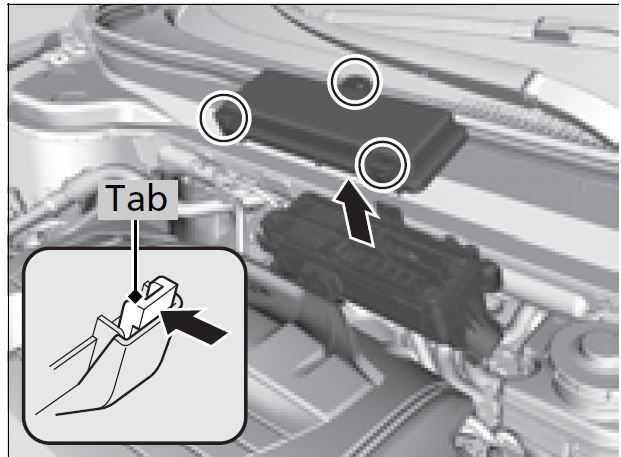
Fuse locations are shown on the fuse box cover. Locate the fuse in question by the fuse number and box cover number. Located near the brake fluid reservoir. Push the tabs to open the box.
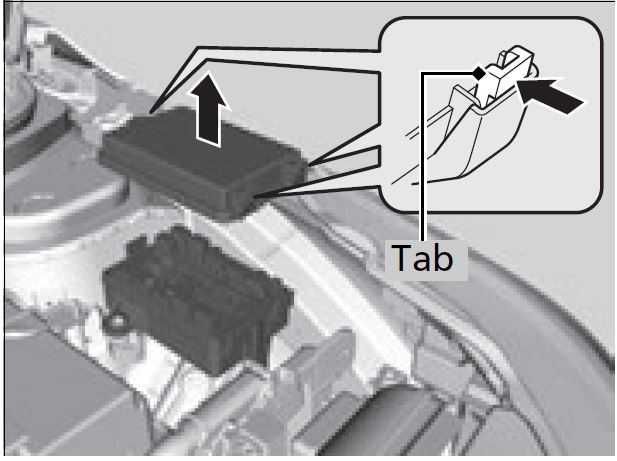
Located near the battery. Push the tabs to open the box.
Engine Compartment Fuse Box Type B*
Fuse locations are shown on the fuse box cover. Locate the fuse in question by the fuse number and box cover number. Located near the brake fluid reservoir. Push the tabs to open the box.
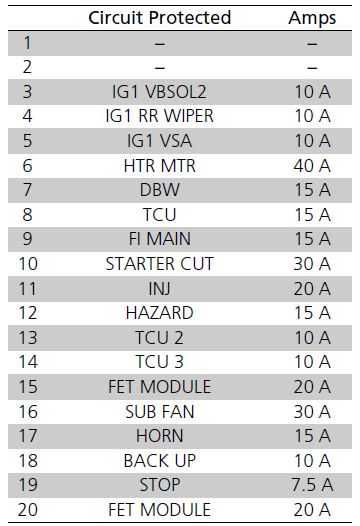
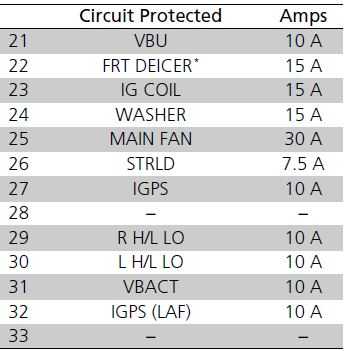
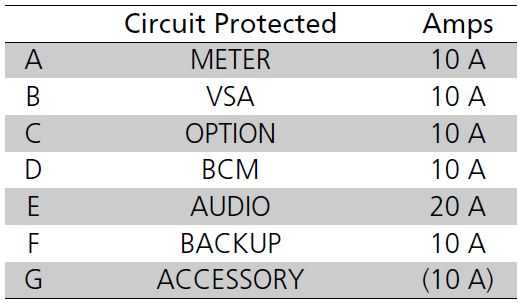
Circuit protected and fuse rating 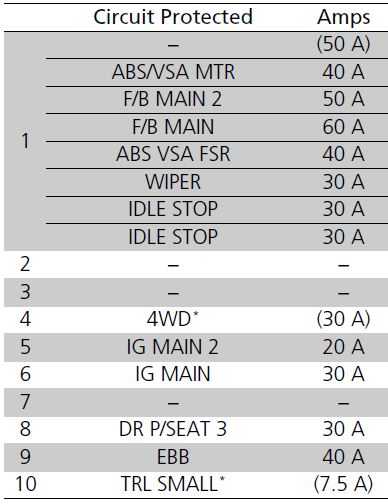

- Models without seat ventilator
- Models with seat ventilator
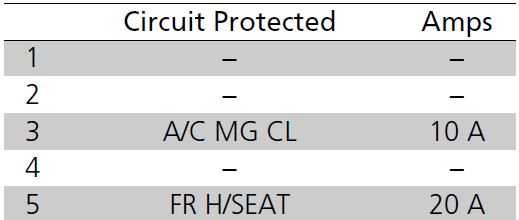
Engine Compartment Fuse Box Type C
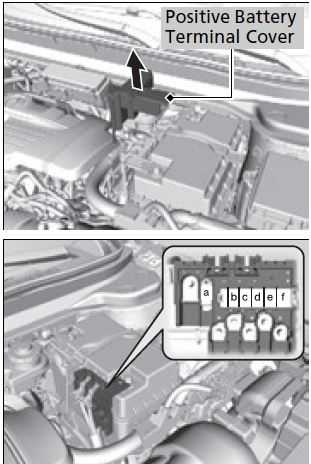
Remove the cover on the + terminal (as shown).
Replacement of this fuse should be done by a dealer. 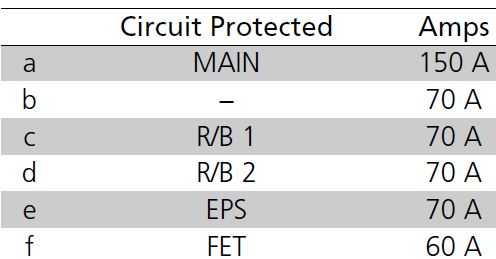
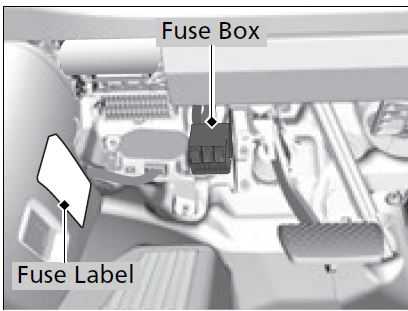
Interior Fuse Box Type A
Located under the dashboard.
Fuse locations are shown on the label on the side panel.
Locate the fuse in question by the fuse number and label number.
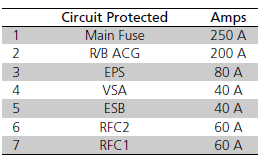
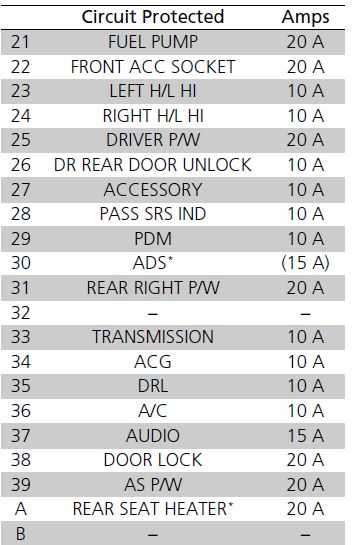
Circuit protected and fuse rating 
Interior Fuse Box Type B
Located under the dashboard.
Fuse locations are shown on the label on the side panel.
Locate the fuse in question by the fuse number and label number.
Interior Fuse Box Type C
Located inside the driver’s side outer panel.
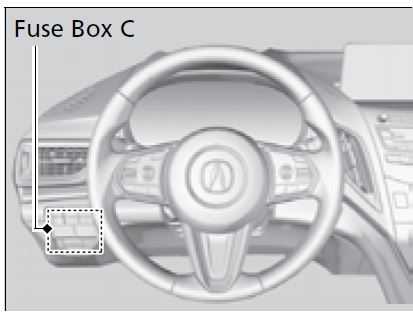
Replacement of this fuse should be done by a dealer.
Circuit protected and fuse rating
Inspecting and Changing Fuses
- Set the power mode to VEHICLE OFF (LOCK). Turn headlights and all accessories off.
- Remove the fuse box cover.
- Check the main fuse in the engine compartment fuse box type A.
- Look at the fuse through the hole.
- If the fuse is blown, have it replaced by a dealer.
 NOTICE
Replacing a fuse with one that has a higher rating greatly increases the chances of damaging the electrical system.
Use the charts to locate the fuse in question and confirm the specified amperage on the fuse label.
Fuse Locations p.678
Replace a fuse with a spare fuse of the same specified amperage.
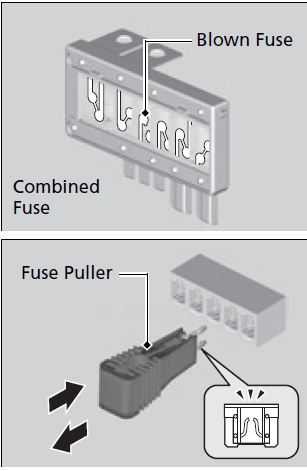
There is a fuse puller on the back of the engine compartment fuse box type A cover.
- Check the combined fuses in the engine compartment fuse box type A.
- Look into the space between the fuses.
- If the fuse is blown, have it replaced by a dealer.
Emergency Towing
Call a professional towing service if you need to tow your vehicle.
Flatbed equipment
The operator loads your vehicle on the back of a truck. This is the best way to transport your vehicle.
2WD models
Wheel lift equipment
The tow truck uses two pivoting arms that go under the front tires and lift them off the ground. The rear tires remain on the ground. This is an acceptable way to tow your vehicle.
WARNING
Securing the vehicle body to the flatbed tow truck can damage the vehicle or cause injury.
NOTICE
Trying to lift or tow your vehicle by the bumpers will cause serious damage. The bumpers are not designed to support the vehicle’s weight.
NOTICE
Improper towing such as towing behind a motorhome or other motor vehicle can damage the transmission.
Never tow your vehicle with just a rope or chain. It is very dangerous since ropes or chains may shift from side to side or break.
WD models
Make sure the parking brake is released. If you cannot release the parking brake, your vehicle must be transported by the flatbed equipment.x
Parking Brake P. 545
If You Cannot Unlock the Fuel Fill Door
What to Do If Unable to Unlock the Fuel Fill Door
If you cannot unlock the fuel fill door, use the following procedure.
- Open the tailgate.
- Push on the tabs, then remove the cover.

- Pull the release cord as shown.
- The release cord unlocks the fuel fill door when it is pulled.
After taking these steps, contact a dealer to have the vehicle checked.
If You Cannot Open the Tailgate
What to Do If Unable to Open the Tailgate
If you cannot open the tailgate, use the following procedure.
- Open the tailgate.
]Push the tabs to open the cover on the left side of cargo area. - Pull the release cord toward you.
- The release cord unlocks the fuel fill door when it is pulled.
After taking these steps, contact a dealer to have the vehicle checked..
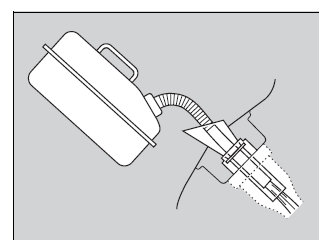
Refueling
Refueling From a Portable Fuel Container
- Turn off the engine.
- Open the fuel fill door.
How to Refuel P. 576 - Take the funnel out of tool box in the cargo area.
Types of Tools P. 640 - Place the end of the funnel on the lower part of filler opening, then insert it slowly and fully.
- Make sure that the end of the funnel goes down along with the filler pipe.
- Fill the tank with fuel from the portable fuel container.
- Pour fuel carefully so you do not spill any.
- Remove the funnel from the filler neck.
- Wipe up any fuel from the funnel before storing it.
- Shut the fuel fill door by hand.

WARNING
Gasoline is highly flammable and explosive. You can be burned or seriously injured when handling fuel.
- Stop the engine, and keep heat, sparks, and flames away.
Handle fuel only outdoors.
Wipe up spills immediately.
NOTICE
Do not insert the nozzle of a portable fuel container or any funnel other than the one provided with your vehicle. Doing so can damage the fuel system.
Do not try to pry open or push open the sealed fuel tank with foreign objects. This can damage the fuel system and its seal.
Make sure the fuel in the portable fuel container is gasoline before you refuel.
FAQ
The 2023 Acura RDX typically comes equipped with a MacPherson strut front suspension and a multi-link rear suspension for a balanced and comfortable ride.
Yes, the 2023 Acura RDX is often available with Super-Handling All-Wheel Drive (SH-AWD) for enhanced traction and handling.
The RDX often features an electric power-assisted steering (EPS) system, which provides precise steering control.
Some trim levels of the 2023 RDX may offer an adaptive suspension system that can adjust to different driving conditions for improved handling.
Yes, the RDX typically offers different driving modes, such as Sport and Comfort, allowing you to adjust handling characteristics to your preference.
The fuse box in the 2023 Acura RDX is usually located in the interior cabin, often under the dashboard on the driver’s side.
You can access the fuse box by opening the driver’s side door and removing the fuse box cover, which is typically labeled for each fuse’s function.
Fuses are designed to protect electrical circuits from overloading by breaking the circuit if excessive current flows, preventing damage to components and electrical fires.
If a fuse in your RDX blows, you should first identify the affected circuit using the fuse box diagram and then replace the blown fuse with a new one of the same rating.
The dashboard of the 2023 RDX typically features a range of indicators, including speedometer, tachometer, fuel gauge, temperature gauge, and various warning lights.
Warning lights like the check engine light indicate potential issues with the vehicle’s engine or emissions system, and it’s important to have them checked by a mechanic.
Yes, the RDX typically includes a TPMS indicator that alerts you when tire pressure is too low in one or more of the vehicle’s tires.
Yes, the RDX often includes an ABS indicator that illuminates briefly during startup and turns off once the system is ready.
Yes, the RDX may include indicators for active safety features, allowing you to monitor the status of these systems on the dashboard.
The owner’s manual typically provides detailed explanations for each indicator and warning light on the dashboard, helping you understand their meanings and actions to take when they illuminate.
Useful Link
View Full User Guide: ACURA RDX 2023 User Manual
Related Articles:
2024 Acura INTEGRA Specs, Price, Features, Mileage (Brochure)
2023 Acura TLX Specs, Price, Features, Mileage (Brochure)