2023 Airstream Touring Coach Interstate 19 Drain | Waste System Guide
A luxury and small RV, the 2023 Airstream Touring Coach Interstate 19 is made for those who want to travel without sacrificing comfort. The cutting-edge waste and drain system on this luxurious touring coach guarantees a smooth and hygienic journey. We’ll go into detail about important elements including the black water tank flush, waste system cleaning, winterizing and storing procedures, and the drain system in this introduction.
Drain and Waste System
Your touring coach has a drain and waste system that includes waste-holding tanks made from corrosion-free, moulded plastic, with trouble-free dump valves. The main (Black Water) holding tank enables you to use the toilet for several days away from disposal facilities. The wastewater from the sink, shower, bath, and lavatory drains into the auxiliary (Gray Water) holding tank. Each tank has its dump valve with both tanks draining through a common outlet. Therefore, only one sewer hose connection is needed when hooking up to a dump station. Almost all campgrounds will have dumping facilities. Park directories, such as Woodall’s and Rand McNally, also list dumping stations. Furthermore, the navigation system’s GPS can be used to locate nearby dumping stations or highlight stations along your route. Check the levels on your multiplex screen regularly. When the Black Water holding tank is full, sewage cannot be emptied from the toilet bowl. If the Gray Water holding tank is overfilled, drain water will back up into the shower floor pan and cause an unpleasant cleaning job. Never drain the tanks at any place other than an approved dumping station.
RV Drain System
WARNING
Never put wet-strength paper towels or tissues in your holding tank since they will not dissolve and can catch in the mechanism of the dump valve. Coloured toilet tissue is slower to dissolve than white. Most motorhome accessory stores offer tissue designed for RVs that will completely dissolve.
2023 Airstream Touring Coach Interstate 19 Owner’s Manual
Macerator Pump
The waste pump is the ideal solution for emptying holding tanks on touring coaches. The macerator section grinds waste down to a particle size of 1/8 in. maximum. The waste pump will macerate and pump all waste and tissue normally found in recreational vehicle waste systems.
CAUTION
The waste hose is pressurized when operating the macerator pump. Secure the loose hose end at the disposal facility with a supplied inlet adaptor before turning on the pump. The high-pressure waste hose is stored on an electric hose reel and connected to the Discharge Port Adaptor. It has a threaded, drip-proof valve with a versatile, two-size, threaded adaptor allowing the valve to be connected to 3 sizes of threaded inlets, including an exterior home sewer clean-out. The adaptor snaps over the valve threads.
A rubber ring is also provided to lodge into a non-threaded inlet. If the rubber ring seems loose when used, Airstream recommends using some type of weight to further secure the hose. Each holding tank, the macerator pump, and the macerator pump electric hose reel have individual switches which are located in the roadside utility compartment. Each valve switch has a light that illuminates to let you know the valve is opened. Pressing a dump valve switch and holding it for 2-3 seconds until it is lit opens a holding tank valve. Pressing it again for 2-3 seconds closes it. The macerator pump has an ON/OFF toggle switch. The reel has a switch for releasing and retracting the hose, once the hose is released it is deployed manually by pulling the hose out. To retract the hose, press and hold the retract button while guiding the hose back and forth onto the reel evenly.
NOTE
Do not run the Macerator pump for more than 15 minutes continuously. Do not run the Macerator pump dry for more than 30 seconds. THE MACERATOR WILL NOT HANDLE HARD SOLID OBJECTS, SANITARY NAPKINS OR RAGS. Never put wet-strength paper towels, tissues, or sanitary napkins in your holding tank. They will not dissolve and will jam the mechanism of the dump valve and the macerator pump impeller.
Waste System Maintenance
Emptying the Black and Gray Water water-holding tanks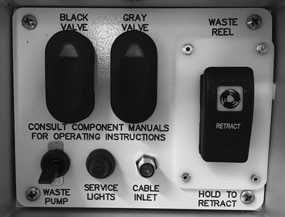
- Remove the high-pressure waste hose by opening the hose reel compartment door and momentarily pressing the “release” switch. Once released, the hose can be manually pulled out. Secure the hose at the disposal facility inlet using the threaded or rubber adaptor and open the drip-proof valve on the end of the hose.
CAUTION
The pressure from the macerator pump may push the hose from the inlet if the hose is not secured properly. - Open the Black Water valve. Empty the Black Water tank first and the Gray Water tank second, using the Gray Water to help flush the pump and hose of Black Water sewage.
- Turn on the macerator pump to liquefy and pump out the solids in the tank.
- When the black tank is empty, turn off the pump.
- Open the Gray Water tank valve and turn on the pump. Run until just before the pump runs dry. Any trickle of grey water left will remain in the discharge hose behind the drip-proof valve and is typical. Remember, running the pump dry for more than 30 seconds could damage the pump.
- Turn the drip-proof valve off and remove the hose adaptor from the dump station inlet. Retract the hose into the hose reel by holding the switch in the “retract” position. Be sure to guide the hose back and forth onto the reel evenly. Close the compartment door.
NOTE
Watch all connections while dumping. Close the dump valve immediately, turn off the pump, and close the hose drip-proof valve if a leak is noticed.
2023 Airstream Touring Coach Interstate 19 User Manual
Macerator Impeller Release Feature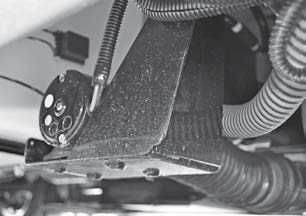
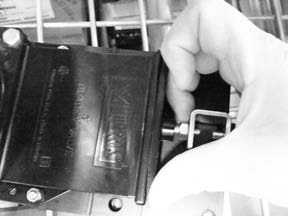
After long periods of non-use, a stuck impeller can be easily broken loose with a screwdriver inserted in the motor shaft slot. Remove the rubber boot, turn the shaft clockwise, and replace the rubber boot. The impeller can usually be found under the touring coach, near the macerator hose reel.
Manual Operation
In case the electric dump valves fail to open, manually pull/push the arm once, to open and close the valve. The manual arm is located under the vehicle, near the macerator hose reel.
Extended Stays
When you are in a park with a disposal facility, empty the tanks every few days or whenever they become almost full. Pumping a large volume of liquid through the tanks at a time will keep toilet paper and other solids completely washed away. Remember to empty the Black Water tank first and then the Gray Water tank using the Gray Water to flush the system. This practice will avoid the accumulation of solids in the tank, which could lead to an unpleasant cleaning job. Should solids accumulate, fill the tank about half full with water using the black tank flush inlet, and then drive the touring coach for a few miles. Don’t wait until the tank is packed solid. The turbulence and surging of the water will usually dissolve the solids into a suspension so the tank can be drained. Draining the tanks as described will protect them from freezing during storage.
Black Water Tank Flush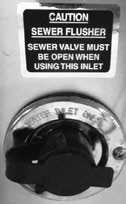
Inside the macerator hose reel utility compartment is a water hose connector for the “black tank flush.” To use, hook up a garden hose and turn it on. Within the tank, a head with multiple holes will spray the interior surface of the tank. Once the tank is about half full, turn the garden hose off and flush the water from the tank using the macerator pump. The gate valve should be closed for the first couple of minutes and then opened to let the water out in a rush. Repeat as needed. It is recommended the tank flush be used every time the black tank is emptied or the holes on the spray head may become clogged.
2023 Airstream Touring Coach Interstate 19 User Guide
Drain System Cleaning
The only cleaning agents that can be used without causing harm to the system are household ammonia and tri-sodium phosphate in small quantities. Do not use any product that contains any portion of petroleum distillates. This type of product will attack the rubber seals of your toilet and dump valve. Also, do not use any dish detergent or abrasive cleaners. All products should be marked as approved for ABS drainage systems.
Winterizing and Storage
When storing your touring coach, use the same precautions as you would in your own home regarding perishables, ventilation, winterizing, and rain protection. In addition, for prolonged storage periods, flush out all the drain lines and waste holding tanks. Also, drain the entire water system, including the water heater and the freshwater tank. Instructions for draining the water system are explained in the following paragraphs on winterizing. Twice a year, or after a long storage period, we suggest you take your unit to your Airstream dealer for a check-up and cleaning of the gas-operated appliances. The main consideration in winterizing is to guard against freezing damage to the freshwater lines, the waste drain lines, the waste holding tanks, the water heater, and the batteries.
Winterizing RV
NOTE
Sprinter recommends disconnecting the current to all chassis electric consumers using the engine battery disconnect cable if the vehicle sits for periods longer than 30 days. This will save jump starts, battery charge-ups, and possible battery damage and replacement. The Mercedes-Benz Sprinter Operator’s Manual describes its location, operation, and cautions in detail.
Storage Tips for RV
NOTE
In very cold weather, winterizing the motor coach is recommended to prevent damage to the waste systems.
Touring Coach Winterization
To perform these steps, you will need an adapter with an air regulator to connect an air compressor to the city water inlet, and access to an air compressor. Adapters are available at most RV stores.
Valve Locations for Winterization
Water heater bypass valve and drain valve – under the roadside ottoman behind the service panel. Low point drain valves – in the curbside wheel well. Freshwater tank drain valves – on the front of the freshwater tank under the touring coach. Water pump – under the passenger side powered ottoman behind the service panel. Winterization kit – behind an access door on the rear of the galley, behind the sliding door.
Instructions for Winterization
- Level the touring coach from side to side and from front to rear.
- Turn the water pump OFF and disconnect the city water.
- OPEN all the water faucets and shower heads, hot and cold, internal and external.
- Water Heater Bypass Valve Shown in Normal Use Position Turn the water heater bypass valve from its normal use position a quarter-turn to the BYPASS position and OPEN the water heater drain valve; see Water Heater Winterizing in this section. Best practice: leave a note as a reminder near the multiplex panel that the drain valve is open and the bypass valve needs to be reset to its normal use position before operation.
- OPEN the low-point drain valves.
- OPEN the fresh water tank drain valve.
- Allow all water to stop draining and proceed to the next step.
- For this step, you will need someone to operate the toilet foot pedal flush valve. Using the air compressor, apply a MAX 50 lbs. of air pressure at the city water inlet until no water remains in the system. Operate the foot pedal on the toilet. You may need to depress the pedal a few times to work out all the water by allowing some air pressure to build up between flushing. Once all the water has been blown from the system, disconnect the air and continue to the next step.
- For this step, have a catch pan or a towel ready to place under the water pump outlet to prevent water from running out into the touring coach. Remove the quick-connect outlet fitting from the water pump. Turn the pump ON briefly to remove any remaining water from the pump head and lines running from the tank.
- Check the water pump strainer to be sure no water remains.
- If you plan to add RV antifreeze using the optional steps below, RECONNECT the water pump. Otherwise, leave the fittings from the pump disconnected until the system is ready to be used again. Best practice: leave a note as a reminder near the multiplex panel that the water pump is disconnected.
- If you plan to add RV antifreeze using the optional procedure below, save this step for the end. Otherwise, for best practice: REMOVE the house batteries from your touring coach and store them in a cool, dry place where there is no danger of freezing. During extended storage periods, especially in cold weather conditions, check the batteries periodically and keep them fully charged for optimal life. If the storage period is 30 days or less, you can turn off the battery disconnect switch rather than remove the batteries.
WARNING
The furnace/water heater manufacturer does not recommend blowing air through the water heater or adding antifreeze to the water heater. Air pressure and antifreeze will cause damage to internal components. Refer to the manufacturer’s user manual for additional winterization instructions.
Optional-Additional Steps for Winterization
An additional step to winterization is to consider adding a non-toxic RV antifreeze (approved for drinking water systems) to the water lines using the pre-installed Winterization Kit. Before beginning, read the RV antifreeze manufacturer’s label for instructions specific to the antifreeze you plan to use. It may take a few gallons to fill the entire system so prepare accordingly. As you follow these steps, it will be helpful to have another person watching and operating the faucets, shower heads, and toilet valves.
RV Plumbing Guide
- RECONNECT all lines and CLOSE all drain valves.
- OPEN the sink and shower drains if they are closed.
- Ensure all the water faucets and shower heads, hot and cold, internal and external, are OPEN.
- Ensure the water heater bypass valve is in the BYPASS position as mentioned in the previous steps for winterization.
- G0 to the winterization kit and turn the valve handle to the winterizing position as indicated on the tag attached to the kit (shown above).
- Uncoil the hose attached to the kit, remove the hose cap, and insert the hose down to the bottom of the RV antifreeze container.
- Turn the water pump ON and run it until antifreeze starts coming out of the faucets. Once antifreeze is running from the taps you can start closing them. Move from one fixture to the next, shutting them off as you go until all the lines are full. Turn the
pump OFF as you empty and transition from one antifreeze container to the next. - Allow the antifreeze to flow down the drains. Flush the toilet and allow antifreeze to flow down the toilet. If equipped, operate the toilet hand sprayer until the antifreeze is coming out. If equipped, work the hand shower sprayer while holding it down in the shower until the antifreeze is coming out, and do the same with the external shower head. Dump any remaining small amounts of antifreeze down a drain.
- Shut the water pump OFF once all the lines are full.
- OPEN all the faucets and leave them open.
- Turn the winterization kit valve back to the normal use position, place the cap back on the hose, and coil it back up for storage.
WARNING
Remove all RV antifreeze spillage from all sinks, drain pans, and faucet parts after winterizing. Failure to do so could damage surface finishes. Do not use water to rinse antifreeze down the drain as it will dilute the antifreeze. - Complete step 11 from the previous set of instructions on winterization.
Water Heater Winterizing
The furnace/water heater has a drain lever located on the water heater, accessed from under the driver’s side powered ottoman seat. Move the lever 90° so that it is in the vertical position. Water will drain from the hot water container via the drainage socket. To close, move the lever 90° so that is in the horizontal position.
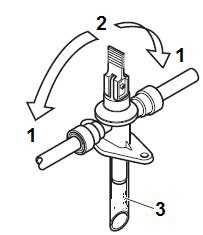
- Lever in “closed during furnace operation” position.
- Lever in “drainage” position.
- Drainage socket
WARNING
Scalding injury from hot water and/or tampering with the drain valve!
When travelling to a location where freezing conditions are likely, or when storing the trailer, be sure to drain all water from the water heater.
FAQS
The Airstream Interstate 19 features a dual-tank drain system for grey and black water. Gravity and a powerful pump facilitate efficient drainage.
Yes, the drain system is designed to handle both grey water (from sinks and showers) and black water (from the toilet) effectively.
Airstream has integrated user-friendly features, making waste system cleaning straightforward. Most tasks can be accomplished using easily accessible components.
Winterizing involves draining water from the plumbing system to prevent freezing. The process includes adding antifreeze and ensuring all water lines are properly cleared.
Yes, the Airstream Interstate 19 has recommended storage procedures to ensure the motorhome is protected during winter months. This includes securing the interior, covering exposed areas, and maintaining proper tyre pressure.
The owner’s manual specifies the type of antifreeze suitable for the Airstream Interstate 19. It’s important to use the recommended product to avoid damage to the plumbing system.
The black water tank flush system uses pressurized water to clean the tank thoroughly. It’s a convenient feature for maintaining sanitation and preventing odours.
The frequency of tank flushing depends on usage. Airstream generally recommends regular flushing after each trip or as needed to keep the system clean.
Airstream may recommend specific cleaning and maintenance products that are compatible with the materials used in the drain and waste system.
The owner’s manual likely guides extreme temperature conditions, such as using insulation or additional heating methods to protect the plumbing system.
Airstream typically designs their motorhomes with accessibility in mind. However, for major repairs, it’s recommended to consult with authorized service centres.
The Airstream Interstate 19 may come equipped with tank level indicators to provide real-time monitoring of grey and black water levels.
Tank capacities can vary, and specific details can be found in the vehicle specifications. This information is crucial for planning trips and managing waste during travels.
Airstream typically provides warranties on various components of their vehicles. Details regarding the warranty coverage for the drain and waste system can be found in the warranty documentation provided with the vehicle.
Useful Links
View Full User Guide: Airstream Touring Coach Interstate 19 2023 User Manual
Download Manuals: https://www.airstream.com/owners/manuals/
2023 Airstream Touring Coach Interstate 19 Carbon Monoxide Detector User Manual