Airstream Travel Trailer Bambi 2023 Tire Inspection and Storage User Manual
Tire Inspection and Storage
Before taking your trailer on a trip or when removing it from an extended storage period, make it a practice to inspect the overall condition of your tires. Check for any type of condition or damage that might result in failure. A thorough check should include both inside and outside sidewalls, tread area and the condition of hardware such as valve stems, valve caps, and wheels. The tread should be checked for any unusual wear, cracking, penetrations and/or cuts. An uneven wear pattern can indicate misalignment or worn suspension parts.
Since many RVs are used seasonally and sometimes stored for extended times, it is possible that tires will take many years to wear out. Tires, as any rubber product, will age over time. If tires show cracking in the sidewall or tread surfaces that are more than 2/32 in. deep, they should be replaced before your next trip or vacation. Store your RV in a cool dry area away from major heat sources and extreme cold. An enclosed storage area is best with no exposure to electromagnetic sources such as generators or transformers. If you must keep your trailer outside, cover your tires from direct sunlight. Take your trailer to your tire dealer for service to check or correct any of these conditions.
Tire and Wheel Replacement
It is possible to replace your tires with a different size, in some instances, to increase your load capacity with a different inflation pressure. If there is a reason to replace your tires with a different size, make sure the following checks are made before the purchase:
- Does the replacement tire have the load capacity that is needed for my trailer and will it fit properly inside the wheel well?
- Will the overall diameter difference affect the braking system?
- Is the increase in air pressure compatible with the maximum rated pressure stamped on the rim?
Most trailers are towed at or near maximum loads during hot weather and then left idle for months. In normal use, oils in the tire come to the surface during flexing and protect the rubber from ultraviolet light. But when the trailer tires sit idle too long, natural aging may cause the rubber to crack prematurely, especially in the sidewall area. Trailer tires over five years old should be inspected by a tire expert for cracking and replaced even if it has no apparent tread wear.
Max Load Single vs. Max Load Dual
Max Load Single refers to the tire rating for applications with only one wheel on each end of a single axle. Max Load Dual refers to the tire rating for dually wheels, where there are two wheels on each end of an axle for a total of 4 wheels on a single axle. Don’t confuse the terms Single and Dual with Tandem. A tandem axle refers to trailers with two axles, one behind the other. For Airstream Travel Trailers, refer to the Max Load Single rating.
WARNING
Do not mismatch wheels and tires. Axle systems are installed with hubs and drums that are compatible with many wheels used in the recreational vehicle industry that have matching bolt patterns. If the original manufacturer-installed equipment is in need of replacement, the wheel manufacturer should be contacted for proof of compatibility prior to replacement and use. Customers replacing original equipment that has not been tested for compatibility must ensure the replacements are compatible to the hub and drum assembly installed.
Such elements of compatibility include, but are not limited to:
- Diameter of the hub-mounting surface.
- Stud length and diameter.
- Location and number of studs.
- Center hole diameter for the wheel.
- Wheel-mounting offset from the rim center.
- Rated capacity of the wheel.
- Wheel fastener torque.
- Wheel nut size and shape.
- Impact of any added wheel accessories (such as decorative center caps) that could affect proper seating of the wheel to the hub surface.
Refer to the following table for wheel specifications.
| Wheel Specifications | ||
| Size/Center Size
In Inches |
Lug Pattern | Model |
| 15 x 6 / 5�5 | 6 | All Models |
| All wheels have zero offsets. | ||
Lug Nut Torquing
Trailer wheels must carry much higher loads per wheel than passenger car or truck wheels. Each wheel may carry 1000 pounds and higher. Furthermore, wheels on tandem axle trailers do not steer, and are subjected to very high side load stress whenever the trailer makes a tight turn. When going around corners, especially on slow, tight turns, the wheels are subject to very strong side loads. This tends to flex the wheel and gradually loosen the wheel nuts. Although the materials and manufacturing methods are maximized for this kind of service, these extra loads can cause stress, which can result in flexing and loosening of wheel nuts. Before each trip and any time a wheel is replaced, be sure to tighten the wheel nuts, following one of the lug-pattern sequences shown below. If the wheel was replaced, check the torque every 5, 25, and 50 miles.
If you notice wheel wobbling or hear a rattling sound coming from a wheel, especially at low speeds, a wheel lug nut may have come loose. This problem is usually caused by improper tightening, or by faulty or damaged lug bolt threads. If suspicious of a loose lug nut, safely stop vehicle as soon as possible. Put up warning devices and check the tightness of all the lug nuts. Tighten all lug nuts to the specified torque, using a torque wrench. If stud threads are damaged or faulty, get professional service help.
NOTE
Use a torque wrench to tighten lug nuts. Tightening by hand or with an impact wrench is not recommended.
NOTE
Torque Aluminum Wheels to 110 ft. bs and Steel Wheels to 100 ft. lbs.
Spare Tire Carrier
The spare tire for Airstreams is stored under the front of the trailer. The front handle of the tire carrier is a 1-in. tube protruding out from under the front A-frame on the curbside. It is secured by a bracket and bolting the inside of the A-frame rail. Removing the bolts allows the front on the tire carrier to be lowered and the spare tire to be removed.
WARNING
The spare tire carrier is designed to carry an undamaged tire and rim assembly of the type and size specified for the trailer. Never place a severely damaged wheel assembly with a damaged partial tire, or a rim only, in the carrier.
Axles and Bearings
NOTE
Never allow heat to be applied to the axle tube because the rubber providing the spring torsion action will be severely damaged.
Rubber Torsion Axle Alignment Specifications
| Toe-In and Camber Specifications | |
| Toe-In each side 1/16 in. | Tolerance 1/8 in + or – |
| Camber each side 3/4 degrees positive | Tolerance 3/4 degrees +
|
Wheel Bearing Maintenance
- Jack trailer at marked jack location pad behind axle on mainframe,
- Remove hubcap or spindle cover, wheel and tire.
- Remove cotter pin.
- Remove dust cap.
- Remove spindle nut and washer.
- Remove bearings and hub.
- Lay down hub with inside grease seal down. Knock out inner bearing and grease seal using wood or plastic dowel and hammer.
- Clean all parts thoroughly with kerosene.
- Check all bearings and races for chips or roughness of any kind. Any damaged component must be replaced.
- Pack bearing with a good grease (No 2 grade-265 ASTM penetration or equivalent).
- Install inner bearing.
- Install new grease seal in hub or rotor using wooden or rawhide mallet.
- Install hub and drum on spindle.
- Install outer bearing.
- Install washer and spindle nut.
- While rotating the wheel, tighten the spindle nut with a 12” wrench until there is a slight tension. Then back off one notch and install cotter pin. There should now be from .001” to .010” end play in hub. If not, back off one notch.
- Check the lug nuts at 5, 25 miles and recheck at 50 miles of travel. For torque specifications, see Specifications on page 4-3.
When packing bearings by hand, place a glob of grease in the palm of one hand and push the large end of the bearing down into the grease. Keep turning the bearing around and forcing it down through the grease until the grease is extruded up through the opposite end. Wipe the extra grease in your hand around the outside of the bearing. It is not necessary to fill the hub and dust cap with grease.
Brakes
Due to normal brake lining wear, the brakes and the controller setting should be checked every six months or 10,000 miles, whichever comes first.
Breakaway Switch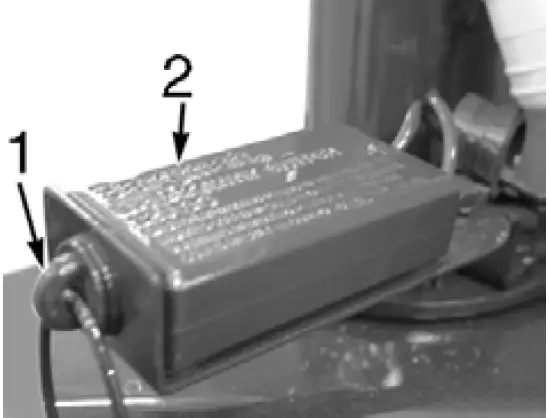
- Pin
- Breakaway Switch
- To prevent corrosion within the breakaway switch, pull the pin out and spray the inside of the switch through the hole with an electric contact cleaner (such as Spray- Kleen). Applying a drop of light household oil on the pin and the groove near the base of the pin will allow the pin to operate freely.
- Immediately reinsert the pin. Perform this procedure every 90 days.
CAUTION
Allow no more than 20 to 30 seconds for pin separation as damage to brake magnets may occur.
Reference Links
View Full User Guide: Airstream Travel Trailer Bambi 2023 User Manual
Download Manuals: https://www.airstream.com/owners/manuals/
Airstream Bolt 2023 Top Accessories
[amalinkspro_table id=”32452″ new-window=”on” nofollow=”on” addtocart=”off” /]