
Airstream Travel Trailer Bambi 2023 Monitor Panel User Manual
Monitor Panel
The display is the only system component that is accessed by the user. All user input to the display is done using the buttons along the bottom of the display.
NOTE
The 16’ Bambi combination Black/Grey tank requires only the “Black” button to be pressed to view the current tank level. Pressing “Grey” will result in “OPn” being displayed.
The display receives the information from the three sender pads via a single, two-conductor wire, and displays the level information in percent of full on a three-digit, LED display. When the front panel button for a particular tank is pressed, the display powers up and displays the level for that tank. If the button is pressed and released, the display will show the level for about 5 seconds and then shuts down automatically. If another button is pressed before the display shuts down, then the new level will immediately be shown. If the same button is pressed twice, the display will hold on that tank and continue to show updated levels for 5 minutes before shutting off. This allows the user to monitor the filling or draining of the tank. By pressing two buttons at once, the diagnostic functions can be accessed.
Sender pads are installed and stuck to the sides of the holding tank. The sender pad scans the water level through the tank wall using digital techniques programmed into the sender microprocessor.
To Read a Water or Sewer Tank Level
- Press the button corresponding to the tank to be checked and release it, the display will show the levels in percent on the LED display. If no other button is pressed, then the display shuts off after about 5 seconds.
- If another button (including BATT) is pressed before the 5-second time is up for the first button, the display will immediately switch to show the new level or voltage. The 5-second time-out is restarted every time a button is pressed.
- To continuously display a reading, press and release the desired button, and then press the same button a second time. When the button is released, the display will be on hold mode, which is indicated by the decimal point on the right-hand side turning on. While the display is in the hold mode it will recheck the level once per second so the user can watch the level change while the tank is being filled or drained. The display will automatically shut off after 5 minutes in hold mode. To end the hold mode before the 5 minutes is up, press any tank button, and the display will shut off.
To Read the Battery Voltage
- Press the BATT button and release it, the display will show the battery voltage on the LED display
- If no other button is pressed, then the display will shut down after about 5 seconds. If the BATT button is held down, the display will continuously recheck the voltage and show the updated value. The reading may flicker back and forth between two values.
- If another button is pressed before the 5-second time is up for the BATT button, the display will immediately switch to show the value for the new button. The 5-second time-out is restarted every time a button is pressed.
- There is no hold mode for the battery voltage
Refrigerator
Your Bambi is equipped with a 12V refrigerator. Review all refrigerator literature supplied in your owner’s packet or stored in the refrigerator prior to operating.
Operation
All units are supplied with a wide-range thermostat designed to sense the evaporator temperature. The coldest position on the thermostat is reached by turning the knob to the right (clockwise); conversely turning the thermostat knob to the left (counterclockwise) yields a warmer setting. To turn the refrigerator off, turn the knob counterclockwise to the STOP/OFF position (in some refrigerators this is reached by turning the knob counter clockwise past the click).
Startup
Turn the power on and set the thermostat between 3 and 4, or near the center. You can make further adjustments to suit your personal requirements after the box has cooled down. Allow the refrigerator to come down to temperature before loading with product. Adding pre-cooled product will help keep the temperature stable when loading. Setting the thermostat to a higher setting will not decrease the time required for the unit to cool down to its normal operating temperature.
Defrost and Cleaning
The frequency of defrost is dependent on the number of door openings, the ambient temperature and the humidity level. Typically, it is a good practice to defrost once there is 1/8 to 1/4 inch of frost buildup on the evaporator (cooling plate). When defrosting, the unit is shut off by turning the thermostat counterclockwise to the STOP/OFF position (in some refrigerators this is reached by turning the knob counterclockwise past the click). Prop the door open. We suggest placing a towel in the bottom of the refrigerator to catch excess moisture. Now that the unit has been defrosted, the interior can be cleaned with a non-abrasive cleaner. Do not use “Brillo” or “SOS” type abrasive pads, as they will score the surfaces. Baking soda is recommended.
CAUTION
Do not use mechanical means to remove frost, such as pointed or sharp objects to accelerate defrosting as this could result in puncturing the refrigerant circuit.
Solar System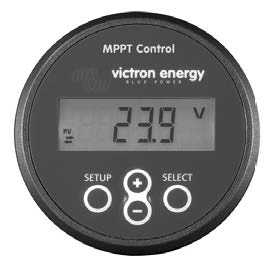
If equipped, the rooftop solar panels installed on your Airstream help maintain battery health, reduce operating expenses, and extend the battery life of the batteries. The solar system’s solar charge controller gathers energy from the individual solar panels and stores it in your batteries. The system features a display (shown above) that allows you to view live status information like solar watts and battery voltage.
To optimize solar charging, ensure the panels are clean and not shaded by trees or structures that might block the sun. Please refer to your owner’s packet for reference material that discusses the solar system and its operation.
The charge controller is configured for a three-step charging process:
- Bulk – The controller delivers as much charge current as possible to quickly recharge the batteries.
- Absorption – The controller switches to a constant voltage mode.
- Float – Voltage is applied to the batteries to maintain them in a fully charged state.
Airstreams manufactured without the solar option have been pre-wired to support solar panels. These units will have a 3-port rooftop-mounted plug-in that allows installing rooftop solar panels without running wires. In addition, a quick plug-in port suitable for a portable solar charging kit has been pre-wired at the front of the unit, near the battery box; see Solar Panel Wiring on page 8-22.
Water Heater
Electronic Ignition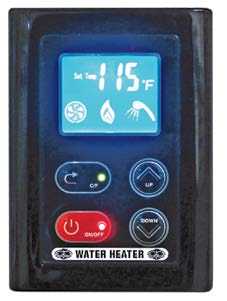
The Bambi is equipped with a continuous water heater featuring freeze protection, and direct spark ignition. The tankless water heater monitors inlet water temperature and flow, and output water temperature and flow. The water heater is controlled by the Control Center located on the wall above the bathroom sink. Turn on the power and press the temperature selection arrow to see current setting. Select desired temperature using the up and down arrow. Turn on the hot water faucet.
The switch used to light your electronic ignition water heater is located above the galley sink on 16’ models and in the bathroom on all other models. Normally, the burner will ignite in just a few seconds unless your LPG system has not been used for some time and air has filled the lines. The system will go into safety lockout, after 3 failed ignition attempts, before the air is expelled. If this happens and error code of “E1” will appear on the screen. Turning the Water Heater off for 30 seconds and then back on reinstates the ignition mode system’s.
Common Error Codes
- E1: Ignition failure of accidental flame off during ignition – Check that you have LP in the tanks, that other LP appliances work, and no debris or obstruction in the burner.
- E2: Flame sensing interrupted during normal operation, a buzzer will sound. Check that you have LP in the tanks, that other LP appliances work, and no debris or obstruction in the burner.
- En: System timer – System will shut off after 20 minutes of continuous usage
- Fd: Water heater operating in Winter Use – The water heater will run for a few seconds and then shut off in freezing conditions if the power is ON. This mode will only protect the Water Heater heat exchanger and not your Airstream’s plumbing system.
NOTE
Review the water heater literature supplied in your owner’s packet before proceeding.
NOTE
The water heater will not operate until a faucet is opened with a minimum water flow of .8 gallons per minute. This process could take up to 60 seconds to register.
WARNING
The water heater has built-in FREEZE PROTECTION and will intermittently cycle the burner when the water temperature reaches 3°C/ 38°F. To provide this freeze protection, the gas supply must be on, gas must be available and electrical power must be on.
CAUTION
This appliance does not have a pilot. It is equipped with an ignition device that automatically lights the burner. Do not try to light the burner by hand.
WARNING
It is dangerous to operate a Tankless Water Heater Unattended. This may occur accidentally if a sufficient leak develops or if a faucet is left open. For this reason the GSWH-2 will automatically shut off after running for 20 minutes and the display will show Error “En”
Reference Links
View Full User Guide: Airstream Travel Trailer Bambi 2023 User Manual
Download Manuals: https://www.airstream.com/owners/manuals/
Airstream 2023 Top Accessories
[amalinkspro_table id=”32452″ new-window=”on” nofollow=”on” addtocart=”off” /]