Airstream Travel Trailer Bambi 2023 Black and Gray Water Tank Draining User Manual
Black and Gray Water Tank Draining
To empty one or both tanks, attach the sewer hose by pressing the bayonet fitting onto the dump valve outlet and rotate clockwise until it feels solid and secure. Attach the outlet end of the hose to the sewage outlet, making sure the hose is placed so it will drain completely. Pull the main dump valve handle as far as it will go and wait until the tank is drained. Close the dump valve and partially refill the tank with clean water and repeat the process until clean. The main holding tank must be flushed out until all paper and waste material is removed. Should solids accumulate, close the dump valve, fill the tank about half full with water, then tow the trailer for a few miles. The turbulence and surging of the water will usually dissolve the solids into suspension so the tank can be drained. Pull the auxiliary tank valve handle to drain the gray water tank. When dumping, the main holding tank should be dumped first, then the auxiliary holding tank. This will help to rinse out the sewer line with auxiliary holding tank water. Replace the bayonet ring cap prior to traveling.
16-ft. Model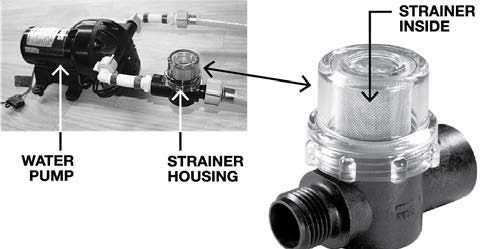
- Combination Wastewater/Sewage (Gray/Black)
Tank Valve - Light
- Light Switch
- Drain Cap (Drain Hose Hookup)
All Other Models
- Wastewater (Gray) Tank Valve
- Light
- Light Switch
- Sewage (Black) Tank Valve
- Drain Cap (Drain Hose Hookup)
Black Water Tank Dumping
When you are in a park and connected to a sewer outlet, keep the main holding tank dump valve closed, and empty the tank every few days, or whenever it becomes almost full. Only by sending a large volume of liquid, all at once, through the main holding tank will toilet paper and other solids completely wash away. This practice will avoid the accumulation of solids in the main holding tank, which could lead to an unpleasant cleaning job. Should solids accumulate, close the dump valve, fill the tank about half full with water, then tow the trailer for a few miles. The turbulence and surging of the water will usually dissolve the solids into suspension so the tank can be drained. Draining the tanks as described will protect them from freezing during storage. When traveling in sub-freezing temperatures, use a winterizing solution designed for RV use. Follow the directions on the container.
Black Water Tank Flush
The trailer has a water hose connector specifically
For flushing the Black Water Tank. To use, hook up a garden hose and turn it on. Within the tank, a head with multiple holes will spray the interior surface of the tank. Once the tank is about half full, turn the garden hose off and flush the water from the tank using the dump valve. The valve should be closed for the first couple of minutes, and then opened to let the water out in a rush. Repeat as needed. It is recommended the tank flush be used on a regular basis or the holes on the spray head may become clogged.
Drain Systems Cleaning
The only cleaning agents that can be used without causing harm to the system are household ammonia and tri-sodium phosphate in small quantities. Do not use any product that contains any portion of petroleum distillates. This type of product will attack the rubber seals of your toilet and dump valve. Also, do not use any dish detergent or abrasive cleaners. All products should be marked as approved for ABS drainage systems.
Winterizing and Storage
When storing your trailer for short or long periods, use the same precautions as you would in your own home in regard to perishables, ventilation, and rain protection. In addition, for prolonged storage periods, flush out all the drain lines and the holding tanks. Also drain the entire water system including the water heater and the water storage tank. Instructions for draining the water system are explained in the following paragraphs on winterizing.
The main consideration in winterizing your trailer is to guard against freeze damage to the freshwater system lines, tank, and pump, the waste drain system including the traps and tanks, the water heater, and the batteries.
To completely winterize your trailer follow this procedure:
- Level the trailer from side to side and front to rear. Open all faucets.
- Turn the water pump switch to the ON position to expel water from the storage tank
- Open all drain valves including exterior water service valve, if applicable.
- While the water is draining from the system, open and flush the toilet-flushing valve. Depress hand spray thumb button on the telephone shower head while holding down inside the tub and drain all water from the flexible hose.
- Unscrew the heads on both spray units and store.
- Turn the pump switch OFF after all water has been removed from the storage tank.
- Disconnect outlet hose from water pump. Turn the pump on until all the water is expelled. This water, about 1/2 cup, can be caught in a towel or rag. Reconnect hose.
- Lower the front of the trailer as far as the jack will allow until water ceases to drain, then crank the jack up as high as it will go and allow any remaining water to drain out.
- After the water has stopped running from the drain lines, apply 50 lb. of air pressure at the city water inlet. An air-to-city water adapter is available from your dealer’s RV accessory store. Be sure the toilet valve, all drain valves, and faucets are open and pump outlet hose is disconnected. This can be done at a service station and will force any remaining water from the water heater and remove any water that may be trapped in low areas.
- Pour a cup of non-toxic RV antifreeze that has been approved and listed by a recognized testing authority such as Underwriter Lab into the lavatory, sink and tub drains to prevent trap freeze-up.
- Be sure to open the waste-holding tank dump valves and drain and flush the tanks thoroughly (this is very important as the sewage in the tanks, if frozen, could seriously damage the tanks). Plan ahead and have this done at a dump station.
- Remove the batteries from your trailer and store in a cool, dry place where there is no danger of freezing. It is very important for optimum life of a battery to check it periodically and to keep it fully charged.
CAUTION
Remove all RV antifreeze spillage from all drain and faucet parts after winterizing. Failure to do so could damage the plumbing fixture’s finish. Do not use water to rinse antifreeze down the drain as it will dilute the antifreeze.
Optional; An additional step to winterization is to consider adding a non-toxic RV antifreeze (approved for drinking water systems) to the water lines using the pre-installed Winterization Kit. Before beginning, read the RV antifreeze manufacturer’s label for instructions specific to the antifreeze you plan to use. It may take 2-3 gallons to fill the entire system so prepare accordingly. It will be helpful to have another person watching and operating the faucets and shower heads as you follow these steps. The Winterization Kit is near the water pump, see Water Pump Access Locations on page 8-10. For drain valve locations, see Drain Valve Locations on page
- Reconnect all lines and shower heads that were disconnected in the previous steps.
- Close all the drain valves.
- Open the sink and shower drains if they are closed.
- Open all the faucets, including the shower head faucet handle and, if equipped, the external shower head.
- Go to the winterization kit and turn the valve handle to the winterizing position as indicated on the tag attached to the kit (shown above).
- Uncoil the hose attached to the kit, remove the hose cap, and insert the hose down to the bottom of the RV antifreeze container.
- Turn the pump switch on and run it until antifreeze starts coming out of the faucets. Once antifreeze runs from one tap, turn it off and continue to
the next one. Move from one fixture to the next, shutting them off as you go until all the lines are full. As you empty each antifreeze container, turn the pump off, transition to a full container, and turn the pump back on to continue. - Allow the antifreeze to flow down drains. Flush the toilet and allow antifreeze to flow down the toilet. If equipped, operate the toilet hand sprayer until antifreeze is coming out. Work the hand shower sprayer while holding it down in the tub until antifreeze is coming out, and if equipped, do the same with the external shower head. Any remaining antifreeze can be dumped down a drain.
- Shut the pump off once all the lines are full. 1
- Open all the faucets and leave them open.
- Turn the winterization kit valve back to the normal use position, place the cap back on the hose, and coil it back up for storage.
CAUTION
Remove all RV antifreeze spillage from all drain and faucet parts after winterizing. Failure to do so could damage the plumbing fixture’s finish. Do not use water to rinse antifreeze down the drain as it will dilute the antifreeze.
Restoring Service After Winter
- Re-install the fully charged batteries.
- Close the dump valve, all water faucets, and freshwater tank drain.
- Add water to the freshwater tank.
- Turn on the water pump.
- Open and close the faucets one at a time until the water runs clear at all faucets signaling RV non-toxic antifreeze is flushed out of lines. Go back and recheck water clarity at all faucets.
- Turn off the water pump.
- Hook up to a city water supply, open the faucets again, and recheck water clarity.
Reference Links
View Full User Guide: Airstream Travel Trailer Bambi 2023 User Manual
Download Manuals: https://www.airstream.com/owners/manuals/
Airstream Bolt 2023 Top Accessories
[amalinkspro_table id=”32452″ new-window=”on” nofollow=”on” addtocart=”off” /]