
 Airstream Travel Trailer International 2023 Rear Hatch and Screen User Manual
Rear Hatch and Screen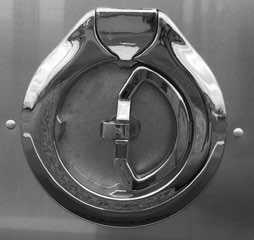
Some 25FB and 27FB models are equipped with a rear hatch and pull-down screen. With the handle in the latched position (shown above) lift up and rotate the handle clockwise, till the handle is in the opposite direction, to unlatch the door and pull open. When closing the hatch make sure the handle is in the unlatched, left side, position. Close the hatch and rotate the handle counter-clockwise so the handle is in the latched, right side, position. Always be sure to lock the rear hatch when not in use. When the rear hatch is opened a screen can be pulled down from the hatch’s upper threshold and latched, via magnets, onto the floor. To open, simply pull up on the screen and allow it to retract upwards.
Emergency Escape Windows
To remove the screen, pull out the screen cord by the cord loop at the bottom portion of the window. Turn the two red latches inward and lift the two red arms on each side, in unison, to open the window and push it out for clearance.
Front End Protection
Window Stone Guards
The tinted solar plexiglass window stone guards on the front of your Airstream provide added protection from road debris while traveling and reduce the effects of sun rays. Raise the center window guard to allow air to flow when the window is open. To raise, unhook the two rubber T-handles on the bottom of the guard, lift the guard to the desired height, and tighten the thumbscrews on each support arm. Be sure to lower and fasten the guard when high winds are approaching and before travel. The corner window guards are removable for cleaning. Airstream recommends removing the corner guards from the unit when cleaning to avoid damaging the guards. There are two screws on each corner guard near the center guard. A quarter-turn will loosen the screws, and the guards will swing outward on their hinges. Lift the guards off the hinges to remove them.
CAUTION
Close window guards before high winds and storm conditions approach, or when towing to avoid damage to the trailer and window guards that cannot be covered by warranty.
Stainless Steel Rock Guards
Stainless steel rock guards protect the front end from road debris. You can clean behind the rock guards by swinging them forward on their hinges. They are locked in place with two acorn-style nuts, removable with a 7/16” wrench.
Power Awning
Complete operating instructions have been provided with your awning. Make sure your traveling companion is familiar with the operation of the awning. The awning’s primary function is sun protection. It is not waterproof, therefore, roll up your awning in case of rain, wind, or snow. Clear tape is placed between the exterior skin and the awning fabric to prevent the awning fabric from rubbing on the coating, thus wearing through it. Inspect the tape every year or after a long trip. Have it replaced if it begins to wear thin? LED light strips have been installed with your awning providing accent lighting. The LED lights are operated by a dimmer switch located just inside the entry door. Units with power awnings installed have a power awning lock switch located on the awning control panel. When OFF this switch will disconnect the power to the awning. Airstream recommends the awning lock switch be turned OFF while traveling.
NOTE
If wind or extended periods of rain are expected, roll up the awning and secure in the traveling position.
CAUTION
The effects of wind and rain on any awning are unpredictable. Severe damage to the trailer and/or the awning may result and cannot be covered by warranty. If the power to the awning has been turned off or interrupted, the entry door must be closed before retracting the awning. When power is interrupted, the awning controller must reestablish its “home” position by completing a “closed/reset cycle.” This is a normal procedure whenever power to the awning controller is interrupted. During the close/reset cycle, the awning arms will fully lower before the awning retracts. If the main entry door is left open during this process, the awning’s gas rafter will contact the door, damaging the gas rafter. If you turn off the power to the awning, or if power is lost while it is extended, follow these steps to retract it:
- Close the entry door, press the retract/close button, and wait for the awning to come to a complete stop. The close/reset cycle is a timed process that prohibits the awning from completely closing, protecting it from damage.
- Press the extend/open button and when the awning starts to extend, press the retract/close button once to stop the awning.
- To complete the process, press the retract/close button once again to finish retracting the awning. After the awning has finished closing, the “Close” LED will illuminate. The home position has been restored.
CAUTION
To avoid damaging the entry door, awning, and awning gas rafter after power to the awning has been interrupted, ensure the door is closed before retracting the awning. Gravity Water Fill The gravity water fill is located on the side of the trailer, behind a locked compartment. It is used to fill the fresh water tank with potable water. A small vent is located next to the port to allow air to expel from the tank as it is filled. Fill the water tank by inserting a high-pressure RV/Marine FDA approved drinking water hose of at least ½-in. diameter made from material that is tasteless, odorless, and non-toxic. It’s a good idea to let the water run through the hose for a short time to flush it out. Rivers sometimes fill their tanks with “home” water to avoid strange water that may be distasteful to them on short outings. Remember, the more water you carry in the fresh water tank, the less cargo carrying capacity you have for other items. The amount of water in the tank may be checked on the Monitor Panel.
City Water Hookup
The city water hook-up is located on the side of the trailer. For consistent water flow and plumbing line safety, an in-line regulator limits pressure to 50 psi. Use a tasteless, odorless, non-toxic, high-pressure hose of at least 1/2 in. diameter designed for RV use. The city water inlet is a standard garden hose thread. We suggest you carry two lengths of hose in order to reach hookups farther away than normal, as well as to have a spare. After hooking up the hose and turning on the city water valve provided in the park, slowly open a faucet. There will be a lot of spurts and sputtering until all the air is expelled from the trailer system. If the water heater is empty, it will take some time before all the air is expelled and a steady flow of water occurs at the faucet. Once a steady flow is achieved at one faucet, the others should be opened long enough to expel the air in the lines going to them. Your plumbing system has a built-in pressure regulator to protect your lines and faucets from extremely high pressures on some city water systems.
Reference Links
View Full User Guide: Airstream Travel Trailer International 2023 User Manual
Download Manuals: https://www.airstream.com/owners/manuals/
Airstream 2023 Top Accessories
[amalinkspro_table id=”32452″ new-window=”on” nofollow=”on” addtocart=”off” /]