
Airstream Travel Trailer International 2023 Winterizing and Storage User Manual
Winterizing and Storage
When storing your trailer for short or long periods, use the same precautions as you would in your own home in regard to perishables, ventilation, and rain protection. In addition, for prolonged storage periods, flush out all the drain lines and the holding tanks. Also drain the entire water system including the water heater and the water storage tank. Instructions for draining the water system are explained in the following paragraphs on winterizing. The main consideration in winterizing your trailer is to guard against freeze damage to the fresh water system lines, tank, and pump, the waste drain system including the traps and tanks, the water heater, and the batteries.
To completely winterize your trailer follow this procedure:
- Level the trailer from side to side and front to rear. Open all faucets.
- Turn the water pump switch to the ON position to expel water from the storage tank
- Open all drain valves including exterior water service valve.
- While the water is draining from the system, open and flush the toilet-flushing valve. Depress hand spray thumb button on the telephone shower head while holding down inside the tub and drain all water from the flexible hose. Unscrew the heads on both spray units and store.
- Turn the pump switch OFF after all water has been removed from the storage tank.
- Disconnect outlet hose from water pump.
- Lower the front of the trailer as far as the jack will allow until water ceases to drain, then crank the jack up as high as it will go and allow any remaining water to drain out.
- After the water has stopped running from the drain lines, apply 50 lb. of air pressure at the city water inlet. An air-to-city water adapter is available from your dealer’s RV accessory store. Be sure the toilet valve, all drain valves, and faucets are open and the pump outlet hose is disconnected. This can be done at a service station and will force any remaining water from the water heater and remove any water that may be trapped in low areas.
- Pour a cup of non-toxic RV antifreeze that has been approved and listed by a recognized testing authority such as Underwriter Lab into the lavatory, sink and tub drains to prevent trap freeze-up.
- Be sure to open the waste-holding tank dump valves and drain and flush the tanks thoroughly (this is very important as the sewage in the tanks, if frozen, could seriously damage the tanks). Plan ahead and have this done at a dump station.
- Remove the batteries from your trailer and store in a cool, dry place where there is no danger of freezing. It is very important for optimum life of a battery to check it periodically and to keep it fully charged.
CAUTION
Remove all RV antifreeze spillage from all drain and faucet parts after winterizing. Failure to do so could result in damage to the plumbing fixture’s finish.
Optional;
An additional step to winterization is to consider adding a non-toxic RV antifreeze (approved for drinking water systems) to the water lines using the pre-installed Winterization Kit. Before beginning, read the RV antifreeze manufacturer’s label for instructions specific to the antifreeze you plan to use. It may take 2-3 gallons to fill the entire system so prepare accordingly. It will be helpful to have another person watching and operating the faucets and showerheads as you follow these steps. The Winterization Kit is near the water pump. See water pump access locations and drain valve locations in Section 8.
- Reconnect all lines and showerheads that were disconnected in the previous steps.
- Close all the drain valves.
- Open the sink and shower drains if they are closed.
- Open all the faucets, including the showerhead faucet handle and, if equipped, the external showerhead.
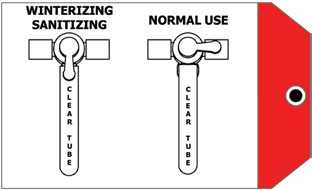
- Go to the winterization kit and turn the valve handle to the winterizing position as indicated on the tag attached to the kit (shown above).
- Uncoil the hose attached to the kit, remove the hose cap, and insert the hose down to the bottom of the RV antifreeze container.
- Turn the pump switch on and run it until antifreeze starts coming out of the faucets. Once antifreeze runs from one tap, turn it off and continue to the next one. Move from one fixture to the next, shutting them off as you go until all the lines are full. As you empty each antifreeze container, turn the pump off, transition to a full container, and turn the pump back on to continue.
- Allow the antifreeze to flow down the drains. Flush the toilet and allow antifreeze to flow down the toilet. If equipped, operate the toilet hand sprayer until the antifreeze is coming out. Work the hand shower sprayer while holding it down in the tub until antifreeze is coming out, and if equipped, do the same with the external showerhead. Any remaining antifreeze can be dumped down a drain.
- Shut the pump off once all the lines are full.
- Open all the faucets and leave them open.
- Turn the winterization kit valve back to the normal use position, place the cap back on the hose, and coil it back up for storage.
CAUTION
Remove all RV antifreeze spillage from all drain and faucet parts after winterizing. Failure to do so could damage the plumbing fixture’s finish. Do not use water to rinse antifreeze down the drain as it will dilute the antifreeze.
Restoring Service After Winter
- Re-install the fully charged batteries.
- Close the dump valve, all water faucets, and freshwater tank drain.
- Add water to the freshwater tank.
- Turn on the water pump.
- Open and close the faucets one at a time until the water runs clear at all faucets signaling RV non-toxic antifreeze is flushed out of lines. Go back and recheck water clarity at all faucets.
- Turn off the water pump.
- Hook up to a city water supply, open the faucets again, and recheck water clarity.
Main Door Care
Lubrication
Apply a little paraffin or grease to the striker pockets and a slight amount of household oil to the lock mechanisms to keep the locks operating smoothly. Also, lubricate the hinge pins periodically with household oil. Use the lubricant sparingly and immediately remove any excess from the exterior skin.
Adjustment
Main door adjustment can be affected by:
- The trailer being improperly leveled (causing twisting of trailer body/shell).*
- Striker bolt alignment being out of adjustment (the striker bolt is adjustable).
- Screen door being out of adjustment, resulting in a situation of the door rubbing the frame, or not closing flush (which will create pressure on the door).
- Main door has come open at some point, introducing a change to the contour of the door frame (check for sheared rivets on the interior skin of door).
When using the stabilizers (for eliminating movement-not leveling) on your Airstream, be sure to check the fit of your main door before and after extending the stabilizers. The fit of the main door can be affected if trailer is not level side to side and front to back.
Windows
Sticking Windows
Forcing the window open may cause the window to shatter. Always follow the guidelines below for releasing a stuck window.
- Unlatch the window latches securing the windows on the interior.
- Apply 303 Aerospace Protectant to a nylon wedge window tool.
- Starting in the corner, tuck the end of the nylon tool under the glass and gently slide to the opposite end.
- Once the window is released, wash the gasket with a mild soap and water solution, and dry.
- Apply 303 Aerospace Protectant (Airstream part 44845WR-01) to the window gasket. To apply, spray/pour 303 onto a soft rag or sponge and apply a generous coating directly to the gasket. Remove any residue that comes in contact with the exterior aluminum skin. This may be ordered through the Airstream dealer or at the Airstream online store at www.airstream.com.
CAUTION
Prying up or applying pressure to the window may cause the window to shatter, resulting in personal injury or unit damage.
Reference Links
View Full User Guide: Airstream Travel Trailer International 2023 User Manual
Download Manuals: https://www.airstream.com/owners/manuals/
Airstream Bolt 2023 Top Accessories
[amalinkspro_table id=”32452″ new-window=”on” nofollow=”on” addtocart=”off” /]