
Airstream Travel Trailer International 2023 User Manual
Airstream Travel Trailer International 2023, the epitome of sophistication and luxury on the road. This iconic travel trailer combines timeless design with modern amenities, offering a truly elevated travel experience. The International showcases a sleek and aerodynamic exterior, exuding elegance and capturing attention wherever it goes. Step inside, and you’ll be immersed in a world of refined comfort and impeccable craftsmanship. The thoughtfully designed interior features premium materials, contemporary finishes, and intelligent layouts that optimize space and functionality. From the fully equipped gourmet kitchen to the plush sleeping quarters and luxurious bathroom, every detail has been meticulously curated to provide the utmost in style and convenience. With advanced technology, including integrated entertainment systems and smart home features, the Airstream Travel Trailer International 2023 sets a new standard for luxurious travel, inviting you to embark on unforgettable journeys in utmost comfort and sophistication.
Airstream Travel Trailer International 2023 INTRODUCTION and Safety User Manual
Airstream Travel Trailer International 2023 INTRODUCTION and Safety User Manual
WARNING
A warning is used for a hazardous situation that, if not avoided, could result in death or serious injury to persons.
CAUTION
Caution is used to advise caution when performing actions that could result in minor or moderate injury to persons and/or damage to equipment.
NOTE
A note is used to address practices not related to personal injury. This applies to hazardous situations involving property damage only.
Optional items may be available on all, or particular models. Additionally, some optional items can only be included during the manufacturing phase and cannot later be added to the trailer. The inclusion of optional items information in this manual does not imply or suggest the availability, application, suitability, or inclusion for any specific unit.
Safety
Safety Precautions
Many things can be construed as safety-related, but the most important is your common sense. If you are careless with matches, cigarettes, flammable material, or any other hazardous material, you surely realize your potential for accidents is greatly increased.
You will find many safety recommendations in this section and throughout the manual. The following recommendations are the ones we consider to be the most important.
Transporting of Passengers
The transporting of people in the trailer puts their lives at risk and may be illegal. The trailer does not have seat belts, therefore, it is not designed to carry passengers.
Towing and Weight Distribution
Weight distribution is an important factor when loading your travel trailer. A recreational vehicle with the cargo distributed properly will result in efficient, trouble-free towing. Refer to Section 7 – Towing for more information.
Controlling Sway
Sway or fishtailing is the sideways action of a trailer caused by external forces. Excessive sway of your travel trailer can lead to the rollover of the trailer and tow vehicle, resulting in serious injury or death. Refer to Section 7 – Towing for more information.
Read all Instructions for INTRODUCTION and Safety User Manual
Airstream Travel Trailer International 2023 Alarms and Detectors User Manual
Airstream Travel Trailer International 2023 Alarms and Detectors User Manual
Alarms and Detectors
Smoke Alarm
A smoke alarm is provided with your trailer. A manual pertaining to the alarm is included in the paperwork given to you at the dealership. Please read and follow all care, maintenance, and safety information contained in the smoke alarm manual. The smoke alarm will beep once a minute for at least 30 days when the battery is weak. The battery must immediately be replaced with a fresh one.
WARNING
Alarm battery is shipped deactivated. Check your alarm for proper battery installation. To activate battery, new Airstream owner’s must install included battery to proper orientation.
WARNING
Smoke alarms have a limited life. The unit should be replaced immediately if it is not operating properly. You should always replace a smoke alarm after 10 years from the date of purchase. Write the purchase date on the space provided on the back of unit. If service is required or you have not received a smoke alarm user’s manual, please contact the manufacturer, your dealer, or Airstream Customer Service.
Liquid Propane Gas (LPG)/Carbon Monoxide (CO) Detector

This detector has a five-year life; see the end-of-life notification in the detector’s manual. Please read the entire detector manual before operating the unit. The LPG/CO detector is located in the galley area. LPG is a mixture of gases produced and sold commercially as a fuel for heating and cooking appliances. LPG is highly flammable and, as a result, can be explosive if ignited under certain circumstances. LPG is heavier than air and, if confined in a closed space, will accumulate close to the floor. The LPG/CO detector is designed to alarm when propane gas exceeds 10% of the lower-explosive limit for more than 30 seconds or if CO gas reaches unsafe levels. When propane gas is detected the horn will sound with constant beeps and the red LED will be on. If CO gas is detected the horn will sound with 4 rapid chirps followed by a 4-second pause and the red LED will flash rapidly. Your LPG/CO detector is wired directly to your trailer battery and incorporates a 1-amp, in-line fuse. It has no internal battery backup. In normal standby mode, the LED indicator will be green.
Low Voltage
The operating voltage for the detector is 12 VDC. The actual voltage supplied to the detector in a recreational vehicle may drop below the minimum 8 VDC. The detector provides the user with a low voltage warning before reaching that level and will provide additional distinct, clear warnings and alarms after the 8 VDC level is reached. However, if available power supplied to the unit is below the operating voltage of 8 VDC, the detector will not detect gas or provide protection against dangerous levels of LPG.
NOTE
If the low voltage warning sounds, the detector will need to be reset by disconnecting the battery, before the normal operation will occur.
Detector Test
If the Silence/Test button is pressed while in normal operation, the alarm will perform a self-test of the CO sensor, propane sensor, and battery voltage. It is recommended to perform a self-test weekly, after powering up from storage, and before each trip. If the self-test passes, the alarm will perform 2 cycles of the CO horn pattern (4 rapid chirps followed by a 4-second pause), followed by 2 cycles of the propane horn pattern (constantly beeping).
WARNING
Activation of this detector indicates the possible presence of LPG, which can cause an explosion and/or fire, causing serious injury or death. This normally indicates a leak in the LPG installation or an LPG appliance. Extinguish all open flames, open your windows and door, and evacuate the unit immediately. Do not activate any electrical switch. Turn off the LPG at your gas tank(s). Do not re-enter your unit until a qualified repair technician has corrected the problem and certified the system as safe.
WARNING
It is not recommended that the detector be disconnected from the battery during periods of storage. There is a small heater on the sensor of the device that burns away impurities in the air during periods of normal use. During periods when power is interrupted, impurities can build up on the sensor. When power is returned to the detector, the detector alarm may activate until the impurities are burned off. This could take a number of hours, during which time the alarm will be constantly on.
WARNING
Have a qualified technician check your LPG system annually or if you detect any signs of leaks or malfunctions.
NOTE
Refer to Section 5 – Interior and Section 6 – Exterior for additional LPG warnings and safety information.
WARNING
Failure to replace this product with the “REPLACE BY DATE” printed on the alarm may result in death by Carbon Monoxide poisoning. Replace By Date is five (5) years from the date of manufacture.
WARNING
Activation of your Carbon Monoxide alarm’s audible horn indicates the presence of Carbon Monoxide that can kill you. Leave the area immediately!
WARNING
This product is intended for use in ordinary, indoor locations of family living units. It is not designed to measure compliance with occupational safety and health administration (OSHA) commercial or industrial standards. Individuals who are at special risk from Carbon Monoxide exposure by reason of age, pregnancy, or medical condition may consider using warning devices that provide audible and visual signals for Carbon Monoxide concentration under 30 ppm. If in doubt, consult your medical practitioner. This Carbon Monoxide Detector Is Not.
Read all Instructions for Alarms and Detectors User Manual
Airstream Travel Trailer International 2023 Carbon Monoxide User Manual
Airstream Travel Trailer International 2023 Carbon Monoxide User Manual
What Is Carbon Monoxide
Carbon Monoxide (CO) is a highly poisonous gas that is released when fuels are burned. It is invisible, has no smell, and is therefore very difficult to detect with the human senses. Under normal conditions, in a room where fuel-burning appliances are well maintained and correctly ventilated, the amount of CO released into the room by appliances is not dangerous. These fuels include wood, coal, charcoal, oil, natural gas, gasoline, kerosene, and propane. Common appliances are often sources of CO. If they are not properly maintained, are improperly ventilated, or malfunction, CO levels can rise quickly. CO is a real danger in air-tight trailers with added insulation, sealed windows, and other weatherproofing that can trap CO inside.
Conditions that can result in potentially dangerous CO situations
- Excessive spillage or reverse-venting of fuel-burning appliances caused by outdoor conditions, such as:
- Wind direction and/or velocity, including high gusts of wind.
- Heavy air in the vent pipes (cold/humid air with extended periods between cycles).
- Negative pressure differential resulting from use of exhaust fans.
- Simultaneous operation of several fuel-burning appliances competing for limited internal air.
- Vent-pipe connections vibrating loose from clothes dryers, furnaces, or water heaters.
- Obstructions in or unconventional vent-pipe designs which can amplify the above situations.
- Extended use of un-vented fuel burning devices.
- Temperature increase that can trap exhaust gases near the ground.
Symptoms of Carbon Monoxide Poisoning
- Mild Exposure – Slight headache, nausea, vomiting, fatigue (flu-like symptoms).
- Medium Exposure – Throbbing headache, drowsiness, confusion, fast heart rate.
- Extreme Exposure – Convulsions, unconsciousness, heart and lung failure. Exposure to CO can cause brain damage and/or death.
WARNING
Many causes of reported CARBON MONOXIDE POISONING indicate that while victims are aware that they are not well, they become so disoriented that they are unable to save themselves by either exiting the area or calling for assistance. Also, young children and pets may be the first to be affected.
WARNING
Test units used in RVs after the vehicle has been in storage, before each trip, and once a week while in use. Failure to test units used in RVs as described may remove your protection.
Fire Extinguisher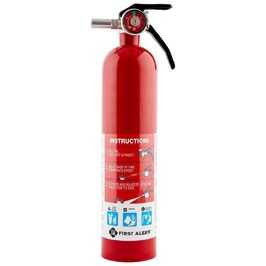
The fire extinguisher should be checked for charge on a regular basis. Make sure your family knows how to release the extinguisher storage bracket and how to properly operate the extinguisher. Check with your local fire department for professional advice on its operation and use if you find the directions on the extinguisher unclear. They will be able and willing to assist you and your family.
Safety
As always, safety should be a top priority. Ensure you and everyone traveling with you can operate the main door and emergency exit window rapidly, without light. Contemplate other means of escape in case the designated exits are blocked.
The escape windows(s) are identified by their red release handles. Lift up on both latches to release the escape window. Push on the glass and it will swing clear.
WARNING
The window operation should be checked before each trip and the latches lubricated with silicon spray or an equivalent lubricant every 3 months.
WARNING
Read the directions on the fire extinguisher carefully. If you have any doubts as to its operation, you and your family should practice, and then replace or recharge the extinguisher. Your local fire department will be able to assist you and answer any questions.
GENERALGENERAL INFORMA INFORMATIONTION
General Information
Limited Warranty Policy
This Limited Warranty Covers
- The first retail owner and any subsequent owners
- ONLY those portions of a NEW travel trailer not excluded under the section “What is Not Covered”, when sold by an authorized dealership and used
for its intended purpose of recreational travel and camping; and, (iii) ONLY defects in workmanship performed and/or materials used to assemble those portions of your travel trailer not excluded under the section “What is Not Covered”. “Defect” means the failure of the workmanship performed and/or materials used to conform with the design and manufacturing specifications and tolerances of Airstream. The Limited Warranty is transferable and the subsequent owner’s warranty coverage period shall be the unexpired balance of the original warranty coverage period. A completed copy of the Warranty Transfer Form must be submitted to Airstream at the time of resale.
When you request and accept the performance of warranty repairs under the terms of this Limited Warranty, you are accepting all terms of this Limited Warranty, including by way of example, warranty limitations and disclaimers, the forum selection clause and the clause reducing the time period when suit must be filed for breach. If any term of condition in this limited warranty conflicts with your state’s Uniform Commercial Code (“UCC”) as interpreted by courts within your state, the provisions of your state’s UCC are varied as allowed for by USS 1-302.
Read all Instructions for Carbon Monoxide User Manual
Airstream Travel Trailer International 2023 Service User Manual
Airstream Travel Trailer International 2023 Service User Manual
Service
Before leaving the factory, every vital part of the trailer is tested for performance. Each test is signed and certified by an inspector. After the trailer arrives on your dealer’s lot, all vital parts and systems are again tested. When you take delivery of your new trailer, you will receive a complete check out. At that time, a specified list of performance checks on your trailer equipment will be conducted, and any deficiencies you have experienced since taking delivery will be corrected. Please contact your dealer if your trailer needs service. Major service under your Airstream Limited Warranty is available through our nationwide network of Airstream Dealer Service Centers. To find a dealer, please visit, www.Airstream.com to use our dealer locator. Occasionally, dealerships change, or new dealers are added that may not appear on the website immediately. Please note that all centers operate on an appointment basis for the utmost efficiency. When you require service for your trailer from the Airstream Factory Service Center or a Certified Dealer Service Center, please contact the service manager for an appointment, and inform them if you are unable to keep the appointment date or wish to change it. Service may be arranged at the Factory Service Center by contacting the Service Coordinator at:
Airstream Factory Service Center,
428 West Pike Street P.O. Box 629
Jackson Center, Ohio 45334-0629
Phone: (937) 596-6111 or (877) 596-6111
Reporting Safety Defects
If you believe that your vehicle has a defect that could cause a crash or could cause injury or death, you should immediately inform the National Highway Traffic Safety Administration (NHTSA), in addition to notifying Airstream Inc.
If NHTSA receives similar complaints, it may open an investigation, and if it finds that a safety defect exists in a group of vehicles, it may order a recall and remedy campaign. However, NHTSA cannot become involved in individual problems between you, your dealer, or Airstream Inc.
To contact NHTSA, you may either call the Vehicle Safety Hotline toll-free at 1-888-327-4236 (TTY: 1-800-424-9153), go to www.safercar.gov, or write to: Administrator, NHTSA, 1200 New Jersey Avenue, S.E.,
Washington, DC 20590. You can also obtain other information about motor vehicle safety from www.safercar.gov.
Camping
Suggested Pre-Travel Check List Interior
- Turn off the water pump switch.
- Close windows and vents.
- Lock all interior cabinet doors.
- Latch refrigerator door. (Seal containers first.)
- Hold down or securely stack all loose, hard, and sharp objects.
- Fasten sliding and faldetta doors.
- Drain the toilet bowl.
- Turn off the interior lights.
- Lower wall-mounted tables to be even with dinette seats. Place Pedestal tables in an upright position.
- Pull up or retract the step.
- Lower blinds.
- Secure and lock the main door.
Exterior
- Disconnect and stow the electrical hookup cord, the sewer (flush out), and the water hookup hoses.
- Turn off the gas at LP tanks.
- Retract stabilizing jacks.
- Check the hitch for proper attachment.
- Check safety chains and breakaway switch cables.
- Fully retract the hitch jack. Remove and stow the jack stand or wood block.
- Check clearance and stoplights.
- Check lug nuts.
- Check tires for correct pressure.
- Adjust tow vehicle mirrors.
- Pull forward about 50 ft, test brakes, and check site for forgotten objects and cleanliness.
Trailer Equipment and Accessories
- Water hose, 5/8-in. high-pressure, tasteless, odorless, non-toxic, (2 25-ft. sections)
- Y connection water hose.
- Sewer hose with clamp.
- Drain cap with hose drain.
- Holding tank cleaner and deodorizer.
- Power cord adapter, 30-amp capacity.
- 30-ft. electric cord, 30-amp capacity.
- 30-ft. electric cord, 50-amp capacity.
- Woodblocks for leveling.
- Wheel chocks.
Read all Instructions for Service User Manual
Airstream Travel Trailer International 2023 Leveling User Manual
Airstream Travel Trailer International 2023 Leveling User Manual
Leveling
Block or chock the wheels to keep the trailer from rolling. Level from front to rear by disconnecting the hitch from the tow vehicle, putting the jack pad under the hitch jack, and adjusting the jack up or down until the trailer is level. Use stabilizing jacks at all four corners, as shown in the diagram, to eliminate the natural spring action of the axles.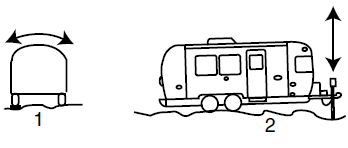
- Side to Side
- Front to Rear
Stabilizing Jacks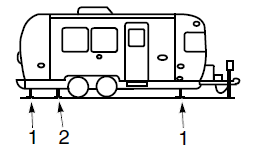
- Stabilizing Jack Location
- Lifting Jack Location
WARNING
Stabilizing jacks should only be used to stabilize trailer. Do not use jacks to lift the trailer.
WARNING
Whenever the trailer must be lifted with a jack, as when changing a tire, always place the lifting jack under the main frame rail. A label is provided to indicate the proper position for the jack. Never use stabilizing jacks to lift the trailer. Refer to Section 8 – Maintenance for further information on jacking.
Effects Of Prolonged Occupancy
Your trailer was designed primarily for recreational use and short-term occupancy. If you expect to occupy the trailer for an extended period, be prepared to deal with condensation and the humid conditions that may be encountered. Moisture can condense on the inside surfaces of the trailer during cold weather when the relative humidity of the interior air is high. This condition is increased because the insulated walls of a recreation vehicle are much thinner than house walls. Also, the relatively small volume and tight, compact construction of modern recreational vehicles mean the normal living activities of even a few occupants will lead to rapid moisture saturation. Estimates indicate a family of four can vaporize up to three gallons of water daily through breathing, cooking, bathing, and washing. Unless the water vapor is carried outside by ventilation or condensed by a dehumidifier, it will condense on the inside of the windows and walls as moisture, or in cold weather, as frost or ice. It may also condense out of sight, within the walls or the ceiling, where it will manifest itself as warped or stained panels.
The appearance of these conditions may indicate a serious problem. When you recognize the signs of excessive moisture and condensation in the trailer, action should be taken to minimize their effects.
Tips To Control Condensation
Allow excess moisture to escape to the outside when:
- Bathing, washing dishes, hair drying, etc.
- Laundering, using appliances and using non-vented gas burners.
- Cooking (Always use the stove vent hood).
Avoid dead air spaces by:
- Using a fan to keep air circulating.
- Leaving closet and cabinet doors partially open.
To help alleviate cold weather condensation:
- Keep the temperature as reasonably cool during cold weather as possible.
- Allow your trailer to breathe; do not make it airtight.
- Allow some warm air to be removed and some cool outside air in.
- Do not allow the furnace to recycle humid interior air; provide reasonable ventilation.
In hot weather, starting the air conditioner early will help remove excess humidity from the air while lowering temperatures.
NOTE
Your trailer is not designed, nor intended, for permanent housing. Use of this product for long-term or permanent occupancy may lead
to premature deterioration of the structure, interior finishes, fabrics, carpeting, and drapes. Damage or deterioration due to long-term occupancy may not be considered normal, and may, under the terms of the warranty, constitute misuse, abuse, or neglect, and may therefore reduce the warranty protection.
Molds
Molds are microscopic organisms that naturally occur in virtually every environment, indoors and out. Outdoors, and mold growth is important in the decomposition of plants. Indoors, mold growth is unfavorable. Left unchecked, molds break down natural materials such as wood products and fabrics. Protect your investment by understanding the potential risks mold imposes.
Contributing Factors To Mold Growth
For mold growth to occur, temperatures, indoors or outdoors, must be between 40° and 100°F, and must also have a source of moisture, such as humidity, standing water, damp materials, etc. Indoors, the most rapid growth occurs with warm and humid conditions.
Inhibiting Mold Growth
By controlling relative humidity, the growth of mold and mildew can be inhibited. In warm climates, the use of the air conditioner will reduce the relative humidity. Vents are located in the bathing and cooking areas. Constant use of these vents is advised during food preparation and bathing, even during colder weather. Additionally, opening a window during these activities will assist in ventilation. In extremely humid conditions, the use of a dehumidifier can be helpful.
Frequent use of your trailer or cleaning regularly is important preventive measure. Additionally, any spills should be wiped up quickly and dried as soon as possible. Avoid leaving damp items lying about. On safe surfaces, use mold-or mildew-killing cleaning products. Check sealants regularly, and reseal when necessary to avoid water leaks. Proper preventive maintenance to the trailer and its accessories, as described both in this manual and in the accompanying literature, will provide the best protection to the trailer. For more information concerning controlling moisture in the trailer, read Tips to Control Condensation in this section.
NOTE
If using a dehumidifier, please read and follow all manufacturer instructions and recommendations for the use and cleaning of the dehumidifier.
Waste Water Systems
The main parts of the wastewater system are the toilet, holding tanks, and tank dump valves (see Section 8 – Maintenance for dump valve information). The system is designed to provide complete self-contained toilet facilities, while on the road or parked, without being connected to a sewage line. It may also be used in the stationary position while connected to a sewage hose. Keep the dump valves closed with either method and empty the tanks when they are nearly full. The idea is to send a large volume of water through the tanks and hose at the same time to float solids away.
Read all Instructions for Leveling User Manual
Airstream Travel Trailer International 2023 Winter Traveling User Manual
Airstream Travel Trailer International 2023 Winter Traveling User Manual
Winter Traveling
Traveling in sub-freezing temperatures will require certain precautions to protect the plumbing system and your personal belongings from being damaged by freezing.
Whenever possible, the heat should be kept set to a constant temperature. It is easier for the furnace to keep a constant room temperature than allow the trailer temperature to drop to 50°F, and then attempt to raise it to room temperature.
Some states do not allow LPG to be turned on while moving. While traveling in these states, simply use your common sense. How cold is it? How long will
it be before you can turn the heat back on? Is the temperature dropping or rising? Remember, when towing at 50 MPH, the wind chill factor will cause the interior of the trailer to cool much faster than a trailer that is parked.
- When parked in sub-freezing temperatures, make sure to keep a full supply of LPG and plug into an external AC power source whenever possible.
- If your stay is longer than overnight, you should try to have 120-volt electricity available. Minimize the use of electricity if a 120-volt power source is not available.
- Leave cabinet doors, wardrobes, and bed doors partially open to allow warm air to circulate around plumbing lines and fixtures. Insulate and/or wrap your exterior water lines with heat tape.
NOTE
Drain and winterize all models if the water systems are not being used during winter traveling. Refer to Section 8 – Maintenance in this manual for winterizing instructions.
Floor Plans And Specifications
Floor Plans
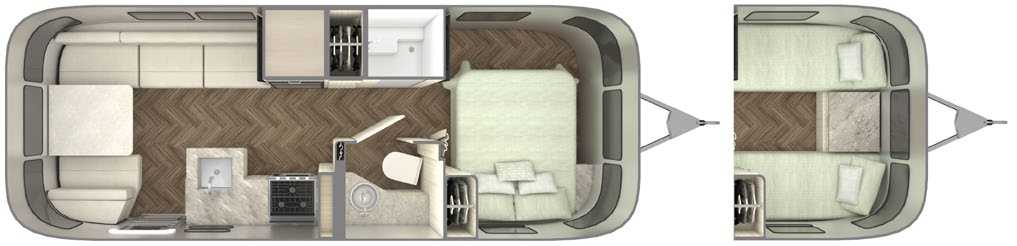
23FB International.
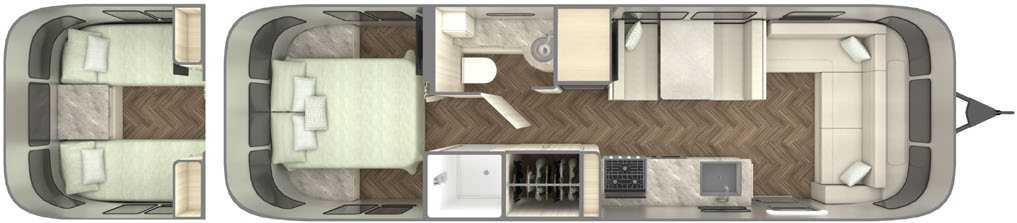
25RB International

25FB International
Floor Plans And Specifications
27FB International
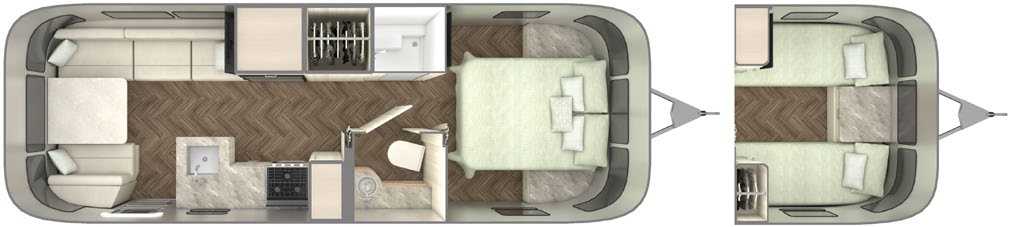
28RB International
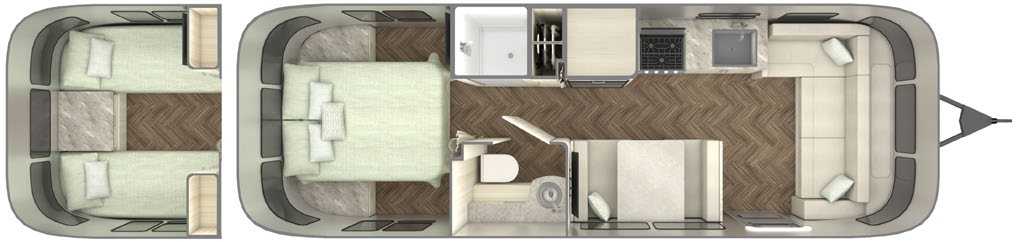
30RB International
Specifications
Specification Chart
NOTE
All product information and specifications listed are as accurate as possible at the time of printing. Since we continually strive to improve our products, all specifications are subject to change without notice. All capacities are approximate and dimensions are nominal and are checked and updated throughout the model year.
|
Item |
Model | |||||
| 23FB | 25RB | 25FB | 27FB | 28RB | 30RB | |
| Exterior length | 23′ 9″ | 25′ 11″ | 25′ 11″ | 28′ | 28′ | 30′ 11″ |
| Exterior width | 8′ | 8′ 5�5″ | 8′ 5�5″ | 8′ 5�5″ | 8′ 5�5″ | 8′ 5�5″ |
| Exterior height with A/C | 9′ 9″ | 9′ 9″ | 9′ 9″ | 9′ 9″ | 9′ 9″ | 9′ 9″ |
| Interior width | 7′ 7″ | 8′ 1″ | 8′ 1″ | 8′ 1″ | 8′ 1″ | 8′ 1″ |
| Interior height with A/C | 6′ 7�5″ | 6′ 7�5″ | 6′ 7�5″ | 6′ 7�5″ | 6′ 7�5″ | 6′ 7�5″ |
| Hitch ball height | 19″ | 19″ | 19″ | 19″ | 19″ | 19″ |
| Hitch ball size | 2 5/16” | 2 5/16” | 2 5/16” | 2 5/16” | 2 5/16” | 2 5/16” |
| UBW (lbs. with LP & batteries) | 5000 | 5700 | 5600 | 6100 | 6100 | 6517 |
| Hitch weight (lbs. with LP & batteries) | 500 | 850 | 875 | 850 | 875 | 898 |
| GVWR (lbs.) | 6000 | 7300 | 7300 | 7600 | 7600 | 8800 |
| Front GAWR (lbs.) | 3500 | 3800 | 3800 | 3800 | 3800 | 4500 |
| Rear GAWR (lbs.) | 3500 | 3800 | 3800 | 3800 | 3800 | 4500 |
| NCC (lbs.) | 1000 | 1600 | 1700 | 1500 | 1500 | 2283 |
| Fresh water tank (gal.) | 37 | 39 | 37 | 37 | 37 | 52 |
| Gray water tank (gal.) | 37 | 31 | 35 | 35 | 34 | 41 |
| Black water tank (gal.) | 17 | 34 | 40 | 40 | 34 | 35 |
| Lug nut torque (Max), aluminum wheels (ft lbs.) | 110 | 110 | 110 | 110 | 110 | 110 |
| Lug nut torque (Max), steel wheel (spare) (ft lbs.) | 100 | 100 | 100 | 100 | 100 | 100 |
| Tire size | ST225/75R15 | |||||
| Tire Max cold* inflation pressure (psi) | 80 | |||||
| Tire Max load rating (lbs.) | 2830 | |||||
The term cold refers to how long a tire has sat idle. Max cold inflation pressure should be checked in the morning (after sitting idle for at least three hours) before driving more than a few miles, or before rising ambient temperatures and the sun’s radiant heat can affect tire pressure.
Read all Instructions for Winter Traveling User Manual
Airstream Travel Trailer International 2023 Information and Cleaning User Manual
Airstream Travel Trailer International 2023 Information and Cleaning User Manual
The interior of all Airstream trailers has been designed for comfort, convenience, durability, and appearance. How you use it and how you take care of it, naturally, depends on you. However, if you learn to operate the interior components and take care of them and the trailer properly, this knowledge will add to your pleasure, as well as the long life of your trailer. All material should be professionally dry cleaned to remove any overall soiled condition.
Upholstery
Spot clean ultra leather regularly with mild soap and water. For stubborn stains, wipe with isopropyl (rubbing alcohol) as soon as possible. Sanitize using a disinfectant such as a 5:1 water/bleach solution. Air dry or dry quickly with a hair dryer on warm setting.
NOTE
Never remove cushion covers for separate dry cleaning or washing. Any tumble cleaning method can destroy the backing, and/or shrink or otherwise damage upholstery fabric.
WARNING
Keep your furniture and family safe from fires caused by careless smoking. Do not smoke when drowsy. Remove immediately any glowing ash or a lighted cigarette that falls onto furniture. Smoldering smoking material can cause upholstered furniture fires.
Interior Aluminum Skin
Interior aluminum skin can be cleaned by washing with any mild non-abrasive soap or detergent. Cleaning should be followed by a thorough clean water rinse. Drying the unit with a chamois or a soft cloth may prevent spots and streaks. Do not use abrasive cleaners or utensils on the aluminum skin as it is coated with a clear coat that could be damaged. Airstream recommends using Pledge® All-Purpose Cleaner to clean interior surfaces including the aluminum skin.
NOTE
When washing or polishing your trailer, always wipe with the grain of the metal.
Curtains
The curtains are on a track. Undo the Velcro at the seams to slide them open. Airstream recommends dry cleaning only for the curtains. To remove them, remove the top screw from the endcap of the curtain track, pull the endcap off, and slide the curtains off.
NOTE
All drapery materials and mattress covers must be professionally dry-cleaned.
Interior Woodwork
The finish on the interior woodwork is a high quality furniture finish and should be treated as any fine furniture finish. Use a high quality furniture cleaner which does NOT contain ammonia or bleach. One good choice is Murphy Oil Soap Clean and Shine.
Counter Area
The solid surface countertops can be cleaned with soap and water, or you can use a common solvent on tough spots. Do not use abrasive cleaners since they could scratch the surface. A protective pad should always be used under hot utensils or pans. Sanding minor damaged areas can repair solid counters.
Read all instructions for Information and Cleaning User Manual
Airstream Travel Trailer International 2023 Electrical User Manual
Airstream Travel Trailer International 2023 Electrical User Manual
Electrical
Battery/12-Volt System Information
The major portion of electrical power in your Airstream is 12-volt. The 12-volt current powers all gas appliances for controls and/or ignition as well as lighting. An exception would be the range which has its own ignition source. All 12-volt current comes through the battery system in the front of the trailer. The batteries are accessible in the battery box on the A-frame of your trailer. Power from the batteries goes to a set of Type 2 thermal breakers. The breakers are tied together by a brass bus bar. One breaker (30 amp) protects the 12-volt tow vehicle charge line coming from the 7-way cord. Another breaker (20 amp) feeds the trailer brake breakaway switch located near the hitch coupler. A 50-amp breaker feeds the battery disconnect relay. The current leaves the relay and travels to the 12-volt distribution panel, located in the converter, and then to the rest of the trailer. Open the decorative door on the front of the converter to access the panel and its fuses. A 12-volt layout diagram is shown in Section 8 -Maintenance.
If you replace a blown fuse and it immediately blows again, do not replace the fuse again until a qualified service technician can correct the problem.
If the replacement fuse holds for a week or more and the gap in the fusible metal is barely melted apart, this usually indicates an overload condition. Reducing the number of lights or appliances used on that particular circuit at the same time could prevent any further fuse failure.
Refer to Section 8 – Maintenance for important battery maintenance information.
Battery Disconnect Switch
The battery disconnect switch is labeled “Battery Power,” and is used to separate the batteries from the 12-volt distribution panel.
The battery disconnect switch has a green backlight when the switch is turned ON, and the batteries’ voltage is within normal operating range. When the battery voltage drops to low, the green light will blink for 5 minutes, indicating the batteries must be charged. If the batteries do not begin to receive a charge, the disconnect switch will shut off to protect the batteries from damage.
When the trailer is plugged into an external AC power source the 12-volt distribution panel will receive power from the converter and the batteries will be charged through the converter charging system regardless of if the battery switch is in the ON/OFF position. If the trailer is NOT plugged into an external AC power source and the switch is turned to OFF the batteries are disconnected and the 12-volt fuse panel will not receive power from the converter. The converter will not charge the batteries with the switch in this position and no shoreline power is present. The OFF position is intended for storage of the trailer or when power conservation is desired.
The charge in the 12-volt batteries can be replenished, depending on the tow vehicle, from the tow vehicle alternator through the 7-way cord. This charge will flow to the batteries regardless of the battery disconnect switch position. Likewise, if ON or OFF, the solar panel will still charge the batteries.
NOTE
Even with the battery disconnect switch in the OFF position the LP detector will have a small parasitic draw.
Inverter
Your Airstream is equipped with a 1000W pure sine wave inverter that converts 12-volt electricity from your batteries into 120-volt power to power the TV’s, as well as, additional labeled 120-volt receptacles. The Inverter is designed with both under-voltage and overvoltage protection to protect the inverter and the battery bank. If the inverter senses too high of a voltage being used, it may shut down. Unplug items that might be using too much current and a manual reset is required. The remote display is located in the Galley area. Below are some of the features.
Display Features
Power Button: Press to turn on; hold to turn off
Select Button: Cycles between display states: Input Voltage, Output Voltage, Output Power, Sleep, Error Code (if applicable)
Power Indicator: Lights up green when the inverter is on • Fault Indicator: Flashes red when an error has occurred
Shore Indicator: Lights up yellow when AC input is detected
Low Bat Warning Indicator: Lights up red when the battery is nearing the end of its charge
Sleep: Lights automatically dim after 30 seconds
NOTE
An operation manual for the inverter has been provided with your owner’s packet. Their manual contains information and error codes that should be reviewed prior to operating.
Read all instructions for Electrical User Manual
Airstream Travel Trailer International 2023 Power Circuits User Manual
Airstream Travel Trailer International 2023 Power Circuits User Guide
12-Volt Power Circuits
The current in the converter system is 12 volts direct current (12 VDC) negative grounded. Power sources that supply 12-VDC current to the system are as follows:
- Main charge line from tow vehicle
- Trailer batteries
- Converter
The power sources listed above are all electrically connected to the 12-volt distribution fuse panel that distributes current to interior branch circuits. The circuits provide power to operate all 12-volt DC lights, pumps, motors, and appliances.
The power converter is a solid-state electronic power supply and is maintenance-free. It is so self-sufficient and quiet that you will probably not know it is working except for the fact that your batteries are always charged, and your 12-volt lights and appliances always work.
If any 12-volt appliance fails to operate, first check your 12-volt distribution fuse block, located behind the decorative front door in the front right-hand corner of the converter, and inspect all fuses. If a fuse is opened or blown, replace it with the same size fuse (never install a larger fuse). If the fuse opens again, have an electrician or certified RV technician locate the circuit trouble. Replace blown fuses only with the same type and amperage size previously used.
If the power converter is not working, first confirm the RV supply or shoreline cord is plugged in to a live circuit. Then check all the 120-volt breakers in your RV distribution panel to make sure they are on. If the breaker is tripped, follow the instructions to reset the breakers. If the breaker trips again, consult an electrician or certified RV technician.
Converter Operation
The power converter is designed to supply the nominal 12-volt-filtered DC power for all 12-volt-operated devices encountered in RV service. Although the converter is an excellent battery charger, the converter does not require a battery to be connected to it for proper operation.
NOTE
When installing a battery(ies), always observe polarity. Connecting a battery in reverse polarity will blow the power converter main fuses located on the 12-volt DC distribution fuse block.
120-Volt AC Panel Board
The AC panel board section of the power converter contains the 120 VAC branch circuit breakers for your RV. One of the breakers controls the 120-volt power to the 12-volt converter section. This breaker may also control another branch circuit. Check the label next to each breaker for what each branch circuit breaker controls.
The 120-volt circuits may be turned on by setting their breaker handle up to the ON position, or off by setting the handle down to the OFF position. To reset the tripped breaker, move the handle to OFF, then ON.
The system incorporates GFCI breakers that implement an auto self-test functionality. When turned off, these breakers require external AC power to be present, or the AC inverter enabled before they can be turned back on. If AC power is present from one of these two sources, and the breaker refuses to stay on consult an electrician or certified RV technician.
Converter Cooling System
The converter’s electronic fan cooling system is the key to long life and trouble-free operation. The fan is never on more than required to cool electronic components in the converter. You may never hear the fan operate.
Automatic Micro-Controller Operation
The power converters 3-stage switch mode is fully automatic. The converter senses which mode it needs to be in by checking the condition of the battery.
The three modes include:
Absorption Mode: During this mode the converter output is in the 13.6 VDC range. This is the mode that the converter will function at normally. This mode provides the 12 VDC and the current required by the trailer.
Bulk Mode: In this mode, the output voltage of the converter will switch to 14.4 VDC range for a maximum of four hours. If the converter cycles between
“Absorption and Bulk modes”, there could be a shorted battery cell or other issues.
Float Mode: If the trailer has not been used for a period of time and the shore power has been left plugged in, the converter will automatically go into float mode with a voltage of 13.2. When the converter senses a demand, by turning on lights, the converter automatically returns to absorption mode.
120-Volt Electrical System
City Power
When your trailer is hooked up to external AC power, the converter system automatically charges the trailer batteries regardless of the battery disconnect switch position and, if the 7-way cord is hooked up and depending on your vehicle, your tow vehicle battery as well. The speed and degree of charge depends on how much power is used for lights and appliances, as only the surplus goes to charging the battery. If you are making an extended stay, then you should keep your trailer hooked up to a 120-volt current if it is available.
While you are connected to external AC power, the wiring is protected by circuit breakers in the breaker panel. The circuit breaker panel for the 120-volt system is located in the converter. In the event of a failure of a 120-volt circuit, first check your trailer circuit breakers and the breaker for the outlet into which your trailer shoreline cord is plugged. If a breaker continues to trip after you have reset it several times, your circuit may be overloaded with appliances or there may be a short in the circuit. Try lessening the load on the circuit. Perhaps an electric griddle, hair dryer, or an electric heater can be turned off. If that does not solve the problem, consult an Airstream Service Center.
The 120-volt electrical system provides power to operate the air conditioner, converter, and 120-volt receptacles for portable appliances. The power is carded through the 120-volt city power flexible cord to the 120-volt distribution panel, and then is distributed to each appliance or receptacle. Exterior outlets for 120-volts are located on the curbside exterior wall between the wheels and above the wheel well.
All wire, components, and wiring methods conform to federal and state requirements.
Read all instructions for Power Circuits User Manual
Airstream Travel Trailer International 2023 Appliances User Manual
Airstream Travel Trailer International 2023 Appliances User Manual
Appliances
All appliances are delivered to Airstream Inc. with in-depth owner’s manuals. Those manuals are included in the delivery case supplied by your dealer. The manuals may contain warnings, cautions, and operating instructions that should be read and followed before operating the appliances. The information contained in the appliances manuals supersedes any information contained in the Airstream Trailer Owner’s Manual on appliances. If you believe contradictory information on appliances is contained in this manual, or If any appliance manual(s) have not been provided with your trailer, contact your dealer, the respective appliance manufacturer, or Airstream Customer Service at 937-596-6111 or write:
Airstream Factory Service Center 428 W. Pike Street
P.O. Box 629 Jackson Center, OH 45334-0629 (937) 596-6111
NOTE
Airstream recommends shutting off the gas supply at the LPG tanks before refueling the tow vehicle or entering a refueling station.
Maintenance
Follow the instructions and warnings noted in the respective appliance and equipment owner’s manuals, as well as those mentioned below.
Annual maintenance should be conducted on propane gas appliances and equipment by an authorized dealer or repair facility. Insects can build nests in the burners of various appliances and equipment. The burner and burner orifice of the propane gas appliances and equipment should be cleaned by an authorized dealer or repair facility at any time circumstances or conditions warrant, but no less than on an annual basis.
WARNING
Most LPG appliances used in recreational vehicles are vented to the outside of the vehicle. When parked close to a gasoline pump, it is possible that gasoline fumes could enter this type of appliance and ignite from the burner flame, CAUSING A FIRE OR EXPLOSION.
Air Conditioner
The roof air conditioner used on Airstream trailers is one of the most popular on the market today. In your owner’s packet is a set of literature covering all operating and maintenance instructions. If the literature is misplaced, contact the air conditioner manufacturer or your Airstream dealer for replacement. Proper voltage to the air conditioner is critical. A voltmeter check may find the voltage much lower at a campground shoreline outlet than the needed 110 to 120 volts. Low voltage is usually associated with older or poorly maintained trailer parks. Parking your trailer so the power cord can be plugged in to a receptacle close to the fuse or circuit breaker box can alleviate low-voltage problems. Avoid extension cords and adapters whenever possible. If an extension cord must be used, it should be as short and heavy as possible to provide the most current. If high temperatures are expected, make an effort to park in a shaded area. Starting the air conditioner early in the morning also helps. It is more efficient to hold a comfortable temperature than it is to lower the temperature after the interior of the trailer is already hot.
Never run your air conditioner with the vents closed. Doing so could cause the air conditioner to freeze and may damage to the unit. The manufacturer recommends having at least 3 vents open when running to prevent any chance of freezing up
NOTE
Review the air conditioning literature supplied in your owner’s packet before proceeding.
NOTE
It is recommended that you clean filters Weekly when A/C is in full use.
Ducted Roof System
International trailers are designed with a ducted roof system. This system provides a more efficient airflow throughout the trailer and allows equal air to be blown from each vent. The ducted roof helps to create a more balanced temperature inside the trailer.
Cooktop
There is little difference between the operation of home gas ranges and the trailer’s cooktop. If, however, you are used to an electric range, operating confidence can be quickly gained by reading the manufacturer’s directions provided in the owner’s packet. Manufacturer’s service and parts manuals are also available.
WARNING
An operation manual for the cooktop has been provided with your owner’s packet. If this has not been provided with your trailer, contact the listed manufacturer to obtain it. Their manual contains specialized warnings and cautions that should be reviewed prior to operating the appliance.
Ceiling Vent Fan
The high-volume roof vent system is designed to quickly exhaust stale, hot air and draw in the fresh air. It is great to use when the outside temperature does not call for air conditioning, but the heat has built up in your trailer. The core of the system is a powerful rotary fan that works with a slightly open window to create a balanced airflow. It is designed for maximum air exchange, minimum sound levels, and power consumption. Fresh, clean, natural air is pulled in. Hot, stale, stuffy air is pushed out.
NOTE
Never place Linden™ or a like cover over the ceiling fan. Greatly restricted airflow and increased sound levels will occur.
Operation
- Open dome approximately 3 in. or more (ceiling faunas a built-in safety switch that will not allow the motor to operate unless dome is partially open).
- Turn the 3-speed knob to desired performance level (3-Low, 2-Medium, 1-High, O-Off).
- Open window(s) or door for airflow.
- The source of airflow is determined by the number of windows (s) or doors opened. For best results, close all roof vents and open one window that is the greatest distance from the ceiling fan.
NOTE
For maximum airflow, do not close the vent shade, if equipped, while using High Volume Roof Vent fan.
Thermostat and Rain Sensor
The fan is equipped with a built-in thermostat. Select your comfort setting and the fan will automatically turn on and off as your trailer heats up and cools down. When the rain sensor becomes wet the dome will close automatically and shut the fan off. Once the sensor has dried out the dome will reopen and the fan will restart.
Read all instructions for Appliances User Manual
Airstream Travel Trailer International 2023 Refrigerator User Manual
Airstream Travel Trailer International 2023 Refrigerator User Manual
Refrigerator
Review all refrigerator literature supplied in your owner’s packet or stored in the refrigerator prior to operating. International models have all-electric refrigerators which feature a strong 12V compressor, no LPG is required. Depending on your model, to turn the refrigerator on, touch and release the ON/OFF button. The blue indicator light will glow solid blue to indicate that the refrigerator is on, or use the wide range thermostat designed to sense the evaporator (cold plate) temperature. The coldest position on the thermostat is reached by turning the knob to the right (clockwise); conversely turning the thermostat knob to the left (counterclockwise) yields a warmer setting. The OFF position is reached by turning hard counterclockwise past the click. The reference point is shown with an indicator sticker beside the knob.
To get ready for a trip, start your refrigerator and let it cool for eight hours before loading it with food. For the best cooling performance, let air move freely inside the compartments. It will be necessary to defrost the refrigerator and freezer compartment from time to time. Frequency depends on usage, the number of times the door is opened and closed, and the humidity level. To defrost, turn the refrigerator off and prop open the door. Most of the condensation will run out of the condensate tube to the outside of the trailer. Use dry towels to keep extra condensation from dripping onto the floor. Do not use heat or sharp objects to speed up the defrosting process as this can damage the unit.
Clean the interior periodically with mild cleaner or a solution of liquid dish detergent and warm water. Rinse with a solution of baking soda and clean water.
CAUTION
Speeding up the defrost process with a knife or scraper is strongly discouraged due to the likelihood of rupturing the refrigerant circuit.
Solar System
If equipped, the rooftop solar panels installed on your Airstream help maintain battery health, reduce operating expenses, and extend the battery life of the batteries. The solar system’s solar charge controller gathers energy from the individual solar panels and stores it in your batteries. The system features a display (shown above) that allows you to view live status information like solar watts and battery voltage.
To optimize solar charging, ensure the panels are clean and not shaded by trees or structures that might block the sun. Please refer to your owner’s packet for reference material that discusses the solar system and its operation.
The charge controller is configured for a three-step charging process:
- Bulk – The controller delivers as much charge current as possible to quickly recharge the batteries.
- Absorption – The controller switches to a constant voltage mode.
- Float – Voltage is applied to the batteries to maintain them in a fully charged state. Airstreams manufactured without the solar option have been pre-wired to support solar panels. These units will have a 3-port rooftop-mounted plug-in that allows installing rooftop solar panels without running wires. In addition, a quick plug-in port suitable for a portable solar charging kit has been pre-wired at the front of the unit, near the battery box Refer to Section 8 – Maintenance for Solar Panel Wiring diagram and information.
Thermostat
To turn the thermostat on when the black light is off, press any button to “wake up” the thermostat. Press and release the – ON/OFF button.
Pressing the MODE button will cycle through the mode options available. A mode is an operation that can be performed by the unit and is controlled by the thermostat. The available modes typically are OFF, COOL, HP (Heat Pump), FURN (Furnace), and AUTO. Press the F/C button to switch between Fahrenheit and Celsius.
NOTE
The Heat Pump Operation works well only when the ambient temperature is above 45° F/ 7°C Pressing the ZONE button will cycle through the available zones. Each zone signifies a unit designed to cool, heat, or dehumidify a specific area of the RV. The FURN option will only be available in one Zone. The FAN button us used to select the fan speed. The options are: AUTO, HI, MED, or LOW.
NOTE
When using the FURNACE the fan speed should be set on AUTO. Otherwise, the AC fan will continuously run. To set the Clock to the correct time, press the CLOCK button. The “HOUR” digits will flash first. Press the CLOCK button again and the “MINUTE” digits will flash. By pressing it a third time the “AM/PM” icon will flash. The UP/DOWN arrows will adjust these for you. Press the CLOCK button again will store these settings into memory.
To Do a System Reset/Remove the Error Code:
- Make sure the CCC 2 thermostat is in the OFF mode (either a blank screen or clock only showing)
- Simultaneously press the MODE and ZONE buttons. The LCD will display “Inuit” and all available zones.
- Release the MODE and ZONE buttons.
- Press the ON/OFF button to exit system set up. This will remove any error code, reset the system, and allow you to re program the thermostat.
Water Heater
The International is equipped with a continuous water heater featuring freeze protection, and direct spark ignition. The tankless water heater monitors inlet water temperature and flow, and output water temperature and flow. The water heater is controlled by the Control Center located on the wall above the bathroom sink. Turn on the power and press the temperature selection arrow to see the current setting. Select the desired temperature using the up and down arrow. Turn on the hot water faucet. Normally, the burner will ignite in just a few seconds unless your LPG system has not been used for some time and air has filled the lines. The system will go into safety lockout, after 3 failed ignition attempts, before the air is expelled. If this happens and error code of “E1” will appear on the screen. Turning the Water Heater off for 30 seconds and then back on reinstates the ignition mode.
Common Error Codes
- E1: Ignition failure of accidental flame off during ignition – Check that you have LP in the tanks, that other LP appliances work, and no debris or obstruction in the burner.
- E2: Flame sensing interrupted during normal operation, a buzzer will sound. Check that you have LP in the tanks, that other LP appliances work, and no debris or obstruction in the burner.
- E n: System timer – System will shut off after 20 minutes of continuous usage
- F d: Water heater operating in Winter Use – The water heater will run for a few seconds and then shut off in freezing conditions if the power is ON. This mode will only protect the Water Heater heat exchanger and not your Airstream’s plumbing system.
NOTE
Review the water heater literature supplied in your owner’s packet before proceeding.
NOTE
The water heater will not operate until a faucet is opened with a minimum water flow of .8 gallons per minute. This process could take up to 60 seconds to register.
WARNING
The water heater has built-in FREEZE PROTECTION and will intermittently cycle the burner when the water temperature reaches 3°C/ 38°F. To provide this freeze protection, the gas supply must be on, the gas must be available and electrical power must be on.
CAUTION
This appliance does not have a pilot. It is equipped with an ignition device that automatically lights the burner. Do not try to light the burner by hand.
Read all instructions for Refrigerator User Manual
Airstream Travel Trailer International 2023 Cleaning User Manual
Airstream Travel Trailer International 2023 Cleaning User Manual
Cleaning
Exterior Skin
We recommend the trailer be washed about every four weeks, and waxed with Walbernize Super Seal or high-quality clearcoat-safe wax in the spring and fall. In coastal and industrial areas, cleaning and waxing should be done more frequently. When traveling through winter weather, all road treatment chemicals should be removed immediately.
NOTE
Abrasive polishes or cleaning solvents such as automatic dishwashers or acid etch cleaners are too strong and should never be used. Rinse all grit from the surface prior to washing. Use soft rags or wash mitts, always moving lengthwise with the grain of the trailer (washing or polishing). Never rub hard on the coating. Even the softest rag will damage the coating if excessive pressure
is applied.
NOTE
Always clean your trailer in the shade or on a cloudy day when the aluminum skin is cool.
Oil, grease, dust, and dirt may be removed by washing skin with any mild non-abrasive soap or detergent. Cleaning should be followed by a thoroughly clean water rinse. Drying the unit with a chamois or a soft cloth may prevent spots and streaks.
After cleaning and drying, a good grade of non-abrasive automotive paste or liquid wax will increase the life of the finish, especially in coastal areas where the finish is exposed to salt air or in polluted industrial areas. It will also protect the shell from minor scratches and make subsequent cleaning easier.
It is important to remove substances such as sap, gum, resin, and asphalt as soon as possible by washing and waxing. Sunlight and time will bake-harden these materials, making them almost impossible to remove without heavy buffing. If asphalt remains on the trailer after washing, use a small amount of kerosene on a rag and wipe the spots individually, being careful not to scratch the finish.
If a substance is found on the coating that cannot be removed by normal washing procedures, Airstream recommends using DX 330 Acryli-Clean, made by PPG Industries. Follow all directions and warnings on the product container.
Acryli-Clean should be used by trained personnel only, using the proper equipment under controlled conditions. Use the Acryli-Clean as sparingly as possible to remove glue, tar, and other similar substance. To keep your trailer looking new, periodically paint the A-frame, LPG tanks, and rear frame.
It is recommended that the caulking and sealant used in external seams and joints, such as end-shell segments and around window frames, light bezels, beltline, rub rail molding, etc., be checked once a year. If this material has dried and become cracked or checked, or if a portion has fallen out, it should be replaced with fresh material to prevent possible rain leaks. Caulking and sealing products are available from your Airstream dealer.
Windows
Clean your trailer windows the same way you clean the windows in your home. Clean the seals with a damp cloth and mild detergent every three to six months. Do not use strong solvents, as they will damage the seals. A coat of natural silicone lubricant applied after the seal has dried will keep it flexible. Spread the lubricant evenly with a brush or finger, working it into the surface. This is good practice for all rubber seals in your trailer.
WARNING
Failure to properly clean and lubricate the window seals could result in the window sticking to the jamb. Window seals that become stuck to the window jamb should be released by a qualified technician trained in the procedure. Do not force, pry, or apply great pressure to open the window. Failure to heed this warning may cause the window to shatter and/or cause personal injury.
For replacement of a damaged window, contact an Airstream Service Center.
Aluminum Wheels
The aluminum wheels and axle end cover come treated with a clear coating. Keep them looking good by washing with soap and water. Do not use abrasive cleaners or polishes on coated aluminum wheels.
General Information and Operation
Step To operates the step, lift up on the front of the step and pull straight out until step locks into place. Some units will be equipped with a double step. After extending the step, the second portion folds out. To store the step, fold it back into position, lift the front slightly and push the step back into its storage area.
To operate the step, lift up on the front of the step and pull straight out until step locks into place. Some units will be equipped with a double step. After extending the step, the second portion folds out. To store the step, fold it back into position, lift the front slightly and push the step back into its storage area.
CAUTION
Once the steps are lowered, press down on them to make sure they are secure in their notches. Never travel with the step lowered or extended.
Main Door
The main door of the trailer is manufactured with a built-in, keyed deadbolt and door lock. The door lock is engaged from the inside by a lever and the deadbolt is engaged by turning the knob. A main door hold-back is mounted on the trailer’s exterior side skin. The hold-back secures the door to the side of the trailer. When opening the door, push it gently into the spring-operated slide. To release the door, slide the hold-back bolt back.
If the door handle becomes inoperable and the door will not open from the inside, it can be opened by manually lifting the door latch release tab. Fold back the velcro adhered to the door frame to access the tab. Lift the tab upward to release the latch and open the door. Use the photo on the right (taken with the door open) as a guide to locate the tab.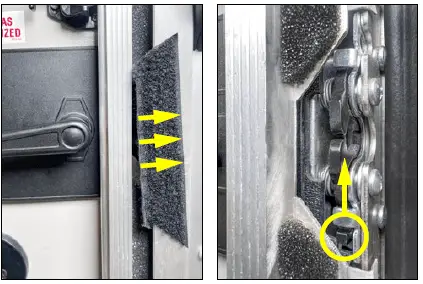
For lubrication and out-of-adjustment issues, refer to Section 8 – Maintenance.
CAUTION
When towing, the door lock and deadbolt must be secured. If it is not locked, the constant vibration of travel may cause the door to open resulting in possible damage.
Screen Door
The screen door is secured to the main door by a slide bolt-type latch. It can be operated independently by releasing the slide bolt and swinging the screen door away from the main door.
CAUTION
Always reattach the screen door to the main door prior to closing the main door; otherwise, damage may occur.
Read all instructions for Cleaning User Manual
Airstream Travel Trailer International 2023 Hatch and Screen User Manual
Airstream Travel Trailer International 2023 Hatch and Screen User Manual
Rear Hatch and Screen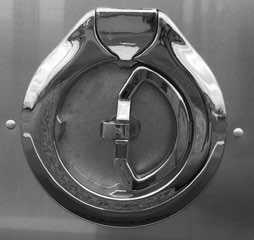
Some 25FB and 27FB models are equipped with a rear hatch and pull-down screen. With the handle in the latched position (shown above) lift up and rotate the handle clockwise, till the handle is in the opposite direction, to unlatch the door and pull open. When closing the hatch make sure the handle is in the unlatched, left side, position. Close the hatch and rotate the handle counter-clockwise so the handle is in the latched, right side, position. Always be sure to lock the rear hatch when not in use. When the rear hatch is opened a screen can be pulled down from the hatch’s upper threshold and latched, via magnets, onto the floor. To open, simply pull up on the screen and allow it to retract upwards.
Emergency Escape Windows
To remove the screen, pull out the screen cord by the cord loop at the bottom portion of the window. Turn the two red latches inward and lift the two red arms on each side, in unison, to open the window and push it out for clearance.
Front End Protection
Window Stone Guards
The tinted solar plexiglass window stone guards on the front of your Airstream provide added protection from road debris while traveling and reduce the effects of sun rays. Raise the center window guard to allow air to flow when the window is open. To raise, unhook the two rubber T-handles on the bottom of the guard, lift the guard to the desired height, and tighten the thumbscrews on each support arm. Be sure to lower and fasten the guard when high winds are approaching and before travel. The corner window guards are removable for cleaning. Airstream recommends removing the corner guards from the unit when cleaning to avoid damaging the guards. There are two screws on each corner guard near the center guard. A quarter-turn will loosen the screws, and the guards will swing outward on their hinges. Lift the guards off the hinges to remove them.
CAUTION
Close window guards before high winds and storm conditions approach, or when towing to avoid damage to the trailer and window guards that cannot be covered by warranty.
Stainless Steel Rock Guards
Stainless steel rock guards protect the front end from road debris. You can clean behind the rock guards by swinging them forward on their hinges. They are locked in place with two acorn-style nuts, removable with a 7/16” wrench.
Power Awning
Complete operating instructions have been provided with your awning. Make sure your traveling companion is familiar with the operation of the awning. The awning’s primary function is sun protection. It is not waterproof, therefore, roll up your awning in case of rain, wind, or snow. Clear tape is placed between the exterior skin and the awning fabric to prevent the awning fabric from rubbing on the coating, thus wearing through it. Inspect the tape every year or after a long trip. Have it replaced if it begins to wear thin? LED light strips have been installed with your awning providing accent lighting. The LED lights are operated by a dimmer switch located just inside the entry door. Units with power awnings installed have a power awning lock switch located on the awning control panel. When OFF this switch will disconnect the power to the awning. Airstream recommends the awning lock switch be turned OFF while traveling.
NOTE
If wind or extended periods of rain are expected, roll up the awning and secure in the traveling position.
CAUTION
The effects of wind and rain on any awning are unpredictable. Severe damage to the trailer and/or the awning may result and cannot be covered by warranty. If the power to the awning has been turned off or interrupted, the entry door must be closed before retracting the awning. When power is interrupted, the awning controller must reestablish its “home” position by completing a “closed/reset cycle.” This is a normal procedure whenever power to the awning controller is interrupted. During the close/reset cycle, the awning arms will fully lower before the awning retracts. If the main entry door is left open during this process, the awning’s gas rafter will contact the door, damaging the gas rafter. If you turn off the power to the awning, or if power is lost while it is extended, follow these steps to retract it:
- Close the entry door, press the retract/close button, and wait for the awning to come to a complete stop. The close/reset cycle is a timed process that prohibits the awning from completely closing, protecting it from damage.
- Press the extend/open button and when the awning starts to extend, press the retract/close button once to stop the awning.
- To complete the process, press the retract/close button once again to finish retracting the awning. After the awning has finished closing, the “Close” LED will illuminate. The home position has been restored.
CAUTION
To avoid damaging the entry door, awning, and awning gas rafter after power to the awning has been interrupted, ensure the door is closed before retracting the awning. Gravity Water Fill The gravity water fill is located on the side of the trailer, behind a locked compartment. It is used to fill the fresh water tank with potable water. A small vent is located next to the port to allow air to expel from the tank as it is filled. Fill the water tank by inserting a high-pressure RV/Marine FDA approved drinking water hose of at least ½-in. diameter made from material that is tasteless, odorless, and non-toxic. It’s a good idea to let the water run through the hose for a short time to flush it out. Rivers sometimes fill their tanks with “home” water to avoid strange water that may be distasteful to them on short outings. Remember, the more water you carry in the fresh water tank, the less cargo carrying capacity you have for other items. The amount of water in the tank may be checked on the Monitor Panel.
City Water Hookup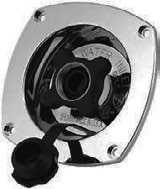
The city water hook-up is located on the side of the trailer. For consistent water flow and plumbing line safety, an in-line regulator limits pressure to 50 psi. Use a tasteless, odorless, non-toxic, high-pressure hose of at least 1/2 in. diameter designed for RV use. The city water inlet is a standard garden hose thread. We suggest you carry two lengths of hose in order to reach hookups farther away than normal, as well as to have a spare. After hooking up the hose and turning on the city water valve provided in the park, slowly open a faucet. There will be a lot of spurts and sputtering until all the air is expelled from the trailer system. If the water heater is empty, it will take some time before all the air is expelled and a steady flow of water occurs at the faucet. Once a steady flow is achieved at one faucet, the others should be opened long enough to expel the air in the lines going to them. Your plumbing system has a built-in pressure regulator to protect your lines and faucets from extremely high pressures on some city water systems.
Read all instructions for Hatch and Screen User Manual
Airstream Travel Trailer International 2023 Tow Vehicle User Manual
Airstream Travel Trailer International 2023 Tow Vehicle User Manual
Tow Vehicle
When buying a new vehicle to tow your trailer, we suggest including towing options offered by most tow vehicle manufacturers. These include such things as a heavy-duty alternator and radiator, heavy-duty springs and shock absorbers, transmission cooler, heavy-duty fan and flasher unit, etc., for the make of the vehicle.
WARNING
Springs that are too stiff can hinder the action of the weight-equalizing hitch and prevent the transfer of weight to the front of the vehicle.
NOTE
Only use springs heavy enough to support your loaded vehicle (not including the trailer). Having a too-harsh spring rate on your tow vehicle will only shorten the life of the tow vehicle and trailer, and will cause your trips to be less enjoyable.
Transmissions may be manual or automatic, but an automatic transmission may prolong your tow vehicle’s life and generally does a better job of controlling engine loads than does the average driver using a manual shift. Having adequate power is very important when considering the purchase of a new vehicle or the trailer-towing capability of your present one. Auto dealers are provided with guidelines to use when helping a customer decide on a tow vehicle. Guidelines are not determined solely by the power output of the engine. The gear ratio of the differential is also a very important part of the guideline.
Inspect the tow vehicle’s hitch regularly for loose bolts or nuts, cracked welds, loose ball mounts, worn parts, etc.
New trailers often carry more food and other supplies than really needed. Remember that every item you take along is one more thing to stow and adds weight to the total load you must pull. Consolidate items in shelves, lockers, and in the refrigerator. It is better
to have one full and one empty locker, than two half empty ones. Special care must be taken not to overload the front and rear ends of the trailer.
Brakes
All trailers are equipped with Dexter Nev-R-Adjust brakes. Please follow all maintenance procedures in the Dexter user’s manual provided in the owner’s packet.
Electronic Brake Controller
The trailer brakes are operated by a 12-volt current from your tow vehicle and must be hooked up so that you have an integrated system with your tow vehicle brakes. To prevent problems and ensure satisfactory braking action, install an electronic controller in line with the brakes in your tow vehicle.
An electronic controller will synchronize the trailer brakes with your tow vehicle brakes. It is designed to apply the trailer brakes with your tow vehicle brakes. Your brake controller should be adjusted to provide for a slight lead of the trailer brakes over the tow vehicle brakes.
NOTE
Study all material provided with your particular brake control. If you do not understand the information, have the installer explain the information to you or call the manufacturer of the controller.
Proper Electric Brake Use
Proper synchronization of the tow vehicles to trailer braking can only be accomplished by road testing. Brake lockup, grab, or harshness is quite often due to lack of synchronization between the tow vehicle and the trailer being towed, a too-high threshold voltage (over 2 volts), or under-adjusted brakes.
WARNING
Never use your tow vehicle or trailer brakes alone to stop the combined load.
WARNING
The braking system should be checked and serviced by qualified, certified technicians only. Failure to do so could result in loss of control of your vehicle or the trailer, causing damage to property, injury, and/or death.
Breakaway Switch
In the event of an accidental separation of the tow vehicle and the trailer, the breakaway switch will set and lock the trailer brakes for a sufficient length of time to stop the trailer. The switch is activated when the wire attached to it and to the tow vehicle pulls out the small pin in the front of the unit.
When the trailer is connected to the tow vehicle, the breakaway switch loop should be attached to the permanent frame of your hitch. When disconnecting the trailer from the tow vehicle, remove the wire loop from the frame. Do not remove the pin from the switch because this will apply the trailer brakes.
WARNING
Do not use the breakaway switch as a parking brake. If the battery should go dead, the trailer parking brake would no longer be applied. Failure to comply could cause damage to property, injury, and/or death.
Loading
When towing a trailer, you are subject to new and different challenges on the highway than you may have previously encountered. Towing a trailer is no small responsibility and should be undertaken with great care and safety first in mind. An accident with a tow vehicle and trailer can have much greater consequences than carelessness with a small car. Like an airline pilot who is responsible for expensive equipment and many lives, you should take your responsibilities as a tow vehicle driver very seriously and learn all you can about doing the job safely and well. Balancing the load and preparing the trailer and tow vehicle are critical to safe handling.
One of the most critical aspects of safely towing a trailer is knowing the weights involved and where they are placed. The first thing to determine is how much is being towed and confirming that it is within the capacities of the equipment being used. Determining where the load is placed is critical to the way your rig will handle on the road. Know what your trailer weighs loaded. Load your trailer including water, propane, etc. and take it to a public scales. Weigh each axle of your vehicle. Refer to your axle weight and tire limits to see if you are within a safe range. Total all axle weights, ensuring you are below the GVWR.
Make sure your load is balanced. Do not load too much on one side. A balanced load is much easier to tow or drive. Front to back balance is also important. Step back and look at your trailer, making sure there is not too much weight on the hitch, or on the rear of the trailer. Secure all items, as loose items can cause damage and become a safety issue. The Cargo Carrying Capacity tag shown below is installed on every trailer and can be found on the inside of the screen door on your trailer.
Read all instructions for Tow Vehicle User Manual
Airstream Travel Trailer International 2023 Weighing Trailer User Manual
Airstream Travel Trailer International 2023 Weighing Trailer User Manual
Weighing Your Trailer
The illustration below shows how to weigh the trailer on scales.
- The trailer’s total weight, cannot exceed GVWR.
- The trailer’s weight on axles cannot exceed GAWR.
- Weight on the trailer tongue.
- To determine that the GAWR is not exceeded, it is necessary to load all of your allowable personal cargo and variable weights. Then hitch the trailer to the tow vehicle with load equalizing hitch properly adjusted. Chock wheels and place the trailer on a scale with both axles only on the scale (see illustration). If the weight on the axles exceeds the axle system’s GAWR, then some of the personal cargo must be redistributed forward in order to place some of this weight on the tongue. The tongue weight should be 10 to 15% of the trailer’s total weight, and must not exceed the tow vehicle’s or the hitch’s maximum weight rating. To determine tongue load, unhitch tow vehicle and place the tongue hitch post on a scale. The trailer must be properly loaded as determined above, with your allowable personal cargo and variable weights.
- Use a scale, such as a bathroom scale, that has a lower weight limit than your tongue load to check the tongue weight by using the following method (see illustration). Place a piece of wood of approximately the same thickness as the bathroom scale on the ground in line with the trailer hitch jack as shown. It should be so spaced that a short piece of pipe or other round piece will lay exactly one foot from the centerline of the jack extension.
Place the scales so that another round piece can be exactly two feet from the centerline of the jack extension in the other direction. Place a 4×4 piece of wood on the two round pieces and screw the jack extension down on the top of the 4×4 until the tongue of the trailer is supported by it. Multiply the scale reading by three. This will be the tongue weight of your trailer. If you exceed the capacity of the bathroom scale, increase the two-foot dimension to three or four more feet, but always multiply the scale reading by the total number of feet between the wood and scales.
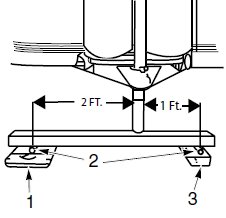
- Bathroom Scale
- Pipe
- Wood Support
NOTE
Be sure the trailer is level when reading the scale.
Hitching Up
The process of hitching up your trailer is something that will become almost second nature with practice. The following section includes proper hitch load distribution. Proper training on connecting your trailer to a tow vehicle is essential for safety. Please see your dealer or other qualified personnel for instruction on the proper hitching of your trailer. Safety chain use on the hitch is required in all states.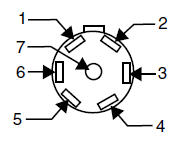
- Black, 12-Volt (+)
- Green, Clearance Lights/Taillights
- Red, Left Turn/Stop
- White, 12-Volt (-)
- Blue, Brake
- Brown, Right Turn/Stop
- Blank
NOTE
The 7-Way plug is spliced to the main harness in the area of the 12-volt distribution panel in front of the trailer.
Equalizing Hitch Load Distribution
When a trailer is properly hitched up to a tow vehicle with a load equalizing hitch, approximately 1/3 of the trailer’s tongue weight will be on the trailer’s axles and 2/3 will be transferred to the tow vehicle. One-third of this weight transfer will be carried by the front wheels and 1/3 by the rear wheels of the tow vehicle (See illustration). Thus, the tire load of each wheel on the tow vehicle will be increased by 1/6 of the trailer’s tongue weight. The tire air pressure of the tow vehicle should be increased to compensate for this additional weight. Refer to the vehicle’s owner’s manual for this information.
WARNING
The tongue weight should be approximately 10 to 15% of the trailer’s total weight. Under no condition should it exceed the tow vehicles hitch rating. Please refer to the tow vehicles documentation for your vehicle’s hitch rating information.
Wireless Observation System
Your travel trailer is equipped with a Wireless Observation system consisting of a camera mounted at the rear of the trailer and a wireless monitor for your tow vehicle. This system will allow you to see what is behind you while towing and provide visibility when backing up the trailer.
NOTE
Carefully read and understand all manufacturer’s instructions provided in your owner’s packet prior to operating.
Towing Tips and Information
We want every Airstream owner to be a safe and courteous driver. A few hours of towing practice in a large, empty parking lot will make pulling your trailer over the road much easier. Mark off two corners of the parking lot for left and right turns. These corners may also be used to practice backing and parking.
Tracking Observation
Observe that the tracks made by the trailer wheels are distinctly different from those made by the tow vehicle. Studying this will make it easier for you to correct mistakes.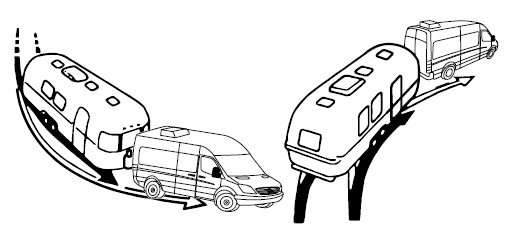
General Information
After thoroughly inspecting your hitch, brakes, and tires, you should be ready to tow. Check traffic, signal when you are about to pull away and start slowly. Look in your mirrors often, and observe the action of the trailer, then carefully move into the proper lane of traffic. Remember that the trailer wheels will not follow the path of the tow vehicle wheels; therefore, wider turns are necessary when turning to the left or to the right.
NOTE
Truck or trailer-type fender, door grip, and rearview mirrors are a must for maximum visibility and are required by law in most states.
Cooling System Overload
When towing, you might encounter a temporary cooling system overload during severe conditions, such as:
- Hot days when pulling on a long grade
- When slowing down after higher-speed driving
- Driving with long, idle periods in traffic jams
If the tow vehicle’s temperature gauge or indicator light indicates overheating, and the air conditioner is on, turn it off, pull over in a safe place, and apply the emergency brake. Increase the engine idle speed. Lift the engine hood and check for fluid leaks at the radiator overflow outlet. Ensure all drive belts are intact and the radiator fan is turning. If you have a problem, have it fixed at the next opportunity. If there is no problem, the light should go off or the temperature should come down within 1 minute. Proceed on the highway a little slower, and resume normal driving after 10 minutes.
Read all instructions for Weighing Trailer User Manual
Airstream Travel Trailer International 2023 Towing User Manual
Airstream Travel Trailer International 2023 Towing User Manual
Off-Road Towing
When driving in mud and sand, let the momentum carry the rig through. Apply power gently and use as little as possible. Stay in the tracks of the vehicle ahead and keep the tow vehicle in the highest possible gear. If you get stuck, it is best to tow the entire rig together without unhitching.
When Being Passed
Despite the best hitch, you will notice that whenever a large bus or truck overtakes your rig, the displaced air first pushes the trailer rear slightly to the right and then affects the front. It may be necessary to steer very slightly, momentarily, toward the bus or truck to help compensate for the sway induced by the passing vehicle. Do not apply the vehicle brakes, as this can tend to exaggerate the situation. You may find, however, that briefly applying the trailer brakes with your manual control will help eliminate sway. On a two-lane road, cars may line up behind you because you travel at a lower speed. It is both courteous and sensible, if you are able, to signal, pull onto the shoulder, and let them pass. Your trailer is designed to be towed easily at any legal speed, so if you are not careful, you may be inclined to forget it is there.
Passing
On freeways or expressways, pick the lane you want and try to stay in it. Always maintain plenty of space between you and the car ahead, at least the length of the tow vehicle plus trailer, for every 10 miles per hour. Remember that in order to pass another vehicle, you will need longer to accelerate. You must also allow for the length of the trailer when returning to the right hand lane.
Backing Up
When backing up, the important thing to remember is to do everything slowly and to immediately correct if you see the trailer turning the wrong way. Concentrate on the rear of the trailer. With your tow vehicle and trailer in a straight line, back up slowly and turn the bottom of the steering wheel in the direction you want the trailer to go. Watch out of the window or in the mirror until the rear of the trailer is pointing in the desired direction. Your tow vehicle will be following the trailer in an arc. Straighten the tow vehicle and trailer by turning the steering wheel more sharply, and then, when they are in line, straighten the steering wheel.
Always try to back to your left because the visibility is much better. When you don’t make it on the first try, it is usually much easier to pull forward to your original position and start over, or at least pull forward until the rig is straight, and then start backing. If your spouse or traveling companion normally directs you when backing, they should position themselves forward of the tow vehicle so the driver can easily see them. Their directions should always indicate to the driver the direction the rear of the trailer should go. A little practice in a parking lot with the person giving directions can save a lot of frustration when backing into a campsite.
Stopped On a Hill
Refer to the following warning if stopped on a hill for a prolonged period of time.
WARNING
Chock the trailer wheels when stopping on a hill or slope. Leaving your tow vehicle in gear is not enough for standstill safety. Do not use trailer brakes as parking brakes.
Controlling Sway or Fishtailing
Sway or fishtailing is the sideways action of a
trailer caused by external forces. It is common for travel trailers to sway in response to strong winds, and crosswinds, when passing by or passing a semi-tractor and trailer, or driving downhill.
WARNING
Excessive sway or fishtailing of your travel trailer can lead to the rollover of the trailer and tow vehicle. Serious injury or death can occur. It
is important that you read and understand the information in this section.
Sway or fishtailing of your recreation vehicle can be controlled and is primarily impacted by four factors:
- Equipment
- Tongue Weight
- Driving
- Corrective Measures
Equipment
When hitched together, the trailer and the tow vehicle must be level. The tires of both the trailer and tow vehicle should be in good condition and properly inflated to their recommended pressures. Braking is a very important factor in vehicle control. Refer to Brakes (and Electronic Brake Controller) in this section.
We recommend a friction sway damper or hitch with built-in sway control be provided for your unit. Please consult your dealer regarding this equipment. Also, refer to Sway Control Device in this section for more information.
Tongue weight
Refer to Weighing Your Trailer and, Equalizing Hitch Load Distribution in this section.
Driving
This is the most important component. The tendency for the vehicle to sway increases with speed therefore, obey all speed limits and reduce speed during inclement weather or windy conditions.
Corrective Measures
If sway occurs, the following techniques should be used:
- Slow down immediately and remove your foot from the accelerator. Avoid using the tow vehicle brakes unless there is a danger of collision. Reduce speed gradually whenever possible. If you can do so safely, use the brake hand controller to gently and progressively apply the trailer brakes. This will help to keep the vehicles aligned. Practice using the brake hand controller on a deserted parking lot. Do not wait until an emergency occurs before using it. Location of the brake hand controller is important and should be made easily accessible.
- Steer as little as possible while maintaining control of the vehicle. Because of natural reaction lag time, quick steering movements to counter trailer sway will actually cause increased sway and loss of control. Keep both hands on the wheel. Hold the wheel as straight as possible until stability is regained.
- Do not jam on the brakes or attempt to press on the accelerator to speed your way out of the fishtailing. Both actions make the situation worse and could cause severe injury or death.
- Once the swaying is under control, stop as soon as possible. Check tire pressures, cargo weight distribution, and look for any signs of mechanical failure. Travel at reduced speeds that permit full control until the problem can be identified and corrected.
Sway Control Device
Although Airstream has not intruded into the hitch manufacturer’s field of expertise and performed formal testing, we find the vast majority of Airstream owners purchase sway-control devices. When passed by large trucks or when exposed to sudden crosswinds, the trailer will be pushed and this action will be felt in the tow vehicle. It is our understanding that the sway control device will reduce the amount of movement, make towing more comfortable, and add some safety. Follow the directions of the sway control manufacturer when having the device installed and when using it.
Read all instructions for Towing User Manual
Airstream Travel Trailer International 2023 Maintenance User Manual
Airstream Travel Trailer International 2023 Maintenance User Manual
Maintenance Schedule
WARNING
Failure to maintain your trailer can cause premature and unexpected parts breakage and/or erratic operation that may be hazardous.
NOTE
See appliance manufacturers’ literature for further information.
| Every 1,000 miles or 60 days | |
| Escape Window | Check the operation of latches and upper hinge. |
| Battery* | Check water level, lead acid
only. |
| Smoke Alarm & CO
Detector |
Test and replace battery as required. |
| Tires | Check tire pressure (See Specifications). |
| Hitch | Check for loose bolts or unusual wear. |
| GFI Circuit Breaker | Test and record. |
| Every 5,000 miles or 90 days | |
| Hitch Ball | Lubricate with hitch ball lube or wheel bearing grease. |
| Range Exhaust
Hood |
Clean fan blades and wash filter. |
| Main Door Step | Lubricate and inspect moving parts. |
| Every 10,000 miles or 6 months | |
| Brakes | Inspect or replace as necessary. |
| NevR-Lube | Visually inspect wheel bearings at tire rotation. Refer to Dexter’s recommendation www.dexteraxle.com or call (574) 295-7888. |
| Tires | Inspect and rotate. |
| Spare Tire Carrier | Lubricate moving parts. |
| Windows, and Door Seals | Clean with mild detergent and apply 303 Aerospace Protectant |
| Exterior | Wax |
| Escape Window | Lubricate latches with WD-40 or light household oil. |
| Every 5,000 miles or 90 days | |
| Main Door Latch | Lubricate with dry graphite |
| Exterior Door Locks | Lubricate with dry graphite. |
| Exterior Hinges | Lubricate with light household
oil |
| LPG Hold-Down | Lubricate with light household
oil |
| LPG Regulator | Check bottom vent for obstructions. |
| Wheel Lug Nuts | Torque Aluminum Wheels to 110 ft. lbs.and Steel Wheels to 100 ft. lbs.. |
| Breakaway Switch | Pull pin and lubricate with household oil. (See further instructions in this section.) |
| 7-Way Plug | Spray with contact cleaner. |
| Every year | |
| Battery | Clean, neutralize, and coat terminals with petroleum jelly. |
| LPG Tanks | Have purged by LPG supplier. |
| Seams | Check and reseal exterior seams, windows, lights, and vents as needed. |
| Hitch Coupler and Ball | Ensure all parts operate freely. Replace any component if worn or damaged. |
| Interior Cabinetry | Visual inspection of latches and locks, hinges and slides. Silicone spray as needed. |
Suggested Maintenance and Replacement Parts
(Part numbers listed are Airstream part numbers and can be ordered by calling a Certified Airstream Dealer.)
WARNING
Always replace the bulb or light fixture with the correct bulb for that light or matching fixture. Failure to heed this warning could cause fire, property damage, personal injury, or death.
Read all instructions for Maintenance User Manual
Airstream Travel Trailer International 2023 Tires User Manual
Airstream Travel Trailer International 2023 Tires User Manual
Tires
Your trailer is equipped at the factory with name brand trailer tires. Most Airstream dealers cannot make adjustments to tires. An Airstream or tire dealer that handles that particular brand must do this. If you experience tire problems, contact the nearest dealer.
Tire Changing
To change a tire with a jack, see the label affixed to the underbelly located to the rear of the wheels. This label reads JACK with an arrow pointing to a plate riveted to the mainframe rail where the jack head must be placed.
Jack Location
NOTE
Airstream does not supply a jack with the trailer.
Leveling blocks can be used instead of a jack to change a flat tire. Position the leveling block under the trailer’s good tire. This will raise the flat tire clear of the ground. All tire and wheel assemblies are balanced at the factory. Be sure to rebalance the tire and wheel assemblies each time a tire is changed.
WARNING
Do not exceed the maximum speed rating of the tires installed on your trailer. Failure to heed this warning could cause catastrophic tire failure resulting in property damage, personal injury, and/or death. Refer to the Tire Safety Information Addendum in your Owner’s packet for more information.
WARNING
Never attempt to change any tire on the trailer without securely chocking the trailer’s remaining wheels. Never position yourself in a manner where a raised trailer can come down on you if it should become dislodged from a jack or ramp.
WARNING
When removing aluminum-forged wheels from the spindle, it is very important to mark them to ensure the wheel is placed in the same position of the drum when reinstalling. If the aluminum-forged wheel is to be mounted on a different drum, it is important to sand all loose corrosion from the mating surfaces.
WARNING
Wheel separation can occur:
- On the first trip, tighten the wheel nuts at beginning of the trip, and at 5, 25, and 50 miles.
- Thereafter, check the wheel nuts before each trip.
- Following winter storage, check wheel nuts before beginning a trip
- Following excessive braking, inspect wheel nuts.
NOTE
Torque Aluminum Wheels to 110 ft. lbs and Steel Wheels to 100 ft. lbs.
In an emergency, remove a flat tire. The independent suspension of the rubber torsion axle allows four- or six-wheeled units to be safely towed on three or five wheels for a short distance (100 miles maximum) and only at a low speed (30 MPH). Be especially careful when crossing holes or dips in the road. Under these circumstances, it is good practice to set your rearview mirrors so that you can observe your tires at all times.
Tire Load and Inflation Information
Maintaining proper tire inflation pressure is essential for both tire safety and performance.
Proper Tire Inflation
The level of air in your tires affects your vehicle’s overall performance. A maximum inflation pressure specification is found on the trailer’s exterior on a metal tag riveted to the lower front, and roadside of the trailer, as well as on the original equipment tires. Air pressure should be checked based on the load on each individual tire. Cold Inflation Pressure should be adjusted to handle the maximum tire load, and all tires on the axle should carry the same inflation pressure. Cold tire inflation pressure is the tire pressure checked in the morning before you drive more than a few miles, or before rising ambient temperatures or the sun’s radiant heat affects it.
Underinflated Tires
Underinflation brings a higher risk of damage due to road hazards, reduces casing durability, causes a loss in fuel economy, and will result in uneven or irregular tire wear. Severe underinflation brings about an increased risk of tread separation, handling difficulties, and possible tire failure, caused by overheating.
When minimum inflation pressure requirements are not met, tire durability and optimum operating conditions are compromised. Tire inflation pressure should always meet the guidelines for vehicle weight.
Observe the following:
- It may be necessary to inflate your tires at a truck stop or truck service center in order to achieve adequate air pressure for your trailer’s needs.
- Only permanent air seal metal valve caps should be used.
- Be safe – if a tire has been run in a 20% underinflated condition, it must be dismounted and inspected by a trained professional. It should not be aired up without a full inspection or without using a safety cage. Use a calibrated gauge. If your tire is rated for higher inflation pressures, a special gauge will be required designed for larger tires.
- Do not bleed air from warm tires to reduce pressure buildup.
- Do not inflate tires to cold PSI rating beyond rim specifications.
How Overloading Affects Your Tires
Tire pressure is what enables your trailer tire to support loads, overloading can have serious consequences. Too much weight can cause stress on the suspension system components, brake failure, handling and steering problems, irregular tire wear, and possible tire failure. If you discover your tires cannot handle the load, lighten the weight of the load on your tires.
Weighing Your Trailer Or Towed Vehicle
Since a trailer or towed vehicle adds to the load on the tires, it is crucial to properly weigh towed vehicles. Refer to Section 7 – Towing section for important information on loading and weighing of the trailer.
Tire Care
The most important function of tires is to provide traction while moving and grip when steering or stopping. The tires on your trailer are designed for highway use and must be properly maintained in order to maximize tire life, as well to provide a safe mode of transportation.
Tire Care Tips
To reduce the risk of tire failure, we strongly recommend the following:
- Check the pressure in your tires, including your spare, at least monthly when the tires are cool (after the vehicle has been stopped for 3 hours and then driven less than 1 mile). Do not reduce pressure when tires are hot. Use a tire gauge to check the pressure and maintain it at the recommended level.
- Never overload your tires. Heed the maximum load-carrying capability of your tires.
- Check your tires frequently for scrapes, bulges, separations, cuts, or snags resulting from use. See your tire dealer immediately if any such condition is discovered.
- Never operate your vehicle in excess of lawful speeds, the maximum speeds justified by driving conditions, or in excess of speeds recommended for the tires you are using.
- Make every effort to avoid running over objects that may damage the tire through impact or cutting, such as chuck holes, glass, metal, etc.
- Never drive on smooth tires. Tires should be removed when 2/32 in. of tread depth remains. In most states, it is illegal to drive with less than 2/32 in. remaining tread depth.
- Park out of the sun whenever possible when in warm climates. In desert regions, use tire covers to prevent ultraviolet light deterioration to tires.
Read all instructions for Tires User Manual
Airstream Travel Trailer International 2023 Maintenance and Inspection User Manual
Airstream Travel Trailer International 2023 Maintenance and Inspection User Manual
Tire Inspection and Storage
Before taking your trailer on a trip or when removing it from an extended storage period, make it a practice to inspect the overall condition of your tires. Check for any type of condition or damage that might result in failure. A thorough check should include both inside and outside sidewalls, tread area, and the condition of hardware such as valve stems, valve caps, and wheels. The tread should be checked for any unusual wear, cracking, penetrations, and/or cuts. An uneven wear pattern can indicate misalignment or worn suspension parts.
Since many RVs are used seasonally and sometimes stored for extended times, it is possible that tires will take many years to wear out. Tires, as any rubber product, will age over time. If tires show cracking in the sidewall or tread surfaces that are more than 2/32-in. deep, they should be replaced before your next trip or vacation. Store your RV in a cool, dry area away from major heat sources and extreme cold. An enclosed storage area is best with no exposure to electromagnetic sources such as generators or transformers. If you must keep your trailer outside, cover your tires from direct sunlight. Take your trailer to your tire dealer for service to check or correct any of these conditions.
Tire and Wheel Replacement
It is possible to replace your tires with a different size, in some instances. If there is a reason to replace your tires with a different size, make sure the following checks are made.
before the purchase:
- Does the replacement tire have the load capacity that is needed for my trailer and will it fit properly inside the wheel well?
- Will the overall diameter difference affect the braking system?
- Is the increase in air pressure compatible with the maximum rated pressure stamped on the rim?
Most trailers are towed at or near maximum loads during hot weather and then are left idle for months. In normal use, oils in the tire come to the surface during flexing and protect the rubber from ultraviolet light. But, when the trailer tires sit idle too long, natural aging may cause the rubber to crack prematurely, especially in the sidewall area. Trailer tires over 5 years old should be inspected by a tire expert for cracking and replaced even if it has no apparent tread wear.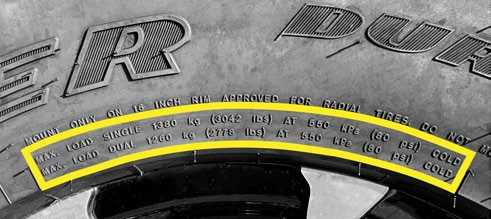
Choosing a Tire
Every tire sold in the United States has a tire rating stamped on the sidewall that shows a tire’s maximum load at a defined pressure. Use the example above to help locate the max load rating in pounds (lbs) and tire pressure in pounds per square inch (psi) on your original equipment tires. Choose a tire with equal load ratings. For the tire size, inflation, and load specifications, see Section 4, Specifications.
Max Load Single vs. Max Load Dual
Max Load Single refers to the tire rating for applications with only one wheel on each end of a single axle. Max Load Dual refers to the tire rating for dually wheels, where there are two wheels on each end of an axle for a total of 4 wheels on a single axle. Don’t confuse the terms Single and Dual with Tandem. A tandem axle refers to trailers with two axles, one behind the other. For Airstream Travel Trailers, refer to the Max Load Single rating.
WARNING
Do not mismatch wheels and tires. Axle systems are installed with hubs and drums that are compatible with many wheels used in the recreational vehicle industry that have matching bolt patterns. If the original manufacturer-installed equipment is in need of replacement, the wheel manufacturer should be contacted for proof of compatibility prior to replacement and use.
Customers replacing the original with equipment that has not been tested for compatibility must ensure the replacements are compatible to the hub and drum assembly installed.
Such elements of compatibility include, but are not limited to:
- Diameter of the hub-mounting surface.
- Stud length and diameter.
- Location and number of studs.
- Center hole diameter for the wheel.
- Wheel-mounting offset from the rim center.
- Rated capacity of the wheel.
- Wheel fastener torque.
- Wheel nut size and shape.
- Impact of any added wheel accessories (such as decorative center caps) that could affect proper seating of the wheel to the hub surface.
Refer to the following table for wheel specifications.
| Wheel Specifications | ||
| Size/Center Size In Inches | Lug Pattern | Model |
| 15 x 6 / 5.5 | 6 | All Models |
| All wheels have zero offset. | ||
Lug Nut Torquing
Trailer wheels must carry much higher loads per wheel than passenger car or truck wheels. Each wheel may carry 1000 pounds and higher. Furthermore, wheels on tandem axle trailers do not steer, and are subjected to very high side load stress whenever the trailer makes a tight turn. When going around corners, especially on slow, tight turns, the wheels are subject to very strong side loads. This tends to flex the wheel and gradually loosen the wheel nuts. Although the materials and manufacturing methods are maximized for this kind of service, these extra loads can cause stress, which can result in flexing and loosening of wheel nuts.
Before each trip and any time a wheel is replaced, be sure to tighten the wheel nuts, following the lug-pattern sequence shown below. If the wheel was replaced, check the torque every 5, 25, and 50 miles.
Read all instructions for Maintenance and Inspection User Manual
Airstream Travel Trailer International 2023 Water Pump User Manual
2023 Airstream Travel Trailer International Water Pump Instruction
Water Pump
Water Pump Access Locations
- The water pump and strainer are under the removable bottom wardrobe shelf.
- The water pump and strainer are under the wardrobe.
- The bottom cabinet panel is held on with a pressure catch and pulls off for access.
- The water pump and strainer are under the wardrobe.
- The bottom cabinet panel is held on with a pressure catch and pulls off for access.
- The water pump and strainer are under the cooktop. The bottom cabinet panel opens for access to a removable panel held in place by screws.
- The water pump and strainer are under the removable bottom wardrobe shelf.
Strainer Cleaning
Locate the water pump and housing cap. Turn housing cap counterclockwise to remove cap and carefully pull out strainer. Clean strainer in small bucket of clean water or under running water. If necessary, clean strainer in a detergent solution. If the detergent solution is used, rinse thoroughly. Install strainer and housing cap, being careful not to damage housing cap seal.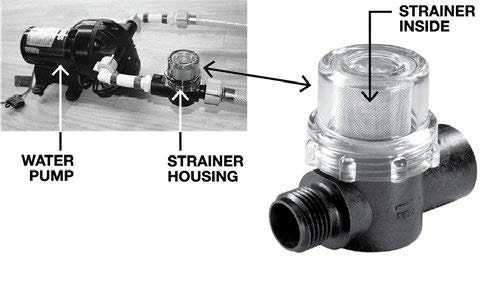
Fresh Water Tanks and Draining
Drain Valves
Drain valve locations are listed below by model; however, it may be helpful to know how to locate them should this information become outdated due to a change in mid-production.
To locate internal low-point drain valves:
- Look for a water line (usually white, red, or blue)protruding from the exterior underbelly. It will be a bare line with no valve. There may be two or more.
- Establish a reference point to something inside the trailer, such as a window or vent.
- Once inside, use your reference point to locate where the water line comes out of the floor. Trace the water line to the nearby low-point drain valve connection.
You can find where water lines come through the floor and locate valves by removing access panels inside or under furniture near your reference point; others are accessible by removing a drawer or opening a cabinet/compartment door. Sometimes access to internal valves is gained externally from inside a storage compartment.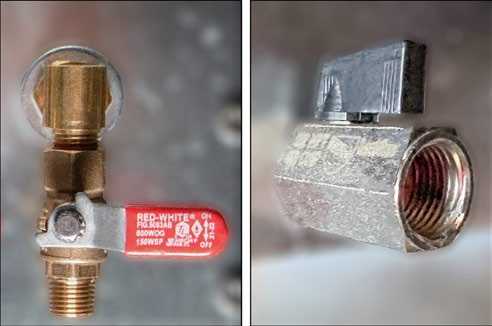 To locate external fresh water tank valve(s), look for a stainless steel valve (right photo) or in-line brass valve(s) (left photo) mounted to the galvanized steel underbelly. For more information on the plumbing layout, see plumbing layouts at the end of this section.
Drain Valve Locations
23FB – The stainless steel fresh water tank drain (right photo, above) is under the trailer on the tank pan in front of the roadside tires. It also has two low-point drain valves inside the pantry cabinet behind the removable lower face panel. The panel is held on by two pressure catches.
25RB – The exterior water line brass low-point drain valves (left photo, above) extend from the bottom of the exterior fresh water tank pan under the trailer, curbside between the tires. There is a low-point drain valve in the curbside-exterior front storage compartment. 25FB, 27FB, and 28RB – The exterior water line brass low-point drain valves (left photo, above) extend from the bottom of the exterior fresh water tank pan, roadside between the tires. A separate stainless steel valve (right photo, above), on the same pan, is used to drain the freshwater tank. 30RB – The two low-point drain valves are under the rear dinette seat cushion under an access panel. The stainless steel fresh water tank drain valve (right photo, above) is on the exterior tank pan under the trailer, curbside between the tires.
Opening and Closing Valves
To open valves, turn the handle to align it with the waterline.
Fresh Water Tank Draining
Pumping the water out with the self-contained water pump can empty the fresh water tank. Simply turn on the pump switch and open a couple of faucets until the water will no longer drain out, or use the petcock-type drain valve located on the freshwater tank pan. Be sure to watch closely and turn the pump off when the tank runs dry. Pump damage can occur if the pump runs dry for more than a few minutes.
Sanitizing
Potable water systems require periodic maintenance to deliver a consistent flow of fresh water. Depending on use and the environment the system is subject to, sanitizing is recommended prior to storing and before using the water system after a period of storage. Systems with new components or ones that have been subjected to contamination should also be disinfected as follows:
- Use one of the following methods to determine the amount of common household bleach needed to sanitize the tank.
- Multiply “gallons of tank capacity” by 0.13; the result is the ounces of bleach needed to sanitize the tank.
- Multiply “Liters of tank capacity” by 1.0; the
- Mix the proper amount of bleach into a container of water.
- Pour the correct amount of solution (water/bleach) into the Fresh Water tank and fill it with potable water.
- Open all faucets (hot and cold) allowing the water
to run until the distinct odor of chlorine is detected. - The standard solution must have 4 hours of contact time to disinfect completely. Doubling the solution concentration will allow for a contact time of one (1) hour.
- When the contact time is completed, drain the tank Refill it with potable water, and flush the plumbing of all sanitizing solutions.
Black and Gray Water Tank Draining
To empty one or both tanks, attach the sewer hose by pressing the bayonet fitting onto the dump valve outlet and rotating clockwise until it feels solid and secure. Attach the outlet end of the hose to the sewage outlet, making sure the hose is placed so it will drain completely. Pull the main dump valve handle as far as it will go and wait until the tank is drained. Close the dump valve and partially refill the tank with clean water, and repeat the process until clean. The main holding tank must be flushed out until all paper and waste material is removed. Now pull the auxiliary tank valve handle to drain the gray water tank. When dumping, the main holding tank should be dumped first, then the auxiliary holding tank. This will help to rinse the sewer line with auxiliary holding tank water. Replace the bayonet ring cap prior to traveling.
Black Water Tank Dumping
When you are in a park and connected to a sewer outlet, keep the main holding tank dump valve closed and empty the tank every few days, or whenever it becomes almost full. Only by sending a large volume of liquid, all at once, through the main holding tank will toilet paper and other solids completely wash away. This practice will avoid the accumulation of solids in the main holding tank, which could lead to an unpleasant cleaning job. Should solids accumulate, close the dump valve, fill the tank about half full with water, then tow the trailer for a few miles. The turbulence and surging of the water will usually dissolve the solids into suspension so the tank can be drained. Draining the tanks as described will protect them from freezing during storage. When traveling in sub-freezing temperatures, use a winterizing solution designed for RV use. Follow the directions on the container.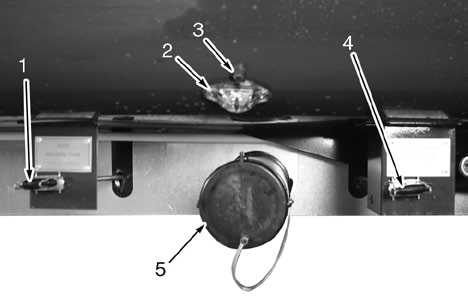
- Black Water (Main) Dump Valve
- Light
- Light Switch
- Auxiliary Tank Dump Valve 5. Drain Cap
Read all instructions for Water Pump User Manual
Airstream Travel Trailer International 2023 Winterizing and Storage User Manual
Airstream Travel Trailer International 2023 Winterizing and Storage User Manual
Winterizing and Storage
When storing your trailer for short or long periods, use the same precautions as you would in your own home in regard to perishables, ventilation, and rain protection. In addition, for prolonged storage periods, flush out all the drain lines and the holding tanks. Also drain the entire water system including the water heater and the water storage tank. Instructions for draining the water system are explained in the following paragraphs on winterizing. The main consideration in winterizing your trailer is to guard against freeze damage to the fresh water system lines, tank, and pump, the waste drain system including the traps and tanks, the water heater, and the batteries.
To completely winterize your trailer follow this procedure:
- Level the trailer from side to side and front to rear. Open all faucets.
- Turn the water pump switch to the ON position to expel water from the storage tank
- Open all drain valves including exterior water service valve.
- While the water is draining from the system, open and flush the toilet-flushing valve. Depress hand spray thumb button on the telephone shower head while holding down inside the tub and drain all water from the flexible hose. Unscrew the heads on both spray units and store.
- Turn the pump switch OFF after all water has been removed from the storage tank.
- Disconnect outlet hose from water pump.
- Lower the front of the trailer as far as the jack will allow until water ceases to drain, then crank the jack up as high as it will go and allow any remaining water to drain out.
- After the water has stopped running from the drain lines, apply 50 lb. of air pressure at the city water inlet. An air-to-city water adapter is available from your dealer’s RV accessory store. Be sure the toilet valve, all drain valves, and faucets are open and the pump outlet hose is disconnected. This can be done at a service station and will force any remaining water from the water heater and remove any water that may be trapped in low areas.
- Pour a cup of non-toxic RV antifreeze that has been approved and listed by a recognized testing authority such as Underwriter Lab into the lavatory, sink and tub drains to prevent trap freeze-up.
- Be sure to open the waste-holding tank dump valves and drain and flush the tanks thoroughly (this is very important as the sewage in the tanks, if frozen, could seriously damage the tanks). Plan ahead and have this done at a dump station.
- Remove the batteries from your trailer and store in a cool, dry place where there is no danger of freezing. It is very important for optimum life of a battery to check it periodically and to keep it fully charged.
CAUTION
Remove all RV antifreeze spillage from all drain and faucet parts after winterizing. Failure to do so could result in damage to the plumbing fixture’s finish.
Optional;
An additional step to winterization is to consider adding a non-toxic RV antifreeze (approved for drinking water systems) to the water lines using the pre-installed Winterization Kit. Before beginning, read the RV antifreeze manufacturer’s label for instructions specific to the antifreeze you plan to use. It may take 2-3 gallons to fill the entire system so prepare accordingly. It will be helpful to have another person watching and operating the faucets and showerheads as you follow these steps. The Winterization Kit is near the water pump. See water pump access locations and drain valve locations in Section 8.
- Reconnect all lines and showerheads that were disconnected in the previous steps.
- Close all the drain valves.
- Open the sink and shower drains if they are closed.
- Open all the faucets, including the showerhead faucet handle and, if equipped, the external showerhead.
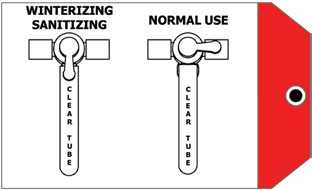
- Go to the winterization kit and turn the valve handle to the winterizing position as indicated on the tag attached to the kit (shown above).
- Uncoil the hose attached to the kit, remove the hose cap, and insert the hose down to the bottom of the RV antifreeze container.
- Turn the pump switch on and run it until antifreeze starts coming out of the faucets. Once antifreeze runs from one tap, turn it off and continue to the next one. Move from one fixture to the next, shutting them off as you go until all the lines are full. As you empty each antifreeze container, turn the pump off, transition to a full container, and turn the pump back on to continue.
- Allow the antifreeze to flow down the drains. Flush the toilet and allow antifreeze to flow down the toilet. If equipped, operate the toilet hand sprayer until the antifreeze is coming out. Work the hand shower sprayer while holding it down in the tub until antifreeze is coming out, and if equipped, do the same with the external showerhead. Any remaining antifreeze can be dumped down a drain.
- Shut the pump off once all the lines are full.
- Open all the faucets and leave them open.
- Turn the winterization kit valve back to the normal use position, place the cap back on the hose, and coil it back up for storage.
CAUTION
Remove all RV antifreeze spillage from all drain and faucet parts after winterizing. Failure to do so could damage the plumbing fixture’s finish. Do not use water to rinse antifreeze down the drain as it will dilute the antifreeze.
Restoring Service After Winter
- Re-install the fully charged batteries.
- Close the dump valve, all water faucets, and freshwater tank drain.
- Add water to the freshwater tank.
- Turn on the water pump.
- Open and close the faucets one at a time until the water runs clear at all faucets signaling RV non-toxic antifreeze is flushed out of lines. Go back and recheck water clarity at all faucets.
- Turn off the water pump.
- Hook up to a city water supply, open the faucets again, and recheck water clarity.
Read all instructions for Winterizing and Storage User Manual
Airstream Travel Trailer International 2023 Electrical Diagrams User Manual
Airstream Travel Trailer International 2023 Electrical Diagrams User Manual
Electrical Diagrams
12-Volt Main Schematic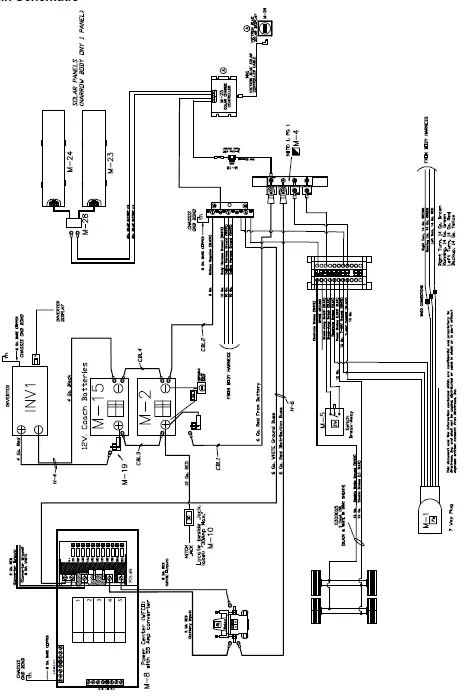
120-Volt/30- and 50-Amp Diagrams
The following electrical diagrams are representative of the National Electric Code (NEC) and the Canadian Standards Association (CSA). All circuits are NEC with the exception of CSA circuits as specified in each respective table.
23FB International (30 Amp)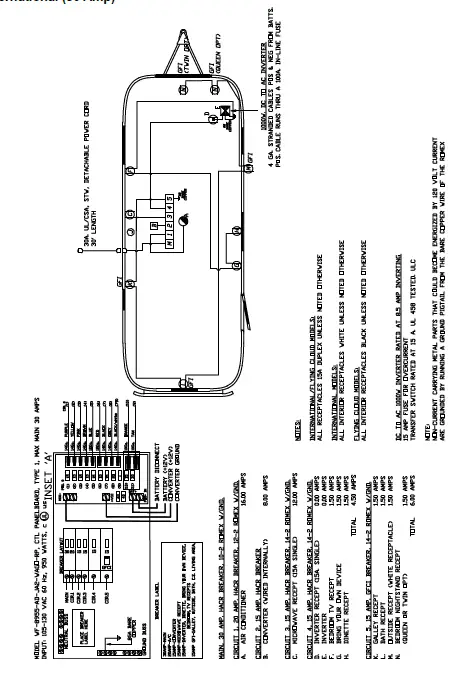 25RB International (30 Amp)
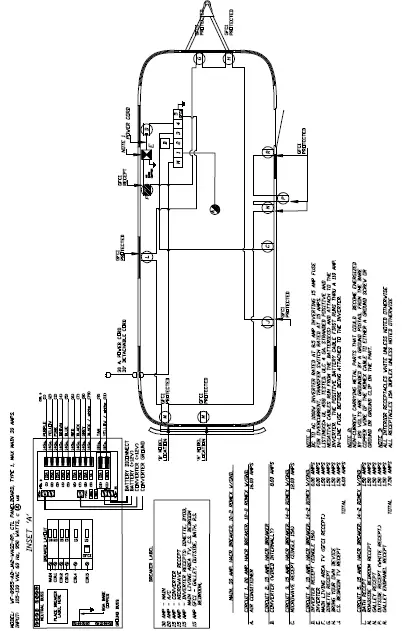
25RB International (50 Amp)
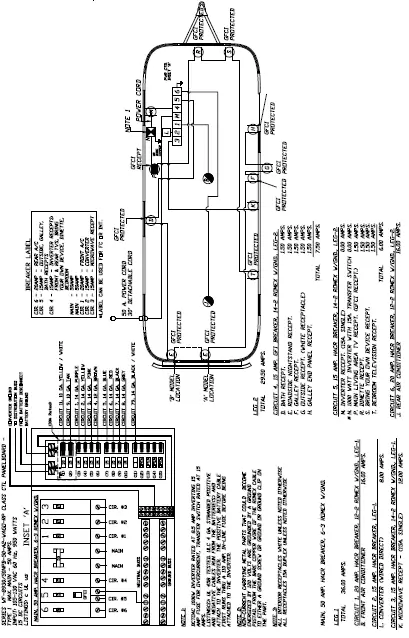
25RB International (50 Amp) – CSA
Read all instructions for Electrical Diagrams User Manual
Useful Links
Download Manuals: https://www.airstream.com/owners/manuals/