
2014 Alfa Romeo MiTo Lights and Wipers Instruction
The 2014 Alfa Romeo MiTo’s lighting and wiper controls give drivers a wide range of options to make sure they can see well and stay safe in all kinds of driving situations. This stylish and small Italian car has easy-to-use switches and settings that let you easily change the headlights, taillights, fog lights, and wipers to suit your driving needs. Whether you’re changing the lights to match the weather, making it easier to see at night, or just making them look the way you want them to, the MiTo’s lighting and wiper instructions make the car’s sporty look and performance even better.
EXTERIOR LIGHTS
LEFT STALK
The left stalk fig. 35 operates most of the exterior lights. The external lights can only be switched on when the ignition key is at MAR.
The instrument panel and the various controls on the dashboard will come on when the external lights are switched on.
DAYTIME RUNNING LIGHTS (DRL)
With the ignition key at MAR and ring nut A, fig. 35 turned to O, the daytime running lights switched on. The other lights and interior lighting stay off. For daytime running light functionality, see the “Menu Items” paragraph in this section. If the function is deactivated, no lights are switched on when ring nut A is turned to O.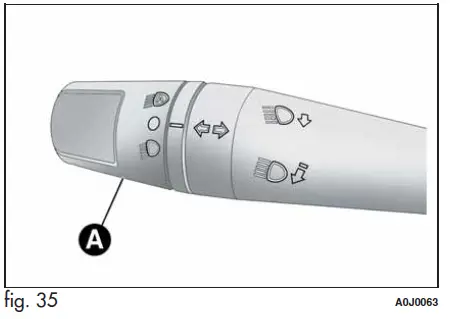
SIDE LIGHTS/DIPPED BEAM HEADLIGHTS
With the ignition key turned to MAR, turn ring nut A fig. 35 to ![]() . The daytime running lights are switched off and the side lights and dipped headlights are switched on. The warning light
. The daytime running lights are switched off and the side lights and dipped headlights are switched on. The warning light ![]() switches on on the instrument panel.
switches on on the instrument panel.
PARKING LIGHTS
These lights can only be switched on with the ignition key at STOP or removed, by moving ring nut A first to position O and then to position ![]() . When the parking lights are switched on, the number plate lights and the front and rear side lights switch on as well (the daytime running lights (DRLs) remain off however). The warning light
. When the parking lights are switched on, the number plate lights and the front and rear side lights switch on as well (the daytime running lights (DRLs) remain off however). The warning light ![]() switches on on the instrument panel. When the direction indicator stalk is activated the side for the lights (left or right) can be selected.
switches on on the instrument panel. When the direction indicator stalk is activated the side for the lights (left or right) can be selected.
AUTOMATIC LIGHTING CONTROL (AUTOLIGHT) (Dusk sensor)
This infrared LED sensor, combined with the rain sensor and located on the windscreen, detects the variations in outside brightness depending on the light sensitivity set with the Set-up Menu: the greater the sensitivity, the less external light is required to activate the exterior lights.
Activation
The dusk sensor activates when ring nut A fig. 35 is turned to ![]() . In this way, the side lights and dipped headlights are activated automatically according to the external light level.
. In this way, the side lights and dipped headlights are activated automatically according to the external light level.
IMPORTANT: The sensor is unable to detect the presence of fog. Therefore under these circumstances, these lights must be turned on manually.
When the lights are turned on by the sensor, the fog lights (for versions/markets, where provided) and the rear fog lights may be turned on. When the lights are automatically switched off, the front and rear fog lights (if activated) are also switched off. The next time the lights are switched on automatically, the fog lights must be reactivated manually (if required). With the sensor active, it is possible to flash the headlights but the main beam headlights cannot be switched on. If you need to turn the lights on, turn the ring nut A to position ![]() and turn the dipped headlights on. When the lights have been activated automatically and are then switched off by the sensor, the dipped beam headlights are switched off first, followed by the side lights a few seconds later. If the sensor is activated but is malfunctioning, the side lights and dipped beam headlights are switched on irrespective of the outside light level and the sensor failure is indicated on the instrument panel display. It is also possible to deactivate the sensor and switch on these lights if necessary.
and turn the dipped headlights on. When the lights have been activated automatically and are then switched off by the sensor, the dipped beam headlights are switched off first, followed by the side lights a few seconds later. If the sensor is activated but is malfunctioning, the side lights and dipped beam headlights are switched on irrespective of the outside light level and the sensor failure is indicated on the instrument panel display. It is also possible to deactivate the sensor and switch on these lights if necessary.
MAIN BEAM HEADLIGHTS
To activate the main beam headlights, with ring nut A at ![]() , pull the stalk towards the steering wheel beyond the end of travel position. The warning light
, pull the stalk towards the steering wheel beyond the end of travel position. The warning light ![]() switches on on the instrument panel. When the stalk is pulled towards the steering wheel again, beyond the end of travel position, the main beam headlights deactivate, the dipped beam headlights reactivate and the warning light
switches on on the instrument panel. When the stalk is pulled towards the steering wheel again, beyond the end of travel position, the main beam headlights deactivate, the dipped beam headlights reactivate and the warning light ![]() switches off.
switches off.
FLASHING
To do this, pull the stalk towards the steering wheel (unstable position) regardless of the position of ring nut A. The warning light ![]() switches on on the instrument panel.
switches on on the instrument panel.
DIRECTION INDICATORS
Bring the stalk into a (stable) position:
- upwards: activates right direction indicator;
- downwards: activates left direction indicator.
Warning light or will flash in the instrument panel. The indicators are switched off automatically when the steering wheel is straightened.
“Lane change” function
If you want to signal that you are changing lanes, hold the left stalk in the unstable position for less than half a second. The direction indicator on the selected side flashes 3times and then switches off automatically.
“FOLLOW ME HOME” DEVICE
This device allows you to illuminate the area in front of the car for a certain amount of time.
Activation
With the ignition key at STOP or removed, pull stalk A towards the steering wheel and move it within 2 minutes of the engine switching off. At every single movement of the stalk, the lights will remain on for an extra 30 seconds up to a maximum of 210 seconds; then the lights are switched off automatically. The warning light ![]() on the instrument panel will light up (and the corresponding message will appear on the display) as long as the function is active. The light comes on when the stalk is first moved and stays on until the function is automatically deactivated. Each movement of the stalk only increases the amount of time the lights stay on.
on the instrument panel will light up (and the corresponding message will appear on the display) as long as the function is active. The light comes on when the stalk is first moved and stays on until the function is automatically deactivated. Each movement of the stalk only increases the amount of time the lights stay on.
Deactivation
Keep stalk A pulled towards the steering wheel for more than 2 seconds.
EXTERNAL COURTESY LIGHTS
This function lights up the car and the space in front of it when the doors are unlocked.
Activation
When the car is parked and the doors are unlocked by pressing the ![]() button on the remote control (or the luggage compartment is unlocked by pressing
button on the remote control (or the luggage compartment is unlocked by pressing ![]() ), the dipped headlights, side lights, and number plate lights are activated. The lights remain lit for approximately 25 seconds unless the doors and boot are locked again with the remote control or the doors or boot are opened and reclosed. In these cases, they go out after 5 seconds. The exterior courtesy lights can be enabled/disabled using the Setup Menu (see the paragraph “Menu Items” in this chapter).
), the dipped headlights, side lights, and number plate lights are activated. The lights remain lit for approximately 25 seconds unless the doors and boot are locked again with the remote control or the doors or boot are opened and reclosed. In these cases, they go out after 5 seconds. The exterior courtesy lights can be enabled/disabled using the Setup Menu (see the paragraph “Menu Items” in this chapter).
WINDOW CLEANING
WINDSCREEN WASHER/WIPER
The right stalk controls the windscreen wiper/washer and rear window wiper/washer operation. This operates only with the ignition key turned to MAR.
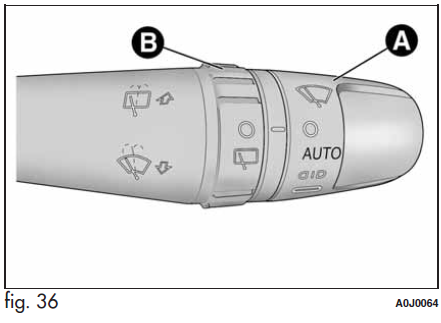
Ring nut A fig. 36 has the following positions:
- O windscreen wipers off;
 intermittent operation (low speed);
- AUTO rain sensor activation (for versions/markets, where provided) (the windscreen wipers adapt the operating speed automatically to suit the intensity of the rain)
 intermittent operation;
 continuous slow operation;
- continuous fast operation.
 Move the stalk upwards (unstable position) to limit operation to the time for which the stalk is held in this position. When released, the stalk will return to its default position and the wiper will be automatically stopped.
Caution
- Do not use the windscreen wiper to remove layers of snow or ice from the windscreen. In such conditions, the windscreen wiper may be subjected to excessive stress and the motor protection, which prevents operation for a few seconds, may intervene. If operation is not restored, even after turning the key and restarting the engine, contact Alfa Romeo Authorized Services.
- Do not operate the windscreen wiper with the blades lifted from the windscreen.
“Smart washing” function
Pull the lever towards the steering wheel (unstable position) to operate the windscreen washer. Keep the stalk pulled for more than half a second, with just one movement, to operate the windscreen washer/wiper jet at the same time.
The wiper stops working three strokes after the stalk is released. A further stroke after approximately 6 seconds completes the cycle.
RAIN SENSOR
This is an infra-red LED sensor fitted on the car windscreen Fig. 37. It is able to detect the presence of rain and consequently manage windscreen wiping in accordance with the amount of water on the windscreen.
Activation
The sensor is activated when ring nut A fig. 36 is turned to the “automatic” position (“AUTO” control): the windscreen wiper stroke frequency is thus adjusted in accordance with the amount of water on the windscreen.
This frequency can vary from no stroke (no rain – windscreen dry) up to the 2nd constant speed operation (heavy rain – windscreen wet). The sensitivity of the rain sensor can be adjusted through the Set-up menu (see paragraph “Menu Items” in this section). If the engine is stopped with the lever in an “automatic” position, when it is next started no wiping cycle will take place even if it is raining. This prevents accidental activation of the rain sensor when the engine is started (e.g. when the windscreen is being washed by hand or the wipers are stuck to the windscreen when there is ice).
 Carry out any of the following manoeuvres to restore automatic operation of the system:
- movement of the left stalk from the automatic position to any other position and then back to automatic;
- sensitivity adjustment (by turning ring nut A to increase or decrease).
When the rain sensor is reactivated using any of the manoeuvres described above, reactivation is indicated by a single stroke of the windscreen wipers, regardless of the condition of the windscreen. If the sensitivity is changed whilst the rain sensor is operating, a windscreen wiper stroke is carried out to confirm the change. In the event of malfunction of the rain sensor, whilst it is active, the windscreen wiper operates intermittently at a speed consistent with the sensitivity setting of the rain sensor, regardless of whether there is rain on the glass (sensor failure is indicated on the display). The sensor continues to operate and it is possible to set the windscreen wiper to continuous mode (1st or 2nd speed). The failure indication remains for as long as the sensor is active.
REAR WINDOW WASHER/WIPER
Activation
This operates only with the ignition key turned to MAR.
Turn ring nut B fig. 36 from position O to position ![]() to operate the rear window wiper as follows:
to operate the rear window wiper as follows:
- in intermittent mode when the windscreen wiper is not operating;
- in synchronous mode (at half the speed of the windscreen wiper) when the windscreen wiper is operating;
- in continuous mode with a reverse gear engaged and the control active.
With the reverse gear engaged and the windscreen wiper on, the rear window wiper is activated in continuous mode. Pushing the stalk towards the dashboard (unstable position) will activate the rear window washer jet. Keep the stalk pushed for more than half a second to activate the rear window wiper as well. Releasing the stalk will activate the smart washing function, as described for the windscreen wiper.
FAQ’s
A: To turn on the headlights, simply rotate the headlight switch to the desired position. It has options for off, parking lights, and full headlights.
A: Yes, you can use the fog lights by rotating the fog light switch to the “on” position when the headlights are on.
A: Push the high beam lever away from you to activate the high beams. Pull it back towards you to return to low beams.
A: You can adjust the brightness of the interior lighting using the interior light dimmer control located on the dashboard.
A: To activate the rear fog lights, turn on the headlights, then pull the fog light switch towards you.
A: The headlight leveling system automatically adjusts the angle of the headlights to maintain proper illumination without blinding oncoming drivers.
A: Use the wiper stalk on the steering column. Push it up for one swipe, down for continuous wiping, and further down for intermittent wiping.
A: The rain-sensing wipers detect rain on the windshield and adjust the wiper speed automatically. You can turn this feature on or off.
A: Yes, you can manually adjust the wiper speed using the wiper stalk. Twist the collar to change the speed.
A: Pull the wiper stalk toward you to spray the windshield washer fluid and clean the windshield.
A: The rear wiper and washer are controlled using a separate stalk on the steering column. Push up for the wiper and pull towards you for the washer.
A: Yes, you can adjust the interval time for intermittent wipers by twisting the collar on the wiper stalk to your preferred setting.
A: To turn off the wipers completely, push the wiper stalk down to the “off” position.
A: No, the wipers will only work when the ignition is on to avoid draining the battery.
A: The wipers automatically return to the parked position when you turn off the ignition if they were active before.