
2014 Alfa Romeo MiTo Seats Setup Instructions
The seats in the 2014 Alfa Romeo MiTo are the best in terms of comfort, ergonomics, and flexibility. They are an important part of the driving experience. Being able to arrange and adjust the seats not only makes sure that the ride is tailored to your needs but also makes it easier for the driver to handle the vehicle and makes the passengers more comfortable. This detailed guide will show you how to set up your seat so that you can make it comfortable and perfect for your trip, whether it’s a short commute or a long road trip. It includes everything from adjusting the seat position to understanding the different features like lumbar support and heating options.
SEATS
FRONT SEATS
Caution: All adjustments must be made with the car stationary.
Lengthwise adjustment
Lift the lever A fig. 22 and push the seat forwards or backward: in the driving position, your arms should rest on the rim of the steering wheel.
Caution: After releasing the adjustment lever, always check that the seat is locked on the guides by trying to move it back and forth. If the seat is not locked into place, it may unexpectedly slide and cause the driver to lose control of the car.
Height adjustment (for versions/markets, where provided)
Move lever B fig. 22 up or down until the desired height is achieved.
IMPORTANT: Carry out the adjustment whilst seated in the driver’s seat.
Backrest angle adjustment
Turn knob C fig. 22 until the desired position is reached.
Caution: For maximum safety, keep the back of your seat upright, lean back into it, and make sure the seat belt fits closely across your chest and pelvis.
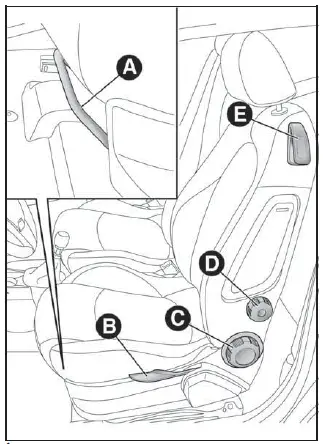
Lumbar adjustment (for versions/markets, where provided)
Turn knob D fig. 22 until the desired position is reached.
Backrest folding
To access the rear seats, pull handle E upwards fig. 22: the backrest will fold and the seat will slide forward when you push the backrest. Moving the backrest backward will return the seat to its initial position.
Caution: Always check that the seat is firmly locked on the guides, trying to push it forward and backward.
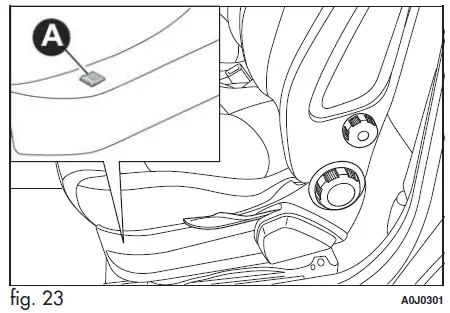
Seat heating (for versions/markets, where provided)
With the key at MAR-ON, press button A fig. 23 (one per seat) to activate/deactivate the function. When the function is enabled, the LED on the button switches on.
SPORTS CONFIGURATION FRONT SEATS
Lengthwise adjustment
Lift the lever A fig. 24 and push the seat forwards or backward: in the driving position, your arms should rest on the rim of the steering wheel.
Backrest angle adjustment
Turn knob B fig. 24 until the desired position is reached.
Backrest folding
To access the rear seats, pull handle C upwards (located behind the backrest) fig. 24. Then release the lever and, pushing on the backrest, slide the seat forward.
REAR SEAT
On versions with sports configuration front seats, the rear seat is available with an integral or split seat and is only 2-seater.
EASY ENTRY
This function allows easy access to the rear seats. To access the rear seats, raise handle E and move the seat’s backrest forwards: the seat moves forward automatically. Bringing the backrest back to its normal position will move the seat back to its initial position. If the backrest encounters an obstacle when moving back (e.g. the knees of the passenger in the back seat), the seat will stop, move forwards by a few centimeters, and then stop in this position.

HEAD RESTRAINTS
FRONT
Head restraints are adjustable in height and they lock automatically into the desired position:
- upwards adjustment: raise the head restraint until it clicks into place;
- downwards adjustment: press button A fig. 25 and lower the head restraint.
Caution: Head restraints must be adjusted so that the head, rather than the neck, rests on them. Only in this case can they protect your head correctly.
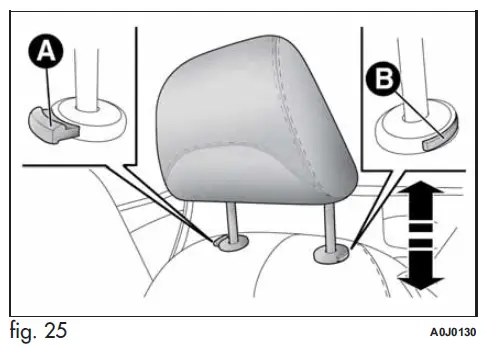
To remove the head restraints:
- raise the head restraints to their maximum height;
- press buttons A and B fig. 25, then remove the head restraints by pulling them upwards.
“Anti-Whiplash” device
The head restraints are equipped with an “Anti-Whiplash” device, which reduces the distance between the head and head restraints in the event of a rear impact, thus mitigating the “whiplash” effect. The head restraint may move when the backrest is pressed by the occupant’s torso or hand: this behaviour is caused by the system and should not be considered a malfunction.
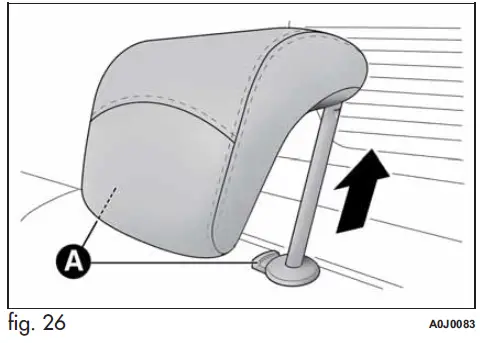
REAR
Two height-adjustable head restraints are provided for the back seats (to adjust the height see the previous paragraph). On some versions, a head restraint is also provided for the central seat. To remove the head restraints:
- raise the head restraints to their maximum height;
- Press buttons A fig. 26, then remove the head restraints by pulling them upwards.
FAQ’s
A: Use the manual or power seat adjustment controls, typically located on the side of the seat, to move the seat forward, backward, up, and down.
A: Some models allow you to adjust the seatback tilt angle. Refer to your owner’s manual for details.
A: Lumbar support can be adjusted to provide extra lower back comfort. Use the lumbar support controls on the side of the seat to customize it.
A: Use the backrest adjustment lever, knob, or controls to recline the seatback to your desired angle.
A: Yes, the passenger seat typically has similar adjustment features, allowing passengers to customize their seating position.
A: The memory seat function allows you to save and recall your preferred seat positions for different drivers. Consult your owner’s manual for instructions on setting up memory positions.
A: If your MiTo is equipped with heated seats, there should be buttons or controls on the dashboard or center console to activate the seat heaters.
A: Yes, most seats have adjustable headrests. You can typically raise or lower the headrests for optimal comfort and safety.
A: Some models offer a one-touch return feature to quickly return the seats to a preset position. Check your owner’s manual for instructions.
A: Consult your owner’s manual for specific care and maintenance instructions to keep the seats in good condition.
A: You can typically install seat covers or accessories, but make sure they are compatible with your car’s airbag systems and don’t interfere with safety features.
A: Adjust the seat position, lumbar support, and other settings to find a comfortable configuration. You can also consider adding seat cushions or covers for extra comfort.
A: Experiment with different seat settings, ensuring that you have a clear view of the road, your feet reach the pedals comfortably, and your posture is ergonomic.
A: Some models may offer a seat adjustment lock feature. Consult your owner’s manual for instructions on using this feature.
A: To reset the seat settings, adjust the seats to your preferred position and use the memory seat function if available to save the configuration.