
![]()
2019 Alfa Romeo 4C Spider Display
The 2019 Alfa Romeo 4C Spider has a high-tech touchscreen screen that controls many of the car’s functions and entertainment features. This touchscreen interface, which is usually between 7 and 8.8 inches, makes it easy to access navigation, audio controls, smartphone integration (via Apple CarPlay and Android Auto), and car settings. Its easy-to-use design lets you change settings and preferences, and in some models, voice commands let you handle it without using your hands. The 4C Spider doesn’t usually have digital instrument clusters for the speedometer and tachometer; instead, it has manual ones. However, the infotainment display may also show important safety data, like feeds from the rearview camera and data from the parking sensors. Regular software updates and customization choices make sure that the user experience is smooth and always changing, which improves the 2019 Alfa Romeo 4C Spider owners’ overall driving and connectivity experience.
INSTRUMENT CLUSTER DISPLAY
Your vehicle is equipped with an instrument cluster display, which offers useful information to the driver. With the ignition in the STOP (OFF/LOCK) position (and the key removed, for vehicles with mechanical key), opening/closing of a door will activate the display for viewing, and display the total miles or kilometers in the odometer. Your instrument cluster display is designed to display important information about your vehicle’s systems and features. Using a driver interactive display located on the instrument panel, your instrument cluster display can show you how systems are working and give you warnings when they aren’t. The steering wheel-mounted controls allow you to scroll through and enter the main menus and submenus. You can access the specific information you want and make selections and adjustments.
Location And Controls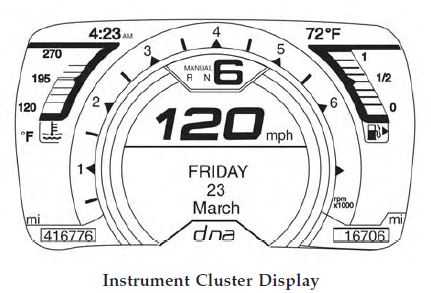
The instrument cluster display features a driver interactive display that is located in the instrument cluster. The instrument cluster display consists of the following:
- Digital Speedometer
- Vehicle Info
- Fuel Economy Info
- Trip Info
- Screen Setup
- Vehicle Settings
The system allows the driver to select information by pushing the following buttons mounted on the instrument panel to the left of the steering column:
- Up Arrow Button
 Push and release the up arrow button to scroll upward through the main menu and submenus or to increase the displayed value. Outside of the menu, the up arrow will adjust the brightness of the instrument panel.
 - Down Arrow Button
 Push and release the down arrow button to scroll downward through the main menu and submenus or to decrease the displayed value. Outside of the menu, the down arrow will adjust the brightness of the instrument panel.
 - SET/BACK Arrow Button
Push and release the SET/BACK arrow button to access/select the information screens or submenu screens of a main menu item. Push and hold the SET/BACK arrow button to return to the main menu from an info screen or submenu item.
Change Engine Oil Indicator System
![]() Your vehicle is equipped with an engine oil change indicator system. The “Change Engine Oil” message will flash in the instrument cluster display for approximately ten seconds and the oil pressure warning light will illuminate. The “Change Engine Oil” message in the instrument cluster display and the oil pressure warning light will turn off after approximately ten seconds.
Your vehicle is equipped with an engine oil change indicator system. The “Change Engine Oil” message will flash in the instrument cluster display for approximately ten seconds and the oil pressure warning light will illuminate. The “Change Engine Oil” message in the instrument cluster display and the oil pressure warning light will turn off after approximately ten seconds.
Reset the Oil Change Reminder message as follows:
- Without pushing the brake pedal, cycle the ignition to the MAR/ON/RUN position (do not start the engine).
- Push and hold the accelerator pedal.
- Push and release the brake pedal six times; with a one second pause between each push of the brake pedal.
- After the 6th release of the brake pedal, pause one second and then release the accelerator pedal.
- NOTE: Consult your authorized dealer if the oil change indicator message does not reset.
Instrument Cluster Display Programmable Menu
The menu comprises a series of functions arranged in a cycle. Push the up and down arrow buttons to access the different options and settings (setup). The setup menu can be activated by pushing the SET/BACK button. Single pushes on the up or down arrow buttons will scroll through the setup menu options. The menu includes the following functions:
- Menu
- Speed Buzzer
- Trip B Data
- Set Time
- Set Date
- Autoclose
- Units
- Language
- Buzzer Volume
- Seat Belt Buzzer
- Service
- Daylights (D.R.L.)
- Exit Menu
Selecting An Option Of The Main Menu Without Submenu:
- Briefly push the SET/BACK button to select the main menu option to set.
- Push the up or down arrow button (by single pushes) to select the new setting.
- Briefly push the SET/BACK button to store the new setting and go back to the main menu option previously selected.
Selecting An Option Of The Main Menu With Submenu:
- Briefly push the SET/BACK button to display the first submenu option.
- Push the up or down arrow button (by single pushes) to scroll through all the submenu options.
- Briefly push the SET/BACK button to select the displayed submenu option and to open the relevant setup menu.
- Push the up or down arrow button (by single pushes) to select the new setting for this submenu option.
- Briefly push the SET/BACK button to store the new setting and go back to the previously selected submenu option.
- Push and hold the SET/BACK button to return to the main menu (short hold) or the main screen (longer hold).
Speed Buzzer (Speed Limit)
With this function, it is possible to set the vehicle speed limit (MPH or km/h) to immediately alert the driver when the set limit is exceeded.
To set the speed limit, proceed as follows:
- Briefly push the SET/BACK button. The display will show the message (Speed Buzzer).
- Push and release the up or down arrow button to select speed limit activation (On) or deactivation (Off).
- When the function is activated (On), briefly push the SET/BACK button to display the previously set speed. Pushing the up or down arrow buttons selects the speed limit. Push SET/BACK to confirm selection.
NOTE: The setting can be increased or decreased by 5 MPH or km/h each time the up or down arrow button is pushed for speed settings above 20 MPH (32 km/h). To increase or decrease the set speed rapidly, push and hold the up or down arrow button. Save the setting by briefly pushing the button when you approach the required setting.Briefly push the SET/BACK button to go back to the menu screen, or push and hold the SET/BACK button (approximately one second) to go back to the main screen without storing the settings.
To cancel the setting, proceed as follows:
- Briefly push the SET/BACK button. “On” will display.
- Push and release the down button. “Off” will display.
- Briefly push the SET/BACK button to go back to the menu screen, or push and hold the SET/BACK button (approximately one second) to go back to the main screen without storing the settings.
Trip B Activation
Through this option, it is possible to activate (On) or deactivate (Off) the Trip B (partial trip) display. For further information, see “Trip Computer.” For activation/deactivation, proceed as follows:
- Briefly push the SET/BACK button. “On” or “Off” will display in the instrument cluster display (according to previous setting).
- Push and release the up or down arrow button to select the setting and once selected a beep will occur to signal the setting is saved.
- Briefly push the SET/BACK button to go back to the menu screen, or push and hold the SET/BACK button (approximately one second) to go back to the main screen without storing the settings.
Set Time
This function may be used to set the clock through two submenu items: “Time” and “Mode.”
Proceed as follows:
- Briefly push the SET/BACK button. The display will show the two submenu items “Time” and “Mode.”
- Push and release the up or down arrow button to navigate the two submenu items.
- Select the required option and then push the SET/ BACK button.
- When accessing the “Time” submenu item, briefly push the SET/BACK button and “hours” will flash on the display.
- Push and release the up or down arrow button for setting.
- Briefly push the SET/BACK button and “minutes” will flash on the display.
- Push and release the up or down arrow button for setting.
NOTE:
- The setting will increase or decrease by one unit each time the up or down arrow button is pushed. Push and hold the button to increase/decrease the setting rapidly. Save the setting by briefly pushing the button when you approach the required setting.
- Briefly push the SET/BACK button to return to the “Time” sub-function.
- When accessing the “Mode” submenu, briefly push the SET/BACK button. The previously set display format will flash on the display.
- Push and release the up or down arrow button to select “24h” or “12h.”
When you have selected the required settings, briefly push the SET/BACK button to go back to the Time, Mode submenu screen, or push and hold the SET/ BACK button (approximately one second) to go back to the main screen without storing the settings.
Set Date
This function may be used to set the date (day – month – year).
To change the date, proceed as follows:
- Briefly push the SET/BACK button and “year” will flash on the display.
- Push and release the up or down arrow button for setting.
- Briefly push the SET/BACK button and “month” will flash on the display.
- Push and release the up or down arrow button for setting.
- Briefly push the SET/BACK button and “day” will flash on the display.
- Push and release the up or down button for setting.
NOTE: The setting will increase or decrease by one unit each time the up or down arrow button is pushed. Push and hold the up or down arrow button to increase/decrease the setting rapidly. Save the setting by briefly pushing the button when you approach the required setting. Briefly push the SET/BACK button to go back to the menu screen, or push and hold the SET/BACK button (approximately one second) to go back to the main screen without storing the settings.
Autoclose
With this function active, the doors will automatically lock at when the vehicle’s speed exceeds 12 MPH (20 km/h).
To change the setting, proceed as follows:
- Briefly push the SET/BACK button “On” or “Off” will flash on the display (according to the previous setting).
- Push and release the up or down arrow button for setting.
- Briefly push the SET/BACK button to go back to the menu screen, or push and hold the SET/BACK button (approximately one second) to go back to the main screen without storing the settings.
Units (Set Units)
This function may be used to set the measurement unit in three submenus: “Distance,” “Temperature” and “Fuel Economy.”
To set the required unit, proceed as follows:
- Briefly push the SET/BACK button to display the three submenus.
- Push and release the up or down arrow button to navigate the three submenus.
- Select the required submenu and then briefly push the SET/BACK button.
- When accessing the “Distance” submenu, briefly push the SET/BACK button. Either “mi” or “km” will appear on the display (according to the previous setting).
- Push and release the up or down arrow button for setting.
- Briefly push the SET/BACK button to return to the submenu.
- When accessing the “Fuel Economy” submenu, briefly push the SET/BACK button. Either “mpg,” “km/l ” or “l/100km” will appear on the display (according to the previous setting).
If the distance unit set is “mi,” the fuel economy unit will be displayed in “mpg.” If the distance unit set is “km,” the fuel economy unit will be displayed in either km/l or l/100km.
- Push and release the up or down arrow button for setting.
- Briefly push the SET/BACK button to return to the submenu.
- When accessing the “Temperature” submenu, briefly push the SET/BACK button. Either “°F” or “°C” will appear on the display (according to the previous setting).
- Push and release the up or down arrow button for setting.
- Briefly push the SET/BACK button to return to the submenu.
When you have made the required settings, briefly push the SET/BACK button to go back to the submenu screen, or push and hold the SET/BACK button (approximately one second) to go back to the main screen without storing the settings.
Language (Selecting The Language)
The messages can be displayed in the following languages: Italian, English (USA), German, Portuguese, Spanish, French, Chinese, Russian, and Mexican Spanish.
To set the required language, proceed as follows:
- Briefly push the SET/BACK button. The previously set “language” will flash on the display.
- Push and release the up or down arrow button for setting.
- Briefly push the SET/BACK button to go back to the menu screen, or push and hold the SET/BACK button (approximately one second) to go back to the main screen without storing the settings.
Buzzer Volume (Adjusting The Failure/Warning Buzzer Volume)
With this function, the volume of the buzzer accompanying any failure/warning indication can be adjusted to one of eight volume levels.
To adjust the volume, proceed as follows:
- Briefly push the SET/BACK button. The previously set volume “level” will flash on the display.
- Push and release the up or down arrow button for setting.
- Briefly push the SET/BACK button to go back to the menu screen, or push and hold the SET/BACK button (approximately one second) to go back to the main screen without storing the settings.
Service (Scheduled Servicing) — If Equipped With this function, it is possible to view information on mileage intervals for servicing. To obtain this information, proceed as follows: Push the SET/BACK button briefly. The display shows the service interval in miles (mi) or kilometers (km) according to the previous setting (see the Unit Of Measurement paragraph). Briefly push the SET/BACK button to go back to the menu screen or hold the button down to go back to the standard screen.
NOTE: The “Scheduled Servicing Plan” includes vehicle maintenance at fixed intervals (refer to “Scheduled Servicing” in “Servicing And Maintenance” for further information). This message is displayed automatically along with the warning light when the key is turned to MAR/ON/RUN – 1242 miles (2,000 km) before these deadlines and reappears every 124 miles (200 km). Below 124 miles (200 km) servicing indications are more frequent. The indication will appear in miles or kilometers according to the Unit Of Measurement settings. When the next scheduled service is approaching and the key is turned to MAR/ON/RUN, the word Service will appear on the display, followed by the number of miles or kilometers left. Contact an authorized dealer. The operations in the “Scheduled Servicing Plan” will be performed and the message will be reset.
Daytime Running Lamps
This function may be used to activate/deactivate the daytime running lamps.
Proceed as follows to switch this function on or off:
- Briefly push the SET/BACK button to display the three submenus.
- Briefly push the SET/BACK button. “On” or “Off” will flash on the display (according to previous setting).
- Push and release the up or down arrow button for setting.
- Briefly push the SET/BACK button to go back to the menu screen, or push and hold the button (approximately one second) to go back to the main screen without storing the settings.
Exit Menu
- This function closes the initial menu screen.
- Briefly push the SET/BACK button to go back to the main screen.
- Push and release the up arrow button to return to the first menu option (Speed Buzzer).
- Push and release the down arrow button to return to the last menu option (Daylights).
Values Displayed
Indications On Display
Each time a value is selected, the following information is shown in the instrument cluster display:
- “Trip A” or “Trip B” location(s)
- Name, value and unit of measure of the selected value (e.g. Range 520 mi).

- After a few seconds, the name of the selected value is replaced by the corresponding icon.
Range
This indicates the distance which may be traveled with the fuel remaining in the tank, assuming that driving conditions will not change. The message “—-” will appear on the display in the following cases:
- Distance less than 30 miles (or 50 km).
- The vehicle is parked for a long time with the engine running.
NOTE: The range depends on several factors: driving style, type of route (freeway, residential, mountain roads, etc.), and conditions of use of the vehicle (load, tire pressure, etc.). Trip planning must take into account the above notes.
Average Fuel Consumption
This value shows the approximate average consumption since the last reset.
Travel Distance
This value shows the distance covered since the last reset.
Current Fuel Consumption
This indicates the fuel consumption. The value is constantly updated. The message “—-” will appear on the display if the vehicle is parked with the engine running.
Average Speed
This value shows the vehicle’s average speed as a function of the overall time elapsed since the last reset.
Travel Time
This value shows the time elapsed since the last reset.
Tire Pressure Values
This screen will display OK at each Tire Pressure Monitoring sensor. Refer to “Tire Pressure Monitoring System” in “Safety” for further information.
FAQ
The 2019 Alfa Romeo 4C Spider typically features an infotainment display.
The size of the infotainment display can vary but is usually around 7 inches to 8.8 inches, depending on the trim and options.
The infotainment display allows access to various functions, including navigation, audio system controls, phone connectivity, and vehicle settings.
Many 2019 Alfa Romeo 4C Spider models support smartphone integration platforms like Apple CarPlay and Android Auto, enabling seamless connectivity with compatible smartphones.
The infotainment display is typically controlled via a touchscreen interface, buttons on the center console, or voice commands, depending on the vehicle’s features and options.
Yes, you can often customize the settings and appearance of the infotainment display, including adjusting screen brightness, configuring audio preferences, and personalizing vehicle settings.
The Alfa Romeo 4C Spider typically features analog gauges for speed and tachometer, rather than a digital instrument cluster.
Depending on the trim and options, the infotainment screen may display safety-related features such as a rearview camera feed, parking sensors, and driver assistance information.
Software updates for the infotainment system are usually available through authorized Alfa Romeo dealerships or can be performed over-the-air if supported by the vehicle.
Yes, you can often use voice commands to control various functions of the infotainment system, such as making phone calls, setting navigation destinations, and changing audio sources.
If you encounter technical issues or malfunctions with the infotainment display, it’s advisable to consult the owner’s manual for troubleshooting steps. If problems persist, you may need to visit an authorized Alfa Romeo dealership for assistance.
Depending on the trim and options, the 2019 Alfa Romeo 4C Spider may come equipped with a built-in navigation system, or it may rely on smartphone-based navigation through Apple CarPlay or Android Auto.
Some vehicles may offer a touchscreen calibration feature to ensure accurate and responsive touch inputs. Refer to the owner’s manual for instructions on how to calibrate the screen if needed.
Yes, many infotainment systems support multiple device connections via Bluetooth or USB, allowing you to switch between audio sources or devices as needed.
Alfa Romeo may release software updates for the infotainment system to improve functionality, fix bugs, or add new features. Check with your local dealership or Alfa Romeo’s official website for available updates.