alliance RV Avenue 2021 Emergency Exit Windows User Manual
Emergency Exit Windows
While all RV brands are different, the operation of the emergency windows are generally consistent across brands. The design, application, and location of these windows are governed by the RV Industries governing bodies. You will find some helpful safety information below regarding these exit windows. Please take time to familiarize yourself and anyone that will be in the RV with the location and operation of all exit windows in the RV.
THE FOLLOWING LABEL IS ON OR NEAR ALL EMERGENCY EXITS IN THE RV
CAUTION
ENSURE THAT ALL EXIT WINDOWS ARE CLOSED AND LOCKED DURING TRAVEL.
Identify and locate all emergency exit windows in the RV, they are easily identifiable by both the “EXIT” sticker and the red hardware used to open them. Know what to expect in the event of an emergency. Activate the release mechanisms on the exit windows and apply pressure to push or slide them open. Once you are familiar with the location and operation, make yourself familiar with the drop between the window and the ground. Depending on the RV, it could be a significant distance.
WARNING
ALWAYS PUT YOUR LEGS OUT FIRST AND ATTEMPT TO LAND ON YOUR FEET IF YOU MUST USE AN EMERGENCY EXIT WINDOW.
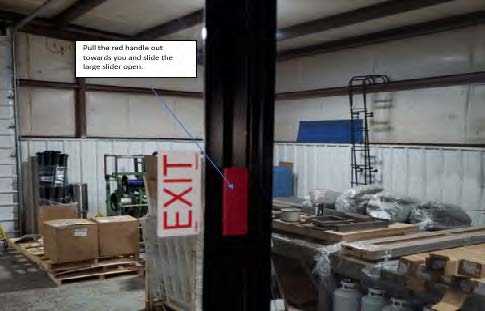
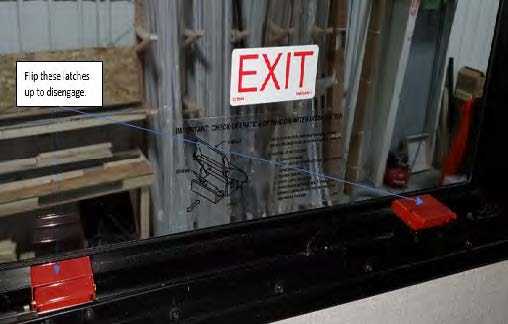
There are two styles of exit windows, and both open differently.
- Pull Style Latch: This style is generally used on larger slider style exit windows. Pull the handle out to slide the window open for escape.
- Flip Style Latch: This style flips up and disengages which allows the window to be pushed out for escape.
Fire Safety
Safety is always important, whether you are at home or on the road. As far as your RV, make sure to keep fire safety a top priority.
**In a fire, evacuating all occupants from the RV safely MUST be your top priority!**
alliance RV Avenue 2021 Top Accessories
[amalinkspro_table id=”32452″ new-window=”on” nofollow=”on” addtocart=”off” /]
Fire Extinguishers
Classified and rated by fire type, A, B and C. These classifications identify the kinds of fires or burning materials they are designed to fight.
A: Trash-Wood-Paper – Effective against fires involving paper, wood, textiles, and plastics. The primary chemical used to fight these fires is monoammonium phosphate due to the chemical’s ability to smother fires in in these types of materials.
B: Liquids – Effective against flammable liquid fires. These can be fires where cooking liquids, oil, gasoline, kerosene, or paint have become ignited. The chemicals used in this type of extinguisher are mono ammonium phosphate and sodium bicarbonate which induces a chemical reaction which extinguishes the fire.
C: Electrical Equipment: – Suitable for fires in “live” electrical equipment. Both mono ammonium phosphate and sodium bicarbonate are used in this type of extinguisher due to their nonconductive properties.
WARNING
NEVER TEST OR PRACTICE USING A FIRE EXTINGUISHER BY SQUEEZING THE TRIGGER. THESE ARE NON-RECHARGEABLE AND ONCE USED, PRESSURE WILL DECREASE OVER TIME AND WILL NOT BE FULLY FUNCTIONAL IN AN EMERGENCY.
WARNING
WHILE USING A FIRE EXTINGUISHER, ALWAYS KEEP YOUR BACK TOWARD A CLEAR PATH FOR EXIT.
WARNING
DO NOT TURN THE ELECTRICAL POWER BACK ON AFTER THE USE OF AN EXTINGUISHER.
WARNING
INSPECT EXTINGUISHERS WEEKLY. IF YOUR RV HAS BEEN IN STORAGE, INSPECT IT BEFORE THE RV IS USED. ALWAYS INSPECT YOUR BEFORE A VACATION OR TRIP WITH YOUR RV.
Fire Extinguishers
A common acronym for proper fire extinguisher operation is P.A.S.S.
- P – Pull the pin
- A – Aim the nozzle (always aim at the base of the fire, not the flames) S – Squeeze the trigger
- S – Sweep from side to side
For additional information on fire extinguisher operation, please refer to the fire extinguishers user’s manual.
Smoke & CO/Carbon Monoxide Alarms
Your RV is equipped with a smoke & CO/Carbon Monoxide combination alarm. Understanding the information in this section will prepare you to reach in the event of an emergency
Follow safety rules and prevent hazardous situations:
- NEVER smoke in bed.
- Keep matches or lighters away from children.
- Store flammable materials in proper containers.
- Keep stove debris free.
- Never leave anything cooking on the stove unattended.
- Keep portable heaters and open flames, such as candles, away from flammable materials.
- Do not let rubbish accumulate.
Refer to the smoke and carbon monoxide alarm owner’s manuals for a more in-depth understanding of the features, functions, and precautions of this safety device. Keep alarms clean and test them weekly. Immediately replace any alarm that is not functioning properly.
WARNING
- THIS ALARM WILL NOT OPERATE WITHOUT BATTERIES.
- NEVER IGNORE ANY ALARM, FAILURE TO RESPOND COULD RESULT IN SERIOUS INJURY OR DEATH.
- TEST ALARMS WEEKLY. IF THE ALARM FAILS TO TEST CORRECTLY, REPLACE THE ALARM IMMEDIATELY.
- Test at least once a week. Always test after the RV has been in storage and before a vacation or long trip.
- Clean the alarm at least once a month.
WARNING
- ALWAYS USE THE EXACT BATTERIES SPECIFIED BY THE ALARM MANUFACTURER.
- NEVER USE AN OPEN FLAME OF ANY KIND TO TEST AN ALARM.DO NOT STAND CLOSE TO THE ALARM WHEN THE HORN IS SOUNDING.
- EXPOSURE AT CLOSE RANGE CAN BE HARMFUL TO YOUR HEARING. WHEN TESTING, STEP AWAY WHEN THE HORN STARTS TO SOUND.
If an alarm sounds, identify which alarm is sounding. CO Alarm – the CO LED will flash red, and an audible horn will beep 4 times and then pause, this will happen repeatedly. The smoke LED will remain off. If this alarm sounds, immediately move everyone to a source of fresh air and call your emergency services. Do not go into the RV until the problem is identified and corrected.
Smoke Alarm – the Smoke LED will flash red, and an audible horn will beep 3 times and then pause, this will happen repeatedly. The CO LED will remain off. If this alarm sounds, get out of the RV as quickly as possible and call your emergency services. Do not go into the RV until the problem is identified and corrected.
Propane (LP) Alarm
For your safety, your RV is equipped with a combination CO and LP Alarm. This alarm will detect both carbon monoxide and propane gas. Please read and become familiar with the individual user’s manual for this alarm. This will help prepare you if there is an emergency.
- THIS UNIT MUST BE REPLACED WITHIN 5 YEARS OF ITS PRODUCTION DATE. THIS ALARM WILL NOT WORK WITHOUT POWER. THIS ALARM WILL ONLY INDICATE THE PRESENCE OF GAS AT THE SENSOR. THERE COULD BE GAS ELSEWHERE THAT HAS NOT REACHED THE SENSOR.
- THIS ALARM IS DESIGNED TO DETECT CARBON MONOXIDE AND PROPANE GAS. THE ALARM IS NOT DESIGNED TO DETECT SMOKE OR FIRE.
If CO is detected, the red CO LED will flash, and the alarm will sound with 4 beeps and then a 5 second silence. This indicates that the CO level is over 35pp. If this alarm is activated, immediate action is required.
If the CO alarm sounds:
- Press the TEST/MUTE button to temporarily silence the alarm.
- MOVE to fresh air immediately.
- Make sure that everyone is accounted for.
- Call 911 or the local emergency services available in your area.
- Do not re-enter the RV until the problem has been corrected.
If propane is detected, the RED led will flash and the alarm will sound with a steady tone and remain on until the area is clear from propane gas. If you hear this alarm, immediate action is required. Exit the RV immediately and do not return into the RV until the problem has been corrected. If the propane gas alarm sounds:
- Extinguish all flames and smoking material and turn off all gas appliances.
- Press the TEST/MUTE button to temporarily silence the alarm (DO NOT DISCONNECT POWER).
- Evacuate the RV. Make sure to account for everyone.
- Open the doors and windows of the RV.
- Turn off the propane tank valve.
- Determine & repair the source of the leak.
- Do not re-enter the RV until the issue has been corrected
Under normal circumstances, this alarm should remain silent and have a steady green LED. If the alarm is defective, you will hear a beep every 30 seconds and an alternating red and green light. Anything outside of a quiet alarm with the green LED requires action.
Reference Links
View Full User Guide: alliance RV Avenue 2021 User Manual
Download Manuals: https://dev.alliancerv.com/owners-manuals