alliance RV Avenue 2021 12-Volt Refrigerator User Manual
12-Volt Refrigerator
An optional 12-Volt refrigerator is available in this Alliance 5th wheel. If equipped, this refrigerator uses 12-Volt battery power to power the refrigerator and allows it to be operated when not on shore power. Please refer to your refrigerators user’s manual for full details on this appliance.
- STORAGE OF FLAMMABLE MATERIALS BEHIND OR AROUND THE REFRIGERATOR CREATES A FIRE HAZARD. DO NOT USE THE AREA BEHIND THE REFRIGERATOR TO STORE ANYTHING, ESPECIALLY FLAMMABLE MATERIALS.
- INCORRECT ADJUSTMENT, CHANGE, OR MAINTENANCE OF THIS REFRIGERATOR CAN CAUSE PERSONAL INJURY OR DEATH. ALWAYS USE AN AUTHORIZED TECHNICIAN FOR NEEDED WORK FAILURE TO READ AND UNDERSTAND THE USER’S MANUAL AND ALL ITS WARNINGS AND CAUTIONS COULD RESULT IN PROPERTY DAMAGE, DEATH, OR SERIOUS INJURY.
12-Volt Refrigerator Control Panel
- Touch and release the On/OFF [1] button to turn the refrigerator on.
- If the indicator light, above the button, glows solid blue, it means the refrigerator is operating correctly.
Note: The freezer compartment and cabinet compartment work independently of each other and both must be adjusted to their desired temperature setting. - Touch the FREEZER COMPARTMENT [5] button to set the compartment temperature setting. The blue LED will turn ON.
- Using the + [4] or [2] buttons to adjust the temperature setting
- The mode [3] will display the temperature setting. 1 is the warmest and 5 is the coldest.
Volt Refrigerator Control Panel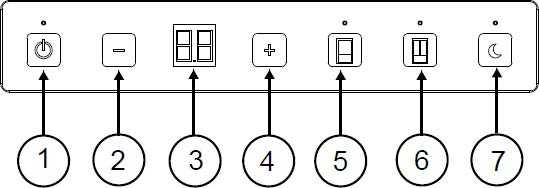
- Touch the CABINET COMPARTMENT [6] button to set the compartment temperature setting.
- Use the + [4] or – [2] buttons to adjust the temperature setting. The mode [3] will display the temperature setting. 1 is the warmest setting and 5 is the coldest setting.
- Press any button to return the control to activate the mode, the mode [3] will illuminate. The display will return to standby mode after 3 seconds.
- Touch the NIGHT MODE [7] button to set the refrigerator to night mode.
- Night mode will turn off automatically after eight hours or if you push the night mode button again to turn the blue indicator light off.
- This 8-hour night mode setting can be changed by pressing the night mode button for 3 seconds. After the 3 seconds, the default 8 hours will be shown in the display. To change this setting, press the “+” or “-“, then press night mode button to make the setting go into effect.
- The new setting is archived in the memory until it is changed.
- To turn on/off the DOOR LED hold the CABINET COMPARTMENT [8] button for 3 seconds
Shut down:
- To shut down the refrigerator, touch and hold the ON/OFF button [1] for 5 seconds and release it.
- Once the refrigerator is turned OFF there is a 5-minute wait cycle before the compressor will turn ON.
Error Codes:
- E1: Cabinet Thermistor Error
- E2: Freezer Thermistor Error
- E3: Low/High voltage cutout
- E4: Cabinet door open (longer than 2 minutes)
- E5: Voltage too low
- E6: Ambient Thermistor Error
- E7: Cabinet Fan Error
- E8: Freezer Condenser fan failure
- E9: Fresh Food Condenser fan failure
Microwave
For your safety, the warnings and cautions outlined in this section must be followed to minimize the risk of fire or explosion or to prevent property damage, death, or personal.
- NEVER ATTEMPT TO OPERATE THIS MICROWAVE WITH THE DOOR OPEN, THIS CAN RESULT IN HARMFUL EXPOSURE TO MICROWAVE ENERGY, NEVER TAMPER WITH THE SAFETY INTERLOCKS DO NOT PLAY ANY OBJECT BETWEEN THE MICROWAVE FRONT FACE AND THE DOOR OR ALLOW SOIL OR CLEANER RESIDUE TO ACCUMULATE ON SEALING SURFACES.
- NEVER OPERATE A DAMAGED MICROWAVE NEVER ADJUST OR REPAIR A MICROWAVE YOURSELF
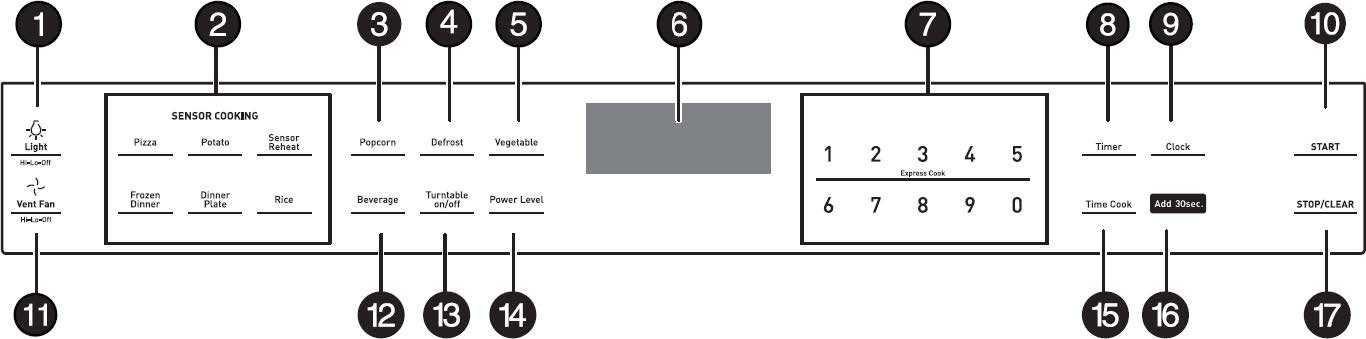
Microwave Control Panel
| # | ITEM | DESCRIPTION |
| 1 | Light | Press to turn on/off the light underneath your microwave. |
| 2 | Sensor Cooking | Detects humidity released by your cooking food and adjusts the cooking time based on the type and amount of food cooking. |
| 3 | Popcorn | Press to cook popcorn. |
| 4 | Defrost | Press to defrost frozen food. |
| 5 | Vegetable | Press to cook vegetables. |
| 6 | Display | In standby mode, displays the time. In cooking mode, displays cooking time, weight, and other information. |
| 7 | Number Pad | Press to enter cook time, defrost time, clock time and other information. |
| 8 | Timer | Press this button, then enter the time you want to count down. |
| 9 | Clock | Press to set or check the clock. |
| 10 | Start | In standby mode, press this button to begin cooking. |
| 11 | Vent Fan | Press to turn on/off your vent fan and remove odors from cooking. |
| 12 | Beverage | Press to heat a beverage. |
| 13 | Turntable On/Off | Press to turn your turntable on or off. |
| 14 | Power Level | Press to change your microwave’s power level (1‐10). |
| 15 | Time Cook | Press to enter a cooking time. |
| 16 | Add 30 Sec. | While cooking, press this button to add 30 seconds to your cooking time. |
| 17 | Stop/Clear | Press to stop the cooking process. Press again to cancel the cooking operation. |
Microwave
Your OTR (Over-the-Range) microwave is equipped with a vent fan and a light underneath the microwave. The fan works as a range hood to filter out smoke and other odors from cooking. Use your range hood anytime you cook, this will help maintain the air quality in your RV. Be sure to read your microwave user’s manual for additional information.
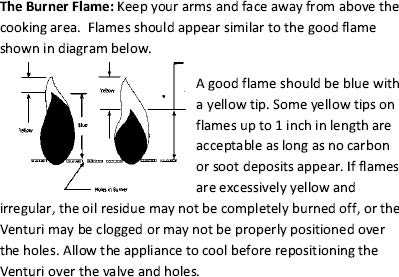
Range/Cooktop
Your Greystone 3-burner residential-style gas range is designed for reliable and trouble-free performance. Some important safety precautions to keep in mind.
WARNING
DO NOT STORE OR USE GASOLINE OR OTHER FLAMMABLE VAPORS AND LIQUIDS IN THE VICINITY OF THIS OR ANY OTHER APPLIANCE.
IF YOU SMELL GAS:
- EXTINGUISH ANY OPEN FLAME
- DO NOT TRY TO LIGHT ANY APPLIANCE
- DO NOT TOUCH ANY ELECTRICAL SWITCH
- IMMEDIATELY CALL YOUR LOCAL EMERGENCY SERVICES
WARNING
READ ALL INSTRUCTIONS IN THE RANGE OWNER’S MANUAL BEFORE USING THIS APPLIANCE NEVER USE THE RANGE AS A SOURCE OF HEAT.
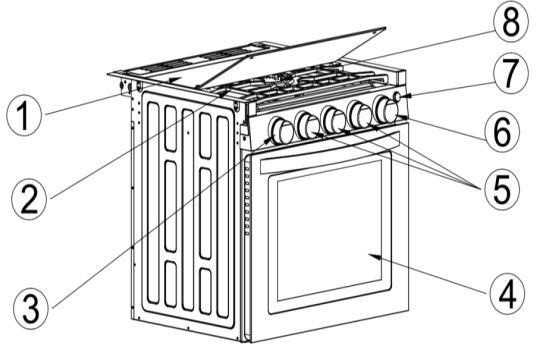
Range Features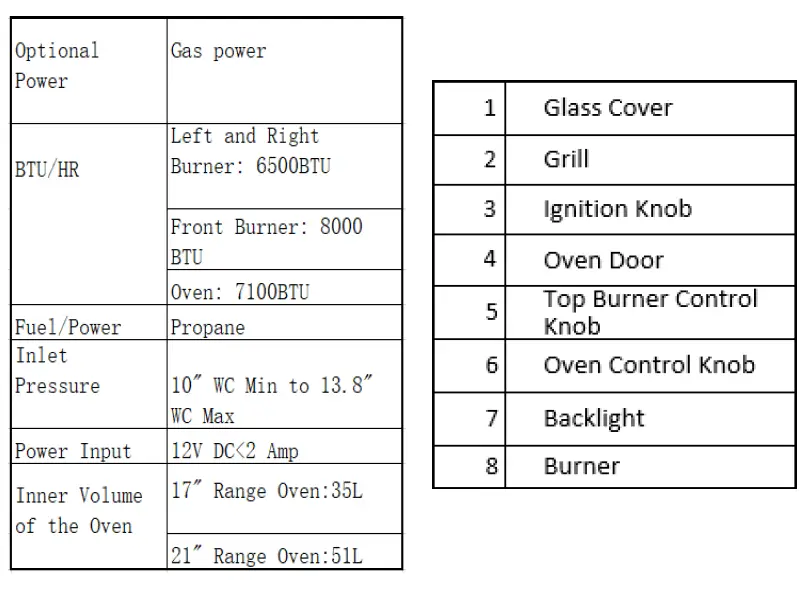
Before Using Your Range
Remove all packaging materials and wipe the surfaces of your range with a damp cloth or sponge. When you turn on a burner or the oven for the first time, smoke and odors may be present. This is normal, make sure the room is well ventilated.
Operation
Match Lighting Oven
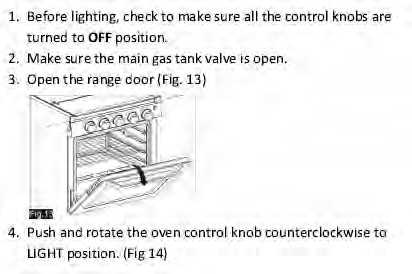
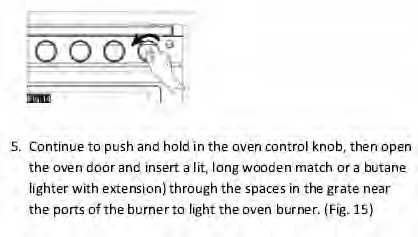
Match Lighting Oven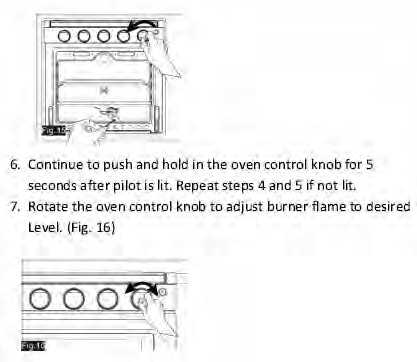
Electronic Ignition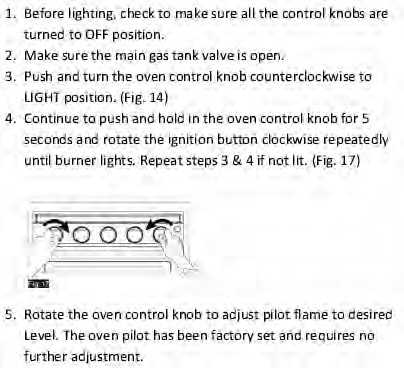
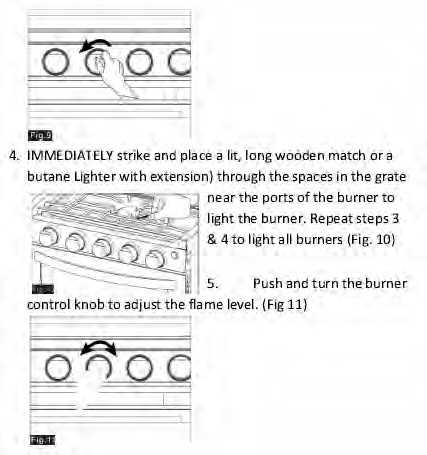
Match Lighting Top Burners
TOP COVER MUST BE OPEN WHEN MAIN BURNER IS IN OPERATION. BASED ON SAFETY CONSIDERATIONS, THE TOP BURNER FLAME SIZE SHOULD BE ADJUSTED SI IT DOES NOT EXTEND BETOND THE EDGE OF THE COOKING UTENSIL.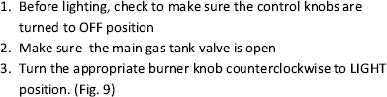
Product Damage hazard
WARNING
WHEN USING THE OVEN, SAND AWAY WHEN OPENING THE OVEN DOOR, ESCAPING HOT AIR OR STEAM CAN BURN YOUR HANDS, FACE, OR EYES.
Troubleshooting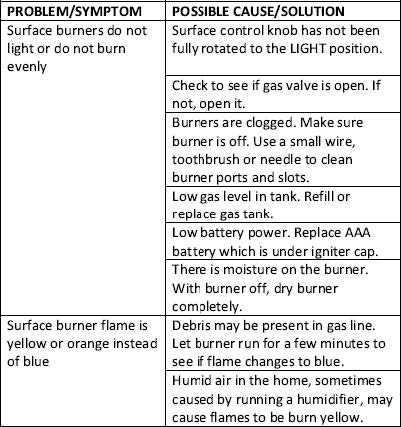
PLUMBING AND UTILITIES
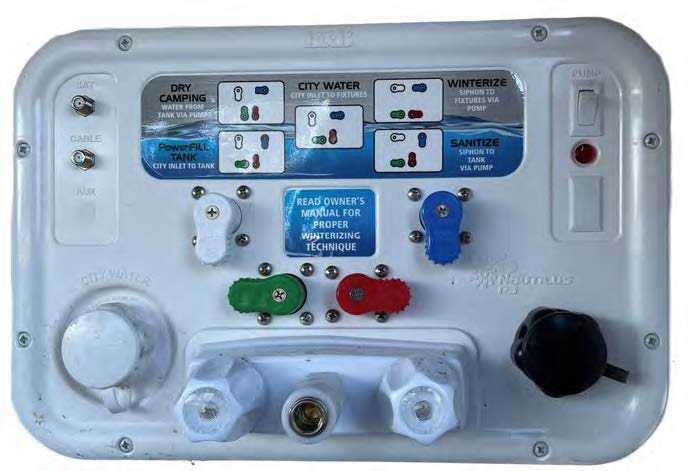
Centralized Docking Station
Alliance RV uses the Nautilus Water Management System. With this system you will have the ability to perform the following functions from a centralized and easy-to-access location:
- The power fill your fresh water tank for dry camping.
- Use your pump to supply water to fixtures from the fresh water tank
- Use your pump to siphon fill or sanitize your fresh water tank from a bucket
- Connect to city water at the camping site to supply water to fixtures
- Winterize your plumbing lines and fixtures
- Bypass hot water heater when winterizing to avoid water heater damage
- Rinse the black tank to help control odors and prevent sewage buildup
- Rinse off items outside the unit with a hot/cold faucet
- Connect cable or satellite.
Docking Station Handle Position and Valve Routing
Docking Station Handle Position and Valve Routing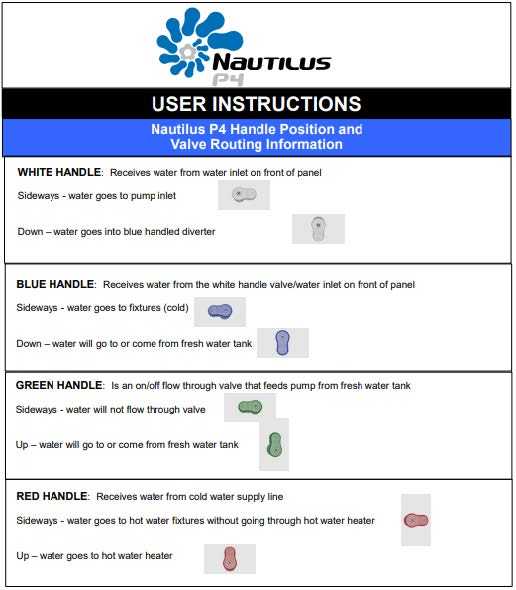
Filling the Fresh Water Tank – Power Fill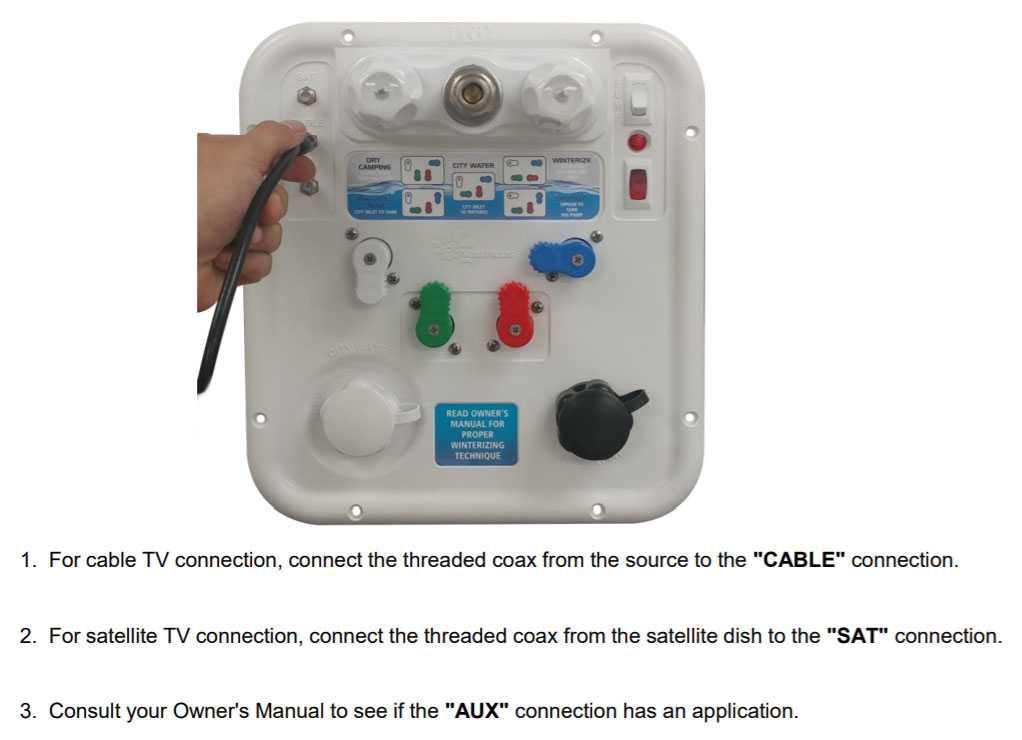
Fill and/or Sanitize the Fresh Water Tank with the Pump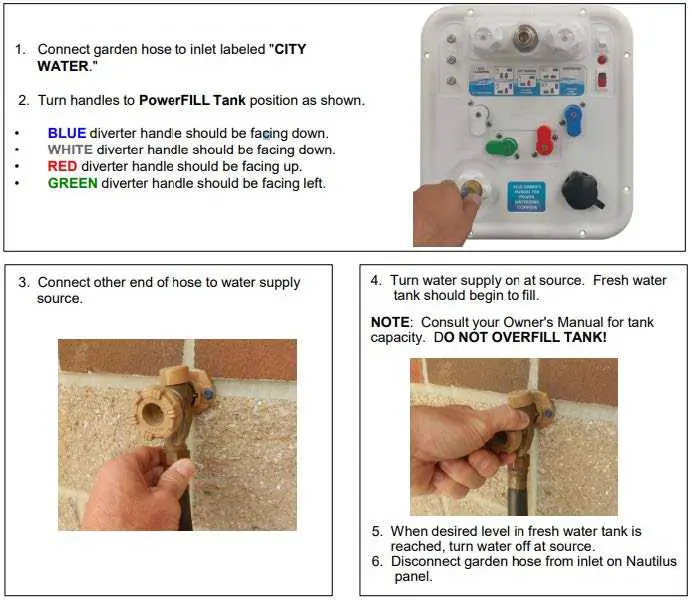
NOTE: For sanitizing, a solution of 1 gallon of water and one-quarter cup of household bleach should be prepared for every fifteen gallons of holding tank capacity.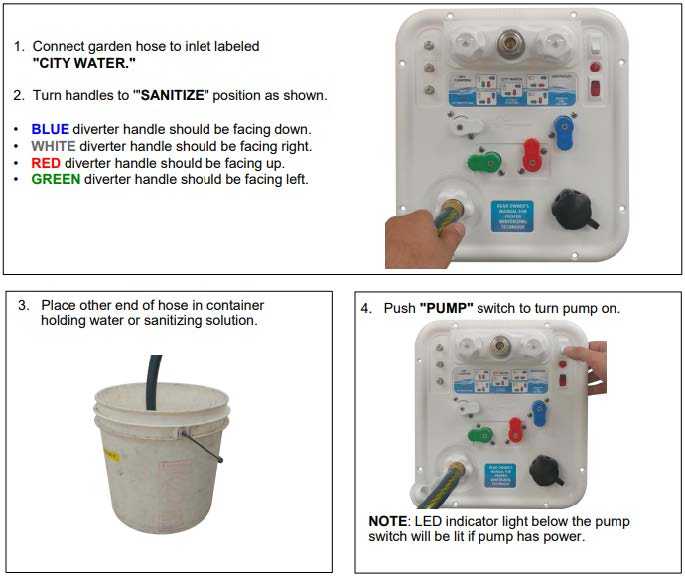
Fill and/or Sanitize the Fresh Water Tank with the Pump (Continued)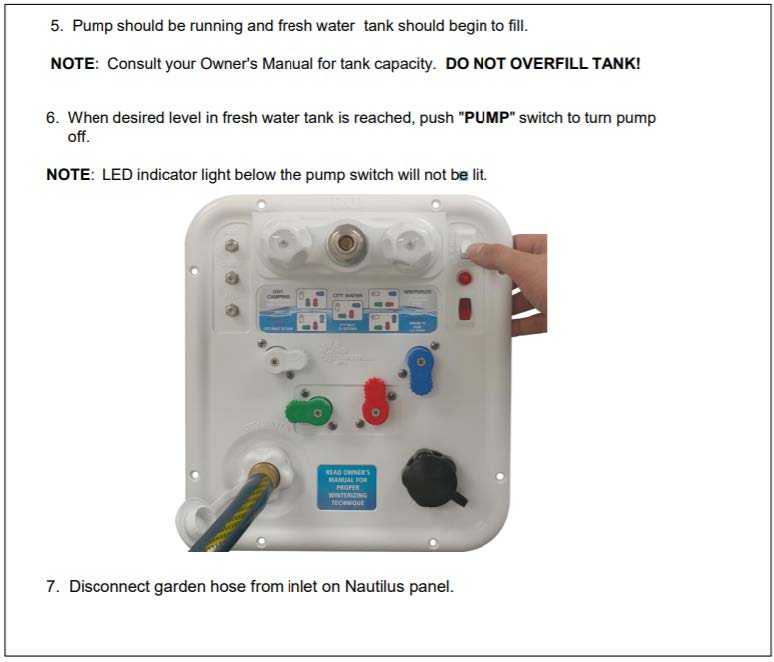
Using the Freshwater Tank for Dry Camping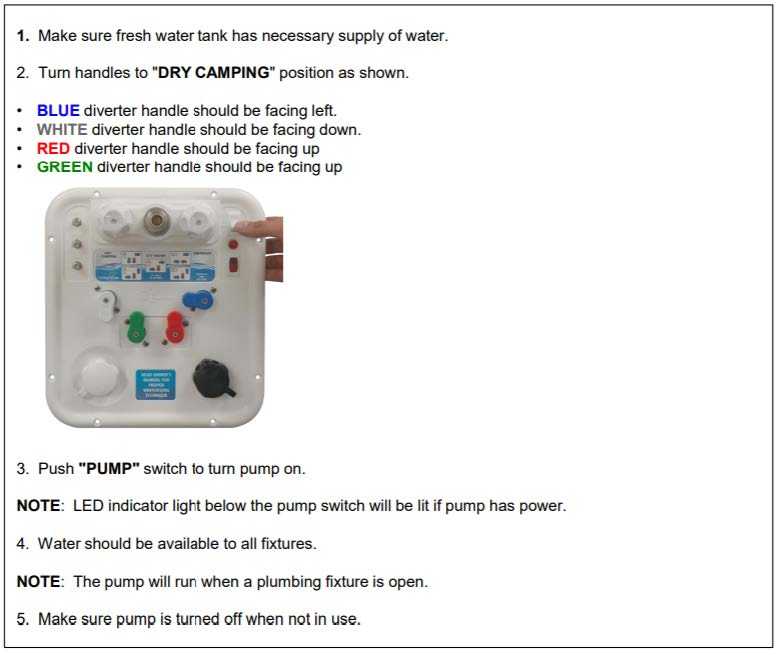
Connecting to City Water 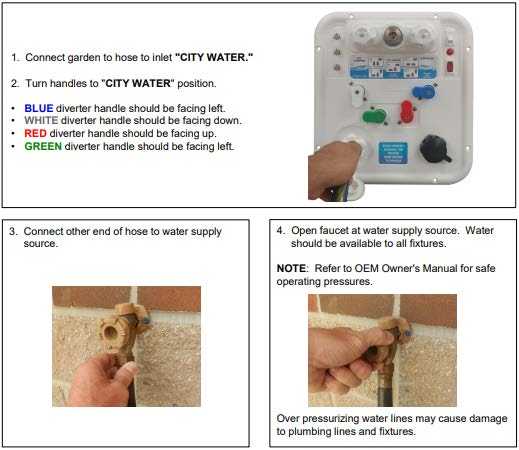
Winterizing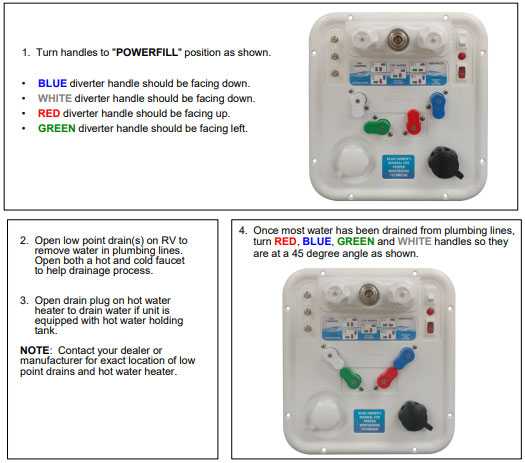
Winterizing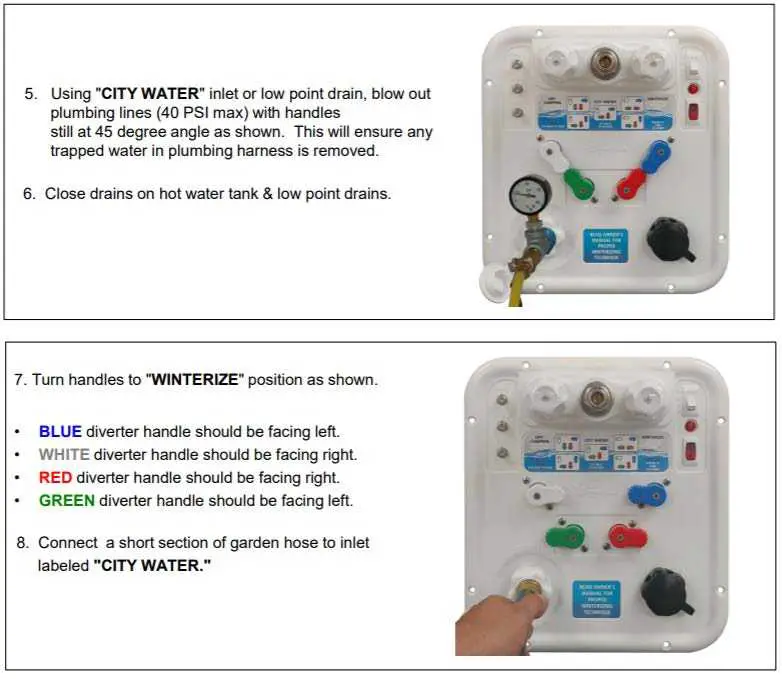
Winterizing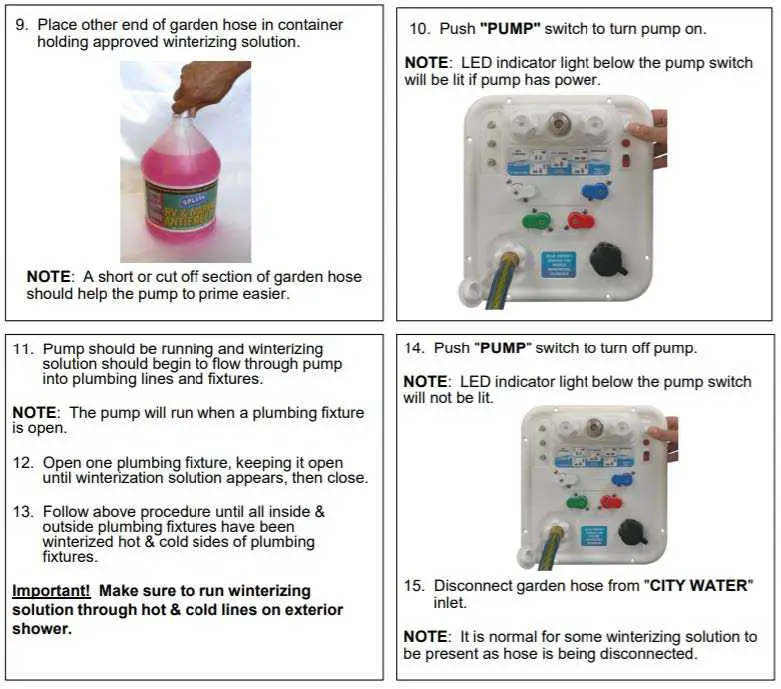
Rinsing Holding Tanks / Tank Flush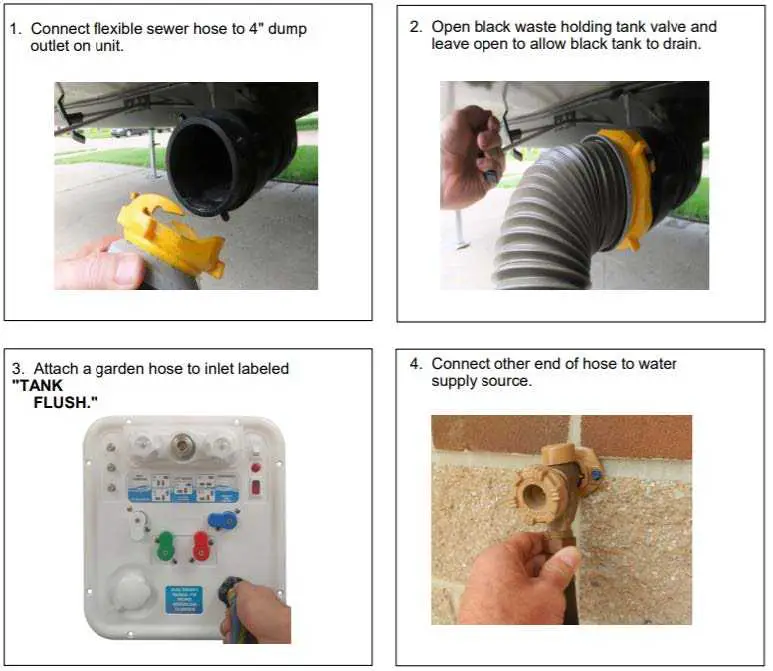
Rinsing Holding Tanks / Tank Flush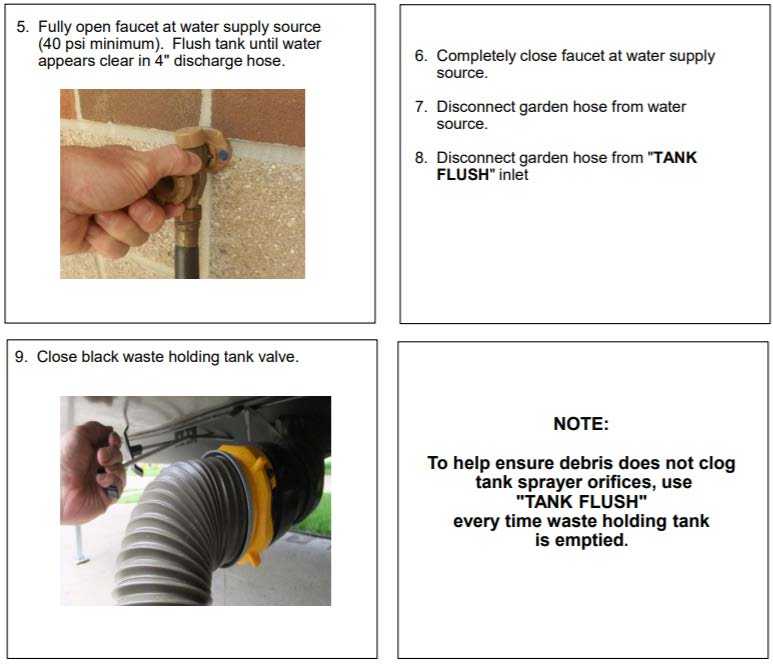
Fresh Water System
Your RVs fresh water system is made up of two inputs, a portable freshwater holding tank with a pressure-demand 12 volt water pump and a city water connection that provides water to the system and bypasses the freshwater holding tank and the water pump to supply your fresh water from an already pressurized source. All holding tanks are equipped with electric heating pads that are controlled in the central monitor panel.
- The portable water system consists of a fresh water holding tank which is filled at the docking station (covered above). The tank is emptied/drained at a “low point” drain on the exterior beneath the freshwater holding tank. Always be sure to drain your fresh water tank between uses, and during storage in the winter, this will prevent any stagnation that can cause water to smell and/or taste bad.
- The water pump. When not hooked up to an external water supply, the RVs fresh water tank is utilized. The water is pumped from the fresh water tank by the water pump. When the power is switched on, the pump works automatically whenever a faucet is on. The water pump is self‐priming and when the system pressure drops below 55psi, the water pump will energize and re‐pressurize the system to that 55psi.
- This tank is equipped with a safety overflow drain. This drain will come straight out of the underbelly of the RV beneath the fresh water tank. This drain should never be plugged or obstructed. Keeping this line open for safety overflow will prevent damage that can occur from overfilling your fresh water tank.
- The city water system is powered by a water hose connected to the docking station (covered above). When connected and turned on, the system will automatically pressurize. It is always a good idea to bleed the system by turning on a hot water faucet until the water runs smoothly and there is no air present.
NOTE: High water pressure can damage your water system. Due to pressure inconsistencies in potential water sources, an RV water pressure regulator can be used between the hose and the connection point to ensure an always consistent water pressure coming into the RV. A safe setting is 45psi.
WARNING
Not regulating water pressure and allowing water pressure that is too high to be connected to the RV can cause irreversible damage to your RVs fresh water system.
Fresh Water System
Draining your freshwater system (required for winterization, covered in the centralized docking station portion of this manual, when the RV is not being used and/or is being stored in the cold or winter months), all tanks should be emptied. This will prevent damage from freezing. Every RV has low point drains in which the freshwater system can be evacuated. These low point drains will be located on the off‐door side of the RV near the water heater directly beneath the RV and coming out of the underbelly. These are shut-off valves that can be opened and closed with a thumb turn.
Reference Links
View Full User Guide: alliance RV Avenue 2021 User Manual
Download Manuals: https://dev.alliancerv.com/owners-manuals
alliance 2023 Top Accessories
[amalinkspro_table id=”32452″ new-window=”on” nofollow=”on” addtocart=”off” /]