alliance RV Avenue 2021 Wheel Nut Torque User Manual
Wheel Nut Torque
Always use a calibrated torque wrench to confirm proper torque. Check the lug nut torque on each wheel before departure. Do NOT under torque or over torque under any circumstance. Tighten all lug nuts in the correct order according to your RVs lug pattern.
WARNING
ALWAYS TORQUE THE WHEEL LUG NUTS TO THE REQUIRED SPECIFICATIONS.
Wheel Lug Nut Torque Chart
|
LUG NUT |
STUD
DIAMETER |
RIM SIZE |
RIM TYPE |
ACCEPTABLE
TORQUE RANGE |
| 8 | 1/2″ | 16″ | Steel/Aluminum | 90‐120 ft./lbs. |
| 8 | 5/8″ | 17.5″ | Aluminum | 140‐160 ft./lbs. |
Lug nuts should be torqued in the pattern shown below: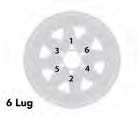
TOWING and LEVELING
When pulling an RV, the most obvious thing is sheer mass. You’ll be taller, wider and much heavier. Allow yourself plenty of room and time to maneuver out of potentially difficult situations. Being taller, RVs are more susceptible to sway caused by cross winds and turbulence created by other large passing vehicles. Having the correct hitch equipment that is adjusted properly can significantly reduce these effects. Know the height of your RV. This will help in avoiding overhead obstructions such as tree branches, low building overhangs, and low clearance bridges or overpasses. Know the width of your RV. This is important when negotiating, turns, and other obstructions. Extendable side mirrors and/or add-on tow mirrors can help.
Know how much your RV weighs and be aware of the weight ratings of the RV. This information is available for your safety. It is critical to never overload your RV. Overloading adversely affects the towing and handling of your RV. Stay within the weight ratings and limits of your RV. A tow vehicle and RV weigh a lot and can take longer to stop. Increase your following distance and give yourself plenty of room and time to stop. Practice makes perfect. Get a feel for how the RV tows and handles. Especially if you are new to RVs.
BRAKE SYSTEMS
Brake Controller
The brake controller should be installed in the tow vehicle to work in conjunction with the RV brakes. Consult with your dealer or brake controller manufacturer to decide what is the right towing combination.
Inspecting Your Brakes
WARNING
FAILURE TO KEEP YOUR BRAKES IN PROPER WORKING CONDITION AS OUTLINED CAN CAUSE PROPERTY DAMAGE, SERIOUS INJURY OR DEATH.
Inspect for leaks and smooth operation. Clean with brake cleaner and flush with brake fluid. Check for cracks, kinks or blockages. Bleed the system to remove all air.
A simple visual inspection of your brake linings will tell you that they are usable. Replacement is necessary if the lining is worn to within 1/16” or less, or if found to be contaminated with grease, oil, or scored or gouged. Hairline heat cracks are normal in bonded linings and should not be cause for concern. When replacement is necessary, it is important to replace both shoes on each brake and both brakes on the same axle. This will help retain the balance of your brakes. Check all hardware. Check the shoe return springs, hold down springs, and adjust springs for stretch or wear and have them replaced as required.
After the replacement of brake shoes and linings, the brakes must be re‐burnished to seat in the new components. This should be done by applying the brakes 20 to 30 times from an initial speed of 40mph. Slowing the vehicle to 20mph. Allow time for brakes to cool between applications. This procedure allows the brake shoes to seat on the drum surface.
Electric Drum Brakes
The electric drum brakes on your RV are similar to the drum brakes on an automobile. The basic difference is that your automotive brakes are actuated by hydraulic pressure while your electric trailer brakes are actuated by an electromagnet.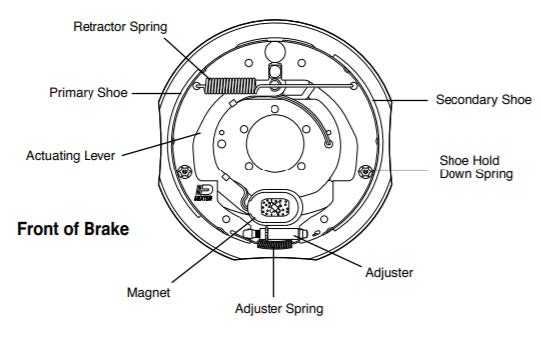
Electrical current is fed into the system by the controller, it flows through the electromagnets in the brakes. The electromagnets are energized and become magnetically attracted to the rotating armature surface of the drums which moves the actuating levers in the direction that the drums are turning. This force causes the actuating cam block at the shoe end of the lever to push the primary shoe out against the inside surface of the brake drum. The force generated by the primary shoe acting through the adjuster moves the secondary shoe out into contact with the brake drum. Increasing the current flow to the electromagnet causes the magnet to grip the armature surface of the brake more firmly. This results in increasing the pressure against the shoes and brake drums until the desired stop is accomplished.
Reference Links
View Full User Guide: alliance RV Avenue 2021 User Manual
Download Manuals: https://dev.alliancerv.com/owners-manuals
alliance 2023 Top Accessories
[amalinkspro_table id=”32452″ new-window=”on” nofollow=”on” addtocart=”off” /]