
2021 Alliance RV Valor Waste Water System User Manual
The Alliance RV Valor 2021 is a true marvel in the world of recreational vehicles. It sets new standards for luxury and usefulness. There are many things that make this RV stand out, but one of the most important is the way it handles waste water. The Valor 2021’s waste water system was made with care and creativity, showing that the company wants to give campers the best experience possible. In a world where sustainability and caring for the environment are becoming more important, the Valor’s waste water system stands out as an example of efficiency and convenience. It lets you enjoy the great outdoors without sacrificing your duty to the environment. The Valor 2021’s waste water system will please even the most discerning RV fans with how smart it is and how easy it is to use. This makes it a standout choice among luxury RVs.
Waste Water System
The waste system contains holding tanks. The quantity of tanks along with the location is dictated by the floor plan of the RV. All tanks are equipped with electric heating pads that can be controlled in the monitor panel.
- Black tanks hold toilet waste. There are some things to note with black tanks. Black tanks typically will need a digester/deodorant (talk with your RV dealer for recommendations). Black tanks require RV toilet paper. RV toilet paper breaks down quicker and is specifically designed for this type of waste water system. You’ll find that this toilet paper breaks down more quickly and allows the waste water to flow more easily during the dumping process. A black tanks monitoring electronics can be adversely affected by debris handing up on the reading probes. For this case, we have installed a tank flush for your black tank(s) to assist in keeping the probe indicators clean so that you have accurate readings on the tank’s levels.
- Gray tanks, an integral part of the waste water system. Gray tanks hold your sink and shower waste water. Gray tanks require less maintenance due to the difference in waste produce making its way into the tank. It may be ideal to dump black tanks first and then your gray tanks, the gray tank running thru the main dump will help in keep the pipeline cleaner.
Toilet
Alliance RV uses the best-in-class 310 series Dome tic RV toilet. Each toilet is 100% factory tested to assure watertight seal in the toilet bowl before it even leaves Docetic. After installation by Alliance RV, the entire waste system is flood tested for leaks by filling the system with water to the rim of the bowl. To use the toilet, first add water to the toilet by pressing the flush pedal only partially down. Water will flow into the bowl while the flush ball remains closed. If the flush ball moves, let up
Toilet slightly on the pedal until the ball closes. Adding water to the empty bowl acts as a trap and helps prevent holding tank odors from entering the RV. Adding water is always recommended prior to flushing solids and/or toilet paper.
To flush the toilet, press the pedal down until it contacts the floor. Release the pedal after the flush is complete. When flushing liquids, quick press of the pedal for 1 to 2 seconds will do. When flushing solids, the pedal should be pressed until the contents are rinsed from the bowl. Never flush longer than needed as this will cause the holding tank capacity to be used up and require more frequent black tank dumps. A small amount of water should collect in the bowl after a flush, this will create an airtight seal. Further instructions and information can be found in the toilet owners’/users manuals.
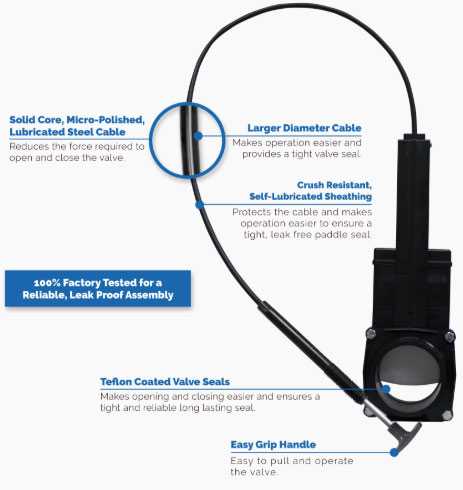
Dumping Your Waste Tanks
Your RV is equipped with cable termination valves. Most of these valves are going to be routed to the centralized docking station convenience center for ease of pulling. However, in some occasions, dictated by floor plan, you may find a gate valve pull handles located on the off‐door side frame rail of the RV.
 Monitoring Your Water Systems
This panel monitors the fill levels of the fresh water, grey water and black water tanks. You will also operate the heaters on the holding tanks here and as well as the power to the fresh water pump (you’ll also find a water pump switch in the exterior docking station) and the water heater. These switches will illuminate while in the on position.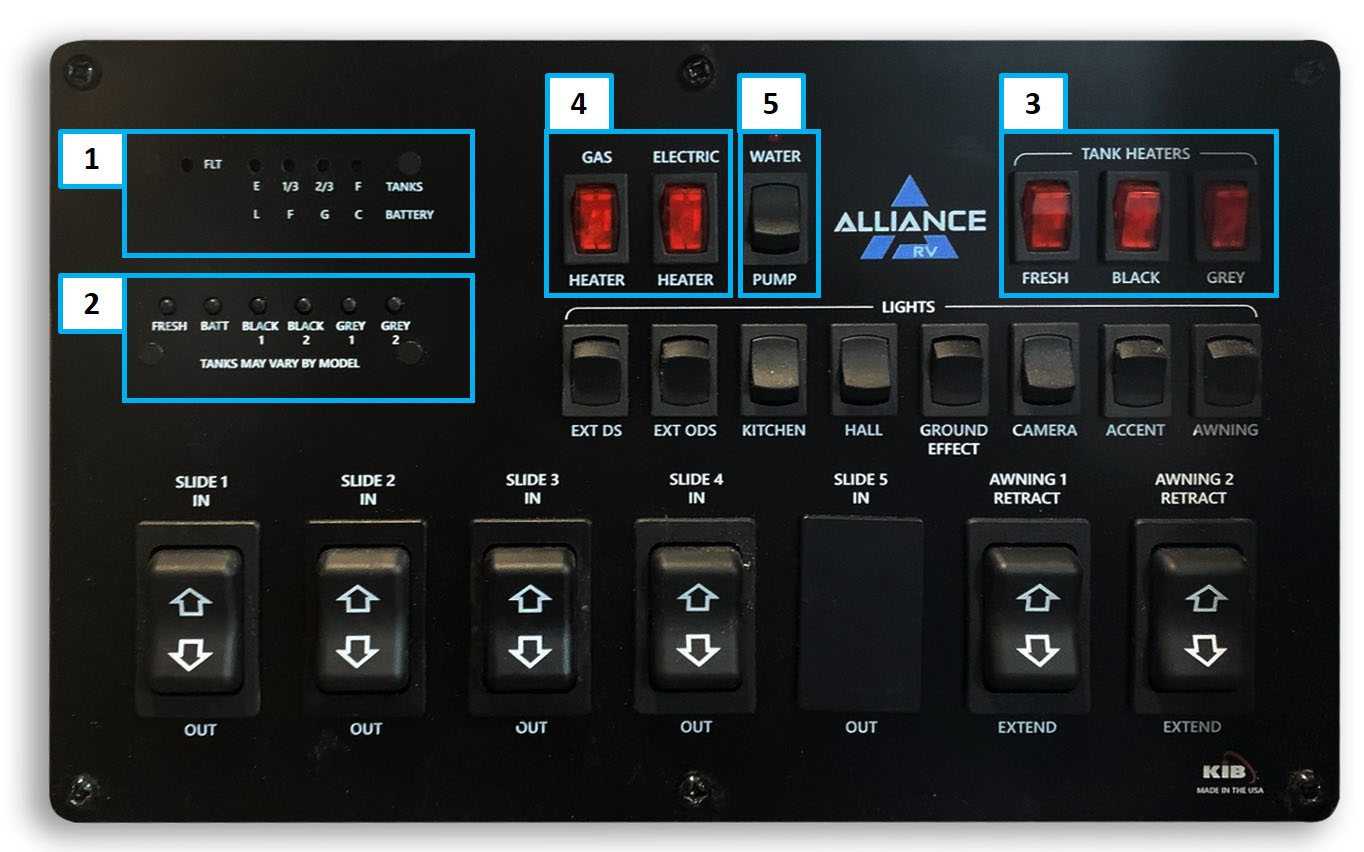
When an individual button is pressed (box 2), the lights above the switch (box 1) illuminate to reveal the level of the selection pushed. For the battery level indicator, the individual letters mean the following:
- L = Low at 6.0 volts
- F = Fair at 11.6 volts
- G = Good at 12.1 volts
- C = Charge at 12.7 volts
The water pump is operated with the water pump switch (box 4) as well as the gas and electric options for the water heater (box 5). The gas water heater switch enables propane operation of the water heater while the electric switch enables electric operation of the water heater. Both switches being on will allow for a quicker hot water recovery. The water heater can be operated in electric or gas only by turning one of the individual switches on.
Note: The holding tank heaters will also be operated from the monitor panel (box 3).
alliance RV Valor 2021 Top Accessories
[amalinkspro_table id=”32452″ new-window=”on” nofollow=”on” addtocart=”off” /]
Washer / Dryer Prep
The washer/dryer prep is located in the front closet or garage of the 5th wheel. You will find both hot and cold water connection points. Should a washer and dryer be your desire, please consult with your dealership or Alliance RV for our installation recommendations. Otherwise, you will find functional cabinet space in that area.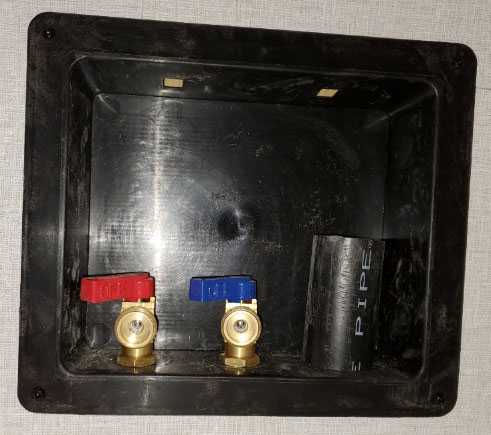
Water Heater
When the RV is not in use or is being stored, the water heater must be drained. This will prevent damage to the water heater lining and protect the water heater in the cold.
- Turn the water heater off (power and gas should be disabled)
- Turn the water pump off
- Open all faucets and plumbing fixtures
- Remove the drain plug from the tank (take care as this is also the anode rod on water heaters in Alliance RV product
- Open the pressure relief valve
WARNING
YOU MUST READ THE USER MANUAL FOR THIS WATER HEATER
For full winterization instructions, see the centralized docking station section of this manual.
FURNITURE
You will find a range of styles and sizes of furniture in your RV, below is some information on the different types of furniture you may see in your RV.
WARNING
MOVING PARTS CAN PINCH, CRUSH OR CUT. KEEP CLEAR AND USE CAUTION
Theatre Seating
A modular seating system that features electric controls and smoothly operating recliners which is assembled and installed by the factory for ease of use.
Every furniture component locks into place with each adjacent piece.
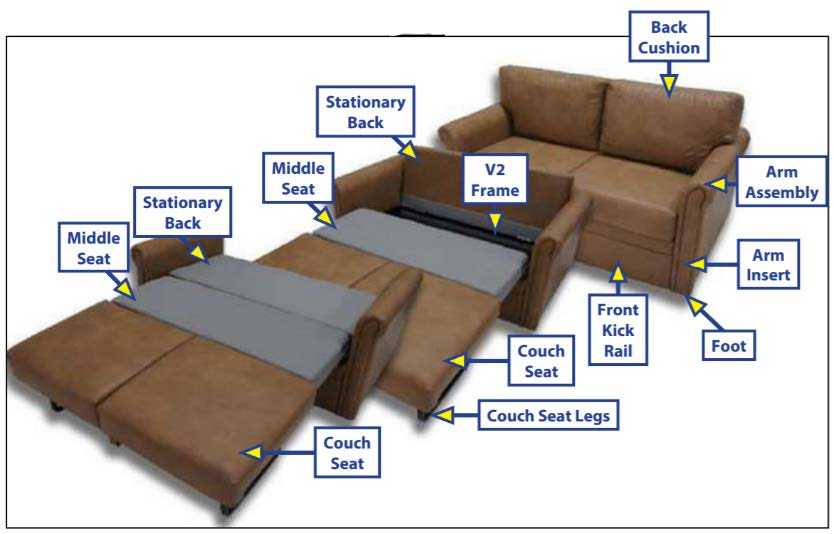
Sofa Seating
Two and three cushion sofas that fold out for additional sleeping.
To operate:
- Remove the back cushions
- Fold out the couch seat to expose the middle seat
- Fold out the couch seat legs and set upright
- Fold down the stationary back
- User back cushions as headrests or pillows.
A polyurethane fabric constructed and designed for all home furniture. Polyurethanes should be cleaned with a mild water-based shampoo or soap. More stubborn stains can be cleaned with a mild, non-alcohol-based cleaning fluid. Rinse with clean water afterward. For non‐liquid stains such as mustard, remove any excess before cleaning. All stains and spills must be attended to promptly.
FURNITURE CONTINUED
Cleaning Furniture Fabric
A polyurethane fabric constructed and designed for all home furniture. Polyurethanes should be cleaned with a mild water based shampoo or soap. More stubborn stains can be cleaned with a mild, non‐alcohol based cleaning fluid. Rinse with clean water afterward. For non‐liquid stains such as mustard, remove any excess before cleaning. All stains and spills must be attended to promptly.
Exterior
An RV comes with a variety of surfaces that need to be cleaned and maintained, from the roof membrane to awning fabrics and beyond. Regular cleaning and maintenance of these different components is needed and will help keep the RV in the best possible condition both cosmetically and functionally.
Keep your roof clean. Use Décor roof cleaners (RP‐RC320S spray or RP‐RC160Cj concentrate) or standard products such as 409, Fantastic or mild detergents are sufficient. Do NOT use harsh abrasives or products containing solvents. For stubborn spots, a rag dampened with mineral spirits is recommended. DO NOT SOAK (never apply mineral spirits directly to the roof) When washing, start from the top and work your way down, try to stay out of direct sunlight. Start by rinsing the roof membrane with clean water to remove any loose dirt or debris. Then, using a medium bristle brush along with a mild detergent/soap and a few gallons of water, scrub the entire roof and then rinse thoroughly, a rubber squeegee may be used to direct water off the roof. A semi‐annual inspection of the roof is suggested. Check the membrane for damage and check the lap sealant used at all termination areas (front, rear and side seams as well as roof attachments). The lap sealant has a limited life span, depending on the geographic region and conditions, and should be repaired or replaced as needed.
NOTE: do not use cleaning solutions that contain solvents or abrasive pads. Sidewalls and the front and rear skin or cap should be washed and waxed to protect and restore.
Never take your RV through an automatic car wash and avoid using highly abrasive cleaning pads or high‐pressure sprayers, the finish and decals/labels on your RV can be damaged by using such products. A soft bristled brush and a mild soap/detergent, if cleaned properly and frequently, will meet your needs. A normal automotive wax should be utilized when waxing your RV, we recommend a good wax two to three times a year, at minimum.
Exposure to salt can result in damage to exterior paints, finishes and other components, it is highly corrosive and should be cleaned off as frequently as possible. The more your RV is exposed to snow, rain, road salt, chemicals and saltwater, the more severe corrosion can be, therefore, a stricter cleaning and maintenance schedule may be needed. Periodically inspect the inbox, chassis, landing gear, axles, wheels, and suspension components for spot rust. When/if you find spot rust, use a wire brush to clean the spot and touch the finish up as needed with a rustproof enamel paint. The more quickly you take care of this, the less damage it can cause and lead to bigger issues.
Your RV is sealed all around to prevent water intrusion and damage to the RV. These seals and sealants (clear and colored) are crucial to your RV’s protection from the outside environment. These seals and sealants should be inspected regularly and touched up and/or resealed as needed, we recommend a visual inspection every 3 months. Make sure to check the roof, slide outs, the corner, termination and beltline trims and moldings on the exterior of the RV. For questions on required seals and sealants, please contact your dealer and Alliance RV. NOTE: your slide outs utilize wipe, cap and bulb seals to protect the room from the outside elements. Due to the nature of a slide out room, these seals are not 100% watertight and should be checked very regularly for any visual signs of damage and addressed immediately when found. Spraying your slide out seals with a silicone spray for lubrication and conditioning will help keep the slide out seals and gaskets malleable, flexible, in good working condition. The rate of the breakdown and deterioration of the seals, sealants and gaskets on your RV is directly tied to the outside environment and the needed maintenance, cleaning and touch up of these crucial components.
Interior
Keep your RV clean and well‐kept during regular usage and always be sure to thoroughly clean after extended uses, long trips and before you store your RV. Sweep and mop floors as required, clean the kitchen and bathroom as you would in your own house. For appliances, sinks, countertops, toilets, showers and flooring, you’ll want to use your regular household cleaners (always refer to the owner’s manual of the individual component for additional information). Make sure that the RV is ventilated well when doing this, clean air is needed for your safety. Strip your bedding down and clean as required, be sure to follow the care instructions on these soft goods. When wiping down cabinets, walls, ceilings and other surfaces, use a mild soap / detergent and warm water in order to not cause damage to these surfaces.
Maintenance Schedule
| FREQUENCY | |||||||
|
MAINTENANCE REQUIRED |
BEFORE USE |
AFTER USE |
MONTHLY |
3 MONTH |
6 MONTHS |
YEARLY / BEFORE STORAGE | REFER TO COMPONENT OWNERS
MANUAL |
|
Heating, Cooling & Ventilation (AC, Furnace, Vents) |
Inspect & Clean |
Yes |
|||||
|
Axles |
Inspect |
Yes |
|||||
|
Brakes |
Test |
Adjust |
Yes |
||||
|
Entry Steps |
Lubricate |
||||||
|
Landing Gear |
Clean & Lubricate |
Yes |
|||||
|
Pinbox & Hitch Equipment |
Inspect |
Lubricate |
|||||
|
Safety Chains |
Inspect |
||||||
|
Slideouts |
Clean Roof |
Run “In / Out” |
|||||
|
Tires |
Inspect |
Yes |
|||||
|
Battery |
Inspect |
Yes |
|||||
|
Electrical Cords / Receptacles |
Inspect |
||||||
|
Generator / Generator Exhaust |
Inspect |
Yes |
|||||
|
Exterior Finish (Roofs, Walls, Slideouts, Chassis) |
Wash |
Wax |
|||||
|
Exterior Moldings & Trims |
Inspect |
||||||
|
Locks and Latches |
Lubricate |
||||||
|
Roof Seams and Attachment Points |
Inspect |
||||||
|
Seals |
Inspect |
||||||
|
Fresh Water System |
Drain |
Sanitize / Winterize | |||||
|
Waste System |
Dump / Flush |
Drain |
|||||
|
Water Heater |
Drain |
Flush / Winterize |
Yes |
||||
|
Propane (LP) System |
Test for Leaks |
||||||
|
Alarms / Detectors (Smoke, CO/LP) |
Test |
Yes |
|||||
VENDOR WARRANTY AND CONTACT INFORMATION
Below you will find a listed supplier, related warranty information and warranty / tech support contact information should you need it. Some of this information may change without notice. Alliance RV will make all efforts to keep this manual as up to date as possible. This is a summary of the component manufacturers warranty only. For details on individual component warranties, see their warranty information.
| COMPONENT | BRAND | SUPPLIER WEBSITE | CONTACT # | MANUFACTURER WARRANTY | ||
|
Air Compressor |
MORryde |
(574) 293‐1582 |
1‐Year Limited |
|||
|
Air Conditioner |
Coleman |
(423) 775‐2131 |
2‐Year Limited |
|||
|
Automatic Transfer Switch |
Progressive Dynamics |
(269) 781‐4241 |
1‐Year Limited |
|||
|
Awnings |
Lippert Components |
(574) 537‐8900 |
1‐Year Limited |
|||
|
Axles |
Dexter Axle |
|
(574) 295‐7888 |
|
1‐Year Limited (Grease & Oil Seals) / 2‐ Year Limited (Electric/Hydraulic Brake Actuators) / 5‐Year Warranty (Axles and Suspension System) | |
|
Baggage Doors |
Lippert Components |
(574) 537‐8900 |
1‐Year Limited |
|||
|
Bed‐Lift System |
Happijac |
(574) 537‐8900 |
1‐Year Limited |
|||
|
Chassis / Frame |
Lippert Components |
(574) 537‐8900 |
1‐Year Limited |
|||
|
Converter |
Progressive Dynamics |
(269) 781‐4241 |
1‐Year Limited |
|||
|
Entry Steps |
Lippert Components |
(574) 537‐8900 |
1‐Year Limited |
|||
|
Fireplace |
LaVanture |
(800) 348‐7625 |
1‐Year Limited |
|||
|
Fuel Pump & Tank |
ECI Fuel Systems |
www.collins‐n‐co.com |
(574) 848‐1118 |
1‐Year Limited |
||
|
Furnace |
Suburban |
(423) 775‐2131 |
2‐Year Limited |
|||
|
Furniture |
Lippert Components |
(574) 537‐8900 |
1‐Year Limited / 5‐Year Fabric |
|||
|
Generator |
Onan |
(800) 888‐6626 |
3‐Year Limited |
|||
|
Inverter |
Renogy |
(574) 294‐2684 |
1‐Year Limited |
|||
|
Leveling System |
Lippert Components |
(574) 537‐8900 |
1‐Year Limited |
|||
|
Lithium Battery |
Renogy |
(574) 294‐2684 |
5‐Year Prorated Warranty |
|||
|
Mattress |
Lippert Components |
(574) 537‐8900 |
1‐Year Limited |
|||
|
Microwave |
Insignia |
(877) 467‐4289 |
1‐Year Limited |
|||
|
Oven / Cooktops |
Greystone |
(574) 971‐4490 |
1‐Year Limited |
|||
|
Ramp Door |
MORryde |
(574) 293‐1581 |
1‐Year Limited / 3‐Year Water Intrusion |
|||
|
Ramp Door Patio Rail Kit |
MORryde |
(574) 293‐1582 |
1‐Year Limited |
|||
|
Ramp Door Steps |
MORryde |
(574) 293‐1583 |
1‐Year Limited |
|||
|
Refrigerator |
Everchill |
(574) 971‐4490 |
1‐Year Limited |
|||
|
PVC Roof Membrane |
Dicor |
(574) 264‐2699 |
15‐Year Limited |
|||
|
Roof Vents / Fans |
MaxxAir |
(423) 775‐2131 |
2‐Year Limited |
|||
|
Slideout Systems |
Lippert Components |
(574) 537‐8900 |
1‐Year Limited |
|||
|
Solar Panels |
Renogy |
(574) 294‐2684 |
10‐Year Limited |
|||
|
Stereo |
JBL |
(574) 522‐7781 |
1‐Year Limited |
|||
|
Suspension System |
MORryde |
(574) 293‐1581 |
1‐Year Limited |
|||
|
Tires |
Lionshead |
(574) 533‐6169 |
1‐Year Guarantee / 5‐Year Limited |
|||
|
Toilet |
Dometic |
(800) 366‐3242 |
1‐Year Limited |
|||
|
Television (110‐Volt) |
LG |
(800) 243‐0000 |
www.lg.com/us/support/email‐appointmen |
1‐Year Limited |
||
|
Television (12‐Volt) |
Connex |
(574) 522‐7781 |
1‐Year Limited |
|||
|
TV Antenna |
Winegard |
(800) 288‐8094 |
2‐Year Limited |
|||
|
Water Heater |
Suburban |
(423) 775‐2131 |
2‐Year Limited |
|||
FAQ
An RV waste water system is a system designed to collect and manage wastewater generated in the RV, including from sinks, showers, and toilets.
RVs typically have separate tanks for black water (toilet waste) and gray water (sinks and shower). These tanks collect the wastewater, and a valve allows for controlled dumping when needed.
You can find specific tank capacities in the RV’s specifications or user manual. It may vary depending on the RV’s model and design.
Many modern RVs have monitoring systems that display tank levels on a control panel. These systems typically use sensors to measure the levels.
RVs have dump valves located on the underside of the vehicle. To empty the tanks, you connect a sewer hose to the valve, open the valve, and allow the waste to flow into a designated waste disposal area or dump station.
No, you should only dump RV waste water in designated dump stations or approved sewer connections. Dumping waste in improper locations can be illegal and harmful to the environment.
The frequency of emptying the tanks depends on usage. Gray water tanks may need more frequent emptying than black water tanks. It’s best to monitor tank levels and empty them as needed.
Many RV-specific toilet papers are designed to break down more easily in the RV’s waste system. However, some regular household toilet papers are also suitable for RV use.
Regularly flushing the tanks with clean water and using RV-friendly tank treatments can help keep the system clean and odor-free. Follow the manufacturer’s recommendations for maintenance.
Using tank treatments, ensuring proper tank ventilation, and keeping the tank valves closed can help prevent odors from escaping.
Yes, there are various RV-specific chemicals and treatments available that can help control odors and break down waste in the tanks.
RVs designed for cold weather use may have heated tanks and insulated plumbing. You can also use tank heaters and insulating materials to prevent freezing.
If you experience clogs in the waste water system, you may need to use specialized products or seek professional assistance to unclog the tanks.
It is generally not recommended to use the RV’s toilet while the vehicle is in motion for safety reasons. It’s best to use rest stops or campground facilities.
Local regulations may vary, so it’s important to follow the rules of the campgrounds or dump stations you visit. Dumping waste illegally can result in fines and environmental damage.
Useful Link
View Full User Guide: alliance RV Valor 2021 User Manual