![]()
Aston Martin DB11 2021 User Guide
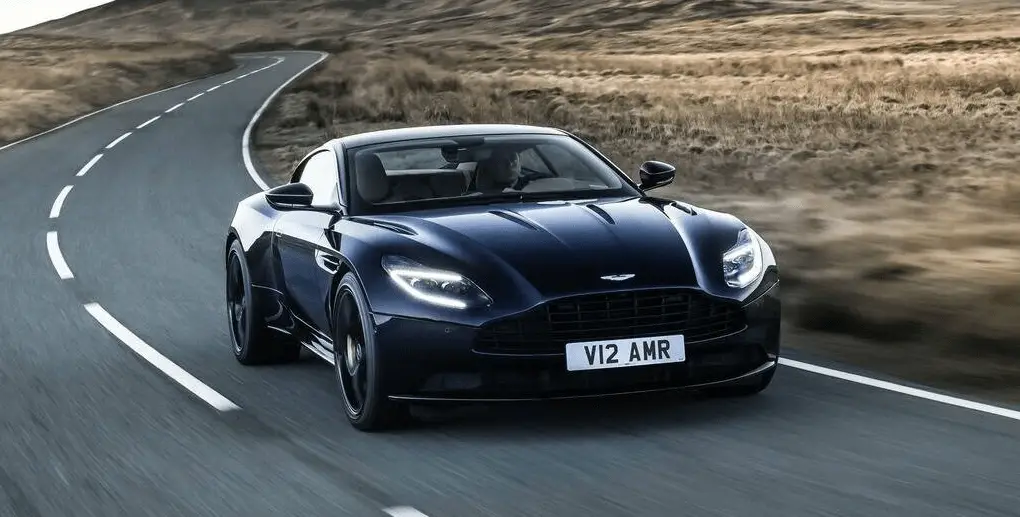
The British company Aston Martin makes the DB11, which is a luxury grand tourer. Even though I don’t know much about the Aston Martin DB11 2021 model until September 2021, I can tell you some general information about it based on its earlier version.
The Aston Martin DB11 has a beautiful look, can go fast, and has a lot of nice features. Here are some of the most important parts and specs of the DB11:
- Design: The DB11 has a sleek and aerodynamic shape that is typical of Aston Martin’s style. It has a unique grille in front, LED headlights, and a curved body.
- Engine: The DB11 usually comes with a number of powerful engines to choose from. The base model comes with a V8 engine, and a V12 engine may be offered for a higher-performance version. The performance of these engines is amazing, and they make driving exciting.
- Performance: The DB11 is made to be a big tourer, which means it has a good mix of comfort and speed. It can be driven in a lively way, accelerates smoothly, and is very stable.
Inside the DB11, you’ll find a luxurious and elegant cabin. All of the interiors is made of high-quality materials, such as expensive leather and carbon fibre trims. The car also has current technology features and ways to connect to the internet. - Safety and Technology: The Aston Martin DB11 usually comes with modern driver assistance systems, airbags, stability control, and other safety features. It may also have a number of high-tech features, like an infotainment system, navigation, premium music, and ways to connect to the internet.
Aston Martin DB11 2021 Quick Start User Guide
Driving Position Guide: 2021 Aston Martin DB11 Interior Features
Quick Start
Vehicle Key
What Do The Buttons On The Key Do?
(Refer to ’Vehicle Key’, page 2.2)
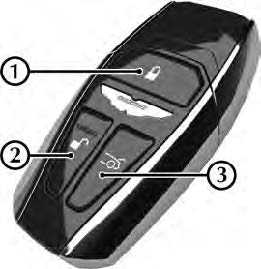
- LOCK: Press to lock the vehicle and arm the security system.

- UNLOCK: Press to unlock either the driver’s door or the vehicle.

- DECK LID OPEN: Press and hold to release the deck lid catch.
 Global Close
Press and hold![]() to unlock all vehicle doors and open all windows.
to unlock all vehicle doors and open all windows.
Press and hold![]() to lock all doors and close all windows. Volante: Global close will also open or close the convertible roof.
to lock all doors and close all windows. Volante: Global close will also open or close the convertible roof.
Keyless Entry
To unlock the vehicle, fully push the front edge of the door handle. If the system recognizes a valid key signal, the door will unlock and open.
To lock the vehicle, close all the vehicle doors and press the rear edge of the door handle to activate the lock switch.
Driving Position
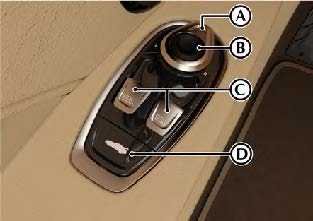
How Do I Adjust The Seat?
(Refer to ’Seat Adjustment’, page 3.2)

- BOLSTER/LUMBAR ADJUSTMENT SELECTOR SWITCH (OPTIONAL): Press the switch up to select lumbar adjustment. Press down to select bolster adjustment.
- BOLSTER/LUMBAR ADJUSTMENT: Use the directional pad to adjust the position of the lumbar or bolster support.
- SEAT POSITION ADJUST: Seat forward/backward and height adjust. Raise front to tilt base of seat.
- SEAT BACKREST ADJUST: Seat back angle adjust.
- MEMORY SEAT POSITIONS: Use to select or store memory positions for the seat, steering column and door mirror positions .
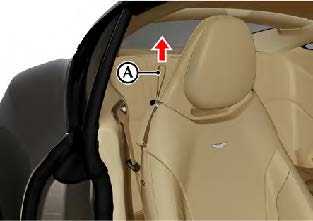
How Do I Get To The Back Seats?
Pull the release strap (A) to release the seat back. Pull and hold to move the rear of the seat forward.

What Do The Door Switches Do?
- DOOR MIRROR SELECTOR: Press to select left or right door mirror (Refer to ’Exterior Mirrors’, page 3.7).
- DOOR MIRROR ADJUSTMENT: Use the direction pad to adjust the mirror position.
- WINDOW SWITCH: Press or pull to operate the driver or passenger windows (Refer to ’Windows’, page 3.5).
- DECK LID: Press and hold to release the deck lid catch (Refer to ’Deck Lid’, page 2.8).
How Do I Adjust The Steering Column?
(Refer to ’Steering Column’, page 3.8)
The reach and tilt angle of the steering column are adjusted by using the adjustment lever. Push the lever down or up to adjust the steering column angle. Pull the lever towards you to bring the steering wheel closer and away to move the steering wheel back.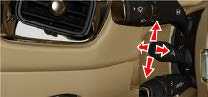
How Do I Use The Memory Positions?
(Refer to ’How Do I Use The Memory Positions?’, page 1.5).
Setting a Position
Adjust the seat, steering column and the door rear view mirrors to the desired position. Push the memory button (M), then press the required memory channel (1, 2 or 3) to save the positions. A chime is heard and a message will show in the message center to confirm. By repeating these steps and pressing an unused button, a second and third driving position can be saved in the memory.
Read all Instructions for Quick Start User Guide
Aston Martin DB11 2021 Vehicle Key User Guide
Vehicle Key
The vehicle is supplied with three vehicle keys; Two primary keys and an emergency key. Keep the second primary key in a safe place. Do not leave a vehicle key in the vehicle when unattended.
Warning:
The engine can be started by any person in the vehicle if the brake pedal is pressed down and the start button is pressed. Care should be taken that the vehicle key is not left in the vehicle with only occupants such as young children or pets inside.
If a vehicle key is lost, contact your Aston Martin Dealer.
If the vehicle key is not in the vehicle, the message ‘Key Not Found’ will be displayed in the instrument cluster when trying to start the vehicle. This message will also be displayed if the vehicle key battery does not have enough charge to be detected by the keyless start system.
Radio Equipment Directive
Hereby, STRATTEC Security Corporation, 3333 West Good Hope Road, Milwaukee, WI 53209 USA declares that this AM Series Key fob is in compliance with the essential requirements and other relevant provisions of Directive 2014/53/EU (RED). The original delegation of conformity can be accessed at the following link www.strattec.com/company/certifications Frequency band 433.05 – 434.79 MHz
Maximum Output Power <10 m W.
Vehicle Security
Vehicle Key Functions
- LOCK:

Press and release to lock the vehicle and arm the security system. - UNLOCK:

Press and release to unlock either the driver’s door or the vehicle (Refer to ’One Step Unlocking€™, page 2.3). - DECKLID OPEN:
Press and hold to release the deck lid catch.
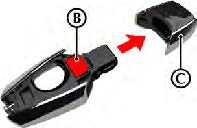
Battery Replacement
To replace the vehicle key’s battery:
- Lift the battery cover (A).
- Push down on the battery to tilt the battery (B) and allow access.
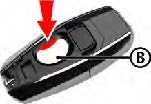
- Remove the battery and install the new battery with the (+) sign facing up.
- Replace the battery cover.
Keyless Start Failure
If the vehicle does not start because the charge in the vehicle key battery is too low, use the emergency start procedure (Refer to ’Emergency Engine Start’, page 2.12).
Keyless Go Zones
The Keyless Go function for vehicle locking and ignition will operate when a vehicle key is inside the vehicle cabin or in one of the below reception zones:
The vehicle key is only needed in one of the reception zones for Keyless Go. For example, the vehicle key can be in the rear reception zone and the passenger side door can be unlocked.
Unlocking and Opening
Unlocking From Outside the Vehicle
Using The Vehicle Key
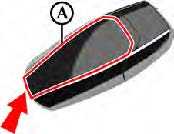
Stand within 5 m (16 f t) of the vehicle and press. To show that the security system has been disarmed and the vehicle unlocked, the direction indicators will flash twice1. Push at point (A) to release the handle and pull to open the door.
- The driver’s door can be set to unlock with the first press of the button and the rest of the vehicle with a second press (Refer to ’One Step Unlocking’, page 2.3).
- For ease of use at night white LEDs are incorporated into the door handles which illuminate when the vehicle is unlocked. The door LEDs will go off after 40 seconds or if the vehicle is locked again.
Global Close
Press and hold![]() to unlock all vehicle doors and open all windows.
to unlock all vehicle doors and open all windows.
Press and hold ![]() to lock all doors and close all windows. When global close is used, the convertible roof will also open or close with the windows respectively.
to lock all doors and close all windows. When global close is used, the convertible roof will also open or close with the windows respectively.
Using Keyless Entry
To unlock the vehicle with keyless-entry active, fully push at point (A) and open the door handle. The front edge of the door handle will press a switch and the door will unlock and open.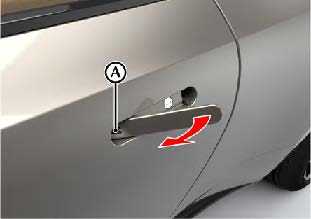
If a door is opened while driving a warning sound will be heard and a warning will be shown on the instrument cluster until the door is closed again.
Automatic Locking
If the vehicle is unlocked but a door is not opened within 40 seconds, the vehicle will automatically lock and arm again.
Locking From Outside the Vehicle
Read all Instructions for Vehicle Key User Guide
Aston Martin DB11 2021 Emergency Access and Start User Guide
Emergency Access and Start
Emergency Key
If the vehicle key fails to operate, or the vehicle battery is fully discharged, use the emergency key to lock or unlock the vehicle.
![]() Do not store the emergency key in the vehicle. If the vehicle battery is fully discharged you will need the emergency key to gain access to the vehicle.
Do not store the emergency key in the vehicle. If the vehicle battery is fully discharged you will need the emergency key to gain access to the vehicle.
![]() If the emergency key is lost, contact your Aston Martin Dealer.
If the emergency key is lost, contact your Aston Martin Dealer.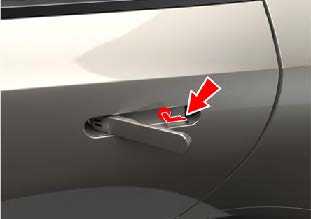
![]() The emergency door lock is always in the door handle for the left side door. Open the door handle and insert the emergency key in the door lock and turn clockwise. Only that door will be unlocked. If the security system was armed, the alarm will start. To stop the alarm insert the vehicle key (even if the vehicle key has lost all power) into the emergency ignition slot and move to position ‘II’ (ignition ON).
The emergency door lock is always in the door handle for the left side door. Open the door handle and insert the emergency key in the door lock and turn clockwise. Only that door will be unlocked. If the security system was armed, the alarm will start. To stop the alarm insert the vehicle key (even if the vehicle key has lost all power) into the emergency ignition slot and move to position ‘II’ (ignition ON).
Caution:
If the vehicle has lost power, the door may require extra effort to open due to the window not dropping down. If this does happen, gently press against the top of the window whilst opening the door.
Caution:
If the vehicle battery is fully discharged, the emergency key will only lock or unlock the left side door. The right side door can be unlocked from inside the vehicle, but unless power is supplied to the vehicle, that door cannot be locked again. Even if the vehicle key has lost all power it will start the engine when used in the emergency ignition slot.
Emergency Deck Lid Release
The deck lid can be opened from inside the luggage compartment by pulling the luminous emergency release handle (A).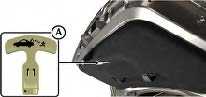
Emergency Engine Start
If the keyless start system fails to start the vehicle, the engine can be started with the emergency start system.
To start the engine:
- Lift the battery cover (A).

- Press the cap release button (B) and remove the key end cap
- Move the armrest back to at least position “1” (Refer to ’Powered Storage Box’, page 3.40)to expose the cup holders and the emergency ignition cover.
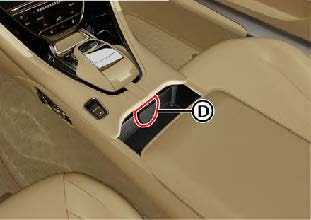
- Remove the emergency ignition cover (D).
- Insert the key into the emergency ignition slot and turn the key clockwise to start the vehicle.
![]() If the keyless ignition system fails, contact your Aston Martin Dealer.
If the keyless ignition system fails, contact your Aston Martin Dealer.
![]() If the emergency ignition is used to start the vehicle, the START button is disabled.
If the emergency ignition is used to start the vehicle, the START button is disabled.
![]() To turn the engine off, turn the key counter-clockwise in the emergency ignition slot.
To turn the engine off, turn the key counter-clockwise in the emergency ignition slot.
![]() The powered armrest will not be able to fully close when the vehicle key is in the emergency ignition slot.
The powered armrest will not be able to fully close when the vehicle key is in the emergency ignition slot.
Anti-Theft Systems
Introduction
This vehicle is protected by an electronic security system which includes:
- Remote arm and disarm
- Perimeter sensing
- Remote door, deck lid, fuel flap lock and unlock
- Alarm siren with battery backup (Only in markets where audible sirens are permitted.)
- Random code encryption to prevent electronic scanning of the vehicle key identity code
- Engine Immobilizer
- Ultrasonic Interior movement sensors
- Tilt (tow-away) sensor
- When the security system is armed, any attempt to gain access by breaking a window or forcibly opening a door, the deck lid, or the bonnet will result in full alarm operation.
Alarm
When the alarm has started a siren will be heard for a 25 seconds cycle (ten cycles maximum) and the direction indicators flash1 for five minutes after which the security system returns to the armed state. The doors and deck lid will stay locked throughout. Stop the alarm at any time by pressing the vehicle key or opening a vehicle door with keyless entry active. There is approximately a ten-second delay before the alarm is stopped.
Engine Immobilizer
The engine immobilizer prevents your vehicle from being started without the correct key. The immobilizer system is activated when the ignition is set to off and the driver’s door is opened.
Caution:
Always take the key with you when you lock the vehicle. The engine can be started if a valid key has been left inside the vehicle.
Interior Motion Sensor
When the vehicle is locked and armed, the interior motion sensor will sense movement inside the vehicle. If movement is detected it will start the alarm. The interior motion sensor will activate 10 seconds after the vehicle is locked and all doors and the deck lid are closed, and the alarm will be set after a further 10 seconds of calibration. All doors must be closed before the interior motion sensor can be activated. The interior motion sensor can be set on or off in the vehicle settings menu (Refer to ’Vehicle Settings’, page 10.2).
Tow Away Protection
When the vehicle is locked and armed a tilt sensor will sense if the vehicle is tilted or lifted. For example, if the vehicle is being raised on a jack or being towed. If the vehicle tilt sensor detects a tilt, the alarm will start. Tow Away Protection will activate 60 seconds after the vehicle is locked and all doors are closed. All doors, including the deck lid, must be closed before tow-away protection can be activated. Tow away protection can be set to on or off in the vehicle settings menu (Refer to ’Vehicle Settings’, page 10.2).
Read all Instructions for Emergency Access and Start User Guide
Aston Martin DB11 2021 Additional Information User Guide
Additional Information
False Alarms
To avoid unnecessary alerts, contact the Secure Operation Centre to inform them of any potential false alarm. Excessive false alerts may result in a charge.
Damage Check
If you are involved in an accident or if your vehicle battery has been disconnected for any reason (for example, body work repair or paint re-spray), you must call Aston Martin Tracking Customer Services so that they can test the system to check that it is still functioning correctly.
Change of Details
You must call Aston Martin Tracking Customer Services if any of your personal details change.
For example:
- Change of address.
- Change of mobile phone number.
- Changing the registration plate on the vehicle.
- Selling the vehicle.
- New owner buying a pre-owned vehicle already fitted with Aston Martin Tracking System.
Contact Details
Aston Martin Tracking 24-Hour Secure Operating Centre:
+ 44 (0) 1282 476 799
Or from abroad:
+ 44 (0) 333 222 0799
Aston Martin Tracking Customer Services:
+ 44 (0) 1282 473 732
(Monday to Friday – 09.00 to 17.00)
When registering for the Aston Martin Tracking System, you are also provided with all the details and contact numbers needed if your vehicle is stolen. Keep these details safe and not in the vehicle so you can refer to them if your vehicle is stolen.
Radio Equipment Directive
Driver Card
Hereby, Vodafone Automotive Spa declares that the radio equipment types 2781 and 8015 are in compliance with Directive 2014/53/EU. The full text of the EU declaration of conformity is available at the following internet address: automotive.vodafone.com, section download.
The devices have the following RF parameters:
- 2781: 433,92 MHz/-30 dBm
- 8015: 433,92 MHz/-12 dBm Telematics Unit
Hereby, Vodafone Automotive Spa declares that the radio equipment types 2145 and 2146 are in compliance with Directive 2014/53/EU. The full text of the EU declaration of conformity is available at the following internet address: automotive.vodafone.com, section download.
This device has the following RF parameters:
- 33 dBm for 850 / 900 MHz;
- 30 dBm for 1800 / 1900 MHz
These devices bear the following CE mark: ![]()
Note for installation: In order to avoid human exposure to electromagnetic fields, the distance of the VTS device with respect to the body of the vehicle occupants must be greater than 0.2m.
Home link Wireless Control
Not available in Azerbaijan
(Optional)
The HomeLink®1 Wireless Control buttons and transceiver are on the interior rear view mirror. The transceiver can be programmed to operate up to three transmitters to operate garage doors, entry gates, home lights, security systems, or other radio frequency-operated devices.
Caution:
As a security precaution make sure that all programming is erased in the Home Link system before selling this vehicle. For information or assistance, contact your Aston Martin Dealer.
Warning:
When the transceiver is being programmed to a garage door opening system, make sure that people and animals, the vehicle and objects are clear to prevent injury or damage as the garage door or gate will operate during the programming. A full list of radio frequency operated devices can be either obtained on the Home Link website. Keep the original transmitter for future use or programming procedures if, for example, you purchase a new vehicle. This device may suffer from interference if operated near to a mobile or fixed station transmitter. This interference can affect the hand-held transmitter as well as the in-vehicle transceiver. The manufacturer is not responsible for any radio or TV interference caused by unauthorized modifications to this equipment. Such modifications could void the user’s authority to operate the equipment.
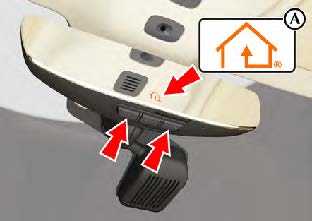
Programming
Step 1 will clear previously programmed devices and is only necessary if programming Home Link for the first time or when erasing all existing programming. This step is not necessary to program additional devices. The Home Link® buttons can be reprogrammed individually but not individually erased.
Press and hold the two outer Home Link buttons until the Home Link symbol (A) begins to flash green after 10 seconds.
Read all Instructions for Additional Information User Guide
Aston Martin DB11 2021 Checks Before Driving and Windows User Guide
Aston Martin DB11 2021 Checks Before Driving and Windows User Guide
Checks Before Driving
Inspect your vehicle to make sure that everything is according to the information and specifications in this Owner’s Guide.
Outside the Vehicle:
- Visually check the road wheels, wheel bolts, and tires.
- Check that all windows, mirrors, and lamps are clear and unobstructed.
- Check that the deck lid, bonnet, and fuel filler flap are securely closed.
- Check the operation of all lamps.
Once Inside the Vehicle:
- Check that the doors are securely closed.
- Check that the seat, mirrors, and steering wheel adjustments are correct.
- Check that all gauges and symbols are reading correctly.
- Check that all passengers have fastened their seat belts.
Seat Adjustment
Front seats only.
Warning:
Do not adjust the driver’s seat whilst driving.
The seats can also be adjusted:
- Up to 6 minutes after a door is unlocked and before the ignition is switched on.
- Up to 6 minutes after the ignition is switched off.
If the seat operation times out:
- Turn the ignition control on.
- Close or open a door.
- The seat adjustment controls are located on each side of the center console.
Seat Controls
The ignition must be on before the lumbar and bolster support1 can be operated.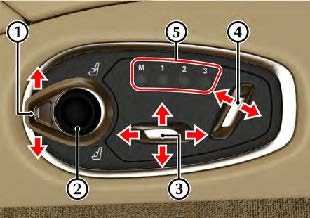
- LUMBAR/BOLSTER ADJUSTMENT SELECTOR SWITCH: Press the switch up to select lumbar adjustment. Press down to select bolster adjustment1..
- LUMBAR/BOLSTER ADJUSTMENT: Use the directional pad to adjust the position of the lumbar or bolster support1..
- SEAT POSITION ADJUST: Seat forward/backward and height adjust. Raise the front to tilt the base of the seat.
- SEAT BACKREST ADJUST: Seat back angle adjustment.
- MEMORY SEAT POSITIONS: Use to select or store memory positions for the seat, steering column, and door mirror positions (Refer to ’Memory Functions’, page 3.9).
- Seat Back Release Caution: Make sure that the headrest for the seat does not hit the sun visor. The seat can cause damage to the sun visor or the sun visor mirror.
Pull the release strap (A) to release the seat back. Pull and hold to move the rear of the seat forward.
Push the rear of the seat into position to lock it in place. A warning message will be shown in the instrument cluster if the seat is not correctly locked back into position. The driver and front passenger seats include non-adjustable head restraints, which limit the rearward travel of the head in a rear impact and may reduce whiplash injuries. When sitting in the seats make sure that the seat back is in an upright position and that the rear of the occupant’s head is positioned in the center of the head restraint area. The head restraints are most effective when the distance between the rear of the occupant’s head and the head restraint is kept to a minimum.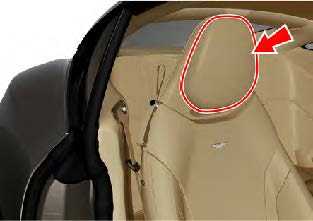
Windows
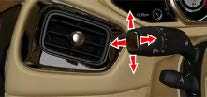
Warning: Misuse of the window switches, especially by children, can result in injury due to entrapment in the window closure. Drivers must advise all passengers of the possible danger and make sure that all obstructions are clear before raising the window. The windows can be operated up to one minute after the ignition is turned off. To raise and lower the windows the ignition must on. Use a window switch on the driver’s side (A) or the passenger’s side (B) to operate a window.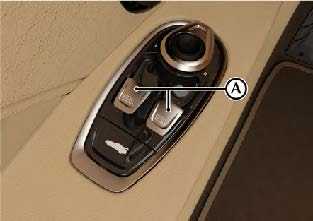
Press or pull past resistance on the window switch to perform a one touch movement down or up.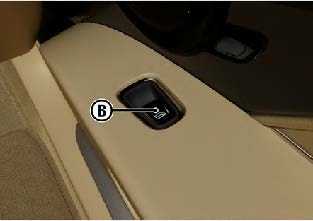
Read all Instructions for Checks Before Driving and Windows User Guide
Aston Martin DB11 2021 Steering Column User Guide
Steering Column
Adjustment
Warning: Do not adjust the steering column whilst driving. The steering column can be adjusted with the ignition set to OFF.
The reach and tilt angle of the steering column are adjusted with the adjustment stalk. Push the stalk down or up to adjust the steering column angle. Pull the stalk towards you to bring the steering wheel closer and away to move the steering wheel back.
Heated Steering Wheel
The ignition must be on before the heated steering wheel can be operated. To set the steering wheel heating to on, rotate the end of the adjustment stalk towards you. The indicator LED lamp will also come on. To turn the steering wheel heating off, rotate the stalk away. The steering wheel heating is always set to off when the ignition is set to off.
Memory Function
The position of the steering column is stored when a seating position is saved for the driver’s seat (Refer to ’Memory Functions’, page 3.9).
Memory Functions
Warning: Make sure that there is nothing in the movement path of the seat or the steering column during adjustment that could cause obstruction.
Warning: To avoid injury, make sure that children do not play with the memory position switches.
Warning: If the seat or steering column accidentally begin to move, press any seat control button to stop the seat.
Lumbar and Bolster’s positions are not recorded when memory positions are saved. The position of the driver and front passenger seats, steering column and exterior mirrors can be memorized and recalled. Three different driving position profiles can be entered in the memory. The memory position of the steering column and both door rear view mirrors are saved in the driver’s seat position.
Setting a Memory Position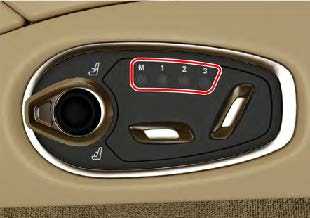
To Save A Memory Position
Warning:
Do not attempt to adjust the driver’s seat whilst driving.
Adjust the seat, steering column, and exterior rearview mirror to the desired position. Push the memory button (M), then press the required memory channel (1, 2, or 3) to save the positions. A chime is heard and a message will show in the message center to confirm. By repeating these steps and pressing an unused button, a second and third driving position can be saved in the memory.
Recalling a Memory Position
Once in the seat, press buttons 1, 2, or 3 (depending on which saved channel is required) until all movement is stopped. The seat will move to the saved position. Seat and steering wheel movement will be interrupted if the memory channel button is released. Exterior mirror movement will continue. Press and hold the memory channel button to complete seat and steering wheel movement.
Emergency Stop
If the seat accidentally begins to move, press any seat control button to stop the seat.
Occupant Restraint System
The system provides protection to the driver and all passengers in a variety of impact conditions.
The system consists of:
- Driver and front passenger safety belts with dual pre-tensioners and load limiting systems.
- Driver and front passenger dual-stage airbags.
- Driver and front passenger seat side airbags.
- Front Passenger Airbag Deactivation (PAD) switch (Market specific).
- Driver and front passenger roof-mounted curtain airbag (coupe).
- Driver and front passenger door-mounted curtain airbag (volante).
- Driver’s knee bolsters airbag.
- Roll Over Protection System (ROPS) (volante)
All of these systems are controlled by the Occupant Restraint Controller (ORC). In a collision, the ORC will analyze information from various sensors, such as crash and seat occupancy conditions. Based on this information the system will deploy the appropriate safety devices. During a crash, the ORC may or may not operate the safety belt pre-tensioner(s) and none, one, or both stages of the dual-stage airbag supplemental restraints. If the pre-tensioners or airbags do not operate in a collision it does not mean that something is wrong with the system. Rather, it means the system determined the accident conditions (crash severity, belt usage, etc.) were not appropriate to operate these safety devices.
Front airbags are designed to operate only in frontal and near-frontal collisions, not rollovers, side impacts, or rear impacts unless the collision causes sufficient longitudinal deceleration.
Determining if the System is Operational
The ORC warning symbol is shown in the instrument cluster to give the condition of the system. A fault with the system is shown by one or more of the following:
- The warning symbol will flash or stay ON.
- The warning symbol does not come ON immediately after the ignition is set to ON.
- A message will show in the right side instrument cluster window with a description of the fault.
If either of these conditions occurs, even intermittently, have the restraint system serviced at your Aston Martin Dealer immediately. Unless serviced, the system may not operate correctly in the event of a collision.
Read all Instructions for Steering Column User Guide
Aston Martin DB11 2021 Airbags User Guide
Airbags
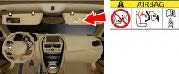
The purpose of the airbags is to provide additional protection for the driver and passengers in the event of a serious impact (front or side impacts). The airbags are supplementary to the seat belts. Important airbag safety labels are located on the sun visors and on the end of the instrument panel (passenger side). Make sure that the instructions on these labels are read and complied with before driving the vehicle.
The front driver’s (A), passenger (B) and knee bolster airbag (C) only deploy in a serious front collision.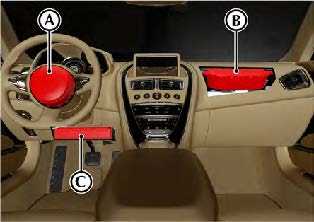
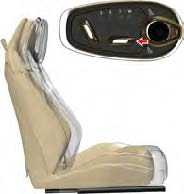
The side airbags (D) located in the front seats and the curtain airbag (E), located in the roof trim1 or door2, only deploy according to which side has been impacted in a serious side collision.

Airbag Deployment
Warning: The use of accessory seat covers may prevent the deployment of seat-side airbags and increase the risk of injury in an accident. Do not use accessory seat covers.
Warning: All passengers, including the driver, should always wear seat belts, whether or not an airbag is provided, to decrease the risk of injury or death in the event of a crash.
Warning: No objects whatsoever should be attached to, or placed on, the center cover of the steering wheel or the front passenger fascia panel. Such objects could cause harm if the vehicle is in a collision severe enough to cause the airbags to deploy. The airbag system is not designed to protect against rear impacts. Airbags inflate rapidly and with considerable force; there is therefore a risk of death or serious injuries such as fractures, facial and eye injuries or internal injuries, particularly to passengers who are not correctly restrained by seat belts or are not sitting correctly when the airbags deploy. The risk of injury from a deployed airbag is greatest close to the trim panel covering the airbag. The whole sequence of events from sensing the impact to the full inflation of the airbag takes place in a fraction of a second. Do not change, modify or tamper with the steering wheel, passenger side fascia or any other part of the airbag system. Such actions could disable the system or cause inadvertent airbag deployment. The system will not deploy in the event of minor frontal or side impacts, such as contacts when parking. All work on the airbag system must only be carried out by an Aston Martin Dealer.
Child Safety
Aston Martin strongly recommends:
- That all children are sat in the rear passenger seats.
- Always use ISOFIX anchors where available.
- Only one child seat be installed to the passenger side of the vehicle at any time.
- A child, regardless of age, should always be restrained when traveling in a vehicle.
Warning: The seat belt reminder function is only designed to recognize an adult-sized occupant and will not be activated by a child seat. If a child seat is to be secured to the front passenger seat with a seat belt, make sure it is correctly installed in accordance with the manufacturer’s instructions. A child seat that is not correctly restrained can cause an infant or child to be seriously injured or killed in a crash.
Warning: Accident statistics show that children are generally safer when correctly restrained in the rear seat than in the front seat. A suitable child restraint, correctly installed and used, provides the highest degree of protection for infants and small children in most accident situations.
Warning: Do not allow children to travel in a vehicle without being correctly restrained. An appropriate child seat or harness should always be used.
Warning: Each seat belt assembly must be used by only one passenger. It is dangerous to put a seat belt around a child being carried on the passengers lap.
Warning: Make sure that an installed child seat does not rest against the door, that the child sits correctly in the seat and does not lean close to, or against, the door or window.
Your vehicle has the following devices for the installation of child restraints:
- Passenger Airbag Deactivation (PAD). (Refer to ’Passenger Airbag Deactivation’, page 3.20)
- Rear seat ISOFIX anchors with tether anchor points1. (Refer to ’Child Seats – ISOFIX Installation’, page 3.23)
- Front seat ISOFIX anchors with tether anchor point (Optional).
- Passenger seat Automatic Locking Retractor (ALR) seat belts.(Refer to ’Seat Position – Seat Belt Installation’, page 3.38)
Child Seat Belt Fastening
Warning: An infant or child that is not correctly restrained can be seriously injured or killed in a crash. Seat belts are designed for adults; infants and smaller children must be restrained in an approved child safety seat. Make sure that there is no slack in the webbing and that the restraint installs correctly across the child’s rib cage and hips. These are the parts of the body most able to take the force of impact. The lap strap should pass across the top of the child’s thighs, bearing on the pelvis, not on the abdominal area.
Passenger Airbag Deactivation
Warning: Before installing a child seat on the front passenger seat, the front passenger airbag must be set to OFF.
Warning: Before driving always confirm that the PAD switch is in the appropriate position according to your requirements.
Warning: With the exception of installing a child seat on the front passenger seat, never set the PAD switch to OFF. The front passenger will not receive the added protection of the airbag. Serious injuries or even death could occur. The PAD switch does not set the front passenger seat side impact airbags or the seat belt pre-tensioners to OFF.
Setting the Airbag to ON or OFF
The Passenger Airbag Deactivation (PAD) switch allows the user to manually set the front passenger airbag to OFF. When the PAD switch is set to OFF, a child seat can be installed on the front passenger seat. The PAD switch is located on the passenger end of the instrument panel and is accessible when the passenger door is open. Insert the emergency vehicle key into the PAD switch and turn clockwise for the OFF position (airbag off) or counter-clockwise for the ON position (airbag on). Remove the key.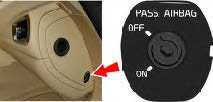
Airbag ON![]()
When the ignition is set to on, make sure that the PASS AIRBAG ON symbol (A) comes on.
Airbag OFF ![]()
When the ignition is set to on, make sure that the PASS AIRBAG OFF symbol (B) comes on.
If the PAD switch is set to OFF when the ignition is set to on, the status symbol will show for approximately 6 seconds before changing to .
At ignition ON if the front passenger airbag is set to OFF, then PASS AIRBAG OFF will show in the message Centre. The PAD switch should be inspected by an Aston Martin Dealer if any of the following conditions occur:
The PAD status symbol does not change from to after six seconds when the ignition is set to ON and the PAD switch is set to OFF.
- The PAD status symbol does not show when the ignition is set to on and the PAD switch set to OFF.

- The PAD status symbol does not show when the ignition is set to on and the PAD switch set to ON.

- No PAD status symbol is shown.
Child Seats and Front Passenger Airbag
Warning: Never place a child in a child’s seat or on a booster cushion on the front passenger seat if the airbag is set to ON.
Warning: With the exception of installing a child seat on the front passenger seat, do not set the PAD switch to OFF, as the front passenger will not receive the added protection of the airbag. Serious injuries or even death could occur.
Read all Instructions for Airbags User Guide
Aston Martin DB11 2021 Warning Labels User Guide
2021 Aston Martin DB11 Warning Labels | Before Driving Guide
Warning Labels
Warning: Extreme Hazard: NEVER use a rearward facing child restraint on a seat protected by an ACTIVE AIRBAG in front of it. DEATH or SERIOUS INJURY to the Child can occur. Warning labels are located on both sides of the passenger sun visor and on the passenger end of the instrument panel.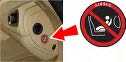
Child Seats – ISOFIX Installation
Coupe – All markets with ISOFIX Front seat.
Always follow the child seat manufacturer’s instructions. Not following the child seat manufacturer’s instructions when installing the child seat is dangerous.
| Mass Group | Size Class | Fixture | ISOFIX Positions | ||||
| As shown on the child safety seat packaging | Front Passenger with Driver’s side Rear ISOFIX Outboard | Passenger’s side Rear Outboard | |||||
| Carry Cot | F | ISO/L1 | X X | X | |||
| G | ISO/L2 | X X | X | ||||
| ‘0’ Up to 10 kg | E | ISO/R1 | IL1 X | IL.2. | |||
| ‘0+’ Up to 13 kg | E | ISO/R1 | IL1. X | IL2. | |||
| D | ISO/R2 | X X | X | ||||
| C | ISO/R3 | X X | X | ||||
| ‘I’ 9 to 18 kg | D | ISO/R2 | X X | X | |||
| C | ISO/R3 | X X | X | ||||
| B | ISO/F2 | IUF1. IUF3 | IUF3. | ||||
| B1 | ISO/F2X | IUF1. IUF3. | IUF3. | ||||
| A | ISO/F3 | IUF1. X | X | ||||
| ‘II’ 15 to 25 kg | X X | X | |||||
| ‘III’ 22 to 36 kg | X X | X |
- Special positioning requirements are needed for the front passenger seat (Refer to ’Front Seats’, page 3.28)
- When a child seat is installed to the rear seat using ISOFIX, you must move the seat directly in front of the child seat to its fully forward and highest position. Move the back of the seat to its fully forward position. The back of the seat must be moved with the seat control switch and not the seat release strap. The front seat should also NOT be occupied. (Refer to ’Rear Passenger Seat Installation’, page 3.32).
- When a child seat is installed to the rear seat using ISOFIX, you must move the seat directly in front of the child seat to its fully forward and lowest position. Move the back of the seat directly in front of the child seat to an upright position.
Volante – All markets with ISOFIX Front seat.
Always follow the child seat manufacturer’s instructions. Not following the child seat manufacturer’s instructions when installing the child seat is dangerous.
| Mass Group | Size Class | Fixture | ISOFIX Positions | ||||
| As shown on the child safety seat packaging | Front Passenger with Driver’s side Rear ISOFIX Outboard | Passenger’s side Rear Outboard | |||||
| Carry Cot | F | ISO/L1 | X X | X | |||
| G | ISO/L2 | X X | X | ||||
| ‘0’ Up to 10 kg | E | ISO/R1 | IL1 X | X | |||
| ‘0+’ Up to 13 kg | E | ISO/R1 | IL1. X | X | |||
| D | ISO/R2 | X X | X | ||||
| C | ISO/R3 | X X | X | ||||
| ‘I’ 9 to 18 kg | D | ISO/R2 | X X | X | |||
| C | ISO/R3 | X X | X | ||||
| B | ISO/F2 | IUF1. X | X | ||||
| B1 | ISO/F2X | IUF1. IUF2 | IUF2. | ||||
| A | ISO/F3 | IUF1. X | X | ||||
| ‘II’ 15 to 25 kg | X X | X | |||||
| ‘III’ 22 to 36 kg | X X | X |
- Special positioning requirements are needed for the front passenger seat (Refer to ’Front Seats’, page 3.28)
- When a child seat is installed to the rear seat using ISOFIX, you must move the seat directly in front of the child seat to its fully forward and lowest position.
- Move the back of the seat directly in front of the child seat to an upright position.
Coupe – All markets without ISOFIX Front seat.
Always follow the child seat manufacturer’s instructions. Not following the child seat manufacturer’s instructions when installing the child seat is dangerous.
Read all Instructions for Warning Labels User Guide
Aston Martin DB11 2021 ISOFIX Anchors User Guide
Seat Setting Guide: 2021 Aston Martin DB11 Seats Installation
ISOFIX Anchors
Warning: An unsecured child seat is dangerous. In a sudden stop or a collision it could move, causing serious injury or death to the child or other passengers. Make sure the child seat is correctly secured in place according to the manufacturer’s instructions.
Warning: When installing the child seat, make sure that there are no seat belts or foreign objects near or around the ISOFIX anchors. If seat belts or a foreign object prevents the child seat from being securely attached to the ISOFIX anchors, the child seat could move in a sudden stop or collision causing serious injury or death to the child or other passengers.
Warning: Make sure that the child seat tether strap is always used when installing a child seat with ISOFIX anchors.
Front Seats (Optional)
The passenger seat is equipped with ISOFIX (International Standards Organization FIX) anchors for the installation of child seats. The anchors (A) are located between the seat base and the seat back.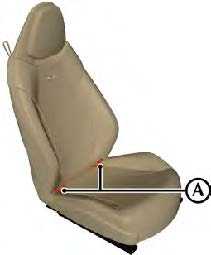
Front Passenger Seat Installation
To install a child seat to the front using ISOFIX, use the procedure that follows:
- The passenger airbag MUST be set to OFF (Refer to ’Passenger Airbag Deactivation’, page 3.20).
- Move the passenger seat to its fully rearward and lowest position. Fully lower the front of the seat cushion.
- Fully recline the back of the seat (the front of the seat will move forward until the seat back is fully reclined).
- Follow the child seat manufacturers instructions and install the child seat into the passenger seat.
- Move the passenger seat backwards. The back of the passenger seat will then rise. Continue to move the seat back until the child seat is supported by the back of the passenger seat.
Rear Seats
This vehicle is equipped with ISOFIX (International Standards Organization FIX) anchors for the installation of child seats on the rear passenger seats. The anchors are located between the seat base and the seat back. The position of the anchors is shown by two tags at the base of each rear seat.
Remove the lower seat back panel (A).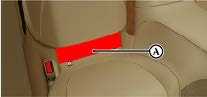
The seat back trim panels are left and right-handed. Secure the child seat using the ISOFIX anchors (B), following the child seat manufacturer’s instructions.
Rear Passenger Seat Installation
When a child seat is installed to the rear seat using ISOFIX, you must move the seat directly in front of the child seat depending on the size seat being installed.
For Size Class E (R1 Fixture) ISOFIX SEATS:
Coupe Only
- Move the base of the seat directly in front of the child seat to its fully forward and lowest position.
- Move the base of the seat to its highest position.
- Adjust the back of the seat to it’s fully forward position.
Read all Instructions for ISOFIX Anchors User Guide
Aston Martin DB11 2021 Child Seat Belt Installation User Guide
Child Seats – Seat Belt Installation
Consult with local manufacturers of forward-facing restraints and booster cushions. These manufacturers can supply you with advice on the safety of their particular child restraints and also advice on installation instructions.
| ‘0’ | Up to 10 kg | U1 | X |
| ‘0+’ | Up to 13 kg | U1. | X |
| ‘I’ | 9 to 18 kg | U1. | X |
| ‘II’ | 15 to 25 kg | U1. | X |
| ‘III’ | 22 to 36 kg | U1. | X |
Table Key
U: Suitable for ‘universal’ category restraints approved for this mass group.
UF: Suitable for forward-facing ‘universal’ category restraints approved for this mass group.
L: Suitable for particular child restraint systems. These restraints may be of the ‘specific vehicle’, ‘restricted’ or ‘semi-universal’ categories.
B: Built-in a restraint approved for this mass group.
X: Seat position not suitable for children in the mass group.
Unsuitable for use with many child restraints due to limited space. Supplied under ECE Regulation 16.
Seat Position – Seat Belt Installation
Warning: Always follow the child seat manufacturer’s instructions for correct installation. Not following the child seat manufacturer’s instructions when installing the child seat is dangerous.
Warning: Seat belt-installed child restraints are designed to be secured by the lap belt and shoulder portion of the safety belt. Children could be endangered in a crash if their child restraints are not properly secured in the vehicle. The Automatic Locking Retractor (ALR) system is designed to securely hold child seats. The ALR system temporarily locks a seat belt that is securing a child seat.
ALR Operation
Gently pull out the seat belt until fully extended. The ALR system will only engage at the maximum extension point of the seat belt. Thread the belt tongue through the child seat as per the child seat manufacturer’s instructions. Engage the tongue into the belt buckle. Adjust the tongue position on the belt to make sure that the lower belt run is tight and then allow the upper run of the seat belt to fully retract until the child seat is securely held. The ALR system will be heard ‘clicking’ as the seat belt retracts. When fully retracted, pull down on the upper run of the belt to check that the ALR lock has engaged. When parked on an incline, the seat belt may lock as it is withdrawn. This is not a fault. If the mechanism locks, release the seat belt tension and then pull the seat belt very gently to avoid the operation of the inertia lock. The ALR system will disengage when the seat belt is fully retracted. The seat belt may then be worn when required as a normal seat belt. Once the ALR is disengaged, the seat belt must be fully extended to re-engage the system on the next occasion that a child seat is installed.
Front Passenger Seat Installation
To install a child seat to the front seat using the seat belt, use the procedure that follows:
- The passenger airbag MUST be set to OFF (Refer to ’Passenger Airbag Deactivation’, page 3.20).
- Move the passenger seat to its fully rearward and highest position. Lower the front of the seat cushion to its lowest position.
- Recline the back of the seat as necessary.
- Follow the child seat manufacturer’s instructions and install the child seat into the passenger seat.
- Raise the seat back until the child seat is supported by the back of the passenger seat.
Rear Passenger Seat Installation
Aston Martin does not recommend a child seat is installed to the rear seats of this vehicle with a seat belt.
Door Pockets
Both front doors have door pockets. Do not use the door pocket to store items that could easily fall out when the door is opened, such as mobile phones or wallets.
Front Trinket Tray
(Not Russian Vehicles)
There is a small trinket tray below the center console for small item storage. Do not store any items in the trinket tray that may cover the hazard warning switch.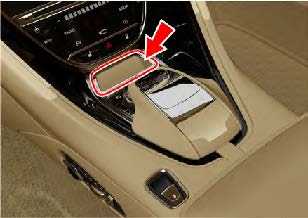
Powered Storage Box
Pull the storage box switch (A) back to move the armrest back from position 0 (closed) to position 1 (cup holders) or position 2 (storage tray)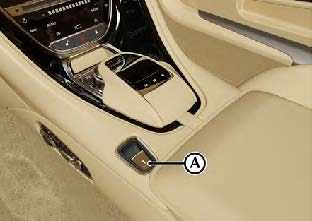
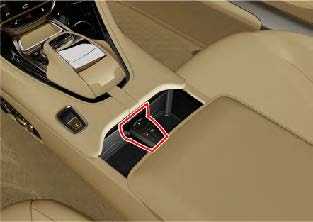
Position 1 (Cup Holders)
Position 1 for the powered storage box gives access to a storage tray with two cup holders. Press to open and close the cup holders. This position also gives access to an emergency ignition switch (Refer to ’Emergency Engine Start’, page 2.12).
Warning: Only use the cup holder when safe to do so.
Warning: Do not place hot drinks in the cup holder while the vehicle is in motion. There is a risk of scalding if spilled.
Warning: Use soft cups only. Hard cups or objects can cause personal injury in a collision.
Caution: Do not put open-top drinks containers in the cup holders. There is a risk of spillage under heavy braking or steering which can damage electrical components.
Read all Instructions for Child Seat Belt Installation User Guide
Aston Martin DB11 2021 Instrument Display User Guide
Instrument Display
Information and Warnings
The left instrument display is used to provide warnings and important information for the running of the vehicle.
- ELECTRIC PARK BRAKE (EPB) MALFUNCTION:

This symbol shows if there is a fault with the electronic park brake. A warning message will also show in the right instrument cluster window. Contact your Aston Martin Dealer as soon as possible. - EPB:
This symbol shows when the electric park brake is applied and goes off when the electric park brake is fully released - LAMP FAILURE:

Shows when a lamp has failed. Have the system checked by an Aston Martin Dealer. - SEAT BELT REMINDER:

Warning: Do not drive the vehicle if the seat belt warning symbol stays ON. Have the system checked by an Aston Martin Dealer.
This warning symbol will come on and a chime will sound for six seconds if the driver’s seat belt is not fastened when the ignition is set to on. The chime will continue to operate at different vehicle speeds until the seat belt is fastened1. - OCCUPANT RESTRAINT CONTROL (ORC)WARNING LIGHT:

Warning: Do not drive the vehicle if the ORC warning symbol stays ON. Have the system checked by an Aston Martin Dealer. At Ignition position I or II this symbol will briefly come on to do a systems test and then turn off. If it does not come on, or if it comes on and stays on, or if it comes on whilst driving, the restraint system has detected a fault. - ELECTRIC POWER ASSISTED STEERING (EPAS):

Warning: Do not drive the vehicle if the EPAS warning symbol stays ON. Have the system checked by an Aston Martin Dealer.
This symbol shows there is a fault with the EPAS system. Consult your Aston Martin Dealer as soon as possible. - MALFUNCTION INDICATION LAMP:

Steady amber shows a fault in the engine management system. Continue driving only if there are no audible, visible or physical signs of degraded engine performance. Consult your Aston Martin Dealer as soon as possible. Flashing amber shows a major fault in the engine management system. Stop immediately. Contact your Aston Martin Dealer. - GASOLINE PARTICULATE FILTER (GPF) FAULT :

(V8 Engine Only) Shows when there’s a fault with the GPF (Refer to ’Gasoline Particulate Filter (GPF)’, page 5.30) - TYRE PRESSURE:
If this symbol stays on or comes on while driving, a tire or tires’ air pressure is below specification[10] ELECTRONIC STABILITY PROGRAM (ESP) :
When ESP is on this symbol will flash when the ESP is operating. If, while ESP is on, the ESP symbol stays on or it comes on whilst driving, the ESP system has detected a fault. A ESP fault message will show in the message center. Consult your Aston Martin Dealer as soon as possible - ABS:
Warning: If the ABS warning symbol stays ON, do not drive the vehicle. Have the system checked by an Aston Martin Dealer?
At Ignition position I or II this symbol will briefly come on to do a systems test and then turn off. If this symbol stays on or comes on while driving there is a fault in the ABS control circuits. - Continue driving only if there are no audible, visible or physical signs of degraded brake performance. Consult your Aston Martin Dealer as soon as possible if this symbol stays on.
- BRAKE WARNING :
If either symbol stays on, there may be a fault with the braking system (Refer to ’Brake Warnings’, page 5.19).
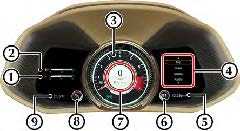
- ENGINE COOLANT TEMPERATURE GAUGE: Shows the engine coolant temperature.
- FUEL GAUGE: Shows how much fuel is left in the fuel tank (Refer to ’Fuel Level Warnings’, page 12.53).
- TACHOMETER: Shows the engine speed in revolutions per minute x 1000. Changes to speedometer when cruise control is set.
- INSTRUMENT CLUSTER MENU: Shows an auxiliary screen for a number of vehicle functions (Refer to ’Instrument Cluster Menu’, page 4.11). Warning messages will also appear in the right side of the instrument cluster.
- CLOCK: Shows the time.
- DRIVE MODE SETTING: Shows which drive mode the vehicle in (Refer to ’Drive Modes’, page 5.11).
- COMBINED SPEEDOMETER AND GEAR INDICATOR: Central gauge that displays vehicle speed and the current selected gear.
- ADAPTIVE DAMPING SYSTEM (ADS) SETTING:
Shows which ADS mode the vehicle is in (Refer to ’Adaptive Damping’, page 5.17). - OUTSIDE TEMPERATURE: Shows the outside temperature.
Centre Stack Controls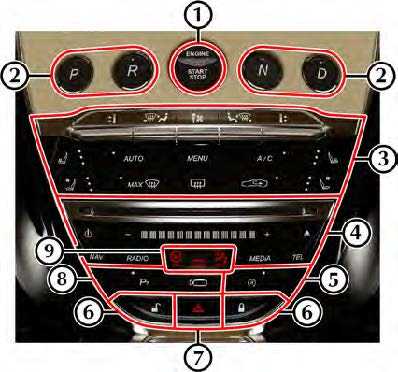
- ENGINE START/STOP:
Press to start or stop the engine. - TRANSMISSION CONTROL BUTTONS:
P (Park), R (Reverse), N (Neutral) and D (Drive) controls. - HEATING AND COOLING CONTROLS:
Controls to operate the heating and ventilation controls (Refer to ’Centre Stack Climate Controls’, page 6.2). - INFOTAINMENT CONTROLS:
Press to operate media controls (Refer to ’Multimedia Controls’, page 8.4), hands-free phone system (Refer to ’Hands-Free Controls’, page 7.2) and satellite navigation (Refer to ’Navigation Controls’, page 9.3). - STOP/START FUNCTION:
Press to turn stop/start function on or off (Refer to ’Stop/Start’, page 5.29). - MASTER LOCK SWITCHES: Press to lock or unlock the vehicle (Refer to ’Interior Lock Switches’, page 2.7).
- HAZARD WARNING SWITCH:
Press to set the hazard warning lamps to ON or OFF. - PARK ASSIST FUNCTIONS:
Press to activate the park distance control sensors or the vehicle camera system (Refer to ’Park Assist Systems’, page 5.31). - PASSENGER AIRBAG STATUS (MARKET DEPENDENT): Indicator to show if the passenger airbag is active or not. Audible Centre Stack Feedback To turn the audible feedback for the center stack ON or OFF, press and hold it anywhere on the volume slider. A tone will be given to confirm the change.
Read all Instructions for Instrument Display User Guide
Aston Martin DB11 2021 Steering Wheel Controls User Guide
Steering Wheel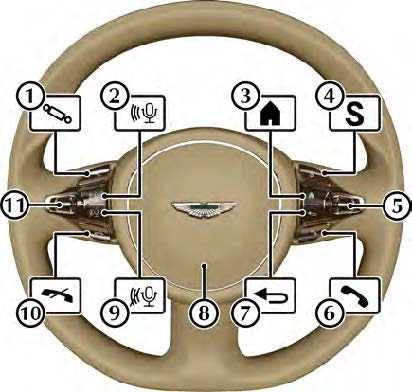
- ADAPTIVE DAMPING:

Press to cycle adaptive damping modes (Refer to ’Adaptive Damping’, page 5.17). - START VOICE CONTROL:

Press to start voice control (Refer to ’Voice Control’, page 4.14). - MENU HOME:

Press to open the instrument cluster menu (Refer to ’Instrument Cluster Menu’, page 4.11). - DRIVE MODE:

Press to cycle between drive modes (Refer to ’Drive Modes’, page 5.11). - MENU SCROLL:
Roll the menu scroll wheel up or down to navigate the instrument cluster menu. Press the scroll wheel button to select an item in the menu (referred to in this handbook as OK). - CALL:

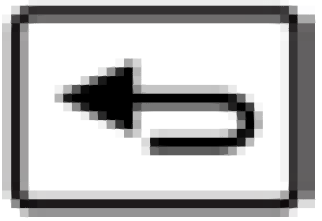
Press to answer an incoming call (Refer to ’Calls’, page 7.5). - MENU BACK:
Press to go back to one level in the instrument cluster menu. - HORN:

Push to sound the vehicle horn. - END VOICE CONTROL:

End voice control. - END CALL:

Press to end a call or reject an incoming call. - VOLUME DIAL: Roll the volume scroll wheel up or down to increase or decrease the volume for the audio system, or volume during a phone call. Press the scroll wheel button to set the sound to ON or OFF. Setting the sound off will also pause media where applicable. Press and hold the scroll wheel button during traffic announcements to set traffic announcements to off. Navigation announcements will still be heard if the sound (audio or call) is set to off. Press and hold the volume scroll button during a navigation announcement to mute navigation prompts.
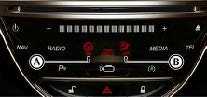
Instrument Cluster Menu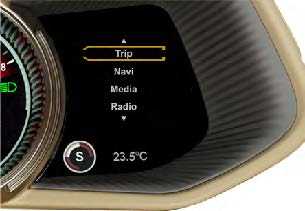
The instrument cluster includes a secondary infotainment system menu. This menu includes settings for the instrument cluster such as trip computer and units as well as audio and navigation overview screens. The instrument cluster menu options are:
- Trip
- Navi
- Radio
- Media
- Telephone
- Service
- Settings
Use the button ![]() to open the menu home screen. Scroll through the available options with the menu scroll wheel and select an item by pressing the scroll wheel button (referred to in this handbook as the OK button). Press the to go back to the menu level.
to open the menu home screen. Scroll through the available options with the menu scroll wheel and select an item by pressing the scroll wheel button (referred to in this handbook as the OK button). Press the to go back to the menu level.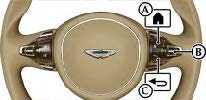
Trip
The trip menu will show journey information about the vehicle. From the trip menu select:
- From Start:
Distance traveled, journey time, average fuel consumption, and average speed are shown from when the ignition was turned ON. - From Reset:
Distance traveled, journey time, average fuel consumption, and average speed are shown from when the trip menu was last reset. - Odometer:
Distance since last trip menu reset and total vehicle distance are shown. - Range/Consumption:
Range till empty and fuel consumption are shown.
Trip Menu Reset
Press OK when the trip menu shows the From Start, From Reset, or Odometer1 to open the Reset window. Press OK to confirm reset.
Navigation
Shows the next turn if a route has been set. If no route has been set, show the direction of travel.
Radio
Shows the selected radio station. Scroll or press OK to open the radio station list. Use the scroll wheel to select a station and press OK to confirm.
Media
Shows the selected media track.
Change Track
Press to open the media tracklist. Use the scroll wheel to select a track.
Change Media Source
Press OK to open the media sources list. Use the scroll wheel to select a media source.
Telephone
A mobile device must be paired to the infotainment before this function can be used (Refer to ’Pairing a Device’, page 7.3). Shows current network provider. Scroll or press OK to open the contact list. Press OK or ![]() to begin a call.
to begin a call.
Read all Instructions for Steering Wheel Controls User Guide
Aston Martin DB11 2021 Driving Techniques User Guide
2021 Aston Martin DB11 Driving Techniques | Engine Start Guide
Driving Techniques
Procedures for driving this vehicle may be unfamiliar to many new owners. To make sure that you have a safe and enjoyable entry into this new phase of Aston Martin motoring, please take time to safely acquire the necessary new driving skills. Practice in safe, lower-speed conditions before investigating the high-performance potential of the vehicle. Driving behavior, such as avoiding aggressive driving, traveling at lower speeds, correctly inflating tires, reducing periods of idling, and not carrying excess weight, will improve fuel consumption and reduce CO2 emissions.
Performance Driving Courses
Performance driving courses are available to enable you to fully understand the control functions of your vehicle and also the basic principles of performance driving. Contact your Aston Martin Dealer for further information.
Running-In
This vehicle is fully hot tested during manufacture and no special running-in procedures are necessary. Nevertheless, it is recommended to limit engine loads (e.g. by accelerating gently and by using lower gears on steep hills or when negotiating tight turns) during the first 1500 km/900 miles.
Track Days
Before using this vehicle on track days contact your Aston Martin Dealer for vehicle setup, service parts, and recommendations.
Wet Conditions
When driving in wet conditions, water can build up under your tires so that they ride on a layer of water. This is called aquaplaning or hydroplaning. When this happens, you have little or no control. Aquaplaning is more prone to happen at higher road speeds if there is a lot of water on the road and particularly if the tires are also underinflated or approaching minimum tread depth.
It is important to take bends or curves at a safe, reasonable speed, particularly when driving on wet or slippery road surfaces.
Slow down when it is raining.
Driving Through Deep Water
If in any doubt whether to drive through deep water, always take the side of caution to avoid potentially costly damage to the vehicle’s engine or other essential systems.
Caution:
Never drive in water deeper than the lower edge of the front bumper. Water can be splashed up into the engine air intakes located in the front upper grille and cause extensive damage to the engine or the vehicle may stall. Always proceed with extreme caution, especially when the depth is not known.
When driving through water, traction or brake capability may be limited. Once through the water, always dry the brakes by driving slowly while applying light pressure on the brake pedal. Waves caused by other vehicles or natural causes can also splash water in the engine air intakes
Tire Skip At Low Speed
In certain conditions, the front tires may ‘skip’ at low speeds with summer tires installed when a high level of steering lock is applied. This is a characteristic of the vehicle and does not affect its safety or performance of the vehicle.
How To Start The Engine
Warning:
The engine can be started by any person in the vehicle if the brake pedal is pressed down. Care should be taken that the vehicle is not left unattended with the key present and occupants such as young children inside.
Caution:
In extremely low temperatures (-20°C and below) do not run the engine above 4000 rpm, while at standstill or when moving off, until the coolant temperature gauge reaches normal operating temperature. If you do, there is a risk of damage to the engine and transmission.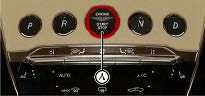
Caution: Make sure the park brake is applied and the transmission is in PARK (P). This will prevent the vehicle from moving once the engine is started. To start the engine, fully press the brake pedal down and press START/STOP (A). The button bezel will flash red once and the steering lock will release. Once the engine begins to crank, release START/STOP.
Stopping The Engine
Press START/STOP to stop the engine.
Quiet Start
Push and hold START/STOP for 3 seconds to use the Quiet Start feature. The button bezel will flash red twice to confirm. In Quiet Start, the volume of the exhaust note is reduced on engine start.
Transmission Controls
The automatic transmission has two main driver modes:
- Automatic Mode:
Transmission is controlled automatically without driver input. - Techtronic Mode:
Gear changes can be controlled with the gearshift paddles behind the steering wheel.
Automatic Mode
In Automatic mode, gearshifts are made using the Park, Reverse, Neutral and Drive (PRND) buttons mounted on the center stack. While driving forward, gearshifts are made automatically according to various driving parameters, i.e. road speed, current selected gear and accelerator demands. When the vehicle is stationary, the transmission will select first gear, ready to move off immediately when the accelerator is pressed.
While in Automatic mode, move to Techtronic mode at any time by pulling back on either the upshift or downshift paddles, mounted behind the steering wheel. As a paddle is pulled back a gearshift will occur, which will be an upshift or downshift according to which paddle is pulled.
Read all instructions for Driving Techniques User Guide
Aston Martin DB11 2021 Cruise Control User Guide
Cruise Control with Speed Limiter
Warning: Only use cruise control or the variable speed limiter if road and traffic conditions are appropriate for maintaining a steady speed for a prolonged period. If you do not, this may cause an accident or collision resulting in death or serious injury.
Warning: Both cruise control and the variable speed limiter are aids and cannot take into account road, weather or traffic conditions. You are responsible for vehicle speed, braking in good time, controlling the distance to any vehicle(s) in front and for staying in the correct lane.
The cruise control system should not be used when:
- Road and traffic conditions do not allow you to maintain a constant speed, e.g. in heavy traffic or on winding roads.
- Driving on smooth or slippery roads. Braking or accelerating can cause the drive wheels to lose traction and the vehicle could then skid.
- Visibility is poor, such as fog, heavy rain or snow.
Selecting Cruise Control or Speed Limiter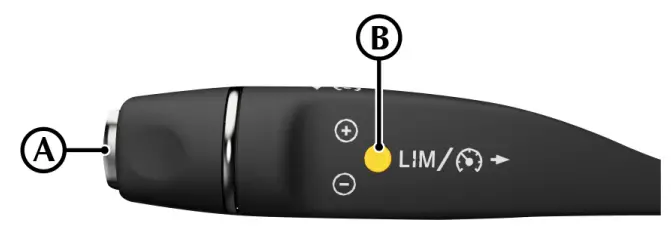
Press the selector button (A) to switch between the cruise control and variable speed limiter function. If the LIM indicator light (B) is set to ON, the variable speed limiter is active.
Operation
Cruise control can be used to maintain a selected vehicle speed without having to use the accelerator. The variable speed limiter brakes automatically so that you do not exceed the set speed. This feature is an aid only and cannot take into account road, weather or traffic conditions. You are responsible for vehicle speed, as well as braking in good time, the distance to any vehicle(s) in front and for staying in the lane. Both cruise control and variable speed limiter only operate at speeds above 30 km/h.
When cruise control or variable speed limiter is active, the tachometer in the instrument cluster changes to vehicle speed.
Setting A Speed
Lightly push the cruise control lever up to increase speed, or down to decrease speed in 1 km/h (1 mph) increments. A hard press in either direction will increase in 10 km/h (5mph) increments. Pushing the cruise control lever in either direction will set a new vehicle speed in the cruise control or new vehicle speed limit. Cruise control will automatically disengage when the brake pedal is pressed or when the vehicle speed falls below 30 km/h (18 mph). The variable speed limiter is not deactivated when the brake pedal is pressed.
Resuming the Set Speed
Warning: Set speed should only be resumed if the driver is aware of the set speed and intends to return to it. Cruise control will not resume at speeds below 30 km/h. Pull the cruise lever towards you to resume the set cruise control speed or speed limit. If the vehicle is accelerated above the set speed, then the set cruise speed will be resumed when the accelerator pedal is released. If the cruise control is deactivated, or the brake pedal is pressed, the cruise control will disengage but the set speed memory will be kept. Pull the cruise control lever again and the vehicle will return to the set speed.
Deactivating Cruise Control
Push the cruise control lever away from you to deactivate the cruise control or speed limiter. The cruise control and speed limiter set speeds will also be cleared when the ignition is set to off.
Cruise control will automatically deactivate when:
- The clutch pedal is pressed down for more than 6 seconds (manual transmission).
- The brake pedal is pressed.
- The parking brake is applied.
- Vehicle speed drops below 30 km/h (18 mph).
- Neutral, Park or Reverse gear positions are selected (automatic transmission).
- The traction control system is activated.
- The variable speed limiter system is activated (LIM indicator light is on).
- A fault occurs in the cruise control system. the cruise control system will not operate until the fault is cleared.
Drive Modes
Vehicle driving characteristics, such as gear changes and throttle response, can be changed by selecting different drive modes.
Three drive modes are available. Press the S button (A) to cycle between:
- GT
- Sport
- Sport
The selected mode will be shown in the right instrument cluster window (B).
Drive modes operate independently of Electronic Stability Program (ESP) and Adaptive Damping System (ADS) modes.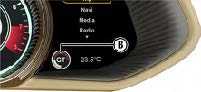
GT Mode
GT mode provides a default comfort setting, best suited to casual and motorway driving.![]()
The transmission is set to use a base transmission calibration when in Drive to suit a touring style of driving. In Techtronic mode, gear shifts take place automatically if engine speed exceeds 6800 rpm. Cylinder Deactivation1(Refer to ’Cylinder Deactivation’, page 5.28) and Stop/Start (Refer to ’Stop/Start’, page 5.29) functions are available to improve fuel economy.
Sport Mode
Sport mode uses a more aggressive transmission calibration, but still with a level of comfort when changing gear.![]()
The transmission now uses a more aggressive calibration when in Drive, yet still comfortable enough to be used for general driving. In Techtronic mode, the transmission will only automatically make a change from 1st into 2nd gear. Throttle response is also increased with a more sporting throttle pedal calibration. The exhaust bypass valves operate at lower engine speed to give a sense of increase driver involvement.
Cylinder Deactivation is disabled in Sport mode, but engine Stop/Start is still available to use. The Stop/Start(Refer to ’Stop/Start’, page 5.29) function is available to improve fuel economy.
Sport+ Mode
Sport+ mode further increases transmission and engine response. The transmission is now set to use an even more![]()
aggressive calibration than used in Sport, with the exhaust bypass valves also revised to open at lower engine loads and speed. Gearshifts are not done automatically from 2nd gear onwards in Techtronic mode, allowing the driver to hold on to individual gears.
Both Cylinder Deactivation1 and engine Stop/Start functions are disabled in Sport+ mode Sport+ mode also adds a transmission temperature gauge (C) to the left instrument cluster window.
Read all instructions for Cruise Control User Guide
Aston Martin DB11 2021 Brakes User Guide
Brake Warnings: 2021 Aston Martin DB11 Anti-Lock Brakes Guide
Brakes
Footbrake
The footbrake uses a vacuum-boosted, dual (diagonal split) circuit hydraulic system with Anti-lock Brake System (ABS).
Warning: In the event of a brake failure, bring the vehicle to a stop as soon as it is safe to do so. Do not continue to drive the vehicle. To do so could result in an accident or collision resulting in death or serious injury.
Warning: Greater care may be necessary after a long drive over salted or gritted roads or if driving in heavy rain, through water or a vehicle wash. Brake action may be delayed and increased braking pressure may be required.
Warning: Aston Martin recommends that the brake fluid is replaced before and after the vehicle is used for high-performance driving such as a track day. Failure to do so may result in greatly reduced brake performance. Contact your Aston Martin Dealer.
If a vacuum boost or a brake circuit fails, the footbrake will still operate, but with greater pedal pressure, increased pedal travel, and longer stopping distances. Contact your Aston Martin Dealer.
(V12 Engine Only)
Vacuum boost is only available with ignition at position II or while the engine is running.
The high-performance brake system used on this vehicle is designed to provide optimal braking under all operating conditions. However, an inherent characteristic of this braking system is some brake noise. Certain combinations of speed, braking forces, and ambient conditions may also cause the brakes to squeal.
Brake Throttle Override
If the throttle and brake pedals are both pressed at the same time for over 3 seconds, the engine will restrict available torque. Normal functionality will return when the throttle pedal is pressed without the brake pedal.
Brake Warnings
Warning: If either brake warning symbol comes ON, you should immediately be prepared for increased stopping distances or partial failure of the braking system.
If the brake warning symbol ![]() comes ON while driving, the brake system has a fault and braking performance may be affected.
comes ON while driving, the brake system has a fault and braking performance may be affected.
If the brake warning symbol ![]() comes ON while driving:
comes ON while driving:
- The brake booster system has a fault and braking performance may be affected.
- The brake fluid level is insufficient.
A message will also show in the instrument cluster window with further information.
Stop as soon as possible in a safe and convenient place. Apply the footbrake and make sure that the parking brake is fully released. If the warning symbol stays ON, do not drive the vehicle. It is essential that the brake system is checked immediately. Contact the nearest Aston Martin Dealer.
ABS Warnings
Warning: If the ABS warning symbol comes ON, you should be aware that wheels could lock during extreme braking or when braking on slippery surfaces.
ABS is monitored for correct operation while the ignition is ON.
If a fault is detected, the ![]() will come ON and the ABS will be either partly or fully OFF. Normal braking will continue to function without ABS.
will come ON and the ABS will be either partly or fully OFF. Normal braking will continue to function without ABS.
In the event of an ABS fault, have the braking and ABS systems checked immediately by an Aston Martin Dealer.
ABS and Electronic Stability Program (ESP) Warnings
Warning: If the ABS and ESP warning symbols come ON, you should be aware that wheels could lock during extreme braking or when braking on slippery surfaces. Steering performance can also function differently and there is an increased risk of skidding and/or accident.
If ![]()
![]() , and
, and ![]() come ON while driving both ABS and ESP have a fault. The brake system will continue to operate but without assistance from either ABS or ESP. Both front and rear wheels may lock under heavy braking which can result in longer braking distances in an emergency stop.
come ON while driving both ABS and ESP have a fault. The brake system will continue to operate but without assistance from either ABS or ESP. Both front and rear wheels may lock under heavy braking which can result in longer braking distances in an emergency stop.
A message will also show in the right instrument cluster window with further information.
Drive on carefully and have the braking and ABS systems checked immediately by an Aston Martin Dealer.
Anti-Lock Braking System
The Anti-lock Braking System (ABS) helps prevent the road wheels from locking and causing the vehicle to skid during emergency braking. This also assists the driver in maintaining steering and directional stability.
If the braking force exceeds type grip in an emergency braking situation, the ABS operates to prevent the wheels locking. A pulsating effect is felt through the brake pedal when this happens. This is a normal effect of the ABS operating.
Two-Stage ABS
The ABS features two levels of calibration that change depending on Electronic Stability Program (ESP) setting (Refer to ’ESP Modes’, page 5.23).
Safety
It is always the driver’s responsibility to drive safely with regard to driving conditions and according to the law. The fact that a vehicle is equipped with ABS must never let the driver be tempted into taking risks which could affect his or her safety or that of other road users.
The addition of ABS cannot overcome the consequences of trying to stop in too short a distance, cornering at too high a speed, or aquaplaning (where the tyres are prevented from contacting the road surface by a layer of water).
The driver should always take road conditions into account. A slippery road surface always requires more braking distance for a given speed, even with ABS. Stopping distances can increase with ABS compared to locked wheels on slushy snow, gravel, sand or certain heavily corrugated or ridged warning sections of road surfaces. If any braking system malfunctions, have the braking and ABS systems checked immediately by your Aston Martin Dealer.
Brake Pad Conditioning
Warning: For track use or high speed driving, new brake pads must be correctly conditioned. Failure to correctly condition the pads may result in greatly reduced brake performance. Contact your Aston Martin Dealer for further information.
When new brake pads are installed the brake discs and pads need to be conditioned. During this time, brake performance will be reduced.
Avoid excessive braking, such as hard stops from high speed and steep descents, for the first few hundred miles or kilometres1 after new brake pads are installed. Park Brake
Park Brake Operation
Warning: If the brake system warning symbol is ON or flashing, do not rely on the park brake to hold the vehicle stationary. Contact your Aston Martin Dealer.
When the vehicle is stationary, push the park brake switch (A) in and release. The warning symbol in the instrument cluster will come on when the park brake is applied. The stop lamps will not come ON
Read all instructions for Brakes User Guide
Aston Martin DB11 Electronic Stability 2021 User Guide
https://autouserguide.com/aston-martin/db11/aston-martin-db11-electronic-stability-2021-user-guide/c
Electronic Stability Program
Warning: It is the driver’s responsibility to drive safely according to the law and with due regard to prevailing conditions.
Warning: Electronic Stability Program (ESP) must never let the driver be tempted into taking risks that could affect his or her safety or that of other road users. ESP cannot overcome the consequences of applying too much engine power for prevailing conditions.
The Electronic Stability Program (ESP) is designed to improve driving safety when the tires are at the limits of their grip capabilities. This is done by control of engine torque and application of the brakes at individual wheels.
Caution: If repair or replacement of the steering or other surrounding equipment is necessary, always refer to your Aston Martin Dealer. There is a sensor in the steering system that detects the steering angle. If the center position of the steering deviates, the ESP may not operate correctly.
Caution: ESP may not operate correctly when using tyre chains.
Caution: Use tires of the same manufacturer, brand, type, tread pattern, and correct size specified in this handbook
(Refer to ’Wheel and Tire Information’, page 12.15)for this vehicle on all four road wheels. Do not mix new and worn tires on the same axle.
ESP Modes
ESP has three modes of operation:
ESP defaults to ON each time the engine is started. The ![]() will flash in the instrument cluster when in operation. ABS is set to stage one. Engine torque and application of the brakes at individual wheels will be controlled by ESP to aid stability.
will flash in the instrument cluster when in operation. ABS is set to stage one. Engine torque and application of the brakes at individual wheels will be controlled by ESP to aid stability.
TRACK MODE:
Warning: TRACK MODE is intended for use on a dry track. Greater driver input will be required to maintain vehicle stability.
Track mode raises the thresholds at which the ESP operates and allows greater wheel slip from the Traction Control System (TCS). Active Yaw Control (AYC) is also modified to allow a higher level of yaw. ABS is set to stage two. When the ESP is set to track, the message ESP TRACK will be shown in the left instrument cluster window.
OFF:
ESP no longer controls engine torque, and both TCS and AYC are disabled. ABS will remain in stage two. ESP OFF will show in the left instrument cluster window when the ESP is set to off.
Two-Stage Anti-lock Braking System (ABS)
The Anti-lock Braking System (ABS) will change its operation depending on ESP mode.
Stage One
When ESP is set to ON, the ABS is tuned to give a level of vehicle performance, control, and stability under braking that will cover everyday driving situations and weather (dry, wet, ice, and snow).
Stage Two
When ESP is set to Track or OFF, the ABS is tuned to allow more experienced drivers to drive closer to the limits of the vehicle’s ability and enjoy its natural balance in a track environment.
When the ABS is set to stage two, the ABS is applied in the following ways:
- The Electronic Brake-force Distribution (EBD) increases the braking force to the rear of the vehicle. This is done by allowing a greater level of slip at the rear axle and a quicker increase in pressure in the rear brakes. Cornering agility will be enhanced when braking, but the driver will experience more vibration through the brake pedal.
- The ABS will allow more slip when the tires are at a higher working temperature, such as when the vehicle is driven on a track. The driver will have more control over brake performance before the ABS is activated.
- Braking performance is given greater priority over stability in areas with different friction surfaces. Increased steering input is required to maintain the direction of travel, but optimum vehicle deceleration is achieved.
- The ABS provides a more aggressive pressure increase for situations where a wheel can become temporarily unloaded, such as in track sections featuring fast, tight corners, strong camber or high-speed crests.
Dynamic Torque Vectoring (DTV)
Dynamic Torque Vectoring (DTV) uses input signals such as speed, acceleration, and steering angle to monitor vehicle behavior during cornering. A small amount of brake pressure will then be applied to the inside rear wheel to reduce understeer. DTV is always active but is more responsive when the ESP is set to either Track or OFF.
Traction Control System (TCS)
The Traction Control System (TCS) is a function of ESP and is used to prevent excessive wheel spin at standing starts, or during acceleration. Wheel spin is usually caused by excessive use of the accelerator pedal, or slippery, loose or bumpy road surfaces.
Warning: It is always the driver’s responsibility to drive safely according to the law and with due regard to prevailing conditions.
Warning: Traction control cannot overcome the consequences of applying too much engine power for conditions, and must never let the driver be tempted into taking risks that could affect their safety or that of other road users. To prevent wheel spin and maintain vehicle stability in such situations, the traction control system will:
- Brake either of the driven wheels when they start to slip.
- Adapt the engine torque to a level corresponding to the traction available on the road surface. These symptoms are normal and will clear as wheel spin is
- eliminated and normal engine power is restored. If cruise control is on it will automatically go OFF when ESP is operating.
If traction control operates when driving on extended icy or slippery surfaces, reduce engine power as necessary until the ESP warning symbol goes OFF.
Read all instructions for Brakes User Guide
Aston Martin DB11 Electronic Stability 2021 User Guide
Electronic Stability Program
Warning: It is the driver’s responsibility to drive safely according to the law and with due regard to prevailing conditions.
Warning: Electronic Stability Program (ESP) must never let the driver be tempted into taking risks that could affect his or her safety or that of other road users. ESP cannot overcome the consequences of applying too much engine power for prevailing conditions.
The Electronic Stability Program (ESP) is designed to improve driving safety when the tires are at the limits of their grip capabilities. This is done by control of engine torque and application of the brakes at individual wheels.
Caution: If repair or replacement of the steering or other surrounding equipment is necessary, always refer to your Aston Martin Dealer. There is a sensor in the steering system that detects the steering angle. If the center position of the steering deviates, the ESP may not operate correctly.
Caution: ESP may not operate correctly when using tyre chains.
Caution: Use tires of the same manufacturer, brand, type, tread pattern, and correct size specified in this handbook
(Refer to ’Wheel and Tire Information’, page 12.15)for this vehicle on all four road wheels. Do not mix new and worn tires on the same axle.
ESP Modes
ESP has three modes of operation:
ESP defaults to ON each time the engine is started. The ![]() will flash in the instrument cluster when in operation. ABS is set to stage one. Engine torque and application of the brakes at individual wheels will be controlled by ESP to aid stability.
will flash in the instrument cluster when in operation. ABS is set to stage one. Engine torque and application of the brakes at individual wheels will be controlled by ESP to aid stability.
TRACK MODE:
Warning: TRACK MODE is intended for use on a dry track. Greater driver input will be required to maintain vehicle stability.
Track mode raises the thresholds at which the ESP operates and allows greater wheel slip from the Traction Control System (TCS). Active Yaw Control (AYC) is also modified to allow a higher level of yaw. ABS is set to stage two. When the ESP is set to track, the message ESP TRACK will be shown in the left instrument cluster window.
OFF:
ESP no longer controls engine torque, and both TCS and AYC are disabled. ABS will remain in stage two. ESP OFF will show in the left instrument cluster window when the ESP is set to off.
Two-Stage Anti-lock Braking System (ABS)
The Anti-lock Braking System (ABS) will change its operation depending on ESP mode.
Stage One
When ESP is set to ON, the ABS is tuned to give a level of vehicle performance, control, and stability under braking that will cover everyday driving situations and weather (dry, wet, ice, and snow).
Stage Two
When ESP is set to Track or OFF, the ABS is tuned to allow more experienced drivers to drive closer to the limits of the vehicle’s ability and enjoy its natural balance in a track environment.
When the ABS is set to stage two, the ABS is applied in the following ways:
- The Electronic Brake-force Distribution (EBD) increases the braking force to the rear of the vehicle. This is done by allowing a greater level of slip at the rear axle and a quicker increase in pressure in the rear brakes. Cornering agility will be enhanced when braking, but the driver will experience more vibration through the brake pedal.
- The ABS will allow more slip when the tires are at a higher working temperature, such as when the vehicle is driven on a track. The driver will have more control over brake performance before the ABS is activated.
- Braking performance is given greater priority over stability in areas with different friction surfaces. Increased steering input is required to maintain the direction of travel, but optimum vehicle deceleration is achieved.
- The ABS provides a more aggressive pressure increase for situations where a wheel can become temporarily unloaded, such as in track sections featuring fast, tight corners, strong camber or high-speed crests.
Dynamic Torque Vectoring (DTV)
Dynamic Torque Vectoring (DTV) uses input signals such as speed, acceleration, and steering angle to monitor vehicle behavior during cornering. A small amount of brake pressure will then be applied to the inside rear wheel to reduce understeer. DTV is always active but is more responsive when the ESP is set to either Track or OFF.
Traction Control System (TCS)
The Traction Control System (TCS) is a function of ESP and is used to prevent excessive wheel spin at standing starts, or during acceleration. Wheel spin is usually caused by excessive use of the accelerator pedal, or slippery, loose or bumpy road surfaces.
Warning: It is always the driver’s responsibility to drive safely according to the law and with due regard to prevailing conditions.
Warning: Traction control cannot overcome the consequences of applying too much engine power for conditions, and must never let the driver be tempted into taking risks that could affect their safety or that of other road users. To prevent wheel spin and maintain vehicle stability in such situations, the traction control system will:
- Brake either of the driven wheels when they start to slip.
- Adapt the engine torque to a level corresponding to the traction available on the road surface. These symptoms are normal and will clear as wheel spin is
- eliminated and normal engine power is restored. If cruise control is on it will automatically go OFF when ESP is operating.
If traction control operates when driving on extended icy or slippery surfaces, reduce engine power as necessary until the ESP warning symbol goes OFF.
Tire Pressure Monitoring System (TPMS)
Warning: Driving on a significantly under-inflated tire causes the tire to overheat and can lead to tire failure. Over-inflation and under-inflation also reduce fuel efficiency and tire tread life and may affect the vehicle’s handling and stopping ability.
Warning: The TPMS is not a substitute for correct tire maintenance, and it is the driver’s responsibility to maintain correct tire pressures, even if under-inflation has not reached the level to set the TPMS tire pressure indicator symbol to ON.
A Tyre Pressure Monitoring System (TPMS) is installed as a safety feature. This system will display the tire pressures for each tire and provide warnings if pressure is below a specified pressure for each tire.
Each tire should be checked at least once every two weeks when cold and inflated to the pressure recommended by the vehicle manufacturer (Refer to ’Wheel and Tyre Information’, page 12.15)or on the tire pressure label. If your vehicle has tires of a different size than the size indicated on the tire pressure label, you should determine the proper tire pressure for those tires.
Tyre Pressure Display
The TPMS display is shown in the right window of the instrument cluster. Use the right scroll wheel on the steering wheel to navigate to Service and select Tyre Pressure. Tire pressures will be displayed in the instrument cluster after the vehicle has been driven for a few minutes.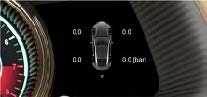
Tyre Pressure Indicator
If an underinflated tyre is detected by the system, the TPMS ![]() symbol is solidly illuminated.
symbol is solidly illuminated.
The message center will also display one of the below messages:
- Please Rectify Tyre Pressures: At least one tyre has too low a pressure. Tyre pressures should be checked and corrected when possible.
- Check Tyre(s): At least one tyre has significantly low pressure. The tyre pressures must be checked and corrected as soon as possible.
- Warning Tyre Defect: At least one tire has lost pressure very suddenly. The vehicle should be stopped as safely as possible and the tires checked.
- Once the message has been acknowledged an image of the vehicle will be displayed in the message center showing which tyre(s) have low or high air pressure and the current tire pressure. When the tire pressure indicator comes ON, stop and check your tires as soon as possible, and inflate or deflate them to the correct pressure.
Read all Instructions for Electronic Stability 2021 User Guide
Aston Martin DB11 2021 Eco Driving Features User Guide
Park Assist Guide: 2021 Aston Martin DB11 Eco Driving Features
Eco Driving Features
Cylinder Deactivation
(V12 Engine Only)
Cylinder deactivation is only available when drive mode is set to GT.
Cylinder deactivation is used to shut off one bank of the engine when it is under a light load. The system will operate at speeds between 30 mph (48 km/h) and 80 mph (130 km/h) from 4th gear and above, so is well suited to motorway driving.
When cylinder deactivation is in operation, the engine switches which bank is disabled to keep the catalysts at the correct operating temperatures. Both banks will then become active immediately during acceleration, with no delay in engine performance.
Stop/Start
The Stop/Start function switches the engine off when the vehicle comes to a stop to reduce fuel consumption and emissions.
Setting On or Off
Stop/Start is not available when drive mode is set to Sport+.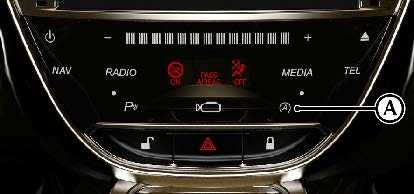
Stop/Start is controlled by the START/STOP button (A) on the centre stack. When the system is active the indicator LED on the button is lit.
Engine Stop Conditions
With Stop/Start active, the engine will switch off when the vehicle is completely stopped, the transmission is in either D (Drive) or N (Neutral) and if the following conditions are met:
- The vehicle battery condition is suitable.
- The bonnet is closed.
- The driver’s door is closed.
- The driver’s seatbelt is fastened.
- The engine is at operating temperate.
- The outside temperature is within a suitable range.
- The vehicle’s climate temperature has reached the set temperature.
- The engine has been on for a minimum of 20 seconds.
If any of the above conditions are not met when the engine attempts a stop/start event, the Stop/Start symbol will be shown in yellow![]() When the engine is switched off, all the remaining vehicle systems will continue to operate (navigation, media, etc). When the engine is switched off due to stop/start, the be shown in the instrument cluster.
When the engine is switched off, all the remaining vehicle systems will continue to operate (navigation, media, etc). When the engine is switched off due to stop/start, the be shown in the instrument cluster. a symbol will Engine Start Conditions
The engine will automatically start again when:
- The engine has been switched off for 3 minutes.
- The engine goes above or below the operating temperature.
- The throttle pedal is pressed.
- The brake pedal is released.
- The steering wheel is turned.
- The STOP/START button has been pressed on the center stack.
- R (Reverse) is selected.
- Sport+ is selected for drive mode (Refer to ’Sport+ Mode’, page 5.13).
- The driver’s seatbelt is unfastened.
- The driver’s door is opened.
- The vehicle begins to roll.
- The battery condition would prevent a restart.
- The vehicle interior has dropped below or increased above the temperature set by the climate control system.
Emergency Stops
If the vehicle detects a level of braking that it determines to be an emergency stop, the stop/start will prevent the engine from switching off.
Gasoline Particulate Filter (GPF)
The GPF system is used to reduce particulate emissions from the exhaust system. Particulates are stored in the exhaust system and are burned off as the filter is filled in an event called regeneration, which happens automatically as the vehicle is driven. If the vehicle is only driven on short journeys or in cold environments where more particulates are generated during cold starts, a warning may be shown in the instrument cluster.
Stage 1 Warning ![]()
![]() Regeneration should be completed in GT mode and without cruise control active.
Regeneration should be completed in GT mode and without cruise control active.
When the stage 1 warning is shown, the vehicle should be driven on a motorway or similar road where a constant and steady speed can be held for several minutes. As the vehicle is driven, the engine calibration is altered to increase the temperature in the exhaust and the filter element until it is high enough to burn the soot. After several minutes of driving, the throttle pedal should be released for a few seconds at a time (or when leaving a motorway junction). This will then enable the soot to be burned from the exhaust system. Repeat this procedure until the warning symbol is no longer shown in the instrument cluster.
If, after a period of driving and doing the above instructions, the warning lamp is still shown, contact your Aston Martin Dealer for assistance.
Stage 2 Warning 
If the stage 2 warning is shown, there is a fault with the GPF system which means the vehicle cannot perform a regeneration. This can be a fault with the GPF electrical or pressure systems, or the filter itself, or that the accumulated particulate mass is too high, and cannot be safely burned. If this warning symbol is shown, contact your Aston Martin Dealer as soon as possible.
Park Assist Systems
Warning: The park assist systems are for aid only. It is the driver’s responsibility to be aware of their surroundings when parking or reversing.
Park Distance Control
Caution: It is always the driver’s responsibility to detect obstacles and estimate the vehicle’s distance from them. Some overhanging objects, barriers, thin obstructions or painted surfaces which could possibly cause damage to the vehicle may not be detected by the system. Always be aware of your surroundings when using the park assist systems.
Caution: Do not clean the sensors with abrasive or sharp objects. This can damage the sensors.
For reliable operation, the sensors in the front and rear bumpers should be kept free from ice, frost, and grime. If a high-pressure spray is used to clean the vehicle, the sensors should only be sprayed briefly and not from a distance of less than 200 mm. The Park Distance Control (PDC) system will give a series of warning tones if objects are detected within the range of the vehicle.
Activation
PDC will activate automatically at ignition on and when D (Drive), R (Reverse) or N (Neutral) is selected. The sensors activated depend on which gear is selected.
(D) Drive Front sensors only.(R) Reverse, (N) Neutral Front and rear sensors.(P) Park Sensors off.
Deactivation
PDC will deactivate when the vehicle speed exceeds 11 mph (18 km/h). The system is reactivated automatically when the vehicle speed is lower.
To manually deactivate PDC press![]() The indicator LED will be set to off to show the system is deactivated.
The indicator LED will be set to off to show the system is deactivated.
Operation
Caution: In heavy rain or similar adverse conditions, the PDC sensors may not always be able to accurately measure distance to close objects. A fully laden vehicle or irregular obstacles may also cause inaccurate measurements. Take extra care in these circumstances. If an obstacle is detected to the front or rear of the vehicle, a series of warning tones will be heard from the front or rear speaker respectively. The frequency of the warning tones increases as the vehicle approaches the obstacle.
The beep becomes a continuous tone when an obstacle is detected at or within approximately 300 mm from the rear or 250 mm from the front of the vehicle.
The LED will flash if a fault is detected in the system and a single three-second tone will be heard (only once per ignition cycle). The system is automatically disabled when a fault is detected.
Read all Instructions for Eco Driving Features User Guide
Aston Martin DB11 2021 Safety Information User Guide
Important Safety Information
Active Park Assist is only an aid. It is the driver’s responsibility to be aware of their surroundings when parking or reversing. Make sure that no persons, animals or objects are in the vehicle’s path.
![]() Active Park Assist is not available if PDC is deactivated or not functioning.
Active Park Assist is not available if PDC is deactivated or not functioning.
Warning: While parking, the vehicle can move into areas of oncoming traffic. This can cause a collision with other road users. Stop the vehicle or cancel the Active Park Assist parking procedure if necessary.
Caution: Parking spaces that are partially occupied may be measured incorrectly. Examples of partially occupied parking spaces can be trailer draw bars, over grown parking spaces or incorrect measurements due to heavy rain or snow. Care should be taken to make sure the space is clear.
Caution: Active Park Assist will not be able to detect objects above the sensor height range when a parking space is measured. These object will not be included when the parking procedure is calculated. Active Park Assist should not be used around objects such as overhanging loads or tail sections of goods vehicles.
![]() Active Park Assist can be canceled at any time by manually controlling the steering wheel.
Active Park Assist can be canceled at any time by manually controlling the steering wheel.
![]() Active Park Assist may also display parking spaces that are not suitable such as prohibited parking zones, driveways or unsuitable road surfaces.
Active Park Assist may also display parking spaces that are not suitable such as prohibited parking zones, driveways or unsuitable road surfaces.
![]() Active Park Assist should only be used for roads that are parallel or at right angles to the direction of travel and on the same road level. The system should not be used for measuring spaces on bends or on raised footpaths.
Active Park Assist should only be used for roads that are parallel or at right angles to the direction of travel and on the same road level. The system should not be used for measuring spaces on bends or on raised footpaths.
Parking Space Detection
Active Park Assist operates at speeds of up to approximately 22 mph (35 km/h). Active Park Assist has activated automatically when driving forwards and independently locates and measures parking spaces on both sides of the vehicle.
At speeds below 18 mph (30 km/h), will show in the instrument cluster. When a parking space has been detected that the vehicle will fit into, a left or right arrow will show which side of the vehicle the space is on.
Active Parking Assist will only detect parking spaces that are
- Parallel to the direction of travel and at least 1.5 m (5 ft) wide and 1 m (3.3ft) longer than your vehicle.
- At right angles to the direction of travel and at least 1 m wider than your vehicle.
parking space if it is at right angles to the vehicle. You must judge if your vehicle will fit in the parking space. The system automatically determines if the parking space is parallel or at right angles to the direction of travel. A parking space is displayed while you are driving past it, until you are approximately 15 m (50 ft) away from it.
Active Park Assist does not assist with parking in right angle space if:
- Two parking spaces are located directly next to each other
- The parking space is directly next to a low obstacle such as a low kerb
- Forward-parking
Active Park Assist will only display parking spaces on the front-passenger side as standard.
Parking spaces on the driver’s side will be displayed if the turn signal on the driver’s side is on. The indicator must remain on, until Active Park Assist is confirmed.
Parking with Active Park Assist
When a parking space has been found and is shown in the instrument cluster, stop the vehicle and select R (Reverse).
- Start Park Assist? will show in the instrument cluster display. Press OK on the scroll wheel to confirm. To cancel press
or continue to drive away from the space. - Release the steering wheel and slowly reverse the vehicle, being ready to brake at all times. Reversing at a speed above 6 mph (10 km/h) will cancel Active Park Assist.
Warning: The vehicle will not automatically brake if an object is detected.
Additional maneuvering may be required in tight parking spaces. If it is necessary for the vehicle to move forward, a message will show in the right message window. Select D (Drive) while the vehicle is stationary. Active Parking Assist will then counter-steer to change the approach angle.
360° Camera System
Caution: The camera system can show a distorted or incorrect view of obstacles or not at all. Obstacles will not be shown under, or in very close proximity to, the front or rear bumpers. Care should also be taken in the blind spots close to the door mirrors, tailgate or transitional areas between cameras in the top-down view.
Caution: Objects that are not at ground level can appear further away than they are. Care should be taken when maneuvering around items such as tow bars and vehicle bumpers.
The 360° camera system uses four cameras (front, rear and both door mirrors) to give a complete view of the vehicle’s immediate surroundings. The system can then be used in a split-screen view to suit different driving scenarios.
Activation
To activate the 360° camera, press the button or select 360° cameras from the Vehicle Settings menu. The camera will show the split screen with either the front or rear view, depending on the transmission selection. The camera system will be disabled when the vehicle speed exceeds 16 km/h (10 mph). At higher speeds the camera display will still be selected, but no image will be shown.
![]() The system will display images again when the vehicle speed drops below 11 km/h (7 mph).
The system will display images again when the vehicle speed drops below 11 km/h (7 mph).
![]() The ignition must be on for the cameras to operate.
The ignition must be on for the cameras to operate.
View Selection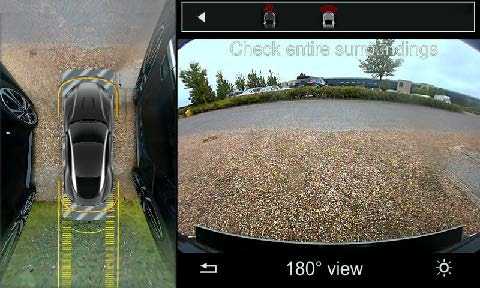
To select the different views, push up on the CONTROL DIAL to the view selection bar.
The split-screen views that can be shown are:
- Top 360° view with rear view
- Top 360° view with top-down rear view
- Top 360° view with a rear corner view
- Top 360° view with a front-corner view
- Top 360° view with top-down front view
- Top 360° view with front view
180° View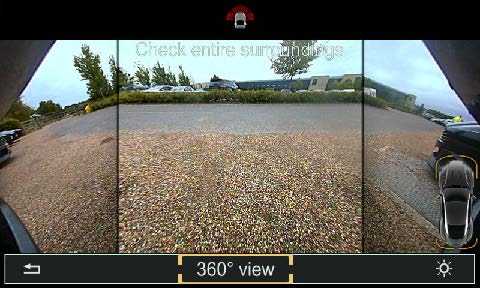
When the camera shows the front or rear view, select 180° view. This will replace the split-screen view and show a much wider angle for the front or rear.
Read all Instructions for Safety Information User Guide
Aston Martin DB11 2021 Climate Control User Guide
2021 Aston Martin DB11 Climate Control | Operating Tips Guide
Climate Control
Centre Stack Climate Controls
- TEMPERATURE:

Press the rocker switch up or down to increase or decrease the temperature. - AIR DISTRIBUTION:
Press the rocker switch up or down to change airflow modes. - AIRFLOW SPEED:

Press the rocker switch up or down to increase or decrease the fan speed. - A/C:

When in manual mode press and release to set the air conditioning ON or OFF. - AIR CIRCULATION:

Warning: Re-circulated air can cause the interior glass to mist up in cold or rainy weather. If demisting is required, use the air conditioning. Controls the source of air entering the vehicle. Press to select re-circulated air (button LED ON). Press and hold for more than two seconds to close the windows. Press again to select outside air as the source (button LED off). Press and hold for more than two seconds and the windows will open to their last position1. Use the re-circulated air position when going through tunnels, driving in congested traffic (high engine exhaust areas) or when maximum cooling is required. Outside air is used as the default air source and should be used for normal conditions and demisting. - HEATED REAR WINDOW:

Press to set the rear window and door mirror heaters ON or OFF. The rear screen heater will automatically set to OFF after 20 minutes and the door mirror heaters set to OFF after 6 minutes. - MENU:

Opens the Climate menu (Refer to ’Climate Menu’, page 6.5). - DEMIST:

Press for maximum defrosts or demist ON or OFF. Outside air intake is automatically selected and air conditioning is automatically started. - AUTO:

Press for automatic climate control (Refer to ’Automatic Climate Control’, page 6.4). - SEAT HEATING/COOLING:
Warning: Do not press the seat heater switch repeatedly. This can cause the seat to become very hot and can cause burn injuries to persons with limited sensitivity to temperature changes.
- Seat Heating (standard):
Press to cycle the seat heating level on the driver or passenger seats. The LEDs show which heating level is set, where the higher the number of LEDs illuminated, the greater the heating level. - Seat Cooling (optional):

Press to cycle the seat cooling level on the driver or passenger seats. The LEDs show which cooling level is set, where the higher the number of LEDs illuminated, the greater the cooling level.
Infotainment Climate Controls
- TEMPERATURE:
Open the temperature list. - AIR DISTRIBUTION MODES: Open the air distribution list.
- AIRFLOW:
Open the airflow speed list. Select a fan speed from 1 to 7 or select AUTO.
- CLIMATE MENU:
Shows the Climate Mode setting and Air Conditioning status. Select to open the Climate Menu (Refer to ’Climate Menu’, page 6.5).
Automatic Climate Control
The temperature is maintained at a set level in automatic mode. The climate system will automatically control the temperature, airflow and air distribution according to the interior and exterior conditions.
To set a temperature for automatic operation:
- Set a temperature.
- Press
- The LED indicator lamp will switch on.
Press and hold ![]() to set the climate control to a default setting of 22°C, low fan speed and vents open. Maximum fan speed will not be available until the engine has reached its normal operating temperature. Any changes to the air distribution or airflow speed will cancel automatic climate control.
to set the climate control to a default setting of 22°C, low fan speed and vents open. Maximum fan speed will not be available until the engine has reached its normal operating temperature. Any changes to the air distribution or airflow speed will cancel automatic climate control.
Manual Climate Control
Manually set the temperature, airflow speed and air distribution:
Warning: Re-circulated air can cause the interior glass to mist up in cold or rainy weather. If demisting is required, use the air conditioning. To prevent cold air from blowing from the vents, airflow speed is reduced until the engine warms up. The climate system will produce the selected temperature regardless of in-vehicle conditions. For an increased cooling effect, press to use re-circulated air.
Climate Menu
The climate control system can also be operated within the infotainment system. Use the CONTROL DIAL or the applicable rocker switch or dial to adjust each function.
Climate Mode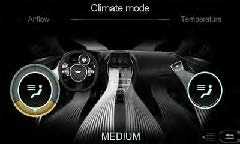
Read all Instructions for Climate Control User Guide
Aston Martin DB11 2021 Phone System User Guide
Phone System
Hands-Free Controls
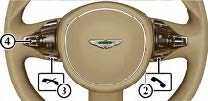
- TEL: Press to access phone menus.

- CALL: Press to answer a phone call.
- END CALL: Press to end a call.
- VOLUME/MUTE: Scroll to increase or decrease call volume. Press to mute.
Device Management
Bluetooth®1 technology is a standard for short-range wireless data transmissions up to approximately 10 metres. Bluetooth can be used to connect your mobile device to the vehicle infotainment system. This system can then be used to operate the hands-free phone system, Bluetooth audio streaming and internet access.
Bluetooth Activation
The vehicle’s Bluetooth system can be turned on or off. Before a device can be paired with the vehicle, the vehicle’s Bluetooth system must be switched to on.
To set the vehicle Bluetooth system on:
- Navigate to VEHICLE on the main menu.
- Select System Settings.
- Select Activate Bluetooth and set to on.
Pairing a Device
Bluetooth must be activated on both the vehicle and the mobile device to be used. Before a device can be used, it must be paired to the infotainment system. To add a new device, select TEL from the main menu and select Connect Device. Select Search for Phones or Search via Telephone.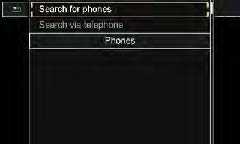
Search for Phones
The mobile device must be set to discoverable mode. Refer to the mobile device manufacturers’ instructions. Select Search for Phones to begin a search for available visible devices. Any devices with a tick next to them have already been paired with the infotainment system. Scroll to the required device and press ENTER. Follow the instructions shown on the device and the infotainment display to pair.
Search via Telephone
Select Search via Telephone to set the infotainment system to ‘listen’ for a device. Follow the device manufacturer’s instructions to search and connect to a new Bluetooth connection in range. Select Aston Martin DB11 from the device list. If the vehicle does not show, check that Bluetooth is active in the infotainment system and search again. Follow the instructions shown on the device and the infotainment display to complete pairing.
Completing Device Pairing
Once the mobile device is paired, it is ready for use with the vehicle audio and hands-free system. The infotainment system will also request access to call history, contact list and messages. After authorization, the infotainment system attempts to connect with the last two devices used automatically. You can authorize up to 15 devices, but only one device can be connected to the multimedia system at a one time.
Selecting a Device
When more than one device has been paired, you can choose which to use for an active connection. To choose a device, select Connect Device. Scroll through the list and select the device to be used. Only one device can be used for an active connection at any one time. The active device is indicated by a dot in the device list. Only one device can be used for an active connection at any one time. The active device is indicated by a dot in the device list.
Device Details
To show device details, select TEL from the main menu and navigate to Connect Device. Scroll through the list and select a device.
Push the CONTROL DIAL right and select Details. The below information will be shown:
- Bluetooth device name
- Bluetooth address
- Availability Status
- Authorization status Deleting a Device
To delete a device, select TEL from the main menu and navigate to Connect Device. Scroll through the list and select the device to be deleted. Push the CONTROL DIAL right and select Deauthorize. A message will show to ask if you really wish to remove this device. Press ENTER to confirm.
Phone Features
Contact Lists
The contact list displays all available contacts for your phone contacts which have a phone number.
To access the contact list press TEL on the center stack or navigate to Telephone to open the phone menu. Select Name to show the list of contact names. Phone contacts will be displayed in alphabetical order.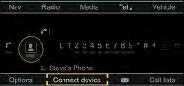
Call lists
Select Call Lists and choose Incoming Calls, Calls Dialed or Speed Dial Preset List.
Make a Call
A call can be made in several ways:
- Choose a contact from the Contacts list.
- Enter a number using the on-screen number pad.
Press on the steering wheel, or press ENTER on the Send icon to begin a call.
End a Call
To end a call, press on the steering wheel or press ENTER on the End Call icon.
Answer a Call
To answer an incoming call, press, or press ENTER.
Reject a Call
To reject a call, press, or select Reject Call and press ENTER.
Second Incoming Call
If there is an incoming call during an active call, press answers the new call and put the original call on hold. To reject the call press , or select Reject Call and press ENTER. Depending on the mobile manufacturer or network supplier, one of the following actions will occur:
Read all Instructions for Phone System User Guide
Aston Martin DB11 2021 Audio Specification User Guide
Aston Martin DB11 2021 DVD Video Media User Guide
Aston Martin DB11 2021 Route and Navigation User Guide
Aston Martin DB11 2021 Settings and Convertible Roof User Guide
Vehicle Settings: 2021 Aston Martin DB11 Convertible Roof Guide
Aston Martin DB11 2021 Roll-Over Protection User Guide
Roll-Over Protection System
Warning: Do not attempt to service or modify the deployable roll-bar system.
Warning: Do not allow any person to sit on the deployable roll-bar covers at any time.
Warning: Do not place any objects on the top of the deployable roll-bar covers.
Warning: Do not attempt to reset the deployable roll-bar system after it has deployed.
Warning: Do not attempt to raise or lower the roof after the deployable roll-bar system has deployed.
Caution: If the roof is raised the deployable roll bars will break through the rear glass.
Caution: Extreme maneuvers may cause the vehicle system to predict a roll-over event and activate the roll-over protection system. If such driving is anticipated by the customer (track day driving, for example) the roof should be fully lowered so the roll bars can be deployed without damaging the vehicle. The roll-over protection system has electronic sensors mounted to the vehicle body that monitors and determine if a roll-over has taken place. If the system senses a rollover, two roll bars mounted under trim panels in the tonal lid, will deploy to protect vehicle occupants. If the roll bars are deployed the door mounted airbags will also be deployed to further protect vehicle occupants.
Warning Labels
Do Not Cover is embossed into the tonal cover above the roll bars.
Wind Deflector
The wind deflector can be used to greatly reduce wind turbulence when the roof is lowered. It is easily installed to mounts in the vehicle and can be left in place with the roof raised or lowered.
Caution: Take care when adjusting the driver or passenger seat position with the wind deflector installed. Make sure that the seats do not come into contact with the wind deflector.
Storage
The wind deflector can easily be folded and stowed away when not used. When the wind deflector is not required, remove it from the vehicle and place it in the storage bag. Place the storage bag in the vehicle luggage compartment.
Installation
To install the wind deflector:
- Remove the wind deflector from the storage bag.
- Unfold the base panels.
Roll-Over Protection User Guide
- Open the main net panel and join the two base panels with the snap connectors.
Caution: Do not try to join the base panels with the snap connector before folding down from their stored position. If you do, you will damage the snap connectors.
- Insert the two locating tabs into the rear seat belt openings. Use the two slide bolts to lock the wind deflector above the rear seats.

When the wind deflector is installed it can used in the raised or lowered position. Grab the top bar of the wind deflector to raise or lower the panel until it clicks into position.
Caution: Do not use the wind deflector to store items. This can cause damage to the wind deflector such as a rip in the net area.
Caution: Do not grab the main net panel. Sharp objects can pierce or otherwise damage the net.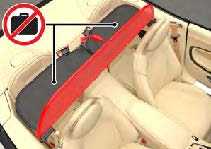
Removal
To remove the wind deflector, do the installation procedure in reverse.
Read all Instructions for Roll-Over Protection User Guide
Aston Martin DB11 2021 Maintenance Checks User Guide
Introduction
Due to the sophistication of the various systems and the specialised equipment required to maintain this vehicle, owner maintenance should be restricted to the routine procedures described in this chapter. If you think that this vehicle is not functioning correctly, please contact an Aston Martin Dealer for the vehicle to be professionally checked.
Parts and Lubricants
Aston Martin recommends that when performing a servicing task, the recommended lubricants (Refer to ’Fluid Specifications’, page 12.11) and parts are used.
Caution: If oils or lubricants are used which do not meet the required fluid specification, vehicle components may experience excessive wear, a build-up of sludge and deposits or cause increased pollution. If it is evident to Aston Martin that use of products other than those which are recommended by the manufacturer has caused damage to the vehicle or engine, Aston Martin may refuse to authorise the repair of such damage under the terms of the manufacturer’s warranty.
Electronic Fuel Injection
Warning: If the fuel system is allowed to run dry, the fuel pump(s) can be permanently damaged.
Warning: Any modifications or additions to the fuel system not specifically designed by Aston Martin are prohibited. If installed, they can cause damage to the fuel system which, in some circumstances, could cause fire. All Service Action and Safety Recall Actions must be undertaken by an Aston Martin Dealer.
The electronic fuel injection system requires specialist equipment and test facilities to set up and maintain so that the vehicle gives maximum performance, coupled with the economy, reliability and safe vehicle emissions. You are, therefore, strongly advised to entrust all service work to an Aston Martin Dealer.
Restraint Systems
Aston Martin recommends that the inflatable restraint systems (airbags) and seat belt components installed to this vehicle are replaced at 10-year intervals from the date of manufacture on the certification label.
Servicing Precautions
To avoid personal injury, the following safety precautions must be observed when the bonnet is open and the engine is operating or the ignition is on.
Warning: Protect yourself against dangerous substances.
Warning: Keep hands, hair, tools, items of clothing and jewellery clear of all drive belts, pulleys and operating mechanisms. The cooling fan may operate even though the engine is not operating.
Warning: Avoid skin contact with all exhaust system and engine components, engine fluids and escaping steam. They may be hot and can cause scalding or burns.
Warning: Any loose objects, such as ties, should be removed before working on a vehicle. Any jewellery should also be removed before working on a vehicle, especially work on the electrical system.
Warning: Catalytic converters convert harmful exhaust gasses into less noxious substances and so reduce environmental pollution. They operate at high temperatures and continue to radiate a considerable amount of heat after the ignition has been set to off.
Warning: Do not breathe exhaust fumes. Exhaust fumes contain carbon monoxide. Carbon monoxide is a dangerous gas, which is colourless and odourless and can cause unconsciousness and may be fatal. Never start or leave the engine running in an enclosed, unventilated area.
Warning: Do not work beneath the vehicle with a vehicle lifting jack as the only support. Place suitable stands under the vehicle.
Warning: Keep children and pets clear of the vehicle. Do not let anyone inside the vehicle unless specifically working to your instructions.
Warning: Keep hands, hair, tools, items of clothing and jewellery clear of all drive belts, pulleys and operating mechanisms. The cooling fan may operate even though the engine is not operating.
Warning: Avoid skin contact with all exhaust system and engine components, engine fluids and escaping steam. They may be hot and can cause scalding or burns.
Warning: Any loose objects, such as ties, should be removed before working on a vehicle. Any jewellery should also be removed before working on a vehicle, especially work on the electrical system.
Warning: Whenever possible, work in the engine compartment with the engine cool, the ignition off and the vehicle battery disconnected.
Warning: Petrol is highly flammable and, in confined spaces, is also explosive and toxic. In the event of spillage, set the engine to off. Do not use a flame or spark near fuel or fuel vapour. Do not smoke near fuel or fuel vapour. Do not inhale fuel vapour or fumes.
Owner Maintenance Checks
In the interests of safety and reliability, it is advisable to carry out the following checks at the intervals suggested (more frequently if your vehicle is heavily used or operating in adverse conditions), and always before starting on a long journey. Refer to the following pages for advice and check procedures.
Before Use Check:
- Operation of lamps, horns, indicators, wipers, washers and warning symbols
- Check there is sufficient fuel for the intended journey, particularly at night and before entering motorways
- Operation of the seat belts
- Operation of the brakes
- Check for fluid deposits underneath the vehicle. Weekly Checks (daily if driving large distances or touring)
- Tyre condition
- Coolant level
- Brake fluid level
- Air conditioning operation
- Windscreen washer fluid level
- Check the operation of windscreen washers.
Read all Instructions for Maintenance Checks User Guide
Aston Martin DB11 2021 Bonnet Release User Guide
Bonnet Release
To open the bonnet press the button (A) located on the end of the instrument panel to release the bonnet latches.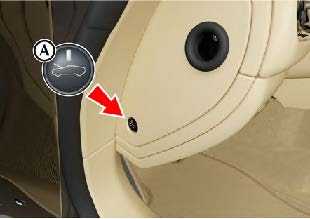
The bonnet release button is always on the driver’s end of the instrument panel and changes with the hand of driver. Lift on the rear edges of the bonnet and pull upward and lift until fully open. The bonnet is then held open by two gas struts. To close the bonnet, lower the bonnet until it starts to fall under its own weight. At that point let the bonnet fall to close. If the bonnet does not shut, open the bonnet again and repeat the closure procedure, this time assist using light hand pressure as the bonnet falls.
Emergency Bonnet Release
In the unlikely event that either the bonnet release switch fails to operate or the vehicle battery is fully discharged, there are two manual release cables (A) located on either side of the instrument panel.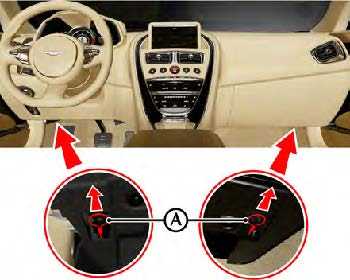
Pull both cables to release the latches for the bonnet.
Fluid Checks and Capacities
Warning:
Engine components may be hot and could cause severe burns.
V12 Engine
- Engine oil filler cap.
- Engine oil dipstick.
- Engine coolant reservoir.
- Brake fluid reservoir 1.
V8 Engine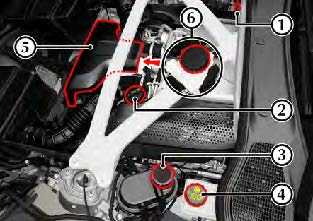
- Engine oil dipstick.
- Engine oil filler cap.
- Engine coolant reservoir.
- Brake fluid reservoir1..
- Forward engine cover
- Charge-cooler coolant reservoir (under [5])2.
Engine Oil Level
Warning: Engine oil or components may be hot and could cause severe burns.
Caution: Running the engine with engine oil below the lower mark or above the upper mark can cause serious engine damage.
Caution: This vehicle’s warranty may be invalidated if the damage is caused by the use of incorrect engine oil. Low-quality or obsolete oils do NOT give the protection required by modern, high-performance engines.
Caution: Failure to use engine oil that meets the required specification can cause excessive engine wear, a build-up of sludge and deposits, and increased pollution. It could also lead to engine failure (Refer to ’Fluid Specifications’, page 12.11).
Engine Oil Level Check:
- The vehicle should be on level ground.
- Check the engine oil level every fourth fuel tank fill or weekly whichever is the sooner.
- Run the engine until it reaches normal operating temperature.
- Turn the engine off and wait 15 minutes to allow the engine oil level to become stable.
- Withdraw and wipe the dipstick clean using a lint-free cloth.
- Fully insert the dipstick into the dipstick tube with the Min. and Max. marking on the blade upwards (facing towards the engine). Withdraw the dipstick again.
- The engine oil level should read between the Min. and Max. marks.
- Put the dipstick back into the dipstick tube.
- If required, remove the engine oil filler cap and top up the engine oil with the recommended engine oil.
- engine: Approximately two liters are required to bring the oil level from Min. to Max.
V8 engine: Approximately one and a half liters are required to bring the oil level from Min. to Max. - Wait for approximately two minutes for the engine oil to settle, then repeat steps 3 to 6 .
- Add engine oil if required. Do not overfill.
- Securely fit the engine oil filler cap.
Engine Oil Level Sensing
Caution: The electronic engine oil level sensing system does not replace the need for the owner to regularly check the engine oil using the dipstick. Check the engine oil level every fourth fuel tank fill or weekly – whichever is the soonest. This vehicle has an electronic engine Oil Level Sensing (OLS) system which records the engine oil level every vehicle starts if the vehicle has been left for 4 or more hours if the vehicle is on level ground, and if it is within a pre-set oil temperature range.
Caution: Running the engine with engine oil below the minimum mark on the dipstick can cause serious engine damage.
The system may not record an oil level if the engine oil temperature is low. For the correct engine oil (Refer to ’Fluid Specifications’, page 12.11).
If the engine oil level is approaching the minimum mark the message OIL LEVEL WARNING CHECK AND TOP UP will show in the message center along with an amber warning triangle and a chime sound. A code will also be stored in the engine management system. The engine oil level is low and should be checked and filled to the required level of engine oil as soon as possible. The message will clear when the oil level is filled with a least 1 liter to the required level and the OLS system has performed a valid check of the oil level.
Engine Coolant Level
Warning: Do not remove the filler cap until the coolant system has cooled. Scalding can be caused by escaping steam or coolant.
Use a cloth or glove to protect hands and protect face and arms adequately.
- Remove the reservoir cap to check the coolant level. The correct coolant level is to the top of the reservoir tank.
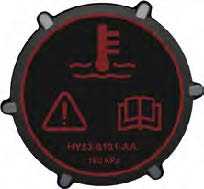
- Make sure that the reservoir cap is secure after topping up.
Caution: Do not over-tighten the reservoir cap. This can cause damage to the reservoir cap or the thread for the reservoir tank.
Read all Instructions for Bonnet Release User Guide
Aston Martin DB11 2021 Washers and Wipers User Guide
Washers and Wipers
Windscreen Wash Fluid
To refill the washer fluid, open the washer fluid reservoir cap (A) and top up as required. In winter, to prevent the windscreen wash fluid freezing, increase the fluid concentration (refer to the manufacturer’s recommendations on the windscreen wash fluid container).
When the level of windscreen wash fluid is low an information message will show in the message centre and the amber warning symbol will come ON.
Local or state regulations may restrict the use of volatile organic compounds (VOCs), which are commonly used as antifreeze agents in windscreen washer fluid. A windscreen washer fluid with limited VOC content should be used only if it provides adequate freeze resistance for all regions and climates in which the vehicle will be operated.
Wiper Blade Replacement
To remove a wiper blade, lift the wiper arm and press at point (B) to release the wiper blade. Slide a new wiper blade on to the wiper arm until it locks into place.
Chassis Systems
Vehicle Body
Two-door coupe with 2+2 seating. Two-door convertible with 2+2 seating.
- Extruded aluminium bonded monologue body structure.
- Curlicue front and Aston Martin Aero Blade rear integrated aerodynamics.
- Deployable spoiler
Steering
Electrically assisted, speed-sensitive rack and pinion power steering. Column adjustment for reach and tilt.
Turns Lock to Lock
2.375 turns.
Turning Circle 11.75 m.
Suspension
Front
Independent double aluminium wishbone incorporating anti-dive geometry. Coil over aluminium monotube dampers and anti-roll bar.
Rear
Multi-link suspension with hollow-cast lower control arms and hot-forged aluminium link arms. Coil over aluminium monotube dampers and anti-roll bar.
Brakes
Foot Brake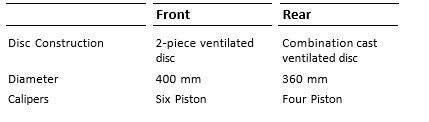
Park Brake
Electrically operated independent park brake callipers on each rear brake disc.
Chassis Features
- Three user selectable adaptive damping settings;
- GT.
- Sport.
- Sport+.
- Anti-Lock Braking System (ABS).
- Hydraulic Brake Assist (HBA).
- Electronic Brake Force Distribution (EBD).
- Three-stage Electronic Stability Program (ESP).
- Dynamic Torque Vectoring (DTV).
Wheels and Tyres
Wheel and Tyre Information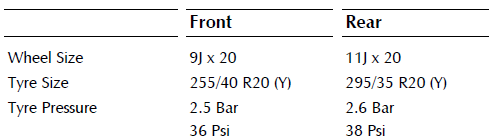
Tyre Loading
Tyres installed in this vehicle shall have a maximum load rating not less than 825 kg (1819 lbs) front and 925 kg (2039 lbs) rear, or a load index of 101 (front) and 105 (rear).
Wheel Bolt Torque
For wheel bolt torque (Refer to ’Wheel Bolt Torque’, page 12.51).
Wheel Alignment
For the most up-to-date wheel alignment values, contact your Aston Martin dealer
Tyres
Tires of the correct type, manufacturer and dimensions, with correct cold inflation pressures are an integral part of every vehicle’s design. Regular maintenance of tyres contributes not only to safety but to the designed function of the vehicle. Road holding, steering and braking are especially vulnerable to incorrectly pressurized, badly installed or worn tyres. Tires of the correct size and type, but made by different manufacturers can have widely varying characteristics.
Read all Instructions for Washers and Wipers User Guide
Aston Martin DB11 2021 Electrical Systems User Guide
Electrical Systems
Fuses
The electrical systems are protected by fuses. If any lamps, accessories, or controls do not function, inspect the applicable fuse.
If a fuse has blown, the inside element will be melted. If the same fuse blows again, avoid using that system and consult your Aston Martin Dealer as soon as possible.
Front Fuses
Engine Primary Fuse Box (A)
V12 Engine
| F1 | 150A | Electronic Power Assisted Steering (EPAS) |
| F2 | 100A | Cooling Fan |
| F3 | 150A | Right Side Engine Fuse Box |
| F4 | 50A | ABS Module |
| F5 | 100A | Left Side Power hold Fuse Box |
| F6 | 100A | Right Side Power hold Fuse Box |
| F7 | 100A | Left side Engine Fuse Box |
| F8 | 100A | Left side Engine Fuse Box |
V8 Engine
| F1 | 150A | Electronic Power Assisted Steering (EPAS) |
| F2 | 100A | Cooling Fan |
| F3 | 150A | Right Side Engine Fuse Box |
| F4 | 50A | ABS Module |
| F5 | 100A | Right Side Engine Fuse Box |
| F6 | 100A | Right Side Power hold Fuse Box |
| F7 | 100A | Right Side Power hold Fuse Box |
| F8 | 100A | Left Side Power hold Fuse Box |
IP Fuse Box (B)
| F1 | 10A | Control Dial Touch Pad
Instrument Cluster Fan |
| F2 | 15A | HVAC Module |
| F3 | 5A | Instrument Cluster |
| F4 | 15A | OBD Socket |
| F5 | 20A | Infotainment Unit |
| F6 | 15A | Steering Column Control Module (SCCM) |
| F7 | 20A | Drive Unit |
| F8 | 5A | – |
| F9 | 7.5A | SCCM |
| F10 | 15A | Common Powertrain Control (CPC) module |
| F11 | 5A | Centre Stack Panel |
| F12 | 5A | CPC module |
| F13 | 7.5A | Central Display |
| F14 | 10A | OBD Socket |
| F15 | 20A | Electronic Steering Lock |
| F16 | 5A | Feedback signal to Body Controller – Front (BCF) |
Right Power hold Fuse Box (C)
V12 Engine
| Right Power hold Fuse Box (C)
V12 Engine |
V8 |
Engine |
|
| F1 – – | F1 | – | – |
| F2 – – | F2 | – | – |
| F3 – – | F3 | – | – |
| F4 – – | F4 | – | – |
| F5 10A HEGO Sensor Bank A | F5 | – | – |
| Catalyst Monitor Bank A | F6 | 20A | Coolant water pump B |
| F6 20A Coolant water pump A | F7 | 20A | Cooling Fan |
| Central Fan Module | F8 | 20A | Coolant water pump A |
| F7 5A Oil Level Sensor | F9 | 25A | Engine Supply |
| Mass Air Flow (MAF) Sensor A Cannister Purge A
Starter Relay Secondary Air Relay A |
||
| F8 | 10A | – |
| F9 | 20A | Fuel Injectors Bank A |
| F10 | 15A | Ignitions Coils Bank A |
| F11 | 10A | Variable Cam Timing (VCT) unit A Compressor Valve A
Secondary Air Injector A Variable Oil Pump Coolant Pump Run On |
| F12 | 15A | Differential Cooling Pump |
| F10 | 25A | Engine Supply |
| F11 | 10A | Purge Valve A
Purge Valve B |
| F12 | 15A | Differential Cooling Pump |
Right Side Engine Fuse Box (D)
V12 Engine
- F1 5A ECM Keep Awake
- F2 15A Right Side Power hold Supply
- F3 5A Right Side Power hold Control
- F4 5A ABS Module
Read all Instructions for Electrical Systems User Guide
Aston Martin DB11 2021 Battery Conditioner User Guide
Battery Conditioner (Optional)
Caution: Do not attempt to start the vehicle with a battery conditioner connected to the main supply.
The Aston Martin battery conditioner is suitable for use on all types of 12-volt AGM and lead acid batteries. If this vehicle is not going to be used for a period of time, and mains power is available, use a battery conditioner to maintain the battery charge level. When connected the battery conditioner will maintain a small trickle charge to keep the battery in a fully charged state. A battery conditioner is designed for conditioning of partially or fully charged batteries. It will not effectively charge a discharged battery.
The battery conditioner uses a magnetic disc to attach to the charger socket (A). To connect the battery conditioner, open the deck lid and attach the charger plug to the charger socket. The deck lid can then be closed and locked with the charger connected. For further safety information and operating instructions, refer to the instructions supplied with the battery conditioner.
Lamps
External Lamps
All external lamps use LEDs and are contained in sealed lamp units. The lamp units are not repairable. If a lamp or lamp unit fails contact your Aston Martin Dealer.
Internal Lamps
All internal lamps are LEDs and are not repairable. If an LED lamp fails contact your Aston Martin Dealer.
Driving Abroad
The headlamps in this vehicle do not require adjustment when driving in countries where vehicles are driven on the opposite side of the road1. The headlamps meet the ECE requirement to operate without conversion.
Vehicle Care
Washing
Warning:
Washing and polishing agents containing silicone should not be applied to glass. This will reduce the efficiency of the windscreen wipers, causing smears which will reduce visibility, particularly during darkness and in the rain.
Caution:
Commercially operated automatic vehicle washes, jet washes and power-operated mops are not recommended. The detergents used can contain certain chemicals which may, over time, be detrimental to some exterior parts of the vehicle. Prolonged usage of automatic vehicle washes and power-operated mops will also cause fine scratches in the paint surface.
Aston Martin are able to supply a range of products to clean and protect your vehicle. Contact you Aston Martin Dealer for further information.
During the winter months, it is advisable to wash the vehicle more frequently, paying particular attention to the underside to combat the detrimental effects of any salt and sand contamination picked up from treated roads. To delay the onset of corrosion developing on the brake components, Aston Martin recommends that after washing this vehicle, the vehicle should be driven a short distance to make sure that all water and cleaning products have dried off.
For best results:
- Do not wash the vehicle in strong sunlight. Let the vehicle cool before washing.
- Do not use household soaps or detergents.
- Do not direct water hoses at full force around the door and boot lid seals.
- Do not use a brush on the car body as this will leave little scratches.
Suggested washing method:
- Fill two buckets with water. Add a mild neutral detergent, as directed by the detergent manufacturer to one of the buckets.
- Use a hose to remove all dust and mud residue from the vehicle. Don’t use a strong jet, as this can rub grit over the paint and scratch it.
- Soak a large clean wash mitt or a soft clean sponge in the soapy water, and begin applying it to the vehicle. Wash the vehicle section by section, starting at the top. Circle around the car several times, washing lower areas with each round. Rinse the dirt out of the wash mitt or soft sponge in the bucket with plain water frequently.
- After one section is washed, rinse it with the hose before moving on, don’t let the soap dry on the paint as this can stain it. Always keep the vehicle wet, this will prevent droplets from drying on the paint and leaving water-spots.
- Dry the car with chamois leather before it air-dries.
Paint Work
Modern water-based paints are much safer and more environmentally friendly than solvent-based paints. Water-based paints are however more susceptible to contamination and marking by corrosive substances. The following list is not exhaustive but does show the most common contaminants which may adversely affect your paintwork:
- Bird droppings,
- Antifreeze,
- Tree sap,
- Oils and greases,
- Insect remains.
Wash such substances from the vehicle using clean warm water with vehicle shampoo at the earliest opportunity, especially in sunny weather which can accelerate contamination.
Other groups of contaminants may be added to this list as the experience of water-based paints and finishes increases.
Satin Paint
(Optional)
The Aston Martin new car warranty covers defects in materials or workmanship of the paintwork. The warranty does NOT cover repairs to your satin or matt paintwork caused by negligence, lack of or improper maintenance such as waxing or polishing the finish, environmental influences, or improper repairs or damage that causes the satin finish to become glossy.
In comparison to conventional paints with a gloss or metallic surface, satin paintwork must be cared for slightly differently. In order to avoid damage to the satin paintwork, make sure that the cleaning and care points below are followed:
- Only use cleaning products recommended by Aston Martin. Abrasive cleaning products will change the satin appearance of the paint and must not be used.
- Do not polish or wax the paintwork. This can lead to glossing of the paintwork.
- Do not wash the car in an automatic car wash. This will avoid particles such as sand and dust, from damaging the painted surface.
- Only use a soft sponge to clean the vehicle. Do not use abrasive cleaning tools.
- Remove insect remains, bird droppings, resins, tar spots, fuels, and oil immediately. Avoid strong rubbing while cleaning the vehicle.
- Any stickers applied to the paintwork will leave a mark when removed.
- Repairs to the paintwork must be completed by an Aston Martin category A or B body shop.
Read all Instructions for Battery Conditioner User Guide
Aston Martin DB11 2021 Powertrain Specifications User Guide
Powertrain Specifications
5.2L V12 Engine
All alloy 48-valve twin-turbocharged V12 engine featuring:
- Independent quad-variable camshaft timing.
- 3 driver selectable powertrain modes.
- Cylinder deactivation.
- Engine stop/start.
- Twin water-to-air charge air coolers. Engine Capacity
5204 cc (317 CID).
89 mm (3.5 inches) Bore.
69.7 mm (2.75 inches) Stroke.
Compression Ratio
9.2:1.
Firing Order
1 – 7 – 5 – 11 – 3 – 9 – 6 – 12 – 2 – 8 – 4 – 10.
Fuel delivery
Multi-point sequential fuel injection.
Idle Speed
650 rpm.
Ignition
‘Coil on Plug’ Ignition System.
Lubrication
Wet sump pressurized system.
Emission Controls
Four oxygen sensors (two per bank) with two catalytic converters (one per bank).
Evaporative lose purge system.
4.0L V8 Engine
All alloy 32-valve twin-turbocharged V8 engine featuring:
- Independent quad-variable camshaft timing.
- 3 driver selectable powertrain modes.
- Engine stop/start.
- Twin water-to-air charge air coolers.
Engine Capacity
3982 cc (242 CID).
83 mm (3.26 inch) Bore. 92 mm (3.62 inches) Stroke. Compression Ratio 10.5:1.
Firing Order
1 – 5 – 4 – 2 – 6 – 3 – 7 – 8.
Fuel delivery
Multi-point sequential fuel injection.
Idle Speed
800 rpm.
Ignition
‘Coil on Plug’ Ignition System.
Lubrication
Wet sump pressurized system
Emission Controls
Four oxygen sensors (two per bank) with four catalytic converters (two per bank).
Evaporative lose purge system.
Transmission
Touchtronic IV Automatic Transmission
Rear-mounted ZF 8HP70 eight-speed automatic gearbox with ‘Shift by Wire’ gear shift and Stop/Start ignition support.
Front-mounted transmission radiator with transmission-mounted heat exchanger and pump.
Driveline
Cast aluminum torque tube with carbon fiber drive shaft.
Final Drive
Limited-slip differential with integrated coolant jacket.
| Gear Ratios | ||
| 1st | 4.714 | |
| 2nd | 3.143 | |
| 3rd | 2.106 | |
| 4th | 1.667 | |
| 5th | 1.285 | |
| 6th | 1.000 | |
| 7th | 0.839 | |
| 8th | 0.667 | |
| Reverse | 3.317 | |
| Final | 2.703 | |
Read all Instructions for Powertrain Specifications User Guide
Aston Martin DB11 2021 Vehicle Lifting User Guide
Vehicle Lifting
Warning: Make sure that no persons are in the vehicle before the vehicle is lifted.
Warning: Make sure that the parking brake is applied and that the vehicle transmission is in P (Park).
Warning: Make sure that the vehicle is parked on firm and level ground to give a secure base for the jack.
Warning: Do not lift the vehicle by placing a jack or other lifting equipment under the suspension arms.
Warning: Do not use a jack or other lifting equipment further inboard on the vehicle than the jacking points are shown.
If this vehicle is to be raised using a vehicle jack make sure that the following jacking points are used.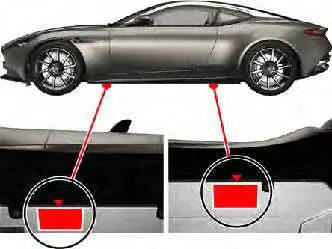
Wheel Bolt Torque
Caution: You must use an applicable plastic-sleeved socket to remove, install, and tighten the wheel bolts. This will help to prevent damage to the surface of the wheel. All-wheel bolts must be tightened in two stages:
- Tighten every second wheel bolt (in the order shown) to 70 Nm (52 l b /f t) until all five bolts are tightened. If a locking wheel bolt is installed, this should be installed last.
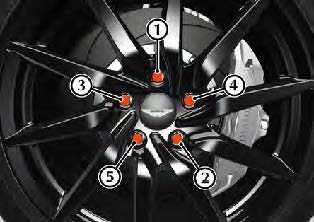
Tighten every second wheel bolt (in the order shown) to 150 Nm (111 l b/f t) until all five bolts are tightened.
Tyre Repair Kit
Warning: Do not use the system to seal a tire that was damaged while driving with insufficient air pressure (e.g. tyre cuts, cracks, bumps or similar damage). Do not use the system to seal tires with sidewall damage. Only punctures in the tread area of tyres may be sealed.
Warning: Do not stand directly beside the tyre while the compressor is pumping. Watch the side wall of the tyre. If there are any cracks, bumps or similar damage set the compressor to OFF. The journey should not be continued. Contact your nearest Aston Martin Dealer.
Warning: If a tyre pressure of 1.8 bar (26 Psi) cannot be reached then the tyre can not be sealed. Do not attempt to re-inflate the tyre. Contact your Aston Martin Dealer.
Warning: If the pressure in the tyre after driving for 3 km is below 1.3 bar (19 Psi) the tyre has not been effectively sealed. The journey should not be continued. Contact your nearest Aston Martin Dealer.
Warning: After a longer period of rest, the tyre pressure should be rechecked.
Caution: The tyre sealant kit only provides temporary mobility. Always refer to local laws and regulations on the use and repair of tires that have been treated with any form of temporary mobility aid. Consult a tyre specialist for advice. Inform the tyre specialist that the tyre contains sealant. Remains of liquid sealant must be handed over to your dealer or disposed of in compliance with local waste disposal regulations. Dispose of empty sealant bottles together with normal household waste.
Operation
Remove the tyre sealant kit from its location in the boot. Follow the instructions detailed on the lid. Read the following instructions and warnings carefully before using the tyre sealant kit. Compliance with these instructions is vital to make sure of vehicle and user safety. Non-compliance with these instructions means risking severe tyre damage and hazardous vehicle behavior which can lead to a road accident involving damage to property or injury to persons.
- Make sure that the vehicle is parked far enough from traffic so that there is no danger from passing vehicles and so that you do not disrupt the traffic. Warn other vehicles using the warning triangle.
- A maximum speed of 80 km/h (50 mph) may not be exceeded at any time after sealing the tyre with the system.• The system provides only a temporary emergency repair for continuing the journey up to 200 km (125 miles) or to the nearest Aston Martin Dealer.
- If the nearest Aston Martin Dealer is over 200 km (125 miles) away, arrange for collection with Aston Martin Assistance.
- The system will effectively seal a tyre that was punctured by an object with a diameter of up to 6 mm. It is possible that a tyre, especially with greater damage, will not be sealed. Do not remove objects that punctured the tyre if they are still lodged in the tyre.
- The sealant bottle needs to be exchanged before it expires. Do not use the system after the expiry date on the sealant bottle or casing has been reached. Contact your nearest Aston Martin Dealer.
- Do not attempt to inflate other objects without using a system adapter and do not inflate objects with a volume greater than 50 liter (air mattresses, rubber boats, etc.). Do not let the system pump air for more than 10 minutes without stopping it and allowing it to cool down.
- Both the hose and the bottle of sealant need to be replaced after using the system. Sealant deposits in a used hose may cause the system to operate incorrectly. New bottles of sealant can be purchased from your Aston Martin Dealer.
Fuel
Fuel Level Warnings
There are two stages of fuel level warning:
- The first fuel level warning changes the fuel symbol on the fuel gauge from white to amber. This means that the vehicle will now be using its reserve fuel level and should be refueled at the nearest fuel station.
- The second fuel level warning will also show a warning symbol in the right instrument cluster window and replaces the Range value. The vehicle is now down to half of its reserve fuel level and should be refueled as soon as possible.
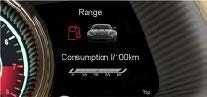
Read all Instructions for Vehicle Lifting User Guide
Aston Martin DB11 2021 Service User Guide
Service
Aston Martin Facilities
A full list of Aston Martin Dealers, Authorized Body Repair Centers and Authorized Service Centers worldwide, can be found at:
www.astonmartin.com Every effort is made to make sure that the information given in the dealer list is accurate and up-to-date. However changes amongst holders of the Aston Martin franchise can occur. Neither Aston Martin nor any listed Importer or Dealer shall in any circumstances be held liable for any inaccuracy, or the consequences thereof. Dealers and Service Centers are also available as a point of interest (POI) in the satellite navigation system.
Aston Martin Franchise Dealers
Dealers all aim to conform to Aston Martin standards of excellence in both sales and service. However, all vehicles sold as Aston Martins are required to meet local legislation requirements. Should service be required in a country other than that in which this vehicle was originally purchased, every effort will be made to meet the owner’s requirements, but the availability of certain parts may be affected by differences in vehicle and component specifications. Aston Martin Dealers are independent traders, they are not the Company’s Agents, and therefore have no authority to bind the Company or to enter into any financial or other commitments on the Company’s behalf. Only Aston Martin Dealers are authorized to carry out warranty work.
Aston Martin Authorized Service Centres
All Aston Martin Approved Service Centers have been assessed and audited to Aston Martin standards. Every effort is made to make sure that the information given in the Aston Martin Authorized Service Centers list is accurate and up-to-date. However changes can occur. Neither Aston Martin nor any Aston Martin Authorised Service Centre shall in any circumstances be held liable for any inaccuracy, or the consequences thereof.
Aston Martin Authorised Body Repairers
A full list of Aston Martin Authorised Body Repairers worldwide can be found at: www.astonmartin.com
All Aston Martin Approved Body Repair centres have been assessed and audited to Aston Martin Body Repair Centre standards in either Category A or B.
Category A
Repairs to the bonded aluminum structure and all paint-related and light structural damage.
Category B
All paint related and light structural damage. Every effort is made to make sure that the information given in the Aston Martin Authorised Body Repairers list is accurate and up-to-date. However changes can occur. Neither Aston Martin nor any Aston Martin Authorised Body Repairer shall in any circumstances be held liable for any inaccuracy, or the consequences thereof.
Vehicle Provenance
Model:
Vehicle Identification Number:
As on the VIN plate
Body Color:
Interior Primary Color:
Interior Secondary Color:
Stitch Color:
Fascia Color:
Jewelry Pack Cooler:
- First Owner
Selling Dealer
Delivery Date - Second Owner
Selling Dealer
Delivery Date - Third Owner
Selling Dealer
Delivery Date - Fourth Owner
Selling Dealer
Delivery Date - Fifth Owner
Selling Dealer
Delivery Date - Sixth Owner
Selling Dealer
Delivery Date
Servicing
Service Periods
Each item in the service schedules must be performed on time as failure to do so may void the new vehicle warranty or other warranties. It is the owner’s responsibility to see that the vehicle is maintained correctly and in accordance with the manufacturer’s service schedules. Vehicle servicing is every 10,000 miles, 16,000 km, or 12 months, whichever occurs first.
Read all Instructions for Service User Guide
Aston Martin DB11 2021 Vehicle Warranties User Guide
Vehicle Warranties
Aston Martin gives a Warranty for each new Aston Martin vehicle and each replacement vehicle or assembly manufactured or supplied by the Company to be free from defects in material and workmanship under normal use and service for the applicable Warranty period. The warranties provided herein are for the benefit of the original purchaser and any subsequent owner during the relevant Warranty Period (defined below) in the Serviced Countries (defined below). An Aston Martin vehicle is built and homologated to support the Region for which it is manufactured and is compliant with the local regulatory requirements of that Region. As a result, the warranties cover Aston Martin vehicles that are built for and supplied to the Region.
For the purposes of this Owner’s Guide, Region means one of the following territories:
- The Americas, including the United States, Canada, and South America; or
- The United Kingdom, Europe, Russia and South Africa; or
- The Middle East, North Africa and India; or
- Asia Pacific, including China, Japan, Taiwan, Hong Kong, Singapore, Australia and New Zealand.
‘Serviced Countries’ means either:
(a) any country in the Region from which your Aston Martin vehicle was purchased, where there is an Aston Martin authorized dealer or repairer; or (b) any country agreed in writing with Aston Martin. Tires are covered separately by the tyre manufacturer. Dealers are expected to offer assistance to the customer in pursuing a claim against the tyre manufacturer.
Exchange Parts Under Warranty
New parts will only be used for repairs at PDI and during the first three months or 5000 km/3000 miles (which ever occurs first) from the date the vehicle is handed over to the first retail customer. Thereafter exchange parts must be used where available under Aston Martin’s exchange plan.
Anti Perforation Corrosion Protection Warranty
The vehicles bodywork is protected by an Anti Perforation Corrosion Warranty. Should any part of the bodywork of the Aston Martin vehicle be perforated, the panel(s) affected by the perforation will be repaired or replaced. The term ‘perforation’ means a hole that penetrates through a body panel from the inside.
Warranty Period
The period of cover for all types of warranty commences on the day the vehicle is handed over to the first registered keeper of the car (first registered keeper shall mean the Dealer in the context of demonstration vehicles). The Vehicle Warranty period of cover is three years with unlimited mileage. The Anti-Perforation Corrosion Warranty period of cover is ten years with unlimited mileage.
Who May Repair the Vehicle
Franchise Holders or Approved Repairers, who are appointed and receive full technical support from Aston Martin, provide facilities for the servicing and repair of Aston Martin motorcars. Only such Franchise Holders or Approved Repairs will under the terms of this warranty, repair replace or readjust, free of charge to the owner, any part or assemble proved to Aston Martin’s satisfaction to show a defect in materials or workmanship within the applicable period.
Wear and Tear Items
Items that are subject to wear and tear are generally divided into two categories, namely those specified for replacement or adjustment during scheduled maintenance and those that require replacement or adjustment dependent upon conditions of use.
Scheduled Maintenance Items
The items listed below are covered by the Vehicle Warranty up to the first scheduled change point that replacement or adjustment is required during scheduled maintenance operations. The customer literature supplied with the new Vehicle includes a service book setting out such scheduled maintenance operations.
- Drive belts
- Spark plugs
- Oil, air, pollen, and fuel filters.
- The period of warranty cover for any item may not exceed the time and distance limitation of the vehicle warranty.
Wear and Tear Items
The items listed below are recognized as having a limited service life or are subject to wear or damage. However, these items are covered by the vehicle warranty for up to one year or the first service, whichever occurs first.
- Wiper blades.
- Wheel alignment and balancing.
- Adjustments, including but not limited to: headlamp and hinged panel adjustments, suspension tightening, steering geometry adjustments, emission and fuel systems checks.
- Vehicle key batteries. Brake pads, brake discs and other friction-related components are not covered when replacement is due to wear and tear, but they are covered against manufacturing defects (whether in material or workmanship) for the duration of the Vehicle Warranty.
Consumables
Replacement or top up of consumable fluids, e.g. oils, antifreeze, brake fluid, windscreen wash solution and refrigerant, will only be covered when they are used as part of a warranty repair.
What is Not Covered
Vehicle Warranty
Aston Martin is not responsible for any repair or replacement that is required as a direct result of:
- Normal wear and tear.
- Friction-related components, e.g. brake pads and brake discs.
- Failure to properly maintain the vehicle in accordance with Aston Martin’s maintenance schedules and service instructions.
- Failure to use Aston Martin specified parts or fluids during a warranty repair (or parts of equivalent quality during a retail repair).
- Damage resulting from neglect, accident, flooding or improper use.
- Any modification of the vehicle or parts which is not authorized by Aston Martin, including any engine performance enhancement modifications.
- Refilling or topping up with incorrect fuel, e.g. diesel instead of petrol.
- Use of bioethanol alternative fuels.
- Use of a fuel not approved or recommended by Aston Martin in the Owner’s Guide is considered misfuelling, and any damage resulting from misfuelling is not covered by the vehicle warranty.
- Defects caused as a result of the vehicle being used in motorsport or track events or for any other purpose other than normal private or commercial use.
- Any vehicle that has had its vehicle identification number altered or removed, or on which the odometer reading has been unlawfully altered.
Read all Instructions for Vehicle Warranties User Guide
Aston Martin DB11 2021 Customer Responsibility User Guide
Customer Responsibility
This handbook describes the proper care and use of the vehicle. Proper maintenance and use guard against major repair expenses resulting from misuse, neglect or inadequate maintenance, and may help increase the value that the customer may receive when selling the vehicle.
The Customer is responsible to:
- Make sure that the vehicle is maintained in accordance with the vehicle service and maintenance guide published in the customer literature.
- Failure to perform maintenance promptly and in accordance with Aston Martin’s specified service intervals will invalidate warranty coverage on the parts affected.
- The customer is required to take the vehicle to a dealer for any warranty repairs as soon as practicable after a defect is detected.
- Make sure that the Service and Maintenance schedule has been stamped by the servicing dealer after the completion of a scheduled service operation.
- Make sure that paint and bodywork is maintained by regular cleaning in accordance with the vehicle manufacturer’s instructions.
- Make sure that the body panels are examined annually by an authorized Aston Martin Dealer and that this inspection is recorded in the Owner’s Handbook.
Warranty Coverage when Touring
Aston Martin has a comprehensive service network in most parts of the world. Any authorised Aston Martin Dealer can carry out repairs under the terms of the vehicle warranty. Under normal circumstances, the customer should not be required to pay for any warranty work performed by an Aston Martin Dealer.
It is the customer’s responsibility to produce the warranty documentation issued with the new vehicle. This establishes the customers right to warranty coverage and the relevant maintenance and service records. If the customer is unable do so, the dealer should seek advice from Aston Martin.
Aston Martin Extended Warranty
Aston Martin Extended Warranty is specifically designed to provide the customer with first class after-sales protection from unexpected repair costs when the vehicle warranty has expired, and the knowledge that your Aston Martin will be repaired by trained technicians using only genuine Aston Martin parts.
Contact your Aston Martin Dealer for more information on the benefits and protection provided by the Aston Martin Extended Warranty.
Consumer Law
The Warranty is a manufacturer’s warranty that supplements and does not affect the Owner’s legal rights under the vehicle purchase agreement or under applicable national legislation governing the sale of consumer goods.
Owner And Vehicle Details
Name:
Address:
Post Code:
Registration Plate No.:
VIN No.:
Engine No.:
Warranty Start Date:
Owner Warranty Transfer (2)
VIN No.:
Odometer:
Date of Purchase:
Name:
Address:
Post Code:
Telephone No.:
Email Address:
Signature:
Date:
Owner Warranty Transfer (1)
VIN No.:
Odometer:
Date of Purchase:
Name:
Address:
Post Code:
Telephone No.:
Email Address:
Signature:
Date:
Owner Warranty Transfer (4)
VIN No.:
Odometer:
Date of Purchase:
Name:
Address:
:
:
Post Code:
Telephone No.:
Email Address:
Signature:
Date:
Read all Instructions for Customer Responsibility User Guide
Aston Martin DB11 2021 Recovery and Alternative Travel User Guide
Aston Martin DB11 2021 Recovery and Alternative Travel User Guide
Recovery
If Aston Martin Emergency Assistance cannot repair your Vehicle at the roadside, the Service Provider will arrange recovery of you and your Vehicle to the nearest Aston Martin Dealer.
If your Vehicle has been involved in an accident or has gone off the road and needs to be salvaged before towing, Aston Martin Emergency Assistance will charge you for services on a ‘Pay for Use’ basis and you may be able to claim these back from your insurance company.
You will be covered for costs of recovery and towing (including any handling fee) but you may be charged for any costs incurred if the Vehicle is, for example, disabled by floods or snow-affected roads, is embedded in sand or mud, or is not easily accessible.
If your Vehicle cannot be repaired and / or recovery is initiated to an Aston Martin Dealer, the Service Provider will provide alternative travel options for you. You will be entitled to receive one of the following additional services:
- An alternative replacement vehicle for up to two working days in your Country, or 14 days if the Breakdown Incident occurs outside your Country (a collection and delivery service, or equivalent, is available from chosen suppliers subject to availability and supplier’s terms and conditions);
- Onward transportation;
- Overnight accommodation.
Vehicle Collection Following Repair
Follwing repairs organised by Aston Martin Emergency Assistance, the cost of a first class rail ticket or (if rail transport would normally exceed six hours) a business class air ticket will be met to permit you or a person you designate to collect the repaired Vehicle. Alternatively, arrangements can be made for your Vehicle to be returned to your home or business address, whichever is the nearest to the repairing Dealer. Alternative addresses closer to the repairing Dealer may also be considered.
Alternative Travel Arrangements
If the Service Provider estimates that the repairs to your Vehicle will take more than eight hours, the Aston Martin Emergency Assistance will cover your reasonable costs for alternative necessary travel, including for members of your party.
Reasonable additional expenses shall be covered for one or a combination of the following:
- Alternative replacement vehicle costs to a maximum of two working days in your Country and up to 14 days outside your Country.
- Airfares (business class ticket).
- Rail fares (first-class ticket).
- Local taxi fares.
- Any other transport equivalent to first-class rail fares.
Replacement Vehicle
If following a Breakdown Incident:
- Your Vehicle is immobilized.
- Roadside repairs are unsuccessful.
- If repair of the Vehicle is not possible within the same day after towing to the Dealer.
Aston Martin Emergency Assistance will organize free of charge, an alternative replacement vehicle for you until the completion of the repairs. The replacement vehicle will include fully comprehensive insurance 1, with an option to upgrade to include a collision damage waiver.
The loan of this alternative replacement vehicle will not exceed two working days (in your Country) or, if the Breakdown Incident occurred outside your Country, 14 days plus two working days after your return to your home country.
Aston Martin Emergency Assistance aim to make sure that the alternative replacement vehicle is a suitable vehicle for you. Specially adapted replacement vehicles will not be provided. The alternative replacement vehicle will be delivered to you, where possible, but if you prefer, taxi costs for collecting the alternative replacement vehicle will be met by Aston Martin Emergency Assistance. You will be responsible for fuelling and basic maintenance of the alternative replacement vehicle, while under your care. You will also be responsible for paying any deposit required by the Vehicle Hire Company.
Once the repair on your Vehicle is complete, the alternative replacement vehicle will then either be returned to the vehicle Hire Company or collection will be arranged where possible, at your request.
If the alternative replacement vehicle has been kept beyond the term of the permitted loan period (as noted above), you will be responsible for any additional charges incurred for the extended period. If you cannot fulfil the nominated vehicle Hire terms and conditions, or circumstances prevent you from qualifying to hire the vehicle, and alternative mobility arrangements are more appropriate, then onward travel arrangements or hotel accommodation will be provided instead. The vehicle hire agreement will be between you and the relevant supplier and will be subject to that supplier’s Terms and Conditions.
These will usually require or include (amongst other things):
- Production of a full driving license valid at the time of issue of the hire vehicle.
- Limits on acceptable endorsements.
- Limitations on the availability and, or engine capacity of the replacement vehicle.
- A deposit, e.g. for fuel.
- Drivers to be aged at least 21 years depending on the Country, and to have held a full driving license for at least 12 months.
Onward or Home Journey
If following a Breakdown Incident that occurs more than 80 km (50 miles) from your place of residence, your Vehicle cannot be repaired at the roadside on the same day of the Breakdown Incident, Aston Martin Emergency Assistance will cover:
- The costs of the journey from the place of the Breakdown Incident to the nearest Dealer.
- The costs of a replacement vehicle as outlined above.
- Where necessary, taxi costs for one journey to the nearest accessible train station or airport, for you and your passenger(s).
- Where necessary, the costs of a first-class train journey for you and your passenger(s). If the train journey exceeds six hours, the cost of a scheduled flight (Business Class) for you and your passenger(s).
Aston Martin Emergency Assistance will reimburse you for reasonable costs incurred relating to the above, upon receipt of a claim letter from you, detailing the circumstances of the claim, along with receipts for all transport costs claimed. All claim letters must be directed to Aston Martin Emergency Assistance at Aston Martin Customer Service, Aston Martin Lagonda Limited, Banbury Road, Gaydon, Warwick, CV35 0DB. Only costs directly connected with the Breakdown Incident will be covered. The refund process for you shall be managed by Aston Martin Emergency Assistance.
Repaired Vehicle Re-delivery
Aston Martin Emergency Assistance will attempt to contact you within 24 hours of successful repair at the Dealer in order to arrange re-delivery of the repaired Vehicle to either your home or place of work, as you request. Alternative addresses closer to the Repairing Dealer may also be considered.
Hotel
If following a Breakdown Incident that occurs more than 80 km/ 50 miles from your place of residence, and your Vehicle cannot be repaired at the roadside on the day of the Breakdown Incident, accommodation costs for you and your passenger(s) shall be covered for the duration of the repair, for up to a maximum of two nights if the Breakdown Incident occurs in your Country, or seven nights if the Breakdown Incident occurs outside your Country. You shall be responsible for any excess costs.
Read all Instructions for Recovery and Alternative Travel User Guide
Aston Martin DB11 2021 What To Do In Emergency User Guide
What To Do In An Emergency
Should assistance be required in the unlikely event of a Breakdown Incident, simply contact Aston Martin Emergency Assistance using the relevant telephone number listed below. It may be helpful to have the relevant telephone numbers entered into your mobile phone ‘phone book’. 00 800 28 86 28 86 1 +44 208 603 9875
When connected, enter the 2-digit number as prompted for your home country. Please do not make your own arrangements as Aston Martin Emergency Assistance will not be able to reimburse you. If you are in a remote location and need assistance, the time taken to receive the assistance may be longer because of distance and local restrictions.
Vehicle Identification and Location
To minimize delay, please have the following information available:
- Your name.
- Aston Martin model.
- The Vehicle Identification Number (VIN). The last six digits from the VIN label in the corner of the windscreen.
- The location of the vehicle.
- Vehicle registration number and color.
- Telephone number where you can be contacted.
- Description of the concern experienced.
European Autoroute Restrictions
If assistance is required on a French Autoroute or on certain Autoroutes in other European countries, you must use the official SOS boxes at the side of the road in order to arrange initial assistance or recovery. You will be connected to the authorised Autoroute Assistance Service because these roads are privatised. Neither Aston Martin Emergency Assistance nor any other assistance organisations are allowed to assist on these roads. Once your Aston Martin has been recovered from the Autoroute, you should contact Aston Martin Emergency Assistance at the earliest opportunity to make sure that any further assistance arrangements you require can be made on your behalf. Aston Martin Emergency Assistance will advise you how to reclaim costs incurred for recovery from the Autoroute.
What is not Covered
Aston Martin Emergency Assistance is thorough and comprehensive; however, claims cannot be met as a result of any of the following:
- Where you, or anyone else acting on your behalf, make repair or service arrangements without authorisation (and a file number) from Aston Martin Emergency Assistance.
- Where any loss, theft, damage, death, bodily injury, cost or expense that is not directly associated with the incident that caused you to claim, unless expressly stated in this policy.
- If the Breakdown Incident is due to fire, theft, accident or vandalism, your costs will not be covered by Aston Martin Emergency Assistance but should be met by third-party insurance covering the incident.
- Damage or injury intentionally caused by you or resulting from your participation in a criminal offence.
- If your vehicle is kept in an un-roadworthy condition or has not been serviced in accordance with the Manufacturer’s recommendations.
- Any costs that would have been payable by you, such as petrol, toll charges, parking fees, cost of meals, drinks, telephone calls and/ or newspapers or any other costs not specifically stated as being covered by Aston Martin Emergency Assistance, which may be incurred by you and/or the other member(s) of your party as a result of and/ or in connection with the Breakdown Incident.
- Release fees: Should your vehicle be stolen and subsequently recovered by the police, you may be asked to pay a release fee before we can remove your Vehicle to an authorised Aston Martin Dealer.
- Specialist charges: In the event that the use of specialist equipment is required to give assistance when your Vehicle has, for example, gone off the road, is in a ditch, is standing on soft ground, sand, shingle, stuck in water or snow or has been immobilised by the removal of its wheels, we will arrange recovery but you will be responsible for the costs of any specialist equipment required. The costs may be refundable under the terms of your motor insurance policy.
- Adverse weather conditions: On those occasions when we experience adverse weather conditions, such as high winds, snow, floods, etc., external resources may be stretched and some operations become physically impossible until the weather improves. At such times, our priority is to make sure that you and your passengers are taken to a place of safety and so the recovery of your Vehicle may not be possible until weather conditions permit.
- Customer-induced breakdown incidents are not covered under Aston Martin Emergency Assistance. However, Aston Martin and the Service Provider will, at their sole discretion, assist you if you request it. However, we are not obligated to provide assistance and you shall be responsible for any charges resulting from any assistance given caused by a customer-induced fault. In such circumstances, a swipe card deposit may be taken by the Service Provider. Assistance in such circumstances will not include additional benefits (replacement vehicle, onward journey, hotel accommodation).
Customer-induced faults may include, for example, the following:- Lock-outs / lost keys
- Broken keys
- Discharged battery
- Running out or loss of fuel
- Use of wrong fuel (no replacement at the location of the breakdown, only towing)
- Tyre damage
- Road traffic accidents.
- Lockout / lost keys: Whilst we will always try to provide assistance by the most practical method, should you be unable to gain entry to your vehicle, modern security systems make it extremely difficult for this to be done should spare keys not be available. If a forced entry is required, you will be asked to sign a declaration stating that you have given permission for this to take place and that any costs for resultant damage will be your sole responsibility.
- Aston Martin Emergency Assistance shall not be required to provide services in the following circumstances:
- In respect of eligible Vehicles situated on private property (for example garage premises) unless you can establish to the reasonable satisfaction of Aston Martin Emergency Assistance that permission has been given by the relevant owner or occupier.
- Vehicle servicing or re-assembly where this is required as a result of neglect or unsuccessful work on the Vehicle other than on the part of the Service Provider or its agents.
- The recovery of any Vehicles bearing trade plates or which Aston Martin Emergency Assistance has reason to believe have just been imported or purchased at auction.
- The transportation of immobilised Vehicles where Aston Martin Emergency Assistance considers this to be part of a commercial activity.
- Assistance for Vehicles broken down as a result of taking part in any ‘Motor Sport Event’, including, without limitation, motor racing, rallying, speed or duration tests or the practice thereof, trials or time-trials, autotests (other than auto tests performed by the Client using roadworthy, road legal cars on public roads), but excluding ‘Concours elegance events, track test days for road-legal Vehicles or rallies held exclusively on open public roads where participants are required to comply with the normal rules of the road (save for Aston Martin organised and controlled track day events).
- Where the police, highways agency and/or other emergency service require that your Vehicle be recovered by a third party.
- Where your entitlement to Aston Martin Emergency Assistance lapses or if your Vehicle is no longer considered eligible for Aston Martin Roadside Assistance, the Service Provider may charge you directly for the Services provided. Any such charges will be charged on a ‘pay for use’ basis and will constitute a direct contract between you and the Service Provider. If it is determined that Aston Martin is at fault for the Vehicle not being recorded as an eligible Vehicle, then Aston Martin shall pay the relevant charges.
- Assistance for routine maintenance and running repairs of the Vehicle such as fixing faulty radios and heated rear windows.
- For transit risk insurance, Aston Martin Emergency Assistance recommends you take out where a Vehicle is to be repatriated.
- Where locksmiths, body-glass or tyre specialists are required. Aston Martin Emergency Assistance will endeavor to arrange for their assistance on your behalf, however, you will be responsible for the costs of their services. Further, if use of a locksmith or other specialist would, in Aston Martin Emergency Assistance’s opinion, mobilise the vehicle, no further service will be given for the breakdown in question.
- The transportation of any animal or pets shall be at the sole discretion of the Service Provider.
- The Service Provider may charge you directly for:
- Any replacement component, lubricant and/or fuel (the ‘Parts’) or consumable items supplied (except where Aston Martin has provided or paid for such Parts)
- Any extension of the Services which you are entitled to receive in connection with this Agreement (shall be performed by the Service Provider (in its absolute discretion) at your request.
- The use of any specialist lifting or towing assistance needed to recover your vehicle if your vehicle has gone off the road, is in a ditch, sunk in soft ground, sand or shingle or when it is stuck in snow or flood water.
Read all Instructions for What To Do In the Emergency User Guide
Reference Links
Download Manuals: https://www.astonmartin.com/en/owners/owners-guides