
Buick Enclave 2023 Driving and Operating User Manual
Driving Information
Driving for Better Fuel Economy
Driving habits can affect fuel mileage. Here are some driving tips to get the best fuel economy possible.
- Set the climate controls to the desired temperature after the engine is started, or turn them off when not required.
- On AWD vehicles, see Driver Mode Control page 215.
- Avoid fast starts and accelerate
- Brake gradually and avoid abrupt
- Avoid idling the engine for long periods of time.
- When road and weather conditions are appropriate, use cruise control.
- Always follow posted speed limits or drive more slowly when conditions
- Keep vehicle tires properly
- Combine several trips into a single
- Replace the vehicle’s tires with the same TPC Spec number molded into the tire’s sidewall near the size.
- Follow recommended scheduled
Distracted Driving
Distraction comes in many forms and can take your focus from the task of driving. Exercise good judgment and do not let other activities divert your attention away from the road. Many local governments have enacted laws regarding driver distraction.
Become familiar with the local laws in your area.
To avoid distracted driving, keep your eyes on the road, keep your hands on the steering wheel, and focus your attention on driving.
- Do not use a phone in demanding driving situations. Use a hands-free method to place or receive necessary phone calls.
- Watch the road. Do not read, take notes, or look up information on phones or other electronic devices.
- Designate a front seat passenger to handle potential distractions.
- Become familiar with vehicle features before driving, such as programming favorite radio stations and adjusting climate control and seat settings. Program all trip information into any navigation device prior to driving.
- Wait until the vehicle is parked to retrieve items that have fallen to the floor.
- Stop or park the vehicle to tend to children.
- Keep pets in an appropriate carrier or restraint.
- Avoid stressful conversations while driving, whether with a passenger or on a cell phone.
Warning
Taking your eyes off the road too long or too often could cause a crash resulting in injury or death. Focus your attention on driving.
Refer to the infotainment section for more information on using that system and the navigation system, if equipped, including pairing and using a cell phone.
Defensive Driving
Defensive driving means “always expect the unexpected.” The first step in driving defensively is to wear the seat belt. See Seat Belts page 48
- Assume that other road users (pedestrians, bicyclists, and other drivers) are going to be careless and make mistakes. Anticipate what they may do and be ready.
- Allow enough following distance between you and the driver in front of you.
- Focus on the task of driving .
Impaired Driving
Death and injury associated with impaired driving is a global tragedy.
Warning
Drinking alcohol or taking drugs and then driving is very dangerous. Your reflexes, perceptions, attentiveness, and judgment can be affected by even a small amount of alcohol or drugs. You can have a serious — or even fatal — collision if you drive after drinking or taking drugs.
Do not drive while under the influence of alcohol or drugs, or ride with a driver who has been drinking or is impaired by drugs. Find alternate transportation home; or if you are with a group, designate a driver who will remain sober.
Control of a Vehicle
Braking, steering, and accelerating are important factors in helping to control a vehicle while driving.
Braking
Braking action involves perception time and reaction time. Deciding to push the brake pedal is perception time. Actually doing it is reaction time.
Average driver reaction time is about three-quarters of a second. In that time, a vehicle moving at 100 km/h (60 mph) travels 20 m (66 ft), which could be a lot of distance in an emergency.
Helpful braking tips to keep in mind include:
- Keep enough distance between you and the vehicle in front of you.
- Avoid needless heavy braking .
- Keep pace with traffic.
If the engine ever stops while the vehicle is being driven, brake normally but do not pump the brakes. Doing so could make the pedal harder to push down. If the engine stops, there will be some power brake assist but it will be used when the brake is applied. Once the power assist is used up, it can take longer to stop and the brake pedal will be harder to push.
Steering
Caution
To avoid damage to the steering system, do not drive over curbs, parking barriers, or similar objects at speeds greater than 3 km/h (1 mph). Use care when driving over other objects such as lane dividers and speed bumps. Damage caused by misuse of the vehicle is not covered by the vehicle warranty.
Electric Power Steering
The vehicle is equipped with an electric power steering system, which reduces the amount of effort needed to steer the vehicle. It does not have power steering fluid. Regular maintenance is not required.
If the vehicle experiences a system malfunction and loses power steering, greater steering effort may be required. Power steering assist also may be reduced if you turn the steering wheel as far as it can turn and hold it there with force for an extended period of time.
See your dealer if there is a problem.
Curve Tips
- Take curves at a reasonable speed. 2
- Reduce speed before entering a curve.
- Maintain a reasonable steady speed through the curve.
- Wait until the vehicle is out of the curve before accelerating gently into the curve.00
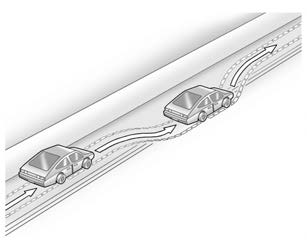
Steering in Emergencies
There are some situations when steering around a problem may be more effective than braking.
-
- Holding both sides of the steering wheel allows you to turn 180 degrees without removing a hand.
- The Antilock Brake System (ABS) allows steering while braking.
The vehicle’s right wheels can drop off the edge of a road onto the shoulder while driving. Follow these tips:
- Ease off the accelerator and then, if there is nothing in the way, steer the vehicle so that it straddles the edge of the pavement.
- Turn the steering wheel about one-eighth of a turn, until the right front tire contacts the pavement edge.
- Turn the steering wheel to go straight down the roadway.
Loss of Control
Skidding
There are three types of skids that correspond to the vehicle’s three control systems:
- Braking Skid — wheels are not rolling.
- Steering or Cornering Skid — too much speed or steering in a curve causes tires to slip and lose cornering force.
- Acceleration Skid — too much throttle causes the driving wheels to spin.
Defensive drivers avoid most skids by taking reasonable care suited to existing conditions, and by not overdriving those conditions. But skids are always possible.
If the vehicle starts to slide, follow these suggestions:
- Ease your foot off the accelerator pedal and steer the way you want the vehicle to The vehicle may straighten out. Be ready for a second skid if it occurs.
- Slow down and adjust your driving according to weather conditions. Stopping distance can be longer and vehicle control can be affected when traction is reduced by water, snow, ice, gravel, or other material on the road. Learn to recognize warning clues — such as enough water, ice, or packed snow on the road to make a mirrored surface — and slow down when you have any doubt.
- Try to avoid sudden steering, acceleration, or braking, including reducing vehicle speed by shifting to a lower gear. Any sudden changes could cause the tires to
Remember: Antilock brakes help avoid only the braking skid.
Off-Road Driving
All-Wheel Drive (AWD) vehicles can be used for off-road driving. Vehicles without AWD and vehicles not equipped with All Terrain (AT) or On-Off Road (OOR) tires must not be driven off-road except on a level, solid surface. To contact the tire manufacturer for more information about the original equipment tires, see the warranty manual.
Controlling the vehicle is the key to successful off-road driving. One of the best ways to control the vehicle is to control the speed.
Warning
When driving off-road, bouncing and quick changes in direction can easily throw you out of position. This could cause you to lose control and crash. You and your passengers should always wear seat belts.
Before Driving Off-Road
- Have all necessary maintenance and service work completed.
- Fuel the vehicle, fill fluid levels, and check inflation pressure in all tires, including the spare, if equipped.
- Read all the information about AWD vehicles in this manual.
- Make sure all underbody shields, if equipped, are properly attached.
- Know the local laws that apply to off-road driving .
To gain more ground clearance if needed, it may be necessary to remove the front fascia lower air dam. However, driving without the air dam reduces fuel economy.
Caution
Operating the vehicle for extended periods without the front fascia lower air dam installed can cause improper airflow to the engine. Reattach the front fascia air dam after off-road driving.
Loading the Vehicle for Off-Road Driving
Warning
- Unsecured cargo on the load floor can be tossed about when driving over rough terrain. You or your passengers can be struck by flying objects. Secure the cargo properly.
- Keep cargo in the cargo area as far forward and as low as possible. The heaviest things should be on the floor, forward of the rear axle.
- Heavy loads on the roof raise the vehicle’s center of gravity, making it more likely to roll over. You can be seriously or fatally injured if the vehicle rolls over. Put heavy loads inside the cargo area, not on the roof.
For more information about loading the vehicle, see Vehicle Load Limits page 196.
Environmental Concerns
Always use established trails, roads, and areas that have been set aside for public off-road recreational driving and obey all posted regulations.
- Do not damage shrubs, flowers, trees, or grasses or disturb wildlife.
- Do not park over things that See
Parking over Things That Burn page 206.
Driving on Hills
Driving safely on hills requires good judgment and an understanding of what the vehicle can and cannot do.
Warning
Many hills are simply too steep for any vehicle. Driving up hills can cause the vehicle to stall. Driving down hills can cause loss of control. Driving across hills can cause a rollover. You could be injured or killed. Do not drive on steep hills.
Before driving on a hill, assess the steepness, traction, and obstructions. If the terrain ahead cannot be seen, get out of the vehicle and walk the hill before driving further.
When driving on hills:
- Use a low gear and keep a firm grip on the steering wheel.
- Maintain a slow
- When possible, drive straight up or down the hill.
- Slow down when approaching the top of the hill.
Warning
Driving to the top of a hill at high speed can cause a crash. There could be a drop-off, embankment, cliff, or even another vehicle. You could be seriously injured or killed. As you near the top of a hill, slow down and stay alert.
- Use headlamps even during the day to make the vehicle more visible.
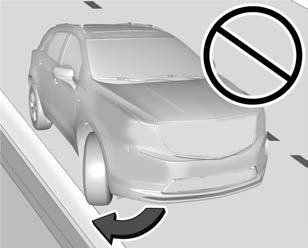
Never go downhill forward or backward with the transmission in N (Neutral). The brakes could overheat and you could lose control. - When driving down a hill, keep the vehicle headed straight down. Use a low gear because the engine will work with the brakes to slow the vehicle and help keep the vehicle under control.
Warning
Heavy braking when going down a hill can cause your brakes to overheat and fade. This could cause loss of control and you or others could be injured or killed. Apply the brakes lightly when descending a hill and use a low gear to keep vehicle speed under control.
- Avoid turns that take the vehicle across the incline of the hill. Driving across an incline puts more weight on the downhill wheels, which could cause a downhill slide or a rollover.
- . Loose gravel, muddy spots, or even wet grass can cause the tires to slip sideways, downhill. If the vehicle slips sideways, it can hit something and potentially
roll over. - . Hidden obstacles can make the steepness of the incline more severe. If a rock is driven across with the uphill wheels, or if the downhill wheels drop into a rut or depression, the vehicle can tilt even more.
- . If an incline must be driven across and the vehicle starts to slide, turn downhill. This should help straighten out the vehicle and prevent side slipping.
If the vehicle stalls on a hill:
- Apply the brakes to stop the vehicle, and then apply the parking brake.
- Shift into P (Park) and then restart the engine.
- If driving uphill when the vehicle stalls, shift to R (Reverse), release the parking brake, and back straight down.
- Never try to turn the vehicle around.
- If the hill is steep enough to stall the vehicle, it is steep enough to cause it to roll over.
- If you cannot make it up the hill, back straight down the hill.
- Never back down a hill in N (Neutral) using only the brake.
- The vehicle can roll backward quickly and you could lose control.
- If driving downhill when the vehicle stalls, shift to a lower gear, release the parking brake, and drive straight down the hill.
- If the vehicle cannot be restarted after stalling, set the parking brake, shift into P (Park), and turn the vehicle off.
- Leave the vehicle and seek help
- Stay clear of the path the vehicle would take if it rolled downhill.
Warning
Getting out of the vehicle on the downhill side when stopped across an incline is dangerous. If the vehicle rolls over, you could be crushed or killed. Always get out on the uphill side of the vehicle and stay well clear of the rollover path.
- Use headlamps even during the day to make the vehicle more visible.
- Never go downhill forward or backward with the transmission in N (Neutral). The brakes could overheat and you could lose control.
- When driving down a hill, keep the vehicle headed straight Use a low gear because the engine will work with the brakes to slow the vehicle and help keep the vehicle under control.
Warning
Heavy braking when going down a hill can cause your brakes to overheat and fade. This could cause loss of control and you or others could be injured or killed. Apply the brakes lightly when descending a hill and use a low gear to keep vehicle speed under control.
- Avoid turns that take the vehicle across the incline of the hill. Driving across an incline puts more weight on the downhill wheels, which could cause a downhill slide or a rollover.
Loose gravel, muddy spots, or even wet grass can cause the tires to slip sideways, If the vehicle slips sideways, it can hit something and potentially roll over.
- Hidden obstacles can make the steepness of the incline more severe. If a rock is driven across with the uphill wheels, or if the downhill wheels drop into a rut or depression, the vehicle can tilt even more .
- If an incline must be driven across and the vehicle starts to slide, turn downhill. This should help straighten out the vehicle and prevent side slipping.
If the vehicle stalls on a hill:
- Apply the brakes to stop the vehicle, and then apply the parking brake.
- Shift into P (Park) and then restart the engine .
- If driving uphill when the vehicle stalls, shift to R (Reverse), release the parking brake, and back straight down.
- Never try to turn the vehicle around. If the hill is steep enough to stall the vehicle, it is steep enough to cause it to roll over.
If you cannot make it up the hill, back straight down the hill.
- If you cannot make it up the hill, back straight down the hill.
- Never back down a hill in N (Neutral) using only the brake.
- The vehicle can roll backward quickly and you could lose control.
- If driving downhill when the vehicle stalls, shift to a lower gear, release the parking brake, and drive straight down the hill.
- If the vehicle cannot be restarted after stalling, set the parking brake, shift into P (Park), and turn the vehicle off.
- Leave the vehicle and seek
- Stay clear of the path the vehicle would take if it rolled downhill.
- Warning
Getting out of the vehicle on the downhill side when stopped across an incline is dangerous. If the vehicle rolls over, you could be crushed c killed. Always get out on the uphill side of the vehicle and stay well clear of the rollover path. -
Driving in Mud, Sand, Snow, or Ice
Use a low gear when driving in mud — the deeper the mud, the lower the gear. Keep the vehicle moving to avoid getting stuck.
Traction changes when driving on sand. On loose sand, such as on beaches or sand dunes, the tires tend to sink into the sand. This affects steering, accelerating, and braking. Drive at a reduced speed and avoid sharp turns or abrupt maneuvers.
Traction is reduced on hard packed snow and ice and it is easy to lose control. Reduce vehicle speed when driving on hard packed snow and ice.
- Warning
Driving on frozen lakes, ponds, or rivers can be dangerous. Ice conditions vary greatly and the vehicle could fall through the ice; you and your passengers could drown. Drive your vehicle on safe surfaces only. - Driving in Water
Warning
Driving through rushing water can be dangerous. Deep water can sweep your vehicle downstream and you and your passengers could drown. If it is only shallow water, it can still wash away the ground from under your tires. Traction could be lost, and the vehicle could roll over. Do not drive through rushing water.
Caution
Do not drive through standing water if it is deep enough to cover the wheel hubs, axles, or exhaust pipe. Deep water can damage the axle and other vehicle parts.
If the standing water is not too deep, drive through it slowly. At faster speeds, water can get into the engine and cause it to stall. Stalling can occur if the exhaust pipe is under water. Do not turn off the ignition when driving through water. If the exhaust pipe is under water, the engine will not start. When going through water, the brakes get wet, and it might take longer to stop. See Driving on Wet Roads page 193.
After Off-Road Driving
Remove any brush or debris that has collected on the underbody or chassis, or under the hood. These accumulations can be a fire hazard.
After operation in mud or sand, have the brake linings cleaned and checked. These substances can cause glazing and uneven braking. Check the body structure, steering, suspension, wheels, tires, and exhaust system for damage and check the fuel lines and cooling system for any leakage.
More frequent maintenance service is required. See Maintenance Schedule page 324.
Driving on Wet Roads
Rain and wet roads can reduce vehicle traction and affect your ability to stop and accelerate. Always drive slower in these types of driving conditions and avoid driving through large puddles and deep-standing or flowing water
Warning
Wet brakes can cause crashes. They might not work as well in a quick stop and could cause pulling to one side. You could lose control of the vehicle.
After driving through a large puddle of water or a car/vehicle wash, lightly apply the brake pedal until the brakes work normally.
Flowing or rushing water creates strong forces. Driving through flowing water could cause the vehicle to be carried away. If this happens, you and other vehicle occupants could drown. Do not ignore police warnings and be very cautious about trying to drive through flowing water.
Hydroplaning
Hydroplaning is dangerous. Water can build up under the vehicle’s tires so they actually ride on the water. This can happen if the road is wet enough and you are going fast enough. When the vehicle is hydroplaning, it has little or no contact with the road.
There is no hard and fast rule about hydroplaning. The best advice is to slow down when the road is wet.
Other Rainy Weather Tips
Besides slowing down, other wet weather driving tips include:
- Allow extra following
- Pass with caution.
- Keep windshield wiping equipment in good shape.
- Keep the windshield washer fluid reservoir
- Have good tires with proper tread depth. See Tires page 285.
- Turn off cruise
- Activate All-Wheel Drive (AWD) See
Driver Mode Control page 215.
Hill and Mountain Roads
Driving on steep hills or through mountains is different than driving on flat or rolling terrain. Tips include:
- Keep the vehicle serviced and in good
- Check all fluid levels and brakes, tires, cooling system, and transmission.
- Shift to a lower gear when going down steep or long hills.
- Warning
Using the brakes to slow the vehicle on a long downhill slope can cause brake overheating, can reduce brake performance, and could result in a loss of braking. Shift the transmission to a lower gear to let the engine assist the brakes on a steep downhill slope.
Warning
Coasting downhill in N (Neutral) or with the ignition off is dangerous. This can cause overheating of the brakes and loss of steering assist. Always have the engine running and the vehicle in gear.
- Drive at speeds that keep the vehicle in its own lane. Do not swing wide or cross the center line.
- Be alert on top of hills; something could be in your lane (e.g., stalled car, crash).
Pay attention to special road signs (e.g., falling rocks area, winding roads, long grades, passing or no-passing zones) and take appropriate action. - Select All-Wheel Drive (AWD) Mode. See Driver Mode Control page 215 and All-Wheel Drive page 210.
Winter Driving
Driving on Snow or Ice
Caution
To avoid damage to the wheels and brake components, always clear snow and ice from inside the wheels and underneath the vehicle before driving.
Snow or ice between the tires and the road creates less traction or grip, so drive carefully. Wet ice can occur at about 0°C (32°F) when freezing rain begins to fall.
Avoid driving on wet ice or in freezing rain until roads can be treated.
For Slippery Road Driving:
- Accelerate gently. Accelerating too quickly causes the wheels to spin and makes the surface under the tires slick.
- Turn on Traction Control. See Traction Control/Electronic Stability Control page 213.
- The Antilock Brake System (ABS) improves vehicle stability during hard stops, but the brakes should be applied sooner than when on dry pavement. See Antilock Brake System (ABS) page 211.
- Allow greater following distance and watch for slippery spots. Icy patches can occur on otherwise clear roads in shaded areas. The surface of a curve or an overpass can remain icy when the surrounding roads are clear. Avoid sudden steering maneuvers and braking while on ice.
- Turn off cruise
Cold Weather Mode
In very low temperatures, a cold weather message may display on the Driver Information Center (DIC). The engine speed, transmission shift patterns, and cabin fan speed may operate differently to enable the vehicle to warm up quicker. You can manually override the cabin fan speed in cold weather mode.
Blizzard Conditions
Stop the vehicle in a safe place and signal for help. Stay with the vehicle unless there is help nearby. If possible, use Roadside Assistance. See Roadside Assistance Program page 338. To get help and keep everyone in the vehicle safe:
- Turn on the hazard warning
- Tie a red cloth to an outside
Warning
Snow can trap engine exhaust under the vehicle. This may cause exhaust gases to get inside. Engine exhaust contains carbon monoxide (CO), which cannot be seen or smelled. It can cause unconsciousness and even death.
If the vehicle is stuck in snow:
- Clear snow from the base of the vehicle, especially any blocking the exhaust pipe.
- Open a window about 5 cm (2 in) on the vehicle side that is away from the wind, to bring in fresh air.
- Fully open the air outlets on or under the instrument panel.
- Adjust the climate control system to circulate the air inside the vehicle and set the fan speed to the highest setting. See “Climate Control Systems.”
For more information about CO, see Engine Exhaust page 206.
To save fuel, run the engine for short periods to warm the vehicle and then shut the engine off and partially close the window. Moving about to keep warm also helps.
If it takes time for help to arrive, when running the engine, push the accelerator pedal slightly so the engine runs faster than the idle speed. This keeps the battery charged to restart the vehicle and to signal for help with the headlamps. Do this as little as possible, to save fuel.
If the Vehicle Is Stuck
Slowly and cautiously spin the wheels to free the vehicle when stuck in sand, mud, ice, or snow.
If stuck too severely for the traction system to free the vehicle, turn the traction system off and use the rocking method. See Traction Control/Electronic Stability Control page 213.
Warning
If the vehicle’s tires spin at high speed, they can explode, and you or others could be injured. The vehicle can overheat, causing an engine compartment fire or other damage. Spin the wheels as little as possible and avoid going above 56 km/h (35 mph).
For All-Wheel Drive (AWD), select Off-Road or AWD mode. See Driver Mode Control page 215 and All-Wheel Drive page 210.
Rocking the Vehicle to Get it Out
Turn the steering wheel left and right to clear the area around the front wheels. Turn off any traction system. Shift back and forth between R (Reverse) and a low forward gear, spinning the wheels as little as possible. To prevent transmission wear, wait until the wheels stop spinning before shifting gears. Release the accelerator pedal while shifting,
and press lightly on the accelerator pedal when the transmission is in gear. Slowly spinning the wheels in the forward and reverse directions causes a rocking motion that could free the vehicle. If that does not get the vehicle out after a few tries, it might need to be towed out. If the vehicle
does need to be towed out, see Transporting a Disabled Vehicle page 311.
Vehicle Load Limits
It is very important to know how much weight the vehicle can carry. This weight is called the vehicle capacity weight and includes the weight of all occupants, cargo, and all nonfactory-installed options. Two labels on the vehicle may show how much weight it may properly carry, the Tire and Loading Information label and the Certification/Tire label.
Warning
Do not load the vehicle any heavier than the Gross Vehicle Weight Rating (GVWR), or either the maximum front or rear Gross Axle Weight Rating (GAWR). This can cause systems to break and change the way the vehicle handles. This could cause loss of control and a crash. Overloading can also reduce stopping performance, damage the tires, and shorten the life of the vehicle.
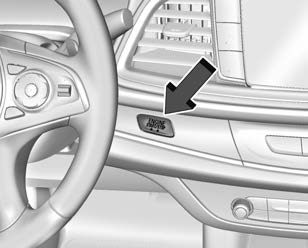
Tire and Loading Information Label

Example Label
A vehicle-specific Tire and Loading Information label is attached to the center pillar (B-pillar). The tire and
loading information label shows the number of occupant seating
positions (1), and the maximum vehicle capacity weight (2) in kilograms and pounds.
The Tire and Loading Information label also shows the size of the original equipment tires (3) and the recommended cold tire inflation pressures (4). For more information on tires and inflation see Tires page 285 and Tire Pressure page 290.
There is also important loading information on the vehicle Certification/ Tire label. It may show the Gross Vehicle Weight Rating (GVWR) and the Gross Axle Weight Rating (GAWR) for the front and rear axle. See “Certification/Tire Label” later in this section.
“Steps for Determining Correct Load Limit
- Locate the statement “The combined weight of occupants and cargo should never exceed XXX kg or XXX lbs.” on your vehicle’s placard.
- Determine the combined weight of the driver and passengers that will be riding in your vehicle.
- Subtract the combined weight of the driver and passengers from XXX kg or XXX lbs.
- The resulting figure equals the available amount of cargo and luggage load capacity. For example, if the “XXX” amount equals 1400 and there will be five 150 lb passengers in your vehicle, the amount of available cargo and luggage load capacity is 650 lbs. (1400-750 (5 x 150) = 650 lbs.)
- Determine the combined weight of luggage and cargo being loaded on the vehicle. That weight may not safely exceed the available cargo and luggage load capacity calculated in Step 4.
- If your vehicle will be towing a trailer, load from your trailer will be transferred to your vehicle. Consult this manual to determine how this reduces the available cargo and luggage load capacity of your vehicle.”
See Trailer Towing page 249 for important information on towing a trailer, towing safety rules and trailering tips.
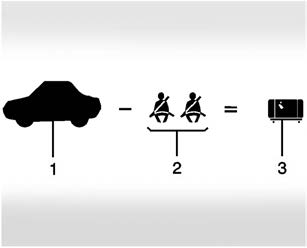
Example 1
- Vehicle Capacity Weight for Example 1 = 453 kg (1,000 lbs).
- Subtract Occupant Weight @ 68 kg (150 lbs) × 2 = 136 kg (300 lbs).
Available Occupant and Cargo
Weight = 317 kg (700 lbs).
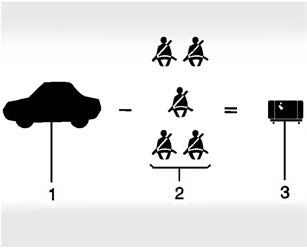
Example 2
- Vehicle Capacity Weight for Example 2 = 453 kg (1,000 lbs).
- Subtract Occupant Weight @ 68 kg (150 lbs) × 5 = 340 kg (750 lbs).
- Available Cargo Weight = 113 kg (250 lbs).

-
Example 3
- Vehicle Capacity Weight for Example 3 = 453 kg (1,000 lbs).
- Subtract Occupant Weight @ 91 kg (200 lbs) × 5 = 453 kg (1,000 lbs).
- Available Cargo Weight = 0 kg (0 lbs).
Refer to the vehicle’s tire and loading information label for specific information about the vehicle’s capacity weight and seating positions. The combined weight of the driver, passengers, and cargo should never exceed the vehicle’s capacity weight.
Certification/Tire Label
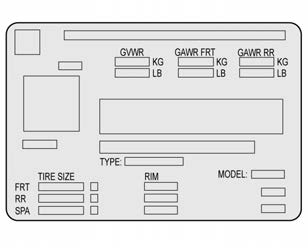
Label Example
A vehicle-specific Certification/Tire label is attached to the center pillar (B-pillar).
The label may show the size of the vehicle’s original tires and the inflation pressures needed to obtain the gross weight capacity of the vehicle. The label shows the gross weight capacity of the vehicle. This is called the Gross Vehicle Weight Rating (GVWR). The GVWR includes the weight of the vehicle, all occupants, fuel, and cargo.
The Certification/Tire label may also show the maximum weights for the front and rear axles, called the Gross Axle Weight Rating (GAWR). To find out the actual loads on the front and rear axles, weigh the vehicle at a weigh station. Your dealer can help with this. Be sure to spread the load equally on both sides of the centerline.
Caution
Overloading the vehicle may cause damage. Repairs would not be covered by the vehicle warranty. Do not overload the vehicle.
Warning
Things inside the vehicle can strike and injure people in a sudden stop or turn, or in a crash.
- Put things in the cargo area of the vehicle. In the cargo area, put them as far forward as possible. Try to spread the weight evenly.
- Never stack heavier things, like suitcases, inside the vehicle so that some of them are above the tops of the seats.
- Do not leave an unsecured child restraint in the vehicle.
Secure loose items in the vehicle. . Do not leave a seat folded down unless needed.
Starting and Operating
New Vehicle Break-In
Caution
The vehicle does not need an elaborate break-in. But it will perform better in the long run if you follow these guidelines:
- Do not drive at any one constant speed, fast or slow, for the first 800 km (500 mi). Do not make full-throttle starts. Avoid downshifting to brake or slow the vehicle.
- . Avoid making hard stops for the first 300 km (200 mi) or so. During this time the new brake linings are not yet broken in. Hard stops with new linings can mean premature wear and earlier replacement. Follow this breaking-in guideline every time you get new brake linings.
- . Do not tow a trailer during break-in.
See Trailer Towing page 249 for the trailer towing capabilities of the vehicle and more information.
Following break-in, engine speed and load can be gradually increased.
On new vehicles, the various mechanical and electrical systems experience a “break-in” period during the first 6 400 km (4,000 mi) of routine driving. As the vehicle is driven, the mechanical systems adjust to provide optimal fuel economy and transmission shift performance.
Electrical systems will adapt and calibrate during the break-in period. A one-time occurrence of clicks and similar vehicle noises is normal during this process.
Normal driving charges the vehicle’s battery to achieve the best operation of the vehicle, including fuel economy and the Stop/Start System. See Stop/Start System page 202.
Ignition Positions
Vehicles with Keyless Access have pushbutton starting.
The remote key must be in the vehicle for the system to operate. If the pushbutton start is not working, the vehicle may be near a strong radio antenna signal causing interference to the Keyless Access system. See Remote Key Operation page 7.
To shift out of P (Park), the engine must be running, and the brake pedal must be applied.
Stopping the Engine/OFF (No Indicator Lights) : When the vehicle is stopped, press ENGINE START/STOP once to turn the engine off.
If the vehicle is in P (Park), the ignition will turn off, and Retained Accessory Power (RAP) will remain active. See Retained Accessory Power (RAP) page 204.
If the vehicle is in R (Reverse), D (Drive) or L (Low), the vehicle will shift to P (Park), the ignition will turn off, and Retained Accessory Power (RAP) will remain active.
If the vehicle is in N (Neutral), the ignition will return to accessory mode and display the message SHIFT TO PARK in the Driver Information Center (DIC). When the vehicle is shifted into P (Park), the ignition will turn off.
Do not turn the engine off when the vehicle is moving. This will cause a loss of power assist in the brake and steering systems and disable the airbags.
If the vehicle must be shut off in an emergency:
- Brake using a firm and steady pressure. Do not pump the brakes This may deplete power assist, requiring increased brake pedal force.
- Shift the vehicle to N (Neutral). This can be done while the vehicle is moving. After shifting to N (Neutral), firmly apply the brakes and steer the vehicle to a safe location.
- Come to a complete stop and shift to P (Park).
- Set the parking brake. See Electric Parking Brake page 211.
- Press ENGINE START/STOP to turn the vehicle off.
Warning
Turning off the vehicle while moving may cause loss of power assist in the brake and steering systems and disable the airbags. While driving, only shut the vehicle off in an emergency.
If the vehicle cannot be pulled over, and must be shut off while driving, press and hold ENGINE START/STOP for longer than two seconds, or press twice in five seconds.
Accessory Mode (Amber Indicator Light) : This mode allows some electrical accessories to be used when the engine is off.
With the ignition off, pressing the button one time without the brake pedal applied will place the ignition system in accessory mode.
The ignition will switch from accessory mode to OFF after five minutes to prevent battery rundown.
ON/RUN/START (Green Indicator Light) : This mode is for driving and starting. With the ignition off, and the brake pedal applied, pressing the button once will place the ignition system in ON/RUN/START. Once engine cranking begins, release the button. Engine cranking will continue until the engine starts. See Starting the Engine page 201.
The ignition will then remain on.
Service Mode
This power mode is available for service and diagnostics, and to verify the proper operation of the malfunction indicator lamp as may be required for emission inspection purposes. With the vehicle off, and the brake pedal not applied, pressing and holding the button for more than five seconds will place the vehicle in Service Mode. The instruments and audio systems will operate as they do in ON/RUN, but the vehicle will not be able to be driven. The engine will not start in Service Mode. Press the button again to turn the vehicle off.
Starting the Engine
Shift the vehicle into P (Park) or N (Neutral).
To restart the engine when the vehicle is already moving, use N (Neutral) only.
Caution
Do not try to shift to P (Park) if the vehicle is moving. If you do, you could damage the transmission. Shift to P (Park) only when the vehicle is stopped.
Caution
If you add electrical parts or accessories, you could change the way the engine operates. Any resulting damage would not be covered by the vehicle warranty. See Add-On Electrical Equipment page 256.
- With the Keyless Access system, the remote key must be in the vehicle. Press ENGINE START/STOP with the brake pedal applied. When the engine begins cranking, let go of the button.
The idle speed will go down as the engine gets warm. Do not race the engine immediately after starting it.
If the remote key is not in the vehicle, if there is interference, or if the remote key battery is low, a Driver Information Center (DIC) will display a message. See Remote Key Operation page 7.
Caution
Cranking the engine for long periods of time, by trying to start the engine immediately after cranking has ended, can overheat and damage the cranking motor, and drain the battery. Wait at least 15 seconds between each try, to let the cranking motor cool down. - If the engine does not start after five to 10 seconds, especially in very cold weather (below −18 °C or 0°F), it could be flooded with too much gasoline. Try pushing the accelerator pedal all the way to the floor and holding it there as you press ENGINE START/STOP. Wait at least 15 seconds between each try, to allow the cranking motor to cool down. When the engine starts, release the accelerator. If the vehicle starts briefly but then stops again, do the same thing. This clears the extra gasoline from the engine. Do not race the engine immediately after starting it. Operate the engine and transmission gently until the oil warms up and lubricates all moving parts.
Stop/Start System
This vehicle has a Stop/Start system to shut off the engine to help conserve fuel. It has components designed for the increased number of starts.
Warning
The automatic engine Stop/Start feature causes the engine to shut off while the vehicle is still on. Do not exit the vehicle before shifting to P (Park). The vehicle may restart and move unexpectedly. Always shift to P (Park), and then turn the ignition off before exiting the vehicle.
Auto Engine Stop/Start
When the brakes are applied and the vehicle is at a complete stop, the engine may turn off. When stopped, the tachometer displays AUTO STOP. See Tachometer page 101. When the brake pedal is released or the accelerator pedal is pressed, the engine will restart.
To maintain vehicle performance, other conditions may cause the engine to automatically restart before the brake pedal is released.
Auto Stops may not occur and/or auto restarts may occur because:
- The climate control settings require the engine to be running to cool or heat the vehicle interior.
The vehicle battery needs to charge.
The vehicle battery has recently been disconnected.
Minimum vehicle speed has not been reached since the last Auto Stop.
The accelerator pedal is pressed.
The engine or transmission is not at the required operating temperature.
The outside temperature is not in the required operating range. - The vehicle transmission is shifted out of D (Drive) to any gear other than P (Park).
Certain driver modes have been selected.
See Driver Mode Control page 215.
The vehicle is on a steep hill or grade.
The driver door has been opened or driver seat belt has been unbuckled.
The hood has been opened.
The Auto Stop has reached the maximum allowed time.
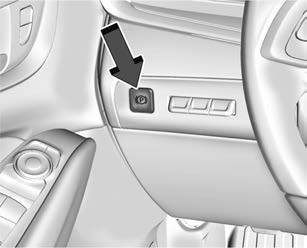
Auto Stop Disable Switch
The automatic engine Stop/Start feature can be disabled and enabled by pressing h.
Auto Stop/Start is enabled each time you start the vehicle.
The automatic engine Stop/Start feature can be disabled and enabled by pressing h.
When the h indicator is illuminated, the system is enabled.
Engine Heater
If equipped, the engine heater can provide easier starting and better fuel economy during engine warm-up in cold weather conditions at or below −18 °C (0 °F). Vehicles with an engine heater should be plugged in at least four hours before starting. An internal thermostat in the plug-end of the cord may exist, which will prevent engine heater operation at temperatures above -18 °C (0 °F).
Warning
Do not plug in the engine block heater while the vehicle is parked in a garage or under a carport. Property damage or personal injury may result. Always park the vehicle in a clear open area away from buildings or structures.
To Use the Engine Heater
- Turn off the engine .
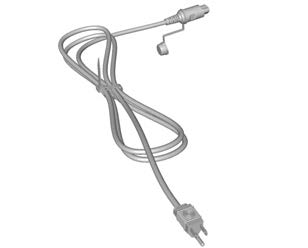
- Check the heater cord for damage. If it is damaged, do not use it. See your dealer for a replacement. Inspect the cord for damage yearly.

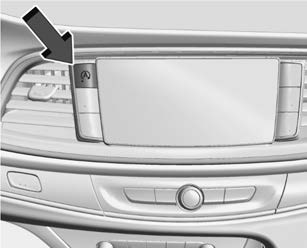
- Open the engine heater connector cover.
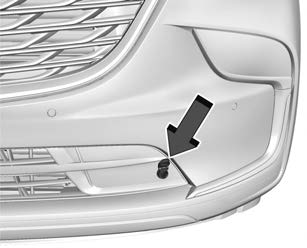
- Plug the heater cord into the connector in the front fascia.
Plug the cord into a grounded 110-volt AC outlet that is protected by a ground fault detection function.
Warning
Improper use of the heater cord or an extension cord can damage the cord and may result in overheating and fire.- Plug the cord into a three-prong electrical utility receptacle that is protected by a ground fault detection function. An ungrounded outlet could cause an electric shock.
- Use a weatherproof, heavy-duty, 15 amp-rated extension cord if needed. Failure to use the recommended extension cord in good operating condition, or using a damaged heater or extension cord, could make it overheat and cause a fire, property damage, electric shock, and injury.
- Do not operate the vehicle with the heater cord permanently attached to the vehicle. Possible heater cord and thermostat damage could occur.
- While in use, do not let the heater cord touch vehicle parts or sharp edges.
- Before starting the vehicle, unplug the cord. Keep the cord away from any moving parts.
- Before starting the engine, be sure to unplug and store the cord.
- Close the engine heater connector cover.
The length of time the heater should remain plugged in depends on several factors. Ask a dealer in the area where you will be parking the vehicle for the best advice on this.
Retained Accessory Power (RAP)
When the vehicle is turned from on to off, the following features (if equipped) will continue to function for up to 10 minutes, or until the driver door is opened. These features will also work when the vehicle is on or in accessory mode:
- Infotainment System
- Power Windows (during RAP this functionality will be lost when any door is opened)
- Sunroof (during RAP this functionality will be lost when any door is opened)
- Auxiliary Power Outlet
- Audio System
- OnStar System
Shifting Into Park
Warning
It can be dangerous to get out of the vehicle if the vehicle is not in P (Park) with the parking brake set. The vehicle can roll. If you have left the engine running, the vehicle can move suddenly. You or others could be injured. To be sure the vehicle will not move, even when you are on fairly level ground, use the steps that follow. If you are pulling a trailer, see Driving Characteristics and Towing Tips page 245.
- Hold the brake pedal down and set the Electric Parking Brake (EPB). See Electric Parking Brake page 211.
- Press the P (Park) switch on the center console.
- Press ENGINE START/STOP to turn the engine off.
If the vehicle is shifted into P (Park) on a hill, the EPB may apply automatically. The driver may not be able to release the EPB using the EPB switch. It should automatically release when the vehicle is shifted out of P (Park).
Leaving the Vehicle with the Engine Running
Warning
It can be dangerous to leave the vehicle with the engine running. It could overheat and catch fire.
It is dangerous to get out of the vehicle if the vehicle is not in P (Park) with the Electric Parking Brake (EPB) set. The vehicle can roll.
Do not leave the vehicle when the engine is running. If you have left the engine running, the vehicle can move suddenly. You or others could be injured. To be sure the vehicle will not move, even when you are on fairly level ground, always set the EPB and shift the vehicle to P (Park). If you are towing a trailer, see Driving Characteristics and Towing Tips page 245.
If you have to leave the vehicle with the engine running, the vehicle must be in P (Park) with the EPB set. Confirm that the vehicle is in P (Park).
Shifting out of Park
This vehicle is equipped with an electronic transmission.
To shift out of P (Park):
- Ensure the engine.
- Apply the brake pedal .
- Press or pull the desired shift switch on the center For N (Neutral) press and hold the N (Neutral) switch until the N indicator illuminates red.
The P indicator will turn white and the gear indicator on the selected shift switch will turn red when the vehicle is no longer in P (Park).
If the vehicle cannot shift from P (Park), a Driver Information Center (DIC) message will be displayed. Check that the ignition is on, the engine is running, and the brake pedal is applied when you are attempting to shift out of P (Park). If all of these are met but the vehicle will not shift out of P (Park), see your dealer for service.
Parking over Things That Burn
Warning
Things that can burn could touch hot exhaust parts under the vehicle and ignite. Do not park over papers, leaves, dry grass, or other things that can burn.
Extended Parking
It is best not to park with the vehicle running. If the vehicle is left running, be sure it will not move and there is adequate ventilation.
See Shifting Into Park page 205 and Engine Exhaust page 206.
If the vehicle is left parked and running with the remote key outside the vehicle, it will continue to run for up to 15 minutes.
If the vehicle is left parked and running with the remote key inside the vehicle, it will continue to run for up to 30 minutes.
The vehicle could turn off sooner if it is parked on a hill, due to lack of available fuel.
The timer will reset if the vehicle is taken out of P (Park) while it is running.
Engine Exhaust
Warning
Engine exhaust contains carbon monoxide (CO), which cannot be seen or smelled. Exposure to CO can cause unconsciousness and even death.
Exhaust may enter the vehicle if:
- The vehicle idles in areas with poor ventilation (parking garages, tunnels, deep snow that may block underbody airflow or tail pipes).
- The exhaust smells or sounds strange or different.
- The exhaust system leaks due to corrosion or damage.
- The vehicle exhaust system has been modified, damaged, or improperly repaired.
There are holes or openings in the vehicle body from damage or aftermarket modifications that are not completely sealed. - If unusual fumes are detected or if it is suspected that exhaust is coming into the vehicle:
- Drive it only with the windows completely down.
- Have the vehicle repaired
Never park the vehicle with the engine running in an enclosed area such as a garage or a building that has no fresh air ventilation.
Running the Vehicle While Parked
It is better not to park with the engine running.
If the vehicle is left with the engine running, follow the proper steps to be sure the vehicle will not move. See Shifting Into Park page 205 and Engine Exhaust page 206.
If parking on a hill and pulling a trailer, see Driving Characteristics and Towing Tips page 245
Automatic Transmission
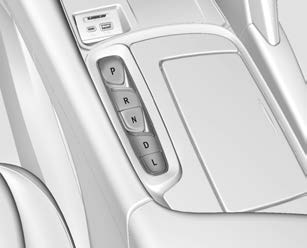
The shift switches are on the center console. The selected gear position will illuminate red on the shift switch, while all others will be displayed in white. If the shift is not immediate, as in very cold conditions, the indicator on the shift switch may flash until it is fully engaged.
The transmission does not operate when the vehicle is off.
If the vehicle is in accessory mode, the transmission can be shifted into P (Park).
If ENGINE START/STOP is pressed twice while at a relatively high speed, the engine will turn off and the transmission will automatically shift into N (Neutral). Once the vehicle is stopped, P (Park) can be selected.
P : This position locks the drive wheels. Use P (Park) when starting the vehicle to ensure the vehicle does not move.
It is dangerous to get out of the vehicle if the transmission is not in P (Park) with the parking brake set. The vehicle can roll.
Do not leave the vehicle when the engine is running. If the engine has been left running, the vehicle can move suddenly. You or others could be injured. To be sure the vehicle will not move, even when on fairly level ground, always set the parking brake and place the transmission into P (Park). See Shifting Into Park page 205 and Driving Characteristics and Towing Tips page 245.
This vehicle is equipped with an electronically controlled transmission. The R (Reverse) and D (Drive) shift switches are designed to prevent inadvertent shifting out of P (Park) unless the ignition is on, and the brake pedal is applied.
When the vehicle is stopped, press ENGINE START/STOP to turn off the vehicle. The transmission will shift to P (Park) automatically.
The vehicle will not shift into P (Park) if it is moving too fast. Stop the vehicle and shift into P (Park).
To shift in and out of P (Park), see Shifting Into Park page 205 and Shifting out of Park page 205.
R : Use this gear to back up.
If the vehicle is shifted into R (Reverse) while the speed is too high, the vehicle will shift into N (Neutral). Reduce the vehicle speed and try the shift again.
To shift into R (Reverse):
- Bring the vehicle to a complete stop.
- Pull the R (Reverse) switch on the center console .
To shift out of R (Reverse):
- Bring the vehicle to a complete console .
- Shift to the desired gear.
At low vehicle speeds, R (Reverse) can be used to rock the vehicle back and forth to get out of snow, ice, or sand without damaging the transmission. See If the Vehicle Is Stuck page 196.
N : In this position, the engine does not connect with the wheels. To restart the engine when the vehicle is already moving, use N (Neutral) only.
Warning
Shifting into a drive gear while the engine is running at high speed is dangerous. Unless your foot is firmly on the brake pedal, the vehicle could move very rapidly. You could lose control and hit people or objects. Do not shift into a drive gear while the engine is running at high speed.
Caution
Shifting out of P (Park) or N (Neutral) with the engine running at high speed may damage the transmission. The repairs would not be covered by the vehicle warranty. Be sure the engine is not running at high speed when shifting the vehicle.
Caution
The vehicle is not designed to stay in N (Neutral) for extended periods of time. It will automatically shift into P (Park).
To shift into N (Neutral), press the N (Neutral) switch until the N indicator is red.
To shift out of N (Neutral):
- Bring the vehicle to a complete stop .
- Shift into the desired gear.
Car Wash Mode
This vehicle includes a Car Wash Mode that allows the vehicle to remain in N (Neutral) for use in automatic car washes. Car Wash Mode is not to be used for vehicle towing. If the vehicle needs to be towed, see Transporting a Disabled Vehicle page 311.
Caution
The vehicle is not designed to stay in N (Neutral) for extended periods of time. It will automatically shift into P (Park) if left in Car Wash Mode.
Car Wash Mode (Engine Off – Driver in Vehicle)
To place the vehicle in N (Neutral) with the engine off and the vehicle occupied:
- Drive to the entrance of the car
- Apply the brake
- Shift to N (Neutral).
- Turn off the engine and release the brake pedal.
- The indicator should continue to show N. If it does not, start the engine and repeat Steps 2–
- The vehicle is now ready for the car wash.
Car Wash Mode (Engine Off – Driver out of Vehicle)
To place the vehicle in N (Neutral) with the engine off and the vehicle unoccupied:
- Drive to the entrance of the car wash .
- Apply the brake pedal.
- Open the door.
- Shift to N (Neutral).
- Turn off the engine and release the brake pedal.
- The indicator should continue to show If it does not, start the engine and repeat Steps 2–5.
- Exit the vehicle and close the The vehicle is now ready for the car wash.
- The vehicle may automatically shift to P (Park) upon re-entry.
Car Wash Mode (Engine On – Driver in Vehicle)
To place the vehicle in N (Neutral) with the engine on and the vehicle occupied:
- Drive to the entrance of the car
- Apply the brake pedal .
- Shift into N (Neutral).
- Release the brake pedal. The vehicle is now ready for the car wash.
Car Wash Mode (Engine On – Driver out of Vehicle
To place the vehicle in N (Neutral) with the engine on and the vehicle unoccupied:
- Drive to the entrance of the car wash.
- Apply the brake pedal.
- Shift into N (Neutral).
- Release the brake pedal. The vehicle is now ready for the car wash.
Car Wash Mode (Engine On – Driver out of Vehicle
To place the vehicle in N (Neutral) with the engine on and the vehicle unoccupied:
- Drive to the entrance of the car wash
- Apply the brake pedal .
- Open the engine .
- Shift into N (Neutral), then release the brake pedal.
- The indicator should continue to show If it does not, repeat Steps 2–4.
- Exit the vehicle and close the The vehicle is now ready for the car wash.
- The vehicle may automatically shift into P (Park) upon re-entry.
Caution
A transmission hot message may display if the automatic transmission fluid is too hot. Driving under this condition can damage the vehicle. Stop and idle the engine to cool the automatic transmission fluid. This message clears when the transmission fluid has cooled sufficiently.
D : This position is for normal driving.
If more power is needed for passing, press the accelerator pedal down.
If the vehicle is shifted into D (Drive) while the speed is too high, the transmission will get ready to engage D (Drive). Reduce the vehicle speed, then the transmission will engage D (Drive).
To shift into D (Drive):
- Bring the vehicle to a complete
- Pull the D (Drive) switch on the center
To shift out of D (Drive):
- Bring the vehicle to a complete stop .
- Shift to the desired gear .
Downshifting the transmission in slippery road conditions could result in skidding. See “Skidding” under Loss of Control page 190
Caution
Spinning the tires or holding the vehicle in one place on a hill using only the accelerator pedal may damage the transmission. The repair will not be covered by the vehicle warranty. If the vehicle is stuck, do not spin the tires. When stopping on a hill, use the brakes to hold the vehicle in place.
Manual Mode
Electronic Range Select (ERS)
Caution
If the vehicle is driven at a high rpm without upshifting while using Electronic Range Select (ERS), the vehicle could be damaged. Always upshift when necessary while using ERS.
Electronic Range Select (ERS), or Manual Mode, allows for the selection of the range of gear positions. Use this mode when driving downhill or towing a trailer to limit the top gear and vehicle speed. The shift position indicator within the Driver
Information Center (DIC) will display a number next to the L indicating the highest available gear.
To enter Electronic Range Select or Manual Mode:
- With the vehicle in D (Drive), press the L (Low) button.
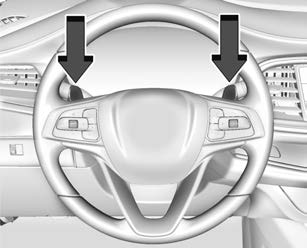
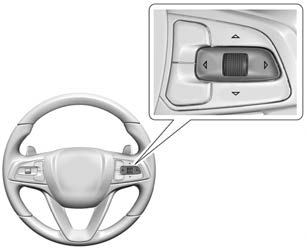
- Tap the left steering wheel control to reduce the highest gear available, or the right control to increase the highest gear
To exit Electronic Range Select, pull the D (Drive) switch on the center console.
When shifting to L (Low), the transmission will shift to a preset lower gear range. For this preset range, the highest gear available will be displayed next to the L in the DIC. See Driver Information Center (DIC). All gears below that number are available to use. For example, when 4 (Fourth) is shown next to the L, 1 (First) through 4 (Fourth) gears are shifted automatically. To shift to 5 (Fifth) gear, tap the right steering wheel control or shift into D (Drive).
L (Low) will prevent shifting to a lower gear range if the engine speed is too high. If the vehicle speed is not reduced within the time allowed, the lower gear range shift will not be completed. Slow the vehicle, then tap the left steering wheel control to the desired lower gear range.
Cruise control can be used while in ERS.
Drive Systems
All-Wheel Drive
Vehicles with this feature can operate in AWD Mode.
Press the button to select All-Wheel Drive (AWD).
The AWD Mode will stay selected until the mode is changed. See Driver Mode Control page 215.
When operated in FWD, the vehicle will deliver power to the front wheels only and may provide better fuel economy.
When using a compact spare tire on an AWD vehicle, the system automatically detects the compact spare and reduces AWD performance to protect the system. To restore full AWD operation and prevent excessive wear on the system, replace the compact spare with a full-size tire as soon as possible. See Compact Spare Tire page 308.
Brakes
Antilock Brake System (ABS)
The Antilock Brake System (ABS) helps prevent a braking skid and maintain steering while braking hard.
ABS performs a system check when the vehicle is first driven. A momentary motor or clicking noise may be heard while this test is going on, and the brake pedal may move slightly. This is normal.

If there is a problem with ABS, this warning light stays on. See Antilock Brake System (ABS) Warning Light page 109.
ABS does not change the time needed to get a foot on the brake pedal and does not always decrease stopping distance. If you get too close to the vehicle ahead, there will not be enough time to apply the brakes if that vehicle suddenly slows or stops. Always leave enough room ahead to stop, even with ABS.
Using ABS
Do not pump the brakes. Just hold the brake pedal down firmly. Hearing or feeling ABS operate is normal.
Braking in Emergencies
ABS allows steering and braking at the same time. In many emergencies, steering can help even more than braking.
Electric Parking Brake
The Electric Parking Brake (EPB) can always be applied, even if the vehicle is off. In case of insufficient electrical power, the EPB cannot be applied or released. To prevent draining the battery, avoid unnecessary repeated cycles of the EPB.
The system has a red parking brake status light and an amber service parking brake warning light. See Electric Parking Brake Light page 108 and Service Electric Parking Brake Light page 108. There are also parking brake-related Driver Information Center (DIC) messages.
Before leaving the vehicle, check the red parking brake status light to ensure that the parking brake is applied.
EPB Apply
To apply the EPB:
- Be sure the vehicle is at a complete
- Press the EPB switch
The red parking brake status light will flash and then stay on once the EPB is fully applied. If the red parking brake status light flashes continuously, then the EPB is only partially applied or there is a problem with the EPB. A DIC message will display. Release the EPB and try to apply it again. If the light does not come on, or keeps flashing, have the vehicle serviced. Do not drive the vehicle if the red parking brake status light is flashing. See your dealer.
If the amber service parking brake warning light is on, press the EPB switch. Continue to hold the switch until the red parking brake status light remains on. If the amber service parking brake warning light is on, see your dealer.
If the EPB is applied while the vehicle is moving, the vehicle will decelerate as long as the switch is pressed. If the switch is pressed until the vehicle comes to a stop, the EPB will remain applied.
The vehicle may automatically apply the EPB in some situations when the vehicle is not moving. This is normal, and is done to periodically check the correct operation of the EPB system, or at the request of other safety functions that utilize the EPB.
If the EPB fails to apply, block the rear wheels to prevent vehicle movement.
EPB Release
To release the EPB:
- Turn the ignition on or to accessory mode.
- Apply and hold the brake
- Press the EPB switch
The EPB is released when the red parking brake status light is off.
If the amber service parking brake warning light is on, release the EPB by pressing and holding the EPB switch. Continue to hold the switch until the red parking brake status light is off. If either light stays on after release is attempted, see your dealer.
Caution
Driving with the parking brake on can overheat the brake system and cause premature wear or damage to brake system parts. Make sure that the parking brake is fully released and the brake warning light is off before driving.
If you are towing a trailer and parking on a hill, see Driving Characteristics and Towing Tips page 245.
Automatic EPB Release
The EPB will automatically release if the vehicle is running, placed into gear, and an attempt is made to drive away. Avoid rapid acceleration when the EPB is applied, to preserve parking brake lining life.
Brake Assist
Brake Assist detects rapid brake pedal applications due to emergency braking situations and provides additional braking to activate the Antilock Brake System (ABS) if the brake pedal is not pushed hard enough to activate ABS normally. Minor noise, brake pedal pulsation, and/or pedal movement during this time may occur. Continue to apply the brake pedal as the driving situation dictates. Brake Assist disengages when the brake pedal is released.
Hill Start Assist (HSA)
Warning
Do not rely on the HSA feature. HSA does not replace the need to pay attention and drive safely. You may not hear or feel alerts or warnings provided by this system. Failure to use proper care when driving may result in injury, death,
or vehicle damage. See Defensive Driving page 188.
When the vehicle is stopped on a grade, Hill Start Assist (HSA) prevents the vehicle from rolling in an unintended direction during the transition from brake pedal release to accelerator pedal apply. The brakes release when the accelerator pedal is applied. If the accelerator pedal is not applied within a few minutes, the Electric Parking Brake will apply. The brakes may also release under other conditions. Do not rely on HSA to hold the vehicle.
HSA is available when the vehicle is facing uphill in a forward gear, or when facing downhill in R (Reverse). The vehicle must come to a complete stop on a grade for HSA to activate.
Ride Control Systems
Traction Control/Electronic Stability Control System Operation
The vehicle has a Traction Control System (TCS) and StabiliTrak/Electronic Stability Control (ESC), an electronic stability control system. These systems help limit wheel slip and assist the driver in maintaining control, especially on slippery road conditions.
TCS activates if it senses that any of the drive wheels are spinning or beginning to lose traction. When this happens, TCS applies the brakes to the spinning wheels and reduces engine power to limit wheel spin.
StabiliTrak/ESC activates when the vehicle senses a difference between the intended path and the direction the vehicle is actually traveling. StabiliTrak/ESC selectively applies braking pressure to any one of the vehicle wheel brakes to assist the driver in keeping the vehicle on the intended path.
If cruise control is being used and TCS or StabiliTrak/ESC begins to limit wheel spin, cruise control will disengage. Cruise control may be turned back on when road conditions allow. TCS and StabiliTrak/ESC will automatically turn on when cruise control is set.
Both systems come on automatically when the vehicle is started and begins to move. The systems may be heard or felt while they are operating or while performing diagnostic checks. This is normal and does not mean there is a problem with the vehicle.
It is recommended to leave both systems on for normal driving conditions, but it may be necessary to turn TCS off if the vehicle gets stuck in sand, mud, ice, or snow. See If the Vehicle Is Stuck page 196 and “Turning the Systems Off and On” later in this section.
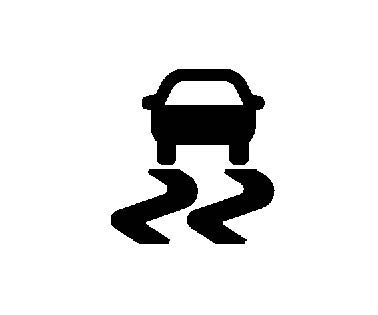
The indicator light for both systems is in the instrument cluster. This light will:
- Flash when TCS is limiting wheel spin .
- Flash when StabiliTrak/ESC is activated .
- Turn on and stay on when either system is not working.
If either system fails to turn on or to activate, a message displays in the Driver Information Center (DIC), and d comes on and stays on to indicate that the system is inactive and is not assisting the driver in maintaining control. The vehicle is safe to drive, but driving should be adjusted accordingly.
If d comes on and stays on:
- Stop the vehicle .
- Turn the engine off and wait 15
- Start the engine .
- Drive the vehicle .
If d comes on and stays on, see your dealer.
Turning the Systems Off and On
Caution
Do not repeatedly brake or accelerate heavily when TCS is off. The vehicle driveline could be damaged.
TCS and StabiliTrak/ESC are turned off and on using the Driver Information Center (DIC) controls. See Driver Information Center (DIC) (Base Level) page 113 or Driver Information Center (DIC) (Uplevel) page 115 and Instrument Cluster (Base Level) page 97 or Instrument Cluster (Uplevel) page 99 for instructions on navigating the cluster menus.
To turn Traction (TCS) or StabiliTrak (ESC) off and on, access the Traction and Stability display from the Options application.
The current status of each system is displayed next to the Traction and Stability icons. To turn either system off or on, select Menu to access the Traction and Stability menu screen.
To turn TCS off, select Traction Off from the menu. The Traction Off Light i displays in the instrument cluster. See Traction Off Light page 110.
If TCS is limiting wheel spin, the TCS will not turn off until the wheels stop spinning.
To turn TCS back on, select Traction On from the menu
Select Stability from the Traction and Stability menu to access the Stability Menu.
To turn StabiliTrak/ESC off, select Stability Off from the menu. The StabiliTrak Off Light g will display in the instrument cluster. See StabiliTrak OFF Light page 110.
TCS cannot be on when StabiliTrak/ESC is off. If TCS is on when StabiliTrak/ESC is turned off, both systems will turn off.|To turn StabiliTrak/ESC back on, select Stability On from the menu. TCS will remain off.
To turn both TCS and StabiliTrak/ESC back on, select Traction On from the Traction and Stability menu and both systems will be turned back on.
Adding accessories can affect the vehicle performance. See Accessories and Modifications page 258.
Driver Mode Control
Driver Mode Control (DMC) allows the driver to adjust the overall driving experience by selecting different modes. These modes will then adjust multiple systems to fit specific driving needs. Drive mode availability and affected vehicle subsystems are dependent upon vehicle trim level, region, and optional features.
If the vehicle is in Tour Mode or AWD Mode it will stay in that mode through future ignition cycles. If the vehicle is in any other mode, it will return to the Tour Mode when the vehicle is restarted. When each mode is selected, a unique and persistent indicator will be displayed in the instrument cluster.
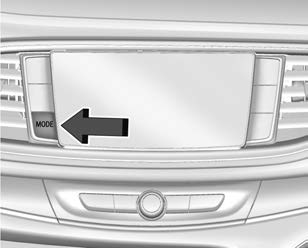
MODE Switch

AWD Mode Switch
To activate each mode, press the MODE switch on the instrument panel.
Modes
Tour Mode
Use for normal city and highway driving to provide a smooth ride. This setting provides balance between comfort and handling.
There is no persistent indicator in the instrument cluster for this mode.
Sport Mode
Use where road conditions or personal preference demand a more controlled response. Sport Mode improves vehicle handling and acceleration on dry pavement.
When active, Sport Mode modifies AWD torque, steering, Electronic Stability Control (ESC), Traction Control System (TCS), and suspension tuning, if equipped.
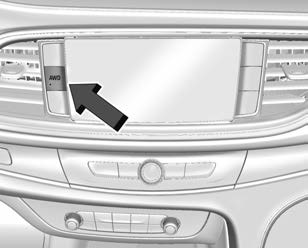
AWD Mode
AWD provides torque to all four wheels. Pressing the AWD Mode switch will select AWD Mode. The AWD light will flash briefly while the system is engaging and stay on to indicate AWD is active. AWD Mode can be turned on and off independently of other modes. Select AWD Mode to improve traction and control on slippery road surfaces, such as gravel, sand, wet pavement, snow, and ice. For more information on AWD, see All-Wheel Drive page 210.
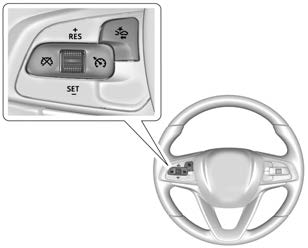
Tow/Haul Mode
This mode will automatically activate AWD, if available. The transmission holds lower gears longer before shifting to provide more torque necessary when towing heavy loads.
This will also increase fuel consumption. Tow/Haul Mode also modifies, steering, ESC, TCS, and suspension tuning, if equipped. Use this mode to assist in maintaining desired vehicle speeds when driving on downhill grades by using the engine and transmission to slow the vehicle.
This helps prevent the brakes from overheating. For more information, see Transporting a Disabled Vehicle page 311.
Cruise Control
With cruise control the vehicle can maintain a speed of about 40 km/h (25 mph) or more without keeping your foot on the accelerator. Cruise control does not work at speeds below 40 km/h (25 mph).
Warning
Cruise control can be dangerous where you cannot drive safely at a steady speed. Do not use cruise control on winding roads or in heavy traffic.
Cruise control can be dangerous on slippery roads. On such roads, fast changes in tire traction can cause excessive wheel slip, and you could lose control. Do not use cruise control on slippery roads.
If equipped with the Traction Control System (TCS), the system may begin to limit wheel spin while you are using cruise control. If this happens, the cruise control will automatically disengage. See Traction Control/Electronic Stability Control page 213. If a collision alert occurs when cruise control is activated, cruise control is disengaged. See Forward Collision Alert (FCA) System page 233. When road conditions allow you to safely use it again, cruise control can be turned back on.
Cruise control will disengage if either TCS or StabiliTrak/Electronic Stability Control (ESC) is turned off.
If the brakes are applied, cruise control disengages.
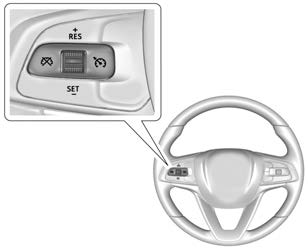
Press to turn cruise control on or off. A white indicator comes on in the instrument cluster.
RES+ : If there is a set speed in memory, press the control up briefly to resume to that speed or press and hold to accelerate. If cruise control is already engaged, use to increase vehicle speed.
SET− : Press the control down briefly to set the speed and activate cruise control.
If cruise control is already engaged, use to decrease vehicle speed.
Press to disengage cruise control without erasing the set speed from memory.
The speedometer reading can be displayed in either English or metric units. See Instrument Cluster (Base Level) page 97 or Instrument Cluster (Uplevel) page 99. The increment value used depends on the units displayed.
Setting Cruise Control
If 5 is on when not in use, SET− or RES+ could get pressed and go into cruise when not desired. Keep 5 off when cruise is not being used.
- Press 5 to turn the cruise system
- Get to the speed
- Press and release SET− . The desired set speed briefly appears in the instrument
- Take your foot off the accelerator
The cruise control indicator on the instrument cluster turns green after the cruise control has been set to the desired speed. See Instrument Cluster (Base Level) page 97 or Instrument Cluster (Uplevel) page 99.
Resuming a Set Speed
If the cruise control is set at a desired speed and then the brakes are applied or * is pressed, the cruise control is disengaged without erasing the set speed from memory.
Once the vehicle reaches about 40 km/h (25 mph) or more, press RES+ up briefly. The vehicle returns to the previously set speed.
Increasing Speed While Using Cruise Control
Do one of the following:
- Press and hold RES+ up until the vehicle accelerates to the desired speed, then release it.
- To increase vehicle speed in small increments, press RES+ up briefly. For each press, the vehicle goes about 1 km/h (1 mph) faster.
Reducing Speed While Using Cruise Control
Do one of the following:
- Press and hold SET− down until the desired lower speed is reached, then release it.
- To slow down in small increments, press SET− down briefly. For each press, the vehicle goes about 1 km/h (1 mph) slower.
- Passing Another Vehicle While Using Cruise ControlUse the accelerator pedal to increase the vehicle speed. When you take your foot off the pedal, the vehicle will slow down to the previously set cruise speed. While pressing the accelerator pedal or shortly following the release to override cruise control, briefly pressing SET− will result in cruise set to the current vehicle speed.Using Cruise Control on HillsHow well the cruise control will work on hills depends upon the vehicle speed, load, and the steepness of the hills. When going up steep hills, you might have to step on the accelerator pedal to maintain your speed. When going downhill, you might have to brake or shift to a lower gear to keep your speed down. If the brake pedal is applied, cruise control will disengage.Ending Cruise Control
There are four ways to end cruise control:
- Step lightly on the brake
- Press *.
- Shift the transmission to N (Neutral).
- To turn off cruise control, press 5.
Erasing Speed Memory
The cruise control set speed is erased from memory if 5 is pressed or the ignition is turned off.Adaptive Cruise Control (Advanced)If equipped with Adaptive Cruise Control (ACC), it allows for selecting the cruise control set speed and following gap. Read this entire section before using this system. ACC uses a camera and radar sensor(s) to detect other vehicles. See Radio Frequency Statement page 343.
The following gap is the following time (or distance) between your vehicle and a vehicle detected directly ahead in your path, moving in the same direction. If no vehicle is detected in your path, ACC works like regular cruise control.
If a vehicle is detected in your path, ACC can speed up the vehicle or apply limited, moderate braking to maintain the selected following gap. To disengage ACC, apply the brake. If the Traction Control System (TCS) or StabiliTrak/Electronic Stability Control (ESC) system activates while ACC is engaged, ACC may automatically disengage. See Traction Control/Electronic Stability Control page 213. When road conditions allow ACC to be safely used, ACC can be turned back on.
Disabling the TCS or StabiliTrak/ESC system will disengage and prevent engagement.
of ACC
ACC can reduce the need for you to frequently brake and accelerate, especially when used on expressways, freeways, and interstate highways. When used on other roads, you may need to take over the control of braking or acceleration more often.ACC automatically slows the vehicle down while navigating the curve and may increase speed out of the curve, but will not exceed the set speed.
- Warning
ACC has limited braking ability and may not have time to slow the vehicle down enough to avoid a collision with another vehicle you are following. This can occur when vehicles suddenly slow or stop ahead, or enter your lane. Also see
“Alerting the Driver” in this section. - Complete attention is always required while driving and you should be ready to take action and apply the brakes. See Defensive Driving page 188.
Warning
ACC will not detect or brake for children, pedestrians, animals, or other objects.
Do not use ACC when:
- On winding and hilly roads or when the sensors are blocked by snow, ice, or dirt. The system may not detect a vehicle ahead. Keep the entire front of the vehicle clean.
- Visibility is low, such as in fog, rain, or snow conditions. ACC performance is limited under these conditions.
- On slippery roads where fast changes in tire traction can cause excessive wheel slip.
- When towing a trailer.
 Press to turn the system on or off. The indicator turns white on the instrument cluster when ACC is turned on.RES+ : Press briefly to resume to a previous set speed or to increase vehicle speed if ACC is already activated. To increase speed by 1 km/h (1 mph), press RES+ briefly. To increase speed to the next 5 km/h (5 mph) mark on the speedometer, hold RES+.SET– : Press briefly to set the speed and activate ACC or to decrease vehicle speed if ACC is already activated. To decrease speed by about 1 km/h (1 mph), press SET– briefly. To decrease speed to the next 5 km/h (5 mph) mark on the speedometer, hold SET–.
- Press to disengage ACC without erasing the selected set speed.Press to select a following gap time (or distance) setting for ACC of Far, Medium, or Near.The speedometer reading can be displayed in either English or metric units. See Instrument Cluster (Base Level) page 97 or Instrument Cluster (Uplevel) page 99. The increment value used depends on the units displayed.Switching Between ACC and Regular Cruise ControlTo switch between ACC and regular cruise control, press and hold *. A Driver Information Center (DIC) message displays.
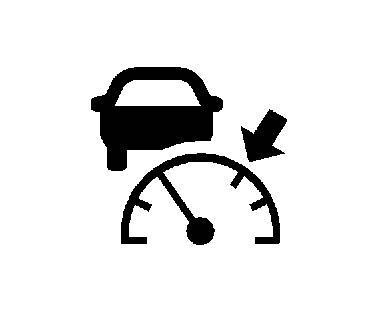
- ACC Indicator
- Regular Cruise Control Indicator
- When ACC is engaged, a green o indicator will be lit on the instrument cluster. When the regular cruise control is engaged, a green J indicator will be lit on the instrument cluster; the following gap will not display.It is recommended to switch from ACC to regular cruise control only, when there are no vehicles ahead of your vehicle.When the vehicle is turned on, the cruise control mode will be set to the last mode used before the vehicle was turned off.
Warning
Always check the cruise control indicator on the instrument cluster to determine which mode cruise control is in before using the feature. If ACC is not active, the vehicle will not automatically brake for other vehicles, which could cause a crash if the brakes are not applied manually. You and others could be seriously injured or killed.
Setting Adaptive Cruise Control
If![]() is on when not in use, it could get pressed and go into ACC when not desired. Keep
is on when not in use, it could get pressed and go into ACC when not desired. Keep ![]() off when cruise is not being used.
off when cruise is not being used.
Select the set speed desired for ACC. This is the vehicle speed when no vehicle is detected in its path.
While the vehicle is moving, ACC will not set at a speed less than 25 km/h (15 mph), although it can be resumed when driving at lower speeds. The minimum allowable set speed is 25 km/h (15 mph).
To set ACC while moving:
- Press .
- Get up to the desired speed.
- Press and release SET–.
- Remove your foot from the accelerator pedal.
After ACC is set, it may immediately apply the brakes if a vehicle ahead is detected closer than the selected following gap.
ACC can also be set while the vehicle is stopped if ACC is on and the brake pedal is applied.
The ACC indicator displays on the instrument cluster and Head-Up Display (HUD), if equipped. When ACC is turned on, the indicator will be lit white. When ACC is active, the indicator will turn green.
Be mindful of speed limits, surrounding traffic speeds, and weather conditions when selecting the set speed.
Resuming a Set Speed
If ACC is set at a desired speed and then the brakes are applied, ACC is disengaged without erasing the set speed from memory.
To begin using ACC again, press RES+ up briefly.
-
- If the vehicle is moving more than 5 km/h (3 mph), it returns to the previous set speed .
- If the vehicle is stopped with the brake pedal applied, press RES+ and release the brake pedal. ACC will hold the vehicle until RES+ or the accelerator pedal is
Once ACC has resumed, the vehicle speed will increase to the set speed under the following conditions:
- There is no vehicle
- The vehicle ahead is beyond the selected following gap.
- The vehicle speed is not being limited because of a sharp turn.
Increasing Speed While ACC is at a Set Speed
If ACC is already activated, do one of the following:
- Use the accelerator to get to the higher Briefly press and release SET– and release the accelerator pedal. The vehicle will now cruise at the higher speed.
When the accelerator pedal is pressed, ACC will not brake because it is overridden. While overridden, the ACC indicator will turn blue on the instrument cluster and HUD, if equipped.
- Press and hold up RES+ until the desired set speed is displayed, then release it.
- To increase vehicle speed in small increments, press RES+ For each press, the vehicle goes about 1 km/h (1 mph) faster.
- To increase vehicle speed in larger increments, hold RES+. While holding RES+, the vehicle speed increases to the next 5 km/h (5 mph) step, then continues to increase by 5 km/h (5 mph) at a time.
- The set speed can also be increased while the vehicle is stopped.
- If stopped with the brake applied, press RES+ until the desired set speed is
- If ACC is holding the vehicle at a stop and there is another vehicle directly ahead, pressing RES+ will increase the set speed.
- Pressing RES+ when there is no longer a vehicle ahead or the vehicle ahead is pulling away and the brake is not applied will cause the ACC to resume.
When it is determined that there is no vehicle ahead or the vehicle ahead is beyond the selected following gap, then the vehicle speed will increase to the set speed.
Reducing Speed While ACC is at a Set Speed
If ACC is already activated, do one of the following:
- Use the brake to get to the desired lower Release the brake and press SET–. The vehicle will now cruise at the lower speed.
- Press and hold SET– until the desired lower speed is reached, then release
- To decrease the vehicle speed in smaller increments, press SET− For each press, the vehicle goes about 1 km/h (1 mph) slower.
- To decrease the vehicle speed in larger increments, hold SET−. While holding SET−, the vehicle speed decreases to the next 5 km/h (5 mph) step, then continues to decrease by 5 km/h (5 mph) at a time.
The set speed can also be decreased while the vehicle is stopped.
- If stopped with the brake applied, press or hold SET− until the desired set speed is displayed.
- Selecting the Follow Distance GapWhen a slower moving vehicle is detected ahead within the selected following gap, ACC will adjust the vehicle’s speed and attempt to maintain the follow distance gap selected.Press on the steering wheel to adjust the following gap. Each press cycles the gap button through three settings: Far, Medium, or Near.When pressed, the current gap setting displays briefly on the instrument cluster and HUD, if equipped. The gap setting will be maintained until it is changed.Since each gap setting corresponds to a following time (Far, Medium, or Near), the following distance will vary based on vehicle speed. The faster the vehicle speed, the further back your vehicle will follow a vehicle detected ahead. Consider traffic and weather conditions when selecting the following gap. The range of selectable gaps may not be appropriate for all drivers and driving conditions.
Changing the gap setting automatically changes the alert timing sensitivity (Far, Medium, or Near) for the Forward Collision Alert (FCA) feature. See Forward Collision Alert (FCA) System page 233.
Alerting the Driver

- If ACC is engaged, driver action may be required when ACC cannot apply sufficient braking because of approaching a vehicle too rapidly.When this condition occurs, the collision alert symbol will flash on the windshield. Either eight beeps will sound from the front, or both sides of the Safety Alert Seat will pulse five times. Touch the Settings icon on the infotainment home page. Select “Vehicle” to display the list of available options and select “Collision/Detection Systems”. See Defensive Driving page 188.Approaching and Following a Vehicle
- The vehicle ahead indicator is on the instrument cluster and HUD display (if equipped). It only displays when a vehicle is detected in your vehicle’s path moving in the same direction. If this symbol is not displaying, ACC will not respond to or brake for vehicles ahead.ACC automatically slows the vehicle down and adjusts vehicle speed to follow a detected vehicle ahead at the selected following gap. The vehicle speed increases or decreases to follow a detected vehicle in front of your vehicle when that vehicle is traveling slower than your vehicle set speed. It may apply limited braking, if necessary. When braking is active, the brake lamps will come on. The automatic braking may feel or sound different than if the brakes were applied manually. This is normal.
- Passing a Vehicle While Using ACC
If the set speed is high enough, and the left turn signal is used to pass a vehicle ahead in the selected following gap, ACC may assist by gradually accelerating the vehicle prior to the lane change
Warning
When using ACC to pass a vehicle or perform a lane change, the following distance to the vehicle being passed may be reduced. ACC may not apply sufficient acceleration or braking when passing a vehicle or performing a lane change. Always be ready to manually accelerate or brake to complete the pass or lane change.
Stationary or Very Slow-Moving Objects
- Warning
ACC may not detect and react to stopped or slow-moving vehicles ahead of you. For example, the system may not brake for a vehicle it has never detected moving. This can occur in stop-and-go traffic or when a vehicle suddenly appears due to a vehicle ahead changing lanes. Your vehicle may not stop and could cause a crash. Use caution when using ACC. Your complete attention is always required while driving and you should be ready to take action and apply the brakes.
Irregular Objects Affecting ACC
ACC may have difficulty detecting the following objects:
- Vehicles with cargo extending from the back end.
- Non-standard shaped vehicles, such as vehicle transport, vehicles with a side car fitted, or horse carriages.
- Objects that are close to the front of your vehicle .
ACC Automatically Disengages
ACC may automatically disengage and you will need to manually apply the brakes to slow the vehicle if:
- The sensors are blocked .
- The Traction Control System (TCS) or StabiliTrak/ESC system has activated or been disabled.
- There is a fault in the system .
- The radar falsely reports blockage when driving in a desert or remote area with no other vehicles or roadside objects.
- A DIC message may display to indicate that ACC is temporarily unavailable.
The ACC active symbol will turn white when ACC is no longer active.
In some cases, when ACC is temporarily unavailable, regular cruise control may be used. See “Switching Between ACC and Regular Cruise Control” in this section.
Always consider driving conditions before using either cruise control system.
Notification to Resume ACC
ACC will maintain a following gap behind a detected vehicle and slow your vehicle to a stop behind that vehicle.
If the stopped vehicle ahead has driven away and ACC has not resumed, the vehicle ahead indicator will flash as a reminder to check traffic ahead before proceeding. In addition, the left and right sides of the Safety Alert Seat will pulse three times,
or three beeps will sound. Touch the Settings icon on the infotainment home page. Select “Vehicle” to display the list of
available options and select ”Alert Type” and “Adaptive Cruise Go Notifier” in “Collision/ Detection Systems”.
When the vehicle ahead drives away, ACC resumes automatically if the stop was brief. If necessary, press RES+ or the accelerator pedal to resume ACC. If stopped for more than two minutes or if the driver door is opened and the driver seat belt is unbuckled, the ACC automatically applies the Electric Parking Brake (EPB) to hold the vehicle. The EPB status light will turn on.
See Electric Parking Brake page 211. To release the EPB, press the accelerator pedal.
A DIC warning message may display indicating to shift to P (Park) before exiting the vehicle.
Warning
If ACC has stopped the vehicle, and if ACC is disengaged, turned off, or canceled, the vehicle will no longer be held at a stop. The vehicle can move. When ACC is holding the vehicle at a stop, always be prepared to manually apply the brakes.
Leaving the vehicle without placing it in P (Park) can be dangerous. Do not leave the vehicle while it is being held at a stop by ACC. Always place the vehicle in P (Park) and turn off the ignition before leaving the vehicle.
ACC Override
If using the accelerator pedal while ACC is active, the ACC indicator turns blue on the instrument cluster and in the HUD, if equipped, to indicate that automatic braking will not occur. ACC will resume operation when the accelerator pedal is not being pressed.
Warning
The ACC will not automatically apply the brakes if your foot is resting on the accelerator pedal. You could crash into a vehicle ahead of you.
Curves in the Road
Warning
On curves, ACC may not detect a vehicle ahead in your lane. You could be startled if the vehicle accelerates up to the set speed, especially when following a vehicle exiting or entering exit ramps. You could lose control of the vehicle or crash. Do not use ACC while driving on an entrance or exit ramp. Always be ready to use the brakes if necessary.
Warning
On curves, ACC may respond to a vehicle in another lane, or may not have time to react to a vehicle in your lane. You could crash into a vehicle ahead of you, or lose control of your vehicle. Give extra attention in curves and be ready to use the brakes if necessary. Select an appropriate speed while driving in curves.
ACC may operate differently in a sharp curve. It may reduce the vehicle speed if the curve is too sharp.
ACC automatically slows the vehicle down while navigating the curve and may increase speed out of the curve, but will not exceed the set speed.
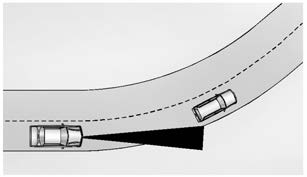
When following a vehicle and entering a curve, ACC may not detect the vehicle ahead and accelerate to the set speed. When this happens, the vehicle ahead indicator will not appear.
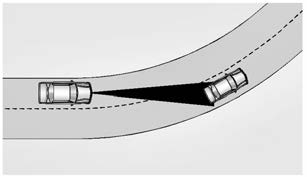
ACC may detect a vehicle that is not in your lane and apply the brake .
ACC may occasionally provide an alert and/ or braking that is considered unnecessary.
It could respond to vehicles in different lanes, signs, guardrails, and other stationary objects when entering or exiting a curve.
This is normal operation. The vehicle does not need service.
Other Vehicle Lane change .

ACC will not detect a vehicle ahead until it is completely in the lane. The brake may need to be manually applied.
Objects Not Directly in Front of Your Vehicle
The detection of objects in front of the vehicle may not be possible if:
- The vehicle or object ahead is not within your lane.
- The vehicle ahead is shifted, not centered, or is shifted to one side of the lane.
Driving in Narrow Lanes
Vehicles in adjacent traffic lanes or roadside objects may be incorrectly detected when located along the roadway.
Do Not Use ACC on Hills and When Towing a Trailer
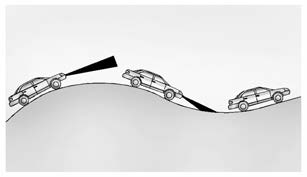
Do not use ACC when driving on steep hills or when towing a trailer. ACC will not detect a vehicle in the lane while driving on steep hills. The driver will often need to take over acceleration and braking on steep hills, especially when towing a trailer. If the brakes are applied, the ACC disengages.
Disengaging ACC
There are three ways to disengage ACC:
- Step lightly on the brake
- Press *.
- Press
Erasing Speed Memory
The cruise control set speed is erased from memory if 5 is pressed or if the ignition is turned off.
Weather Conditions Affecting ACC
System operation may be limited under snow, heavy rain, or road spray conditions.
Accessory Installations and Vehicle Modifications
Do not install or place any object around the front camera windshield area that would obstruct the front camera view.
Do not install objects on top of the vehicle that overhang and obstruct the front camera, such as a canoe, kayak, or other items that can be transported on a roof rack system. See Roof Rack System page 87.
Do not modify the hood, headlamps, or fog lamps, as this may limit the camera’s ability to detect an object.
Cleaning the Sensing System
The radar sensor on the front of the vehicle can become blocked by snow, ice, dirt, or mud. This area needs to be cleaned for ACC to operate properly.
If ACC will not operate, regular cruise control may be available. See “Switching Between ACC and Regular Cruise Control” previously in this section. Always consider driving conditions before using either cruise control system.
For cleaning instructions, see “Washing the Vehicle” under Exterior Care page 314.
Driver Assistance Systems
This vehicle may have features that work together to help avoid crashes or reduce crash damage while driving, backing, and parking. Read this entire section before using these systems.
Warning
Do not rely on the Driver Assistance Systems. These systems do not replace the need for paying attention and driving safely. You may not hear or feel alerts or warnings provided by these systems. Failure to use proper care when driving may result in injury, death, or vehicle damage. See Defensive Driving page 188.
Under many conditions, these systems will not:
- Detect children, pedestrians, bicyclists, or animals.
Detect vehicles or objects outside the area monitored by the system.
Work at all driving speeds. - Warn you or provide you with enough time to avoid a crash.
- Work under poor visibility or bad weather conditions.
- Work if the detection sensor is not cleaned or is covered by ice, snow, mud, or dirt.
- Work if the detection sensor is covered up, such as with a sticker, magnet, or metal plate.
- Work if the area surrounding the detection sensor is damaged or not properly repaired.
- Complete attention is always required while driving, and you should be ready to take action and apply the brakes and/or steer the vehicle to avoid crashes.
Audible or Safety Alert Seat
Some driver assistance features alert the driver of obstacles by beeping. To view available settings for this feature, touch the Settings icon on the infotainment home page. Select “Vehicle” to display the list of available options and select “Comfort and Convenience”.
If equipped with the Safety Alert Seat, the driver seat cushion may provide a vibrating pulse alert instead of beeping. To view available settings for this feature, touch the Settings icon on the infotainment home page. Select “Vehicle” to display the list of available options and select “Collision/ Detection Systems”.
Cleaning
Depending on vehicle options, keep these areas of the vehicle clean to ensure the best driver assistance feature performance. Driver Information Center (DIC) messages may display when the systems are unavailable or blocked.
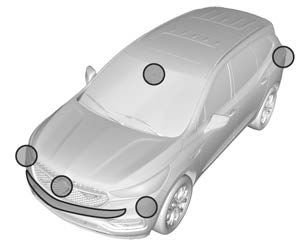
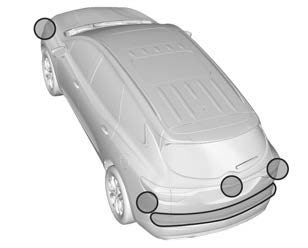
- Front and rear bumpers and the area
- below the bumpers
- Front grille and headlamps
- Front camera lens in the front grille or near the front emblem .
- Front side and rear side panels
- Outside of the windshield in front of the rearview mirror
- Side camera lens on the bottom of the outside mirrors
- Rear side corner bumpers
- Rear Vision Camera above the license plate
Radio Frequency
This vehicle may be equipped with driver assistance systems that operate using radio frequency. See Radio Frequency Statement page 343.
Assistance Systems for Parking or Backing
If equipped, the Rear Vision Camera (RVC), Surround Vision, Rear Park Assist (RPA), Front and Rear Park Assist (FRPA), and Rear Cross Traffic Alert (RCTA) may help the driver park or avoid objects. Always check around the vehicle when parking or backing.
Rear Vision Camera (RVC)
When the vehicle is shifted into R (Reverse), the Rear Vision Camera (RVC) displays an image of the area behind the vehicle in the infotainment display. The previous screen displays when the vehicle is shifted out of R (Reverse) after a short delay. To return to the previous screen sooner, press Home or Back on the infotainment system, shift into P (Park), or reach a vehicle speed of approximately 12 km/h (8 mph) while in D (Drive ).

- View Displayed by the Camera
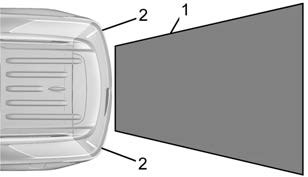 View Displayed by the Camera
 - Corners of the Rear Bumper
Displayed images may be farther or closer than they appear. The area displayed is limited and objects that are close to either corner of the bumper or under the bumper do not display.
A warning triangle may appear on the infotainment display to show that Rear Park Assist (RPA) or Rear Cross Traffic Alert (RCTA) has detected an object. This triangle changes from amber to red and increases in size the closer the object.
Warning
The camera(s) do not display children, pedestrians, bicyclists, crossing traffic, animals, or any other object outside of the cameras’ field of view, below the bumper, or under the vehicle. Shown distances may be different from actual distances. Do not drive or park the vehicle using only these camera(s). Always check behind and around the vehicle before driving. Failure to use proper care may result in injury, death, or vehicle damage.
Surround Vision System
If equipped, Surround Vision shows an image of the area surrounding the vehicle, along with the front or rear camera views on the infotainment display. The front camera is in the grille or near the front emblem, the side cameras are on the bottom of the outside mirrors, and the rear camera is above the license plate.
The Surround Vision system can be accessed by selecting CAMERA in the infotainment display or when the vehicle is shifted into R (Reverse). To return to the previous screen sooner, when not in R (Reverse) press Home or Back on the infotainment system, shift into P (Park), or reach a vehicle speed of approximately 12 km/h (8 mph) while in D (Drive).
Warning
The Surround Vision cameras have blind spots and will not display all objects near the corners of the vehicle. Folding outside mirrors that are out of position may not display surround view correctly. Always check around the vehicle when parking or backing.
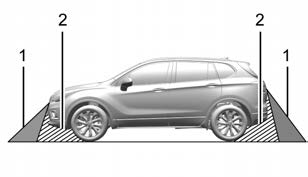
- Views Displayed by the Surround Vision Cameras
- Area Not Shown
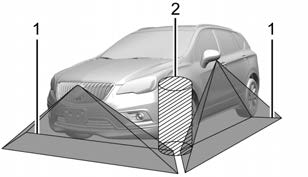
- Views Displayed by the Surround Vision Cameras
- Area Not Shown
Warning
The camera(s) do not display children, pedestrians, bicyclists, crossing traffic, animals, or any other object outside of the cameras’ field of view, below the bumper, or under the vehicle. Shown distances may be different from actual distances. Do not drive or park the vehicle using only these camera(s). Always check behind and around the vehicle before driving. Failure to use proper care may result in injury, death, or vehicle damage.
Camera Views
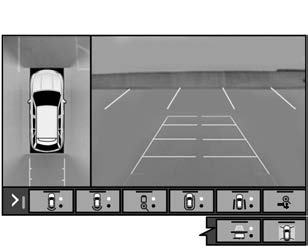
Touch the camera view buttons along the bottom of the infotainment display. Available views will differ depending on vehicle options.
Front/Rear Standard View : Displays an image of the area in front or behind the vehicle. Touch Front/Rear Standard View on the infotainment display when a camera view is active. Touching the button multiple times will toggle between front and rear camera views.
If equipped, the front view camera also displays when the Park Assist system detects an object within 30 cm (12 in).
Front/Rear Overhead View : Displays a Front or Rear Overhead View of the vehicle.
Touching the button will toggle between the two views.
Side Forward/Rearward View : Displays a view that shows objects next to the front or rear sides of the vehicle. Touch Side Forward/Rearward View on the infotainment display when a camera view is active.
Touching the button multiple times will toggle between forward and rearward views. Park Assist and RCTA overlays are not available when Side Forward/Rearward View is active.
Hitch View : Assists while connecting to a trailer. Displays a zoomed-in view of the hitch to help align the vehicle’s hitch ball with the trailer coupler. Shifting into P (Park) while in this view will automatically engage the Electric Parking Brake (EPB).
Guidance Lines : Displays available guidelines. The horizontal markings represent distance from the vehicle.
Top Down View : Displays an image of the area surrounding the vehicle, along with other views in the infotainment display. Top Down can be enabled or disabled by touching the Top Down View button multiple times.
Hitch Guidance
If equipped, this feature displays a single, centered guideline on the camera display to assist with aligning a vehicle’s hitch ball with a trailer coupler. Select the trailer guidance line button, then align the trailer guidance line over the trailer coupler.
Continuously steer the vehicle to keep the guidance line centered on the coupler when backing. RVC Park Assist overlays will not display when the trailer guidance line is active. Hitch Guidance is only available in Standard View.
To check the trailer when in a forward gear above 12 km/h (8 mph), touch CAMERA on the infotainment display to view the rear camera. Touch X to exit the view or it will be removed automatically after eight second .
Warning
Use Hitch Guidance only to help back the vehicle to a trailer hitch or, when traveling above 12 km/h (8 mph), to briefly check the status of your trailer. Do not use for any other purpose, such as making lane change decisions. Before making a lane change, always check the mirrors and glance over your shoulder. Improper use could result in serious injury to you or others.
Park Assist
|The vehicle may be equipped with Front and Rear Park Assist (FRPA). Under certain conditions, the Park Assist system can assist the driver during backing and parking maneuvers when the vehicle is driven at no more than 9 km/h (6 mph). An illuminated indicator in the Park Assist button indicates the system is ready.
Sensors located in the bumpers measure the distance between the vehicle and objects using sonar technology. These sensors are designed to detect certain objects up to 2.5 m (8 ft) behind and 1.2 m (4 ft) in front of your vehicle that are taller than 25 cm (10 in).
Different environmental conditions may affect whether and how far the Park Assist system can detect objects. Keep the sensors clean of mud, dirt, snow, ice, and slush; and clean sensors after a car wash in freezing temperatures. Sensors that are not clean may not detect objects or may cause the system to alert when not required .
Warning
The Park Assist System is no substitute for careful and attentive driving. The Park Assist system does not detect children, pedestrians, bicyclists, animals, or objects located below the bumper or that are too close or too far from the vehicle. It is not available at speeds greater than 9 km/h (6 mph). To prevent injury, death,
or vehicle damage, even with Park Assist, always check the area around the vehicle and check all mirrors before moving forward or backing.
How the System Works
The vehicle may have a Park
Assist amphitheatre-like display on the cluster with bars that represent the estimated location of a detected object and the vehicle’s distance from the object. As a detected object becomes closer, more bars light up and change color from yellow to amber to red.
When an object is first detected in the rear, one beep will be heard from the rear, or the driver’s seat will pulse two times,
if equipped with Safety Alert Seat. When an object is very close, five beeps will sound from the front or rear (depending on the object’s location), or the driver’s seat will pulse five times. Beeps for front are higher pitched than the rear.
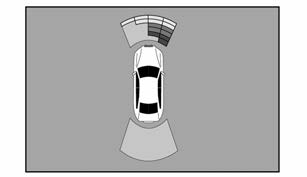
Turning the System On and Off
The Park Assist System can be turned on or off using the infotainment system. To view available settings for this feature, touch the Settings icon on the infotainment home page. Select “Vehicle” to display the list of available options and select “Collision/Detection Systems”.
The X button is used to turn on or off the Park Assist, which also turns on or off the Backing Warning and Reverse Automatic Braking (RAB) at the same time. When the system is turned off, a system off message is shown on the display. This message disappears after a short period of time.
Turn off Park Assist when towing a trailer to prevent unwanted beeps and when a bike rack is attached to ensure proper operation.
When the System Does Not Seem to Work Properly
If a service message displays, check the following conditions:
- The sensors may not be clean. Keep the vehicle’s front and rear bumpers free of mud, dirt, snow, ice, and slush. For cleaning instructions, see Exterior Care page 314.
- The Park Assist sensors may be covered by frost or ice. Frost or ice can form around and behind the sensors and may not always be seen; this can occur after washing the vehicle in cold weather. The message may not clear until the frost or ice has melted.
If a service message displays and the above conditions do not exist, take the vehicle to your dealer for repairs.
If the Park Assist System does not activate due to a temporary condition, a system off message is shown on the display. This can occur under the following conditions:
- The driver has disabled the
- An object is currently blocking the rear sensors (for example, bike rack, tailgate, trailer hitch, etc.). Once the object is removed, Park Assist will return to normal
- The bumper is damaged. Take the vehicle to your dealer for repairs.
- Other conditions, such as vibrations from a jackhammer or the compression of air brakes on a very large truck, are affecting system performance.
Rear Pedestrian Alert
If equipped, and under certain conditions, this feature can provide alerts for a pedestrian within the system’s range directly behind the vehicle. This feature only works in R (Reverse) below 12 km/h (8 mph), and detects pedestrians up to 8 m (26 ft) away during daytime driving. During nighttime driving, feature performance is very limited .
Rear Pedestrian Alert Indicator
When a pedestrian is detected within the system’s range directly behind the vehicle, this symbol flashes amber on the infotainment display, along with five beeps from the rear, or if equipped, two pulses from both sides of the driver seat. When a pedestrian is detected close to the vehicle, the symbol flashes red on the infotainment display, along with ten beeps from the rear, or if equipped, seven pulses from both sides of the driver seat .
Warning
Rear Pedestrian Alert does not automatically brake the vehicle. It also does not provide an alert unless it detects a pedestrian, and it may not detect all pedestrians if:
- The pedestrian is not directly behind the vehicle, fully visible to the Rear Vision Camera (RVC), or standing
- The pedestrian is part of a group.
- The pedestrian is a child.
- Visibility is poor, including nighttime conditions, fog, rain, or snow.
- The RVC is blocked by dirt, snow, or ice.
- The RVC, taillamps, or back-up lamps are not cleaned or in proper working condition .
- The vehicle is not in R (Reverse).
To help avoid death or injury, always check for pedestrians around the vehicle before backing up. Be ready to take action and apply the brakes. See Defensive Driving page 188. Keep the RVC, taillamps, and back-up lamps clean and in good repair.
Rear Pedestrian Alert can be set to Off or Alert. To view available settings from the infotainment screen, touch Settings > Vehicle > Collision/Detection Systems > Rear Pedestrian Detection.
If equipped, alerts can be set to beeps or seat pulses. To view available settings from the infotainment screen, touch Settings > Vehicle > Collision/Detection Systems > Alert Type.
Rear Cross Traffic Alert (RCTA) System
If equipped, Rear Cross Traffic Alert (RCTA) displays a red warning triangle with a left or right pointing arrow on the infotainment display to warn of traffic coming from the left or right. This system detects objects
coming from up to 20 m (65 ft) from the left or right side of the vehicle. When an object is detected, either three beeps sound from the left or right or three Safety Alert Seat pulses occur on the left or right side, depending on the direction of the detected vehicle.
Driving With a Trailer
Use caution while backing up when towing a trailer. The RCTA feature is automatically disabled when a trailer is attached to the vehicle.
Turning the Features On or Off
The X button on the center console is used to turn on or off Rear Park Assist (RPA) and RCTA at the same time. The indicator light in the button comes on when the features are on and turns off when the features have been disabled.
RCTA can be turned on or off using the infotainment system. To view available settings for this feature, touch the Settings icon on the infotainment home page. Select “Vehicle” to display the list of available options and select “Collision/Detection Systems”.
Assistance Systems for Driving
If equipped, when driving the vehicle in a forward gear, Forward Collision Alert (FCA), Lane Departure Warning (LDW), Lane Keep Assist (LKA), Side Blind Zone Alert (SBZA), Lane Change Alert (LCA), Automatic Emergency Braking (AEB), and/or the Front Pedestrian Braking (FPB) System can help to avoid a crash or reduce crash damage.
Forward Collision Alert (FCA) System
If equipped, the FCA system may help to avoid or reduce the harm caused by front-end crashes. When approaching a vehicle ahead too quickly, FCA provides a red flashing alert on the windshield and rapidly beeps or pulses the driver seat. FCA also lights an amber visual alert if following another vehicle much too closely.
FCA detects vehicles within a distance of approximately 60 m (197 ft) and operates at speeds above 8 km/h (5 mph). If the vehicle has Adaptive Cruise Control (ACC), it can detect vehicles to distances of approximately 110 m (360 ft) and operates at all speeds.
See Adaptive Cruise Control (Advanced) page 218.
Warning
FCA is a warning system and does not apply the brakes. When approaching a slower-moving or stopped vehicle ahead too rapidly, or when following a vehicle too closely, FCA may not provide a warning with enough time to help avoid a crash. It also may not provide any warning at all. FCA does not warn of pedestrians, animals, signs, guardrails, bridges, construction barrels, or other objects. Be ready to take action and apply the brakes. See Defensive Driving page 188.
FCA can be disabled through vehicle settings. To view available settings for this feature, touch the Settings icon on the infotainment home page. Select “Vehicle” to display the list of available options and select “Collision/ Detection Systems
Detection Systems
- FCA warnings will not occur unless the FCA system detects a vehicle ahead. When a vehicle is detected, the vehicle ahead indicator will display green. Vehicles may not be detected on curves, highway exit ramps, or hills, due to poor visibility; or if a vehicle ahead is partially blocked by pedestrians or other objects. FCA will not detect another vehicle ahead until it is completely in the driving lane.
Warning
- FCA does not provide a warning to help avoid a crash, unless it detects a vehicle. FCA may not detect a vehicle ahead if the FCA sensor is blocked by dirt, snow, or ice, or if the windshield is damaged. It may also not detect a vehicle on winding or hilly roads, or in conditions that can limit visibility such as fog, rain, or snow, or if the headlamps or windshield are not cleaned or in proper condition. Keep the windshield, headlamps, and FCA sensors clean and in good repair.
Collision Alert
With Head-Up Display
Without Head-Up Display
When your vehicle approaches another detected vehicle too rapidly, the red FCA display will flash on the windshield. Also, eight rapid high-pitched beeps will sound from the front, or both sides of the Safety Alert Seat will pulse five times. When this Collision Alert occurs, the brake system may prepare for driver braking to occur more rapidly which can cause a brief, mild deceleration. Continue to apply the brake pedal as needed.
Tailgating Alert
- The vehicle ahead indicator will display amber when you are following a vehicle ahead too closely.
- Selecting the Alert Timing
The Collision Alert control is on the steering wheel. Press [ to set the FCA timing to Far, Medium, or Near. The first button press shows the current setting on the DIC. Additional button presses will change this setting. The chosen setting will remain until it is changed and will affect the timing of both the Collision Alert and the Tailgating Alert features. The timing of both alerts will vary based on vehicle speed. The faster the vehicle speed, the farther away the alert will occur. Consider traffic and weather conditions when selecting the alert timing. The range of selectable alert timings may not be appropriate for all drivers and driving conditions.
If your vehicle is equipped with Adaptive Cruise Control (ACC), changing the FCA timing setting automatically changes the following gap setting (Far, Medium, or Near).
Following Distance Indicator
The following distance to a moving vehicle ahead in your path is indicated in following time in seconds on the Driver Information Center (DIC). See Driver Information Center (DIC) (Base Level) page 113 or Driver Information Center (DIC) (Uplevel) page 115. The minimum following time is seconds away. If there is no vehicle detected ahead, or the vehicle ahead is out of sensor range, dashes will be displayed.
Unnecessary Alerts
FCA may provide unnecessary alerts for turning vehicles, vehicles in other lanes, objects that are not vehicles, or shadows. These alerts are normal operation and the vehicle does not need service.
Cleaning the System
If the FCA system does not seem to operate properly, this may correct the issue:
- Clean the outside of the windshield in front of the rearview mirror.
- Clean the entire front of the vehicle .
- Clean the headlamps.
Automatic Emergency Braking (AEB)
If equipped, the AEB system may help avoid or reduce the harm caused by front-end crashes. AEB also includes Intelligent Brake Assist (IBA). When the system detects a vehicle ahead in your path that is traveling in the same direction that you may be about to crash into, it can provide a boost to braking or automatically brake the vehicle. This can help avoid or lessen the severity of crashes when driving in a forward gear. Depending on the situation,
the vehicle may automatically brake moderately or hard. This automatic emergency braking can only occur if a vehicle is detected. This is shown by the FCA vehicle ahead indicator being lit. See Forward Collision Alert (FCA) System page 233.
The system works when driving in a forward gear between 8 km/h (5 mph) and 80 km/h (50 mph), or on vehicles with Adaptive Cruise Control (ACC), above 4 km/h (2 mph). It can detect vehicles up to approximately 60 m (197 ft).
Warning
AEB is an emergency crash preparation feature and is not designed to avoid crashes. Do not rely on AEB to brake the vehicle. AEB will not brake outside of its operating speed range and only responds to detected vehicles.
AEB may not:
- Detect a vehicle ahead on winding or hilly roads.
Detect all vehicles, especially vehicles with a trailer, tractors, muddy vehicles, etc. - Detect a vehicle when weather limits visibility, such as in fog, rain, or snow.
Detect a vehicle ahead if it is partially blocked by pedestrians or other objects.
Complete attention is always required while driving, and you should be ready to take action and apply the brakes and/or steer the vehicle to avoid crashes.
AEB may slow the vehicle to a complete stop to try to avoid a potential crash. If this happens, AEB may engage the Electric Parking Brake (EPB) to hold the vehicle at a stop. Release the EPB or firmly press the accelerator pedal .
Warning
AEB may automatically brake the vehicle suddenly in situations where it is unexpected and undesired. It could respond to a turning vehicle ahead, guardrails, signs, and other non-moving objects. To override AEB, firmly press the accelerator pedal, if it is safe to do so.
Intelligent Brake Assist (IBA)
IBA may activate when the brake pedal is applied quickly by providing a boost to braking based on the speed of approach and distance to a vehicle ahead.
Minor brake pedal pulsations or pedal movement during this time is normal and the brake pedal should continue to be applied as needed. IBA will automatically disengage only when the brake pedal is released.
Warning
IBA may increase vehicle braking in situations when it may not be necessary. You could block the flow of traffic. If this occurs, take your foot off the brake pedal and then apply the brakes as needed.
AEB and IBA can be disabled through vehicle settings. To view available settings for this feature, touch the Settings icon on the infotainment home page. Select “Vehicle” to display the list of available options and select “Collision/Detection system.
Warning
Using AEB or IBA while towing a trailer could cause you to lose control of the vehicle and crash. Turn the system to Alert or Off when towing a trailer.
A system unavailable message may display if:
- The front of the vehicle or windshield is not clean.
- Heavy rain or snow is interfering with object detection.
- There is a problem with the StabiliTrak/ Electronic Stability Control (ESC) system.
The AEB system does not need service.
Front Pedestrian Braking (FPB) System
If equipped, the FPB system may help avoid or reduce the harm caused by front-end crashes with nearby pedestrians when driving in a forward gear. FPB displays an amber indicator, ~, when a nearby pedestrian is detected ahead. When approaching a detected pedestrian too quickly, FPB provides a red flashing alert on the windshield and rapidly beeps or pulses the driver seat. FPB can provide a boost to braking or automatically brake the vehicle. This system includes Intelligent Brake Assist (IBA), and the Automatic Emergency Braking (AEB) system may also respond to pedestrians. See Automatic Emergency Braking (AEB) page 235.
The FPB system can detect and alert to pedestrians in a forward gear at speeds between 8 km/h (5 mph) and 80 km/h
(50 mph). During daytime driving, the system detects pedestrians up to a distance of approximately 40 m (131 ft). During nighttime driving, system performance is very limited.
Warning
FPB does not provide an alert or automatically brake the vehicle, unless it detects a pedestrian. FPB may not detect pedestrians, including children:
- When the pedestrian is not directly ahead, fully visible, or standing upright, or when part of a group.
- Due to poor visibility, including nighttime conditions, fog, rain, or snow.
- If the FPB sensor is blocked by dirt, snow, or ice.
If the headlamps or windshield are not cleaned or in proper condition.
Be ready to take action and apply the brakes. For more information, see Defensive Driving page 188. Keep the windshield, headlamps, and FPB sensor clean and in good repair.
FPB can be set to Off, Alert, or Alert and Brake through vehicle settings. To view available settings from the infotainment screen, touch Settings > Vehicle > Collision/ Detection Systems.
Detecting the Pedestrian Ahead
FPB alerts and automatic braking will not occur unless the FPB system detects a pedestrian. When a pedestrian that may
enter the vehicle’s forward path is detected, the pedestrian ahead indicator will display amber.
Front Pedestrian Alert
With Head-Up Display
Without Head-Up Display
When the vehicle approaches a pedestrian ahead too rapidly, the red FPB alert display will flash on the windshield. Eight rapid high-pitched beeps will sound from the front, or both sides of the Safety Alert Seat will pulse five times. When this Pedestrian Alert occurs, the brake system may prepare for driver braking to occur more rapidly which can cause a brief, mild deceleration.
Continue to apply the brake pedal as needed. Cruise control may be disengaged when the Front Pedestrian Alert occurs.
Automatic Braking
If FPB detects it is about to crash into a pedestrian directly ahead, and the brakes have not been applied, FPB may automatically brake moderately or brake hard. This can help to avoid some very low speed pedestrian crashes or reduce pedestrian injury. FPB can automatically brake to detected pedestrians between 8 km/h (5 mph) and 80 km/h (50 mph).
Automatic braking levels may be reduced under certain conditions, such as higher speeds.
If this happens, Automatic Braking may engage the Electric Parking Brake (EPB) to hold the vehicle at a stop. Release the EPB. A firm press of the accelerator pedal will also release Automatic Braking and the EPB.
Warning
FPB may alert or automatically brake the vehicle suddenly in situations where it is unexpected and undesired. It could falsely alert or brake for objects similar in shape or size to pedestrians, including shadows. This is normal operation and the vehicle does not need service. To override Automatic Braking, firmly press the accelerator pedal, if it is safe to do so.
Automatic Braking can be disabled through vehicle settings. To view available settings from the infotainment screen, touch Setting Vehicle > Collision/Detection Systems > Front Pedestrian Detection.
Warning
Using the Front Pedestrian Braking system while towing a trailer could cause you to lose control of the vehicle and crash. Turn the system to Alert or Off when towing a trailer.
Cleaning the System
If FPB does not seem to operate properly, cleaning the outside of the windshield in front of the rearview mirror may correct the issue.
Side Blind Zone Alert (SBZA)
If equipped, the SBZA system is a lane-changing aid that assists drivers with avoiding crashes that occur with moving vehicles in the side blind zone, or blind spot areas. When the vehicle is in a forward gear, the left or right side mirror display will light up if a moving vehicle is detected in that blind zone. If the turn signal is activated and a vehicle is also detected on the same side, the display will flash as an extra warning not to change lanes. Since this system is part of the Lane Change Alert (LCA) system, read the entire LCA section before using this feature.
Lane Change Alert (LCA)
If equipped, the LCA system is a lane-changing aid that assists drivers with avoiding lane change crashes that occur with moving vehicles in the side blind zone (or spot) areas or with vehicles rapidly approaching these areas from behind. The LCA warning display will light up in the corresponding outside mirror and will flash if the turn signal is on .
Warning
LCA does not alert the driver to vehicles outside of the system detection zones, pedestrians, bicyclists, or animals. It may not provide alerts when changing lanes under all driving conditions. Failure to use proper care when changing lanes may result in injury, death, or vehicle damage. Before making a lane change, always check mirrors, glance over your shoulder, and use the turn signals.
LCA Detection Zones
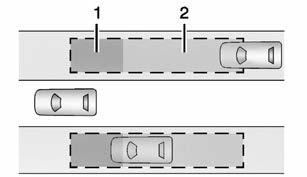
- SBZA Detection Zone
- LCA Detection Zone
The LCA sensor covers a zone of approximately one lane over from both sides of the vehicle, or 3.5 m (11 ft). The height of the zone is approximately between 0.5 m (1.5 ft) and 2 m (6 ft) off the ground. The Side Blind Zone Alert (SBZA) warning area starts at approximately the middle of the vehicle and goes back 5 m (16 ft). Drivers are also warned of vehicles rapidly approaching from up to 70 m (230 ft) behind the vehicle.
How the System Works
The LCA symbol lights up in the outside mirrors when the system detects a moving vehicle in the next lane over that is in the side blind zone or rapidly approaching that zone from behind. A lit LCA symbol indicates it may be unsafe to change lanes. Before making a lane change, check the LCA display, check mirrors, glance over your shoulder, and use the turn signals.

Left Outside Mirror Display
Right Outside Mirror Display
When the vehicle is started, both outside mirror LCA displays will briefly come on to indicate the system is operating. When the vehicle is in a forward gear, the left or right outside mirror display will light up if a moving vehicle is detected in the next lane over in that blind zone or rapidly approaching that zone. If the turn signal is activated in the same direction as a detected vehicle, this display will flash as an extra warning not to change lanes.
LCA can be disabled. When you disable LCA, Side Blind Zone Alert is also disabled. To view available settings from the infotainment screen, touch Settings > Vehicle > Collision/Detection Systems. If LCA is disabled by the driver, the LCA mirror displays will not light up.
When the System Does Not Seem to Work Properly
The LCA system requires some driving for the system to calibrate to maximum performance. This calibration may occur more quickly if the vehicle is driving on a straight highway road with traffic and roadside objects (e.g., guardrails, barriers).
LCA displays may not come on when passing a vehicle quickly, for a stopped vehicle, or when towing a trailer. The LCA detection zones that extend back from the side of the vehicle do not move further back when a trailer is towed. Use caution while changing lanes when towing a trailer. LCA may alert to objects attached to the vehicle, such as a trailer, bicycle, or object extending out to either side of the vehicle. Attached objects may also interfere with the detection of vehicles. This is normal system operation; the vehicle does not need service.
LCA may not always alert the driver to vehicles in the next lane over, especially in wet conditions or when driving on sharp curves. The system does not need to be serviced. The system may light up due to guardrails, signs, trees, shrubs, and other non-moving objects. This is normal system operation; the vehicle does not need service.
LCA may not operate when the LCA sensors in the left or right corners of the rear bumper are covered with mud, dirt, snow, ice, or slush, or in heavy rainstorms. For cleaning instructions, see “Washing the Vehicle” under Exterior Care page 314. If the DIC still displays the system unavailable message after cleaning both sides of the vehicle toward the rear corners of the vehicle, see your dealer.
If the LCA displays do not light up when moving vehicles are in the side blind zone or are rapidly approaching this zone and the system is clean, the system may need service. Take the vehicle to your dealer.
Radio Frequency Information
See Radio Frequency Statement page 343.
Lane Keep Assist (LKA)
If equipped, LKA may help avoid crashes due to unintentional lane departures. This system uses a camera to detect lane markings. The LKA can be ready to assist at speeds between 60 km/h (37 mph) and 180 km/h (112 mph). On some vehicles, the system will instead operate above 50 km/h (31 mph). LKA may assist by gently turning the steering wheel if the vehicle approaches a detected lane marking. It may also provide a Lane Departure Warning (LDW) alert if the vehicle crosses a detected lane marking. This system is not intended to keep the vehicle centered in the lane. LKA will not assist and alert if the turn signal is active in the direction of lane departure, or if it detects that you are accelerating, braking or actively steering. LKA can be overridden by turning the steering wheel. If the system detects you are steering intentionally across a lane marker, the LDW may not be given. Do not expect the LDW to occur when you are intentionally crossing a lane marker.
Warning
The LKA system does not continuously steer the vehicle. It may not keep the vehicle in the lane or give a Lane Departure Warning (LDW) alert, even if a lane marking is detected.
The LKA and LDW systems may not:
- Provide an alert or enough steering assist to avoid a lane departure or crash.
- Detect lane markings under poor weather or visibility conditions. This can occur if the windshield or headlamps are blocked by dirt, snow, or ice; if they are not in proper condition; or if the sun shines directly into the camera.
- Detect road edges.
Detect lanes on winding or hilly roads. - If LKA only detects lane markings on one side of the road, it will only assist or provide an LDW alert when approaching the lane on the side where it has detected a lane marking. Even with LKA and LDW, you must steer the vehicle. Always keep your attention on the road and maintain proper vehicle position within the lane, or vehicle damage, injury, or death could occur. Always keep the windshield, headlamps, and camera sensors clean and in good repair. Do not use LKA in bad weather conditions or on roads with unclear lane markings, such as construction zones.
Warning
Using LKA on slippery roads could cause loss of control of the vehicle and a crash. Turn the system off.
LKA will not alert the driver if a towed trailer crosses into an adjacent lane of travel. Serious injury or property damage may occur if the trailer moves into another lane. Always monitor the trailer position while towing to make sure it is within the same lane as the tow vehicle.
- How the System WorksLKA uses a camera sensor installed on the windshield ahead of the rearview mirror to detect lane markings. It may provide brief steering assist if it detects an unintended lane departure. It may further provide an audible alert or the driver seat may pulse indicating that a lane marking has been crossed. The system does not provide a Lane Departure Warning (LDW) when intentionally steering across a lane marker.To turn LKA on and off, press
 on the center stack. If equipped, the indicator light on the button comes on when LKA is on and turns off when LKA is disabled. In some vehicles a long press of over three seconds is required to turn LKA off.
 - When on, is white, if equipped, indicating that the system is not ready to assist. A is green if LKA is ready to assist. LKA may assist by gently turning the steering wheel if the vehicle approaches a detected lane marking. is amber when assisting. It may also provide a Lane Departure Warning (LDW) alert by flashing amber if the vehicle crosses a detected lane marking. Additionally, there may be three beeps, or the driver seat may pulse three times, on the right or left, depending on the lane departure direction.Take SteeringThe LKA system does not continuously steer the vehicle. If LKA does not detect active driver steering, an alert and chime may be provided. Steer the vehicle to dismiss. LKA may become temporarily unavailable after repeated take steering alerts.
When the System Does Not Seem to Work Properly
The system performance may be affected by:
- Close vehicles
- Sudden lighting changes, such as when driving through tunnels.
- Banked
- Roads with poor lane markings, such as two-lane roads.
If the LKA system is not functioning properly when lane markings are clearly visible, cleaning the windshield may help.
A camera blocked message may display if the camera is blocked. Some driver assistance systems may have reduced performance or not work at all. An LKA or LDW unavailable message may display if the systems are temporarily unavailable. This message could be due to a blocked camera. The LKA system does not need service. Clean the outside of the windshield behind the rearview mirror.
LKA assistance and/or LDW alerts may occur due to tar marks, shadows, cracks in the road, temporary or construction lane markings, or other road imperfections. This is normal system operation; the vehicle does not need service. Turn LKA off if these conditions continue.
Fuel
Top Tier Fuel
GM recommends the use of TOP TIER Detergent Gasoline to keep the engine clean, reduce engine deposits, and maintain optimal vehicle performance. Look for the TOP TIER Logo or see www.toptiergas.com for a list of TOP TIER Detergent Gasoline marketers and applicable countries.

Recommended Fuel
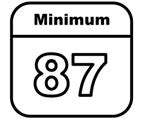
Regular unleaded gasoline meeting ASTM specification D4814 with a posted octane rating (R+M)/2 of 87 or greater is recommended. Do not use gasoline with a posted octane rating of less than 87, as this will result in reduced performance and driveability. If heavy knocking is heard when using gasoline rated at 87 or greater, the engine needs service.
Do not use any fuel labeled E85 or FlexFuel. Do not use gasoline with ethanol levels greater than 15% by volume.
Prohibited Fuels
Caution
Do not use fuels with any of the following conditions; doing so may damage the vehicle and void its warranty:
- For vehicles that are not FlexFuel, fuel labeled greater than 15% ethanol by volume, such as mid-level ethanol blends (16–50% ethanol), E85, or FlexFuel.
- Fuel with any amount of methanol, methylal, ferrocene, and aniline. These fuels can corrode metal fuel system parts or damage plastic and rubber
- Fuel containing metals such as methylcyclopentadienyl manganese tricarbonyl (MMT), which can damage the emissions control system and spark plugs.
- Fuel with a posted octane rating of less than the recommended fuel. Using this fuel will lower fuel economy and performance, and may decrease the life of the emissions catalyst.
Fuels in Foreign Countries
The U.S., Canada, and Mexico post fuel octane ratings in anti-knock index (AKI). For fuel not to use in a foreign country, see Prohibited Fuels page 243.
Fuel Additives
TOP TIER Detergent Gasoline is highly recommended for use with your vehicle. If your country does not have TOP TIER Detergent Gasoline, add ACDelco Fuel System Treatment Plus−Gasoline to the vehicle’s gasoline fuel tank at every oil change or 15 000 km (9,000 mi), whichever occurs first. TOP TIER Detergent Gasoline and ACDelco Fuel System Treatment Plus Gasoline will help keep your vehicle’s engine fuel deposit free and performing optimally.
Filling the Tank
An arrow on the fuel gauge indicates which side of the vehicle the fuel door is on. See Fuel Gauge page 101
Warning
Fuel vapors and fuel fires burn violently and can cause injury or death.
Follow these guidelines to help avoid injuries to you and others:
- Read and follow all the instructions on the fuel pump island.
- Turn off the engine when refueling.
Keep sparks, flames, and smoking materials away from fuel.
Do not leave the fuel pump unattended.
Avoid using electronic devices while refueling.
Do not re-enter the vehicle while pumping fuel.
Keep children away from the fuel pump and never let children pump fuel. - Before touching the fill nozzle, touch a metallic object to discharge static electricity from your body.
- Fuel can spray out if the fill nozzle is inserted too quickly. This spray can happen if the tank is nearly full, and is more likely in hot weather. Insert the fill nozzle slowly and wait for any hiss noise to stop before beginning to flow fuel.
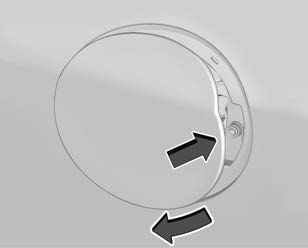
To open the fuel door, push and release the rearward center edge of the door.
The capless refueling system does not have a fuel cap. Fully insert and latch the fill nozzle, begin fueling.
Warning
Overfilling the fuel tank by more than three clicks of a standard fill nozzle may cause:
- Vehicle performance issues, including engine stalling and damage to the fuel system.
- Fuel spills.
- Under certain conditions, fuel fires.
- Be careful not to spill fuel. Wait five seconds after you have finished pumping before removing the fill nozzle. Clean fuel from painted surfaces as soon as possible. See Exterior Care page 314. Push the fuel door closed until it latches.
Filling the Tank with a Portable Fuel Container
If the vehicle runs out of fuel and must be filled from a portable fuel container .
- Locate the capless funnel adapter from the rear cargo area under the load floor tray.
- Insert and latch the funnel into the capless fuel system.
Warning
Attempting to refuel from a portable fuel container without using the funnel adapter may cause fuel spillage and damage the capless fuel system. This could cause a fire. You or others could be badly burned and the vehicle could be damaged. - Remove and clean the funnel adapter and return it to the storage location
Filling a Portable Fuel Container
Warning
Never fill a portable fuel container while it is in the vehicle. Static electricity discharge from the container can ignite the fuel vapor. You or others could be badly burned and the vehicle could be damaged. To help avoid injury to you and others:
- Dispense fuel only into approved containers.
- Do not fill a container while it is inside a vehicle, in a vehicle’s trunk, in a pickup bed, or on any surface other than the ground.
- Bring the fill nozzle in contact with the inside of the fill opening before operating the nozzle. Maintain contact until filling is complete.
- Keep sparks, flames, and smoking materials away from fuel.
Avoid using electronic devices while pumping fuel.
Trailer Towing
General Towing Information
Only use towing equipment that has been designed for the vehicle. Contact your dealer or trailering dealer for assistance with preparing the vehicle to tow a trailer. Read the entire section before towing a trailer.
To tow a disabled vehicle, see Transporting a Disabled Vehicle page 311. To tow the vehicle behind another vehicle such as a motor home, see Recreational Vehicle Towing page 312.
Driving Characteristics and Towing Tips
Warning
You can lose control when towing a trailer if the correct equipment is not used or the vehicle is not driven properly. For example, if the trailer is too heavy or the trailer brakes are inadequate for the load, the vehicle may not stop as expected. You and others could be seriously injured. The vehicle may also be damaged, and the repairs would not be covered by the vehicle warranty. Pull a trailer only if all the steps in this section have been followed. Ask your dealer for advice and information about towing a trailer with the vehicle.
Driving with a Trailer
Trailering is different than just driving the vehicle by itself. Trailering means changes in handling, acceleration, braking, durability, and fuel economy. Successful, safe trailering takes correct equipment, and it has to be used properly.
The following information has many time-tested, important trailering tips and safety rules. Many of these are important for your safety and that of your passengers. Read this section carefully before pulling a trailer.
When towing a trailer:
- Become familiar with and follow all state and local laws that apply to trailer These requirements vary from state to state.
- State laws may require the use of extended side view mirrors. If your visibility is limited or restricted while towing, install extended side view mirrors, even if not required.
- Do not tow a trailer during the first 800 km (500 mi) of vehicle use to prevent damage to the engine, axle, or other parts.
- GM recommends performing an oil change to the vehicle before heavy.
- Do not drive over 80 km/h (50 mph) and do not make starts at full throttle during the first 800 km (500 mi) of trailer
- Vehicles can tow in D (Drive). If the transmission downshifts too often, a lower gear may be selected using Manual Mode. See Manual Mode page 210.
If equipped, the following driver assistance features should be turned off when towing a trailer:
- Adaptive Cruise Control (ACC)
- Super Cruise Control
- Park Assist
- Automatic Parking Assist (APA)
- Reverse Automatic Braking (RAB)
If equipped, the following driver assistance features should be turned to alert or off when towing a trailer:
- Automatic Emergency Braking (AEB)
- Intelligent Brake Assist (IBA)
- Front Pedestrian Braking (FPB)
If equipped with Lane Change Alert (LCA), the LCA detection zones that extend back from the side of the vehicle do not move further back when a trailer is towed. Use caution while changing lanes when towing a trailer.
If equipped with Rear Cross Traffic Alert (RCTA), use caution while backing up when towing a trailer, as the RCTA detection zones that extend out from the back of the vehicle do not move further back when a trailer is towed.
Warning
To prevent serious injury or death from carbon monoxide (CO), when towing a trailer:
Do not drive with the liftgate, trunk/hatch, or rear-most window open.
Fully open the air outlets on or under the instrument panel.
Adjust the climate control system to a setting that brings in only outside air. See “Climate Control Systems” in the Index.
For more information about carbon monoxide, see Engine Exhaust page 206.
Towing a trailer requires experience. The combination of the vehicle and trailer is longer and not as responsive as the vehicle itself. Get used to the handling and braking of the combination by driving on a level road surface before driving on public roads.
The trailer structure, the tires, and the brakes must be all be rated to carry the intended cargo. Inadequate trailer equipment can cause the combination to operate in an unexpected or unsafe manner. Before driving, inspect all trailer hitch parts and attachments, safety chains, electrical connectors, lamps, tires, and mirrors. See Towing Equipment page 252. If the trailer has electric brakes, start the combination moving and then manually apply the trailer brake controller to check the trailer brakes work. During the trip, occasionally check that the cargo and trailer are secure and that the lamps and any trailer brakes are working.
Towing with a Stability Control System
When towing, the stability control system might be heard. The system reacts to vehicle movement caused by the trailer, which mainly occurs during cornering. This is normal when towing heavier trailers.
Following Distance
Stay at least twice as far behind the vehicle ahead as you would when driving without a trailer. This can help to avoid heavy braking and sudden turns.
Passing
More passing distance is needed when towing a trailer. The combination of the vehicle and trailer will not accelerate as quickly and is much longer than the vehicle alone. It is necessary to go much farther beyond the passed vehicle before returning to the lane. Pass on level roadways. Avoid passing on hills if possible.
Backing Up
Hold the bottom of the steering wheel with one hand. To move the trailer to the left, move that hand to the left. To move the trailer to the right, move that hand to the right. Always back up slowly and, if possible, have someone guide you.
Making Turns
Caution
Turn more slowly and make wider arcs when towing a trailer to prevent damage to your vehicle. Making very sharp turns could cause the trailer to contact the vehicle.
Make wider turns than normal when towing, so the trailer will not go over soft shoulders, over curbs, or strike road signs, trees, or other objects. Always signal turns well in advance. Do not steer or brake suddenly.
Driving on Grades
Reduce speed and shift to a lower gear before starting down a long or steep downhill grade. If the transmission is not shifted down, the brakes may overheat and result in reduced braking efficiency.
The vehicle can tow in D (Drive). Shift the transmission to a lower gear if the transmission shifts too often under heavy loads and/or hilly conditions.
When towing at higher altitudes, engine coolant will boil at a lower temperature than at lower altitudes. If the engine is turned off immediately after towing at high altitude on steep uphill grades, the vehicle could show signs similar to engine overheating. To avoid this, let the engine run, preferably on level ground, with the transmission in P (Park) for a few minutes before turning the engine off. If the overheat warning comes on, see Engine Overheating page 268.
Warning
To prevent serious injury or death, always park your vehicle and trailer on a level surface when possible.
When parking your vehicle and your trailer on a hill:
- Press the brake pedal, but do not shift into P (Park) yet. Turn the wheels into the curb if facing downhill or into traffic if facing uphill.
- Have someone place chocks under the trailer wheels.
- When the wheel chocks are in place, gradually release the brake pedal to allow the chocks to absorb the load of the trailer.
- Reapply the brake pedal. Then apply the parking brake and shift into P (Park).
- Release the brake pedal.
Leaving After Parking on a Hill
- Apply and hold the brake pedal:
- Start the engine.
- Shift into the desired gear.
- Release the parking brake.
- Let up on the brake pedal.
- Drive slowly until the trailer is clear of the chocks.
- Stop and have someone pick up and store the chocks.
Maintenance When Trailer Towing
The vehicle needs service more often when used to tow trailers. See Maintenance Schedule page 324. It is especially important to check the engine oil, axle lubricant, belts, cooling system, and brake system before and during each trip.
Check periodically that all nuts and bolts on the trailer hitch are tight.
Engine Cooling When Trailer Towing
The cooling system may temporarily overheat during severe operating conditions. See Engine Overheating page 268.
Trailer Towing
Caution
Towing a trailer improperly can damage the vehicle and result in costly repairs not covered by the vehicle warranty. To tow a trailer correctly, follow the directions in this section and see your dealer for important information about towing a trailer with the vehicle.
Trailer Weight
Warning
Never exceed the towing capacity for your vehicle.
Safe trailering requires monitoring the weight, speed, altitude, road grades, outside temperature, dimensions of the front of the trailer, and how frequently the vehicle is used to tow a trailer.
Trailer Weight Ratings
When towing a trailer, the combined weight of the vehicle, vehicle contents, trailer, and trailer contents must be below all of the maximum weight ratings for the vehicle including:
- Gross Combined Weight Rating (GCWR)
- Gross Vehicle Weight Rating (GVWR)
- Maximum Trailer Weight Rating
- Gross Axle Weight Rating-Rear (GAWR-RR)
- Maximum Trailer Tongue Weight Rating
See “Weight-Distributing Hitch Adjustment” under Towing Equipment page 252 to determine if equalizer bars are required to obtain the maximum trailer weight rating.
See “Trailer Brakes” under Towing Equipment page 252 to determine if brakes are required based on the trailer weight.
The only way to be sure the weight is not exceeding any of these ratings is to weigh the tow vehicle and trailer combination, fully loaded for the trip, getting individual weights for each of these items.
Warning
You and others could be seriously injured or killed if the trailer is too heavy or the trailer brakes are inadequate for the load. The vehicle may be damaged, and the repairs would not be covered by the vehicle warranty.
Only tow a trailer if all the steps in this section have been followed. Ask your dealer for advice and information about towing a trailer.
Gross Combined Weight Rating (GCWR)
GCWR is the total allowable weight of the completely loaded vehicle and trailer including any fuel, passengers, cargo, equipment, and accessories. Do not exceed the GCWR for your vehicle. The GCWR for the vehicle is on the Tow Rating Chart following.
To check that the weight of the vehicle and trailer are within the GCWR for the vehicle, follow these steps:
- Start with the “curb weight” from the Trailering Information Label.
- Add the weight of the trailer loaded with cargo and ready for the trip.
- Add the weight of all
- Add the weight of all cargo in the
- Add the weight of hitch hardware such as a draw bar, ball, load equalizer bars, or sway bars.
- Add the weight of any accessories or aftermarket equipment added.
The resulting weight cannot exceed the GCWR value shown on the Trailering Information Label.
The gross combined weight can also be confirmed by weighing the truck and trailer on a public scale. The truck and trailer should be loaded for the trip with passengers and cargo .
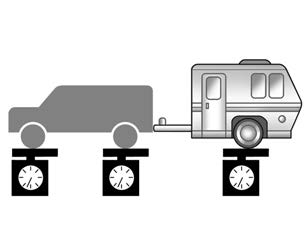
Gross Vehicle Weight Rating (GVWR)
For information about the vehicle’s maximum load capacity, see Vehicle Load Limits page 196. When calculating the GVWR with a trailer attached, the trailer tongue weight must be included as part of the weight the vehicle is carrying.
Maximum Trailer Weight Rating
The maximum trailer weight rating is calculated assuming the tow vehicle has a driver, a front seat passenger, and all required trailering equipment. This value represents the heaviest trailer the vehicle can tow, but it may be necessary to reduce the trailer weight to stay within the GCW, GVWR, maximum trailer tongue load, or GAWR-RR for the vehicle.
Use the tow rating chart to determine how much the trailer can weigh, based on the vehicle model, powertrain and trailering option .
| Vehicle | Maximum Trailer Weight | *GCWR |
| Front-Wheel Drive | 680 kg (1,500 lb) | 3 050 kg (6,725 lb) |
| Front-Wheel Drive, V92 Trailer Towing Package | 2 268 kg (5,000 lb) | 4 650 kg (10,250 lb) |
| All-Wheel Drive | 680 kg (1,500 lb) | 3 200 kg (7,055 lb) |
| All-Wheel Drive, V92 Trailer Towing Package | 2 268 kg (5,000 lb) | 4 750 kg (10,470 lb) |
| *The Gross Combination Weight Rating (GCWR) is the total allowable weight of the completely loaded vehicle and trailer including any passengers, cargo, equipment, and conversions. The GCWR for the vehicle should not be exceeded. | ||
Maximum Trailer Tongue Weight Rating
The Maximum Trailer Tongue Weight Rating is the allowable trailer tongue weight that the vehicle can support using a conventional
trailer hitch. It may be necessary to reduce the overall trailer weight to stay within the maximum trailer tongue weight rating while
still maintaining the correct trailer load balance.
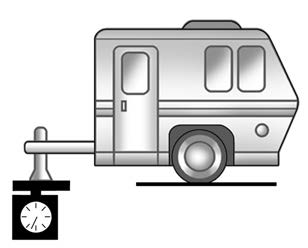
Do not exceed a maximum trailer tongue weight of 226 kg (500 lb) for a conventional trailer hitch.
The trailer tongue weight contributes to the Gross Vehicle Weight (GVW). GVW includes the CURB WEIGHT of your vehicle, any passengers, cargo, equipment and the trailer tongue weight. Vehicle options, passengers, cargo, and equipment reduce the maximum allowable tongue weight the vehicle can carry, which also reduces the maximum allowable trailer weight.
Trailer Load Balance
The correct trailer load balance must be maintained to ensure trailer stability. Incorrect load balance is a leading cause of trailer sway.
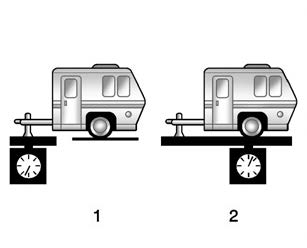
The trailer tongue weight (1) should be 10– 15% of the loaded trailer weight (2). Some specific trailer types, such as boat trailers, fall outside of this range. Always refer to the trailer owner’s manual for the recommended trailer tongue weight for each trailer. Never exceed the maximum loads for your vehicle, hitch and trailer.
After loading the trailer, separately weigh the trailer and then the trailer tongue and calculate the trailer load balance percentage to see if the weights and distribution are appropriate for your vehicle. If the trailer weight is too high, it may be possible to transfer some of the cargo into your vehicle .
If the trailer tongue weight is too high or too low, it may be possible to rearrange some of the cargo inside of the trailer.
Do not exceed the maximum allowable tongue weight for your vehicle. Use the shortest hitch extension available to position the hitch ball closer to your vehicle. This will help reduce the effect of the trailer tongue weight on the trailer hitch and the rear axle.
If a cargo carrier is used in the trailer hitch receiver, choose a carrier that positions the load as close to the vehicle as possible.
Make sure the total weight, including the carrier, is no more than half of the maximum allowable tongue weight for the vehicle or 227 kg (500 lb), whichever is less.
Ask your dealer for trailering information or assistance.
Rear Gross Axle Weight Rating (GAWR-RR)
The GAWR-RR is the total weight that can be supported by the rear axle of the vehicle. Do not exceed the GAWR-RR for the vehicle, with the tow vehicle and trailer fully loaded for the trip including the weight of the trailer tongue. If using a weight-distributing hitch, do not exceed the GAWR-RR before applying the weight distribution spring bars.
For additional assistance with trailering or additional information, see your dealer.
Towing Equipment
Hitches
Always use the correct hitch equipment for your vehicle. Crosswinds, large trucks going by, and rough roads can affect the trailer and the hitch.
Never attach rental hitches or other bumper-type hitches. Only use frame-mounted hitches that do not attach to the bumper.
Hitch Cover
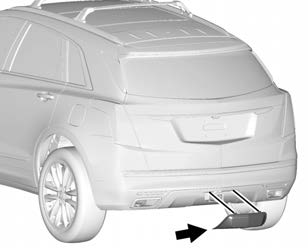
To remove hitch cover, if equipped:
- Remove the two fasteners on the lower tabs.
- Pull the lower edge of the cover to about a 45 degree angle.
- Pull the cover downward to disengage the upper attachments.
To reinstall hitch cover:
- Hold cover at a 45 degree angle to the vehicle and push the upper tabs into the slots in the bumper.
- Push the bottom of the cover forward until the lower tabs line up with the lower slots.
- Snap the hitch cover into place by pushing the upper corners
- Reinstall the two fasteners on the lower tabs.
Consider using mechanical sway controls with any trailer. Ask a trailering professional about sway controls or refer to the trailer manufacturer’s recommendations and instructions.
Weight-Distributing Hitch Adjustment
A weight-distributing hitch may be useful with some trailers.
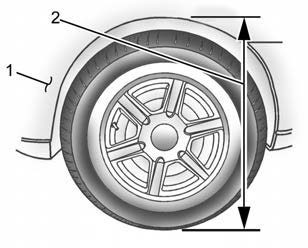
- Front of Vehicle
- Body to Ground Distance
When using a weight-distributing hitch, measure the front fender height above the front axle distance (2) before and after connecting the trailer. Adjust the spring bars until the front fender height distance (2) is approximately half way between the first and second measurements.
Tires
Do not tow a trailer while using a compact spare tire on the vehicle .
- Tires must be properly inflated to support loads while towing a trailer. See Tires page 285 for instructions on proper tire inflation.
Safety Chains
Always attach chains between the vehicle and the trailer, and attach the chains to the holes on the trailer hitch platform.
Instructions about safety chains may be provided by the hitch manufacturer or by the trailer manufacturer.
Cross the safety chains under the tongue of the trailer to help prevent the tongue from contacting the road if it becomes separated from the hitch. Always leave just enough slack so the combination can turn. Never allow safety chains to drag on the ground.
Trailer Brakes
Loaded trailers over 450 kg (1,000 lb) must be equipped with brake systems and with brakes for each axle. Trailer braking equipment conforming to Canadian Standards Association (CSA) requirement CAN3-D313, or its equivalent, is recommended.
State or local regulations may require trailers to have their own braking system if the loaded weight of the trailer exceeds certain minimums that can vary from state to state.
Read and follow the instructions for the trailer brakes so they are installed, adjusted, and maintained properly.
Warning
Never attempt to tamper with the hydraulic brake system for your trailer brakes. Do not connect a trailer’s hydraulic brake system directly to your vehicle’s hydraulic brake system. If you do, both the vehicle antilock brakes and the trailer brakes may not function, which could result in a crash.
Trailer Wiring
The trailer wiring harness (if equipped), with a seven-pin connector is located at the rear of the vehicle, and it is tied to the vehicle’s frame.
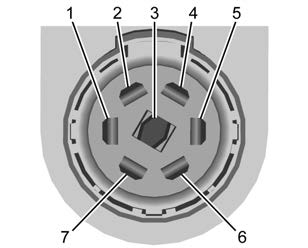
If the vehicle is not equipped with a seven-pin trailer connector, the body harness has provisions to connect a trailer harness and a seven-pin trailer connector which is available through your dealer.
Use only a round, seven-wire connector with flat blade terminals meeting SAE J2863 specifications for proper electrical connectivity.
| 1 | Stop/Turn Signal Left | Yellow/Blue |
| 2 | Tail/Parking Lamps | Gray/Brown |
| 3 | Reverse Lamps | White/Green |
The seven-wire harness contains the following trailer circuits
| 4 | Battery Feed | Red/Green |
| 5 | Stop/Turn Signal Right | Green/Brown |
| 6 | Electric Trailer Brake* | Blue |
| 7 | Ground | Black |
Circuit powered by electric trailer brake control wiring provisions.
Electric Trailer Brake Control Wiring Provisions
Wiring provisions for an aftermarket electric trailer brake controller are included with the vehicle as part of the trailer wiring package. The harness contains the following circuits.
| Electric Trailer Brakes | Blue |
| Battery Feed | Red/Green or Red/Blue |
| Brake Apply Signal | White/Blue |
| Ground | Black |
Refer to the aftermarket electric trailer brake controller owner’s manual to determine wire color coding of the electric trailer brake .
controller. The wire colors on the brake controller may be different from the vehicle. The electric trailer brake controller should be installed by your dealer or a qualified service center.
If equipped, there are four blunt cut wires inside the front driver side instrument panel. It will be necessary to have a technician connect the 12-volt power to the engine compartment fuse block.
Trailer Lamps
Always check all trailer lamps are working at the beginning of each trip, and periodically on longer trips.
Turn Signals When Towing a Trailer
When properly connected, the trailer turn signals will illuminate to indicate the vehicle is turning, changing lanes, or stopping.
When towing a trailer, the arrows on the instrument cluster will illuminate even if the trailer is not properly connected or the bulbs are burned out.
Tow/Haul Mode
For instructions on how to enter Tow/Haul mode, see Driver Mode Control page 215.
Tow/Haul assists when pulling a heavy trailer or a large or heavy load.
Tow/Haul Mode is designed to be most effective when the vehicle and trailer combined weight is at least 75% of the vehicle’s Gross Combined Weight Rating (GCWR). See “Weight of the Trailer” under Trailer Towing page 249.
Tow/Haul Mode is most useful when pulling a heavy trailer or a large or heavy load:
- Through rolling terrain
- In stop-and-go traffic
- In busy parking lots
Operating the vehicle in Tow/Haul Mode when lightly loaded or not towing will not cause damage; however, it is not recommended and may result in unpleasant engine and transmission driving characteristics and reduced fuel economy.
Trailer Sway Control (TSC)
Vehicles with StabiliTrak/Electronic Stability Control (ESC) have a Trailer Sway Control (TSC) feature. Trailer sway is unintended side-to-side motion of a trailer while towing. If the vehicle is towing a trailer and the TSC detects that sway is increasing, the vehicle brakes are selectively applied at each wheel, to help reduce excessive trailer sway.
If equipped with the Integrated Trailer Brake Control (ITBC) system, and the trailer has an electric brake system, StabiliTrak/ESC may also apply the trailer brake .
If TSC is enabled, the Traction Control System (TCS)/StabiliTrak/ESC warning light will flash on the instrument cluster. Reduce vehicle speed by gradually removing your foot from the accelerator. If trailer sway continues, StabiliTrak/ESC can reduce engine torque to help slow the vehicle. TSC will not function if StabiliTrak/ESC is turned off. See Traction Control/Electronic Stability Control page 213.
Warning
Trailer sway can result in a crash and in serious injury or death, even if the vehicle is equipped with TSC.
If the trailer begins to sway, reduce vehicle speed by gradually removing your foot from the accelerator. Then pull over to check the trailer and vehicle to help correct possible causes, including an improperly or overloaded trailer, unrestrained cargo, improper trailer hitch configuration, or improperly inflated or incorrect vehicle or trailer tires. See Towing Equipment page 252 for trailer ratings and hitch setup recommendations.
Trailer Tires
Special Trailer (ST) tires differ from vehicle tires. Trailer tires are designed with stiff sidewalls to help prevent sway and to support heavy loads. These features can make it difficult to determine if the trailer tire pressures are low only based on a visual inspection.
Always check all trailer tire pressures before each trip when the tires are cool. Low trailer tire pressure is a leading cause of trailer tire blow-outs.
Trailer tires deteriorate over time. The trailer tire sidewall will show the week and year the tire was manufactured. Many trailer tire manufacturers recommend replacing tires more than six years old.
Overloading is another leading cause of trailer tire blow-outs. Never load your trailer with more weight than the tires are designed to support. The load rating is located on the trailer tire sidewall.
Always know the maximum speed rating for the trailer tires before driving. This may be significantly lower than the vehicle tire speed rating. The speed rating may be on the trailer tire sidewall. If the speed rating is not shown, the default trailer tire speed rating is 105 km/h (65 mph).
Conversions and Add-Ons
Add-On Electrical Equipment
Warning
The Data Link Connector (DLC) is used for vehicle service and Emission Inspection/Maintenance testing. See Malfunction Indicator Lamp (Check Engine Light) page 106
A device connected to the DLC — such as an aftermarket fleet or driver-behavior tracking device — may interfere with vehicle systems. This could affect vehicle operation and cause a crash. Such devices may also access information stored in the vehicle’s systems.
Caution
Some electrical equipment can damage the vehicle or cause components to not work and would not be covered by the vehicle warranty. Always check with your dealer before adding electrical equipment.
Add-on equipment can drain the vehicle’s 12-volt battery, even if the vehicle is not operating.
The vehicle has an airbag system. Before attempting to add anything electrical to the vehicle, see Servicing the Airbag-EquippedVehicle page 63
Useful Links
View Full Manual: Buick Enclave 2023 User Manual | Auto User Guide
Download Manual: Manuals and Guides | Vehicle Support | Buick