
Buick Enclave 2023 Infotainment System User Manual
Infotainment System
Introduction
Read the following pages to become familiar with the features.
Warning
Taking your eyes off the road for too long or too often while using any infotainment feature can cause a crash. You or others could be injured or killed. Do not give extended attention to infotainment tasks while driving. Limit your glances at the vehicle displays and focus your attention on driving. Use voice commands whenever possible.
The infotainment system has built-in features intended to help avoid distraction by disabling some features when driving. These features may gray out when they are unavailable. Many infotainment features are also available through the instrument cluster and steering wheel controls.
Before driving:
- Become familiar with the operation, center stack controls, steering wheel controls, and infotainment display.
- Set up the audio by presetting favorite stations, setting the tone, and adjusting the speakers.
- Set up phone numbers in advance so they can be called easily by pressing a single control or by using a single voice command.
See Distracted Driving page 187.
Active Noise Cancellation (ANC)
If equipped, ANC reduces engine noise in the vehicle’s interior. ANC requires the factory-installed audio system, radio, speakers, amplifier (if equipped), induction system, and exhaust system to work properly. Deactivation is required by your dealer if related aftermarket equipment is installed.
Overview
Infotainment System
The infotainment system is controlled by using the infotainment display, the controls on the center stack, steering wheel controls, and voice recognition.
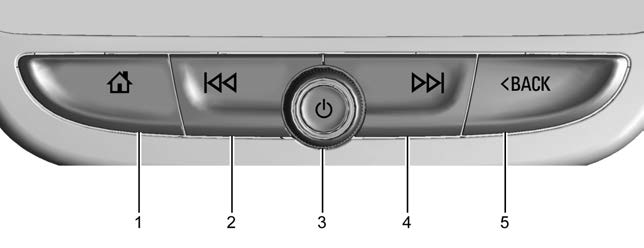
 (Home Page)
- Press to go to the Home Page. See “Home Page” later in this section.
. Press to exit Android Auto or Apple CarPlay. To enter back into Android Auto or Apple CarPlay, press and hold. See Apple CarPlay and Android Auto page 164.
- Press to go to the Home Page. See “Home Page” later in this section.

-
- Radio: Press and release to go to the previous station or channel. Press and hold to fast seek the next strongest previous station or channel. See AM-FM Radio page 137.
- USB/Bluetooth: Press to seek to the beginning of the current or previous track. Press and hold to quickly reverse through a track.
Release to return to playing speed. See USB Port page 141 or Bluetooth Audio page 143.
-
 (Power)
- Press to turn the power on.
Press to mute/unmute the system when on. - Press and hold to display the power off screen or the option to display the power off screen.
- Turn to decrease or increase the volume.
- Press to turn the power on.

- Radio: Press and release to go to the next station or channel. Press and hold to fast seek the next track or strongest station or channel.
- USB/Bluetooth: Press to seek the next track. Press and hold to fast forward through a track. Release to return to playing speed. See USB Port page 141 or Bluetooth Audio page 143.
- BACK
- . BACK may include an arrow or not next to the icon. Either way, the function is the same. Press S BACK to return to the previous display in a menu.
Home Page
The Home Page is where vehicle application icons are accessed. Some applications are disabled when the vehicle is moving.
Swipe left or right across the display to access the pages of icons.
Managing Home Page Icons
- Touch and hold any of the Home Page icons to enter edit mode.
- Continue holding the icon and drag it to the desired position.
- Release your finger to drop the icon in the desired position.
- To move an application to another page, drag the icon to the edge of the display toward the desired page.
Continue dragging and dropping application icons as desired.
Steering Wheel Controls
If equipped, some audio controls can be adjusted at the steering wheel.
 Press to answer an incoming call or start voice recognition. See Bluetooth (Pairing and Using a Phone) page 161 or Bluetooth (Overview) page 160.
![]() Press to reject an incoming call or end a current call. Press to mute or unmute the infotainment system when not on a call
Press to reject an incoming call or end a current call. Press to mute or unmute the infotainment system when not on a call
The favorite and volume switches are on the back of the steering wheel.
- Favorite: When on a radio source, press to select the next or previous favorite. When on a media source, press to select the next or previous track.
- Volume: Press to increase or decrease the volume.
Using the System
Audio
Touch the Audio icon to display the active audio source page. Examples of available sources may include AM, FM, SXM (if equipped), USB, and Bluetooth.
Phone
Touch the Phone icon to display the Phone main page. See Bluetooth (Pairing and Using a Phone) page 161 or Bluetooth (Overview) page 160.
Nav
If equipped, touch the Nav icon to display the navigation map. See Using the Navigation System page 144.
Climate
If equipped, touch the Climate icon to display the Climate main page. See Dual Automatic Climate Control System page 179.
Wi-Fi Hotspot
Touch the Wi-Fi Hotspot icon to display the Wi-Fi Hotspot information. See Settings page 166.
Users
If equipped, touch the Users icon to sign in or create a new user profile, and follow the on-screen instructions.
Only four user profiles can be active at one time in the vehicle. It may be necessary to remove a profile from the menu before creating or signing into an existing profile. The removed profile can be logged into at a later time.
Settings
Touch the Settings icon to display the Settings menu. See Settings page 166.
Apple CarPlay
Touch the Apple CarPlay icon to activate Apple CarPlay (if equipped) after a supported device is connected. See Apple CarPlay and Android Auto page 164.
Android Auto
Touch the Android Auto icon to activate Android Auto (if equipped) after a supported device is connected. See Apple CarPlay and Android Auto page 164.
Apps
If equipped, in-vehicle apps are available for download. Touch the Apps icon on the Home Page to begin.
Downloading and using in-vehicle apps requires Internet connectivity which can be accessed with a data plan through the vehicle’s built-in 4G LTE Wi-Fi hotspot,
if equipped, or a compatible mobile device hotspot. On most mobile devices, activation of the Wi-Fi hotspot is in the device’s Settings menu under Mobile Network Sharing, Personal Hotspot, Mobile Hotspot, or similar.
Availability of apps and connectivity varies by vehicle, conditions, and location. Data plan rates apply. Features are subject to change. For more information, see www.my.buick.com/learn.
OnStar Services
If equipped, touch the OnStar Services icon to display the OnStar Services and Account pages. See OnStar Overview page 346.
Camera
If equipped, touch the Camera icon to access the camera application. See Assistance Systems for Parking or Backing page 227.
Shortcut Tray
The shortcut tray is near the bottom of the display. It shows up to four applications.
Infotainment Display Features
Infotainment display features show on the display when available. When a feature is unavailable, it may gray out. When a feature is touched, it may highlight.
Haptic Feedback
If equipped, haptic feedback is a pulse that occurs when an icon or option is touched on the display or when controls on the center stack are pressed.
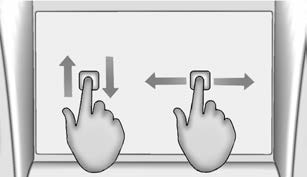
Infotainment Gestures
Use the following finger gestures to control the infotainment system.
Touch/Tap

Touch/tap is used to select an icon or option, activate an application, or change the location inside a map .
Touch and Hold

Touch and hold can be used to start another gesture, or to move or delete an application.
Drag
Drag is used to move applications on the Home Page, or to pan the map. To drag the item, it must be held and moved along the display to the new location. This can be done up, down, right, or left. This feature is only available when vehicle is parked and not in motion.
Nudge

Nudge is used to move items a short distance on a list or a map. To nudge, hold and move the selected item up or down to a new location.
Fling or Swipe

Fling or swipe is used to scroll through a list, pan the map, or change page views. Do this by placing a finger on the display then moving it rapidly up and down or right and left.
Spread
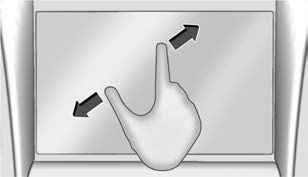
Spread is used to zoom in on a map, certain images, or a web page. Place finger and thumb together on the display, then move them apart.
Pinch
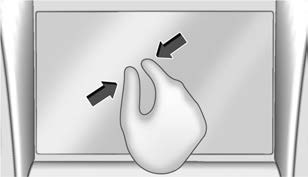
Pinch is used to zoom out on a map, certain images, or a web page. Place finger and thumb apart on the display, then move them together.
Cleaning High Gloss Surfaces and Vehicle Information and Radio Displays
For vehicles with high gloss surfaces or vehicle displays, use a microfiber cloth to wipe surfaces. Before wiping the surface with the microfiber cloth, use a soft bristle brush to remove dirt that could scratch the surface. Then use the microfiber cloth by gently rubbing to clean. Never use window cleaners or solvents. Periodically hand wash the microfiber cloth separately, using mild soap. Do not use bleach or fabric softener.
Rinse thoroughly and air dry before next use.
Software Updates
Over-the-Air Software Updates
If equipped, see “Updates” under Settings page 166 for details on software updates.
Radio
AM-FM Radio
Playing the Radio
From the Home Page, touch the Audio icon to display the active audio source page.
Choose from the three most recently used sources listed at the left side of the display or touch the More icon to display a list of available sources. Examples of available sources are AM, FM, SXM (if equipped), MyMedia (if available), USB, AUX (if equipped), and Bluetooth.
Infotainment System Sound Menu
From any of the audio source main pages, touch Sound to display the following:
Equalizer : Touch to adjust Bass, Midrange, Treble, and Surround (if equipped) using the options on the infotainment display.
Fade/Balance : Touch to adjust by using the controls on the infotainment display or by tapping/dragging the crosshair.
Finding a Station
Seeking a Station
From the AM, FM, or SXM (if equipped) display, touch![]() or
or ![]() on the infotainment display to search for the previous or next strong station or channel.
on the infotainment display to search for the previous or next strong station or channel.
Browsing Stations
From the AM, FM, or SXM (if equipped) display, touch Browse to list all available stations or channels. Navigate up and down through all stations by scrolling the list.
Touch the station or channel you want to listen to. Touch H to save the station or channel as a favorite.
If equipped, touch Update Station List to update the active stations in your area.
Direct Tune
Access Direct Tune by touching the Tune icon on the infotainment display to bring up the keypad. Navigate through all frequencies using 7 or 6 on the right side of the Direct Tune display. Directly enter a station or channel using the keypad. When a new station or channel is entered, the information about that station or channel displays on the right side. This information will update with each new valid frequency. Touch H to save the station or channel as a favorite.
The keypad will gray out entries that do not contribute to a valid frequency and will automatically place a decimal point within the frequency number.
Touch (X) to delete one number at a time. Touch and hold (X) to delete all numbers.
A valid AM or FM station will automatically tune to the new frequency but not close the Direct Tune display. When listening to SXM (if equipped), touch Go after entering the channel. Touch S on the infotainment display or touch z to exit out of Direct Tune.
The tune arrows on the right side of the Direct Tune display 7 or 6 will tune through the complete station or channel list one station step at a time per touch.
A touch and hold advances through stations or channels quickly.
If equipped, HD Radio multicast stations cannot be tuned directly through the Direct Tune feature. Only the analog or
HD1 station can use that feature. Use the display arrows to adjust to the multicast stations.
AM, FM, and SXM Categories
From the AM stations, if equipped with HD Radio, FM, or SXM (if equipped) display, touch Categories at the top of the Browse menu to access the categories list. The list contains names associated with the AM or FM stations, or SXM channels. Touch a category name to display a list of stations or channels for that category. Touching a station or channel from the list will tune the radio to that station or channel.
Storing Radio Station Presets
Favorites show in the area at the top of the display.
AM, FM, SXM (if equipped), and HD Radio Stations (if equipped) : Touch and hold a preset to store the current station or channel as a favorite. Touch a saved favorite to recall a favorite station.
Favorites can also be stored by touching H in a station or channel list. This will highlight indicating that it is now saved as a favorite.
The number of favorites displayed is automatically adjusted by default, but can be manually adjusted in Settings in the System tab under Favorites and then Set Number of Audio Favorites. It can also be adjusted in Settings in the Apps tab under Audio and then Set Number of Audio Favorites.
HD Radio Technology
If equipped, HD Radio is a free service with features such as digital quality sound, more stations available on a single frequency such as HD2 and HD3, and display information such as artist and song title.
From the Now Playing display, touch the HD Radio icon to turn HD on or off.
Station Access
To access HD Radio stations:
- Tune the radio to the station. If HD Radio is turned on and the station is broadcasting in HD Radio, the radio will automatically tune to the HD version of the current channel (HD1) after several
- seconds. The radio will also display icons representing additional channels (H…HD8), that may be available. When the radio successfully tunes to a HD station, the HD logo will display and digital audio will play.
- Touch the display arrows to tune to the previous or next HD Radio station.
There may be a delay before the station starts playing.
The HD Radio station number is indicated next to the HD logo.
HD Radio stations can be saved as favorites.
For a list of all stations, see www.hdradio.com.HD Radio Troubleshooting
Digital Audio Delay : Wait for the signal to process. This can take several seconds.Volume Change, Audio Skip, Echo, Digital Audio Lost : Station signal strength may be weak, the station is out of range, or the station may be out of alignment. Verify proper reception on another station.
If the HD Radio signal weakens while listening to HD1, the radio will automatically switch to the analog version of the radio station.
If the HD Radio signal loses reception while listening to stations HD2 to HD8, the radio mutes until the signal can be recovered or until the station is changed.
HD Radio can be disabled if driving in a weak signal area. Touch HD Radio On/Off to toggle HD Radio reception on and off.Radio Data System (RDS)RDS relies on receiving specific RDS information from radio stations and only works when the information is available.
It is possible that a radio station could broadcast information that causes the radio to work improperly.
In addition, RDS features are region and country of sale specific. This means specific RDS content may not be available in your listening area or in the country you operate the vehicle.
To turn RDS features on or off, select Settings > Apps> Audio> RDS> Select ON or OFF.The following core and region specific RDS features may be supported by radio broadcasters in your listening area:
Core RDS features
- Display radio station call letters
- Display messages from radio stations
- Provide radio station category information (when available)
Region Specific RDS features
- Support Traffic Program (TP) Alerts
- Support Alternate Frequency (AF) Switching
- Support Region Switching
Satellite Radio
SiriusXM Radio Service
If equipped, vehicles with a valid SiriusXM radio subscription can receive SiriusXM programming.
SiriusXM radio has a wide variety of programming and commercial-free music, coast to coast, in digital-quality sound. In the U.S., see www.siriusxm.com or call 1-888-601-6296. In Canada, see www.siriusxm.ca or call 1-877-438-9677.
When SiriusXM is active, the channel name, number, song title, and artist appear on the display.
SiriusXM with 360L
SiriusXM with 360L interface has enhanced in-vehicle listening experience for subscribers. The experience now offers more categories and system learned recommendations toward discovering more personalized content.
To use the full SiriusXM 360L program, including streaming content and listening recommendations, OnStar Connected Access is required. Connected vehicle services vary by model and require a complete working electrical system, cell reception, and GPS signal. An active connected plan is required.
Reference the SiriusXM user guide for use and subscription information.
Radio Reception
Unplug electronic devices from the accessory power outlets if there is interference or static in the radio.
FM
FM signals only reach about 16 to 65 km (10 to 40 mi). Although the radio has a built-in electronic circuit that automatically works to reduce interference, some static can occur, especially around tall buildings or hills, causing the sound to fade in and out.
AM
The range for most AM stations is greater than for FM, especially at night. The longer range can cause station frequencies to interfere with each other. Static can also occur when things like storms and power lines interfere with radio reception. When this happens, try reducing the treble on the radio.
SiriusXM Satellite Radio Service
If equipped, SiriusXM Satellite Radio Service provides digital radio reception. Tall buildings or hills can interfere with satellite radio signals, causing the sound to fade in and out. In addition, traveling or standing under heavy foliage, bridges, garages, or tunnels may cause loss of the SiriusXM signal for a period of time. Some cellular services may interfere with SXM reception causing loss of signal.
Mobile Device Usage
Mobile device usage, such as making or receiving calls, charging, or just having the mobile device on may cause static interference in the radio. Unplug the mobile device or turn it off if this happens.
Multi-Band Antenna
The multi-band roof antenna may be used for radio, navigation, and other communication systems, depending on the equipped options. To ensure clear reception, keep the antenna clear of obstructions, such as snow and ice. If the vehicle has a sunroof, and it is open, or a roof loaded with cargo, reception may be affected.
Audio Players
Avoiding Untrusted Media Devices
When using media devices such as USB and mobile devices, consider the source.
Untrusted media devices could contain files that affect system operation or performance and should be avoided.
USB Port
Audio stored on a USB device may be listened to.
Depending on your vehicle, it may be equipped with two USB ports in the center console under the armrest and another two on the center stack. These ports are for data and charging. There may also be two USB ports at the rear of the center console and a USB port on each side of the third row seats for charging only.
Caution
To avoid vehicle damage, unplug all accessories and disconnect all accessory cables from the vehicle when not in use. Accessory cables left plugged into the vehicle, unconnected to a device, could be damaged or cause an electrical short if the unconnected end comes in contact with liquids or another power source such as the accessory power outlet.
Playing from a USB
A USB mass storage device can be connected to the USB port.
Audio extensions supported by the USB may include:
Playing from a USB
A USB mass storage device can be connected to the USB port.
Audio extensions supported by the USB may include:
- MP3
- AAC
- OGG
- 3GP
My Media Library
MyMedia is only available when more than one indexed device is connected. It allows access to content from all indexed media sources. MyMedia will show as an available source in the Source page.
USB MP3 Player and USB Devices
The USB MP3 players and USB devices connected must comply with the USB Mass Storage Class specification (USB MSC).
To play a USB device:
- Connect the USB .
- Touch Audio from the Home page.
- Select USB device.
Use the following when playing an active USB source:
Touch to play the current media source.
Touch to pause playback of the current media source.
- Touch to seek the beginning of the current or previous track.
- Touch and hold to reverse quickly through Release to return to playing speed. Elapsed time displays.
- Touch to seek the next
- Touch and hold to advance quickly through Release to return to playing speed. Elapsed time displays.
Shuffle : Touch the shuffle icon to play music in random order.
USB Sound Menu
See “Infotainment System Sound Menu” under AM-FM Radio page 137.
USB Browse Menu
When a list of songs, albums, artists, or other types of media displays, the up and down arrows and A-Z appear on the left side. Select A-Z to view a display that will show all letters of the alphabet and select the letter to go to.
Touch the up and down arrows to move the list up and down.
Touch Browse and the following may display:
Playlists:
- Touch to view the playlists stored on the USB.
- Touch a playlist to view the list of all songs in that playlist.
- Touch a song from the list to begin
Supported playlist extensions are m3u and pls.
Artists:
- Touch to view the list of artists stored on the USB.
- Touch an artist name to view a list of all albums by the artist.
- To select a song, touch All Songs or touch an album and then touch a song from the list.
Songs:
- Touch to display a list of all songs on the USB.
- To begin playback, touch a song from the list.
Albums:
- Touch to view the albums on the
- Touch the album to view a list of all songs on the album.
- Touch a song from the list to begin
Genres:
- Touch to view the genres on the
- Touch a genre to view a list of
- Touch an artist to view albums by that
- Touch an album to view songs on the
- Touch a song to start
Composers:
- Touch to view the composers on the USB.
- Touch a Composer to view a list of albums by that composer.
- Touch an album or All Songs to view a list of songs.
- Touch a song from the list to begin
Folders:
- Touch to view the directories on the USB.
- Touch a folder to view a list of all
- Touch a file from the list to begin
Podcasts : Touch to view the podcasts on the connected Apple device and get a list of podcast episodes.
Audiobooks:
- Touch to view the audiobooks stored on the Apple device.
- Touch an audiobook to get a list of
- Touch the chapter from the list to begin
File System and Naming
File systems supported by the USB may include:
- FAT32
- NTFS
- HFS+
The songs, artists, albums, and genres are taken from the file’s song information and are only displayed if present. The radio displays the file name as the track name if the song information is not available.
Storing and Recalling Media Favorites
To store media favorites, touch Browse to display a list of media types.
Touch one of the following Browse options to save a favorite:
Playlists : Touch  next to any playlist to store the playlist as a favorite. Touch a saved favorite to recall a favorite playlist. The first song in the playlist begins to play.
Artists : Touch next to any artist to store the artist as a favorite. Touch a saved favorite to recall a favorite artist. The first song in the artist list begins to play.
Songs : Touch next to any song to store the song as a favorite. Touch a saved favorite to recall a favorite song.
Albums : Touch next to any album to store the album as a favorite. Touch a saved favorite to recall a favorite album. The first song in the album list begins to play.
Genres : Touch next to any genre to store the genre as a favorite. Touch a saved favorite to recall a favorite genre. The first song of the genre begins to play.
Podcasts : Touch next to any podcast to store the podcast as a favorite. Touch a saved favorite to recall a favorite podcast. The podcast begins to play.
Audiobooks : Touch next to any audiobook to store the audiobook as a favorite. Touch a saved favorite to recall a favorite audiobook. The first chapter in the audiobook begins to play.
Media Playback and Mute
USB playback will be paused if the system is muted. If the steering wheel mute control is pressed again, playback will resume.
If the source is changed while in mute, playback resumes and audio will unmute.
Auxiliary Jack
This vehicle may have an auxiliary input jack. Possible auxiliary audio sources include:
- Laptop computer
- Audio music player
This jack is not an audio output. Do not plug headphones into the auxiliary input jack. Set up an auxiliary device while the vehicle is in P (Park).
Connect a 3.5 mm (1/8 in) cable from the auxiliary device to the auxiliary input jack. When a device is connected, the system can play audio from the device over the vehicle speakers.
If an auxiliary device has already been connected, but a different source is currently active, touch More and then touch AUX to make the source active.
Shuffle and Browse are not available in the AUX source menu.
Bluetooth Audio
Music may be played from a paired Bluetooth device. See Bluetooth (Pairing and Using a Phone) page 161 or Bluetooth (Overview) page 160 for help pairing a device.
Volume and song selection may be controlled by using the infotainment controls or the mobile device. If Bluetooth is selected and no volume is present, check the volume setting on the infotainment system.
Music can be launched by touching Bluetooth from the recent sources list on the left of the display or by touching the More option and then touching the Bluetooth device.
To play music via Bluetooth:
- Power on the device, and pair to connect the device.
- Once paired, touch Audio from the Home Page, then touch Bluetooth from the recent sources list on the left of the Bluetooth Sound Menu
- See “Infotainment System Sound Menu” under AM-FM Radio page 137.
Manage Bluetooth Devices
From the Home Page:
- Touch
- Touch Devices to add or delete
When touching Bluetooth, the radio may not be able to launch the audio player on the connected device to start playing. When the vehicle is not moving, use the mobile device to begin playback.
All devices launch audio differently. When selecting Bluetooth as a source, the radio may show as paused on the display. Press play on the device or touch p on the vehicle display to begin playback.
Browse functionality will be provided where supported by the Bluetooth device. This media content will not be part of the MyMedia source mode.
Some smartphones support sending Bluetooth music information to display on the radio. When the radio receives this information, it will check to see if any is available and display it. For more information about supported Bluetooth features, visit your brand website. See Online Account page 337 for details.
See Radio Frequency Statement page 343.
Navigation
Using the Navigation SystemIf equipped, launch the Nav application by touching the Nav icon on the Home Page or on the shortcut tray near the bottom of the infotainment display.
When the Nav application is launched for the first time, a product walkthrough is available. Use of the feature requires the Terms and Conditions and the Privacy statement to be confirmed. If available and signed into a profile, it is also suggested to enable and confirm Predictive Navigation.
Predictive Navigation (If Equipped)
If Predictive Navigation is available and confirmed, this feature learns preferences by remembering where the vehicle has been.
It uses the locations and navigation history to personalize routes and results.
Predictive Navigation may learn elements such as:
- Personalized routes based on preferred
- Search results that provide best matches at the top of the list.
- Predictive
- Local map content
Predictive Navigation can also be enabled or disabled at a later time by touching A (Options). While in Options, touch Settings, then Map and Navigation Settings, and then Predictive Navigation.
After opening the Nav application for the first time, the application will always open in full map view displaying the vehicle’s current location. When the vehicle is stopped, the search bar will appear along the top of the navigation map view.
Manually close the search bar by touching
- When the vehicle is moving, the } (Search) icon will replace the search bar to maximize the full map view.
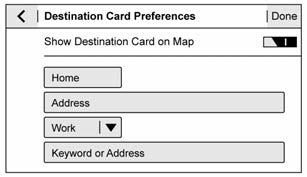
Destination Card Preferences
From the Nav application, set up Home and Work addresses to enable one-touch navigation. To set up Home and Work addresses, touch A and select Settings, then Map and Navigation Settings, and then Destination Card Preferences. Show Destination Card on Map should be on by default. Select and enter Home and/or Work address and save
If the vehicle’s system is not signed into a customized profile, the current location icon uses a generic symbol. Once signed into a customized profile, the current location symbol will show a customized icon. See Navigation Symbols 0 147.
Map and Navigation Settings
Touch A while in the map view to display options. The following may display:
- 3D Heading Up, 2D Heading Up, 2D North Up
- Show on Map
- Traffic Events (available with Connected
- Navigation)
- Settings
- Edit Destination (if a route has been set)
- Avoid on Route (if a route has been set)
Touch Settings to view Map and Navigation Settings. The following may display:
- Destination Card Preferences
Map Preferences - Route Preferences
Navigation Voice Control
Traffic Preferences
Alert Preferences
Fuel Grade Preferences
Manage History
Predictive Navigation: See “Predictive Navigation (If Equipped)” previously in this section. - About
To exit a list, touch z in the top right corner to return to the main map view.
Make sure to set up preferences before setting a destination and starting active guidance.
Map Preferences
Touch to choose between basic map feature configurations
Map Colors
- Auto – Touch to automatically change modes based on lighting conditions.
- Day (Light)
- Night (Dark)
3D Landmarks (Default is On) : Touch On or Off. When turned on, the system will display all 3D Landmarks on the map depending on the zoom level.
3D Buildings (Default is Off) : Touch On or Off. When turned on, the system will display all of the possible 3D building shapes on the map depending on the zoom level.
Show Terrain in 3D (Default is Off) :
If equipped, touch On or Off. When turned on, the system will display terrain information on the map in 3D view.
Auto-Zoom (Default is On) : Touch On or Off. When turned on, the system will automatically adjust the zoom level when the vehicle is approaching a turn. After the turn is completed, the system automatically brings the zoom back to the originally set level. If the vehicle is approaching a turn with the next turn occurring shortly after, the Auto-Zoom will remain on until both turns are completed.
Route Preferences
Touch to access the Route Preferences. The choices are:
Preferred Route – Choose from two different route options: Fastest or Eco-Friendly.
- Fastest would be the route with the shortest drive time.
- Eco-Friendly would be the most fuel-efficient route.
Avoid on Route – Choose any of the road features to avoid while on route:
- Highways
- Unpaved Roads
- Ferries
- Carpool Lanes
- Toll Roads
- Tunnels
- Country Borders
Navigation Voice Control
Touch to access the voice control setting display.
- Navigation Volume – To adjust the volume level, touch the up and down arrows. If the voice guidance prompt is being heard, volume can also be adjusted using the knob on the center stack or the volume switch on the steering wheel.
Navigation Voice Prompt Level During a Call. Options available are:
- Full Prompt (Selected by default)
- Tone Only
- None
Traffic Events (If Equipped)
This feature provides a list of events that are on the route or nearby. Touch A and then select Traffic Events. A connected Navigation service plan is required.
Traffic Preferences (If Equipped)
While in Map View, touch A, then Settings and then Map and Navigation Settings to access Traffic Preferences. When Show Traffic on Map is turned on, the feature provides an overview of the traffic flow using different coded colors. The following options are available for rerouting:
- Auto Reroute to Better Route – The system will automatically reroute if the system detects there is a traffic issue
- Ask Before Rerouting (Default) – If the system detects there is a traffic issue ahead, it will display a pop-up with details about the Choose to reroute or cancel the alert.
- Never Search for Better Route – The system will not check for a better route until one of the above options is
- Alert PreferencesSet alerts on or off during both inactive and active guidance views. The following alerts may be available:
- Road Safety Alerts – Touch to display upcoming School Zones.
- Traffic Camera Alerts
Manage History
Touch Manage History to access the History options:
- Clear Recent Destinations – Touch \ to clear the recent destinations.
- Clear Search History – Touch \ to clear the search history.
About
Touch to display software information, such as:
- Telenav Terms and Conditions
- Telenav Privacy Statement
- Navigation Version
Maps
The Navigation application requires a map database to run. It is stored on an SD card that is connected to the infotainment system. If the map database is not available, a missing SD card error message will be displayed.
SD Card Error Messages
The SD card only works for one unique vehicle. The SD card must pass authentication verification to be used for that specific vehicle. If the SD card has a switch that can be set to read-only mode, ensure that it is in the upward position and not in read-only.
Potential error scenarios and messages include:
- The SD card has initialized for the first time: “Once initialized, this SD card can only be used for navigation in this ”.
- The SD card is not working properly: “SD card is not functioning properly.
(Error Code).”
See your dealer if this message appears.
- The SD card is not paired with the existing system: “This SD card is not valid in this vehicle for navigation. See Owner’s Manual for more detail or visit your (Error Code).”
- The SD card has been removed from the slot: “SD card has been removed.
(Error Code).”
Make sure the SD card is in the slot. If it was removed and inserted and you still receive an error code, see your dealer.
Touch Confirm to resume after the initialization error message. For the other messages, touch OK to return to the Home Page.
Navigation Symbols
Following are the most common symbols that may appear in the Nav application.

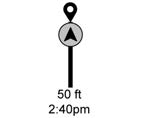
This indicates the vehicle’s current location and direction on the map.

This is the vehicle’s current location icon during inactive guidance mode. Once a user profile is created, the current location icon can be customized.
This icon indicates the vehicle’s current location and direction on the map.

The destination pin marks the location of the final destination. Touch the pin to view the destination address or to add it or remove it from the Favorites list. Hide the information by touching the pin one more time. It will automatically time out if no action is taken.

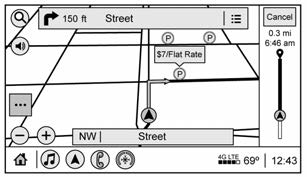
If equipped, smart Points of Interest (POIs) are places of interest for parking and gas station .
The progress bar provides an overview of the route progress and may show traffic and incidents along the way. As the route proceeds, the vehicle icon moves up the bar.
Touch the icon to zoom out on the map and view the entire route. Touch it again to return to the previous view.
View the drive time by touching the estimated time of arrival (ETA).
Current Location
When the vehicle is parked and not in a Navigation session, the user icon is centered on the map view, highlighting the current location.
Destination
Receiving Destination Directions from Different Sources
Destinations can be received or transferred from different sources to the Nav application for route guidance. If equipped, some of these sources may include:
- Navigation from search
- An address from the Contacts
- An application on the smartphone that can send destinations to the vehicle.
Waypoints
Add up to five waypoints, which are additional destinations, along the route. To add an additional stop or waypoint:
- From active guidance, touch }.
- Search for the destination using One-Box, Voice search, or the Quick Category icons.
- Choose search results Along Route, Nearby, or Near Destination.
- Choose the desired waypoint and touch Add to Trip or replace the current destination by touching New
-
- Touch A
- Touch Edit
- Modify destination order by touching and holding the arrow until it is highlighted. Drag to move the waypoint up or down the list.
- Delete a waypoint by touching Y.
A pop-up will appear to confirm waypoint removal. Once the request is confirmed, the system will remove the address from the destinations list. Touch z on the top right corner so the system can recalculate the route.
If there is only one address in the destinations list, the system will disable the move and delete functions. The system will not allow the final destination to be deleted.
Map Information
Road network attributes are contained in the map database for map information.
Attributes include information such as street names, street addresses, and turn restrictions. A detailed area includes all major highways, service roads, and residential roads. The detailed areas include Places of Interest (POIs) such as restaurants, airports, banks, hospitals, police stations, gas stations, tourist attractions, and historical monuments.
If the vehicle does not have an applicable service plan, the map database may not include data for newly constructed areas or map database corrections that are completed after production. The navigation system provides full route guidance in the detailed map areas.
Zoom Control
The zoom control display is shown on the map view. A few ways to zoom in or out are:
- Touch + or – to zoom in or out on the map.
- Double tap with one finger to zoom in or single tap with two fingers to zoom out on the map.
- Use the index finger and thumb to zoom out by pinching and then zoom in by spreading those two fingers on the map.
Map Gestures and Map Scale
Use the following gestures on the infotainment display to adjust the map scale and display options.
- Pinch to zoom in or out.
- Pan the map.
- Use two fingers to tilt down and change from 2D to 3D. Tilt up to change back to 2D.
- Rotate the
- See Using the System page 134.
Mute
When in active guidance, the audio prompts while using navigation can be muted. Touch the speaker icon on the right side of the upper bar. A slash will appear on the speaker to indicate voice guidance is muted.
Active Guidance View
When a destination is chosen and a navigation session is active, the navigation system enters into an Active Guidance View (AGV).
Map Orientation
Touch A on the map to access map orientation settings. Map orientation is 3D Heading Up by default.
Available settings are:
- 3D Heading Up (Default): 3D map with the vehicle pointing up. In this mode, the current location icon will always head up and the map will rotate around it.
- 2D Heading Up: 2D map with the vehicle pointing up. In this mode, the current location icon will always head up and the map will rotate around it.
- 2D North Up: 2D map with North pointing up. In this mode, the current location icon will shift as the vehicle turns left and
Touch the icon to change the map type. The icon and label will also update accordingly.
Depending on the zoom level of the 2D Heading Up and 3D Heading Up maps, the system may automatically switch to the 2D North Up map.
When in AGV, the entire route can be viewed in 2D North Up by touching the traffic bar. The map will zoom out and readjust to display the full route. When in 2D North Up Route View, the Recenter icon will appear in the middle of the display. Touch either the Recenter icon or the traffic bar again to return to the previous view, either 2D or 3D.
Lane Guidance
The map will display the lane information for the upcoming maneuver if it is available.
- Junction View
When a vehicle is on the highway and approaching the exit, an image displays the lane that the vehicle must stay in to complete the next maneuver.Quick-Turn View 
When the vehicle is approaching a turn with the next turn following in quick succession, a quick-turn list appears below the primary turn indicator. An audio prompt will announce the quick turn.
Auto-Zoom
When approaching a maneuver, the map will automatically zoom in to show both the vehicle icon and the upcoming maneuver to give a better view of the maneuver. Once the maneuver is complete, the system will zoom back to the previous zoom level.
Touch A on the map to access Settings then touch Map Preferences to access Auto-Zoom. This feature can be enabled or disabled.
Directions
Touch the menu option next to the next turn street name to display Directions.
Directions displays the turns and directions from the current location to the final destination.
Editing Directions
Directions can be edited by choosing y, which expands the list to fill the display and enters the Edit Mode. While in Edit Mode, an unwanted route segment can be removed from the route by touching Y next to the segment. A pop-up appears to confirm segment removal.
When the route segment has been removed, all segments are replaced by an activity indicator while the new route is recalculated. When the recalculation is complete, the activity indicator is replaced with the new route segments.
Highway Exits List
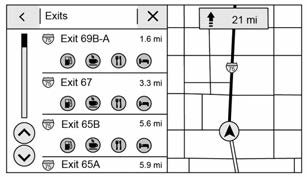 Touch C to open the Exit list. This icon displays next to the current street name near the bottom of the display. The icon only appears when on a highway with defined exits.
While traveling on roads with designated exits, an Exit list may be available. The Exit list displays the exit number, distance to the exit from the current vehicle position, and convenience stops that may be available, such as gas, coffee, food, and lodging.
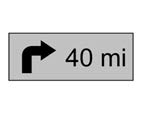
Next Maneuver Menu
When in Active Guidance, the Next Maneuver Turn Arrow, Street Name, and Maneuver Distance are shown in the Next Maneuver at the top of the display overlaying the map. ETA, Distance to Destination, and Traffic Indicator are
displayed in a panel pinned on the right of the display.
Navigation Next Turn Maneuver Alert If the Navigation application is not open when a near maneuver prompt is given, it is shown as an alert. Touch the alert to go to the main navigation view or touch to dismiss the alert.
Repeat Voice Guidance
This symbol indicates the next guidance maneuver. Touch it to repeat the last spoken guidance instruction.
Incident Alert (If Equipped)
During active guidance, if the system determines that there is an incident ahead but there is not a better route, the system will play a tone and show a Quick Notice.
This will only show once per incident.
Incident Reports (If Equipped)
Incident report icons, along with traffic flow data, display on the map during both active and inactive guidance.
End Route
Touch Cancel at the top right corner to end active guidance and return to inactive guidance. If active guidance is canceled before the destination has been reached, a pop-up option to Resume Trip will appear.
Resume Trip
The trip can be resumed if it was canceled by touching the Resume Trip pop-up option.
If the system has determined that the destination has been reached, either because the arrival view displayed or the destination has been passed, the Resume Trip option will not appear.
Favorites
The navigation favorites can have contacts, addresses, or POIs that have been saved through the favorite icon on the details view.
Accessing Favorites
In the Nav application, view the Favorites list by touching ![]() in the search bar along the top of the Nav map view. If the search bar is closed, touch } and select .
in the search bar along the top of the Nav map view. If the search bar is closed, touch } and select .
Saving Favorites
Favorites can be added from a number of the system’s applications. Touch the favorites icon to save content as a favorite.
Renaming Navigation Favorites
- Touch the Settings icon on the Home Page and touch the System tab.
- Touch Favorites to access the Manage Favorites option.
- Touch a saved Navigation favorite to access the edit Touch the edit icon to rename the favorite.
- Touch Save to store the renamed favorite.
Recents
Touch to access a list of recent destinations.
Recenter Position Icon
Touch the Recenter Position arrow in the middle of the map view to reset the map to the current location.
Last Parked Location
The Last Parked Location is the last location the vehicle engine was turned off. That location is displayed in the first row of the Recents list. Touching the last Parked Location shows the Address Details view to either save the address or drive to it. The Last Parked Location can be deleted by entering the Edit display. Once the Last Parked Location is deleted, it no longer appears in the Recents list, unless the vehicle is started at that location again.
Show POI Icons
To see the POI categories, touch Options, then touch Show on Map. Up to eight categories of icons can be selected.
Smart POI Icons on Map (If Equipped)
The smart POI icons such as fuel stations and parking may appear based on time, location, driver search behavior, driving conditions, and vehicle conditions.
Touch a smart POI icon to open the corresponding details:
- Left side: Name and address of the
- Right side: E + ETE (Estimated Time )
Smart Fuel Station Icons
Fuel station prices are shown if available for nearby stations when the vehicle is low on fuel.
Smart Parking Icons
When reaching a densely populated destination and the system determines that parking may be limited, the system will attempt to display nearby parking destinations with pricing information, if available.
Report an Issue Using POI Details (If Equipped)
In the POI details page, a POI issue can be reported if the data is not accurate or the address is incorrect. Touch Report an Issue near the bottom of the display to access the issue selection page. Touch one of the predefined issues on the selection page, then touch Send. The system will send the information for analysis.
Search
Touch Search on the infotainment display to open the search display. It has a search field entry box, quick category icon shortcuts, recents icon, favorites icon, and keyboard.
Auto Complete
Enter a partial location in the field entry box on the search display. Auto complete will attempt to complete the destination based on what is being entered. Touch the suggested item to search.
Search While in Motion with No Front Seat Passenger Present
The search display will not allow changes or text input with the keyboard when the vehicle is in motion. As a result, a display showing three rows of the most commonly used categories appears. Touching the search box will activate speech recognition.
Search While in Motion with Front Seat Passenger Present
If the system detects that the front seat passenger is present with both driver and passenger seat belts buckled, touching the search icon will display an alert message that allows the passenger to search for a destination as if the vehicle were stopped.
Connected Navigation
Connected Navigation is a subscription service that enables certain capabilities within the navigation system, such as Traffic, Smart Search/Routing, and Predictive Navigation capabilities. The system will show an alert when the subscription is expiring and will ask to renew the plan.
Global Positioning System (GPS)
If equipped, the position of the vehicle is determined by using satellite signals, various vehicle signals, and map data.
At times, other interference such as the satellite condition, road configuration, condition of the vehicle, and/or other circumstances can affect the navigation system’s ability to determine the accurate position of the vehicle.
The GPS shows the current position of the vehicle using signals sent by GPS satellites. When the vehicle is not receiving signals from the satellites, a symbol appears in the status bar.
This system might not be available or interference can occur if any of the following are true:
- Signals are obstructed by tall buildings, trees, large trucks, or a tunnel.
- Satellites are being repaired or improved.
For more information if the GPS is not functioning properly, see Problems with Route Guidance page 154 and If the System Needs Service page 155.
Vehicle Positioning
At times, the position of the vehicle on the map could be inaccurate due to one or more of the following reasons:
- The road system has changed.
- The vehicle is driving on slippery road surfaces such as sand, gravel, or snow.
- The vehicle is traveling on winding roads or long, straight roads.
- The vehicle is approaching a tall building or a large vehicle.
- The surface streets run parallel to a freeway.
- The vehicle has been transferred by a vehicle carrier or a ferry.
- The current position calibration is set incorrect
- The vehicle is traveling at high speed.
- The vehicle changes directions more than once, or the vehicle is turning on a turn table in a parking lot.
- The vehicle is entering and/or exiting a parking lot, garage, or a lot with a roof.
- The GPS signal is not received.
- A roof carrier is installed on the vehicle.
- Tire chains are installed on the vehicle.
- The tires are replaced or wom.
- The tire pressure for the tires is incorrect .
- This is the first navigation use after the map data is updated.
- The 12-volt battery has been disconnected for several days.
- The vehicle is driving in heavy traffic where driving is at low speeds, and the vehicle is stopped and started repeatedly.
Problems with Route Guidance
Inappropriate route guidance can occur under one or more of the following conditions:
- The turn was not made on the road indcator.
- Route guidance might not be available when using automatic rerouting for the next right or left turn.
- The route might not be changed when using automatic rerouting.
- There is no route guidance when turning at an intersection.
- Plural names of places might be announced occasionally.
It could take a long time to operate automatic rerouting during high-speed driving.
- Automatic rerouting might display a route returning to the set waypoint if heading for a destination without passing through a set waypoint.
- The route prohibits the entry of a vehicle due to a regulation by time or season or any other regulation which may be given.
- Some routes might not be
- The route to the destination might not be shown if there are new roads, if roads have recently changed, or if certain roads are not listed in the map data. See Maps page 147.
To recalibrate the vehicle’s position on the map, park with the vehicle running for two to five minutes, until the vehicle position updates. Make sure the vehicle is parked in a location that is safe and has a clear view of the sky and away from large obstructions.
If the System Needs Service
If the navigation system needs service, see your dealer.
Map Data Updates
The map data in the vehicle is the most up-to-date information available when the vehicle was produced. The map data is updated periodically, provided that the map information has changed and the vehicle has a relevant service plan.
See www.gmnavdisc.com for details on ordering, purchasing, and installing a new or replacement SD card. Features are subject to change. For more information on this feature, visit your brand website.
If the vehicle is equipped with Connected Navigation, which is a subscription service that enables certain features of the navigation system, such as Traffic, Smart Search/Routing, and Predictive Navigation, then the system will download the latest map data from the cloud.
Database Coverage Explanations
Coverage areas vary with respect to the level of map detail available for any given area. Some areas feature greater levels of detail than others. If this happens, it does not mean there is a problem with the system. As the map data is updated, more detail can become available for areas that previously had limited detail. See Map Data Updates page 155.
Voice Recognition
If equipped, voice recognition allows for hands-free operation within the navigation, audio, phone, and weather applications. This feature can be started by pressing g on the steering wheel or touching g on the infotainment display.
However, not all features within these areas are supported by voice commands.
Generally, only complex tasks that require multiple manual interactions to complete are supported by voice commands.
For example, tasks that take more than one or two touches, such as a song or artist to play from a media device, would be supported by voice commands. Other tasks, like adjusting the volume or seeking up or down, are audio features that are easily performed by touching one or two options, and are not supported by voice commands.
In general there are flexible ways to speak commands for completing the tasks.
If your language supports it, try stating a one-shot command, such as “Directions to address <number, street, city, state/ province>.” Do not include the ZIP code while stating the address during the
command. Another example of a one-shot Destination Entry command is, “Directions to Place of Interest at <hotel>.” If these commands do not work, try saying, “Take me to Place of Interest” or “Find address” and the system will walk you through by asking additional questions.
Hybrid Speech Recognition
If equipped, this feature helps distinguish words by using Internet-based information along with the system’s voice recognition database. This allows you to speak more naturally when using voice recognition.
Using Voice Recognition
Voice recognition becomes available once the system has been initialized. This begins when the ignition is turned on. Initialization may take a few moments.
- Press g on the steering wheel controls to activate voice recognition.
- The audio system mutes and the system plays a prompt.
- Clearly speak one of the commands described in this section.
A voice recognition system prompt can be interrupted while it is playing by pressing g again.
Once voice recognition is started, both the infotainment display and instrument cluster show the selections and visual dialog content. These displays can be turned on or off in the Tutorial Mode under Settings page 166.
There are three voice prompt modes supported:
- Informative verbal prompts: This type of prompt will provide more information regarding the supported actions.
- Short prompts: This type of prompt will provide simple instructions about what can be stated.
- Auto informative prompts: This type of prompt plays during the first few speech sessions, then automatically switches to the short prompt after some experience has been gained through using the system.
If a command is not spoken, the voice recognition system says a help prompt.
Prompts and Infotainment Displays
While a voice recognition session is active, there may be corresponding options showing on the displays. A selection can be made by manually touching the option, or by speaking the number for the option to select. Manual interaction in the voice recognition session is permitted. Interaction during a voice session may be completed entirely using voice commands while some manual commands may expedite a task. If a selection is made using a manual control, the voice recognition dialog will progress in the same way as if the selection were made using a voice command. Once the system completes the task, or the session is terminated, the voice recognition dialog stops.
An example of this type of manual intervention is touching an entry of a displayed number list instead of speaking the number associated with the entry desired.
Canceling Voice Recognition
Touch or say “Cancel” or “Exit” to terminate the voice recognition session and show the display where voice recognition was initiated.
Press on the steering wheel controls to terminate the voice recognition session and show the display where voice recognition was initiated
Natural Language Commands
Most languages do not support natural language commands in sentence form. For those languages, use direct commands like the examples shown on the display.
Helpful Hints for Speaking Commands
Voice recognition can understand commands that are naturally stated in sentence form or direct commands that state the application and the task.
For best results:
- Listen for the prompt before saying a command or reply.
- Speak the command naturally, not too fast, not too slow.
- Use direct commands without a lot of extra For example, “Call <name> at work,” “Play” followed by the artist or song name, or “Tune” followed by the radio station number.
- Navigation destinations can be made in a single command using keywords. A few examples are: “I want directions to an address,” “I need to find a place of interest or (POI),” or “Find contact.”
The system responds by requesting more details. For other POIs, say the name of a category like “Restaurants,” “Shopping Malls,” or “Hospitals.”
- Navigating to a destination outside of the current country takes more than one command. The first command is to tell the system where the navigation will take place, such as an Address, Intersection, POI, or If Address or Intersection is selected, the second command is to say, “Change Country.” Once the system responds, say the country before saying the rest of the address and/or intersection.
If POI is asked for, say “Change Location,” then “Change Country.”
Direct commands might be more clearly understood by the system. An example of a direct command would be “Call <number>.” Examples of these direct commands are displayed on most of the screens while a voice session is active. If “Phone” or “Phone Commands,” is spoken, the system understands that a phone call is requested and will respond with questions until enough details are gathered to make a call.
If a cell phone number has been saved with a name and a place, the direct command should include both, for example “Call <name> at work.”
Using Voice Recognition for List Options
When a list is displayed, a voice prompt will ask to confirm or select an option from that list.
When a display contains a list, there may be options that are available but not displayed. The list on a voice recognition screen functions the same as a list on other displays. Scrolling or flinging can be used to help display other entries from the list.
Manually scrolling or paging the list on a display during a voice recognition session suspends the current voice recognition event and plays the prompt “Please select manually or touch the Back icon on the infotainment display to try again.”
If manual selection takes more than 15 seconds, the session terminates and prompts that it has timed out. The display returns to the display where voice recognition was initiated.
The Back Command
Say “Back” or touch the Back icon on the infotainment display to go to the previous menu.
If in voice recognition, and “Back” is spoken all the way back to the starting display, and then “Back” is spoken one more time, the voice recognition session will cancel.
Help
Say “Help” on any voice recognition display and the help prompt for the display is played.
Voice Recognition for the Radio
If browsing the audio sources when voice is touched, the voice recognition commands for AM, FM, and SiriusXM (if equipped) are available.
“Switch to AM” : Switch bands to AM and tune to the last AM radio station.
“Switch to FM” : Switch bands to FM and tune to the last FM radio station.
“Switch to SXM” : Switch bands to SiriusXM and tune to the last SiriusXM channel.
“Tune to <AM frequency> AM” : Tune to the radio station whose frequency is identified in the command (like “nine fifty”).
“Tune to <FM frequency> FM” : Tune to the radio station whose frequency is identified in the command (like “one oh one point one”).
“Tune to <AM frequency> AM HD” : Tune to the HD Radio station (if equipped) whose frequency is identified in the command.
“Tune to <FM frequency> FM HD” : Tune to the HD Radio station (if equipped) whose frequency is identified in the command.
“Tune to <FM frequency> FM HD <HD channel number>” : Tune to the HD Radio station (if equipped) whose frequency and HD channel are identified in the command.
“Tune to SXM <SXM channel number>” : Tune to the SiriusXM radio station whose channel number is identified in the command.
“Tune to SXM <SXM channel name>” : Tune to the SiriusXM radio station whose channel name is identified in the command.
Voice Recognition for Audio MyMedia
The available voice recognition commands for [browsing] MyMedia are:
“Play Artist” : Begin a dialog to enter a specific artist name.
“Play Artist <artist name>” : Begin playback of a specific artist.
“Play Album” : Begin a dialog to enter a specific album name.
“Play Album <album name>” : Begin playback of a specific album.
“Play Song” : Begin a dialog to enter a specific song name.
“Play Song <song name>” : Begin playback of a specific song, if available.
“Play Genre” : Begin a dialog to enter a specific genre.
“Play Genre <genre name>” : Begin playback of a specific genre.
“Play Playlist” : Begin a dialog to enter a specific playlist name.
“Play Playlist <playlist name>” : Begin playback of a specific playlist.
“Play <device name>” : Play music from a specific device identified by name. The device name is the name displayed on the display when the device is first selected as an audio source.
“Play Chapter” : Begin a dialog to enter a specific name.
“Play Chapter <chapter name>” : Begin playback of a specific chapter.
“Play Audiobook” : Begin a dialog to enter a specific audiobook.
“Play Audiobook <audiobook name>” :
Begin playback of a specific audiobook.
“Play Episode” : Begin a dialog to enter a specific name.
“Play Episode <episode name>” : Begin playback of a specific episode.
“Play Podcast” : Begin a dialog to enter a specific podcast.
“Play Podcast <podcast name>” : Begin playback of a specific podcast.
“My Media” : Begin a dialog to enter the desired media content.
Handling Large Amounts of Media Content
It is expected that large amounts of media content will be brought into the vehicle.
It may be necessary to handle large amounts of media content in a different way than smaller amounts of media. The system may limit the options of voice recognition by not allowing selection of files by voice at the highest level if the number of files exceeds the maximum limit.
Changes to voice commands due to media content limits are:
- Files including other individual files of all media types such as songs, audiobook chapters, podcast episodes, and videos.
- Album type folders including types such as albums and audiobooks.
There are no restrictions if the number of files and albums is fewer than 12,000. When the number of files connected to the system is between 12,000 and 24,000, the content cannot be accessed directly with one command like “Play <song name>.”
The restriction is that the command “Play Song” must be spoken first; the system will then ask for the song name. The reply command would be to say the name of the song to play.
Similar limits exist for album content.
If there are more than 12,000 albums, but fewer than 24,000, the content cannot be accessed directly with one command like, “Play <album name>.” The command “Play Album” must first be spoken; the system will then ask for the album name. The reply would be to say the name of the album to play.
Once the number of files has exceeded approximately 24,000, there is no support for accessing the songs directly through voice commands. There will still be access to the media content by using commands for playlists, artists, and genres.
The access commands for playlists, artists, and genres are prohibited after the number of this type of media exceeds 12,000.
The system will provide feedback the first time voice recognition is initiated if it has become apparent that any of these limits are reached during a device initializing process.
Voice recognition performance will degrade to some extent based on many factors when adding large amounts of data to recognize. If this is the case, perhaps accessing songs through playlists or artist name would work better.
Voice Recognition for Navigation (If Equipped)
“Navigation” : Begin a dialog to enter specific destination information.
“Navigation Commands” : Begin a dialog to enter specific destination information.
Address” : Begin a dialog to enter a specific destination address, which includes the entire address consisting of the house number, street name, city, state/province, and country. Do not include the ZIP code.
“Place of Interest” : Begin a dialog to enter a destination Place of Interest category or major brand name.
The name must be precisely spoken. Nicknames or short names for the businesses will not likely be found. Lesser known businesses might have to be located by category, such as fast food, hotels, or banks.
“Navigate to Contact” : Begin a dialog to enter a specific destination contact name.
“Cancel Route” : End route guidance.
“Take Me Home” : Create a route to a stored home location.
Voice Recognition for the Phone
“Call <contact name>” : Initiate a call to a stored contact. The command may include location if the contact has location numbers stored.
“Call <contact> At Home,” “At Work,” “On Mobile,” or “On Other” : Initiate a call to a stored contact and location at home, at work, on mobile device, or on another phone.
“Call <cell phone number>” : Initiate a call to a cell phone number of seven digits, 10 digits, or three digit emergency numbers.
“Pair Phone” : Begin the Bluetooth pairing process. Follow the instructions on the infotainment display.
“Redial” : Initiate a call to the last dialed number.
“Switch Phone” : Select a different connected cell phone for outgoing calls.
“Voice Keypad” : Begin a dialog to enter special numbers like international numbers. The numbers can be entered in groups of digits with each group of digits being repeated back by the system. If the group of digits is not correct, the command “Delete” will remove the last group of digits and allow them to be re-entered. Once the entire number has been entered, the command “Call” will start dialing the number.
Phone Assistant Voice Recognition
Press and hold g on the steering wheel controls to pass through and launch Google phone assistant or Siri.
For the low radio, whether connected by Bluetooth or phone projection, the only available voice recognition is either Siri (iPhone) or the Google Assistant (Android).
Phone
Bluetooth (Overview)
The Bluetooth-capable system can be paired with up to 10 Bluetooth devices and two active Bluetooth devices, allowing:
- Placement and receipt of calls in a hands-free mode.
- Sharing of the device’s address book or contact list with the vehicle.
To minimize driver distraction, before driving, and with the vehicle parked:
- Become familiar with the features of the mobile Organize the phone book and contact lists clearly and delete duplicate or rarely used entries.
If possible, program speed dial or other shortcuts.
- Review the controls and operation of the infotainment system.
- Pair mobile device(s) to the vehicle. The system may not work with all mobile See “Pairing” later in this section.
Vehicles with a Bluetooth system can use a Bluetooth-capable mobile device with a Hands-Free Profile to make and receive phone calls. The infotainment system and voice recognition are used to control the system. The system can be used while the ignition is on or in accessory mode. The range of the Bluetooth system can be up to 9.1 m (30 ft). Not all mobile devices support all functions and not all mobile devices work with the Bluetooth system. Visit your brand website for more information about compatible mobile devices. See Online Account 0 337.
Controls
Use the controls on the center stack and the steering wheel to operate the Bluetooth system.
Steering Wheel Controls
Press to answer incoming calls and start voice recognition on your connected Bluetooth mobile device.
Press to end a call, decline a call, or cancel an operation. Press to mute or unmute the infotainment system when not on a call.
Infotainment System Controls
For information about how to navigate the menu system using the infotainment controls, see Overview page 132.
Audio System
When using the Bluetooth mobile device system, sound comes through the vehicle’s front audio system speakers and overrides the audio system. The volume level while on a mobile device call can be adjusted by pressing the steering wheel controls or the volume control on the center stack. The adjusted volume level remains in memory for later calls. The volume cannot be lowered beyond a certain level.
Bluetooth (Pairing and Using a Phone)
Pairing
A Bluetooth-enabled mobile device must be paired to the Bluetooth system and then connected to the vehicle before it can be used. See the mobile device manufacturer’s user guide for Bluetooth functions before pairing the device.
Pairing Information
If no mobile device has been connected, the Phone main page on the infotainment display will show the Connect Phone option. Touch this option to connect.
Another way to connect is to touch the Phones tab at the top right of the display and then touch Add Phone.
- A Bluetooth smartphone with music capability can be paired to the vehicle as a smartphone and a music player at the same time.
- Up to 10 devices can be paired to the Bluetooth system.
- The pairing process is disabled when the vehicle is moving.
- Pairing only needs to be completed once, unless the pairing information on the cell phone changes or the cell phone is deleted from the system.
- If multiple paired cell phones are within range of the system, the system connects to the paired cell phone that is set to First to Connect. If there is no cell phone set to First to Connect, it will link to the cell phone which was used last. To link to a different paired cell phone, see “Linking to a Different Phone” later in this section.
Pairing a Phone
- Make sure Bluetooth has been enabled on the cell phone before the pairing process is started.
- Touch the Phone icon on the Home Page or the phone icon on the shortcut tray near the bottom of the display.
- Touch Phones at the top of the infotainment display. There is also a Connect Phones option in the middle of the Phone display which will shortcut to the Phone List menu.
- Touch Add
- Select the vehicle name shown on the infotainment display from your cell phone’s Bluetooth Settings list.
- Follow the instructions on the cell phone to confirm the six-digit code showing on the infotainment display and touch Pair. The code on the cell phone and infotainment display will need to be acknowledged for a successful pair.
- Start the pairing process on the cell phone to be paired to the vehicle. See the cell phone manufacturer’s user guide
for information on this process. Once the cell phone is paired, it will show under Connected.
- If the vehicle name does not appear on your cell phone, there are a few ways to start the pairing process over:
- Turn the cell phone off and then back on.
- Go back to the beginning of the Phone menus on the infotainment display and restart the pairing
- Reset the cell phone, but this step should be done as a last effort.
- If the cell phone prompts to accept connection or allow phone book download, touch Always Accept and The phone book may not be available if not accepted.
- Repeat Steps 1−8 to pair additional cell
First to Connect Paired Phones
If multiple paired cell phones are within range of the system, the system connects to the paired cell phone that is set as First to Connect. To enable a paired cell phone as the First to Connect phone:
- Make sure the cell phone is turned
- Touch Settings, then touch
- Touch Phones to access all paired and all connected cell phones and mobile
- Touch the information icon or pencil icon to the right of the cell phone to open the cell phone’s settings menu.
- Touch the First to Connect option, to enable the setting for that device.
Cell phones and mobile devices can be added, removed, connected, and disconnected. A sub-menu will display whenever a request is made to add or manage cell phones and mobile devices.
Listing All Paired and Connected Phones
- Touch the Phone icon on the Home Page or the phone icon on the shortcut tray near the bottom of the display.
- Touch
Disconnecting a Connected Phone
- Touch the Phone icon on the Home
- Touch
- Touch the information icon or the pencil icon next to the connected cell phone or mobile device to show the cell phone’s or mobile device’s information display.
- Touch
Deleting a Paired Phone
- Touch the Phone icon on the Home Page or the phone icon on the shortcut tray near the bottom of the display.
- Touch
- Touch the information icon or the pencil icon next to the connected cell phone to display the cell phone’s or mobile device’s information display.
- Touch Forget
Linking to a Different Phone
To link to a different cell phone, the new cell phone must be in the vehicle and paired to the Bluetooth system.
- Touch the Phone icon on the Home Page or the phone icon on the shortcut tray near the bottom of the display.
- Touch
- Touch the new cell phone to link to from the not connected phone list. See “First to Connect Paired Phones” previously in this section.
Switching to Handset or Handsfree Mode
To switch between handset or handsfree mode:
- While the active call is hands-free, touch the Handset option to switch to the handset mode.
The mute icon will not be available or functional while Handset mode is active.
While the active call is on the handset, touch the Handset option to switch to the hands-free mode.
Making a Call Using Contacts and Recent Calls
Calls can be made through the Bluetooth system using personal cell phone contact information for all cell phones that support the Phone Book feature. Become familiar with the cell phone settings and operation. Verify the cell phone supports this feature.
The Contacts menu accesses the phone book stored in the cell phone.
The Recents menu accesses the recents call list from your cell phone.
To make a call using the Contacts menu:
- Touch the Phone icon on the Home
Touch
The Contacts list can be searched by using the first character. Touch A-Z on the infotainment display to scroll through the list of names.
Touch the name to call.
- Touch the desired contact number to To make a call using the Recents menu:
- Touch Phone on the Home
- Touch
- Touch the name or number to
Making a Call Using the Keypad
To make a call by dialing the numbers:
- Touch the Phone icon on the Home
- Touch Keypad and enter a phone
- Touch # on the infotainment display to start dialing the number.
Searching Contacts Using the Keypad
To search for contacts using the keypad:
- Touch the Phone icon on the Home
- Touch Keypad and enter partial phone numbers or contact names using the digits on the keypad to search.
Results will show on the right side of the display. Touch one to place a call.
Accepting or Declining a Call
When an incoming call is received, the infotainment system mutes and a ring tone is heard in the vehicle.
Accepting a Call
There are two ways to accept a call:
- Press g on the steering wheel
- Touch Answer on the infotainment
Declining a Call
There are two ways to decline a call:
- Press on the steering wheel
- Touch Ignore on the infotainment
Call Waiting
Call waiting must be supported on the Bluetooth cell phone and enabled by the wireless service carrier to work.
Accepting a Call
Press g to answer, then touch Switch on the infotainment display.
Declining a Call
Press to decline, then touch Ignore on the infotainment display
Switching Between Calls (Call Waiting Calls Only)
To switch between calls, touch Phone on the Home Page to display Call View. While in Call View, touch the call information of the call on hold to change calls.
Three-Way Calling
Three-way calling must be supported on the Bluetooth cell phone and enabled by the wireless service carrier to work.
To start a three-way call while in a current call:
- In the Call View, touch Add Call to add another call.
- Initiate the second call by selecting from Recents, Contacts, or Keypad.
- When the second call is active, touch the merge icon to conference the three-way call together.
Ending a Call
Press on the steering wheel
- Touch on the infotainment display, next to a call, to end only that call.
Dual Tone Multi-Frequency (DTMF) Tones
The in-vehicle Bluetooth system can send numbers during a call. This is used when calling a menu-driven phone system. Use the Keypad to enter the number.
Apple CarPlay and Android Auto
If equipped, Android Auto and/or Apple CarPlay capability may be available through a compatible smartphone. If available, the Android Auto and Apple CarPlay icons will change from gray to color on the Home Page of the infotainment display.
To use Android Auto and/or Apple CarPlay:
For Wired Phone Projection
- Download the Android Auto app to your smartphone from the Google Play store. There is no app required for Apple
Connect your Android phone or Apple iPhone by using the factory-provided phone USB cable and plugging into a USB data port. For best performance, it is highly recommended to use the device’s factory-provided USB cable, which should be replaced after significant wear to maintain connection quality. Aftermarket or third-party cables may not work.
- When the phone is first connected to activate Apple CarPlay or Android Auto, accept the terms and conditions on both the infotainment system and the phone.
- Follow the instructions on the
The Android Auto and Apple CarPlay icons on the Home Page will illuminate depending on the smartphone. Android Auto and/or Apple CarPlay may automatically launch upon USB connection. If not, touch the Android Auto or Apple CarPlay icon on the Home Page to launch.
Press on the center stack to return to the Home Page.
For Wireless Phone Projection
If equipped, verify your phone is wireless compatible by visiting the Google Android Auto or Apple CarPlay support page.
- Download the Android Auto app to your smartphone from the Google Play There is no app required for Apple CarPlay.
- For first time connection, there are two ways to set up wireless projection:
- Connect your Android phone or Apple iPhone by using the factory-provided phone USB cable and plugging into a USB data For best performance, it is highly recommended to use the device’s factory-provided USB cable, which should be replaced after significant wear to maintain connection quality. Aftermarket or third-party cables may not work.
- Connecting the phone over
See Bluetooth (Pairing and Using a Phone) page 161 or Bluetooth (Overview) page 160.
- Make sure wireless is turned on the phone for wireless projection to work.
- When the phone is first connected to activate Apple CarPlay or Android Auto, agree to the terms and conditions on both the infotainment system and the
- Follow the instructions on the
The Android Auto and Apple CarPlay icons on the Home Page will illuminate depending on the smartphone. Android Auto and/or Apple CarPlay may automatically launch upon wireless connection. If not, touch the Android Auto or Apple CarPlay icon on the Home Page to launch.
Wireless Carplay and/or Wireless Android Auto may experience occasional service disruption due to outside Wi-Fi interference.
To disconnect the phones wireless projection:
- Select Settings from the Home
- Select Phones
- Touch 4 or the pencil icon next to the phone to be disconnected.
- Turn off Apple CarPlay or Android
Press { on the center stack to return to the Home Page.
Features are subject to change. For further information on how to set up Android Auto and Apple CarPlay in the vehicle, visit your brand website. See Online Account page 337 for details.
Android Auto is provided by Google and is subject to Google’s terms and privacy policy. Apple CarPlay is provided by Apple and is subject to Apple’s terms and privacy policy. Data plan rates apply. For Android Auto support and to see if your phone is compatible, see https://support.google.com
android auto. For Apple CarPlay support and to see if your phone is compatible, see www.apple.com/ios/carplay/. Apple or Google may change or suspend availability at any time. Android Auto, Android, Google, Google Play, and other marks are trademarks of Google Inc.; Apple CarPlay is a trademark of Apple Inc.
Press { on the center stack to exit Android Auto or Apple CarPlay. To enter back into Android Auto or Apple CarPlay, press and hold { on the center stack.
Apple CarPlay and Android Auto can be disabled from the infotainment system. To do this, touch Home, Settings, and then touch the Apps tab along the top of the display. Use the On/Off toggled to turn off Apple CarPlay or Android Auto.
Settings
Not all vehicles will have all features. Certain settings can be managed in the Online Account sites when an account is established, and may be modified if other users have accessed the vehicle or created accounts. This may result in changes to the security or functionality of the infotainment system. Some settings may also be transferred to a new vehicle, if equipped. For instructions, visit your brand website.
Refer to the User Terms and Privacy Statement for important details. To view, touch the Settings icon on the Home Page of the infotainment display.
The settings menu may be organized into four categories. Select the desired category by touching System, Apps, Vehicle, or Personal.
To access the personalization menus:
- Touch Settings on the Home Page on the infotainment display.
- Touch the desired category to display a list of available options.
- Touch to select the desired feature
- Touch the options on the infotainment display to disable or enable a feature.
- Touch z to go to the top level of the Settings menu.
System
The menu may contain the following:
Time / Date
Allows setting of the clock.
Language
Sets the display language used on the infotainment display. It may also use the selected language for voice recognition and audio feedback.
Phones
Allows connecting to a different cell phone or mobile device source, disconnect a cell phone or media device, or delete a cell phone or media device.
Wi-Fi Networks
Shows connected and available Wi-Fi networks.
If a 4G LTE data package is not active on the vehicle, the infotainment system can be connected to an external protected Wi-Fi network, such as a mobile device or home hotspot, to utilize connected services.
Wi-Fi Hotspot
Allows adjustment of different Wi-Fi features.
Privacy
Allows adjustment of the infotainment privacy settings.
Device Remote Access
Allows devices to interact with vehicle features and access data.
Display
Allows adjustment of the infotainment display.
Sounds
Allows adjustment of the infotainment system sounds.
Voice
Allows adjustment of the infotainment voice recognition features.
Favorites
Allows adjustment of the infotainment favorite settings.
Updates
If equipped, the vehicle can download and install select software updates over a wireless connection. The system will prompt for certain updates to be downloaded and installed. There is also an option to check for updates manually.
To manually check for updates, touch Settings on the Home Page and select the System tab. Go to the Vehicle Software section and touch Updates. Follow the on-screen prompts. The steps to check for, download, and install updates may vary by vehicle.
The vehicle can be used normally during the software download. Once the download is complete, there may be a prompt to accept the installation of the update upon the next ignition cycle or the next time the vehicle is shifted into P (Park). For most updates, the vehicle will be disabled and cannot be driven during the installation. The system will deliver messages indicating success or error during and after the download and installation processes.
Downloading Over-the-Air vehicle software updates requires Internet connectivity, which can be accessed through the vehicle’s built-in 4G LTE connection, if equipped and active. If required, data plans are provided by a third party. Optionally, a secure Wi-Fi hotspot such as a compatible mobile device hotspot, home hotspot, or public hotspot can be used. Applicable data rates may apply.
To connect the infotainment system to a secured mobile device hotspot, home hotspot, or public hotspot, touch Settings on the Home Page, select the System tab, followed by Wi-Fi Networks. Select the appropriate Wi-Fi network, and follow the on-screen prompts. Download speeds may vary.
On most compatible mobile devices, activation of the Wi-Fi hotspot is in the Settings menu under Mobile Network Sharing, Personal Hotspot, Mobile Hotspot, or similar.
Availability of Over-the-Air software updates varies by vehicle and country. Features are subject to change. For more information on this feature, see Online Account page 337 for details.
Preferences
Allows the infotainment system to disable or enable the download of new updates in the background.
About
Shows the infotainment system software information
Running Applications
Shows a complete list of applications that are currently running on the infotainment system.
Return to Factory Settings
Allows resetting the infotainment system settings in the vehicle.
Apps
The menu may contain the following:
Android Auto
Allows interacting directly with a mobile device on the infotainment display. See Apple CarPlay and Android Auto page 164.
Apple CarPlay
Allows interacting directly with a mobile device on the infotainment display. See Apple CarPlay and Android Auto page 164.
Apps
Shows app settings and information.
Audio
Adjusts different audio settings.
Climate
Adjusts different climate settings.
Navigation
Adjusts different navigation settings. See Using the Navigation System page 144.
Phone Adjusts different phone settings.
SiriusXM
Adjusts different SiriusXM settings.
Vehicle
The menu may contain the following:
Rear Seat Reminder
Allows for a chime and a message when the rear door has been opened before or during operation of the vehicle.
Climate and Air Quality
Adjusts different climate settings.
Collision/Detection Systems
Adjusts different driver assistance system settings.
Comfort and Convenience
Adjusts different comfort and convenience settings.
Lighting
Adjusts different lighting settings.
Power Door Locks
Adjusts different door lock settings. Remote Lock, Unlock, and Start Adjusts different remote lock settings. Seating Position
Adjusts different seat settings.
Teen Driver
See Teen Driver page 169.
Valet Mode
This will lock the infotainment system and steering wheel controls. It may also limit access to vehicle storage locations, if equipped.
To enable valet mode:
- Enter a four-digit code on the keypad.
- Select Enter to go to the confirmation screen.
- Re-enter the four-digit code.
Touch Lock or Unlock to lock or unlock the system. Touch Back to go back to the previous menu.
Personal
If equipped, this menu allows adjustment of different user profile settings. See “Users” in Using the System page 134 for information on setting up user profiles.
The menu may contain the following:
Name
Edit your user name that will be displayed in the vehicle.
Vehicle Account Information
View the vehicle account information and to change the account password.
An “unverified user account” pop-up will display until the account information verification process has been completed on the Internet. Check your registered e-mail account for an activation e-mail to complete the verification process.
Profile Picture
Choose or change your profile picture.
Profile Identifiers
Have the vehicle recognize the identifier you choose.
If the remote key is lost or stolen, see your dealer.
Security
Have your profile secured with a PIN.
Vehicle Name
Edit the vehicle name.
Vehicle Account
View the vehicle account information and to change the account password.
Delete Profile
Remove the profile from the vehicle.
Teen Driver
If equipped, this allows multiple keys to be registered for beginner drivers to encourage safe driving habits. When the vehicle is started with a Teen Driver key, it will automatically activate certain safety systems, allow setting of some features, and limit the use of others. The Report Card will record vehicle data about driving behavior that can be viewed later. When the vehicle is started with a registered key, the Driver Information Center (DIC) displays a message that Teen Driver is active.
To access:
- Touch Settings on the Home Page, then touch Vehicle, and then Teen Driver.
- Create a Personal Identification Number (PIN) by choosing a four-digit PIN.
Re-enter the PIN to confirm. To change the PIN, touch Change PIN.
The PIN is required to:
- Set up/Add or remove keys.
- Change Teen Driver setting.
- Change or clear the Teen Driver PIN.
- Access or delete Report Card data.
Set up/Add keys to activate Teen Driver and assign restrictions to the key:
Any vehicle key can be registered, up to a maximum of eight keys. Label the key to tell it apart from the other keys.
For a pushbutton start system:
- Start the Vehicle.
- For automatic transmissions, the vehicle must be in P (Park). For manual transmissions, the vehicle must be stopped with the parking brake set.
- From the Settings menu, touch Vehicle and then Teen Driver.
- Enter the PIN.
Place the remote key you wish to register in the transmitter pocket. The key does not need to be the one that
started the vehicle. See Remote Key Operation 07 for transmitter pocket location.
- From the Teen Driver menu, touch Setup Keys or Add/Remove Teen Driver Keys.
- If the remote key has not previously been registered, the option to add the key displays. Touch Add and a confirmation message displays. Teen Driver restrictions will be applied whenever this remote key is used to operate the vehicle.
- If the remote key has already been registered, the option to remove the key displays. If Remove is touched, the remote key is no longer registered. A confirmation message displays, and Teen Driver restrictions will not be applied if this remote key is used to operate the vehicle.
In vehicles with a pushbutton start system, if a Teen Driver and a non-Teen Driver key are both present at start up, the vehicle will recognize the non-Teen Driver key to start the vehicle. The Teen Driver settings will not be active.
For a keyed ignition system:
- Start the vehicle.
- For automatic transmissions, the vehicle must be in P (Park). For manual transmissions, the vehicle must be stopped with the parking brake set.
- From the Settings menu, touch Vehicle and then Teen Driver.
- Enter the PIN.
- Touch Setup Keys or Add/Remove Teen Driver Keys. The system displays instructions for registering or unregistering a key. A confirmation message displays.
Manage Settings or Teen Driver Settings
Depending on the options of your vehicle, the following menu items may be displayed:
Buckle to Drive : When turned ON, Buckle to Drive prevents the driver from shifting out of P (Park) for a period of time after the brake pedal is pressed if the driver, or on some vehicles the detected passenger, has not buckled their seat belt. On some vehicles, Buckle to Drive is always ON when Teen Driver is active and is not configurable.
Audio Volume Limit : Allows a maximum audio volume to be set. Turn the audio volume limit on or off. Use the arrows to choose the maximum allowable level for the audio volume. On some infotainment systems, touch Set Audio Volume Limit to choose the maximum allowable audio volume level.
Set Audio Volume Limit : Use the arrows to choose the maximum allowable level for the audio volume.
Teen Driver Speed Limiter : Limits the maximum speed of the vehicle. When the speed limiter is turned on and the vehicle is started with a Teen Driver key, the DIC displays a message that the top speed is limited.
On certain vehicles, when the Speed Limiter is turned ON, the vehicle’s maximum acceleration will be limited. The DIC will display a message that the acceleration is limited.
Teen Driver Speed Warning : Displays a warning in the DIC when exceeding a selectable speed. Turn the speed warning on or off and choose the desired speed warning level. The speed warning does not limit the speed of the vehicle. On some infotainment systems, touch Set Teen Driver Speed Warning to set the warning speed.
Set Teen Driver Speed Warning : Choose the desired speed warning level. The speed warning does not limit the speed of the vehicle.
SiriusXM Explicit Content Filter : Allows the SiriusXM Explicit Content Filter to be turned ON or OFF. When ON, the teen driver will not be able to listen to SiriusXM stations that contain explicit content, and the Explicit Content Filter selection in the Audio Settings will be unavailable for change.
When Teen Driver is Active:
- If equipped, the radio will mute when the driver seat belt, and in some vehicles the front passenger seat belt, is not buckled. The audio from any device paired to the vehicle will also be muted.
- An object placed on the front passenger seat, such as a briefcase, handbag, grocery bag, laptop, or other electronic device, could cause the passenger sensing system to falsely sense an unbuckled front passenger and mute the radio.
If this happens, remove the object from the seat. See Passenger Sensing System page 60.
Some safety systems, such as Automatic Emergency Braking, if equipped, cannot be turned off.
The gap setting for Adaptive Cruise Control and alert timing for Forward Collision Alert, if equipped, cannot be When trying to change a safety feature that is not configurable in Teen Driver, the feature may be grayed out or removed from the infotainment menu, or the DIC will display a message indicating that Teen Driver is active and the action is not available.
Super Cruise, if equipped, is not available.
Enhanced Low Fuel Warning (if equipped)
- When the vehicle is low on fuel, the low fuel light on the instrument cluster flashes and the DIC low fuel warning cannot be dismissed.
- Do not tow a trailer if equipped with Automatic Emergency Braking.
Report Card
The vehicle owner must secure the driver’s consent to record certain vehicle data when the vehicle is driven with a registered Teen Driver key. There is one Report Card per vehicle. Data is only recorded when a registered Teen Driver key is used to operate the vehicle.
The Report Card data is collected from the time Teen Driver is activated or the last time the Report Card was reset. The following items may be recorded:
- Distance Driven – the total distance
- Maximum Speed – the maximum vehicle speed detected.
- Overspeed Warnings – the number of times the speed warning setting was exceeded.
- Wide Open Throttle – the number of times the accelerator pedal was pressed nearly all the way down.
- Forward Collision Alerts (if equipped) – the number of times the driver was notified when approaching a vehicle ahead too quickly and at potential risk for a crash.
- Forward Automatic Braking, also called Automatic Emergency Braking (if equipped) – the number of times the vehicle detected that a forward collision was imminent and applied the brakes.
- Reverse Automatic Braking (if equipped) – the number of times the vehicle detected that a rearward collision was imminent and applied the brakes.
- Traction Control – the number of times the Traction Control System activated to reduce wheel spin or loss of traction.
- Stability Control – the number of events which required the use of electronic stability control.
- Antilock Braking System Active – The number of Antilock Brake System
- Tailgating Alerts (if equipped)– the number of times the driver was alerted for following a vehicle ahead too closely.
Report Card Data
Cumulative Data is saved for all trips until the Report Card is reset or until the maximum count is exceeded. If the maximum count is exceeded for a Report Card line item, that item will no longer be updated in the Report Card until it is reset. Each item will report a maximum of 1,000 counts. The distance driven will report a maximum of 64 374 km (40,000 mi).
To delete Report Card data, do one of the following:
- From the Report Card display, touch Reset.
- Touch Clear PIN and All Teen Driver Keys from the Teen Driver This will also unregister any Teen Driver keys and delete the PIN.
Forgotten PIN
See your dealer to reset the PIN.
Trademarks and License Agreements
FCC Information
See Radio Frequency Statement page 343.

“Made for iPhone,” means that an electronic accessory has been designed to connect specifically to iPhone, and has been certified by the developer to meet Apple performance standards. Apple is not responsible for the operation of this device or its compliance with safety and regulatory standards. Please note that the use of this accessory with iPhone may affect wireless performance. iPhone are trademarks of Apple Inc., registered in the U.S. and other countries.

Trial length and service availability may vary by model, model year or trim. Service will automatically stop at the end of your trial subscription period unless you decide to continue service. If you do not wish to enjoy your trial, you can cancel by calling the number below. All SiriusXM services require a subscription, each sold separately by SiriusXM after the trial period. Service subject to the applicable SiriusXM Customer Agreement and Privacy Policy, visit www.siriusxm.com (USA) or www.siriusxm.ca (Canada) to see complete terms and how to cancel which includes calling 1-866-635-2349 (USA) or 1-888-539-7474 (Canada). Some services and features are subject to device capabilities and location availability. Content varies by SiriusXM subscription package. All fees, content and features are subject to change.
SiriusXM with 360L: Some features, including steaming content and listening recommendations, require an active OnStar Connected Access plan and may vary by vehicle model. Content varies by SiriusXM subscription plan. GM connected vehicle services vary by vehicle model and require active service plan, working electrical system, cell reception and GPS signal. See onstar.com for details and limitations.
SiriusXM, Pandora, Stitchery and all related logos are trademarks of Sirius XM Radio Inc. and its respective subsidiaries.
SiriusXM satellite service is only available in the 48 contiguous United States (and Puerto Rico with limited availability) and Canada.
In Canada: Some deterioration of service may occur in extreme northern latitudes. This is beyond the control of SiriusXM.
Explicit Language Notice: Channels with frequent explicit language are indicated with an “XL” preceding the channel name.
Family-friendly packages are available by contacting SiriusXM:
- USA Customers — See siriusxm.com or call 1-888-601-6296.
- Canada Customers — See siriusxm.ca or call 1-877-438-9677.
It is prohibited to copy, decompile, disassemble, reverse engineer, hack, manipulate, or otherwise make available any technology or software incorporated in receivers compatible with the SiriusXM Satellite Radio System or that support the SiriusXM website, the Online Service or any of its content.
General Requirements:
- A License Agreement from SiriusXM is required for any product that incorporates SiriusXM Technology and/or for use of any of the SiriusXM marks to be manufactured, distributed, or marketed in the SiriusXM Service Area.
- For products to be distributed, marketed, and/or sold in Canada, a separate agreement is required with Sirius XM Canada Inc.

TouchSense Technology and TouchSense System 1000 Series Licensed from Immersion Corporation. TouchSense System 1000 protected under one or more of the U.S. Patents at the following address www.immersion.com/patent-marking.html and other patents pending.
Bose
Bose AudioPilot and Bose Centerpoint surround are registered trademarks of Bose Corporation in the U.S. and other countries.
Bluetooth
The Bluetooth word mark and logos are owned by the Bluetooth SIG, Inc. and any use of such marks by General Motors is under license. Other trademarks and trade names are those of their respective owners.
Java
Java is a registered trademark of Oracle and/or its affiliates.
MPEG4–AVC (H.264)
THIS PRODUCT IS LICENSED UNDER THE AVC PATENT PORTFOLIO LICENSE FOR THE PERSONAL AND NON-COMMERCIAL USE OF A CONSUMER TO (i) ENCODE VIDEO IN COMPLIANCE WITH THE AVC STANDARD (“AVC VIDEO”) AND/OR (ii) DECODE AVC
VIDEO THAT WAS ENCODED BY A CONSUMER ENGAGED IN A PERSONAL AND NON-COMMERCIAL ACTIVITY AND/OR WAS OBTAINED FROM A VIDEO PROVIDER LICENSED TO PROVIDE AVC VIDEO. NO LICENSE IS GRANTED OR SHALL BE IMPLIED FOR ANY OTHER USE. ADDITIONAL INFORMATION MAY BE OBTAINED FROM MPEG LA, LLC. SEE https://www.mpegla.com
VC-1
THIS PRODUCT IS LICENSED UNDER THE VC-1 PATENT PORTFOLIO LICENSE FOR THE PERSONAL AND NON-COMMERCIAL USE OF A CONSUMER TO (i) ENCODE VIDEO IN COMPLIANCE WITH THE VC-1 STANDARD (“VC-1 VIDEO”) AND/OR (ii) DECODE VC-1 VIDEO THAT WAS ENCODED BY A CONSUMER ENGAGED IN A PERSONAL AND NON-COMMERCIAL ACTIVITY AND/OR WAS OBTAINED FROM A VIDEO PROVIDER LICENSED TO PROVIDE VC-1 VIDEO. NO LICENSE IS GRANTED OR SHALL BE IMPLIED FOR ANY OTHER USE. ADDITIONAL INFORMATION MAY BE OBTAINED FROM MPEG LA, LLC. SEE https://www.mpegla.com
MPEG4–Visual
USE OF THIS PRODUCT IN ANY MANNER THAT COMPLIES WITH THE MPEG-4 VISUAL STANDARD IS PROHIBITED, EXCEPT FOR USE BY A CONSUMER ENGAGING IN PERSONAL AND NON-COMMERCIAL ACTIVITIES.
MP3
MPEG Layer-3 audio coding technology licensed from Fraunhofer IIS and Thomson.
WMV/WMA
This product includes technology owned by Microsoft Corporation and under a license from Microsoft Licensing, GP. Use or distribution of such technology outside of this product is prohibited without a license from Microsoft Corporation and/or Microsoft Licensing, GP as applicable.
Map End User License Agreement
END USER TERMS
The Map Data SD card (“Data”) is provided for your personal, internal use only and not for resale. It is protected by copyright, and is subject to the following terms (this “End User License Agreement”) and conditions which are agreed to by you, on the one
hand, and HERE North America, LLC (“HERE”) and its licensors (including their licensors and suppliers) on the other hand.
The Data for areas of Canada includes information taken with permission from Canadian authorities, including: © Her Majesty the Queen in Right of Canada, © Queen’s Printer for Ontario, © Canada Post Corporation, GeoBase®.
HERE holds a nonexclusive license from the United States Postal Service® to publish and sell ZIP+4® information.
© United States Postal Service 2013. Prices are not established, controlled, or approved by the United States Postal Service. The following trademarks and registrations are owned by the USPS: United States Postal Service, USPS, and ZIP+4.
TERMS AND CONDITIONS
Personal Use Only: You agree to use this Data for the solely personal, noncommercial purposes for which you were licensed, and not for service bureau, timesharing or other similar purposes. Except as otherwise set forth herein, you agree not to otherwise reproduce, copy, modify, decompile, disassemble or reverse engineer any portion of this Data, and may not transfer or distribute it in any form, for any purpose, except to the extent permitted by mandatory laws. You may transfer the Data and all accompanying materials on a permanent basis if you retain no copies and the recipient agrees to the terms of this End User License Agreement. Multi-disc sets may only be transferred or sold as a complete set as provided to you and not as a subset thereof.
Restrictions
Except where you have been specifically licensed to do so by HERE and without limiting the preceding paragraph, you may not (a) use this Data with any products, systems, or applications installed or otherwise connected to or in communication with vehicles capable of vehicle navigation, positioning, dispatch, real time route guidance, fleet management or similar applications; or (b) with, or in communication with, including without limitation, cellular phones, palmtop and handheld computers, pagers, and personal digital assistants or PDAs.
Warning
This Data may contain inaccurate or incomplete information due to the passage of time, changing circumstances, sources used, and the nature of collecting comprehensive geographic data, any of which may lead to incorrect results.
No Warranty
This Data is provided to you “as is,” and you agree to use it at your own risk. HERE and its licensors (and their licensors and suppliers) make no guarantees, representations, or warranties of any kind, express or implied, arising by law or otherwise, including but not limited to, content, quality, accuracy, completeness, effectiveness, reliability, fitness for a particular purpose, usefulness, use or results to be obtained from this Data, or that the Data or server will be uninterrupted or error free.
Disclaimer of Warranty
THE DATABASE IS PROVIDED ON AN “AS IS” AND “WITH ALL FAULTS BASIS” AND HARMAN (AND THEIR LICENSORS AND SUPPLIERS) EXPRESSLY DISCLAIM ALL OTHER WARRANTIES, EXPRESS OR IMPLIED, INCLUDING BUT NOT LIMITED TO, THE IMPLIED WARRANTIES OF
NON-INFRINGEMENT, MERCHANTABILITY, SATISFACTORY QUALITY, ACCURACY, TITLE AND FITNESS FOR A PARTICULAR PURPOSE. NO ORAL OR WRITTEN ADVICE OR INFORMATION PROVIDED BY HARMAN (OR ANY OF THEIR LICENSORS, AGENTS, EMPLOYEES, OR THIRD PARTY PROVIDERS) SHALL CREATE A WARRANTY, AND YOU ARE NOT ENTITLED TO RELY ON ANY SUCH ADVICE OR INFORMATION. THIS DISCLAIMER OF WARRANTIES IS AN ESSENTIAL CONDITION OF THIS AGREEMENT.
Disclaimer of Liability
HERE AND ITS LICENSORS (INCLUDING THEIR LICENSORS AND SUPPLIERS) SHALL NOT BE LIABLE TO YOU IN RESPECT OF ANY CLAIM, DEMAND OR ACTION, IRRESPECTIVE OF THE NATURE OF THE CAUSE OF THE CLAIM, DEMAND OR ACTION ALLEGING ANY LOSS, INJURY OR DAMAGES, DIRECT OR INDIRECT, WHICH MAY RESULT FROM THE USE OR POSSESSION OF THIS DATA; OR FOR ANY LOSS OF PROFIT, REVENUE, CONTRACTS OR SAVINGS, OR ANY OTHER DIRECT, INDIRECT, INCIDENTAL, SPECIAL OR CONSEQUENTIAL DAMAGES ARISING OUT OF YOUR USE OF OR INABILITY TO USE THIS DATA, ANY DEFECT IN THIS DATA, OR THE BREACH OF THESE TERMS OR CONDITIONS, WHETHER IN AN ACTION IN CONTRACT OR TORT OR BASED ON A WARRANTY, EVEN IF HERE OR ITS LICENSORS HAVE BEEN ADVISED OF THE POSSIBILITY OF SUCH DAMAGES. Some allow certain liability exclusions or damages limitations, so to that extent the above may not apply to you.
Export Control
You agree not to export from anywhere any part of the Data provided to you or any direct product thereof except in compliance with, and with all licenses and approvals required under, applicable export laws, rules and regulations. Entire Agreement: These terms and conditions constitute the entire agreement between HERE (and its licensors, including their licensors and suppliers) and you pertaining to the subject matter hereof, and supersedes in their entirety any and all written or oral agreements previously existing between us with respect to such subject matter.
Governing Law
The above terms and conditions shall be governed by the laws of the State of Illinois, without giving effect to (i) its conflict of laws provisions, or (ii) the United Nations Convention for Contracts for the International Sale of Goods, which is explicitly excluded. You agree to submit to the jurisdiction of the State of Illinois for any and all disputes, claims, and actions arising from or in connection with the Data provided to you hereunder.
Government End Users
If the Data is being acquired by or on behalf of the United States government or any other entity seeking or applying rights similar to those customarily claimed by the United States government, this Data is a “commercial item” as that term is defined at 48 C.F.R. (“FAR”) 2.101, is licensed in accordance with this End User License Agreement, and each copy of Data delivered or otherwise furnished shall be marked and embedded as appropriate with the following “Notice of Use,” and be treated in accordance with such Notice:

NOTICE OF USE
CONTRACTOR (MANUFACTURER/ SUPPLIER) NAME:
HERE North America, LLC
CONTRACTOR (MANUFACTURER/SUPPLIER) ADDRESS:
425 West Randolph Street, Chicago, IL 60606.
This Data is a commercial item as defined in FAR 2.101 and is subject to the End User License Agreement under which this Data was provided.
© 2014 HERE North America, LLC. All rights reserved.
If the Contracting Officer, federal government agency, or any federal official refuses to use the legend provided herein, the Contracting Officer, federal government agency, or any federal official must notify HERE prior to seeking additional or alternative rights in the Data.
Unicode
Copyright © 1991-2010 Unicode, Inc. All rights reserved. Distributed under the Terms of Use in https://www.unicode.org/copyright.html.
Free Type Project
Portions of this software are copyright © 2010 The FreeType Project (https://www.freetype.org). All rights reserved.
Open Source SW
Further information concerning the OSS licenses is shown in the infotainment display.
QNX
Portions of this software are copyright © 2008-2011, QNX Software Systems. All rights reserved.
Part C – EULA
Copyright © 2011, Software Systems GmbH & Co. KG. All Rights Reserved.
The product you have purchased (“Product”) contains Software (Runtime Configuration No. 505962; “Software”) which is distributed by or on behalf of the Product manufacturer “Manufacturer”) under license from Software Systems Co. (“QSSC”). You may only use the Software in the Product and in compliance with the license terms below.
Subject to the terms and conditions of this License, QSSC hereby grants you a limited, non-exclusive, non-transferable license to use the Software in the Product for the purpose intended by the Manufacturer. If permitted by the Manufacturer, or by applicable law, you may make one backup copy of the Software as part of the Product software.
QSSC and its licensors reserve all license+C31 rights not expressly granted herein, and retain all right, title and interest in and to all copies of the Software, including all intellectual property rights therein. Unless required by applicable law you may not reproduce, distribute or transfer, or de-compile, disassemble or otherwise attempt to unbundle, reverse engineer, modify or create derivative works of, the Software. You agree: (1) not to remove, cover or alter any proprietary notices, labels or marks in or on the Software, and to ensure that all copies bear any notice contained on the original; and (2) not to export the Product or the Software in contravention of applicable export control laws.
EXCEPT TO THE EXTENT OTHERWISE REQUIRED BY APPLICABLE LAW, QSSC AND ITS LICENSORS PROVIDE THE SOFTWARE ON AN “AS IS” BASIS, WITHOUT WARRANTIES OR CONDITIONS OF ANY KIND, EITHER EXPRESS OR IMPLIED INCLUDING, WITHOUT LIMITATION, ANY WARRANTIES OR CONDITIONS OF TITLE, NON-INFRINGEMENT, MERCHANTABILITY OR FITNESS FOR A PARTICULAR PURPOSE. ANY WARRANTIES OR OTHER PROVISIONS OFFERED BY THE MANUFACTURER OR ITS DISTRIBUTOR(S) THAT DIFFER FROM THIS LICENSE ARE OFFERED BY THE MANUFACTURER OR ITS DISTRIBUTOR(S) ALONE AND NOT BY QSSC, ITS AFFILIATES OR THEIR LICENSORS. YOU ASSUME ANY RISKS ASSOCIATED WITH YOUR USE OF THE SOFTWARE UNDER THIS LICENSE.
EXCEPT TO THE EXTENT OTHERWISE REQUIRED BY APPLICABLE LAW (SUCH AS IN THE CASE OF DELIBERATE OR GROSSLY NEGLIGENT ACTS), IN NO EVENT SHALL QSSC, ITS AFFILIATES OR THEIR LICENSORS BE LIABLE TO YOU UNDER ANY LEGAL THEORY, WHETHER IN TORT (INCLUDING NEGLIGENCE), CONTRACT OR OTHERWISE, FOR DAMAGES, INCLUDING ANY DIRECT, INDIRECT, SPECIAL, INCIDENTAL, OR CONSEQUENTIAL DAMAGES OF ANY CHARACTER ARISING AS A RESULT OF THIS LICENSE OR OUT OF THE USE OR INABILITY TO USE THE PRODUCT (INCLUDING BUT NOT LIMITED TO DAMAGES FOR LOSS OF GOODWILL, WORK STOPPAGE, PRODUCT FAILURE OR MALFUNCTION, OR ANY AND ALL OTHER COMMERCIAL DAMAGES OR LOSSES), EVEN IF QSSC, ITS AFFILIATES OR THEIR LICENSORS HAVE BEEN ADVISED OF THE POSSIBILITY OF SUCH DAMAGES.
WMA
This product is protected by certain intellectual property rights of Microsoft. Use or distribution of such technology outside of this product is prohibited without a license from Microsoft.
For more information on the Software, including any open source software license terms (and available source code) as well as copyright attributions applicable to the Runtime Configuration indicated above, please contact the Manufacturer or contact QSSC at 175 Terence Matthews Crescent, Kanata, Ontario, Canada K2M 1W8 (licensing@qnx.com).
Linotype
Helvetica is a trademark of Linotype Corp. registered in the U.S. Patent and Trademark Office and may be registered in certain other jurisdictions in the name of Linotype Corp. or its licensee Linotype GmbH.
Usage in text form of each of the Licensed Trademarks is:
The trademark attribution requirements for the Licensed Trademarks may be viewed at https://www.linotype.com/2061-19414/trademarks.html.
END USER NOTICE
The marks of companies displayed by this product to indicate business locations are the marks of their respective owners. The use of such marks in this product does not imply any sponsorship, approval, or endorsement by such companies of this product.
Useful Links
View Full Manual:Buick Enclave 2023 User Manual | Auto User Guide
Download Manual: Manuals and Guides | Vehicle Support | Buick