Cadillac CT4 2023 Audio Players and Navigation
The advanced audio and navigation system of the 2023 Cadillac CT4 improves the convenience and enjoyment of in-car entertainment. The CT4’s high-end sound system, like the Bose Performance Series audio system that is available, produces amazing sound quality for an engrossing listening experience. With its responsive touchscreen display, the infotainment system’s easy-to-use navigation, music streaming, and smartphone connectivity via Apple CarPlay and Android Auto are all made possible. The CT4 offers exceptional audio quality that accentuates its opulent interior while keeping drivers informed, entertained, and connected with its smart navigation functions, voice recognition capabilities, and real-time traffic updates.
2023 Cadillac CT4 Specs, Price, Features, Mileage and Review
Audio Players
Avoiding Untrusted Media Devices
When using media devices such as USB and mobile devices, consider the source. Untrusted media devices could contain files that affect system operation or performance and should be avoided.
USB Port
Audio stored on a USB device may be listened to. Depending on your vehicle, it may be equipped with two USB ports in the center console under the armrest and another two on the center stack. These ports are for data and charging. There may also be two USB ports at the rear of the center console and a USB port on each side of the third-row seats for charging only.
Caution
To avoid vehicle damage, unplug all accessories and disconnect all accessory cables from the vehicle when not in use. Accessory cables left plugged into the vehicle, unconnected to a device, could be damaged or cause an electrical short if the unconnected end comes in contact with liquids or another power source such as the accessory power outlet.
Playing from a USB
A USB mass storage device can be connected to the USB port.
Audio extensions supported by the USB may include:
- MP3
- AAC
- OGG
- 3GP
My Media Library
MyMedia is only available when more than one indexed device is connected. It allows access to content from all indexed media sources. MyMedia will show as an available source in the Source page.
USB MP3 Player and USB Devices
The USB MP3 players and USB devices connected must comply with the USB Mass Storage Class specification (USB MSC).
To play a USB device:
- Connect the USB.
- Touch Audio from the Home Page.
- Select a USB device.
Use the following when playing an active USB source:
p: Touch to play the current media source.
j: Touch to pause playback of the current media source.
- Touch to seek the beginning of the current or previous track.
- Touch and hold to reverse quickly through playback. Release to return to playing speed. Elapsed time displays.
- Touch to seek the next track.
- Touch and hold to advance quickly through playback. Release to return to playing speed. Elapsed time displays.
Shuffle: Touch the shuffle icon to play music in random order.
USB Browse Menu
When a list of songs, albums, artists, or other types of media displays, the up and down arrows and A-Z appear on the left side. Select A-Z to view a display that will show all letters of the alphabet and select the letter to go to. Touch the up and down arrows to move the list up and down.
Touch Browse and the following may display:
Playlists:
- Touch to view the playlists stored on the USB.
- Touch a playlist to view the list of all songs in that playlist.
- Touch a song from the list to begin playback.
Supported playlist extensions are m3u and pls.
Artists:
- Touch to view the list of artists stored on the USB.
- Touch an artist name to view a list of all albums by the artist.
- To select a song, touch All Songs or touch an album and then touch a song from the list.
Songs:
- Touch to display a list of all songs on the USB.
- To begin playback, touch a song from the list.
Albums:
- Touch to view the albums on the USB.
- Touch the album to view a list of all songs on the album.
- Touch a song from the list to begin playback.
Genres:
- Touch to view the genres on the USB.
- Touch a genre to view a list of artists.
- Touch an artist to view albums by that artist.
- Touch an album to view songs on the album.
- Touch a song to start playback.
Composers:
- Touch to view the composers on the USB.
- Touch a Composer to view a list of albums by that composer.
- Touch an album or All Songs to view a list of songs.
- Touch a song from the list to begin playback.
Folders:
- Touch to view the directories on the USB.
- Touch a folder to view a list of all files.
- Touch a file from the list to begin playback.
Podcasts: Touch to view the podcasts on the connected Apple device and get a list of podcast episodes.
Audiobooks:
- Touch to view the audiobooks stored on the Apple device.
- Touch an audiobook to get a list of chapters.
- Touch the chapter from the list to begin playback.
File System and Naming
File systems supported by the USB may include:
- FAT32
- NTFS
- HFS+
The songs, artists, albums, and genres are taken from the file’s song information and are only displayed if present. The radio displays the file name as the track name if the song information is not available.
Storing and Recalling Media Favorites
To store media favorites, touch Browse to display a list of media types.
Touch one of the following Browse options to save a favorite:
Playlists: Touch H next to any playlist to store the playlist as a favorite. Touch a saved favorite to recall a favorite playlist. The first song in the playlist begins to play.
Artists: Touch H next to any artist to store the artist as a favorite. Touch a saved favorite to recall a favorite artist. The first song in the artist list begins to play.
Songs: Touch H next to any song to store the song as a favorite. Touch a saved favorite to recall a favorite song.
Albums: Touch H next to any album to store the album as a favorite. Touch a saved favorite to recall a favorite album. The first song in the album list begins to play.
Genres: Touch H next to any genre to store the genre as a favorite. Touch a saved favorite to recall a favorite genre. The first song of the genre begins to play.
Podcasts: Touch H next to any podcast to store the podcast as a favorite. Touch a saved favorite to recall a favorite podcast. The podcast begins to play.
Audiobooks: Touch H next to any audiobook to store the audiobook as a favorite. Touch a saved favorite to recall a favorite audiobook. The first chapter in the audiobook begins to play.
Media Playback and Mute
USB playback will be paused if the system is muted. If the steering wheel mute control is pressed again, playback will resume. If the source is changed while in mute, playback resumes and the audio will unmute.
Bluetooth Audio
Music may be played from a paired Bluetooth device. Volume and song selection may be controlled by using the infotainment controls or the mobile device. If Bluetooth is selected and no volume is present, check the volume setting on the infotainment system. Music can be launched by touching Bluetooth from the recent sources list on the left of the display or by touching the More option and then touching the Bluetooth device.
To play music via Bluetooth:
- Power on the device, and pair to connect the device.
- Once paired, touch Audio from the Home Page, then touch Bluetooth from the recent sources list on the left of the display.
Manage Bluetooth Devices
From the Home Page:
- Touch Audio.
- Touch Devices to add or delete devices.
When touching Bluetooth, the radio may not be able to launch the audio player on the connected device to start playing. When the vehicle is not moving, use the mobile device to begin playback. All devices launch audio differently. When selecting Bluetooth as a source, the radio may show as paused on the display. Press play on the device or touch p on the vehicle display to begin playback. Browse functionality will be provided where supported by the Bluetooth device. This media content will not be part of the MyMedia source mode. Some smartphones support sending Bluetooth music information to display on the radio. When the radio receives this information, it will check to see if any is available and display it. For more information about supported Bluetooth features, visit your brand website.
Navigation
Using the Navigation System
If equipped, launch the Nave application by touching the Nave icon on the Home Page or on the shortcut tray near the bottom of the infotainment display. When the Nav application is launched for the first time, a product walkthrough is available. Use of the feature requires the Terms and Conditions and the Privacy Statement to be confirmed. If available and signed into a profile, it is also suggested to enable and confirm Predictive Navigation.
Predictive Navigation (If Equipped)
If Predictive Navigation is available and confirmed, this feature learns preferences by remembering where the vehicle has been. It uses the locations and navigation history to personalize routes and results.
Predictive Navigation may learn elements such as:
- Personalized routes based on preferred streets.
- Search results that provide the best matches at the top of the list.
- Predictive traffic.
- Local map content updating.
Predictive Navigation can also be enabled or disabled at a later time by touching A (Options). While in Options, touch Settings, then Map and Navigation Settings, and then Predictive Navigation.
Navigation Map View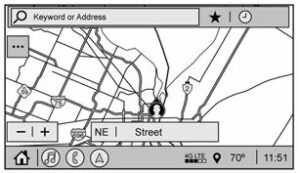
After opening the Nav application for the first time, the application will always open in full map view displaying the vehicle’s current location. When the vehicle is stopped, the search bar will appear along the top of the navigation map view. Manually close the search bar by touching z. When the vehicle is moving, the }(Search) icon will replace the search bar to maximize the full map view.
Destination Card Preferences
From the Nav application, set up Home and Work addresses to enable one-touch navigation. To set up Home and Work addresses, touch A and select Settings, then Map and Navigation Settings, and then Destination Card Preferences. Show Destination Card on Map should be on by default. Select and enter your Home and/or Work address and save.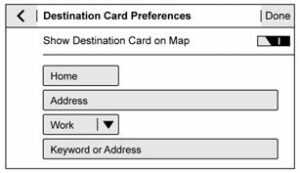
If the vehicle’s system is not signed into a customized profile, the current location icon uses a generic symbol. Once signed into a customized profile, the current location symbol will show a customized icon.
Map and Navigation Settings
Touch A while in the map view to display options.
The following may display:
- 3D Heading Up, 2D Heading Up, 2D North Up
- Show on Map
- Traffic Events (available with Connected Navigation)
- Settings
- Edit Destination (if a route has been set) . Avoid on Route (if a route has been set)
Touch Settings to view Map and Navigation Settings.
The following may display:
- Destination Card Preferences
- Map Preferences
- Route Preferences
- Navigation Voice Control
- Traffic Preferences
- Alert Preferences
- Fuel Grade Preferences
- Manage History
- Predictive Navigation: See “Predictive Navigation (If Equipped)” previously in this section.
- About
To exit a list, touch z in the top right corner to return to the main map view. Make sure to set up preferences before setting a destination and starting active guidance.
Map Preferences
Touch to choose between basic map feature configurations:
Map Colors
- Auto – Touch to automatically change modes based on lighting conditions.
- Day (Light)
- Night (Dark)
3D Landmarks (Default is On): Touch On or Off. When turned on, the system will display all 3D Landmarks on the map depending on the zoom level.
3D Buildings (Default is Off): Touch On or Off. When turned on, the system will display all of the possible 3D building shapes on the map depending on the zoom level.
Show Terrain in 3D (Default is Off) :
If equipped, touch On or Off. When turned on, the system will display terrain information on the map in 3D view. Auto-Zoom (Default is On) : Touch On or Off. When turned on, the system will automatically adjust the zoom level when the vehicle is approaching a turn. After the turn is completed, the system automatically brings the zoom back to the originally set level. If the vehicle is approaching a turn with the next turn occurring shortly after, the Auto-Zoom will remain on until both turns are completed.
Route Preferences
Touch to access the Route Preferences. The choices are:
- Preferred Route – Choose from two different route options: Fastest or Eco-Friendly.
- The fastest would be the route with the shortest drive time.
- Eco-Friendly would be the most fuel-efficient route.
- Avoid on Route – Choose any of the road features to avoid while on route:
- Highways
- Unpaved Roads
- Ferries
- Carpool Lanes
- Toll Roads
- Tunnels
- Country Borders
Navigation Voice Control
Touch to access the voice control setting display.
- Navigation Volume – To adjust the volume level, touch the up and down arrows. If the voice guidance prompt is being heard, the volume can also be adjusted using the knob on the center stack or the volume switch on the steering wheel.
- Navigation Voice Prompt Level During a Call. Options available are:
- Full Prompt (Selected by default) ‐ Tone Only
- None
Traffic Events (If Equipped)
This feature provides a list of events that are on the route or nearby. Touch A and then select Traffic Events. A connected Navigation service plan is required.
Traffic Preferences (If Equipped)
While in Map View, touch A, then Settings, and then Map and Navigation Settings to access Traffic Preferences. When Show Traffic on Map is turned on, the feature provides an overview of the traffic flow using different coded colors.
The following options are available for rerouting:
- Auto Reroute to Better Route – The system will automatically reroute if the system detects there is a traffic issue ahead.
- Ask Before Rerouting (Default) – If the system detects there is a traffic issue ahead, it will display a pop-up with details about the issue. Choose to reroute or cancel the alert.
- Never Search for Better Route – The system will not check for a better route until one of the above options is selected.
Alert Preferences
Set alerts on or off during both inactive and active guidance views. The following alerts may be available:
- Road Safety Alerts – Touch to display upcoming School Zones.
- Traffic Camera Alerts
Manage History
Touch Manage History to access the History options:
- Clear Recent Destinations – Touch \ to clear the recent destinations.
- Clear Search History – Touch \ to clear the search history.
About
Touch to display software information, such as:
- Talena Terms and Conditions
- Talena Privacy Statement
- Navigation Version
Maps
The Navigation application requires a map database to run. It is stored on an SD card that is connected to the infotainment system. If the map database is not available, a missing SD card error message will be displayed.
SD Card Error Messages
The SD card only works for one unique vehicle. The SD card must pass authentication verification to be used for that specific vehicle. If the SD card has a switch that can be set to read-only mode, ensure that it is in the upward position and not in read-only.
Potential error scenarios and messages include:
- The SD card has been initialized for the first time: “Once initialized, this SD card can only be used for navigation in this vehicle.”
- The SD card is not working properly: “SD card is not functioning properly. (Error Code).” See your dealer if this message appears.
- The SD card is not paired with the existing system: “This SD card is not valid in this vehicle for navigation. See the Owner’s Manual for more detail or visit your dealer. (Error Code).”
- The SD card has been removed from the slot: “SD card has been removed. (Error Code).”
- Make sure the SD card is in the slot. If it was removed and inserted and you still receive an error code, see your dealer.
Touch Confirm to resume after the initialization error message. For the other messages, touch OK to return to the Home Page.
Navigation Symbols
The following are the most common symbols that may appear in the Nav application. This indicates the vehicle’s current location and direction on the map.
This is the vehicle’s current location icon during inactive guidance mode. Once a user profile is created, the current location icon can be customized.
This icon indicates the vehicle’s current location and direction on the map.
The destination pin marks the location of the final destination. Touch the pin to view the destination address to add it or remove it from the Favorites list. Hide the information by touching the pin one more time. It will automatically time out if no action is taken.
If equipped, smart Points of Interest (POIs) are places of interest for parking and gas stations.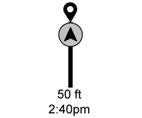
The progress bar provides an overview of the route progress and may show traffic and incidents along the way. As the route proceeds, the vehicle icon moves up the bar. Touch the icon to zoom out on the map and view the entire route. Touch it again to return to the previous view. View the drive time by touching the estimated time of arrival (ETA).
Current Location
When the vehicle is parked and not in a Navigation session, the user icon is centered on the map view, highlighting the current location.
Destination
Receiving Destination Directions from Different Sources
Destinations can be received or transferred from different sources to the Nav application for route guidance. If equipped, some of these sources may include:
- Navigation from search results.
- An address from the Contacts list.
- An application on the smartphone that can send destinations to the vehicle.
Waypoints
Add up to five waypoints, which are additional destinations, along the route. To add an additional stop or waypoint:
- From active guidance, touch }.
- Search for the destination using One-Box, Voice search, or the Quick Category icons.
- Choose search results Along Route, Nearby, or Near Destination.
- Choose the desired waypoint and touch Add to Trip or replace the current destination by touching New Destination.
Route options are not available for waypoints.
Arriving at a Waypoint
When approaching a waypoint, the system will display a Destination Arrival view. To continue on to the next destination touch the Drive to message on the infotainment display.
If the vehicle passes the waypoint or gets out of the current route, the system will automatically reroute back to this waypoint. At the same time, it will show a Drive to icon along with the next waypoint address so the current waypoint can be skipped and guidance can resume to the next waypoint or destination.
Editing a Waypoint
When waypoints are added during active guidance, the system allows a stop to be deleted or the order to be changed. To edit a waypoint:
- Touch A.
- Touch Edit Destinations.
- Modify destination order by touching and holding the arrow until it is highlighted. Drag to move the waypoint up or down the list.
- Delete a waypoint by touching Y.
A pop-up will appear to confirm waypoint removal. Once the request is confirmed, the system will remove the address from the destinations list. Touch z on the top right corner so the system can recalculate the route. - If there is only one address in the destinations list, the system will disable the move and delete functions. The system will not allow the final destination to be deleted.
Map Information
Road network attributes are contained in the map database for map information. Attributes include information such as street names, street addresses, and turn restrictions. A detailed area includes all major highways, service roads, and residential roads. The detailed areas include Places of Interest (POIs) such as restaurants, airports, banks, hospitals, police stations, gas stations, tourist attractions, and historical monuments. If the vehicle does not have an applicable service plan, the map database may not include data for newly constructed areas or map database corrections that are completed after production. The navigation system provides full route guidance in detailed map areas.
Zoom Control
The zoom control display is shown on the map view. A few ways to zoom in or out are:
- Touch + or – to zoom in or out on the map.
- Double tap with one finger to zoom in or single tap with two fingers to zoom out on the map.
- Use the index finger and thumb to zoom out by pinching and then zoom in by spreading those two fingers on the map.
Map Gestures and Map Scale
Use the following gestures on the infotainment display to adjust the map scale and display options.
- Pinch to zoom in or out.
- Pan the map.
- Use two fingers to tilt down and change from 2D to 3D. Tilt up to change back to 2D.
- Rotate the map.
Mute
When in active guidance, the audio prompts while using navigation can be muted. Touch the speaker icon on the right side of the upper bar. A slash will appear on the speaker to indicate voice guidance is muted.
Active Guidance View
When a destination is chosen and a navigation session is active, the navigation system enters into an Active Guidance View (AGV).
Map Orientation
Touch A on the map to access map orientation settings. Map orientation is 3D Heading Up by default.
Available settings are:
- 3D Heading Up (Default): 3D map with the vehicle pointing up. In this mode, the current location icon will always head up and the map will rotate around it.
- 2D Heading Up: 2D map with the vehicle pointing up. In this mode, the current location icon will always head up and the map will rotate around it.
- 2D North Up: 2D map with North pointing up. In this mode, the current location icon will shift as the vehicle turns left and right.
Touch the icon to change the map type. The icon and label will also update accordingly. Depending on the zoom level of the 2D Heading Up and 3D Heading Up maps, the system may automatically switch to the 2D North Up map. When in AGV, the entire route can be viewed in 2D North Up by touching the traffic bar. The map will zoom out and readjust to display the full route. When in 2D North Up Route View, the Reenter icon will appear in the middle of the display. Touch either the Reenter icon or the traffic bar again to return to the previous view, either 2D or 3D.
Lane Guidance
The map will display the lane information for the upcoming maneuver if it is available.
Junction View
When a vehicle is on the highway and approaching the exit, an image displays the lane that the vehicle must stay in to complete the next maneuver.
Quick-Turn View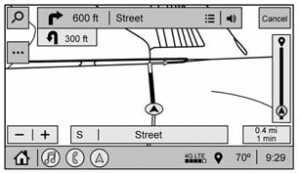
When the vehicle is approaching a turn with the next turn following in quick succession, a quick-turn list appears below the primary turn indicator. An audio prompt will announce the quick turn.
Auto-Zoom
When approaching a maneuver, the map will automatically zoom in to show both the vehicle icon and the upcoming maneuver to give a better view of the maneuver. Once the maneuver is complete, the system will zoom back to the previous zoom level. Touch A on the map to access Settings, then touch Map Preferences to access Auto-Zoom. This feature can be enabled or disabled.
Directions
Touch the menu option next to the next turn street name to display Directions. Directions display the turns and directions from the current location to the final destination.
Editing Directions
Directions can be edited by choosing y, which expands the list to fill the display and enters the Edit Mode. While in Edit Mode, an unwanted route segment can be removed from the route by touching Y next to the segment. A pop-up appears to confirm segment removal. When the route segment has been removed, all segments are replaced by an activity indicator while the new route is recalculated. When the recalculation is complete, the activity indicator is replaced with the new route segments.
Highway Exits List
Touch C to open the Exit list. This icon displays next to the current street name near the bottom of the display. The icon only appears when on a highway with defined exits. While traveling on roads with designated exits, an Exit list may be available. The Exit list displays the exit number, distance to the exit from the current vehicle position, and convenience stops that may be available, such as gas, coffee, food, and lodging.
Next Maneuver Menu
When in Active Guidance, the Next Maneuver Turn Arrow, Street Name, and Maneuver Distance are shown in the Next Maneuver at the top of the display overlaying the map. ETA, Distance to Destination, and Traffic Indicator are displayed in a panel pinned on the right of the display.
Navigation Next Turn Maneuver Alert
If the Navigation application is not open when a near maneuver prompt is given, it is shown as an alert. Touch the alert to go to the main navigation view or touch z to dismiss the alert.
Repeat Voice Guidance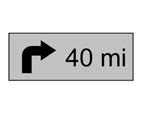 This symbol indicates the next guidance maneuver. Touch it to repeat the last spoken guidance instruction.
Incident Alert (If Equipped)
During active guidance, if the system determines that there is an incident ahead but there is not a better route, the system will play a tone and show a Quick Notice. This will only show once per incident.
Incident Reports (If Equipped)
Incident report icons, along with traffic flow data, are displayed on the map during both active and inactive guidance.
End Route
Touch Cancel at the top right corner to end active guidance and return to inactive guidance. If active guidance is canceled before the destination has been reached, a pop-up option to Resume Trip will appear.
Resume Trip
The trip can be resumed if it is canceled by touching the Resume Trip pop-up option. If the system has determined that the destination has been reached, either because the arrival view is displayed or the destination has been passed, the Resume Trip option will not appear.
Favorites
The navigation favorites can have contacts, addresses, or POIs that have been saved through the favorite icon on the details view.
Accessing Favorites
In the Nav application, view the Favorites list by touching H in the search bar along the top of the Nav map view. If the search bar is closed, touch } and select H.
Saving Favorites
Favorites can be added from a number of the system’s applications. Touch the favorites icon to save content as a favorite.
Renaming Navigation Favorites
- Touch the Settings icon on the Home Page and touch the System tab.
- Touch Favorites to access the Manage Favorites option.
- Touch a saved Navigation favorite to access the edit icon. Touch the edit icon to rename the favorite.
- Touch Save to store the renamed favorite.
Recants
Touch H to access a list of recent destinations.
Reenter Position Icon
Touch the Reenter Position arrow in the middle of the map view to reset the map to the current location.
Last Parked Location
The Last Parked Location is the last location where the vehicle engine was turned off. That location is displayed in the first row of the Recants list. Touching the last Parked Location shows the Address Details view to either save the address or drive to it. The Last Parked Location can be deleted by entering the Edit display. Once the Last Parked Location is deleted, it no longer appears in the Recants list, unless the vehicle is started at that location again.
Show POI Icons
To see the POI categories, touch Options, then touch Show on Map. Up to eight categories of icons can be selected.
Smart POI Icons on Map (If Equipped)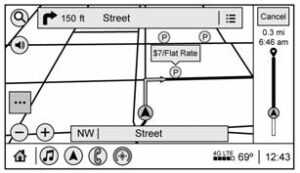 The smart POI icons such as fuel stations and parking may appear based on time, location, driver search behavior, driving conditions, and vehicle conditions.
Touch a smart POI icon to open the corresponding details:
- Left side: Name and address of the POI.
- Right side: E + ETE (Estimated Time Enrooted.)
Smart Fuel Station Icons
Fuel station prices are shown if available for nearby stations when the vehicle is low on fuel.
Smart Parking Icons
When reaching a densely populated destination and the system determines that parking may be limited, the system will attempt to display nearby parking destinations with pricing information,
if available.
Report an Issue Using POI Details (If Equipped)
In the POI details page, a POI issue can be reported if the data is not accurate or the address is incorrect. Touch Report an Issue near the bottom of the display to access the issue selection page. Touch one of the predefined issues on the selection page, then touch Send. The system will send the information for analysis.
Search
Touch Search on the infotainment display to open the search display. It has a search field entry box, quick category icon shortcuts, recants icon, favorites icon, and keyboard.
Auto Complete
Enter a partial location in the field entry box on the search display. Autocomplete will attempt to complete the destination based on what is being entered. Touch the suggested item to search.
Search While in Motion with No Front Seat Passenger Present
The search display will not allow changes or text input with the keyboard when the vehicle is in motion. As a result, a display showing three rows of the most commonly used categories appears. Touching the search box will activate speech recognition.
Search While in Motion with Front Seat Passenger Present
If the system detects that the front seat passenger is present with both driver and passenger seat belts buckled, touching the search icon will display an alert message that allows the passenger to search for a destination as if the vehicle were stopped.
Connected Navigation
Connected Navigation is a subscription service that enables certain capabilities within the navigation system, such as Traffic, Smart Search/Routing, and Predictive Navigation capabilities. The system will show an alert when the subscription is expiring and will ask to renew the plan.
Global Positioning System (GPS)
If equipped, the position of the vehicle is determined by using satellite signals, various vehicle signals, and map data. At times, other interference such as the satellite condition, road configuration, condition of the vehicle, and/or other circumstances can affect the navigation system’s ability to determine the accurate position of the vehicle. The GPS shows the current position of the vehicle using signals sent by GPS satellites. When the vehicle is not receiving signals from the satellites, a symbol appears in the status bar.
This system might not be available or interference can occur if any of the following are true:
- Signals are obstructed by tall buildings, trees, large trucks, or a tunnel.
- Satellites are being repaired or improved.
Vehicle Positioning
At times, the position of the vehicle on the map could be inaccurate due to one or more of the following reasons:
- The road system has changed.
- The vehicle is driving on slippery road surfaces such as sand, gravel, or snow.
- The vehicle is traveling on winding roads or long, straight roads.
- The vehicle is approaching a tall building or a large vehicle.
- The surface streets run parallel to a freeway.
- The vehicle has been transferred by a vehicle carrier or a ferry.
- The current position calibration is set incorrectly.
- The vehicle is traveling at high speed.
- The vehicle changes directions more than once, or the vehicle is turning on a turn table in a parking lot.
- The vehicle is entering and/or exiting a parking lot, garage, or a lot with a roof.
- The GPS signal is not received.
- A roof carrier is installed on the vehicle.
- Tire chains are installed on the vehicle.
- The tires are replaced or worn.
- The tire pressure for the tires is incorrect.
- This is the first navigation use after the map data is updated.
- The 12-volt battery has been disconnected for several days.
- The vehicle is driving in heavy traffic where driving is at low speeds, and the vehicle is stopped and started repeatedly.
Problems with Route Guidance
Inappropriate route guidance can occur under one or more of the following conditions:
- The turn was not made on the road indicated.
- Route guidance might not be available when using automatic rerouting for the next right or left turn.
- The route might not be changed when using automatic rerouting.
- There is no route guidance when turning at an intersection.
- Plural names of places might be announced occasionally.
- It could take a long time to operate automatic rerouting during high-speed driving.
- Automatic rerouting might display a route returning to the set waypoint if heading for a destination without passing through a set waypoint.
- The route prohibits the entry of a vehicle due to regulation by time or season or any other regulation that may be given.
- Some routes might not be searched.
- The route to the destination might not be shown if there are new roads if roads have recently changed, or if certain roads are not listed in the map data.
To recalibrate the vehicle’s position on the map, park with the vehicle running for two to five minutes, until the vehicle position updates. Make sure the vehicle is parked in a location that is safe and has a clear view of the sky and is away from large obstructions.
If the System Needs Service
If the navigation system needs service, see your dealer.
Map Data Updates
The map data in the vehicle is the most up-to-date information available when the vehicle was produced. The map data is updated periodically, provided that the map information has changed and the vehicle has a relevant service plan. See www.gmnavdisc.com for details on ordering, purchasing, and installing a new or replacement SD card. Features are subject to change. For more information on this feature, visit your brand website. If the vehicle is equipped with Connected Navigation, which is a subscription service that enables certain features of the navigation system, such as Traffic, Smart Search/Routing, and Predictive Navigation, then the system will download the latest map data from the cloud.
Database Coverage Explanations
Coverage areas vary with respect to the level of map detail available for any given area. Some areas feature greater levels of detail than others. If this happens, it does not mean there is a problem with the system. As the map data is updated, more detail can become available for areas that previously had limited detail.
FAQ
The CT4 typically offers various audio systems, including standard setups and optional premium systems like the Bose Performance Series.
The exact number of speakers may vary, but the Bose Performance Series often includes a high number of strategically placed speakers for a premium sound experience.
Yes, the CT4 typically allows users to customize audio settings, including equalizer settings and speaker balance.
Some CT4 models may offer HD Radio support, providing access to high-quality radio broadcasts.
Yes, the CT4 typically offers both Apple CarPlay and Android Auto compatibility for seamless smartphone integration.
Wireless smartphone charging and connectivity features may be available on certain CT4 models.
Yes, the CT4 often features a built-in navigation system that provides turn-by-turn directions and real-time traffic updates.
The CT4 typically includes voice recognition capabilities for hands-free navigation control.
The navigation system in the CT4 may offer 3D mapping and landmarks for enhanced visual guidance.
The CT4 often uses a combination of GPS and connected services to provide real-time traffic information on the navigation system.
The navigation system in the CT4 may offer rerouting options to avoid traffic congestion.
Yes, the CT4 typically allows users to save favorite destinations and create personalized navigation profiles.
Yes, the infotainment system is often controlled through a responsive touchscreen display.
Many CT4 models include physical knobs and buttons for quick and intuitive audio and navigation controls.
The CT4 may offer over-the-air (OTA) software updates and map updates to keep the system current.
Useful Link
View Full User Guide: Cadillac CT4 2023 User Guide
Download Manuals: https://www.cadillac.com/support/vehicle/manuals-guides
2023 Cadillac CT4 Specs, Price, Features, Mileage and Review