
 Engine Compartment: 2023 Cadillac CT5 Vehicle Checks Guide
Setting out on an adventure in the 2023 Cadillac CT5 is evidence of the successful combination of performance and luxury. This complicated vehicle’s engine compartment is its heart, and proper maintenance and operation depend heavily on your ability to comprehend its subtleties. In this introduction, we explore the details of the engine that powers the Cadillac CT5 by delving into the Engine Compartment portion of the Vehicle Checks Guide. The guide illuminates the underbelly of several engine components, including the serpentine belt. Discover how to visually inspect these parts to make sure they function flawlessly for the best results.
2023 Cadillac CT5 Specs, Price, Features, Mileage and Review
General Information
For service and parts needs, visit your dealer. You will receive genuine GM parts and GM-trained and supported service people.
Genuine GM parts have one of these marks:
California Perchlorate Materials Requirements
Certain types of automotive applications, such as airbag initiators, seat belt pretensioners, and lithium batteries contained in electronic keys, may contain perchlorate materials. Perchlorate Material special handling may apply. See www.dtsc.ca.gov/hazardouswaste/ perchlorate.
Accessories and Modifications
Adding non-dealer accessories or making Adding non-dealer accessories or making modifications to the vehicle can affect vehicle performance and safety, including such things as airbags, braking, stability, ride and handling, emissions systems, aerodynamics, durability, Driver Assistance Systems, and electronic systems like antilock brakes, traction control, and stability control. These accessories or modifications could even cause malfunction or damage not covered by the vehicle warranty.
2023 Cadillac CT5 Vehicle Checks Owners Manual
Damage to suspension components caused by modifying vehicle height outside of factory settings will not be covered by the vehicle warranty.
Damage to vehicle components resulting from modifications or the installation or use of non-GM-certified parts, including control module or software modifications, is not covered under the terms of the vehicle warranty and may affect the remaining warranty coverage for affected parts.
GM Accessories are designed to complement and function with other systems on the vehicle. See your dealer to accessorize the vehicle using genuine GM Accessories installed by a dealer technician.
Vehicle Checks
Doing Your Service Work
Warning
It can be dangerous to work on your vehicle if you do not have the proper knowledge, service manual, tools, or parts. Always follow the owner’s manual procedures and consult the service manual for your vehicle before doing any service work. If doing some of your service work, use the proper service manual. It tells you much more about how to service the vehicle than this manual can. To order the proper service manual, see Publication Ordering Information 0 390.
This vehicle has an airbag system. Before attempting to do your service work, see Servicing the Airbag-Equipped Vehicle
0 60.
Vehicle Health Assessment
If equipped with remote vehicle start, open the hood before performing any service work to prevent remote starting the vehicle
accidentally. See Remote Vehicle Start 0 12.
Keep a record with all parts receipts and list the mileage and the date of any service work performed. See Maintenance Records
0 374.
Caution
Even small amounts of contamination can cause damage to vehicle systems. Do not allow contaminants to contact the fluids, reservoir caps, or dipsticks.
Hood
Warning
- For vehicles with auto engine stop/start, turn the vehicle off before opening the hood. If the vehicle is on, the engine will start when the hood is opened. You or others could be injured.
- Components under the hood can get hot from running the engine. To help avoid the risk of burning unprotected skin, never touch these components until they have cooled, and always use a glove or towel to avoid direct skin contact. Clear any snow from the hood before opening.
Under-the-Hood Inspection
To open the hood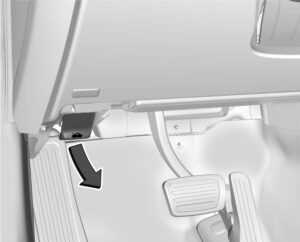
- Pull the hood release lever with the symbol. It is on the lower left side of the instrument panel.
 To close the hood
 - Before closing the hood, be sure all filler caps are on properly, and all tools are removed.
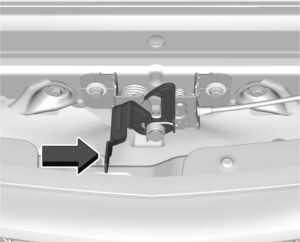
- Go to the front of the vehicle and locate the secondary release lever under the front centre of the hood. Push the secondary hood release lever to the right to release.
After you have partially lifted the hood, the gas strut system will automatically lift the hood and hold it in the fully open position.
To close the hood
- Before closing the hood, be sure all filler caps are on properly, and all tools are removed.
- Pull the hood down until the strut system is no longer holding up the hood.
Lower the hood 20 cm (8 in) above the vehicle. Allow the hood to fall. Check to make sure the hood is latched completely. Repeat this process with additional force if necessary.
2023 Cadillac CT5 Vehicle Checks User Manual
Warning
Do not drive the vehicle if the hood is not latched completely. The hood could open fully, block your vision, and cause a crash. You or others could be injured. Always close the hood completely before driving. The Driver Information Center (DIC) will display a message if the hood is not fully closed. Stop and turn off the vehicle, check the hood for obstructions, and close the hood again. Check to see if the message still appears on the DIC.
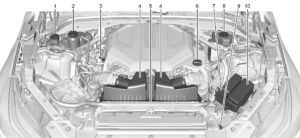
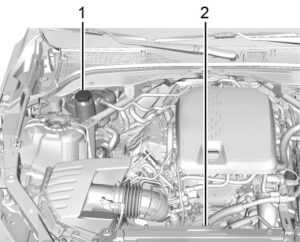
Engine Compartment Overview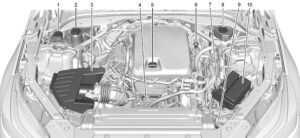
Cadillac CT5 Engine Compartment
2.0L L4 Engine
- Windshield Washer Fluid Reservoir. See Washer Fluid 0 310.
- Engine Coolant Surge Tank and Pressure Cap. See Cooling System 0 305.
- Engine Air Cleaner/Filter 0 302.
- Engine Cooling Fan (Out of View). See Cooling System 0 305.
- Engine Oil Fill Cap. See Engine Oil 0 298.
- Engine Oil Dipstick. See Engine Oil 0 298.
- Remote Positive (+) Battery Terminal. See Jump Starting – North America 0 352.
- Brake Fluid Reservoir. See Brake Fluid 0 314.
- Remote Negative (-) Battery Terminal. See Jump Starting – North America 0 352.
- Engine Compartment Fuse Block 0 320.
3.0L V6 Engine
- Windshield Washer Fluid Reservoir. See Washer Fluid 0 310.
- Engine Coolant Surge Tank and Pressure Cap. See Cooling System 0 305.
- Engine Oil Dipstick. See Engine Oil 0 298.
- Engine Air Cleaner/Filter 0 302.
- Engine Cooling Fan (Out of View). See Cooling System 0 305.
- Engine Oil Fill Cap. See Engine Oil 0 298.
- Remote Positive (+) Battery Terminal. See Jump Starting – North America 0 352.
- Brake Fluid Reservoir. See Brake Fluid 0 314.
- Remote Negative (-) Battery Terminal. See Jump Starting – North America 0 352.
- Engine Compartment Fuse Block 0 320.
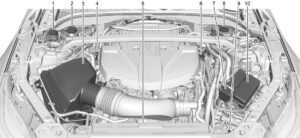
6.2L V8 Engine
- Windshield Washer Fluid Reservoir. See Washer Fluid 0 310.
- Engine Coolant Surge Tank and Pressure Cap. See Cooling System 0 305.
- Engine Air Cleaner/Filter 0 302.
- Engine Oil Dipstick. See Engine Oil 0 298.5.
- Engine Cooling Fan (Out of View). See Cooling System 0 305.
- Engine Oil Fill Cap. See Engine Oil 0 298.
- Remote Positive (+) Battery Terminal. See Jump Starting – North America 0 352.
- Brake/Clutch Fluid Reservoir. See Brake Fluid 0 314.
- Remote Negative (-) Battery Terminal. See Jump Starting – North America 0 352.
- Engine Compartment Fuse Block 0 320.
2023 Cadillac CT5 Vehicle Checks User Guide
Engine Oil
To ensure proper engine performance and long life, careful attention must be paid to engine oil. Following these simple, but important steps will help protect your investment.
- Use engine oil approved to the proper specification and of the proper viscosity grade. See “Selecting the Right Engine Oil” in this section..
- Check the engine oil level regularly and maintain the proper oil level. See “Checking Engine Oil” and “When to Add Engine Oil” in this section.
- Change the engine oil at the appropriate time. See Engine Oil Life System 0 300.
- Always dispose of engine oil properly. See “What to Do with Used Oil” in this section.
Checking Engine Oil
Check the engine oil level regularly, every 650 km (400 mi), especially before a long trip. The engine oil dipstick handle is a loop.
See Engine Compartment Overview 0 294 for the location.
Warning
The engine oil dipstick handle may be hot; it could burn you. Use a towel or glove to touch the dipstick handle. If a low oil Driver Information Center (DIC) message displays, check the oil level.
Follow these guidelines:
- To get an accurate reading, park the vehicle on level ground. Check the engine oil level after the engine has been off for at least two hours. Checking the engine oil level on steep grades or too soon after engine shutoff can result in incorrect readings. Accuracy improves when checking a cold engine before starting. Remove the dipstick and check the level.
- If unable to wait two hours, the engine must be off for at least 15 minutes if the engine is warm, or at least 30 minutes if the engine is not warm. Pull out the dipstick, wipe it with a clean paper towel or cloth, and then push it back in all the way. Remove it again, keeping the tip down, and check the level.
When to Add Engine Oil 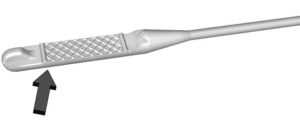
2.0L L4 Turbo (LSY) Engine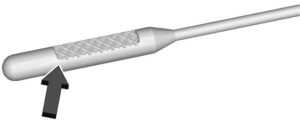
3.0L V6 Twin Turbo (LGY) and 6.2L V8 (LT4) Engines
If the oil is below the cross-hatched area at the tip of the dipstick and the engine has been off for at least 15 minutes, add 1 L (1 q t) of the recommended oil and then recheck the level. See “Selecting the Right Engine Oil” later in this section for an explanation of what kind of oil to use. For engine oil crankcase capacity, see Capacities and Specifications 0 377.
Automotive Maintenance Tips
Caution
Do not add too much oil. Oil levels above or below the acceptable operating range shown on the dipstick are harmful to the engine. If the oil level is above the operating range (i.e., the engine has so much oil that the oil level gets above the cross-hatched area that shows the proper operating range), the engine could be damaged. Drain the excess oil or limit driving of the vehicle, and seek a service professional to remove the excess oil.
See Engine Compartment Overview 0 294 for See Engine Compartment Overview 0 294 for Add enough oil to put the level somewhere Add enough oil to put the level somewhere in the proper operating range. Push the dipstick back in when through.
Selecting the Right Engine Oil – 2.0L L4 Turbo (LSY) and 3.0L V6 Twin Turbo (LGY) Engines
Selecting the right engine oil depends on both the proper oil specification and viscosity grade. See Recommended Fluids and Lubricants 0 371.
Specification
Use full synthetic engine oils that meet the dexos1 specification. Engine oils that have been approved by GM as meeting the
dexos1 specification are marked with the dexos1-approved logo.  Caution
Failure to use the recommended engine oil or equivalent can result in engine damage not covered by the vehicle warranty.
Viscosity Grade
For the 2.0L L4 Turbo (LSY) engine, use SAE 0W-20 viscosity grade engine oil. For the 3.0L V6 Twin Turbo (LGY) engine,
use SAE 5W-30 viscosity grade engine oil. Cold Temperature Operation: In an area of extreme cold, where the temperature falls
below −29 °C (−20 °F), an SAE 0W-30 oil may be used. An oil of this viscosity grade will provide easier cold starting for the engine at extremely low temperatures. When selecting an oil of the appropriate viscosity grade, it is recommended to select an oil of the correct specification. See “Specification” earlier in this section.
Selecting the Right Engine Oil — 6.2L V8 (LT4) Engine
Selecting the right engine oil depends on both the proper oil specification and viscosity grade. See Recommended Fluids and Lubricants 0 371.
Specification
Use full synthetic engine oils that meet the decors’ specifications. Engine oils that have been approved by GM as meeting the decors’ specifications are marked with the decors’ approved logo.
Caution
Failure to use the recommended engine oil or equivalent can result in engine damage not covered by the vehicle warranty.
Viscosity Grade
For the 6.2L V8 (LT4) engine, use SAE 0W-40 viscosity grade engine oil. GM recommends Mobil 1 engine oil that shows the deco-approved logo. When selecting an oil of the appropriate viscosity grade, it is recommended to select an oil of the correct specification. See “Specification” earlier in this section. Engine Oil Additives/Engine Oil Flushes Do not add anything to the oil. The recommended oils meeting the dexos specification are all that is needed for good performance and engine protection. Engine oil system flushes are not recommended and could cause engine damage not covered by the vehicle warranty.
What to Do with Used Oil
Used engine oil contains certain elements that can be unhealthy for your skin and could even cause cancer. Do not let used oil stay on your skin for very long. Clean your skin and nails with soap and water, or a good hand cleaner. Wash or properly dispose of clothing or rags containing used engine oil. See the manufacturer’s warnings about the use and disposal of oil products. Used oil can be a threat to the environment. If you change your oil, be sure to drain all the oil from the filter before disposal. Never dispose of oil by putting it in the trash or pouring it on the ground, into sewers, streams or bodies of water. Recycle it by taking it to a place that collects used oil.
Engine Oil Life System
When to Change Engine Oil This vehicle has a computer system that indicates when to change the engine oil and filter. This is based on a combination of factors which include engine revolutions, engine temperature, and miles driven. Based on driving conditions, the mileage at which an oil change is indicated can vary considerably. For the oil life system to work properly, the system must be reset every time the oil is changed. When the system has calculated that oil life has been diminished, it indicates that an oil change is necessary. CHANGE ENGINE OIL SOON message comes on. Change the oil as soon as possible within the next 1,000 km (600 mi). It is possible that, if driving under the best conditions, the oil life system might indicate that an oil change is not necessary for up to a year. The engine oil and filter must be changed at least once a year and at this time the system must be reset. Your dealer has trained service people who will perform this work and reset the system. It is also important to check the oil regularly throughout an oil drain interval and keep it at the proper level. If the system is ever reset accidentally, the oil must be changed at 5,000 km (3,000 mi) since the last oil change. Remember to reset the oil life system whenever the oil is changed.
How to Reset the Engine Oil Life System
- Reset the system whenever the engine oil is changed so that the system can calculate the next engine oil change. To reset the system:
- Using the DIC buttons, display REMAINING OIL LIFE on the DIC. See Driver Information Center (DIC) (Base Level) 0 109 or Driver Information Center (DIC) (Up level) 0 112.
- Press and hold the thumbwheel on the steering wheel. When the confirmation message displays, select YES. The oil life will change to 100%. Be careful not to reset the oil life display accidentally at any time other than after the oil is changed. It cannot be reset accurately until the next oil change.
The oil life system can also be reset as follows:
- Using the DIC buttons, display REMAINING OIL LIFE on the DIC. See Driver Information Center (DIC) (Base Level) 0 109 or Driver Information Center
(DIC) (Up level) 0 112. - Fully press and release the accelerator pedal three times within five seconds. If the CHANGE ENGINE OIL SOON message is not on, the system is reset. The system is reset when the CHANGE ENGINE OIL SOON message is off. If the CHANGE ENGINE OIL SOON message comes back on when the vehicle is started the engine oil life system has not been reset. Repeat the procedure.
Automatic Transmission Fluid
How to Check Automatic Transmission Fluid
It is not necessary to check the transmission fluid level. A transmission fluid leak is the only reason for fluid loss. If a leak occurs, take the vehicle to your dealer and have it repaired as soon as possible. The vehicle is not equipped with a transmission fluid-level dipstick. There is a special procedure for checking and changing the transmission fluid. Because this procedure is difficult, this should be done at the dealer. Contact your dealer for
additional information.
Caution
Use of the incorrect automatic transmission fluid may damage the vehicle, and the damage may not be covered by the vehicle warranty. Always use the correct automatic transmission fluid. See Recommended Fluids and Lubricants 0 371. Change the fluid and filter at the intervals listed in Maintenance Schedule 0 366, and be sure to use the fluid listed in Recommended Fluids and Lubricants 0 371.
Manual Transmission Fluid
It is not necessary to check the manual transmission fluid level. A transmission fluid leak is the only reason for fluid loss. If a leak occurs, take the vehicle to your dealer and have it repaired as soon as possible. See Recommended Fluids and Lubricants 0 371 for the proper fluid to use.
Hydraulic Clutch
For vehicles with a manual transmission, it is not necessary to regularly check brake/ clutch fluid unless there is a leak suspected. Adding fluid will not correct a leak. A fluid loss in this system could indicate a problem. Have the system inspected and repaired.
When to Check and What to Use
The brake/hydraulic clutch fluid reservoir cap has this symbol on it. See Engine Compartment Overview 0 294 for reservoir location. The common hydraulic clutch and brake master cylinder fluid reservoir is filled with brake fluid as indicated on the reservoir cap. See Brake Fluid 0 314 for brake fluid to use. How to Check and Add Fluid Visually check the brake/clutch fluid reservoir to make sure the fluid level is at the MIN (minimum) line on the side of the reservoir. The brake/hydraulic clutch fluid system should be closed and sealed. Do not remove the cap to check the fluid level or to top-off the fluid level. Remove the cap only when necessary to add the proper fluid until the level reaches the MIN line.
Engine Air Filter Life System
This feature provides the engine air filter’s remaining life and the best timing for a change. The timing to change an engine air filter depends on driving and environmental conditions.
When to Change the Engine Air Filter
When the Driver Information Center (DIC) displays a message to replace the engine air filter at the next oil change, follow this timing. When the DIC displays a message to replace the engine air filter soon, replace the engine air filter at your earliest convenience. The system must be reset after the engine air filter is changed. If the DIC displays a message to check the engine air filter system, see your dealer.
How to Reset the Engine Air Filter Life System To reset:
- Place the vehicle in P (Park).
- Display the Air Filter Life on the DIC. See Driver Information Center (DIC) (Base Level) 0 109 or Driver Information Center (DIC) (Up level) 0 112.
- Press T on the steering wheel, or press the trip odometer reset stem if the vehicle does not have DIC controls, to move to the Reset/Disable display area. Select Reset, then press the thumbwheel or press the reset stem for several seconds.
- Press the thumbwheel or the reset stem to confirm the reset.
Engine Air Cleaner/Filter
The engine air cleaner/filter is in the engine compartment on the passenger side of the vehicle for the 2.0L L4 and 6.2L V8 engines, and in the centre of the engine compartment for the 3.0L V6 engine. See Engine Compartment Overview 0 294.
When to Inspect the Engine Air Cleaner/Filter
- For intervals on changing and inspecting the engine air filter, see Maintenance Schedule 0 366.
- If equipped with Engine Air Filter Life System, see Engine Air Filter Life System 0 302.
- If driving in very dusty areas, follow the engine air filter inspecting and changing intervals, see Maintenance Schedule 0 366.
How to Inspect/Replace the Engine Air Cleaner/Filter
Do not start the engine or have the engine running with the engine air cleaner/filter housing open. Before removing the engine air cleaner/filter, make sure that the engine air cleaner/filter housing and nearby components are free of dirt and debris. Do not clean the engine air cleaner/filter or components with water or compressed air.
Warning
Operating the engine with the air cleaner/filter off can cause you or others to be burned. Use caution when working on the engine. Do not start the engine or drive the vehicle with the air cleaner/ filter off, as flames may be present if the engine backfires.
Caution
If the air cleaner/filter is off, dirt can easily get into the engine, which could damage it. Always have the air cleaner/ filter in place when driving.
To inspect or replace the air cleaner/filter:
- Remove the five screws on top of the air cleaner/filter cover.
- Lift the air/cleaner/filter cover away from the air cleaner/filter housing.
- Pull out the air cleaner/filter.
- Warning
If part replacement is necessary, the part must be replaced with one of the same part number or with an equivalent part. Use of a replacement part without the same fit, form, and function may result in personal injury or damage to the vehicle. - Inspect or replace the air cleaner/filter.
- Reverse Steps 1–3 to reinstall the air cleaner/filter cover.
- If equipped, reset the engine air filter life system after replacing the engine air filter. See Engine Air Filter Life System 0 302.
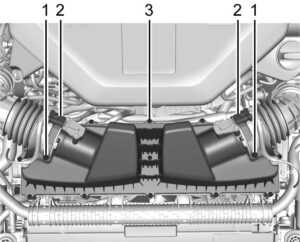
3.0L V6 Engine
- Air Duct Clamps
- Electrical Connectors
- Screw
- Disconnect the harness connectors from the air cleaner/filter cover electrical connectors (2).
- Loosen the screws on the air duct clamps (1) holding the air outlet ducts in place. Do not remove clamps. Move the ducts aside.
- Remove the 13 screws (3) on top of the engine air cleaner/filter cover to gain access to both air cleaners/filters.
- Lift the engine air cleaner/filter cover
- Warning
If part replacement is necessary, the part must be replaced with one of the same part number or with an equivalent part. Use of a replacement part without the same fit, form, and function may result in personal injury or damage to the vehicle. - Lift and remove one or both engine air cleaners/filters.
- Inspect or replace one or both engine air cleaners/filters.
- Reverse Steps 1–4 to reinstall the engine air cleaner/filter cover.
- If equipped, reset the engine air filter life system after replacing the engine air filter. See Engine Air Filter Life System 0 302.
- Remove the six screws on top of the air cleaner/filter cover.
- Lift the air/cleaner/filter cover away from the air cleaner/filter housing.
- Warning
If part replacement is necessary, the part must be replaced with one of the same part number or with an equivalent part. Use of a replacement part without the same fit, form, and function may result in personal injury or damage to the vehicle. - Pull out the air cleaner/filter.
- Inspect or replace the air cleaner/filter.
- Reverse Steps 1–3 to reinstall the air cleaner/filter cover.
- If equipped, reset the engine air filter life system after replacing the engine air filter. See Engine Air Filter Life System 0 302.
Cooling System
The cooling system allows the engine to maintain the correct working temperature.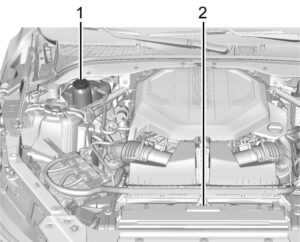
2.0L L4 Engine
- Engine Coolant Surge Tank and Pressure Cap
- Engine Cooling Fan (Out of View)
 3.0L V6 Engine
- Engine Coolant Surge Tank and Pressure Cap
- Engine Cooling Fan (Out of View)
6.2L V8 Engine
- Engine Coolant Surge Tank and Pressure Cap
- Engine Cooling Fan (Out of View)
Warning
An underhold electric fan can start up even when the engine is not running and can cause injury. Keep hands, clothing, and tools away from any underhold electric fan. Do not touch the heater or radiator hoses or other engine parts. They can be very hot and can burn you. Do not run the engine if there is a leak; all coolants could leak out. That could cause an engine fire and can burn you. Fix any leak before driving the vehicle.
Caution
Do not use anything other than a mix of DEX-COOL coolant that meets GM Standard GMW3420 and clean, drinkable water. Anything else can cause damage to the engine cooling system and the vehicle, which would not be covered by the vehicle warranty.
Engine Coolant
The cooling system in the vehicle is filled with DEX-COOL engine coolant. See Maintenance Schedule 0 366 and Recommended Fluids and Lubricants 0 371. The following explains the cooling system and how to check and add coolant when it is low. If there is a problem with engine overheating, see Engine Overheating 0 310.
What to Use
Warning
Do not touch the heater radiator hoses or other engine parts. They can be very hot and can burn you. Do not run the engine if there is a leak; all coolant could leak out. That could cause an engine fire and can burn you. Fix any leak before driving the vehicle.
Use a 50/50 mixture of clean drinkable water and DEX-COOL coolant.
This mixture
- Gives freezing protection down to −37 °C (−34 °F), the outside temperature.
- Gives boiling protection up to 129 °C (265 °F), engine temperature.
- Protects against rust and corrosion.
- Will not damage aluminum parts.
- Helps keep the proper engine
Caution
Do not use anything other than a mix of DEX-COOL coolant that meets GM Standard GMW3420 and clean, drinkable water. Anything else can cause damage to the engine cooling system and the vehicle, which would not be covered by the vehicle warranty.
Never dispose of engine coolant by putting it in the trash, pouring it on the ground, or into sewers, streams, or bodies of water. Has the coolant been changed by an authorized service centre, familiar with legal requirements regarding used coolant disposal? This will help protect the environment and your health.
Checking Coolant
The vehicle must be on a level surface when checking the coolant level. It is normal to see coolant moving in the upper coolant hose return line when the engine is running. It is also normal to see bubbles entering the surge tank through the small hose. Check to see if coolant is visible in the coolant surge tank. If the coolant inside the coolant surge tank is boiling, do not do anything else until it cools down.

If coolant is visible but the coolant level is not at or above the indicated mark, add a 50/50 mixture of clean drinkable water and DEX-COOL coolant. Be sure the cooling system is cool before this is done. If no coolant is visible in the coolant surge tank, add coolant as follows:
How to Add Coolant to the Coolant Surge Tank
Warning
Spilling coolant on hot engine parts can burn you. Coolant contains ethylene glycol and it will burn if the engine parts are hot enough. Plain water, or other liquids such as alcohol, can boil before the proper coolant mixture will. With plain water or the wrong mixture, the engine could get too hot but there would not be an overheat warning. The engine could catch fire and you or others could be burned. Steam and scalding liquids from a hot cooling system are under pressure. Turning the pressure cap, even a little, can cause them to come out at high speed and you could be burned. Never turn the cap when the cooling system, including the pressure cap, is hot. Wait for the cooling system and pressure cap to cool.
Caution
Failure to follow the specific coolant fill procedure could cause the engine to overheat and could cause system damage. If coolant is not visible in the surge tank, contact your dealer.
If no problem is found, check to see if coolant is visible in the coolant surge tank. If coolant is visible but the coolant level is not at or above the indicated mark, add a 50/50 mixture of clean, drinkable water and DEX-COOL coolant at the coolant surge tank, but be sure the cooling system, including the coolant surge tank pressure cap, is cool before you do it.
- Automatic Coolant Service Fill Instructions The vehicle is equipped with a service feature that assists with filling and removing air from the cooling system after the service of components or when coolant is added after being too low.
To use the service feature:
- With a cold system, add coolant to the indicated line on the surge tank.
- Replace the pressure cap on the surge tank.
To activate the service feature:
- Connect the vehicle to a battery charger.
- Turn the ignition on. See Ignition Positions 0 208.
- Turn off the air conditioning.
- Set the parking brake.
- At the same time, press the accelerator and the brake pedal for two seconds, then release.
- At the end of the cycle, check the coolant level in the surge tank and add coolant if it is below the indicated line. Turn the ignition off, allow the Electronic Control Module (ECM) to go to sleep, for about two minutes, and repeat Steps 2–6.
Listen for pump activation and movement of the control valves while watching the level of the coolant in the surge tank. If the tank empties, turn the ignition off, carefully remove the pressure cap, refill to the indicated line, replace the pressure cap, and repeat Steps 2–6. The fill and air removal process will run for approximately 15 minutes.
Caution
If the pressure cap is not tightly installed, coolant loss and engine damage may occur. Be sure the cap is properly and tightly secured.
3.0L V6 Engine and 6.2L V8 Engine
- Remove the coolant surge tank pressure cap when the cooling system, including the coolant surge tank pressure cap and upper radiator hose, is no longer hot. Turn the pressure cap slowly counterclockwise. If you hear a hiss, wait for that to stop. This will allow any pressure still left to be vented out of the discharge hose.
- Keep turning the pressure cap slowly and remove it.
2.0L L4 Engine and 3.0L V6 Engine Coolant Surge Tank
6.2L V8 Engine Coolant Surge Tank - Fill the surge tank with the proper mixture to the indicated level mark.
- With the coolant surge tank pressure cap off, start the engine and let it run until you can feel the upper radiator hose getting hot. Watch out for the engine cooling fan. By this time, the coolant level inside the coolant surge tank may be lower. If the level is lower, add more of the proper mixture to the surge tank until the level reaches the indicated level mark.
- Replace the pressure cap tightly.
- Check the level in the surge tank after the engine is shut off and the cooling system has cooled down. If the coolant is not at the proper level, repeat Steps 1–
- If the coolant still is not at the proper level when the system cools down again, see your dealer.
Caution
If the pressure cap is not tightly installed, coolant loss and engine damage may occur. Be sure the cap is properly and tightly secured.
Engine Overheating
The vehicle has an indicator to warn of the engine overheating. If the decision is made not to lift the hood when this warning appears, get service help
right away. See Roadside Assistance Program 0 385. If the decision is made to lift the hood, make sure the vehicle is parked on a level surface. Then check to see if the engine cooling fan is running. If the engine is overheating, the fan should be running. If it is not, do not continue to run the engine. Has the vehicle
serviced?
Caution
Do not run the engine if there is a leak in the engine cooling system. This can cause a loss of all coolant and can damage the system and vehicle. Have any leaks been fixed right away?
If Steam Is Coming from the Engine Compartment
Warning
Steam and scalding liquids from a hot cooling system are under pressure. Turning the pressure cap, even a little, can cause them to come out at high speed and you could be burned. Never turn the cap when the cooling system, including the pressure cap, is hot. Wait for the cooling system and pressure cap to cool.
If No Steam Is Coming from the Engine Compartment
If an engine overheat warning is displayed but no steam can be seen or heard, the problem may not be too serious. Sometimes the engine can get a little too hot when the vehicle:
- Climbs a long hill on a hot day.
- Stops after high-speed driving.
- Idles for long periods in traffic.
If the overheat warning is displayed with no sign of steam:
1. Turn the air conditioning off.
2. Turn the heater on to the highest temperature and to the highest fan speed. Open the windows as necessary.
3. When it is safe to do so, pull off the road, shift to P (Park) or N (Neutral) and let the engine idle. If the overheat warning no longer displays, the vehicle can be driven. Continue to drive the vehicle slowly for about 10 minutes. Keep a safe vehicle distance from the vehicle in front. If the warning does not come back on, continue to drive normally and have the cooling system checked for proper fill and function. If the warning continues, pull over, stop, and park the vehicle right away. If there is no sign of steam, idle the engine for three minutes while parked. If the warning is still displayed, turn off the engine until it cools down.
Washer Fluid
What to Use
When windshield washer fluid is needed, be sure to read the manufacturer’s instructions before use. If operating the vehicle in an area where the temperature may fall below freezing, use a fluid that has sufficient protection against freezing.
Adding Washer Fluid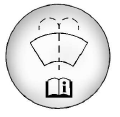
Open the cap with the washer symbol on it. Add washer fluid until the tank is full. See Engine Compartment Overview 0 294 for reservoir location.
Caution
- Do not use a washer fluid that contains any type of water-repellent coating. This can cause the wiper blades to chatter or skip.
- Do not use engine coolant (antifreeze) in the windshield washer. It can damage the windshield washer system and paint.
- Do not mix water with ready-to-use washer fluid. Water can cause the solution to freeze and damage the washer fluid tank and other parts of the washer system.
- When using concentrated washer fluid, follow the manufacturer’s instructions for adding water.
- Fill the washer fluid tank only three-quarters full when it is very cold. This allows for fluid expansion if freezing occurs, which could damage the tank if it is full.
Brakes
Disc brake linings, except J57 V-Series Blacking with carbon ceramic brakes, have built-in wear indicators that make a high-pitched warning sound when the brake linings are worn and new linings are needed. The sound can come and go or can be heard all the time when the vehicle is moving, except when applying the brake
pedal firmly. The V-Series Blacking has electronic pad wear sensors. See Brake Pad Life System (If Equipped) 0 313.
Warning
- The brake wear warning sound means that soon the brakes will not work well. That could lead to a crash. When the brake wear warning sound is heard, have the vehicle serviced.
- The brake wear warning sound means that soon the brakes will not work well. That could lead to a crash. When the brake wear warning sound is heard, have the vehicle serviced.
Brake Squeal and Brake Dust
Some driving conditions or climates can cause a brake squeal when the brakes are first applied, clearing up the following several applies. This does not mean something is wrong with the brakes.
Vehicle Care
Vehicles equipped with high-performance brake systems provide superior fade resistance but will produce increased brake squeal and brake dust on the wheels and callipers as compared to standard brake linings. This is normal. To help reduce squeal, high-performance brake pads are treated with an anti-squeal paste that may need to be reapplied periodically as part of normal vehicle maintenance. The anti-squeal paste will dissipate over time. Also, the use of wheel cleaners or power washers directly on the brake callipers may remove the anti-squeal paste from the brake pads. It may be necessary to reapply the anti-squeal paste if it is removed during cleaning.
If brake squeal is excessive, the anti-squeal paste should be reapplied. The anti-squeal paste should always be reapplied whenever the brake pads are removed or replaced. See your dealer for service.
Brake Pedal Travel
See your dealer if the brake pedal does not return to normal height, or if there is a rapid increase in pedal travel. This could be a sign that brake service may be required.
Replacing Brake System Parts
Always replace brake system parts with new, approved replacement parts. If this is not done, the brakes may not work properly. The braking performance can change in many ways if the wrong brake parts are installed or if the parts are improperly installed. The Brake Fade Warning Assist system is designed for use with factory-installed brake pads or GM-approved replacement pads. If the brake pads on the vehicle need to be replaced, use GM-approved brake pads. If this is not done, the brake fade warning system may not function properly.
High-Performance Brake Lining Car Wash and Extended Parking Care
If equipped with high-performance brake components, binding or clunking may be noticeable after extended parking or in cold weather when the brakes have been wet, such as when driving in the rain or after a car wash. The clunking is normal for brakes with high-performance brake linings and does not affect the operation of the brakes. When driving, normal braking will allow for the brakes to feel smooth and the clunking to go away. If the vehicle is washed before overnight parking or long-term storage, drive it and apply the brakes several times to thoroughly dry the brakes.
Brake Rotor Wear (V-Series Blacking With J57 Carbon Ceramic Rotors)
The V-Series Blacking with J57 has carbon ceramic brake rotors. The rotors should be visually inspected whenever the brake pads are replaced. Carbon ceramic brake rotors also need to be weighed before brake pads are replaced to confirm that the rotor mass is greater than the wear-out mass printed on the rotor. The rotor can be reused if the weight of the rotor is above the mass limit. Carbon ceramic brake rotor inspection and weighing methods can be found in the service manual.
V-Series Blacking Brake Burnish
Procedure for Corrosion Cleanup Corrosion spotting and grooving on the brake rotor surface may appear after the vehicle sits for an extended period, especially in high humidity. This corrosion may result in brake pulsation and noise. To help restore optimal braking performance and reduce noise, complete the following procedure:
Caution
Performing the brake burnish procedure on a base brake system can result in brake damage. Perform this procedure only on dry pavement, in a safe manner, and compliance with all local and state ordinances/laws regarding motor vehicle operation. The new vehicle break-in period should be completed before performing the brake burnishing procedure or damage may occur to the powertrain/engine. See New Vehicle Break-In 0 206. Brake fade can occur during this burnish procedure and can cause brake pedal travel to increase. This could extend the stopping distance until the brakes are fully burnished.
Completing the following procedure as instructed will not damage the brakes. The brake pads may smoke and produce an odour. The braking force and pedal travel may increase. After the procedure, the brake pads may appear white at the rotor contact.
- Using the G-Force Gauge in the HUD display, apply the brakes 10 times starting at 100 km/h (60 mph) to 50 km/h (30 mph) while decelerating at 0.4g. See Head-Up Display (HUD) 0 114. This is a medium brake application. Drive for at least 0.5 km (0.3 mi) between applying the brakes.
- If further cleanup of the brake discs is needed, repeat this procedure with 0.7g applications. As with all high-performance brake systems, some amount of brake squeal is normal.
Brake Pad Life System (If Equipped)
When to Change Brake Pads
If equipped, this system estimates the remaining life of the front and rear brake pads. Brake Pad Life is displayed in the Driver Information Center (DIC), along with a percentage for each axle. The system must be reset every time the brake pads are changed. When the system has determined that the brake pads need to be replaced, a message displays, which may include mileage remaining. Brake pads should always be replaced as complete axle sets.
How to Reset the Brake Pad Life System
The system will automatically detect when significantly worn brake pads are replaced. When the ignition is turned on after new pads and wear sensors are installed, a message will display. Follow the prompts to reset the system. The brake pad life system can also be manually reset:
- Display Brake Pad Life on the DIC. See Driver Information Center (DIC) (Base Level) 0 109 or Driver Information Center (DIC) (Up level) 0 112.
- Select the Brake Pad Life menu.
- Select front or rear pads as appropriate.
- Select YES on the confirmation message. Repeat for the pads on the other axle if they were also replaced.
How to Disable the Brake Pad Life System
The brake pad life system can be turned off. This may be necessary if aftermarket brake pads without wear sensors are installed. When the system is turned off, the front and rear brake pad life percentages will not display. However, the built-in wear indicators that make a high-pitched warning sound when the brake pads are worn can still determine when the pads should be replaced. See Brakes 0 311.
To turn off the brake pad life system:
- Display Brake Pad Life on the DIC. See Driver Information Center (DIC) (Base Level) 0 109 or Driver Information Center (DIC) (Up level) 0 112.
- Select the Brake Pad Life menu.
- Select DISABLE. To turn the brake pad life system back on, follow the above steps but select ENABLE in Step 2.
Brake Pad Sensor System (V-Series Blacking)
The V-Series Blacking has electronic brake pad wear sensors, when the brake pads need to be replaced, a message displays in the Driver Information Center (DIC). When the message displays, install new brake pads and brake pad wear sensors on the vehicle. When the ignition is turned on after new brake pads and brake pad wear sensors are installed, the message should no longer display. The brake pad sensor system can only be reset by replacing the brake pads and brake wear sensors.
Brake Fluid
The brake/clutch master cylinder reservoir is filled with GM-approved DOT 4 brake fluid as indicated on the reservoir cap. See Engine Compartment Overview 0 294 for the location of the reservoir.
Checking Brake Fluid
Place the vehicle in P (Park) or Neutral with the parking brake applied if equipped with a manual transmission. On a level surface, the brake fluid level should be between the minimum and maximum marks on the brake fluid reservoir.
There are only two reasons why the brake fluid level in the reservoir may go down:
- Normal brake lining wear. When new linings are installed, the fluid level goes back up.
- A fluid leak in the brake/clutch hydraulic system. Has the brake/clutch hydraulic system been fixed? With a leak, the brakes will not work well.
Always clean the brake fluid reservoir cap and the area around the cap before removing it. Do not top off the brake/clutch fluid. Adding fluid does not correct a leak. If the fluid is added when the linings are worn, there will be too much fluid when new brake linings are installed. Add or remove fluid, as necessary, only when work is done on the brake/clutch hydraulic system.
Vehicle Storage
Warning
Batteries have acid that can burn you and gas that can explode. You can be badly hurt if you are not careful. See Jump Starting – North America 0 352 for tips on working around a battery without getting hurt. Infrequent Usage: Remove the black, negative (−) cable from the battery to keep the battery from running down. Extended Storage: Remove the black, negative (−) cable from the battery or use a battery trickle charger.
All-Wheel Drive
If the vehicle is equipped with All-Wheel-Drive (AWD), this is an additional system that needs lubrication.
Transfer Case
Under normal driving conditions, transfer case fluid does not require maintenance unless there is a fluid leak or unusual noise. If required, have the transfer case serviced by your dealer. Park Brake and P (Park) Mechanism Check.
Warning
When you are doing this check, the vehicle could begin to move. You or others could be injured and property
could be damaged. Make sure there is room in front of the vehicle in case it begins to roll. Be ready to apply the regular brake at once should the vehicle begin to move.
- Park on a fairly steep hill, with the vehicle facing downhill. Keeping your foot on the regular brake, set the parking brake.
- To check the parking brake’s holding ability: With the engine running and the transmission in N (Neutral), slowly remove foot pressure from the regular brake pedal. Do this until the vehicle is held by the parking brake only.
- Automatic transmission vehicles only: To check the P (Park) mechanism’s holding ability: With the engine running, shift to P (Park). Then release the parking brake followed by the regular brake. Contact your dealer if service is required.
Wiper Blade Replacement
Windshield wiper blades should be inspected for wear or cracking. It is a good idea to clean or replace the wiper blade assembly regularly or when worn. For proper windshield wiper blade length and type, see Maintenance Replacement Parts 0 372.
Caution
Allowing the wiper arm to touch the windshield when no wiper blade is installed could damage the windshield. Any damage that occurs would not be covered by the vehicle warranty. Do not allow the wiper arm to touch the windshield. To replace the wiper blade assembly:
- Pull the windshield wiper assembly away from the windshield. The passenger-side wiper arm has limited travel.
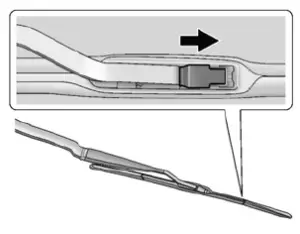
- Lift up on the latch in the middle of the wiper blade where the wiper arm attaches.
- With the latch open, pull the wiper blade down toward the windshield far enough to release it from the J-hooked end of the wiper arm.
- Remove the wiper blade.
- Reverse Steps 1–3 for wiper blade replacement.
Windshield Replacement
HUD System
The windshield is part of the HUD system. If the windshield needs to be replaced, a GM replacement windshield is recommended. The replacement windshield must be installed according to GM specifications for proper alignment. If it is not, the HUD image may look out of focus.
Driver Assistance Systems
If the windshield needs to be replaced and the vehicle is equipped with a front camera sensor for the Driver Assistance Systems, a GM replacement windshield is recommended. The replacement windshield must be installed according to GM specifications for proper alignment. If it is not, these systems may not work properly, they may display messages, or they may not work at all. See your dealer for proper windshield replacement.
Acoustic Windshield
The vehicle is equipped with an acoustic windshield. If the windshield needs to be replaced be sure to get an acoustic windshield so you will continue to have the benefits an acoustic windshield can provide.
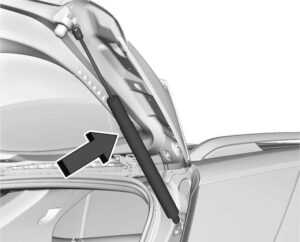
Gas Strut(s)
Your vehicle may be equipped with a gas strut(s) to assist in lifting and holding open the hood/trunk/liftgate system in the fully open position.
Warning
If the gas struts that hold open the hood, trunk, and/or liftgate fail, you or others could be seriously injured. Take the vehicle to your dealer for service immediately. Visually inspect the gas struts for signs of wear, cracks, or other damage periodically. Check to make sure the hood/trunk/liftgate is held open with enough force. If struts are failing to hold the hood/trunk/liftgate, do not operate. Has the vehicle been serviced?
Caution
Do not apply tape or hang any objects from gas struts. Also, do not push down or pull on gas struts. This may cause damage to the vehicle. See Maintenance Schedule 0 366.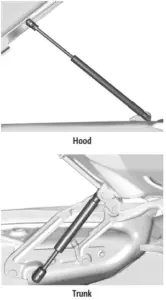
Reference Links
The guide provides step-by-step instructions on the Hood Release mechanism, emphasizing safety measures for secure access to the Engine Compartment.
The guide highlights essential fluids such as engine oil, coolant, and brake fluid, providing information on reservoir locations and instructions on checking and maintaining proper levels.
The Battery and Charging System section guides you on visually inspecting the battery, understanding its location, and identifying indicators of potential issues for a dependable electrical system.
The guide details various engine components and belts, providing insights into their locations and instructions on visually inspecting them to ensure smooth operation.
The guide explains the importance of the Air Filter and Intake System, offering guidance on checking and, if necessary, replacing the air filter for efficient airflow to the engine.
The guide highlights the importance of fluid leak checks and provides information on identifying warning signs, empowering drivers to address potential issues promptly.
The guide may provide recommendations on the frequency of fluid leak checks, helping drivers establish a proactive maintenance routine.
The guide typically includes a maintenance schedule and recommendations for essential engine-related tasks, assisting drivers in staying ahead of maintenance needs.
Yes, the guide provides information on recommended intervals for tasks such as fluid changes, belt inspections, and other engine-related maintenance, allowing drivers to plan accordingly.
The guide may provide information on visual indicators or warning signs that drivers can look for during engine component inspections, aiding in the early detection of potential issues.
The guide may offer general guidance on addressing common issues identified during inspections, but for specific troubleshooting, additional assistance from a qualified professional may be needed.
Yes, the guide typically includes information on the role of various engine components, helping drivers understand the functionality of key elements within the Engine Compartment.
Yes, the guide often includes safety precautions to be followed during engine compartment inspections, ensuring a secure and accident-free maintenance process.
Useful Links
View Full User Guide: Cadillac CT5 2023 User Guide
Download Manuals: https://www.cadillac.com/support/vehicle/manuals-guides
Cadillac CT5 2023 Headlamp And Electrical System User Guide
2023 Cadillac CT5 Specs, Price, Features, Mileage and Review