![]()
Cadillac CT5 2023 User Guide
Cadillac CT5 2023 Introduction User Guide
Introduction
The names, logos, emblems, slogans, vehicle model names, and vehicle body designs appearing in this manual including, but not limited to, GM, the GM logo, CADILLAC, the CADILLAC Emblem, and CT5, are trademarks and/or service marks of General Motors LLC, its subsidiaries, affiliates, or licensors. For vehicles first sold in Canada, substitute the name “General Motors of Canada Company” for Cadillac Motor Car Division wherever it appears in this manual. This manual describes features that may or may not be on the vehicle because of optional equipment that was purchased on the vehicle, model variants, country specifications, features/applications that may not be available in your region, or changes subsequent to the printing of this owner’s manual, including changes in standard or optional content. Refer to the purchase documentation relating to your specific vehicle to confirm the features. Keep this manual in the vehicle for quick reference.
Canadian Vehicle Owners
Canadian Vehicle Owners A French language manual can be obtained from your dealer, at www.helminc.com, or from
Using this Manual
To quickly locate information about the vehicle, use the Index in the back of the manual. It is an alphabetical list of what is in the manual and the page number where it can be found.
Danger, Warning, and Caution
Warning messages found on vehicle labels and in this manual describe hazards and what to do to avoid or reduce them.
Danger
Danger indicates a hazard with a high level of risk that will result in serious injury or death.
Warning
Warning indicates a hazard that could result in injury or death.
Caution
Caution indicates a hazard that could result in property or vehicle damage.
CIRCLE
A circle with a slash through it is a safety symbol which means “Do not,” “Do not do this,” or “Do not let this happen.
Symbols
The vehicle has components and labels that use symbols instead of text. Symbols are shown along with the text describing the operation or information relating to a specific component, control, message, gauge, or indicator.
- Shown when the owner’s manual has additional instructions or information.
- Shown when the service manual has additional instructions or information.
- Shown when there is more information on another page — “see page.”
Vehicle Symbol Chart
Here are some additional symbols that may be found on the vehicle and what they mean. See the features in this manual for information.
- Air Conditioning System
- Air Conditioning Refrigerant Oil
- Airbag Readiness Light
- Antilock Brake System (ABS)
- Brake System Warning Light
- Dispose of Used Components Properly
- Do Not Apply High-Pressure Water
- Engine Coolant Temperature
- Flame/Fire Prohibited
- Flammable
- Forward Collision Alert
- Fuse Block Cover Lock Location
- Fuses
- ISOFIX/LATCH System Child Restraints
- Keep Fuse Block Covers Properly Installed
- Lane Change Alert
- Lane Departure Warning
- Lane Keep Assist
- Malfunction Indicator Lamp
- Oil Pressure
- Park Assist
- Pedestrian Ahead Indicator
- Power
- Rear Cross Traffic Alert
- Registered Technician
- Remote Vehicle Start
- Risk of Electrical Fire
- Seat Belt Reminders
- Side Blind Zone Alert
- Stop/Start
- Tire Pressure Monitor
- Traction Control/StabiliTrak/Electronic
- Stability Control (ESC)
- Under Pressure
- Vehicle Ahead Indicator
Instrument Panel Overview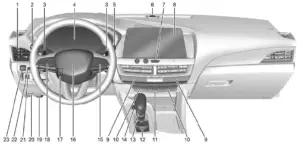
Read all Instructions for Introduction User Guide
Cadillac CT5 2023 Keys and Locks User Guide
Keys, Doors, and Windows
Keys and Locks
Keys
Warning
Leaving children in a vehicle with a remote key is dangerous and children or others could be seriously injured or killed. They could operate the power windows or other controls or make the vehicle move. The windows will function with the remote key in the vehicle, and children or others could be caught in the path of a closing window. Do not leave children in a vehicle with a remote key.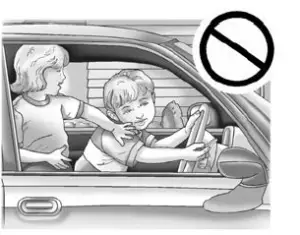
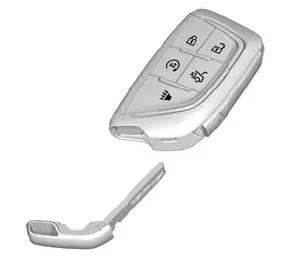
The key inside the remote key is used for the driver door and glove box. To remove the mechanical key, press the button on the side of the remote key near the bottom, and pull the mechanical key out. Never pull the mechanical key out without pressing the button. If it becomes difficult to turn the key, inspect the key blade for debris. Periodically clean with a brush or pick. See your dealer if a new mechanical key is needed. Contac Roadside Assistance if locked out of the vehicle. See Roadside Assistance Program 0 385. With an active OnStar or connected service plan, an OnStar Advisor may remotely unlock the vehicle. See OnStar Overview 394.
Remote Key
- See Radio Frequency Statement 0 390. If there is a decrease in the remote key operating range: Check the distance. The remote key may be too far from the vehicle.
- Check the location. Other vehicles or objects may be blocking the signal.
- Check the remote key battery. See “Battery Replacement” later in this section.
- If the remote key is still not working correctly, see your dealer or a qualified technician for service.
Remote Key Operation
The Keyless Access system allows for vehicle entry when the remote key is within 1 m (3 f t). See “Keyless Access Operation” later
in this section. The remote key functions may work up to 60 m (197 f t) away from the vehicle. Other conditions can impact the performance of the remote key. See Remote Key 0 7.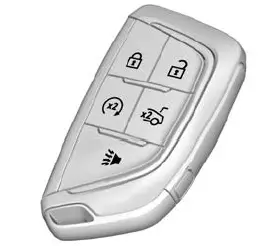
- Press to lock all doors and the fuel door, if equipped. The turn signal indicators may flash and/or the horn may sound on the second press to indicate locking. To view available settings for this feature, touch the Settings icon on the infotainment home page. Select “Vehicle” to display the list of available options and select “Remote Lock, Unlock, Start”. Pressing Q may also arm the alarm system. See Vehicle Alarm System 0 21.
- If equipped with remote folding mirrors, double pressing and holding Q on the remote key may fold the mirrors. See Folding Mirrors 0 25.
K : Press to unlock the driver door and the fuel door, if equipped. Press again within five seconds to unlock all doors. The remote key can be programmed to unlock all doors on the first button press. To view available settings for this feature, touch the Settings icon on the infotainment home page. Select “Vehicle” to display the list of available options and select “Remote Lock, Unlock, Start”. When remotely unlocking the vehicle at night, the headlamps and back-up lamps may come on for about 30 seconds to light your approach to the vehicle. The turn signal indicators may flash to indicate unlocking. Pressing K will disarm the alarm system. See Vehicle Alarm System 0 21. Double press and hold K for about three seconds to remotely open the windows, if enabled. To view available settings for this feature, touch the Settings icon on the infotainment home page. Select Vehicle” to display the list of available options and select “Remote Lock, Unlock,
Start”. - If equipped with remote folding mirror, double pressing and holding K on the remote key may unfold the mirrors. See Folding Mirrors 0 25.
Press S twice to start the engine from outside the vehicle using the remote key. See Remote Vehicle Start 0 12. Press and release one time to initiate vehicle locator. The exterior lamps flash and the horn chirps three times. Press and hold 7 for more than three seconds to sound the panic alarm. The horn sounds and the turn signal lamps flash for 30 seconds, or until 7 is pressed again or the vehicle is started. Press twice to release the trunk.
Keyless Access Operation
The Keyless Access system lets you lock and unlock the doors and access the trunk without removing the remote key from your pocket, purse, briefcase, etc. The remote key must be within 1 m (3 f t) of the trunk or door being opened. The button is on the outside door handle. The Keyless Access system can be programmed to be turned off or to unlock all doors on the first door handle press from the driver door. Keyless unlocking can also be turned off. To view available settings for this feature, touch the Settings icon on the infotainment home page. Select “Vehicle” to display the list of available options and select “Remote Lock, Unlock, Start”. If equipped with memory seats, remote keys 1 and 2 are linked to seating positions of memory 1 or 2. See Memory Seats 0 38.
Keyless Unlocking/Locking from the Driver’s Door
When the doors are locked and the remote key is within 1 m (3 f t) of the door handle, pressing the door handle button on the inside of the driver door handle will unlock the driver door. If the door handle button is pressed again within five seconds, all passenger doors will unlock. If equipped with a remote folding mirror, pressing the driver door handle button may fold and unfold the mirrors. See Folding Mirrors 0 25.
Read all Instructions for Keys and Locks User Guide
Cadillac CT5 2023 Doors,Security and Mirrors User Guide
Doors
Warning
Exhaust gases can enter the vehicle if it is driven with the liftgate or trunk/hatch open, or with any objects that pass through the seal between the body and the trunk/hatch or liftgate. Engin exhaust contains carbon monoxide (CO) which cannot be seen or smelled. It can cause unconsciousness and even death. If the vehicle must be driven with the liftgate or trunk/hatch open:
- Close all of the windows.
- Fully open the air outlets on or under the instrument panel.
- Adjust the climate control system to a setting that brings in only outside aired set the fan speed to the highest setting. See “Climate Control Systems” in the Index.
- If the vehicle is equipped with a power liftgate, disable the power liftgate function.
See Engine Exhaust 0 214.
Manual Trunk
To release the trunk, the vehicle must be off or in P (Park).
- Press on the driver door.
- Press X twice quickly on the remote key.
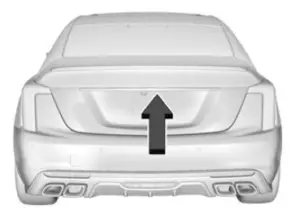
- Press the touchpad on the rear of the trunk above the license plate when all doors are unlocked. The trunk can be opened while the vehicle is locked by pressing the touchpad above the license plate while the remote key is within 1 m (3 f t) of the rear of the vehicle. See Remote Key Operation 0 7.
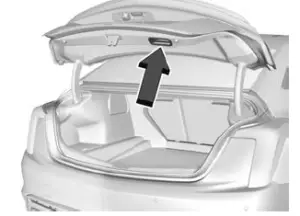 Close the trunk by pulling on the handle. Do not use the handle as a tie-down. Do not press the touch pad while closing the trunk; this will cause the trunk lid to be unlatched. The trunk has an electric latch. If the vehicle has lost power or the battery is disconnected, the trunk will not open. If this happens, enter the rear compartment by folding the rear seats down, and pull the emergency release handle to open the trunk.
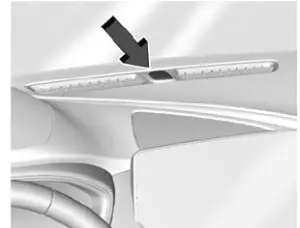
Hands-Free Trunk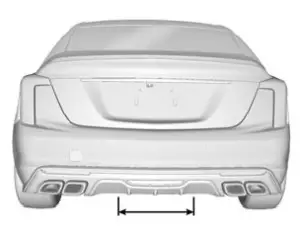
If equipped, the trunk may be opened with a kicking motion under the rear bumper at the location of the projected logo. The remote key must be within 1 m (3 f t).
The hands-free feature can be customized. To view available settings for this feature, touch the Settings icon on the infotainment home page. Select “Vehicle” to display the list of available options and select “Comfort and Convenience”. Choose from the following.
On-Open Only: The kicking motion is activated to open the trunk.
Off: The feature is disabled.
- To operate, kick your foot straight up in one swift motion under the center of the rear bumper at the location of the projected logo, then pull it back.
- Do not sweep your foot from side to side.
- Do not keep your foot under the bumper;it will not activate.
- This feature may be temporarily disabled under some conditions. If it does not respond to the kick, open the trunk by another method or start the vehicle and the feature will be re-enabled Projected Logo.
Projected Logo
If equipped with this feature, a vehicle logo will be projected for one minute onto the ground near the rear bumper when a remote key is detected within approximately 2 m (6 f t). The projected logo may not be visible under brighter daytime conditions.
Read all Instructions for Doors,Security and Mirrors User Guide
Cadillac 2023 Top Accessories
[amalinkspro_table id=”32446″ new-window=”on” nofollow=”on” addtocart=”off” /]
Cadillac CT5 2023 Interiors User Guide
Interior Mirrors
Interior Rearview Mirrors
Adjust the rearview mirror for a clear view of the area behind the vehicle. Do not spray glass cleaner directly on the mirror. Use a soft towel dampened with water.
Manual Rearview Mirror
If equipped, push the tab forward for daytime use and pull it rearward for nighttime use to avoid the glare of the headlamps from behind.
Automatic Dimming Rearview Mirror
If equipped, automatic dimming reduces the glare of headlamps from behind. The dimming feature comes on when the vehicle is started.
Rear Camera Mirror
If equipped, this automatic dimming mirror provides a wide-angle camera view of the area behind the vehicle.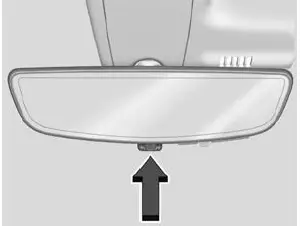
Pull the tab to turn on the display. Push the tab to turn it off. When off the mirror is automatically dimming. Adjust the mirror for a clear view of the area behind the vehicle while the display is off.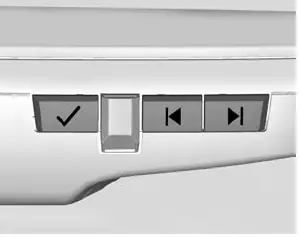
Press V to scroll through the adjustment options. Press t and u to adjust the settings using
the indicators on the mirror. The indicators will remain visible for five seconds after the last button activation, and the settings will remain saved.
The adjustment options are: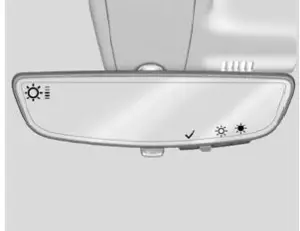
- Brightness
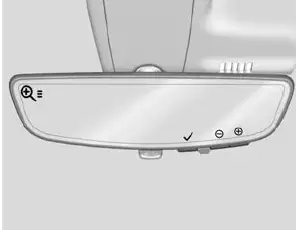
- Zoom
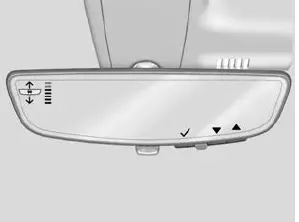
- Title
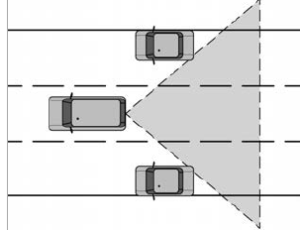
The Rear Camera Mirror (RCM) has a limited view. Portions of the road, vehicles and other objects may not be seen. Do not drive or park the vehicle using only this camera. Objects may appear closer than they are. Check the outside mirrors or glance over your shoulder when making lane changes or merging. Failure to use proper care may result in injury, death, or vehicle damage.
Troubleshooting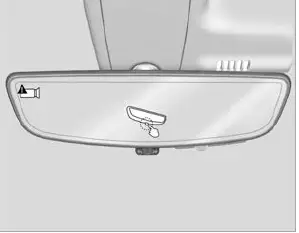
see your dealer for service if a blue screen and 3 are displayed in the mirror, and the display shuts off. Also, push the tab as indicated to return to the automatic dimming mode. The Rear Camera Mirror may not work. properly or display a clear image if:
Read all Instructions for Interiors User Guide
Cadillac CT5 2023 Head Restraints and Rear Seats User Guide
Head Restraints
If equipped with base seats, the vehicle’s front seats have adjustable head restraints in the outboard seating positions.
If equipped with high-performance seats, the vehicle’s front seats have head restraints in the outboard seating positions that cannot be adjusted.
Warning
With head restraints that are not installed and adjusted properly, there is a greater chance that occupants will suffer a neck/spinal injury in a crash. Do not
drive until the head restraints for al occupants are installed and adjusted properly.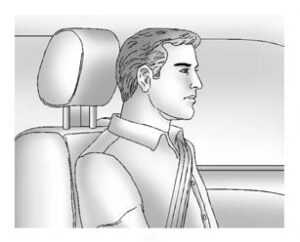
If equipped with base seats, adjust the head restraint so that the top of the restraint is at the same height as the top of the occupant’s head. This position reduces the chance of a neck injury in a crash
Front Seats
The vehicle’s front seats have adjustable head restraints in the outboard seating positions.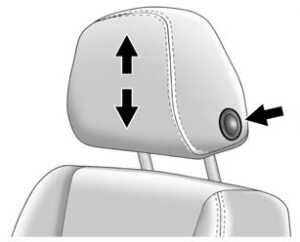
Adjust the head restraint so that the top of the restraint is at the same height as the top of the occupant’s head. This position reduces the chance of a neck injury in a crash. The height of the head restraint can be adjusted.
To raise or lower the head restraint, press the button located on the side of the head restraint, and pull up or push the head restraint down and release the button. Pull and push on the head restraint after the button is released to make sure that it is locked in place.
The front seat outboard head restraints are not removable.
Rear Seats
Second Row Seats
The vehicle’s rear second-row seats have adjustable head restraints in the outboard seating positions.
The height of the head restraint can be adjusted. Pull the head restraint up to raise it. Try to move the head restraint to make sure that it is locked in place.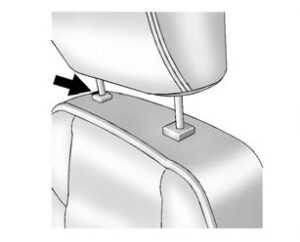
To lower the head restraint, press the button, located on the top of the seatback, and push the head restraint down. Try to move the head restraint after the button is released to make sure that it is locked in place. Rear outboard head restraints are not removable.
Front Seats
Power Seat Adjustment
Warning
You can lose control of the vehicle if you try to adjust the driver’s seat while the vehicle is moving. Adjust the driver seat only when the vehicle is not moving.
Warning
The power seats will work with the ignition off. Children could operate the power seats and be injured. Never leave children alone in the vehicle.
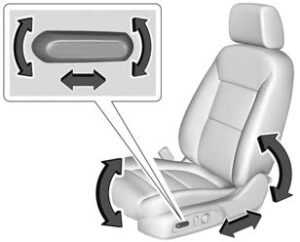
To adjust the seat:
- Move the seat forward or rearward by sliding the control forward or rearward.
- Raise or lower the seat by moving the rear of the control up or down.
- If equipped, raise or lower the front part of the seat cushion by moving the front of the control up or down.
For vehicles not equipped with front cushion tilt, the front part of the control will raise and lower the seat. If the vehicle is not in P (Park), seat travel may be limited. Release and press the seat switch again to continue the movement. To adjust the seatback, see Reclining Seatbacks 0 36.
To adjust the lumbar support, see Lumbar Adjustment 0 36. Some vehicles are equipped with a Safety Alert Seat. This feature activates a vibrating pulse alert in the driver’s seat to help the driver avoid crashes.
If something has blocked the seat during movement, the movement may stop. Remove the obstruction and try the adjustment again. If movement is still not available, see your dealer.
Thigh Support Adjustment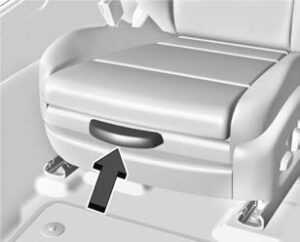
If equipped, pull up on the lever. Then pull or push on the support to lengthen or shorten. Release the lever to lock in place.
Read all Instructions for Head Restraints and Rear Seats User Guide
Cadillac CT5 2023 Seat Belts User Guide
Seat Belt Use in the 2023 Cadillac CT5 | A Step-by-Step Guide
Seat Belts
This section describes how to use seat belts properly, and some things not to do.
Warning
Do not let anyone ride where a seat belt cannot be worn properly. In a crash, if you or your passenger(s) are not wearing seat belts, injuries can be much worse than if you are wearing seat belts.
You can be seriously injured or killed by hitting things inside the vehicle harder or by being ejected from the vehicle. In addition, anyone who is not buckled up can strike other passengers in the vehicle. It is extremely dangerous to ride in a cargo area, inside or outside of a vehicle.
In a collision, passengers riding in these areas are more likely to be seriously injured or killed. Do not allow passengers to ride in any area of the vehicle that is not equipped with seats and seat belts. Always wear a seat belt, and check that all passenger(s) are restrained properly too.
This vehicle has indicators as a reminder to buckle the seat belts. See Seat Belt Reminders 0 98.
Why Seat Belts Work
When riding in a vehicle, you travel as fast as the vehicle does. If the vehicle stops suddenly, you keep going until something stops you. It could be the windshield, the instrument panel, or the seat belts! When you wear a seat belt, you and the vehicle slow down together. There is more time to stop because you stop over a longer distance and, when worn properly, your strongest bones take the forces from the seat belts. That is why wearing seat belts makes such good sense.
Questions and Answers About Seat Belts
Q: Will I be trapped in the vehicle after a crash if I am wearing a seat belt?
A: You could be — whether you are wearing a seat belt or not. Your chance of being conscious during and after a crash, so you can unbuckle and get out, is much greater if you are belted.
Q: If my vehicle has airbags, why should I have to wear seat belts?
A: Airbags are supplemental systems only.
They work with seat belts — not instead of them. Whether or not an airbag is provided, all occupants still have to buckle up to get the most protection.
Also, in nearly all states and in all Canadian provinces, the law requires wearing seat belts.
Buckle To Drive
If equipped, this feature delays the vehicle from shifting out of P (Park) when the driver seat belt is not buckled. The Buckle to Drive feature must be turned ON in the infotainment system to work. To turn the Buckle to Drive feature on or off, select Settings > Vehicle > Buckle to Drive. See Teen Driver 0 163, if equipped.
If the vehicle is on and the brake pedal is pressed with the vehicle in P (Park) but the driver seat belt is not buckled, a message displays in the Driver Information Center (DIC) and the vehicle will be delayed from shifting out of P (Park). Buckle the driver seat belt to clear the message and shift out of P (Park). Shifting from P (Park) will be delayed once for each time the vehicle is started.
For some fleet vehicles, the feature is always ON and cannot be turned OFF in the infotainment system. The vehicle will be delayed from shifting from P (Park) each time the driver attempts to do so while the driver seat belt is not buckled. Turning the vehicle off and then on will not change this condition.
On some models, Buckle to Drive may also delay shifting out of P (Park) if a front passenger seat belt is unbuckled. A message is displayed in the DIC. Buckle the front passenger seat belt to shift out of P (Park).
This feature may delay the vehicle from shifting out of P (Park) if an object, such as a briefcase, handbag, grocery bag, laptop, or another electronic device, is on the front passenger seat. If this happens, remove the object from the seat or buckle the seat belt to shift out of P (Park).
If the driver, or on some vehicles, the present front passenger remains unbuckled, the DIC message will turn off after several seconds and the vehicle can be shifted out of P (Park). See “Seat Belts” and “Child Restraints” in the Index for information about the importance of proper restraint use.
If the driver seat belt or the front passenger seat belt is unbuckled when driving, the seat belt reminder chime and light(s) will come on. See Seat Belt Reminders 0 90. This feature may not function properly if the airbag readiness light is on. See Airbag Readiness Light 98.
How to Wear Seat Belts Properly Follow these rules for everyone’s protection.
Follow these rules for everyone’s protection.
There are additional things to know about seat belts and children, including smaller children and infants. If a child will be riding in the vehicle, see Older Children 0 64 or Infants and Young Children 0 66. Review and follow the rules for children in addition to the following rules.
It is very important for all occupants to buckle up. Statistics show that unbelted people are hurt more often in crashes than those who are wearing seat belts.
There are important things to know about wearing a seat belt properly.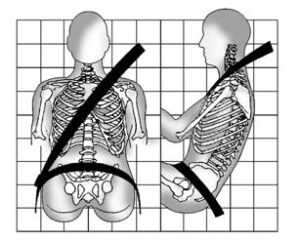
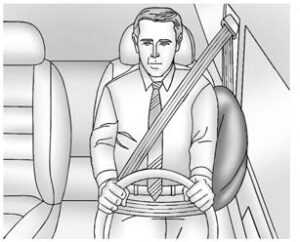
- Sit up straight and always keep your feet on the floor in front of you (if possible).
- Wear the lap part of the belt low and snug on the hips, just touching the thighs. In a crash, this applies force to the strong pelvic bones and you would be less likely to slide under the lap belt.
If you slid under it, the belt would apply force on your abdomen. This could cause serious or even fatal injuries.
- Wear the shoulder belt over the shoulder and across the chest. These parts of the body are best able to take belt restraining forces. The shoulder belt locks if there is a sudden stop or crash.
Warning
You can be seriously injured, or even killed, by not wearing your seat belt properly.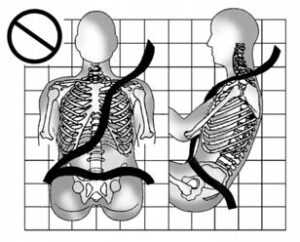

Read all Instructions for Seat Belts User Guide
Cadillac CT5 2023 Airbag System User Guide
Airbag System
The vehicle has the following airbags:
- A frontal airbag for the driver
- A frontal airbag for the front outboard passenger
- A knee airbag for the driver
- A front center airbag for the driver and front outboard passenger
- A seat-mounted side impact airbag for the driver
- A seat-mounted side impact airbag for the front outboard passenger
- A roof-rail airbag for the driver and for the second and third-row passengers seated directly behind the driver
- A roof-rail airbag for the front outboard passenger and the second and third-row passengers seated directly behind the front outboard passenger
All vehicle airbags have the word AIRBAG on the trim or on a label near the deployment opening. For frontal airbags, the word AIRBAG is on the center of the steering wheel for the driver and on the instrument panel for the front outboard passenger. For knee airbags, the word AIRBAG is on the lower part of the instrument panel. For the front center airbag, the word AIRBAG is on the inboard side of the driver seatback.
For seat-mounted side impact airbags, the word AIRBAG is on the side of the seatback or side of the seat closest to the door.
For roof-rail airbags, the word AIRBAG is on the ceiling or trim. Airbags are designed to supplement the protection provided by seat belts. Even though today’s airbags are also designed to help reduce the risk of injury from the force of an inflating bag, all airbags must inflate very quickly to do their job.
Here are the most important things to know about the airbag system:
Warning
You can be severely injured or killed in a crash if you are not wearing your seat belt, even with airbags. Airbags are designed to work with seat belts, not replace them. Also, airbags are not designed to inflate in every crash. In some crashes, seat belts are the only restraint. See When Should an Airbag Inflate? 0 54.
Wearing your seat belt during a crash helps reduce your chance of hitting things inside the vehicle or being ejected from it. Airbags are “supplemental restraints” to seat belts. Everyone in the vehicle should wear a seat belt properly, whether or not there is an airbag for that person.
Warning
Because airbags inflate with great force and faster than the blink of an eye, anyone who is up against, or very to any airbag when it inflates can be seriously injured or killed. Do not sit unnecessarily close to any airbag, as you would be if sitting on the edge of the seat or leaning forward. Seat belts help keep you in position before and during a crash. Always wear a seat belt, even with airbags. The driver should sit as far back as possible while still maintaining control of the vehicle. The seat belts and the front outboard passenger airbags are most effective when you are sitting well back and upright in the seat with both feet on the floor.
Occupants should not lean on or sleep against the front center armrest or console in vehicles with a front center airbag.
Occupants should not lean on or sleep against the door or side windows in seating positions with seat-mounted side impact airbags and/or roof-rail airbags.
Warning
Children who are up against, or very close to, any airbag when it inflates can be seriously injured or killed. Always secure children properly in the vehicle. To read how see Older Children 0 61 or Infants and Young Children 0 63.
There is an airbag readiness light on the instrument cluster, which shows the airbag symbol.
The system checks the airbag’s electrical system for malfunctions. The light tells you if there is an electrical problem. See Airbag Readiness Light 0 98.
Where Are the Airbags?
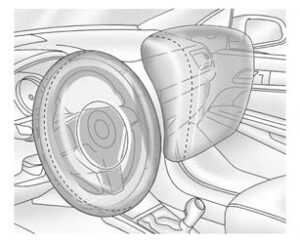 The driver frontal airbag is in the center of the steering wheel.
The front outboard passenger frontal airbag is in the passenger side instrument panel
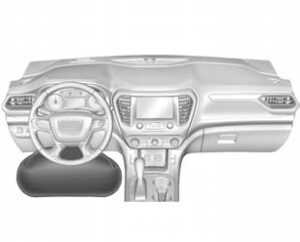 The driver knee airbag is below the steering column. The front outboard passenger knee airbag is below the glove box
Driver Side Shown, Passenger Side Similar
The seat-mounted side impact airbags for the driver and front outboard passenger are in the sides of the seatbacks closest to the door.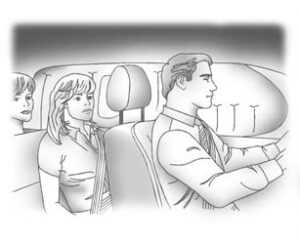
Driver Side Shown, Passenger Side Similar
The roof-rail airbags for the driver, front outboard passenger, and second and third-row outboard passengers are in the ceiling above the side windows.
Warning
If something is between an occupant and an airbag, the airbag might not inflate properly or it might force the object into that person causing severe injury or even death. The path of an inflating airbag must be kept clear. Do not put anything between an occupant and an airbag, and do not attach or put anything on the steering wheel hub or on or near any other airbag covering.
Do not use seat or console accessories that block the inflation path of a seat-mounted side impact airbag or the front center airbag.
Never secure anything to the roof of a vehicle with roof-rail airbags by routing a rope or tie-down through any door or window opening. If you do, the path of an inflating roof-rail airbag will be blocked.
Read all Instructions for Airbag System User Guide
Cadillac CT5 2023 Child Restraints and Storage User Guide
Child Restraints
Older Children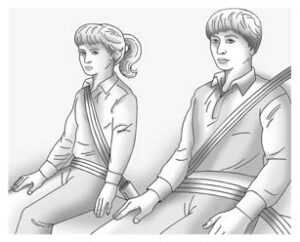
Older children who have outgrown booster seats should wear the vehicle’s seat belts. Refer to How to Wear Seat Belts Properly 0 45. The manufacturer instructions that come with the booster seat state the weight and height limitations for that booster.
Use a booster seat with a lap-shoulder belt until the child passes the fit test below:
- Sit all the way back on the seat. Do the knees bend at the seat edge? If yes, continue. If no, return to the booster seat.
- Buckle the lap-shoulder belt. Does the shoulder belt rest on the shoulder? If yes, continue. If no, try using the rear seat belt comfort guide, if available. See “Rear Seat Belt Comfort Guides” under Lap-Shoulder Belt 0 50. If a comfort guide is not available, or if the shoulder belt still does not rest on the shoulder, then return to the booster seat.
- Does the lap belt fit low and snug on the hips, touching the thighs? If yes, continue.
If no, return to the booster seat. - Can proper seat belt fit be maintained for the length of the trip? If yes, continue.
If no, return to the booster seat.
Q: What is the proper way to wear seatbelts?
A: An older child should wear a lap-shoulder belt and get the additional restraint a shoulder belt can provide. The shoulder belt should not cross the face or neck.
The lap belt should fit snugly below the hips, just touching the top of the thighs.
This applies belt force to the child’s pelvic bones in a crash. It should never be worn over the abdomen, which could cause severe or even fatal internal injuries in a crash.
Also, see “Rear Seat Belt Comfort Guides” under Lap-Shoulder Belt 0 47.
According to accident statistics, children are safer when properly restrained in a rear seating position. In a crash, children who are not buckled up can strike other people who are buckled up, or can be thrown out of the vehicle. Older children need to use seat belts properly.
Warning
Never allow more than one child to wear the same seat belt. The seat belt cannot properly spread the impact forces. In a crash, they can be crushed together and seriously injured. A seat belt must be used by only one person at a time.
Warning
Never allow a child to wear the seat belt shoulder belt under both arms or behind their back. A child can be seriously injured by not wearing the lap shoulder belt properly. In a crash, the child would not be restrained by the shoulder belt.
The child could move too far forward increasing the chance of head and neck injury. The child might also slide under the lap belt. The belt force would then be applied right on the abdomen. That could cause serious or fatal injuries. The shoulder belt should go over the shoulder and across the chest.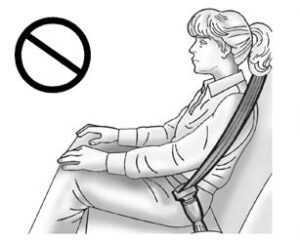
Infants and Young Children
Everyone in a vehicle needs protection! This includes infants and all other children. Neither the distance traveled nor the age and size of the traveler changes the need, for everyone, to use safety restraints. In fact, the law in every state in the United States and in every Canadian province says children up to some age must be restrained while in a vehicle.
Warning
Children can be seriously injured or killed the shoulder belt is worn behind their back, under their legs, or wrapped around their neck. The shoulder belt can tighten but cannot be loosened if it is locked. The shoulder belt locks when it is pulled all the way out of the retractor. It unlocks when the shoulder belt is allowed to go all the way back into the retractor, but it cannot do this if it is wrapped around the child. Never leave children unattended in a vehicle and never allow children to improperly wear, or play with, seat belts.
Every time infants and young children ride in vehicles, they should have the protection provided by appropriate child restraints.
Neither the vehicle’s seat belt system nor its airbag system is designed for them. Children who are not restrained properly can strike other people, or can be thrown out of the vehicle.
Warning
Never hold an infant or a child while riding in a vehicle. Due to crash forces, an infant or a child will become so heavy it is not possible to hold it during a crash.
For example, in a crash at only 40 km/h (25 mph), a 5.5 kg (12 lb) infant will suddenly become a 110 kg (240 lb) force on a person’s arms. An infant or child should be secured in an appropriate child restraint.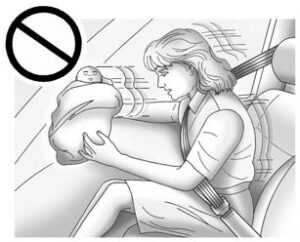
Warning
Children who are up against, or very close to, any airbag when it inflates can be seriously injured or killed. Never put a rear-facing child restraint in the front passenger seat. Secure a rear-facing child restraint in the rear seat.
It is also better to secure a forward-facing child restraint in a rear seat. If a forward-facing child restraint must be secured in the front passenger seat, always move the front passenger seat as far back as it will go.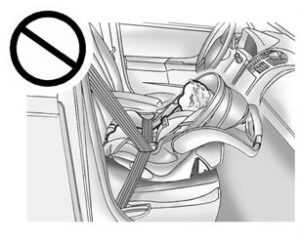
If a child restraint is installed in the second-row center seat, move the second-row seat to the rearward position, whenever possible, to minimize contact with the front center airbag. Child restraints are devices used to restrain, seat, or position children in the vehicle and are sometimes called child seats or car seats.
There are three basic types of child restraints:
- Forward-facing child restraints
- Rear-facing child restraints
- Belt-positioning booster seats
The proper child restraint for your child depends on their size, weight, and age, and also on whether the child restraint is compatible with the vehicle in which it will be used. For each type of child restraint, there are many different models available. When purchasing a child restraint, be sure it is designed to be used in a motor vehicle and is designed by a genuine child restraint manufacturer. If it is, the child restraint will have a label saying that it meets federal motor vehicle safety standards.
Read all Instructions for Child Restraints and Storage User Guide
Cadillac CT5 2023 Controls User Guide
Controls
Steering Wheel Adjustment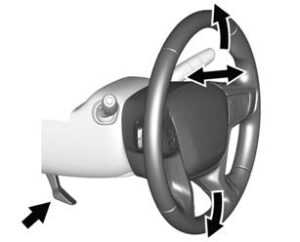
To adjust the steering wheel:
- Pull the lever down.
- Move the steering wheel up or down.
- Pull or push the steering wheel closer or away from you.
- Pull the lever up to lock the wheel in place.
Power Tilt and Telescoping Steering Wheel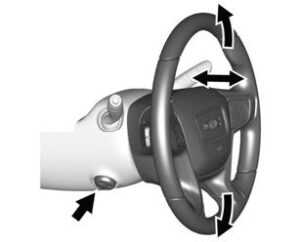
If equipped, the control is on the left side of the steering column.
- Push the control up or down to tilt the steering wheel up or down.
- Push the control forward or rearward to move the steering wheel toward the front or rear of the vehicle.
Do not adjust the steering wheel while driving. To set the power tilt wheel memory position, see Memory Seats 0 38.
Heated Steering Wheel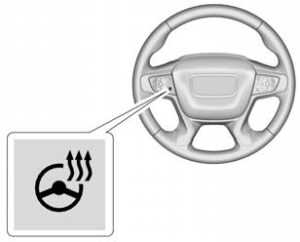
- If equipped, press to turn it on or off.
An indicator light next to the button displays when the feature is turned on.
The steering wheel takes about three minutes to start heating. If equipped with a remote start heated steering wheel, the heated steering wheel and indicator will turn on automatically. If equipped with auto-heated seats, the heated steering wheel will turn on along with the heated seats when it is cold outside. The heated steering wheel indicator light may not come on. See Heated and Ventilated Front Seats 0 40.
Horn
Press the steering wheel pad to sound the horn.
Windshield Wiper/Washer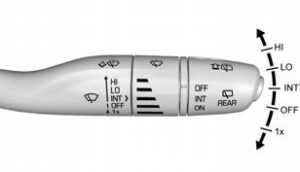
With the ignition on or in ACC/ACCESSORY, move the windshield wiper lever to select the wiper speed.
HI: Use for fast wipes
LO: Use for slow wipes
INT: Move the windshield wiper lever to
INT. Turn the band up for more frequent wipes or down for less frequent wipes.
OFF: Use to turn the wipers off.
1X : For a single wipe, briefly move the wiper lever down. For several wipes, hold the wiper lever down.
- Pull the windshield wiper lever toward you to spray windshield washer fluid and activate the windshield wipers. The wipers will continue until the lever is released or the maximum wash time is reached. When the windshield wiper lever is released additional wipes may occur depending on how long the windshield washer had been activated. See Washer
Fluid 0 277 for information on filling the windshield washer fluid reservoir.
Warning
In freezing weather, do not use the washer until the windshield is warmed. Otherwise, the washer fluid can form ice on the windshield, blocking your vision.
Warning
Before driving the vehicle, always clear snow and ice from the hood, windshield, washer nozzles, roof, and rear of the vehicle, including all lamps and windows. Reduced visibility from snow and ice buildup could lead to a crash.
Clear snow and ice from the wiper blades and windshield before using them. If frozen to the windshield, carefully loosen or thaw them. Damaged blades should be replaced. See Wiper Blade Replacement 0 281. Heavy snow or ice can overload the wiper motor. See Electrical System Overload 0 283.
Wiper Parking
If the ignition is turned off while the wipers are on LO, HI, or INT, they will immediately stop.
If the windshield wiper lever is then moved to OFF before the driver door is opened or within 10 minutes, the wipers will restart and move to the base of the windshield. If the ignition is turned off while the wipers are performing wipes due to windshield washing, the wipers continue to run until they reach the base of the windshield.
Rear Window Wiper/Washer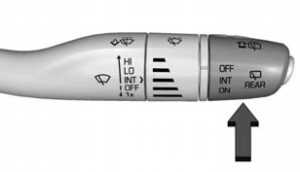
The rear window wiper/washer controls are on the end of the windshield wiper lever.
Turn the controls to adjust the setting.
OFF : Turns the wiper off.
INT : Turns on the rear wiper with a delay between wipes.
ON : Turns on the rear wiper.
- Push the windshield wiper lever forward to spray washer fluid on the rear window. The wipers will clear the rear window and either stop or return to your preset speed. For more washer cycles, press and hold the lever.
The rear window wiper/washer will not operate if the liftgate is open or ajar. If the liftgate is opened while the rear wiper is on, the wiper returns to the parked position and stops.
Rear Wiper Arm Assembly Protection
When using an automatic car wash, move the rear wiper control to OFF to disable the rear wiper. In some vehicles, if the transmission is in N (Neutral) and the vehicle speed is very slow, the rear wiper will automatically park. The wiper operations return to normal when the transmission is no longer in N (Neutral) or the vehicle speed has increased.
Reverse Gear Wipes
If the rear wiper control is off, the rear wiper will automatically operate continuously when the vehicle is in R (Reverse) and the front windshield wiper is performing low or high-speed wipes. If the rear wiper control is off, the vehicle is in R (Reverse), and the front windshield wiper is performing interval wipes, then the rear wiper automatically performs interval wipes. This feature can be turned on or off. Go to Settings > Vehicle > Comfort and Convenience > Reverse Gear Wipes > Select ON or OFF. The windshield washer reservoir is used for the windshield and the rear window. Check the fluid level in the reservoir if either washer is not working. See Washer Fluid 0 277.
Read all Instructions for Controls User Guide
Cadillac CT5 2023 Warning and Indicators User Guide
Warning
Warning lights and gauges can signal that something is wrong before it becomes serious enough to cause an expensive repair or replacement. Paying attention to the warning lights and gauges could prevent injury. Some warning lights come on briefly when the engine is started to indicate they are working. When one of the warning lights comes on and stays on while driving, or when one of the gauges shows there may be a problem, check the section that explains what to do. Waiting to do repairs can be costly and even dangerous.
Instrument Cluster (Base Level and Midlevel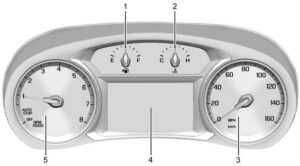
English Base Level and Midlevel Shown, Metric Similar
- Tachometer 0 95
- Driver Information Center (DIC) (Base Level) 0 109 or
- Driver Information Center (DIC) (Uplevel) 0 112
- Speedometer 0 95
- Engine Coolant Temperature Gauge (Uplevel) 0 97 or
- Engine Coolant Temperature Gauge (Base Level) 0 97
- Fuel Gauge 0 96
Cluster Menu
There is an interactive display area in the center of the instrument cluster
Base Level Cluster Menu
There is an interactive display area in the center of the instrument cluster.
Press S or T to access the cluster applications. Use the thumbwheel to scroll y or z through the list of available features. Press the thumbwheel to select.
Not all applications will be available on all vehicles.
- Info Tiles Selection/Trip Computer/ Maintenance/Driver Assistance: The selected Driver Information Center (DIC) displays can be viewed. See Driver Information Center (DIC) (Base Level) 0 102 or Driver Information Center (DIC) (Uplevel) 0 104.
- Performance
- Audio
- Navigation
- Phone
- Options
- Simplify
If equipped, press the thumbwheel to enter the Performance menu. Scroll through the available items.
Performance Timer : Press the thumbwheel to enter the setup menu. Use the thumbwheel to scroll to select the desired speed segment, then press the thumbwheel to enter the submenu. Use the thumbwheel to confirm the speed segment selection or to reset the best time for that segment. On the next acceleration, the performance timer will record the time. Pressing the thumbwheel while the timer is running will cancel the timer if done before reaching the end of the segment.
Lap Timer (without PDR) : Press the thumbwheel when Lap Timer is displayed to start, stop, or reset the lap timer. Press the thumbwheel while the Lap Timer page is active to start the timer. If the lap timer is active, pressing the thumbwheel will stop the current lap timer and start a new lap.
Pressing the thumbwheel within 10 seconds after completing the last lap (Stop Lap Timer option is displayed), the Lap Timer will stop.
Press the thumbwheel after the lap timer is stopped to reset the timer, or to view the lap history. A maximum of 16 laps can be stored.
Lap Timer (with PDR) : The lap times recorded with the PDR system will automatically be displayed in this window.
This only happens if a track has been selected in the PDR system and a video recording is started. See Performance Data Recorder (PDR) 157.
Oil Pressure: Shows the current oil pressure in either kilopascal (kPa) or in pounds per square inch (psi).
Transmission Fluid Temperature :
If equipped, shows the temperature of the transmission fluid in either degrees Celsius (° C) or degrees Fahrenheit (°F).
eLSD: Displays the amount of rear differential coupling when the Electronic Limited-Slip Differential (eLSD) is active and functioning during vehicle operation.
A reading of 1% is an open differential and 100% is locked. It is normal for the value to make small or large changes due to driving conditions and driver inputs. For the V-Series Blackwing models, the eLSD maintains some coupling even if the vehicle is stationary or not accelerating. Coupling values of 3% and up are typical. See Limited-Slip Differential 0 235.
Tire Temperature: If equipped, displays tire temperature status. Unknown may display if the information is unavailable.
Tire temperature states:
- Cold — Drive with caution as tire performance may be degraded.
- Cool — Drive with caution as tire performance may be degraded.
- Normal — Tires are at normal driving temperature.
- Warm — Tires are ready for aggressive driving.
- Overheated — Tire temperature may be higher than optimal.
Options
Press V to select the Options app, then press p to enter the Options menu. Use w or x to scroll through items in the Options menu.
Units: Press p while Units is displayed to enter the Units menu. Choose English or Metric units by pressing V while the desired item is highlighted.
Info Pages: Press p while Info Pages is displayed to enter the Info Pages menu and select the items to be displayed in the Info app.
Speed Warning: The Speed Warning display allows you to set a speed not to be exceeded. To set, press p when Speed Warning is displayed.
Scroll w or x to adjust the value. Press V to set the speed.
Instrument Cluster (Uplevel)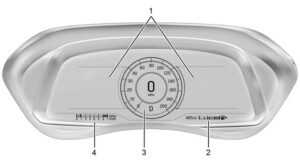
Audio
Use w or x to scroll through options, browse for music, select from favorites, or change the audio source. In the main view, scroll to change the station or go to the next or previous track.
Read all Instructions for Warning and Indicators User Guide
Cadillac CT5 2023 Information Displays User Guide
Information Displays
Driver Information Center (DIC) (Base Level)
The DIC is displayed in the instrument cluster. It shows the status of many vehicle systems.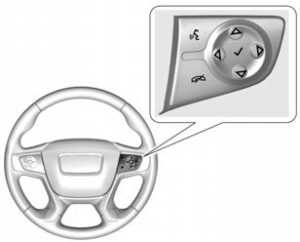
or T: Press to move between the interactive display zones in the cluster. Press S to go back to the previous menu.
y or z: Use the thumbwheel to scroll to the previous or next selection.
V: Press to open a menu or select a menu item. Press and hold to reset values on certain screens.
Info Page Options
The info displays on the DIC can be turned on or off through the Options menu.
- Press T to scroll to the Options menu.
Use the thumbwheel to scroll to Info Pages and press the thumbwheel to select. - Scroll y or z to move through the list of possible info displays.
- Press the thumbwheel while an item is highlighted to select or deselect that item.
The info pages can also be turned on or off through the DIC Info Page Options
DIC Information Displays
The following is the list of all possible DIC information displays. Some of the information displays may not be available for your particular vehicle.
While in the Info Page Options menu, the info pages can be restored to the default factory settings by pressing and holding Ron the left steering wheel controls and the thumbwheel on the right steering wheel controls at the same time.
Speed : Shows the vehicle speed in either kilometers per hour (km/h) or miles per hour (mph).
Trip 1 or Trip 2 and Average Fuel
Economy : The Trip display shows the current distance traveled, in either kilometer (km) or miles (mi), since the trip odometer was last reset. The trip odometer can be reset by pressing V and selecting yes or no while this display is active.
The Average Fuel Economy display shows the approximate average liters per 100 kilometers (L/100 km) or miles per gallon (mpg). This number is calculated based on the number of L/100 km (mpg) recorded since the last time this menu item was reset. This number reflects only the approximate average fuel economy that the vehicle has right now, and will change as driving conditions change. The Average Fuel Economy can be reset by pressing V and selecting yes or no while this display is active.
DIC Info Pages
The following is the list of all possible DIC info page displays. Some may not be available for your particular vehicle. Some items may not be turned on by default but can be turned on through the Options app. See “DIC Info Page Options” earlier in this section.
Speed: Shows the vehicle speed in either kilometers per hour (km/h) or miles per hour (mph). A speed limit sign can also be shown, if equipped.
Trip A or Trip B: Shows the current distance traveled, in either kilometers (km) or miles (mi), since the trip odometer was last reset.
This also shows the approximate average liters per 100 kilometers (L/100 km) or miles per gallon (mpg). This number is calculated based on the number of L/100 km (mpg) recorded since the last time this menu item was reset. This number reflects only the approximate average fuel economy that the vehicle has right now, and will change as driving conditions change. Press and hold V while this display is active to reset the trip odometer and the average fuel economy. Trip A and Trip B can also be reset by pressing p and choosing reset.
Fuel Range: This shows the approximate distance the vehicle can be driven without refueling. LOW will be displayed when the vehicle is low on fuel. The fuel range estimate is based on an average of the vehicle’s fuel economy over recent driving history and the amount of fuel remaining in the fuel tank.
Oil Life : This shows an estimate of the oil’s remaining useful life. If REMAINING OIL LIFE 99% is displayed, that means 99% of the current oil life remains.
When the remaining oil life is low, the CHANGE ENGINE OIL SOON message will appear on the display. The oil should be changed as soon as possible. See Engine Oil 0 298. In addition to the engine oil life system monitoring the oil life, additional maintenance is recommended. See Maintenance Schedule 0 366.
The Oil Life display must be reset after each oil change. It will not reset itself. Do not reset the Oil Life display accidentally at any time other than when the oil has just been changed. It cannot be reset accurately until the next oil change. See Engine Oil Life System 300.
Air Filter Life: If equipped, Shows an estimate of the engine air filter’s remaining useful life and the state of the system.
Engine Air Filter Life 95% means 95% of the current air filter life remains. Messages will display based on the engine air filter life and the state of the system. When the REPLACE AT NEXT OIL CHANGE message displays, the engine air filter should be replaced at the time of the next oil change.
When the REPLACE SOON message displays, the engine air filter should be replaced at the earliest convenience.
Brake Pad Life: If equipped, This displays an estimate of the remaining life of the front and rear brake pads. Messages will display based on brake pad wear and the state of the system. Reset the Brake Pad Life display after replacing the brake pads. See Brake Pad Life System (If Equipped) 0 313.
Tire Pressure: This shows the approximate pressures of all four tires. Tire pressure is displayed in either kilopascal (kPa) or in pounds per square inch (psi). If the pressure is low, the value for that tire is shown in amber. See Tire Pressure Monitor System 0 301 and ire Pressure Monitor Operation 0 302.
Fuel Economy: Displays average fuel economy, the best fuel economy over the selected distance, and a bar graph showing instantaneous fuel economy.
Average Vehicle Speed: Displays the average vehicle speed of the vehicle in kilometers per hour (km/h) or miles per hour (mph). This average is based on the various vehicle speeds recorded since the last reset. Reset the average speed by pressing V when it is displayed.
Fuel Economy: The center displays the approximate instantaneous fuel economy as a number and bar graph. Displayed above the bar graph is a running average of fuel economy for the most recently traveled selected distance. Displayed below the bar graph is the best average fuel economy that has been achieved for the selected distance.
The selected distance is displayed at the top of the page as “last xxx mi/km.” Press V to select the distance or reset best value. Use w and x to choose the distance and press V. Press w and x to select “Reset Best Score.” Press V to reset the best average fuel economy. After reset, the best value displays “-,-” until the selected distance has been traveled.
Timer: This display can be used as a timer. To start the timer, press V while this display is active. The display will show the amount of time that has passed since the timer was last reset. To stop the timer, press V briefly while this display is active and the timer is running. To reset the timer to zero, press and hold V while this display is active, or press p and select reset the timer.
Battery Voltage: Displays the current battery voltage, if equipped. Battery voltage changes are normal while driving. See Charging System Light 0 106. If there is a problem with the battery charging system, the DIC will display a message.
Transmission Fluid Temperature: Shows the temperature of the automatic transmission fluid in either degrees Celsius (°C) or degrees Fahrenheit (°F).
Blank Page: Shows no information.
Fuel Information or Fuel Range: This shows the approximate distance the vehicle can be driven without refueling. LOW will be displayed when the vehicle is low on fuel. The fuel range estimate is based on an average of the vehicle’s fuel economy over recent driving history and the amount of fuel remaining in the fuel tank. If equipped, may also show the instantaneous fuel economy.
Read all Instructions for Information Displays User Guide
Cadillac CT5 2023 Vehicle and Remote System User Guide
Universal Remote: 2023 Cadillac CT5 | Programing and Features
Vehicle Messages
Messages displayed on the DIC indicate the status of the vehicle or some action that may be needed to correct a condition.
Multiple messages may appear one after another. The messages that do not require immediate action can be acknowledged and cleared by pressing V. The messages that require immediate action cannot be cleared until that action is performed. All messages should be taken seriously; clearing the message does not correct the problem. If a SERVICE message appears, see your dealer. Follow the instructions given in the messages.
The system displays messages regarding the following topics:
- Service Messages
- Fluid Levels
- Vehicle Security
- Brakes
- Steering
- Ride Control Systems
- Driver Assistance Systems
- Cruise Control
- Lighting and Bulb Replacement
- Wiper/Washer Systems
- Doors and Windows
- Seat Belts
- Airbag Systems
- Engine and Transmission
- Tire Pressure
- Battery
Engine Power Messages
REDUCED ACCELERATION DRIVE WITH CARE
This message displays when the vehicle’s propulsion power is reduced. A reduction in propulsion power can affect the vehicle’s ability to accelerate. If this message is on, but there is no observed reduction in performance, proceed to your destination. Under certain conditions, the performance may be reduced the next time the vehicle is driven. The vehicle may be driven while this message is on, but maximum acceleration and speed may be reduced. Anytime this message stays on, or displays repeatedly, the vehicle should be taken to your dealer for service as soon as possible.
Under certain operating conditions, propulsion will be disabled. Try restarting after the ignition has been off for two minutes.
Vehicle Speed Messages
This message shows that the vehicle speed has been limited to the speed displayed. The limited speed is protection for various propulsion and vehicle systems, such as lubrication, thermal, brakes, suspension, Teen Driver if equipped, or tires.
Universal Remote System
See Radio Frequency Statement 390.
Universal Remote System Programming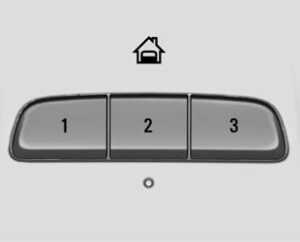
If equipped, these buttons are in the overhead console.
This system can replace up to three remote control transmitters used to activate devices such as garage door openers, security systems, and home automation devices. These instructions refer to a garage door opener, but can be used for other devices. Do not use the Universal Remote system with any garage door opener that does not have the stop and reverse feature. This includes any garage door opener model manufactured before April 1, 1982.
Read these instructions completely before programming the Universal Remote system. It may help to have another person assist with the programming process.
Keep the original hand-held transmitter for use in other vehicles as well as for future programming. Erase the programming when vehicle ownership is terminated. See “Erasing Universal Remote System Buttons” later in this section.
To program a garage door opener, park outside directly in line with and facing the garage door opener receiver. Clear all people and objects near the garage door.
Make sure the hand-held transmitter has a new battery for quicker and more accurate transmission of the radio-frequency signal.
Programming the Universal Remote System
For questions or programming help, see www.homelink.com/gm or call 1-800-355-3515. For calls placed outside the U.S., Canada, or Puerto Rico, international rates will apply and may differ based on landline or mobile phone.
Programming involves time-sensitive actions, and may time out causing the procedure to be repeated.
To program up to three devices:
- Hold the end of the hand-held transmitter about 3 to 8 cm (1 to 3 in) away from the Universal Remote system buttons with the indicator light in view. The hand-held transmitter was supplied by the manufacturer of the garage door opener receiver.
- Press and release one of the three Universal Remote system buttons to be programmed. Press and hold the hand-held transmitter button. Do not release the hand-held transmitter button until the indicator light changes from a slow to a rapid flash or continuous light. Then release the hand-held transmitter button.
Some garage door openers may require the substitution of Step 2 with the procedure under “Radio Signals for Some Gate Operators” later in this section. - Press and hold the newly programmed Universal Remote system button for five seconds while watching the indicator light and garage door activation.
- If the indicator light stays on continuously or the garage door moves when the button is pressed, then programming is There is no need to complete Steps 4–6.
- If the indicator light does not come on or the garage door does not move, a second button press may be required. For a second time, press and hold the newly programmed button for five seconds. If the indicator light is continuously lit, or the garage door moves, programming is complete.
- If the indicator light flashes rapidly and the garage door does not move, continue with programming
Steps 4–6
Learn or Smart Button
- After completing Steps 1–3, locate the Learn or Smart button inside the garage on the garage door opener receiver. The name and color of the button may vary by manufacturer.
- Press and release the Learn or Smart button. Step 6 must be completed within 30 seconds of pressing this button.
- Return to the vehicle and firmly press and hold the trained Universal Remote system button for two seconds and Repeat the “press/hold/release” sequence up to three times to complete the training process.
The Universal Remote system should now activate the garage door. Repeat the process for programming the two remaining buttons.
Radio Signals for Some Gate Operators
For questions or programming help, see www.homelink.com/gm or call 1-800-355-3515. For calls placed outside the U.S., Canada, or Puerto Rico, international rates will apply and may differ based on landline or mobile phone. Some radio-frequency laws and gate operators require transmitter signals to time out or quit after several seconds of transmission. This may not be long enough for the Universal Remote system to pick up the signal during programming.
Read all Instructions for Vehicle and Remote System User Guide
Cadillac CT5 2023 Exterior,Interior Lighting User Guide
Headlight Features: 2023 Cadillac CT5 Interior Lighting Instructions
Exterior Lighting
Exterior Lamp Controls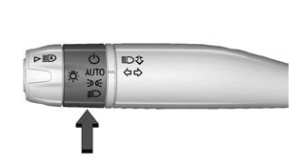 The exterior lamp control is on the turn signal lever. Turn the control to the following positions:
- Turns the exterior lamps off and deactivate the AUTO mode. Turn to O again to reactivate the AUTO mode. In Canada, the headlamps will automatically reactivate when the vehicle is shifted out of P (Park).
- AUTO: Automatically turns the exterior lamps on and off, depending on outside lighting.
- Turns on the parking lamps including all lamps, except the headlamps. Turns on the headlamps together with the parking lamps and instrument panel lights.
IntellBeam System
If equipped, this system turns the vehicle’s high-beam headlamps on and off according
to surrounding traffic conditions. The system turns the high-beam headlamps on when it is dark enough and there is no other traffic present. This light becomes on in the instrument cluster when the IntellBeam system is enabled.
Turning On and Enabling IntellBeam To to enable the IntellBeam system, press bon the turn signal lever when it is dark outside and the exterior lamp control is in AUTO or 2.
Driving with IntellBeam
The system only activates the high beams when driving over 40 km/h (25 mph). The blue high-beam on light appears on the instrument cluster when the high beams are on. There is a sensor near the top center of the windshield that automatically controls the system. Keep this area of the windshield clear of debris to allow for best system performance. The high-beam headlamps remain on, under automatic control, until one of the following situations occurs:
- The system detects an approaching vehicle’s headlamps.
- The system detects a preceding vehicle’s taillamps.
- The outside light is bright enough that high-beam headlamps are not required.
- The vehicle’s speed drops below 20 km/h (12 mph).
- The IntellBeam system is disabled by the button on the turn signal lever. If this happens, press on the turn signal lever when the exterior lamp control is in the AUTO or 2 position to reactivate the IntellBeam system. The instrument cluster light will come on to indicate the
The intellBeam system is reactivated. The high beams may not turn off automatically if the system cannot detect another vehicle’s lamps because of any of the following: - The other vehicle’s lamps are missing, damaged, obstructed from view, or otherwise undetected.
- The other vehicle’s lamps are covered with dirt, snow, and/or road spray.
- The other vehicle’s lamps cannot be detected due to dense exhaust, smoke, fog, snow, road spray, mist, or other airborne obstructions.
- The vehicle’s windshield is dirty, cracked, or obstructed by something that blocks the view of the light sensor.
- The vehicle is loaded such that the front end points upward, causing the light sensor to aim high and not detect headlamps and taillamps.
- The vehicle is being driven on winding or hilly roads. The automatic high-beam headlamps may need to be disabled if any of the above conditions exist.
Exterior Lamps Off Reminder
A warning chime sounds if the driver door is opened while the ignition is off and the exterior lamps are on.
Headlamp High/Low-Beam Changer
- Push the turn signal lever away from you and release, to turn the high beams on. To return to low beams, push the lever again or pull it toward you and release.
 This indicator light turns on in the instrument cluster when the high-beam headlamps are on.
Flash-to-Pass
To flash the high beams, pull the turn signal lever toward you, and release.
Daytime Running Lamps (DRL)
DRL can make it easier for others to see the front of your vehicle during the day. Fully functional DRL are required on all vehicles first sold in Canada. If equipped, the DRL will come on when all of the following conditions are met:
- The ignition is on.
- The exterior lamp control is in AUTO.
- The light sensor determines it is daytime.
The DRL turn off when the headlamps are turned to O or the ignition is off. For vehicles first sold in Canada, the DRL can only be turned off when the vehicle is parked.
Automatic Headlamp System
When the exterior lamp control is set to AUTO and it is dark enough outside, the headlamps come on automatically.
If equipped, the light sensor is on top of the instrument panel or on the windshield near
the rearview mirror. Do not cover the sensor, otherwise the headlamps will come on when they are not needed. The system may also turn on the headlamps when driving through a parking garage or tunnel. If the vehicle is started in a dark garage, the automatic headlamp system comes on immediately. If it is light outside when the vehicle leaves the garage, there is a slight delay before the automatic headlamp system turns off the headlamps. During that delay, the instrument cluster may not be as bright as usual. Make sure the instrument panel brightness control is in the full bright position. See Instrument Panel Illumination Control 0 126.When it is bright enough outside, the headlamps will turn off. The automatic headlamp system turns off when the exterior lamp control is turned to O or the ignition is off. For vehicles sold in Canada, this control only works when the transmission is in P (Park).
Lights On with Wipers
If the windshield wipers are activated in daylight with the engine on, and the exterior lamp control is in AUTO, the headlamps, parking lamps, and other exterior lamps come on. The transition time for the lamps coming on varies based on wiper speed. When the wipers are not operating, these lamps turn off. Move the exterior lamp control to O or ;to disable this feature.
Hazard Warning Flashers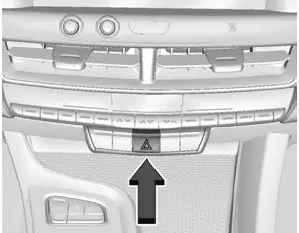
- Press this button to make the front and rear turn signal lamps flash on and off. Release the button for at least one second and press again to turn the flashers off. The hazard warning flashers turn on automatically if the airbags deploy.
Turn and Lane-Change Signals
Move the lever all the way up or down to signal a turn. An arrow on the instrument cluster flashes in the direction of the turn or lane change. Raise or lower the lever until the arrow starts to flash to signal a lane change. Hold it there until the lane change is completed. If the lever is briefly pressed and released, the turn signal flashes three times. The turn and lane change signal can be turned off manually by moving the lever back to its original position. If after signaling a turn or lane change, the arrow flashes rapidly or does not come on, a signal function may be inoperative. This vehicle may be equipped with LED lighting. For replacement of any LED lighting, contact your dealer.
Read all Instructions for Exterior, Interior Lighting User Guide
Cadillac CT5 2023 Lighting Features User Guide
Lighting Features
Entry Lighting
The interior lamps turn on when pressing K on the remote key or opening any doors ,and the dome lamp control is not in the OFF position. Some exterior lamps also turn on when pressing K on the remote key or opening any doors. Low-Beam lamps will only turn on briefly at night, or in areas with limited lighting. All lamps will gradually fade out after about 30 seconds. Entry lighting can be disabled manually by closing all doors, pressing Q on the remote key, or starting the vehicle. This feature can be changed. On the infotainment home page, select the Setting icon > Vehicle > Vehicle Locator Lights.
Approach Detection
If equipped, the entry lighting feature will automatically turn on when the remote key is detected within approximately 2 m (6 f t) of the vehicle. If the vehicle has remained parked for an extended period of time with no remote key use or keyless access operation, approach detection will be disabled. To reactivate, press any button on the remote key or open and close all vehicle doors to re-enable the entry lighting feature on approach.
Exit Lighting
Some exterior lamps and interior lamps turn on when the driver door is opened after the vehicle is turned off. The exterior and interior lamps remain on for a set amount of time, then automatically turn off. The interior lights turn on when the vehicle is turned off. The exterior lamps turn off immediately by turning the exterior lamp control off. This feature can be changed. On the infotainment home screen, select the Settings icon T Vehicle T Exit Lighting.
Battery Load Management
The vehicle has Electric Power Management (EPM), which estimates the battery’s temperature and state of charge. It then adjusts the voltage for best performance and extended life of the battery. When the battery’s state of charge is low, the voltage is raised slightly to quickly bring the charge back up. When the state of charge is high, the voltage is lowered slightly to prevent overcharging. If the vehicle has a voltmeter gauge or a voltage display on the Driver Information Center (DIC), you may see the voltage move up or down. This is normal. If there is a problem, an alert will be displayed. The battery can be discharged at idle if the electrical loads are very high. This is true for all vehicles. This is because the generator (alternator) may not be spinning fast enough at idle to produce all the power that is needed for very high electrical loads. A high electrical load occurs when several of the following are on, such as: headlamps, high beams, fog lamps, rear window defogger, climate control fan at high speed, heated seats, engine cooling fans, and loads plugged into accessory power outlets.
EPM works to prevent excessive discharge of the battery. It does this by balancing the generator’s output and the vehicle’s electrical needs. It can increase engine idle speed to generate more power, whenever needed. It can temporarily reduce the power demands of some accessories.
Normally, these actions occur in steps or levels, without being noticeable. In rare cases at the highest levels of corrective action, this action may be noticeable to the driver. If so, a DIC message might be displayed. If a battery message is displayed, it is recommended that the driver reduce the electrical loads as much as possible. See Driver Information Center (DIC) (Base Level) 0 109 or Driver Information Center (DIC) (Up level) 0 112.
Battery Power Protection
This feature helps prevent the battery from being drained if the interior courtesy lamps or reading lamps are accidentally left on. If any of these lamps are left on, they automatically turn off after 10 minutes, if the ignition is off. The lamps will not come back on again until one of the following occurs:
- The ignition is turned on.
- The doors are closed and then re-opened.
Exterior Lighting Battery Saver
The exterior lamps turn off about 10 minutes after the vehicle is turned off, if the parking
lamps or headlamps have been manually left on. This protects against draining the battery. To restart the 10-minute timer, turn the exterior lamp control to the O position and then back to the;or 2 positions. To keep the lamps on for more than 10 minutes, the vehicle must be on or in accessory mode.
Read all Instructions for Lighting Features User Guide
Cadillac CT5 2023 Introduction and Radio User Guide
Radio
AM-FM Radio
Playing the Radio
Press e on the console controls or touch the Audio icon on the Home Page to display the active audio source page. Choose the three most recently used sources listed on the left side of the display. Choose the More option to display a list of available sources. Examples of available sources may include AM, FM, SXM (if equipped), MyMedia, USB, AUX (if equipped), and Bluetooth.
Infotainment System Sound Menu
From any of the audio source main pages, touch Sound to display the following:
Equalizer: Touch to adjust Bass, Midrange, Treble, and Surround (if equipped) using the options on the infotainment display.
Fade/Balance: Touch to adjust by using the controls on the infotainment display or by tapping/dragging the crosshair.
Sound Mode (If Equipped)
Bose Center point surround sound systems have four sound modes:
- Normal: Adjusts the audio to provide the best sound for all seating positions.
- Driver: Adjusts the audio to provide the best sound for the driver.
- Rear: Adjusts the audio to provide the best sound for the rear seat occupants.
- Center point: Turns on Bose Center point surround technology. This setting creates a surround sound from nearly any audio source: existing stereo and MP3 players. For more information on Bose Center’s point surround technology, see www.boseautomotive.com.
- AKG surround sound systems have two sound modes:
- Normal: Adjusts the audio to provide the best sound for all seating positions.
- Rear: Adjusts the audio to provide the best sound for the rear seat occupants.
Finding a Station
Seeking a Station
From the AM, FM, or SXM (if equipped) option, press 7 or 6 on the console controls or from the AM or FM menu, touch 7 or 6 to search for the previous or next strong station or channel.
Browsing Stations
Touch the Browse option to list all available stations or channels. Navigate up and down through all stations and channels by scrolling the list. Touch the station you want to listen to. Touch to save the station or channel as a favorite. If equipped, touch Update Station List to update the active stations or channels in your area.
Direct Tune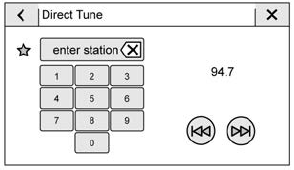
Access Direct Tune by touching the Tune icon on the infotainment display to bring up the keypad. Navigate through all frequencies using the arrows on the Direct Tune display. Directly enter a station or channel using the keypad. When a new station or channel is entered, the information about that station or channel displays on the right side. This information will update with each new valid frequency. Touch to save the station or channel as a favorite. The keypad will gray out entries that do not contribute to a valid frequency and will automatically place a decimal point within the frequency number. Touch (X) to delete one number at a time.
Touch and hold (X) to delete all numbers. A valid AM or FM station will automatically tune to the new frequency but not close the Direct Tune display. When listening to SXM (if equipped), touch Go after entering the channel. Press on the console controls, touch the Back icon on the infotainment display, or z to exit out of Direct Tune. The tune arrows on the right side of the Direct Tune display tune through the complete station list one station step at a time per touch. A touch and hold advances through stations quickly. If equipped, HD Radio multicast stations
cannot be tuned directly through the Direct Tune feature. Only the analog or HD1 station can use that feature. Use the arrows on the Direct Tune display to adjust to the multicast stations.
AM, FM, and SXM Categories
From the AM stations, if equipped with HD Radio, FM, or SXM (if equipped) display,
touch Categories at the top of the Browse menu to access the categories list. The list contains names associated with the AM or FM stations, or SXM channels. Touch a category name to display a list of stations or channels for that category. Touching a station or channel from the list tunes the radio to that station or channel.
Storing Radio Station Presets
Favorites are stored in the area at the top of the display.
AM, FM, SXM (if equipped), and HD Radio Stations (if equipped) :
Press and hold a preset to store the current station as a favorite. Touch a saved favorite to recall a favorite station. Favorites can also be stored by touching H in a station or channel list. This will highlight indicating that it is now saved as a favorite. The number of favorites displayed is automatically adjusted by default, but can be manually adjusted in Settings in the System tab under Favorites and then Set Number of Audio Favorites. It can also be adjusted in Settings in the Apps tab under Audio and then Set Number of Audio Favorites.
Radio Data System (RDS)
RDS relies on receiving specific RDS information from radio stations and only works when the information is available. It is possible that a radio station could broadcast information that causes the radio to work improperly. In addition, RDS features are region and country of sale specific. This means specific RDS content may not be available in your listening area or in the country you operate the vehicle. To turn RDS features on or off, select Settings > Apps> Audio> RDS> Select ON or OFF. The following core and region-specific RDS features may be supported by radio broadcasters in your listening area:
Core RDS features
- Display radio station call letters
- Display messages from radio stations
- Provide radio station category information (when available)
Region Specific RDS features
- Support Traffic Program (TP) Alerts
- Support Alternate Frequency (AF) Switching
- Support Region Switching
Read all Instructions for Introduction and Radio User Guide
Cadillac CT5 2023 Audio Players and Navigation User Guide
Audio Players
Avoiding Untrusted Media Devices
When using media devices such as USB and mobile devices, consider the source. Untrusted media devices could contain files that affect system operation or performance and should be avoided.
USB Port
Audio stored on a USB device may be listened to.
Depending on your vehicle, it may be equipped with two USB ports in the center console under the armrest and another two on the center stack. These ports are for data and charging. There may also be two USB ports at the rear of the center console and a USB port on each side of the third row seats for charging only.
Caution
To avoid vehicle damage, unplug all accessories and disconnect all accessory cables from the vehicle when not in use. Accessory cables left plugged into the vehicle, unconnected to a device, could be damaged or cause an electrical short if the unconnected end comes in contact with liquids or another power source such as the accessory power outlet.
Playing from a USB
A USB mass storage device can be connected to the USB port.
Audio extensions supported by the USB may include:
- MP3
- AAC
- OGG
- 3GP
My Media Library
MyMedia is only available when more than one indexed device is connected. It allows access to content from all indexed media sources. MyMedia will show as an available source in the Source page.
USB MP3 Player and USB Devices
The USB MP3 players and USB devices connected must comply with the USB Mass Storage Class specification (USB MSC).
To play a USB device:
- Connect the USB.
- Touch Audio from the Home Page.
- Select USB device.
Use the following when playing an active USB source:
p : Touch to play the current media source.
j : Touch to pause playback of the current media source.
- Touch to seek the beginning of the current or previous track.
- Touch and hold to reverse quickly through playback. Release to return to playing speed. Elapsed time displays.
- Touch to seek the next track.
- Touch and hold to advance quickly through playback. Release to return to playing speed. Elapsed time displays.
Shuffle : Touch the shuffle icon to play music in random order.
USB Sound Menu
See “Infotainment System Sound Menu” under AM-FM Radio 0 127.
USB Browse Menu
When a list of songs, albums, artists,
or other types of media displays, the up and down arrows and A-Z appear on the left side. Select A-Z to view a display that will show all letters of the alphabet and select the letter to go to.
Touch the up and down arrows to move the list up and down.
Touch Browse and the following may display:
Playlists:
- Touch to view the playlists stored on the USB.
- Touch a playlist to view the list of all songs in that playlist.
- Touch a song from the list to begin playback.
Supported playlist extensions are m3u and pls.
Artists:
- Touch to view the list of artists stored on the USB.
- Touch an artist name to view a list of all albums by the artist.
- To select a song, touch All Songs or touch an album and then touch a song from the list.
Songs:
- Touch to display a list of all songs on the USB.
- To begin playback, touch a song from the list.
Albums:
- Touch to view the albums on the USB.
- Touch the album to view a list of all songs on the album.
- Touch a song from the list to begin playback.
Genres:
- Touch to view the genres on the USB.
- Touch a genre to view a list of artists.
- Touch an artist to view albums by that artist.
- Touch an album to view songs on the album.
- Touch a song to start playback.
Composers:
- Touch to view the composers on the USB.
- Touch a Composer to view a list of albums by that composer.
- Touch an album or All Songs to view a list of songs.
- Touch a song from the list to begin playback.
Folders:
- Touch to view the directories on the USB.
- Touch a folder to view a list of all files.
- Touch a file from the list to begin playback.
Podcasts: Touch to view the podcasts on the connected Apple device and get a list of podcast episodes.
Read all Instructions for Audio Players and Navigation User Guide
Cadillac CT5 2023 Voice Recognition and Phone User Guide
Voice Recognition
If equipped, voice recognition allows for hands-free operation within the navigation, audio, phone, and weather applications. This feature can be started by pressing g on the steering wheel or touching g on the infotainment display. However, not all features within these areas are supported by voice commands. Generally, only complex tasks that require multiple manual interactions to complete are supported by voice commands.
For example, tasks that take more than one or two touches, such as a song or artist to play from a media device, would be supported by voice commands. Other tasks, like adjusting the volume or seeking up or down, are audio features that are easily performed by touching one or two options, and are not supported by voice commands. In general there are flexible ways to speak commands for completing the tasks.
If your language supports it, try stating a one-shot command, such as Directions to address <number, street, city, state/province>.Do not include the ZIP code while stating the address during the command. Another example of a one-shot Destination Entry command s, Directions to Place of Interest at <hotel>. If these commands do not work, try saying, Take me to Place of Interest or â Find address and the system will walk you through by asking additional questions.
Hybrid Speech Recognition
If equipped, this feature helps distinguish words by using Internet-based information along with the system’s voice recognition database. This allows you to speak more naturally when using voice recognition.
Using Voice Recognition
Voice recognition becomes available once the system has been initialized. This begins when the ignition is turned on. Initialization may take a few moments.
- Press g on the steering wheel controls to activate voice recognition.
- The audio system mutes and the system plays a prompt.
- Clearly speak one of the commands described in this section.
A voice recognition system prompt can be interrupted while it is playing by pressing g again. Once voice recognition is started, both the infotainment display and instrument cluster show the selections and visual dialog content. These displays can be turned on or off in the Tutorial Mode under Settings 0 168.
There are three voice prompt modes supported:
- Informative verbal prompts: This type of prompt will provide more information regarding the supported actions.
- Short prompts: This type of prompt will provide simple instructions about what can be stated.
- Auto informative prompts: This type of prompt plays during the first few speech sessions, then automatically switches to the short prompt after some experience has been gained through using the system.
If a command is not spoken, the voice recognition system says a help prompt.
Prompts and Infotainment Displays
While a voice recognition session is active, there may be corresponding options showing on the displays. A selection can be made by manually touching the option, or by speaking the number for the option to select. Manual interaction in the voice recognition session is permitted. Interaction during a voice session may be completed entirely using voice commands while some manual commands may expedite a task. If a selection is made using a manual control, the voice recognition dialog will progress in the same way as if the selection were made using a voice command. Once the system completes the task, or the session is terminated, the voice recognition dialog stops. An example of this type of manual intervention is touching an entry of a displayed number list instead of speaking the number associated with the entry desired.
Canceling Voice Recognition
- Touch or say “Cancel” or “Exit” to terminate the voice recognition session and show the display where voice recognition was initiated.
- Press on the steering wheel controls to terminate the voice recognition session and show the display where voice recognition was initiated.
Natural Language Commands
Most languages do not support natural language commands in sentence form. For those languages, use direct commands like the examples shown on the display.
Helpful Hints for Speaking Commands
Voice recognition can understand commands that are naturally stated in sentence form or direct commands that state the application and the task.
For best results:
- Listen for the prompt before saying a command or reply.
- Speak the command naturally, not too fast, not too slow.
- Use direct commands without a lot of extra words. For example, “Call <name> at work,” “Play” followed by the artist or song name, or “Tune” followed by the radio station number.
- Navigation destinations can be made in a single command using keywords. A few examples are: “I want directions to an address,” “I need to find a place of interest or (POI),” or “Find contact.”
- The system responds by requesting more details. For other POIs, say the name of acategory like “Restaurants,” “Shopping Malls,” or “Hospitals.”
- Navigating to a destination outside of the current country takes more than one command. The first command is to tell the system where the navigation will take place, such as an Address, Intersection, POI, or Contact. If Address or Intersection is selected, the second command is to say, “Change Country.” Once the system responds, say the country before saying the rest of the address and/or intersection.
If POI is asked for, say “Change Location,” then “Change Country.”
Direct commands might be more clearly understood by the system. An example of a direct command would be “Call <number>.” Examples of these direct commands are displayed on most of the screens while a voice session is active. If “Phone” or “Phone Commands,” is spoken, the system understands that a phone call is requested and will respond with questions until enough details are gathered to make a call. If a cell phone number has been saved with a name and a place, the direct command should include both, for example “Call <name> at work.”
Using Voice Recognition for List Options
When a list is displayed, a voice prompt will ask to confirm or select an option from that list.
When a display contains a list, there may be options that are available but not displayed. The list on a voice recognition screen functions the same as a list on other displays. Scrolling or flinging can be used to help display other entries from the list. Manually scrolling or paging the list on a display during a voice recognition session suspends the current voice recognition event and plays the prompt “Please select manually or touch the Back icon on the infotainment display to try again.”
If manual selection takes more than 15 seconds, the session terminates and prompts that it has timed out. The display returns to the display where voice recognition was initiated The Back Command Say “Back” or touch the Back icon on the infotainment display to go to the previous menu.
If in voice recognition, and “Back” is spoken all the way back to the starting display, and then “Back” is spoken one more time, the voice recognition session will cancel.
Read all Instructions for Voice Recognition and Phone User Guide
Cadillac CT5 2023 Settings and License Agreements User Guide
Settings
Certain settings can be managed in the Online Account sites when an account is established and may be modified if other users have accessed the vehicle or created accounts. This may result in changes to the security or functionality of the infotainment system. Some settings may also be transferred to a new vehicle, if equipped. For instructions, visit your brand website. Refer to the User Terms and Privacy Statement for important details. To view, touch the Settings icon on the Home Page of the infotainment display. The settings menu may be organized into four categories. Select the desired category by touching System, Apps, Vehicle, or Personal.
To access the personalization menus:
- Touch Settings on the Home Page on the infotainment display.
- Touch the desired category to display a list of available options.
- Touch to select the desired feature setting.
- Touch the options on the infotainment display to disable or enable a feature.
- Touch z to go to the top level of the Settings menu.
System
The menu may contain the following:
Time / Date
Allows setting of the clock.
Language
Sets the display language used on the infotainment display. It may also use the selected language for voice recognition and audio feedback.
Phones
Allows connecting to a different cell phone or mobile device source, disconnecting a cell phone or media device, or delete a cell phone or media device.
Wi-Fi Networks
Shows connected and available Wi-Fi networks. If a 4G LTE data package is not active on the vehicle, the infotainment system can be connected to an external protected Wi-Fi network, such as a mobile device or home hotspot, to utilize connected services.
Wi-Fi Hotspot
Allows adjustment of different Wi-Fi features.
Privacy
Allows adjustment of the infotainment privacy settings.
Display
Allows adjustment of the infotainment display.
Sounds
Allows adjustment of the infotainment system sounds.
Voice
Allows adjustment of the infotainment voice recognition features.
Favorites
Allows adjustment of the infotainment favorite settings.
Updates
If equipped, the vehicle can download and install select software updates over a wireless connection. The system will prompt for certain updates to be downloaded and installed. There is also an option to check for updates manually. To manually check for updates, touch Settings on the Home Page and select the System tab. Go to the Vehicle Software section and touch Updates. Follow the on-screen prompts. The steps to check for, download, and install updates may vary by vehicle.
The vehicle can be used normally during the software download. Once the download is complete, there may be a prompt to accept the installation of the update upon the next ignition cycle or the next time the vehicle is shifted into P (Park). For most updates, the vehicle will be disabled and cannot be driven during the installation. The system will deliver messages indicating success or error during and after the download and installation processes.
Downloading Over-the-Air vehicle software updates requires Internet connectivity, which can be accessed through the vehicle’s built-in 4G LTE connection, if equipped and active. If required, data plans are provided by a third party. Optionally, a secure Wi-Fi hotspot such as a compatible mobile device hotspot, home hotspot, or public hotspot can be used. Applicable data rates may apply.
To connect the infotainment system to a secured mobile device hotspot, home hotspot, or public hotspot, touch Settings on the Home Page, and select the System tab, followed by Wi-Fi Networks. Select the appropriate Wi-Fi network, and follow the on-screen prompts. Download speeds
may vary. On most compatible mobile devices, activation of the Wi-Fi hotspot is in the Settings menu under Mobile Network Sharing, Personal Hotspot, Mobile Hotspot, or similar. Availability of Over-the-Air software updates varies by vehicle and country. Features are subject to change. For more information on this feature, see Online Account 0 380 for details.
Preferences
Allows the infotainment system to disable or enable the download of new updates in the background.
About
Shows the infotainment system software information.
Running Applications
Shows a complete list of applications that are currently running on the infotainment system.
Return to Factory Settings
Allows resetting the infotainment system settings in the vehicle.
Apps
The menu may contain the following:
Android Auto
Allows interacting directly with a mobile device on the infotainment display. See Apple CarPlay and Android Auto 0 158.
Apple CarPlay
This feature allows you to interact directly with your mobile device on the infotainment display. See Apple CarPlay and Android Auto 0 158.
Apps
Shows app settings and information.
Audio
Adjusts different audio settings.
Climate
Adjusts different climate settings.
Navigation
Adjusts different navigation settings. See Using the Navigation System 0 141.
Phone
Adjusts different phone settings.
SiriusXM
Adjusts different features.
Vehicle
The menu may contain the following:
Rear Seat Reminder
Allows for a chime and a message when the rear door has been opened before or during the operation of the vehicle.
Buckle to Drive
This feature can prevent shifting out of Park when the driver, and if applicable the front passenger, the seat belt is not buckled. See Buckle To Drive 044.
Driver Mode Customization
See “Driver Mode Customization” in Driver Mode Control 0 227.
Read all Instructions for Settings and License Agreements User Guide
Cadillac CT5 2023 Climate Controls User Guide
Window Defogger: 2023 Cadillac CT5 Climate Controls Features & Instruction
Climate Control Systems
Dual Automatic Climate Control System
The climate control buttons on the center stack and on the climate control display are used to adjust the heating, cooling, and ventilation.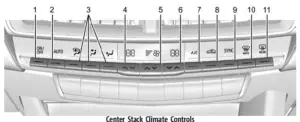
- ON/OFF (Power)
- AUTO (Automatic Operation)
- Air Delivery Mode Control
- Driver Temperature Controls
- Fan Control
- Passenger Temperature Controls
- A/C (Air Conditioning)
- Recirculation
- SYNC (Synchronized Temperature)
- Defrost
- Rear Window Defogger
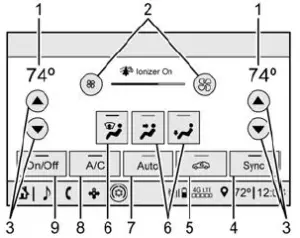
Climate Control Display
- Driver and Passenger Temperature Displays
- Fan Control
- Driver and Passenger Temperature Controls
- Sync (Synchronized Temperature)
- Recirculation
- Air Delivery Mode Control
- Auto (Automatic Operation)
- A/C (Air Conditioning)
- On/Off (Power)
The fan, air delivery mode, air conditioning, driver and passenger temperatures, recirculation, and Sync settings can be controlled by touching CLIMATE on the infotainment Home Page or the climate button in the climate control display application tray. A selection can then be made on the front climate control page displayed. See the infotainment manual.
Climate Control Status Display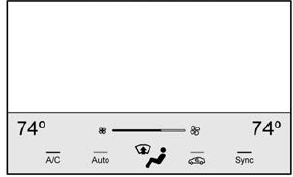
The climate control status display appears briefly when the center stack climate controls are adjusted.
Climate Control Influence on Fuel Economy
The climate control system depends on other vehicle systems for heat and power input. Certain climate control settings can lead to higher fuel usage.
The following climate control settings use more fuel:
- MAX air conditioning mode
- Defrost mode
- Extreme temperature settings, such as 15° C (60° F) or 32° C (90° F)
- High fan speed settings To help reduce fuel usage:
- Use the full automatic control as described under “Automatic Operation.”
- Select a temperature setting that is higher in hot weather and lower in cold weather.
- Turn off the air conditioning when it is not needed.
- Only use defrost to clear the windows.
Automatic Operation
To place the system in automatic mode:
- Press AUTO.
- Set the driver and passenger temperature. To find your comfort setting, start with 22 °C (72 °F) and allow the system time to stabilize. Then adjust the temperature as needed for the best comfort.
To improve fuel efficiency and to cool the vehicle faster, recirculation may be automatically selected in warm weather. The recirculation light will not come on when automatically controlled. Press @to manually select recirculation; press it again to select outside air. Do not cover the solar sensor on the top of the instrument panel near the windshield. This sensor regulates air temperature based on sun load. See “Sensors” later in this section.
Manual Operation
ON/OFF: Press to turn the climate control system on or off. When the system is off, outside air will be prevented from entering the vehicle. When the system is on, a button is pressed, or the knob is turned, the climate control system will turn on and deliver airflow per the current setting. Q 9 R: Press the fan controls on the center stack or the climate control display to increase or decrease the fan speed. Press and hold the controls to adjust speed more quickly.
Press AUTO to return to automatic operation.
Driver and Passenger Temperature Control:
The temperature can be adjusted separately for the driver and the passenger. Press w / x to increase or decrease the temperature. SYNC: Press to link the passenger and rear climate temperature settings, if equipped, to the driver setting. The SYNC indicator light will turn on. When the passenger or rear climate temperature settings are adjusted, the SYNC indicator light is off. The driver-side or passenger-side temperature display shows the temperature setting increasing or decreasing.
Air Delivery Mode Control:
Press Y,[, or z to change the direction of the airflow. An indicator light comes on in the selected mode button. All three buttons or any combination of the three buttons can be used to select the air delivery mode. Changing the mode cancels the automatic operation and the system goes into manual mode. Press AUTO to return to automatic operation.
z: This mode clears the windows of fog or moisture. Air is directed to the windshield, outboard panel outlets, and side window vents. The system automatically forces outside air into the vehicle and the air conditioning compressor will run, unless the outside temperature is close to freezing.
Y: Air is directed to the instrument panel outlets. Air is directed to the floor outlets, with some to the windshield, side window outlets, outboard panel outlets, and second-row floor outlets.
Read all Instructions for Climate Controls User Guide
Cadillac CT5 2023 Driving Information User Guide
Driving Information
Driving for Better Fuel Economy
Driving habits can affect fuel mileage. Here are some driving tips to get the best fuel economy possible.
- Set the climate controls to the desired temperature after the engine is started or turn them off when not required.
- On AWD vehicles, see Driver Mode Control 0 220.
- Avoid fast starts and accelerate smoothly.
- Brake gradually and avoid abrupt stops.
- Avoid idling the engine for long periods of time.
- When road and weather conditions are appropriate, use cruise control.
- Always follow posted speed limits or drive more slowly when conditions require.
- Keep vehicle tires properly inflated.
- Combine several trips into a single trip.
- Replace the vehicle’s tires with the same TPC Spec number molded into the tire’s sidewall near the size.
- Follow recommended scheduled maintenance.
Distracted Driving
Distraction comes in many forms and can take your focus from the task of driving. Exercise good judgment and do not let other activities divert your attention away from the road. Many local governments have enacted laws regarding driver distraction. Become familiar with the local laws in your area.
To avoid distracted driving, keep your eyes on the road, keep your hands on the steering wheel, and focus your attention on driving.
- Do not use a phone in demanding driving situations. Use a hands-free method to place or receive necessary phone calls.
- Watch the road. Do not read, take notes, or look up information on phones or other electronic devices.
- Designate a front-seat passenger to handle potential distractions.
- Become familiar with vehicle features before driving, such as programming favorite radio stations and adjusting climate control and seat settings. Program all trip information into any navigation device prior to driving.
- Wait until the vehicle is parked to retrieve items that have fallen to the floor.
- Stop or park the vehicle to tend to children.
- Keep pets in an appropriate carrier or restraint.
- Avoid stressful conversations while driving, whether with a passenger or on a cell phone.
Warning
Taking your eyes off the road too long or too often could cause a crash resulting in injury or death. Focus your attention on driving. Refer to the infotainment section for more information on using that system and the navigation system, if equipped, including pairing and using a cell phone.
Defensive Driving
Defensive driving means “always expect the unexpected.” The first step in driving defensively is to wear the seat belt. See Seat Belts 0 47.
- Assume that other road users (pedestrians, bicyclists, and other drivers) re going to be careless and make mistakes. Anticipate what they may do and be ready.
- Allow enough following distance between you and the driver in front of you.
- Focus on the task of driving.
Impaired Driving
Death and injury associated with impaired driving is a global tragedy.
Warning
Drinking alcohol or taking drugs and then driving is very dangerous. Your reflexes, perceptions, attentiveness, and judgment can be affected by even a small amount of alcohol or drugs. You can have a serious — or even fatal — collision if you drive after drinking or taking drugs. Do not drive while under the influence of alcohol or drugs, or ride with a driver who has been drinking or is impaired by drugs. Find alternate transportation home; or if you are with a group, designate a driver who will remain sober
Control of a Vehicle
Braking, steering, and accelerating are important factors in helping to control a vehicle while driving.
Braking
Braking action involves perception time and reaction time. Deciding to push the brake pedal is perception time. Actually doing it is reaction time. The average driver reaction time is about three-quarters of a second. In that time, a vehicle moving at 100 km/h (60 mph) travels 20 m (66 ft), which could be a lot of distance in an emergency.
Helpful braking tips to keep in mind include:
- Keep enough distance between you and the vehicle in front of you.
- Avoid needless heavy braking.
- Keep pace with traffic.
If the engine ever stops while the vehicle is being driven, brake normally but do not pump the brakes. Doing so could make the pedal harder to push down. If the engine stops, there will be some power brake assist but it will be used when the brake is applied. Once the power assist is used up, it can take longer to stop and the brake pedal will be harder to push.
Steering
Caution
To avoid damage to the steering system, do not drive over curbs, parking barriers, or similar objects at speeds greater than 3 km/h (1 mph). Use care when driving over other objects such as lane dividers and speed bumps. Damage caused by misuse of the vehicle is not covered by the vehicle warranty.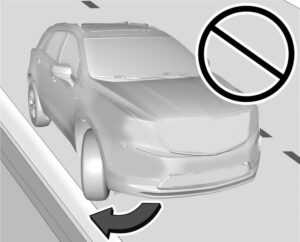
Electric Power Steering
The vehicle is equipped with an electric power steering system, which reduces the amount of effort needed to steer the vehicle. It does not have power steering fluid. Regular maintenance is not required. If the vehicle experiences a system malfunction and loses power steering, greater steering effort may be required.
Power steering assist also may be reduced if you turn the steering wheel as far as it can turn and hold it there with force for a extended period of time.
See your dealer if there is a problem.
Curve Tips
- Take curves at a reasonable speed.
- Reduce speed before entering a curve.
- Maintain a reasonable steady speed through the curve.
- Wait until the vehicle is out of the curve before accelerating gently into the straightaway.
Read all Instructions for Driving Information User Guide
Cadillac CT5 2023 Starting and Operating User Guide
Starting and Operating
New Vehicle Break-In
Caution
Follow these recommended guidelines during the first 2 414 km (1,500 mi) of driving this vehicle. Parts have a break-in period and performance will be better in the long run.
- Avoid full-throttle starts and abrupt stops.
- Do not exceed 4000 engine rpm.
- Avoid driving at any one constant speed, fast or slow.
- Do not drive above 129 km/h (80 mph).
- Avoid downshifting to brake or slow the vehicle when the engine speed will exceed 4000 rpm.
- Do not let the engine labor. Never lug the engine in high gear at low speeds. With a manual transmission, shift to the next lower gear. This rule applies at all times, not just during the break-in period.
- Do not participate in racing events, sport driving schools, or similar activities during this break-in period.
- Check engine oil with every refueling and add if necessary. Oil and fuel consumption may be higher than normal during the first 2 414 km (1,500 mi).
- To break in new tires, drive at moderate speeds and avoid hard cornering for the first 322 km (200 mi).
- New tires do not have maximum traction and may tend to slip.
- New brake linings also need a break-in period. Avoid making hard stops during the first 322 km (200 mi). This is recommended every time brake linings are replaced.
- Should the vehicle be used for racing or competitive driving (after the break-in), the rear axle lubricant must be replaced beforehand.
See Track Events and Competitive Driving (V-Series and V-Series Black wing) 0 191.
On new vehicles, the various mechanical and electrical systems experience a “break-in” period during the first 6,400 km (4,000 miles) of routine driving. As the vehicle is driven, the mechanical systems adjust to provide optimal fuel economy and transmission shift performance. Electrical systems will adapt and calibrate during the break-in period. A one-time occurrence of clicks and similar vehicle noises is normal during this process. Normal driving charges the vehicle’s battery to achieve the best operation of the vehicle, including fuel economy.
Composite Materials
This vehicle may be equipped with parts containing carbon fiber, sheet-molding compound, or other composite materials. Dealer-installed accessories may also contain composite materials.
Warning
Exposed edges of parts containing carbon fiber and other composite materials can be sharp. Contact with these parts could result in injury. Use caution to avoid
Warning
contacting these parts, including when washing the vehicle. If the parts are damaged, replace the parts promptly with replacements from your dealer.
Warning
Rocker extensions may break under pressure, resulting in property damage or injury. Do not stand on the rocker extension or use it as a step.
Warning
Rear-end spoilers may break under pressure, resulting in property damage or injury. Do not push the vehicle by the spoiler or use the spoiler as a handle.
Ignition Positions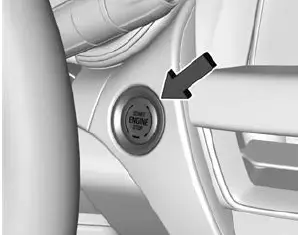
The vehicle has an electronic keyless ignition with a pushbutton start. The Remote Key must be in the vehicle for the system to operate. If the pushbutton start is not working, the vehicle may be near a strong radio antenna signal causing interference to the Keyless Access system. See Remote Key Operation 0 7. To shift out of P (Park), the vehicle must be on and the brake pedal must be applied.
Stopping the Engine/OFF (No Indicator
Lights) : When the vehicle is stopped, press ENGINE START/STOP once to turn the engine off. If the vehicle is in P (Park), the ignition will turn off, and Retained Accessory Power (RAP) will remain active. See Retained Accessory Power (RAP) 0 212. If the vehicle has an automatic transmission and is not in P (Park), the ignition will return to accessory mode and display a message in the Driver Information Center (DIC). When the vehicle is shifted into P (Park), the ignition system will turn OFF. If the vehicle has a manual transmission and is stationary, the ignition will turn off, and Retained Accessory Power (RAP) will remain active. See Retained Accessory Power (RAP) 0 212. The vehicle may have an electric steering column lock. The lock is activated when the vehicle is switched to OFF and the driver’s door is opened. A sound may be heard as the lock actuates or releases. The steering column lock may not release with the wheels turned off center. If this happens, the vehicle may not start. Move the steering wheel from left to right while attempting to start the vehicle. If this does not work, the vehicle needs service. Do not turn the engine off when the vehicle is moving. This will cause a loss of power assist in the brake and steering systems and disable the airbags.
If the vehicle must be shut off in an emergency:
- Brake using firm and steady pressure. Do not pump the brakes repeatedly. This may deplete power assist, requiring increased brake pedal force.
- Shift the vehicle to N (Neutral). This can be done while the vehicle is moving. After shifting to N (Neutral), firmly apply the brakes and steer the vehicle to a safe location.
- Come to a complete stop. Shift to P (Park) with an automatic transmission, or Neutral with a manual transmission. Turn the ignition off.
- Set the parking brake. See Electric Parking Brake 0 223.
Warning
Turning off the vehicle while moving may cause loss of power assist in the brake and steering systems and disable the airbags. While driving, only shut the vehicle off in an emergency. If the vehicle cannot be pulled over and must be shut off while driving, press and hold ENGINE START/STOP for longer than two seconds, or press twice within five seconds.
Accessory Mode (Amber Indicator Light):
This mode allows the use of some electrical accessories when the engine is off. With the ignition off, pressing the button once without the brake pedal applied will place the ignition system in accessory mode. The ignition will switch from accessory mode to OFF after five minutes to prevent battery rundown.
ON/RUN/START (Green Indicator Light) :
This mode is for driving and starting. With the ignition off, and the brake pedal applied, pressing the button once will place the ignition system in ON/RUN/START. Once engine cranking begins, release the button. Engine cranking will continue until the engine starts. See Starting the Engine 0 209. The ignition will then remain on.
Read all instructions for Starting and Operating User Guide
Cadillac CT5 2023 Engine Exhaust and Brakes User Guide
Engine Exhaust
Warning
Engine exhaust contains carbon monoxide (CO), which cannot be seen or smelled. Exposure to CO can cause unconsciousness and even death.
Exhaust may enter the vehicle if:
- The vehicle idles in areas with poor ventilation (parking garages, tunnels, deep snow that may block underbody airflow or tail pipes).
- The exhaust smells or sounds strange or different.
- The exhaust system leaks due to corrosion or damage.
- The vehicle exhaust system has been modified, damaged, or improperly repaired.
- There are holes or openings in the vehicle body from damage or aftermarket modifications that are not completely sealed.
If unusual fumes are detected or if it is suspected that exhaust is coming into the vehicle:
- Drive it only with the windows completely down.
- Have the vehicle repaired immediately?
Never park the vehicle with the engine running in an enclosed area such as a garage or a building that has no fresh air ventilation.
Running the Vehicle While Parked
It is better not to park with the engine running. If the vehicle is left with the engine running, follow the proper steps to be sure the vehicle will not move. See Shifting Into Park 0 209 and Engine Exhaust 0 214. If the vehicle is left with the engine running, follow the proper steps to be sure the vehicle will not move. See Shifting Into Park (Mechanical Shifter) 0 206 or Shifting Into Park (Electronic Shifter) 0 206 and Electric Parking Brake 283.
Automatic Transmission
Automatic Transmission (Mechanical Shifter)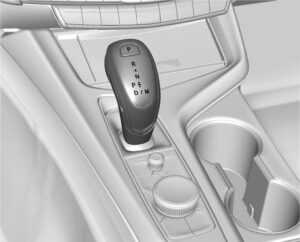
The shift pattern is displayed in the top of the shift lever. The selected gear position will illuminate red on the shift lever, while all others will be displayed in white. If the shift is not immediate, as in very cold conditions, the indicator on the shift lever may flash until it is fully engaged.
The shift lever always starts from a center position, represented by an up/down arrow on the shift pattern. After releasing the shift lever, it will return to the center position.
The transmission does not operate when the vehicle is off. If the vehicle is in accessory mode, the transmission can be shifted into P (Park).
If the vehicle is turned off while at a relatively high vehicle speed, the transmission will automatically shift to N (Neutral). Once the vehicle is stopped, it can be shifted into P (Park).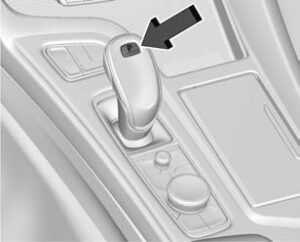
There are several different positions for the shift lever.
P : This position locks the drive wheels. Use P (Park) when starting the vehicle to ensure the vehicle does not move.
Warning
It is dangerous to get out of the vehicle if the shift lever is not fully in P (Park) with the parking brake firmly set. The vehicle can roll.
Do not leave the vehicle when the engine is running unless you have to. If you have left the engine running, the vehicle can move suddenly. You or others could be injured. To be sure the vehicle will not move, even when you are on fairly level ground, always set the parking brake and move the shift lever to P (Park). See Shifting Into Park (Mechanical Shifter) 0 206 or Shifting Into Park (Electronic Shifter) 0 212. If you are pulling a trailer, see Driving Characteristics and Towing Tips 0 223.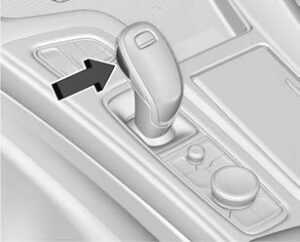
This vehicle is equipped with an electronically controlled transmission. The shift lock release button is designed to prevent inadvertent shifting out of P (Park) unless the ignition is on, the brake pedal is applied, and the shift lock release button is pressed. When the vehicle is stopped, press ENGINE START/STOP to turn off the vehicle. The transmission will shift to P (Park) automatically unless the vehicle is in N (Neutral), See “Car Wash Mode” following. The vehicle will not shift into P (Park) if it is moving too fast. Stop the vehicle and shift into P (Park).
To shift in and out of P (Park), see Shifting
Into Park 0 212 and Shifting out of Park 0 213
Make sure the shift lever is fully in P (Park)before starting the engine. The vehicle has an electronic shift lock release system. Fully apply the regular brakes first and then press the shift lever button before shifting from P (Park) when the ignition is on. If you cannot shift out of P (Park), ease pressure on the shift lever and push the shift lever all the way into P (Park) as you maintain brake application. Then press the shift lever button and move the shift lever into another gear. See Shifting out of Park (Mechanical Shifter) 0 207 or Shifting out of Park (Electronic Shifter) 0 208.
Service Shift Lever Message
If the message SERVICE SHIFTER SEE OWNER’S MANUAL appears in the Driver Information Center (DIC), the shift lever needs service. Has the vehicle serviced as soon as possible? If the vehicle is automatically shifting into P (Park), check to
see if the P (Park) button on top of the shift lever is stuck. To operate the vehicle, hold the shift lever in the desired gear, R (Reverse) or D (Drive), until vehicle speed exceeds 15 km/h (10 mph), then release the shift lever.
R: Use this gear to back up.
If the vehicle is shifted from either R (Reverse) to D (Drive) or M (Manual Mode), or M (Manual Mode) or D (Drive) to R (Reverse) while the speed is too high, the vehicle will shift to N (Neutral). Reduce the vehicle speed and try the shift again.
Read all Instructions for Engine Exhaust and Brakes User Guide
Cadillac CT5 2023 Ride Control User Guide
Ride Control Systems
Traction Control/Electronic Stability Control System Operation
The vehicle has a Traction Control System (TCS) and StabiliTrak/Electronic Stability Control (ESC), an electronic stability control system. These systems help limit wheel spin and assist the driver in maintaining control, especially on slippery road conditions.
TCS activates if it senses that any of the drive wheels are spinning or beginning to lose traction. When this happens, TCS applies the brakes to the spinning wheels and reduces engine power to limit wheel spin. StabiliTrak/ESC activates when the vehicle senses a difference between the intended path and the direction the vehicle is actually traveling. StabiliTrak/ESC selectively applies braking pressure to any one of the vehicle wheel brakes to assist the driver in keeping the vehicle on the intended path.
If cruise control is being used and TCS or StabiliTrak/ESC begins to limit wheel spin, cruise control will disengage. Cruise control may be turned back on when road conditions allow. TCS and StabiliTrak/ESC will automatically turn on when cruise control is set. Both systems come on automatically when the vehicle is started and begins to move. The systems may be heard or felt while they are operating or while performing diagnostic checks. This is normal and does not mean there is a problem with the vehicle.
It is recommended to leave both systems on for normal driving conditions, but it may be necessary to turn TCS off if the vehicle gets stuck in sand, mud, ice, or snow. See If the Vehicle Is Stuck 0 200 and “Turning the Systems Off and On” later in this section.
The indicator light for both systems is in the instrument cluster. This light will.
- Will flash when TCS is limiting wheel spin
- Will flash when StabiliTrak/ESC is activated
- Will turn on and stay on when either system is not working
- May flash when ABS is active
If either system fails to turn on or to activate, a message may display in the Driver Information Center (DIC), and d comes on and stays on to indicate that the system is inactive and is not assisting the driver in maintaining control. The vehicle is safe to drive, but driving should be adjusted accordingly.
If d comes on and stays on:
- Stop the vehicles .
- Turn the engine off and wait 15
- Start the engine.
- Drive the vehicle.
If d comes on and stays on, the vehicle may need more time to diagnose the problem. If the condition persists, see your dealer.
Turning the Systems Off and On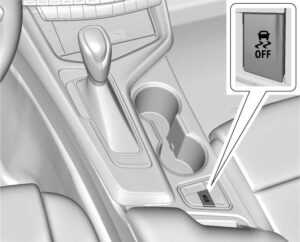
Caution
Do not repeatedly brake or accelerate heavily when TCS is off. The vehicle driveline could be damaged. To turn off only TCS, press and release g. The Traction Off light i displays in the instrument cluster and a DIC message may display. To turn TCS on again, press and release g. The Traction Off light i displayed in the instrument cluster will turn off.
If TCS is limiting wheel spin when g is pressed, the system will not turn off until the wheels stop spinning. To turn off both TCS and StabiliTrak/ESC, press and hold g until the Traction Off light i and StabiliTrak/ESC OFF light g come on and stay on in the instrument cluster. A DIC message may display. To turn TCS and StabiliTrak/ESC on again, press and release g. The Traction Off light i and StabiliTrak/ESC OFF light g in the instrument cluster turn off. StabiliTrak will automatically turn on if the vehicle exceeds 56 km/h (35 mph). Traction control will remain off. Adding accessories can affect the vehicle’s performance. See Accessories and Modifications 0 291.
Driver Mode Control
Driver Mode Control (DMC) allows the driver to adjust the overall driving experience to better suit driver preference by adjusting vehicle systems to fit specific driving needs. Drive mode availability and affected vehicle systems are dependent on vehicle trim level, region, and optional features.
If the vehicle is in Tour Mode or My Mode, it will stay in that mode through future ignition cycles. If the vehicle is in any other mode, it will return to Tour Mode when the vehicle is restarted. When a mode is selected, an indicator will come on in the instrument cluster and stay on.
Mode Activation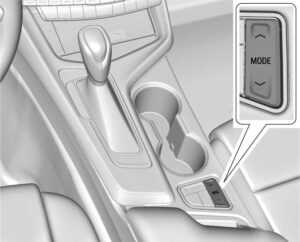
Driver Mode Control Switch for Automatic Transmission
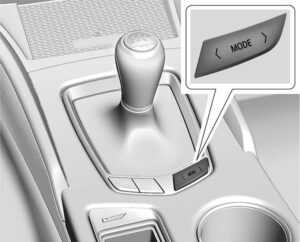
Driver Mode Control Switch for Manual Transmission
To activate, press the MODE switch on the center console. Use the up and down arrows to move through the menu.
V-Mode Switch (Variant 1)
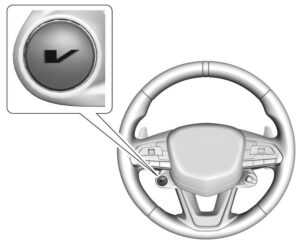
V-Mode Switch (Variant 2)
Depending on trim level, the V-Mode switch may be located on the right side or left side of the steering wheel. To activate V-Mode, press the V-Mode switch on the steering wheel. To deactivate, select a different mode using the DMC switch, or press the V-Mode switch again.
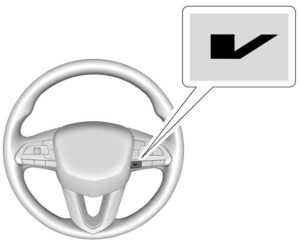
Performance Traction Management (PTM) Switch If equipped, activate PTM by pressing the PTM switch on the steering wheel.
A PTM menu will appear in the Driver Information Center (DIC). Press up or down on the PTM switch to scroll through the options and make a selection. To exit PTM, select INACTIVE in the PTM menu.
Read all Instructions for Ride Control User Guide
Cadillac CT5 2023 Driver Assistance User Guide
Driver Assistance Systems
This vehicle may have features that work together to help avoid crashes or reduce crash damage while driving, backing, and parking. Read this entire section before using these systems
Warning
Do not rely on the Driver Assistance Systems. These systems do not replace the need for paying attention and driving safely. You may not hear or feel alerts or warnings provided by these systems. Failure to use proper care when driving may result in injury, death, or vehicle damage. See Defensive Driving 0 192.
Under many conditions, these systems will not:
- Detect children, pedestrians, bicyclists, or animals.
- Detect vehicles or objects outside the area monitored by the system.
- Work at all driving speeds.
- Warn you or provide you with enough time to avoid a crash.
- Work under poor visibility or bad weather conditions.
- Work if the detection sensor is not cleaned or is covered by ice, snow, mud, or dirt
- Work if the detection sensor is covered up, such as with a sticker, magnet, or metal plate.
- Work if the detection sensor viewing zone is interrupted by an installed accessory, such as a bike rack, or hitch-mounted cargo carrier.
- Work if the area surrounding the detection sensor is damaged or not properly repaired.
Complete attention is always required while driving, and you should be ready to take action and apply the brakes and/or steer the vehicle to avoid crashes.
Audible or Safety Alert Seat
Some driver assistance features alert the driver of obstacles by beeping. To view available settings for this feature, touch the Settings icon on the infotainment home page. Select “Vehicle” to display the list of available options and select “Comfort and Convenience”.
If equipped with the Safety Alert Seat, the driver seat cushion may provide a vibrating pulse alert instead of beeping. To view available settings for this feature, touch the Settings icon on the infotainment home page. Select “Vehicle” to display the list of available options and select “Collision/Detection Systems”.
Cleaning
Depending on vehicle options, keep these areas of the vehicle clean to ensure the best driver assistance feature performance. Driver Information Center (DIC) messages may display when the systems are unavailable or blocked.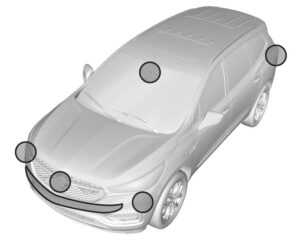
- Front and rear bumpers and the area below the bumpers
- Front grille and headlamps
- The front camera lens in the front grille or near the front emblem
- Front side and rear side panels
- Outside of the windshield in front of the rearview mirror
- The side camera lens on the bottom of the outside mirrors
- Rear side corner bumpers
- Rear Vision Camera above the license plate
Radio Frequency
This vehicle may be equipped with driver assistance systems that operate using radio frequency. See Radio Frequency Statement 0 359 or Radio Frequency Statement 386.
Assistance Systems for Parking or Backing
If equipped, the Rear Vision Camera (RVC), Surround Vision, Rear Park Assist (RPA), Front and Rear Park Assist (FRPA), and Rear Cross Traffic Alert (RCTA) may help the driver park or avoid objects. Always check around the vehicle when parking or backing.
Rear Vision Camera (RVC)
When the vehicle is shifted into R (Reverse), the Rear Vision Camera (RVC) displays an image of the area behind the vehicle in the infotainment display. The previous screen displays when the vehicle is shifted out of R (Reverse) after a short delay. To return to the previous screen sooner, press Home or Back on the infotainment system, shift into P (Park), or reach a vehicle speed of approximately 12 km/h (8 mph) while in D (Drive).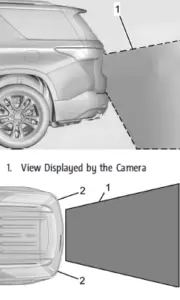
- View Displayed by the Camera
- Corners of the Rear Bumper Displayed images may be farther or closer than they appear. The area displayed is limited and objects that are close to either corner of the bumper or under the bumper do not display.
A warning triangle may appear on the infotainment display to show that Rear Park Assist (RPA) or Rear Cross Traffic Alert (RCTA) has detected an object. This triangle changes from amber to red and increases in size the closer the object.
Warning
The camera(s) do not display children, pedestrians, bicyclists, crossing traffic, animals, or any other object outside of the cameras’ field of view, below the bumper, or under the vehicle. Shown distances may be different from actual distances. Do not drive or park the vehicle using only these camera(s). Always check behind and around the vehicle before driving. Failure to use proper care may result in injury, death, or vehicle damage.
Surround Vision System
If equipped, Surround Vision shows an image of the area surrounding the vehicle, along with the front or rear camera views on the infotainment display. The front camera is in the grille or near the front emblem, the side cameras are on the bottom of the outside mirrors, and the rear camera is above the license plate.
The Surround Vision system can be accessed by selecting CAMERA in the infotainment display or when the vehicle is shifted into R (Reverse). To return to the previous screen sooner, when not in R (Reverse) press Home or Back on the infotainment system, shift into P (Park), or reach a vehicle speed of approximately 12 km/h (8 mph) while in D (Drive).
Warning
The Surround Vision cameras have blind spots and will not display all objects near the corners of the vehicle. Folding outside mirrors that are out of position may not display the surround view correctly. Always check around the vehicle when parking or backing.
- Views Displayed by the Surround Vision Cameras
- Area Not Shown
Warning
The camera(s) do not display children, pedestrians, bicyclists, crossing traffic, animals, or any other object outside of the cameras’ field of view, below the bumper, or under the vehicle. Shown distances may be different from actual distances. Do not drive or park the vehicle using only these camera(s). Always check behind and around the vehicle before driving. Failure to use proper care may result in injury, death, or vehicle damage.
Camera Views
Read all Instructions for Driver Assistance User Guide
Cadillac CT5 2023 Fuel, Conversions and Add-Ons User Guide
2023 Cadillac CT5 Fuel, Conversions and Add-Ons Instructions
Fuel
Top Tier Fuel
GM recommends the use of TOP TIER Detergent Gasoline to keep the engine clean, reduce engine deposits, and maintain optimal vehicle performance. Look for the TOP TIER Logo or see www.toptiergas.com for a list of TOP TIER Detergent Gasoline marketers and applicable countries.
Recommended Fuel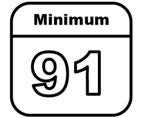
Regular unleaded gasoline meeting ASTM specification D4814 with a posted octane rating (R+M)/2 of 87 or greater is recommended. Do not use gasoline with a posted octane rating of less than 87, as this will result in reduced performance and driveability. If heavy knocking is heard when using gasoline rated at 87 or greater, the engine needs service. Do not use any fuel labeled E85 or FlexFuel. Do not use gasoline with ethanol levels greater than 15% by volume.
Prohibited Fuels
Caution
Do not use fuels with any of the following conditions; doing so may damage the vehicle and void its warranty:
- For vehicles that are not FlexFuel, fuel labeled greater than 15% ethanol by volume, such as mid-level ethanol blends (16–50% ethanol), E85, or FlexFuel.
- Fuel with any amount of methanol, methylal, ferrocene, and aniline. These fuels can corrode metal fuel system parts or damage plastic and rubber parts.
- Fuel containing metals such as methylcyclopentadienyl manganese tricarbonyl (MMT), which can damage the emissions control system and spark plugs.
- Fuel with a posted octane rating of less than the recommended fuel. Using this fuel will lower fuel economy and performance, and may decrease the life of the emissions catalyst.
Fuels in Foreign Countries
The U.S., Canada, and Mexico post fuel octane ratings in anti-knock index (AKI). For fuel not to use in a foreign country, see Prohibited Fuels 0 275.
Fuel Additives
TOP TIER Detergent Gasoline is highly recommended for use with your vehicle. If your country does not have TOP TIER Detergent Gasoline, add ACDelco Fuel System Treatment Plus−Gasoline to the vehicle’s gasoline fuel tank at every oil
change or 15 000 km (9,000 mi), whichever occurs first. TOP TIER Detergent Gasoline and ACDelco Fuel System Treatment Plus Gasoline will help keep your vehicle’s engine fuel deposit free and performing optimally.
Filling the Tank
An arrow on the fuel gauge indicates which side of the vehicle the fuel door is on. See Fuel Gauge 98.
Warning
Fuel vapors and fuel fires burn violently and can cause injury or death.
Follow these guidelines to help avoid injuries to you and others:
- Read and follow all the instructions on the fuel pump island.
- Turn off the engine when refueling.
- Keep sparks, flames, and smoking materials away from fuel.
- Do not leave the fuel pump unattended.
- Avoid using electronic devices while refueling.. Do not re-enter the vehicle while pumping fuel.
Keep children away from the fuel pump and never let children pump fuel. - Before touching the fill nozzle, touch a metallic object to discharge static electricity from your body.
- Fuel can spray out if the fill nozzle is inserted too quickly. This spray can happen if the tank is nearly full, and is more likely in hot weather. Insert the fill nozzle slowly and wait for any hiss noise to stop before beginning to flow fuel.
If equipped, the fuel door unlocks when the vehicle doors are unlocked. See Remote Key Operation 0 7.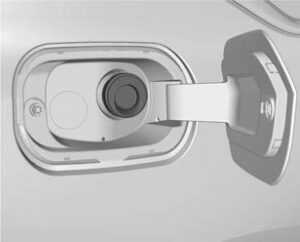
To open the fuel door, push and release the rearward center edge of the door.
The capless refueling system does not have a fuel cap. Fully insert and latch the fill nozzle, then begin fueling.
Warning
Overfilling the fuel tank by more than three clicks of a standard fill nozzle may cause:
- Vehicle performance issues, including engine stalling and damage to the fuel system
- Fuel spills.
- Under certain conditions, fuel fires.
Be careful not to spill fuel. Wait five seconds after you have finished pumping before removing the fill nozzle. Clean fuel from painted surfaces as soon as possible. See Exterior Care 0 356 Push the fuel door closed until it latches
Warning
If a fire starts while you are refueling, do not remove the fill nozzle. Shut off the flow of fuel by shutting off the pump or by notifying the station attendant. Leave the area immediately.
Filling the Tank with a Portable Fuel Container
If the vehicle runs out of fuel and must be filled from a portable fuel container: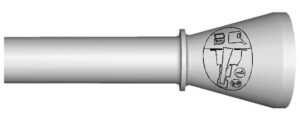
- Locate the capless funnel adapter from the rear cargo area under the load floor.
- Insert and latch the funnel into the capless fuel system.
Warning
Attempting to refuel from a portable fuel container without using the funnel adapter may cause fuel spillage and damage the capless fuel system. This could cause a fire. You or others could be badly burned and the vehicle could be damaged. - Remove and clean the funnel adapter and return it to the storage location.
Filling a Portable Fuel Container
Warning
Never fill a portable fuel container while it is in the vehicle. Static electricity discharge from the container can ignite the fuel vapor. You or others could be badly burned and the vehicle could be damaged. To help avoid injury to you and others:
Read all Instructions for Fuel, Conversions and Add-Ons User Guide
Cadillac CT5 2023 Information and Vehicle Checks User Guide
General Information
For service and parts needs, visit your dealer. You will receive genuine GM parts and GM-trained and supported service people.
Genuine GM parts have one of these marks:
California Perchlorate Materials Requirements
Certain types of automotive applications, such as airbag initiators, seat belt pretensioners, and lithium batteries contained in electronic keys, may contain perchlorate materials. Perchlorate Material special handling may apply. See www.dtsc.ca.gov/hazardouswaste/ perchlorate.
Accessories and Modifications
Adding non-dealer accessories or making Adding non-dealer accessories or making modifications to the vehicle can affect vehicle performance and safety, including such things as airbags, braking, stability, ride and handling, emissions systems, aerodynamics, durability, Driver Assistance Systems, and electronic systems like antilock brakes, traction control, and stability control. These accessories or modifications could even cause malfunction or damage not covered by the vehicle warranty.
Damage to suspension components caused by modifying vehicle height outside of factory settings will not be covered by the vehicle warranty.
Damage to vehicle components resulting from modifications or the installation or use of non-GM-certified parts, including control module or software modifications, is not covered under the terms of the vehicle warranty and may affect the remaining warranty coverage for affected parts.
GM Accessories are designed to complement and function with other systems on the vehicle. See your dealer to accessorize the vehicle using genuine GM Accessories installed by a dealer technician. Also, see Adding Equipment to the Airbag-Equipped Vehicle 0 60.
Vehicle Checks
Doing Your Own Service Work
Warning
It can be dangerous to work on your vehicle if you do not have the proper knowledge, service manual, tools, or parts. Always follow owner’s manual procedures and consult the service manual for your vehicle before doing any service work.If doing some of your own service work, use the proper service manual. It tells you much more about how to service the vehicle than this manual can. To order the proper service manual, see Publication Ordering Information 0 390.
This vehicle has an airbag system. Before attempting to do your own service work, see Servicing the Airbag-Equipped Vehicle
0 60.
If equipped with remote vehicle start, open the hood before performing any service work to prevent remote starting the vehicle
accidentally. See Remote Vehicle Start 0 12.
Keep a record with all parts receipts and list the mileage and the date of any service work performed. See Maintenance Records
0 374.
Caution
Even small amounts of contamination can because damage to vehicle systems. Do not allow contaminants to contact the fluids, reservoir caps, or dipsticks.
Hood
Warning
For vehicles with auto engine stop/start, turn the vehicle off before opening the hood. If the vehicle is on, the engine will start when the hood is opened. You or others could be injured.
Warning
Components under the hood can get hot from running the engine. To help avoid the risk of burning unprotected skin, never touch these components until they have cooled, and always use a glove or towel to avoid direct skin contact.
Clear any snow from the hood before opening.
To open the hood: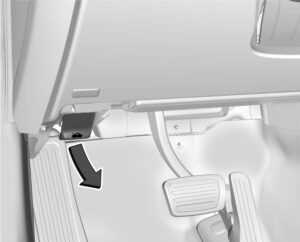
- Pull the hood release lever with the is a symbol. It is on the lower left side of the instrument panel.
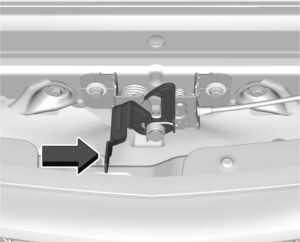 To close the hood:
 - Before closing the hood, be sure all filler caps are on properly, and all tools are removed.
- Go to the front of the vehicle and locate the secondary release lever under the front center of the hood. Push the secondary hood release lever to the right to release.
After you have partially lifted the hood, the gas strut system will automatically lift the hood and hold it in the fully open position.
To close the hood:
- Before closing the hood, be sure all filler caps are on properly, and all tools are removed.
- Pull the hood down until the strut system is no longer holding up the hood.
Lower the hood 20 cm (8 in) above the vehicle. Allow the hood to fall. Check to make sure the hood is latched completely. Repeat this process with additional force if necessary.
Warning
Do not drive the vehicle if the hood is not latched completely. The hood could open fully, block your vision, and cause a crash. You or others could be injured. Always close the hood completely before driving. The Driver Information Center (DIC) will display a message if the hood is not fully closed. Stop and turn off the vehicle, check the hood for obstructions, and close the hood again. Check to see if the message still appears on the DIC.
Read all Instructions for Information and Vehicle Checks User Guide
Cadillac CT5 2023 Headlamp and Electrical System User Guide
Electrical System: 2023 Cadillac CT5 Headlamps Features Guide
Headlamp Aiming
Front Headlamp Aiming
The headlamp aim has been preset and should need no further adjustment. If the vehicle is damaged in a crash, the headlamp aim may be affected. If adjustment to the headlamps is necessary, see your dealer.
Bulb Replacement
LED Lighting
This vehicle has LED lamps. For replacement of any LED lighting assembly, contact your dealer.
Electrical System
Electrical System Overload
The vehicle has fuses and circuit breakers to protect against an electrical system overload. When the current electrical load is too heavy, the circuit breaker opens and closes, protecting the circuit until the current load returns to normal or the problem is fixed.
This greatly reduces the chance of circuit overload and fire caused by electrical problems. Fuses and circuit breakers protect power devices in the vehicle.
If there is a problem on the road and a fuse needs to be replaced, the same amperage fuse can be borrowed. Choose some feature of the vehicle that is not needed to use and replace it as soon as possible.
To check a fuse, look at the band inside the fuse. If the band is broken or melted, replace the fuse. Be sure to replace a bad fuse with a fuse of identical size and rating.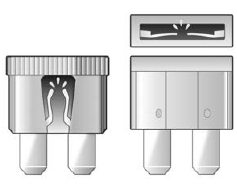
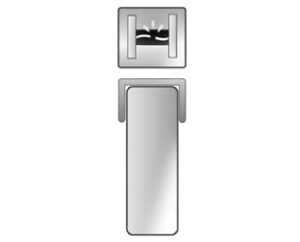
Replacing a Blown Fuse
- Turn off the vehicle.
- Locate the fuse puller in the engine compartment fuse block.

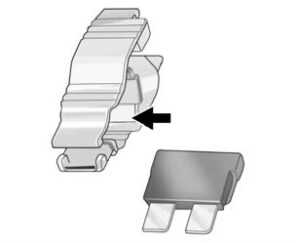
- Use the fuse puller to remove the fuse from the top or side, as shown above.
- If the fuse must be replaced immediately, borrow a replacement fuse with the same amperage from the fuse block. Choose a vehicle feature that is not needed to safely operate the vehicle. Repeat Steps 2-3.
- Insert the replacement fuse into the empty slot of the blown fuse.
At the next opportunity, see your dealer to replace the blown fuse.
Headlamp Wiring
An electrical overload may cause the lamps o go on and off, or in some cases to remain off. Has the headlamp wiring checked right away if the lamps go on and off or remain off?
Windshield Wipers
If the wiper motor overheats due to heavy snow or ice, the windshield wipers will stop until the motor cools and will then restart.
Although the circuit is protected from electrical overload, overload due to heavy snow or ice may cause wiper linkage damage. Always clear ice and heavy snow from the windshield before using the windshield wipers. If the overload is caused by an electrical problem and not snow or ice, be sure to get it fixed.
Fuses and Circuit Breakers
The wiring circuits in the vehicle are protected from short circuits by a combination of fuses and circuit breakers. This greatly reduces the chance of damage caused by electrical problems.
Danger
Fuses and circuit breakers are marked with their ampere rating. Do not exceed the specified amperage rating when replacing fuses and circuit breakers. The use of an oversized fuse or circuit breaker can result in a vehicle fire. You and others could be seriously injured or killed.
Warning
Installation or use of fuses that do not meet GM’s original fuse specifications is dangerous. The fuses could fail, and result in a fire. You or others could be injured or killed, and the vehicle could be damaged. See Accessories and Modifications 0 291 and General Information 0 291.
To check or replace a blown fuse, see Electrical System Overload 0 318.
Read all Instructions for Headlamp and Electrical System User Guide
Cadillac CT5 2023 Wheels and Tires User Guide
Wheels and Tires
Every new GM vehicle has high-quality tires made by a leading tire manufacturer. See the warranty manual for information regarding the tire warranty and where to get service. For additional information refer to the tire manufacturer.
Warning
- Poorly maintained and improperly used tires are dangerous.
- Overloading the tires can cause overheating as a result of too much flexing. There could be a blowout and a serious crash. See Vehicle Load Limits 0 203.
- Underinflated tires pose the same danger as overloaded tires. The resulting crash could cause serious injury. Check all tires frequently to maintain the recommended
pressure. Tire pressure should be checked when the tires are cold. - Overinflated tires are more likely to be cut, punctured, or broken by a sudden impact — such as when hitting a pothole. Keep tires at the recommended pressure.
- Worn or old tires can cause a crash. If the tread is badly worn, replace them.
- Replace any tires that have been damaged by impacts with potholes, curbs, etc.
- Improperly repaired tires can cause a crash. Only your dealer or an authorized tire service center should repair, replace, dismount, and mount the tires.
- Do not spin the tires in excess of 56 km/h (35 mph) on slippery surfaces such as snow, mud, ice, etc. Excessive spinning may cause the tires to explode.
See Tire Pressure for High-Speed Operation 0 335 for inflation pressure adjustment for high-speed driving.
All-Season Tires
This vehicle may come with all-season tires. These tires are designed to provide good overall performance on most road surfaces and weather conditions. Original equipment tires designed to GM’s specific tire performance criteria have a TPC specification code molded onto the sidewall. Original equipment all-season tires can be identified by the last two characters of this TPC code, which will be “MS.”
Consider installing winter tires on the vehicle if frequent driving on snow or ice-covered roads is expected. All-season tires provide adequate performance for most winter driving conditions, but they may not offer the same level of traction or performance as winter tires on snow or ice-covered roads. See Winter Tires 0 328.
Winter Tires
This vehicle was not originally equipped with winter tires. Winter tires are designed for increased traction on snow and ice-covered roads. Consider installing winter tires on the vehicle if frequent driving on ice or snow-covered roads is expected. See your dealer for details regarding winter tire availability and proper tire selection. Also, see Buying New Tires 0 342.
With winter tires, there may be decreased dry road traction, increased road noise, and shorter tread life. After changing to winter tires, be alert for changes in vehicle handling and braking.
If using winter tires:
- Use tires of the same brand and tread type on all four wheel positions.
- Use only radial ply tires of the same size, load range, and speed rating as the original equipment tires.
Winter tires with the same speed rating as the original equipment tires may not be available for H, V, W, Y, and ZR speed rated tires. If winter tires with a lower speed rating are chosen, never exceed the tire’s maximum speed capability.
Run-Flat Tires
This vehicle, when new, may have had run-flat tires. There is no spare tire, no tire changing equipment, and no place to store a tire in the vehicle
Warning
While driving with run-flat tires at a reduced inflation pressure, avoid making sudden stops or severe maneuvers as the handling capabilities of the tires will be reduced. Driving too fast could cause loss of control and you or others could be injured. Do not drive over 80 km/h (50 mph) with the tire operating at low pressure. Drive cautiously and check the tire pressure as soon as possible.
Run-flat tires can be driven up to 80 km (50 mi) at speeds less than 80 km/h (50 mph) after a loss of inflation pressure has occurred. There is no need to stop on the side of the road to change the tire. The possible driving range after a pressure loss will vary based on the vehicle load and driving conditions. As soon as possible, contact the nearest authorized GM or run-flat servicing facility for inspection and repair or replacement.
When driving on a deflated run-flat tire, avoid potholes and other road hazards that could damage the tire and/or wheel beyond repair. When a tire has been damaged, or if driven any distance while deflated, check with an authorized run-flat tire service center to determine whether the tire can be repaired or should be replaced. To maintain the run-flat feature, all replacement tires must be run-flat tires. To locate the nearest GM or run-flat servicing facility, call Customer Assistance.
Self-Sealing Tires
This vehicle may have self-sealing tires. These tires have a material inside that can seal punctures from common road hazards, such as nails and screws, in the tread area. The tire may lose air pressure if the sidewall is damaged or the tread puncture is too large. If the Tire Pressure Monitor System indicates the tire pressure is low, inspect the tire for damage and inflate it to the recommended pressure. If the tire is unable to maintain the recommended pressure, contact the nearest authorized GM servicing facility immediately for inspection and repair or replacement. To locate the nearest GM servicing facility, call. GM Customer Assistance.
Caution
Do not drive on a deflated self-sealing tire as this could damage the tire. Make sure the tire is inflated to the recommended pressure or have it immediately repaired or replaced.
When tire replacement is needed replace with a self-sealing tire, because the vehicle does not come with a spare tire or tire changing equipment.
Noise Reducing Tires (V-Series Blackwing Only)
This vehicle may be equipped with tires that have noise-absorbing foam technology to reduce road and interior noise levels.
To maintain overall vehicle performance, replace damaged or worn tires with Tire
Performance Criteria Specification (TPC Spec) original equipment tires equipped with noise-absorbing foam. See Buying New Tires 0 342.
Low-Profile Tires
If the vehicle has 225/45R17 91V, 235/40R18 91V, 235/40R18 XL 95Y, or 235/35R19 XL 91V, 255/35ZR18 (94Y), or 275/35ZR18 (99Y) size tires, they are classified as low-profile tires.
Caution
Low-profile tires are more susceptible to damage from road hazards or curb impact than standard-profile tires. Tire and/or wheel assembly damage can occur when coming into contact with road hazards like potholes, or sharp-edged objects, or when sliding into a curb. The warranty does not cover this type of damage. Keep tires set to the correct inflation pressure and when possible, avoid contact with curbs, potholes, and other road hazards.
Read all Instructions for Wheels and Tires User Guide
Cadillac CT5 2023 Jump Starting and Towing User Guide
Jump Starting
Jump Starting – North America
For more information about the vehicle battery, see Battery – North America 0 215. If the battery has run down, try to use another vehicle and some jumper cables to start your vehicle. Be sure to use the following steps to do it safely.
WARNING: Battery posts, terminals and related accessories can expose you to chemicals including lead and lead compounds, which are known to the State of California to cause cancer and birth defects or other reproductive harm. Wash hands after handling. For more information go to www.P65Warnings.ca.gov.
See California Proposition 65 Warning 0 1.
Warning
Batteries can hurt you. They can be dangerous because:
- They contain acid that can burn you.
- They contain gas that can explode or ignite.
- They contain enough electricity to burn you.
If you do not follow these steps exactly, some or all of these things can hurt you.
Caution
Ignoring these steps could result in costly damage to the vehicle that would not be covered by the vehicle warranty. Trying to start the vehicle by pushing or pulling it will not work, and it could damage the vehicle.
Caution
If the jumper cables are connected or removed in the wrong order, electrical shorting may occur and damage the vehicle. The repairs would not be covered by the vehicle warranty. Always connect and remove the jumper cables in the correct order, making sure that the cables do not touch each other or other metal.
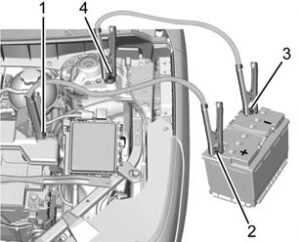
2.0L L4 Engine Shown, 3.6L V6 Engine and 2.7L L4 Engine Similar
Connection Points and Sequence
- Discharged Battery Positive (+) Terminal
- Good Battery Positive (+) Terminal
- Good Battery Negative (−) Terminal
- Discharged Battery Remote Negative (−) Terminal
The discharged battery positive (+) terminal and the discharged battery remote negative (–) terminal are on the driver’s side of the vehicle.
The good battery negative (–) terminal and the good battery positive (+) terminal are on the battery of the vehicle providing the jump start.
- Check the other vehicle. It must have a 12-volt battery with a negative ground system. the other vehicle does not have a 12-volt system with a negative ground, both vehicles can be damaged. Only use a vehicle that has a 12-volt system with a negative ground for jump starting.
- Position the two vehicles so that they are not touching.
- Set the parking brake firmly and put the shift lever in P (Park) with an automatic transmission, or Neutral with a manual transmission
Caution
If any accessories are left on or plugged in during the jump-starting procedure, they could be damaged. The repairs would not be covered by the vehicle warranty. Whenever possible, turn off or unplug all accessories on either vehicle when jump starting. - Turn the ignition off. Turn off all lights and accessories in both vehicles, except the hazard warning flashers if needed.
Warning
An electric fan can start up even when the engine is not running and can injure you. Keep hands, clothing, and tools away from any underhood electric fan.
Warning
Using a match near a battery can cause battery gas to explode. People have been hurt doing this, and some have been blinded. Use a flashlight if you need more light. Battery fluid contains acid that can burn you. Do not get it on you. If you accidentally get it in your eyes or on your skin, flush the place with water and get medical help immediately.
Warning
Fans or other moving engine parts can injure you badly. Keep your hands away from moving parts once the engine is running. - Connect one end of the red positive (+) cable to the positive (+) terminal on the discharged battery.
- Connect the other end of the red positive (+) cable to the positive (+) terminal of the good battery.
- Connect one end of the black negative (–) cable to the negative (–) terminal of the good battery.
- Connect the other end of the black negative (–) cable to the remote negative (–) terminal on the driver-side shock tower for the discharged battery.
- Start the engine in the vehicle with a good battery and run the engine at idle speed for at least four minutes.
- Try to start the vehicle that had a dead battery. If it will not start after a few tries, it probably needs service.
Jumper Cable Removal
Reverse the sequence exactly when removing the jumper cables. After starting the disabled vehicle and removing the jumper cables, allow it to idle for several minutes.
Read all Instructions for Jump Starting and Towing User Guide
Cadillac CT5 2023 Appearance Care User Guide
Appearance Care
Exterior Care
Locks
Locks are lubricated at the factory. Use a de-icing agent only when absolutely necessary, and have the locks greased after using. See Recommended Fluids and Lubricants 0 371.
Washing the Vehicle
To preserve the vehicle’s finish, wash it often and out of direct sunlight.
Caution
Do not use petroleum-based, acidic, or abrasive cleaning agents as they can damage the vehicle’s paint, metal, or plastic parts. If damage occurs, it would not be covered by the vehicle warranty. Approved cleaning products can be obtained from your dealer. Follow all manufacturer directions regarding correct product usage, necessary safety precautions, and appropriate disposal of any vehicle care product.
Caution
Avoid using high-pressure washes closer than 30 cm (12 in) to the surface of the vehicle. Use of power washers exceeding 8 274 kPa (1,200 psi) can result in damage or removal of paint and decals.
Automatic Car Wash
Caution
Automatic car washes can cause damage to the vehicle, wheels, ground effects, and convertible top (if equipped).
Do not use automatic car washes due to lack of clearance for the undercarriage, wide rear tires, and wheels.
Caution
To avoid damage to a matte paint finish, do not use an automatic car wash equipped with brushes or scrubbers. Only use touchless automatic car washes.
If using an automatic car wash, follow the car wash instructions. The windshield wiper and rear window wiper, if equipped, must be off. Remove any accessories that may be damaged or interfere with the car wash equipment.
Hand Wash
Rinse the vehicle well, before and after washing, to remove all cleaning agents completely. If they are allowed to dry on the surface, they could stain.
Dry the finish with a soft, clean chamois or an all-cotton towel to avoid surface scratches and water spotting.
Cleaning Underhood Components
Caution
Do not power wash any component under the hood that has this symbol. This could cause damage that would not be covered by the vehicle warranty.
Solvents or aggressive cleaners may harm under-hood components. The usage of these chemicals should be avoided. Recommend water only. A pressure washer may be used, but care must be utilized.
The following criteria must be followed:
- Water pressure must be kept below 14 000 KPa (2,000 PSI).
- Water temperature must be below 80 °C (180 °F).
- A spray nozzle with a 40-degree wide angle spray pattern or wider must be used.
- The nozzle must be kept at least 30 cm (1 ft) away from all surfaces.
Finish Care
Application of aftermarket clearcoat sealant/ wax materials is not recommended.
If painted surfaces are damaged, see your dealer to have the damage assessed and repaired. Foreign materials such as calcium chloride and other salts, ice-melting agents, road oil and tar, tree sap, bird droppings, chemicals from industrial chimneys, etc., can damage the vehicle’s finish if they remain on painted surfaces. Wash the vehicle as soon as possible. If necessary, use non-abrasive cleaners that are marked safe for painted surfaces to remove foreign matter.
Occasional hand waxing or mild polishing should be done to remove residue from the paint finish. See your dealer for approved cleaning products.
Do not apply waxes or polishes to uncoated plastic, vinyl, rubber, decals, simulated wood, or flat paint as damage can occur.
Caution
Machine compounding or aggressive polishing on a basecoat/clearcoat paint finish may damage it. Use only non-abrasive waxes and polishes that are made for a basecoat/clearcoat paint finish on the vehicle. To keep the paint finish looking new, keep the vehicle garaged or covered whenever possible
Protecting Exterior Bright Metal Moldings
Caution
Failure to clean and protect the bright metal moldings can result in a hazy white finish or pitting. This damage would not be covered by the vehicle warranty. The bright metal moldings on the vehicle are aluminum, chrome, or stainless steel.
To prevent damage always follow these cleaning instructions:
- Be sure the molding is cool to the touch before applying any cleaning solution.
- Use only approved cleaning solutions for aluminum, chrome, or stainless steel.
Some cleaners are highly acidic or contain alkaline substances and can damage the moldings.
- Always dilute a concentrated cleaner according to the manufacturer’s
- Do not use cleaners that are not intended for automotive use.
- Use a nonabrasive wax on the vehicle after washing to protect and extend the molding finish.
Carbon Fiber Care
Carbon fiber composite parts can be washed and waxed like any other parts. Use clear or black-pigmented wax. See Composite Materials 0 207.
Cleaning Exterior Lamps/Lenses, Emblems, Decals, and Stripes
Use only lukewarm or cold water, a soft cloth, and a car washing soap to clean exterior lamps, lenses, emblems, decals, and stripes. Follow the instructions under “Washing the Vehicle” previously in this section. Lamp covers are made of plastic, and some have a UV protective coating. Do not clean or wipe them when dry.
Read all Instructions for Appearance Care User Guide
Cadillac CT5 2023 Service and Maintenance User Guide
General Information
Your vehicle is an important investment. This section describes the required maintenance for the vehicle. Follow this schedule to help protect against major repair expenses resulting from neglect or inadequate maintenance. It may also help to maintain the value of the vehicle if it is sold. It is the responsibility of the owner to have all required maintenance performed.
Your dealer has trained technicians who can perform required maintenance using genuine replacement parts. They have up-to-date tools and equipment for fast and accurate diagnostics. Many dealers have extended evening and Saturday hours, courtesy transportation, and online scheduling to assist with service needs. Your dealer recognizes the importance of providing competitively priced maintenance and repair services. With trained technicians, the dealer is the place for routine maintenance such as oil changes and tire rotations and additional maintenance items like tires, brakes, batteries, and wiper blades.
Caution
Damage caused by improper maintenance can lead to costly repairs and may not be covered by the vehicle warranty. Maintenance intervals, checks, inspections, recommended fluids, and lubricants are important to keep the vehicle in good working condition.
Do not have chemical flushes that are not approved by GM performed on the vehicle. The use of flushes, solvents, cleaners, or lubricants that are not approved by GM could damage the vehicle, requiring expensive repairs that are not covered by the vehicle warranty. Because of the way people use vehicles, maintenance needs vary. There may need to be more frequent checks and services. The Additional Required Services – Normal are for vehicles that The Tire Rotation and Required Services are the responsibility of the vehicle owner. It is recommended to have your dealer perform these services every 12 000 km/7,500 mi.
Proper vehicle maintenance helps to keep the vehicle in good working condition, improves fuel economy, and reduces vehicle emissions.
Load Limits 0 200.
- Are driven on reasonable road surfaces within legal driving limits.
- Use the recommended See
Additional Required Services Service
Every 12 000 km (7,500 mi)
Normal
Recommended Fuel 0 247.
Refer to the information in the Maintenance Schedule Additional Required Services – Normal Service.
Warning
Performing maintenance work can be dangerous and can cause serious injury. Perform maintenance work only if the required information, proper tools, and equipment are available. If they are not, see your dealer to have a trained technician do the work. See Doing Your Own Service Work 0 262.
Maintenance Schedule
Tire Rotation and Required Services Every 12 000 km (7,500 mi) Tires are rotated to achieve a more uniform wear for all tires. The first rotation is the most important. Anytime unusual wear is noticed, rotate the tires as soon as possible, check for proper tire inflation pressure, and check for damaged tires or wheels. If the unusual wear continues after the rotation, check the wheel alignment. See When It Is Time for New Tires 0 341 and Wheel Replacement 0 344
- Perform Multi-Point Vehicle Inspection. See Multi-Point Vehicle Inspection (MPVI) 0 369.
- Lubricate body components. See Exterior Care 0 356.
Additional Required Services — Normal Service
Every 12 000 km (7,500 mi).
- Check the engine oil level and oil life percentage. If needed, change the engine the oil, and filter, and reset oil in the life system. Or when the CHANGE ENGINE OIL SOON message displays, have the engine oil and filter changed within the next 1 000 km/600 mi. If driven under the best conditions, the engine oil life system may not indicate the need for vehicle service for up to a year. The engine oil and filter must be changed at least once a year and the oil life system must be reset. Your trained dealer technician can perform this work. If the engine oil life system is reset accidentally, service the vehicle within 5 000 km/3,000 mi since the last service.
Reset the oil life system when the oil is changed. See Engine Oil Life System 0 270.
- When the REPLACE AT NEXT OIL CHANGE message displays, the engine air filter should be replaced at the next engine oil change. When the REPLACE ENGINE AIR
FILTER SOON message displays, the engine air filter should be replaced at the earliest convenience. Reset the engine air filter life system after the engine air filter is replaced. See Engine Air Filter Life System 0 271.
Every 36 000 km (22,500 mi) - Replace the passenger compartment air filter. Or every 24 months, whichever comes first. More frequent passenger compartment air filter replacement may be needed if driving in areas with heavy traffic, poor air quality, high dust levels, or environmental allergens. Passenger compartment air filter replacement may also be needed if there is reduced airflow, window fogging, or odors. Your GM dealer can help determine when to replace the filter.
Every 96 000 km (60,000 mi) - Replace spark plugs. (2.0L L4 Engine Only.)
Inspect spark plug wires and/or boots.
Every 156 000 km (97,500 mi)
- Replace spark plugs. (3.6L V6 Engine Only.) Inspect spark plug wires and/or boots.
Every 161 000 km (100,000 mi) - Replace hood and/or body lift support gas struts. Or every 10 years, whichever comes first. See Gas Strut(s) 0 282.
Every 240 000 km (150,000 mi) - Change rear axle fluid, if equipped with AWD. Do not directly power wash the transfer case and/or front/rear axle output seals. High-pressure water can overcome the seals and contaminate the transfer case fluid. Contaminated fluid will decrease the life of the transfer case and/ or axles and should be replaced.
- Drain and fill the engine cooling system. Or every six years, whichever comes first.
See Cooling System 0 272. Severe Conditions Requiring More
Frequent Maintenance
- Public service, military, or commercial use vehicles to include the following:
- Ambulances, police cars, and emergency rescue vehicles.
- Civilian vehicles such as light-duty pick-up trucks, SUVs, and passenger cars that are used in military applications.
- Recovery vehicles such as tow trucks and flatbed single-vehicle carriers or any vehicle that is consistently used in towing trailers or other loads.
- High-use commercial vehicles such as courier delivery vehicles, private security patrol vehicles, or any vehicles that operate on a 24–hour basis.
- Any vehicle consistently operated in a high sand or dust environment such as those used on oil pipelines and similar applications.
- Vehicles that are regularly used for short trips of 6 km (4 mi) or less.
The oil life indicator will show you when to change the oil and filter. Under severe conditions, the indicator may come on before 12 000 km (7,500 mi).
Read all Instructions for Service and Maintenance User Guide
Cadillac CT5 2023 Information and Safety Defects User Guide
Customer Information
Customer Satisfaction Procedure
Your satisfaction and goodwill are important to your dealer and to GMC. Normally, any concerns with the sales transaction or the operation of the vehicle will be resolved by your dealer’s sales or service departments. Sometimes, however, despite the best intentions of all concerned, misunderstandings can occur. If your concern has not been resolved to your satisfaction, the following steps should be taken:
STEP ONE: Discuss your concern with a member of dealership management. Normally, concerns can be quickly resolved at that level. If the matter has already been reviewed with the sales, service, or parts manager, contact the owner of your dealership or the general manager.
STEP TWO: If after contacting a member of dealership management, it appears your concern cannot be resolved by your dealership without further help, in the U.S., call 1-800-462-8782. In Canada, call General Motors of Canada Customer Care Centre at 1-800-263-3777 (English), or 1-800-263-7854 (French).
We encourage you to call the toll-free number in order to give your inquiry prompt attention.
Have the following information available to give the Customer Assistance representative:
- Vehicle Identification Number (VIN). This is available from the vehicle registration or title, or the plate at the top left of the instrument panel and visible through the windshield.
- Dealership name and location.
- Vehicle delivery date and present
When contacting GMC, remember that your concern will likely be resolved at a dealer’s facility. That is why we suggest following Step One first.
STEP THREE — U.S. Owners: Both General Motors and your dealer are committed to making sure you are completely satisfied with your new vehicle. However, if you continue to remain unsatisfied after following the procedure outlined in Steps One and Two, you can file with the Better Business Bureau (BBB) AUTO LINE Program to enforce your rights.
The BBB AUTO LINE Program is a out-of-court program administered by the BBB National Programs, Inc. to settle automotive disputes regarding vehicle repairs or the interpretation of the New Vehicle Limited Warranty. Although you may be required to resort to this informal dispute resolution program prior to filing a court action, use of the program is free of charge and your case will generally be heard within 40 days. If you do not agree with the decision given in your case, you may reject it and proceed with any other venue for relief available to you.
You may contact the BBB AUTO LINE Program using the toll-free telephone number or write them at the following address:
BBB Auto Line a Division of BBB National Programs, Inc. 1676 International Drive
Suite 550
McLean, VA 22102
Telephone: 1-800-955-5100 www.bbbautoline.org
This program is available in all 50 states and the District of Columbia. Eligibility is limited by vehicle age, mileage, and other factors. General Motors reserves the right to change eligibility limitations and/or discontinue its participation in this program.
STEP THREE — Canadian Owners : In the event that you do not feel your concerns have been addressed after following the procedure outlined in Steps One and Two, General Motors of Canada Company wants you to be aware of its participation in a no-charge Mediation/Arbitration Program. General Motors of Canada Company has committed to binding arbitration of owner disputes involving factory-related vehicle service claims. The program provides for the review of the facts involved by an impartial third party arbiter, and may include an informal hearing before the arbiter. The program is designed so that the entire dispute settlement process, from the time you file your complaint to the final decision, should be completed in about 70 days. We believe our impartial program offers advantages over courts in most jurisdictions because it is informal, quick, and free of charge.
For further information concerning eligibility in the Canadian Motor Vehicle Arbitration Plan (CAMVAP), call toll-free 1-800-207-0685, or call the General Motors Customer Care Centre, 1-800-263-3777 (English), 1-800-263-7854 (French), or write to: Mediation/Arbitration Program c/o Customer Care Centre
General Motors of Canada Company 500 Wentworth Street W Oshawa, ON L1J 0C5
Your inquiry should be accompanied by the Vehicle Identification Number (VIN).
Customer Assistance Offices
Cadillac is committed to assisting customers. Visit us online at www.gmc.com/support (U.S.) or www.mygmc.ca (Canada) to chat with us or find answers to commonly asked questions, tips, vehicle how-to instructions, and available support.
Need more help? Use the phone numbers or mailing addresses below for additional assistance.
United States and Puerto Rico
Cadillac Customer Assistance Center
Cadillac Motor Car Division
P.O. Box 33169
Detroit, MI 48232-5169
1-800-458-8006
TTY: Dial 711 relay service and contact
1-800-833-2438
Roadside Assistance: 1-800-224-1400
Canada
Cadillac Customer Care Centre
General Motors of Canada Company
500 Wentworth Street W
Oshawa, ON L1J 0C5
1-888-446-2000 (English/French)
Cadillac Roadside Assistance: 1-800-882-1112
Overseas
Please contact the local General Motors Business Unit.
Customer Assistance for Text Telephone (TTY) Users
To assist customers who are deaf, hard of hearing, or speech-impaired and who use Text Telephones (TTYs), Cadillac has TTY equipment available at its Customer Assistance Center. Any TTY user in the U.S. can communicate with Cadillac by dialing:
1-888-889-2438. TTY users in Canada can dial 1-800-263-3830.
Online Account
Create a GMC Account (U.S.) at gmc.com
Learn more about your vehicle features, shop for and manage your connected services and OnStar plans, and access diagnostic information specific to your vehicle.
Read all Instructions for Information and Safety Defects User Guide
Cadillac CT5 2023 Reporting Safety Defects User Guide
Reporting Safety Defects
Reporting Safety Defects to the United States Government
If you believe that your vehicle has a defect which could cause a crash or could cause injury or death, you should immediately inform the National Highway Traffic Safety Administration (NHTSA) in addition to notifying General Motors. If NHTSA receives similar complaints, it may open an investigation, and if it finds that a safety defect exists in a group of vehicles, it may order a recall and remedy campaign. However, NHTSA
cannot become involved in individual problems between you, your dealer, or General Motors.
To contact NHTSA, you may call the Vehicle Safety Hotline toll-free at 1-888-327-4236 (TTY: 1-800-424-9153); go to https://www.safercar.gov; or write to:
Administrator, NHTSA 1200 New Jersey Avenue, S.E. Washington, D.C. 20590 You can also obtain other information about motor vehicle safety from https://www.safercar.gov.
Reporting Safety Defects to the Canadian Government
If you live in Canada, and you believe that the vehicle has a safety defect, notify Transport Canada immediately,
and notify General Motors of Canada Company. Call Transport Canada at 1-800-333-0510; go to www.tc.gc.ca/recalls (English) www.tc.gc.ca/rappels (French) or write to: Transport Canada Motor Vehicle Safety Directorate Defect Investigations and Recalls Division 80 Noel Street Gatineau, QC J8Z 0A1
Reporting Safety Defects to General Motors
In addition to notifying NHTSA (or Transport Canada) in a situation like this, notify
General Motors. In the U.S., call 1-800-458-8006, or write: Cadillac Customer Assistance Center Cadillac Motor Car Division P.O. Box 33169 Detroit, MI 48232-5169 In Canada, call 1-888-446-2000, or write:
Canadian Cadillac Customer Care Centre General Motors of Canada Company 500 Wentworth Street W Oshawa, ON L1J 0C5 In Mexico, call 800-466-0805 or 800-212-234-5522.
In other Central America and Caribbean Countries, call 52-555-901-2369.
Read all Instructions for Reporting Safety Defects User Guide
Cadillac CT5 2023 OnStar User Guide
OnStar
- Voice Command Button
- Q Blue OnStar Button
- Red Emergency Button
This vehicle may be equipped with a comprehensive, in-vehicle system that can connect to an OnStar Advisor for Emergency, Security, Navigation, Connections, and Diagnostics Services. OnStar services may require a paid service plan and data plan.
OnStar requires the vehicle battery and electrical system, cellular service, and GPS satellite signals to be available and operating. OnStar acts as a link to existing emergency service providers. OnStar may collect information about you and your vehicle, including location information. See OnStar User Terms, Privacy Statement, and Software Terms for more details including system limitations at www.onstar.com (U.S.) or www.onstar.ca (Canada).
The OnStar system status light is next to the OnStar buttons. If the status light is:
- Solid Green: System is
- Flashing Green: On a
- Red: Indicates a
- Off: System is off. Press Q twice to speak with an OnStar Advisor.
Press Q or call 1-888-4ONSTAR
(1-888-466-7827) to speak to an Advisor.
Functionality of the Voice Command button may vary by vehicle and region.
Press = to:
- Open the OnStar app on the infotainment display. If equipped, the infotainment system has OnStar controls in the embedded OnStar app on the Home Page. Most OnStar functions that can be performed with the buttons can be done using the app. To open the app, touch the OnStar icon on the Home Page. App updates require a corresponding service plan. Features vary by region and model. Features are subject to change. For more information, see my.gmc.com/learn or press Q.
Or
- Give OnStar Turn-by-Turn Navigation voice
- Obtain and customize the Wi-Fi hotspot name or SSID and password, if equipped.
Press Q to connect to an Advisor to:
- Verify account information or update contact information.
- Get driving
- Receive a Diagnostic check of the vehicle’s key operating systems.
- Receive Roadside
- Manage Wi-Fi Settings, if
Press > to get a priority connection to an OnStar Advisor available 24/7 to:
- Get help for an
- Be a Good Samaritan or respond to an AMBER Alert.
- Get assistance in severe weather or other crisis situations and find evacuation
OnStar Services
Emergency
Emergency Services require an active safety and security plan. With Automatic Crash Response, built-in sensors can automatically alert a specially trained OnStar Advisor who is immediately connected in to the vehicle to help.
Press > for a priority connection to an OnStar Advisor who can contact emergency service providers, direct them to your exact location, and relay important information.
With OnStar Crisis Assist, specially trained Advisors are available 24 hours a day, 7 days a week, to provide a central point of contact, assistance, and information during a crisis. With Roadside Assistance, Advisors can locate a nearby service provider to help with a flat tire, a battery jump, or an empty gas tank.
Security
If equipped, OnStar provides these services:
- With Stolen Vehicle Assistance, OnStar Advisors can use GPS to pinpoint the vehicle and help authorities quickly recover it.
- With Remote Ignition Block, if equipped, OnStar can block the vehicle from being
- With Stolen Vehicle Slowdown,
if equipped, OnStar can work with law enforcement to gradually slow the vehicle down.
Theft Alarm Notification
If equipped, if the doors are locked and the vehicle alarm sounds, a notification by text, e-mail, or phone call will be sent. If the vehicle is stolen, an OnStar Advisor can work with authorities to recover the vehicle.
Read all Instructions for OnStar User Guide
Cadillac CT5 2023 Connected Services User Guide
Connections: 2023 Cadillac CT5 Connected Services Features Guide
Connected Services
Navigation
Navigation requires a specific OnStar or connected service plan. Press Q to receive Turn-by-Turn direction or have them sent to the vehicle’s navigation screen, if equipped. Select Turn-by-Turn Directions from the Services tab of the OnStar app to call an Advisor or select a recent or favorite destination. Touch the navigation icons to select home, address, or place. A destination transfer from OnStar will show the detail view of the destination when it is transferred from OnStar to the Navigation application. See www.onstar.com for a coverage map. Services vary by model. Map coverage is available in the United States and Canada.
Turn-by-Turn Navigation
- Press Q to connect to an Advisor.
- Request directions to be downloaded to the vehicle.
- Follow the voice-guided commands.
Using Voice Commands During a Planned Route
Functionality of the Voice Command button, if equipped, may vary by vehicle and region. For some vehicles, press = to open the OnStar app on the infotainment display.
Send Destination to Vehicle
Directions can be sent to the vehicle’s navigation screen, if equipped. Press Q, then ask the Advisor to download directions to the vehicle’s navigation system, if equipped. After the call ends, the navigation screen will provide prompts to begin driving directions. Routes that are sent to the navigation screen can only be canceled through the navigation system.
See www.onstar.com (U.S.) or www.onstar.ca (Canada).
Connections
The following services help with staying connected.
For coverage maps, see www.onstar.com (U.S.) or www.onstar.ca (Canada).
Ensuring Security
- Change the default passwords for the Wi-Fi hotspot and my Cadillac mobile app.
Make these passwords different from each other and use a combination of letters and numbers to increase the security. - Change the default name of the SSID (Service Set Identifier). This is the network name that is visible to other wireless devices. Choose a unique name and avoid family names or vehicle descriptions.
Wi-Fi Hotspot (If Equipped)
- The vehicle may have a built-in Wi-Fi hotspot that provides access to the Internet and web content at 4G LTE speed. Up to seven mobile devices can be connected. A data plan is required. Use the in-vehicle controls only when it is safe to do so.
- To retrieve Wi-Fi hotspot information, press = to open the OnStar app on the infotainment display, then select Wi-Fi Hotspot. On some vehicles, touch Wi-Fi or Wi-Fi Settings on the screen.
- The Wi-Fi settings will display the Wi-Fi hotspot name (SSID), password, and on some vehicles, the connection type (no Internet connection, 3G, 4G, 4G LTE), and signal quality (poor, good, excellent). The LTE icon shows connection to Wi-Fi. It is possible that the icon may not illuminate even though the vehicle has an active connection.
- To change the SSID or password, press Q or call 1-888-4ONSTAR to connect with an Advisor. On some vehicles, the SSID and password can be changed in the Wi-Fi Hotspot menu. After initial set-up, your vehicle’s Wi-Fi hotspot will connect automatically to your mobile devices. Manage data usage by turning Wi-Fi on or off on your mobile device, by using the my Cadillac mobile app, or by contacting an OnStar Advisor. On some vehicles, Wi-Fi can also be managed from the Wi-Fi Hotspot menu.
My Cadillac Mobile App (If Available)
Download the my Cadillac mobile app to compatible Apple and Android smartphones. Cadillac users can access the following services from a smartphone:
Remotely start/stop the vehicle, if factory-equipped.
- Lock/unlock doors, if equipped with automatic locks.
- Activate the horn and lamps.
- Check the vehicle fuel level, oil life, or tire pressure, if factory-equipped with the Tire Pressure Monitor System.
- Send destinations to the vehicle.
- Locate the vehicle on a map (U.S. market only).
- Turn the vehicle’s Wi-Fi hotspot on/off, manage settings, and monitor data consumption, if equipped.
- Locate a dealer and schedule service.
- Request Roadside Assistance.
- Set a parking reminder with pin drop, take a photo, make a note, and set a timer.
- Connect with Cadillac on social media.
Features are subject to change. For my Cadillac mobile app information and compatibility, see my.cadillac.com. An active OnStar or connected service plan may be required. A compatible device, factory-installed remote start, and power locks are required. Data rates apply. See
www.onstar.com for details and system limitations.
Read all Instructions for Connected Services User Guide
Reference Links
Download Manuals: https://www.cadillac.com/support/vehicle/manuals-guides
Cadillac 2023 Top Accessories
[amalinkspro_table id=”32446″ new-window=”on” nofollow=”on” addtocart=”off” /]