
![]()
Fuse Box Diagram: 2023 Cadillac XT5 Replacing Fuses Guide
This 2023 Cadillac XT5 fuse box diagram shows where all the fuses are located and what they do. It gives you a complete picture of the car’s electrical system. Fixing electricity problems and quickly replacing blown fuses are both made easier by this helpful guide. Knowing how the fuse box is set up and which fuses go with what makes servicing go smoothly and without any problems. Understanding the fuse box design makes the process easier and faster, whether you’re fixing a broken part or just doing regular checks. This makes it easier to find and fix electrical problems. By following this guide, Cadillac XT5 owners can easily find their way around the fuse box, making sure their car runs smoothly and reliably on the road.
2023 Cadillac XT5 Specs, Price, Features, Mileage (Brochure)
Electrical System
Electrical System Overload
The vehicle has fuses and circuit breakers to protect against an electrical system overload.
When the current electrical load is too heavy, the circuit breaker opens and closes, protecting the circuit until the current load returns to normal or the problem is fixed.
This greatly reduces the chance of circuit overload and fire caused by electrical problems.
Fuses and circuit breakers protect power devices in the vehicle.
If there is a problem on the road and a fuse needs to be replaced, the same amperage fuse can be borrowed. Choose some feature of the vehicle that is not needed to use and replace it as soon as possible.
To check a fuse, look at the band inside the fuse. If the band is broken or melted, replace the fuse. Be sure to replace a bad fuse with a fuse of identical size and rating.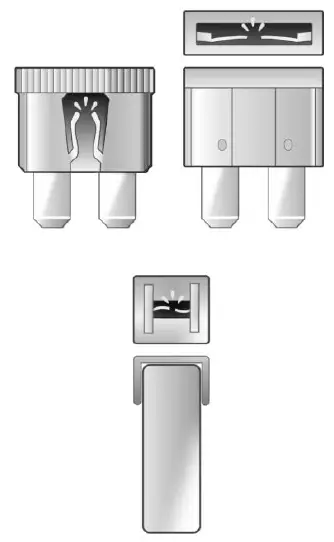
Replacing a Blown Fuse
- Turn off the vehicle.
- Locate the fuse puller in the engine compartment fuse block.

- Use the fuse puller to remove the fuse from the top or side, as shown above.
- If the fuse must be replaced immediately, borrow a replacement fuse with the same amperage from the fuse block. Choose a vehicle feature that is not needed to safely operate the vehicle. Repeat Steps 2-3.
- Insert the replacement fuse into the empty slot of the blown fuse.
At the next opportunity, see your dealer to replace the blown fuse.
Headlamp Wiring
An electrical overload may cause the lamps to go on and off, or in some cases to remain off. Have the headlamp wiring checked right away if the lamps go on and off or remain off?
Windshield Wipers
If the wiper motor overheats due to heavy snow or ice, the windshield wipers will stop until the motor cools and will then restart. Although the circuit is protected from electrical overload, overload due to heavy snow or ice may cause wiper linkage damage. Always clear ice and heavy snow from the windshield before using the windshield wipers. If the overload is caused by an electrical problem and not snow or ice, be sure to get it fixed.
Fuses and Circuit Breakers
The wiring circuits in the vehicle are protected from short circuits by a combination of fuses and circuit breakers. This greatly reduces the chance of damage caused by electrical problems.
Danger
Fuses and circuit breakers are marked with their ampere rating. Do not exceed the specified amperage rating when replacing fuses and circuit breakers. The use of an oversized fuse or circuit breaker can result in a vehicle fire. You and others could be seriously injured or killed.
Warning
Installation or use of fuses that do not meet GM’s original fuse specifications is dangerous. The fuses could fail, and result in a fire. You or others could be injured or killed, and the vehicle could be damaged.
See Accessories and Modifications 0 258 and General Information 0 258. To check or replace a blown fuse, see Electrical System Overload 0 278.
Engine Compartment Fuse Block
The underhood fuse block is in the engine compartment, on the driver’s side of the vehicle.
Caution
Do not pull the engine compartment fuse block lever, since it is intended only for service purposes. If pulled, vehicle malfunction may occur.
Caution
Spilling liquid on any electrical component of the vehicle may damage it. Always keep the covers on any electrical component.
To remove the fuse block cover, press the clips on the cover and lift it straight up.
The vehicle may not be equipped with all of the fuses, relays, and features shown.
| Fuses | Usage |
| F1 | Antilock Brake System |
| F2 | Starter 1 |
| F3 | DC-DC Transformer 1 |
| F4 | – |
| F5 | DC-DC Transformer 2 |
| F6 | Amplifier 1 |
| F7 | Front Blower |
| F8 | Starter 3 |
| F9 | – |
| F10 | – |
| F11 | – |
| F12 | Front Wiper |
| F13 | Starter 2 |
| F14 | LED/Automatic Headlamp Leveling |
| F15 | Rear Wiper 1 |
| F16 | – |
| F17 | – |
| F18 | Automatic Headlamp Leveling Module |
| F19 | – |
| F20 | – |
| F21 | – |
| F22 | Electronic Brake Control Module |
| F23 | Parking/Trailer Lamps |
| F24 | Right Trailer Stoplamp/ Turnlamp |
| F25 | Steering Column Lock |
| F26 | – |
| F27 | Left Trailer Stoplamp/ Turnlamp |
| F28 | – |
| F29 | – |
| F30 | Washer Pump |
| F31 | – |
| F32 | – |
| F33 | Fog Lamps |
| F34 | Horn |
| F35 | – |
| F36 | Headlamp High beam – Left |
| F37 | Headlamp high beam – Right |
| F38 | Spare |
| F39 | Transmission Control Module/Battery 1 |
| F40 | Left Rear Bus Electrical Center/DC DC Ignition |
| F41 | Instrument Cluster |
| F42 | Heating, Ventilation, and Air Conditioning/Central Gateway Module run crank |
| F43 | Head Up Display/ Reflective Light Auxiliary |
| F44 | Electronic Brake Control Module Electric Brake Booster/Run/Crank |
| F45 | – |
| F46 | – |
| F47 | – |
| F48 | Rear Wiper 2 |
| F49 | Interior Rearview Mirror/ Trailer/Rear Heated Seat Run Crank |
| F50 | Fuel Tank Zone Module Run Crank |
| F51 | Heated Steering Wheel |
| F52 | Air Conditioning Clutch |
| F53 | Coolant Pump |
| F54 | – |
| F55 | – |
| F56 | Spare |
| F57 | Engine Control Module/ Ignition |
| F58 | Transmission Control Module/Ignition |
| F59 | Engine Control Module Battery |
| F60 | – |
| F61 | O2 Sensor 1/Aeroshutter/ Mass Air Flow Sensor |
| F62 | Engine Control Module– Odd |
| F63 | O2 Sensor 2 |
| F64 | Engine Control Module– Even |
| F65 | Engine Control Module Powertrain 1 |
| F66 | Engine Control Module Powertrain 2 |
| F67 | Engine Control Module Powertrain 3 |
| F68 | – |
| F69 | – |
| F70 | – |
| F71 | – |
| F72 | – |
| F73 | – |
| F74 | – |
| F75 | – |
| F76 | – |
| F77 | – |
| Relays | Usage |
| K1 | Starter 1 |
| K2 | Run/Crank |
| K3 | Starter 3 |
| K4 | LED/Automatic Headlamps |
| K5 | – |
| K6 | – |
| K7 | Engine Control Module |
| K8 | Air Conditioning |
| K9 | – |
| K10 | Starter 2 |
Instrument Panel Fuse Block
The instrument panel fuse block is in the center console between the driver and passenger seats. To access the fuses, open the fuse panel door, or remove the panel from the passenger side by pulling it out or
see your dealer.
To reinstall the door, push the door back into its original location. The vehicle may not be equipped with all of the fuses, relays, and features shown.
2023 Cadillac XT5 Specs, Price, Features, Mileage (Brochure)

| Fuses | Usage |
| F1 | Body Control Module 6 |
| F2 | Diagnostic Link/Central Gateway Module |
| F3 | Electric Steering Column Lock |
| F4 | – |
| F5 | Logistics |
| F6 | Heating, Ventilation, and Air Conditioning/ Humidity Sensor |
| F7 | Body Control Module 3 |
| F8 | Park Aid/Electronic Transmission Range System Hybrid |
| F9 | Right Front Heated Seat |
| F10 | Airbag |
| F11 | – |
| F12 | Amplifier 2 |
| F13 | Body Control Module 7 |
| F14 | Spare/Left Front Heated Seat |
| F15 | Instrument Panel Switch Bank |
| F16 | Sunroof |
| F17 | Body Control Module 1 |
| F18 | Instrument Cluster/Head-up Display |
| F19 | – |
| F20 | Rear Seat Entertainment |
| F21 | Body Control Module 4 |
| F22 | Infotainment/USB Data/ Aux Jack |
| F23 | Body Control Module 2 |
| F24 | USB Charger/Wireless Charging |
| F25 | Park Aid/Electronic Transmission Range System |
| F26 | Communications Integration Module |
| F27 | Video/Night Vision Module |
| F28 | Heating, Ventilation, and Air Conditioning Display |
| F29 | Radio |
| F30 | Steering Wheel Adjustment Controls |
| F31 | Electronic Brake Control Module Electric Brake Booster |
| F32 | DC AC Inverter |
| F33 | Driver Power Seat |
| F34 | Passenger Power Seat |
| F35 | Battery IEC 1 Feed |
| F36 | Electric Power Steering |
| F37 | Rear Seat Entertainment/USB Charge/Wireless Charging Module/ Auxiliary Power Outlet/ Lighter |
| F38 | Body Control Module 8 |
| F39 | – |
| Circuit Breakers/Minifuses | Usage |
| F40 | – |
| F41 | – |
| F42 | Auxiliary Power Outlet (CB)/Lighter (mini fuse) |
Rear Compartment Fuse Block
The rear compartment fuse block is in the cargo area, on the driver’s side of the vehicle behind the lower trim panel. To open, turn the latch with a flat-bladed tool and pull the trim panel from the edges to fold it down.
The label for this fuse block is in the spare tire area, on the foam under the cargo floor. The vehicle may not be equipped with all of the fuses, relays, and features shown.
| Fuses | Usage |
| F1 | – |
| F2 | Trailer Battery 1 |
| F3 | Driver Seat Belt Motor |
| F4 | Rear Blower |
| F5 | Rear Drive Control |
| F6 | Passenger Seat Belt Motor |
| F7 | Right Window |
| F8 | Rear Window Defogger |
| F9 | Left Window |
| F10 | – |
| F11 | Trailer Reverse |
| F12 | – |
| F13 | – |
| F14 | – |
| F15 | – |
| F16 | – |
| F17 | – |
| F18 | Trailer Module/Accessory Power Module/ Rechargeable Energy Storage System Ignition |
| F19 | Ventilated Seats/Left Front Heated Seats Run Crank |
| F20 | – |
| F21 | Trailer Connector |
| F22 | – |
| F23 | – |
| F24 | Passenger Window Switch |
| F25 | – |
| F26 | Trailer Brake |
| F27 | Driver Ventilated Seat/ Lumbar |
| F28 | Passive Entry/Passive Start |
| F29 | – |
| F30 | Canister Vent |
| F31 | Rechargeable Energy Storage System |
| F32 | Heated Mirror |
| F33 | – |
| F34 | Liftgate Module |
| F35 | Fuel System Control Module/Fuel Tank Zone Module |
| F36 | Passenger Ventilated Seat/Lumbar |
| F37 | External Amplifier Hybrid |
| F38 | Window Module |
| F39 | Rear Closure |
| F40 | Memory Seat Module |
| F41 | Automatic Occupancy Sensor |
| F42 | Trailer Battery 2 |
| F43 | Blower Console |
| F44 | – |
| F45 | Liftgate Motor |
| F46 | Rear Heated Seats |
| F47 | – |
| F48 | Glass Break Sensor |
| F49 | – |
| F50 | – |
| F51 | – |
| F52 | Active Dampening System Module |
| F53 | – |
| F54 | External Object Calculating/Side Blind Zone Alert |
| F55 | – |
| F56 | Universal Garage Door Opener/Rain Sensor |
| F57 | Theft Deterrent |
| Circuit Breakers | Usage |
| CB1 | – |
| CB2 | – |
| CB3 | Rear Auxiliary Power Outlet |
| Relays | Usage |
| K1 | – |
| K2 | – |
FAQs
The fuse box in a 2023 Cadillac XT5 is located in the engine compartment on the driver’s side.
To access the fuse box, you need to open the hood of the car and locate the fuse box cover on the driver’s side.
Generally, you may need a fuse puller tool or a pair of needle-nose pliers to remove and replace fuses.
The 2023 Cadillac XT5 typically has two fuse boxes: one in the engine compartment and one in the interior.
The 2023 Cadillac XT5 typically uses standard blade-type fuses, with sizes ranging from 5A to 30A.
A blown fuse can often be identified by a visibly broken filament inside the fuse or by using a multimeter to check for continuity.
Fuses in a 2023 Cadillac XT5 control various electrical components such as lights, power windows, radio, and other accessories.
It’s not recommended to replace a fuse with one of a higher amperage, as this can potentially cause damage to the electrical system.
The fuse box cover typically has a diagram indicating which fuse corresponds to which electrical component.
Some models may come with spare fuses included, but it’s always a good idea to have a variety of spare fuses on hand.
You can generally replace a fuse yourself following the instructions in the owner’s manual.
If replacing a fuse doesn’t solve the problem, there may be a larger electrical issue that requires professional diagnosis and repair.
Fuses typically don’t need to be reset; once the issue causing the fuse to blow is resolved and the fuse is replaced, the system should function normally.
Always ensure the vehicle is turned off before replacing fuses to avoid electrical shock or damage to the vehicle’s electrical system.
Useful Link:
View full PDF: Cadillac XT5 2023 User Guide | Auto User Guide
2023 Cadillac XT5 Specs, Price, Features, Mileage (Brochure)