
![]()
Replacing Fuses: 2022 Cadillac CT5 Fuses and Fuse Box Diagram
For the 2022 Cadillac CT5, knowing how to change fuses is important for keeping the car’s electrical systems in good shape and making sure they keep working. As important safety features, fuses keep different lines from being overloaded with electricity, which could cause damage. When a fuse blows, it stops the flow of power to a certain part, which means it needs to be replaced. To make this process go more smoothly, Cadillac gives drivers a complete fuse map that shows them where each fuse in the car’s fuse box is located and what it does. If you need to fix a blown fuse that affects the headlights, power windows, or other important systems, the fuse diagram makes it easier to find the broken fuse and replace it right away. Drivers of the Cadillac CT5 can quickly fix electrical problems by following the right steps and having a good idea of how the fuses are organized. This will restore functionality and make sure the driver has a smooth experience.
2024 Cadillac CT5 Specs, Price, Features, Mileage And Review
Electrical System
Electrical System Overload
The vehicle has fuses and circuit breakers to protect against an electrical system overload.
When the current electrical load is too heavy, the circuit breaker opens and closes, protecting the circuit until the current load returns to normal or the problem is fixed. This greatly reduces the chance of circuit overload and fire caused by electrical problems.
Fuses and circuit breakers protect power devices in the vehicle.
If there is a problem on the road and a fuse needs to be replaced, the same amperage fuse can be borrowed. Choose some feature of the vehicle that is not needed to use and replace it as soon as possible.
To check a fuse, look at the band inside the fuse. If the band is broken or melted, replace the fuse. Be sure to replace a bad fuse with a fuse of identical size and rating.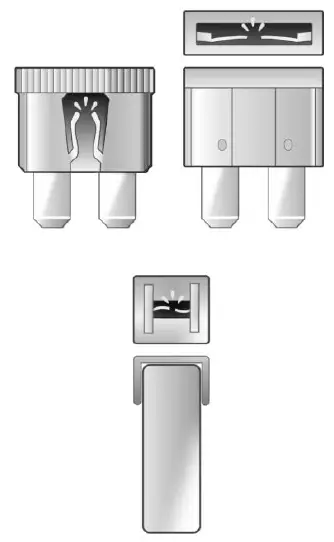
Replacing a Blown Fuse
- Turn off the vehicle.
- Locate the fuse puller in the engine compartment fuse block.

- Use the fuse puller to remove the fuse from the top or side, as shown above.
- If the fuse must be replaced immediately, borrow a replacement fuse with the same amperage from the fuse block. Choose a vehicle feature that is not needed to safely operate the vehicle. Repeat Steps 2-3.
- Insert the replacement fuse into the empty slot of the blown fuse.
At the next opportunity, see your dealer to replace the blown fuse.
Headlamp Wiring
An electrical overload may cause the lamps to go on and off, or in some cases to remain off. Have the headlamp wiring checked right away if the lamps go on and off or remain off?
Windshield Wipers
If the wiper motor overheats due to heavy snow or ice, the windshield wipers will stop. The wiper function is available immediately after the wiper switch is set to off, and back to on.
To protect the wiper motor from overheating, the wipers may slow down when the windshield is dry for a long period. If a period of dry operation, or little moisture, exceeds 10 minutes, the wipers may switch to intermittent operation, and remain there. When moisture is again detected on the windshield, wiper operation will return to the operator-selected speed.
Although the circuit is protected from electrical overload, overload due to heavy snow or ice may cause wiper linkage damage. Always clear ice and heavy snow from the windshield before using the windshield wipers. If the overload is caused by an electrical problem and not snow or ice, be sure to get it fixed.
Fuses and Circuit Breakers
The wiring circuits in the vehicle are protected from short circuits by a combination of fuses and circuit breakers. This greatly reduces the chance of damage caused by electrical problems.
Danger
Fuses and circuit breakers are marked with their ampere rating. Do not exceed the specified amperage rating when replacing fuses and circuit breakers. The use of an oversized fuse or circuit breaker can result in a vehicle fire. You and others could be seriously injured or killed.
Warning
Installation or use of fuses that do not meet GM’s original fuse specifications is dangerous. The fuses could fail, and result in a fire. You or others could be injured or killed, and the vehicle could be damaged.
Engine Compartment Fuse Block
The engine compartment fuse block is on the driver’s side of the engine compartment
Lift the fuse block cover to access the fuses. The vehicle may not be equipped with all of the fuses and relays shown.
Caution
Spilling liquid on any electrical component of the vehicle may damage it. Always keep the covers on any electrical component.
| Fuses | Usage |
| 1 | Long Range Radar Front Sensor |
| 2 | Park/Daytime Running Lamps |
| 3 | Exterior Lighting Module 4 |
| 4 | Exterior Lighting Module 7 |
| 5 | Headlamp Level |
| 6 | – |
| 7 | Electronic Brake Control Module |
| 8 | Washer Pump |
| 9 | – |
| 10 | – |
| 11 | – |
| 12 | Horn |
| 13 | Front Wiper |
| 14 | Exterior Lighting Module 6 |
| 15 | Exterior Lighting Module 1 |
| 16 | Exterior Lighting Module 5 |
| 17 | Exterior Lighting Module 3 |
| 18 | Aero Shutter |
| 19 | – |
| 20 | – |
| 21 | Virtual Key System/ Power Sounder Module |
| 22 | Engine Control Module Battery |
| 23 | Transmission Control Module |
| 24 | Active Engine Mount |
| 25 | – |
| 26 | Engine Control Module |
| 27 | Injectors/Ignition 2 |
| 28 | Charged Air Cooler |
| 29 | Transmission Aux Oil Pump/Transmission Reverse Lock Out |
| 30 | Injectors/Ignition 1 |
| 31 | Emissions 1 |
| 32 | Emissions 2 |
| 33 | Starter Solenoid |
| 34 | – |
| 35 | – |
| 36 | Starter Pinion |
| 37 | AC Clutch |
| 38 | – |
| 39 | – |
| 40 | – |
| 41 | – |
| 42 | Water Pump |
| 43 | – |
| 44 | – |
| Relays | Usage |
| 47 | – |
| 48 | Front Wiper Speed |
| 49 | Front Wiper Control |
| 51 | – |
| 52 | Engine Control Module |
| 53 | Starter Solenoid |
| 54 | Starter Pinion |
| 55 | – |
| 57 | AC Clutch |
| 58 | – |
Instrument Panel Fuse Block
The instrument panel fuse block is at the end of the driver side of the instrument panel.
To access the fuses, remove the end panel by gently prying with a plastic tool near each clip, beginning at the point shown.
To install the end cover, insert the tabs on the back of the cover into the slots in the instrument panel at the points shown. Align the clips with the slots in the instrument panel, and press the cover into place. The vehicle may not be equipped with all of the fuses and relays shown.
| Fuses | Usage |
| 1 | – |
| 2 | Heating, Ventilation, and Air Conditioning Blower |
| 3 | – |
| 4 | – |
| 5 | Theft Deterrent/ Universal Garage Door Opener/ Overhead Console/ Rain Sensor |
| 6 | – |
| 7 | Air Quality Ionizer |
| 8 | Heated Steering Wheel |
| 9 | – |
| 10 | Electronic Steering Column Lock 1 |
| 11 | – |
| 12 | – |
| 13 | – |
| 14 | – |
| 15 | – |
| 16 | – |
| 17 | – |
| 18 | Display/Infotainment/ USB/Multi-function Control Module |
| 19 | Sensing and Diagnostic Module/ Automatic Occupant Sensing/Data Link Connection/Wireless Charging Module/ Virtual Key Module |
| 20 | Power Steering Column Module/ Electronic Steering Column Lock 2 |
| 21 | Driver Monitor System/Performance Data Recorder |
| 22 | – |
| 23 | – |
| 24 | – |
| 25 | USB |
| 26 | – |
| 27 | – |
| 28 | – |
| 29 | – |
| 30 | – |
| 31 | Headlamp Level |
| 32 | – |
| 33 | Body Ignition/IP Ignition |
| 34 | Exhaust Valve |
| 35 | Transmission Control Module Ignition/ Engine Control Module Ignition/Shift Ignition/Brake Ignition |
| 36 | Shift Module |
| 37 | Body Control Module 1/Electronic Park Brake Switch |
| 38 | Center Stack Module |
| 39 | Steering Wheel Controls |
| 40 | Body Control Module 2 |
| 41 | Body Control Module 3 |
| 42 | Body Control Module 4 |
| Circuit Breakers | Usage |
| CB1 | Auxiliary Power Outlet 1 |
| CB2 | Auxiliary Power Outlet 2 |
| Relays | Usage |
| 1 | Run After Park/ Accessory |
| 2 | Run Crank |
| 3 | – |
| 4 | – |
| 5 | – |
2024 Cadillac CT5 Specs, Price, Features, Mileage And Review
Rear Compartment Fuse Block
The rear compartment fuse block is behind a cover on the driver’s side of the rear compartment.
The vehicle may not be equipped with all of the fuses, relays, and features shown.
| Fuses | Usage |
| 1 | Remote Function Actuator |
| 2 | – |
| 3 | Driver Heated Seat |
| 4 | Fuel Tank Zone Module |
| 5 | – |
| 6 | – |
| 7 | – |
| 8 | – |
| 9 | – |
| 10 | Motor Seat Belt Passenger |
| 11 | Canister Vent Solenoid |
| 12 | Sunroof |
| 13 | – |
| 14 | – |
| 15 | Passenger Heated Seat |
| 16 | – |
| 17 | Electronic Suspension Control |
| 18 | – |
| 19 | Motor Seat Belt Driver |
| 20 | Rear Defog |
| 21 | DC to DC Transformer 2 |
| 22 | Driver Power Window/Door Handle Switch |
| 23 | External Object Calculating Module/ Front Camera Module/High Definition Localization Module/ Short Range Radar |
| 24 | Passenger Power Window/Door Handle Switch |
| 25 | – |
| 26 | Amplifier (V Series Blackwing) |
| 27 | Rear Drive Control Module |
| 28 | – |
| 29 | – |
| 30 | – |
| 31 | DC to DC Transformer 1 |
| 32 | Transfer Case Electronic Control |
| 33 | Central Gateway Module/Side Blind Zone Alert |
| 34 | Video Processing Module |
| 35 | Hands-Free Closure Release |
| 36 | Exterior Lighting Module 2 |
| 37 | Passenger Memory Seat Module |
| 38 | – |
| 39 | Right Front/Right Rear Window |
| 40 | – |
| 41 | – |
| 42 | Amplifier |
| 43 | Park Assist Module |
| 44 | Driver Memory Seat Module |
| 45 | OnStar |
| 46 | – |
| 47 | – |
| 48 | – |
| 49 | – |
| 50 | Driver Seat |
| 51 | Left Front/Left Rear Window |
| 52 | Passenger Seat |
| Relays | Usage |
| 53 | – |
| 54 | – |
| 55 | Run |
FAQs
A fuse is a protective device designed to interrupt the circuit in case of overcurrent. In the 2022 Cadillac CT5, fuses protect various electrical components from damage due to electrical faults.
You can visually inspect the fuse to see if the metal strip inside is intact. A blown fuse will have a broken or melted strip, or the fuse housing may appear discolored.
The fuse box in the 2022 Cadillac CT5 is typically located in the passenger compartment or under the hood. Consult your owner’s manual for the exact location.
Accessing the fuse box may vary depending on its location. Generally, you’ll need to open the fuse box cover, which may involve removing screws or clips.
Typically, you’ll only need a pair of needle-nose pliers to remove and install fuses. However, it’s always a good idea to keep a fuse puller or a set of automotive fuses on hand.
You should use a fuse with the same amperage rating as the one you’re replacing. Consult your owner’s manual or the fuse box cover for the correct amperage.
No, it’s not recommended. Using a fuse with a higher amperage rating can lead to damage to the electrical system or even a fire hazard.
Use needle-nose pliers to grip the fuse and pull it straight out of the fuse box. Be careful not to damage the fuse or surrounding components.
Simply align the new fuse with the corresponding slot in the fuse box and push it in until it’s fully seated.
You can usually replace a fuse yourself. It’s a simple and inexpensive repair that doesn’t require special tools or expertise.
If a new fuse blows immediately after replacement, it indicates that there’s an underlying electrical problem that needs to be addressed. In this case, it’s best to consult a mechanic.
Always make sure the ignition is turned off before replacing fuses to avoid electrical shock or damage to components.
It’s important to use automotive fuses that are compatible with your vehicle’s electrical system. Using the wrong type of fuse can lead to malfunction or damage.
Fuses typically last a long time and may not need to be replaced unless there’s a fault in the electrical system. However, if you’re experiencing frequent blown fuses, it could indicate an underlying issue.
Yes, the fuse diagram is usually printed on the fuse box cover or can be found in the owner’s manual. It shows the location and amperage rating of each fuse, making it easier to identify and replace them when necessary.
Useful Link:
View full PDF: Cadillac CT5 2022 User Guide | Auto User Guide
2024 Cadillac CT5 Specs, Price, Features, Mileage And Review