![]()
How To Install Rear View RVS-115-W BACKUP SENSOR SYSTEM Install Guide
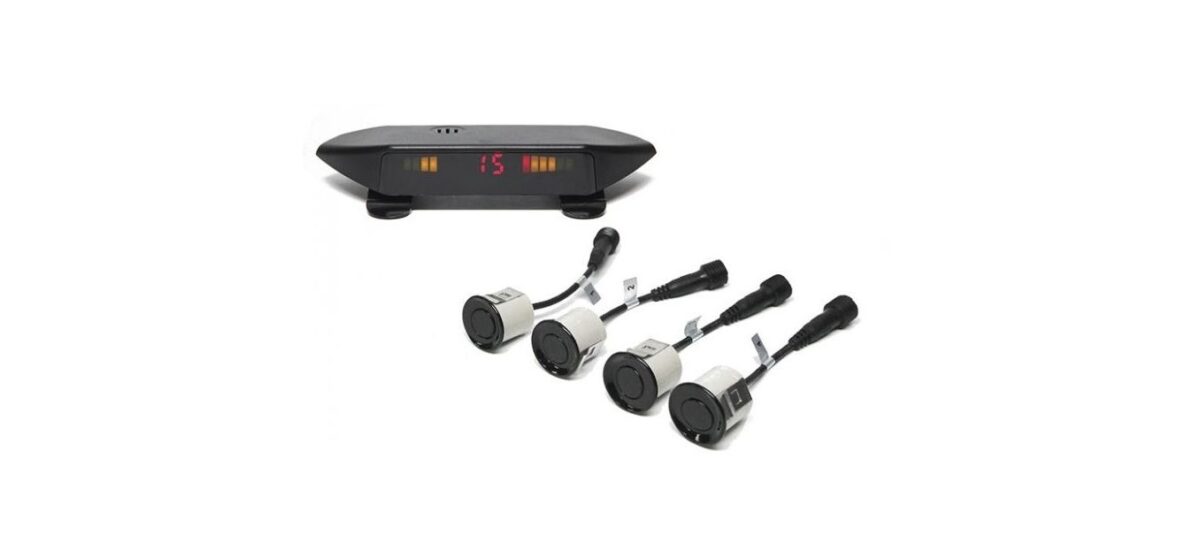
An inventive and necessary car accessory, the RVS-115-W Backup Sensor System is made to improve ease and safety when reversing your car. This system uses sophisticated sensor technology to identify objects, persons, or other cars behind your car. It then sounds an alert to let you know when there are potential collisions and to make tight parking situations easier to manoeuvre. Whether it’s a compact car, SUV, or truck, the RVS-115-W Backup Sensor System is a great addition to any vehicle because of its simple installation and intuitive operation, which provide an additional layer of security and peace of mind.
How To Install Rear View RVS-115-W
- RVS-115-W BACKUP SENSOR SYSTEM kit (sensors, wiring, control unit and alarm module included) screwdriver
-
Tools for crimping and wire stripping
-
Heat shrink tube or electrical tape drill bit selection and drill mounting brackets, if any are missing
-
Select the Sensor Locations:Choose the optimal spots to install the sensors on the back bumper of your car. They should ideally be equidistant from one another and at a height that allows them to detect obstructions without being readily damaged.
-
Mark the locations of the sensors:Using a pencil or marker, indicate on the bumper the selected sensor locations.
-
Get the wiring ready:Determine an appropriate route for the wiring that connects the sensors and control unit. Removing interior trim or panels may be necessary in order to gain access to the vehicle’s wiring.
-
Install Sensors:To make room for the sensor brackets or sensors themselves, drill holes at the designated sensor locations on the bumper. Make sure you adhere to the hole sizes and spacing specified by the manufacturer. Use the included brackets or an appropriate mounting technique to firmly anchor the sensors in place. Make sure they are flat with the bumper surface and correctly aligned.
-
Sensors and Control Unit Connection:The sensor cables should be routed through the car to the control unit. To keep the wiring secure along the way, use wire clips or clips with an adhesive backing. Attach the sensor wires to the control unit’s matching input terminals. Usually, each sensor has wires that are color-coded.
-
Mounting Control Device:Select a good spot within the car for the control unit to be mounted. Usually, this is in the back cargo space or trunk. To fasten it in place, use mounting brackets or screws.
-
Link Control Unit to Vehicle Power Supply:Connect the power line of the control unit to a 12-volt power source inside the car, such as the fuse box or the reverse lights.Attach the control unit’s ground wire to a sturdy ground point on the car’s chassis.
-
Link the Alert Module:Use the supplied connections to connect any alert modules that come with your package to the control unit.
-
Evaluate the system:To test the backup sensor system, turn on the car and put it in reverse before securing all wires and parts. Check to make sure the sensors identify impediments and sound the alerts as they should.
-
Secure Components and Wiring:After you’re certain that everything is operating as it should, replace any removed interior panels or trim and fasten all wiring with clips or adhesive.
-
Adjust the System (if required):If you need to calibrate the system, do so according to the manufacturer’s instructions. Model-specific differences may exist in the calibration parameters.
-
Last Verification:To make sure the system functions as intended, perform one last test by shifting the car backward.
-
Savour the Benefits of Your Backup Sensor System:Now that it is fitted, your RVS-115-W BACKUP SENSOR SYSTEM is prepared to increase safety when reversing your car.
Cable Connection Diagram
Installation Overview
- Drill four holes for the four (4) waterproof sensors at equal distances in the rear bumper:
- 21.5 mm when not using a grommet
- 25.00 mm when using grommet
-
Mount sensors using the included grommets (Optional)
-
Connect the sensors to the Sensor Harness Cable
-
Connect the Sensor Harness Cable to the Control Module
-
Connect LED Display to Power Harness Cable
-
Connect the Power Harness to the LED Display
-
Connect the Power Harness to the Power Source
Sensor input connections distance:
- Power harness cable length: 48
- ft. Sensors “1” and “2”: 25 ft.
- Sensors “3” and “4”: 13 ft.
Display Diagram
DISPLAY SETTINGS
- Flip Numerical Display – Display installed on the Dashboard
- Mirror Numerical Display – Display installed on TOP of Rear
- Windshield Normal Numerical Display – Display installed on TOP of Windshield
VOLUME SETTINGS
- High
- Low
- Off
- High sound is aprox. 80 db at 10 cm
- Low sound is aprox. 60 db at 10 cm
Sensor System Diagram
Sensor Visual and Audible Warnings Waterproof Control Module Diagram
Sensor Detecting Angles
Sensor Specifications
|
Sensor Type: |
Analog Sensor |
|
Sensor Quantity: |
4 Sensors |
|
Sensor Frequency: |
40 kHz +/- kHz |
|
Static Capacitance: |
2000± 15%pF |
|
Input Voltage max.: |
140 Vp-p {at 40KHz) |
|
Decay Time: |
<1.2ms |
|
Decay Parameter : |
20±3 (Admissible parameter) |
|
Echo Sensitivity: |
>200 mV |
|
Horizontal Angle: |
50° |
|
Vertical Angle: |
59° |
|
Detection Range: |
0.22mm (0.08ft) – 2.5m (8ft) |
|
Working Voltage: |
10.0 ~ 28.0 VDC |
|
Rated Current (ECU): |
60mA max |
|
Wiring Harness: |
Vehicle Spec. T-Piece |
|
Working Temperature |
-40°C ~ +80°C |
|
Storage Temperature |
-40°C ~ +90°C |
Waterproof Control Module Specifications
|
Normal Voltage |
12 VDC |
|
Operating Voltage |
1.0 ~ 28 VDC |
|
Rated Current |
60 mA |
|
Operating Frequency |
40 +/- 1 kHz |
|
Housing Material |
ABS |
|
Housing Color |
Black |
|
Working Temperature |
-30°C ~ 80°C |
|
Storage Temperature |
-40°C ~ 90°C |
|
Waterproof Rating |
IP67 |
FAQs of Rear View RVS-115-W
The RVS-115-W BACKUP SENSOR SYSTEM is an automotive accessory designed to provide enhanced safety while reversing your vehicle by detecting obstacles behind you.
It works by using ultrasonic sensors installed at the rear of the vehicle to detect objects and obstacles. When an obstacle is detected, the system provides audible alerts to the driver.
The main components typically include ultrasonic sensors, a control unit, and an alert module.
The installation process varies but often involves mounting the sensors at the rear of the vehicle and connecting them to the control unit, which is then connected to the vehicle’s power supply.
The system provides audible alerts, often in the form of beeping sounds, with the frequency of beeps increasing as the vehicle gets closer to an obstacle.
Some backup sensor systems allow for the customization of alert volume, sensitivity, and other settings to suit individual preferences.
Backup sensor systems are typically designed to work in various weather conditions, but heavy rain, snow, or dirt on the sensors can affect performance.
Backup sensor systems are primarily designed to detect stationary objects but may not reliably detect fast-moving objects.
Backup sensor systems can be installed on various types of vehicles, including cars, SUVs, trucks, and RVs.
Routine maintenance may include cleaning the sensors to ensure optimal performance. Refer to the system’s manual for maintenance guidelines.
Some systems may have a disable feature that allows you to turn off the alerts temporarily, but this should be used judiciously, as it affects safety.
Warranty coverage may vary depending on the manufacturer and retailer, so it’s essential to check the specific warranty terms at the time of purchase.
Installation difficulty can vary. Some individuals with automotive experience may choose to install it themselves, while others may prefer professional installation.
Backup sensor systems can complement rearview cameras, providing additional safety when reversing.
You can often find backup sensor systems for sale online through various retailers and automotive accessory websites.