
OMBAR M571 Car Dash Cam
The OMBAR M571 Car Dash Cam is a small, sturdy gadget that offers wide coverage and high-definition clarity to improve your driving experience. This cutting-edge dashboard camera has a wide-angle lens, smooth recording capabilities, and night vision, making it the ideal travelling companion for accurately capturing every important detail.
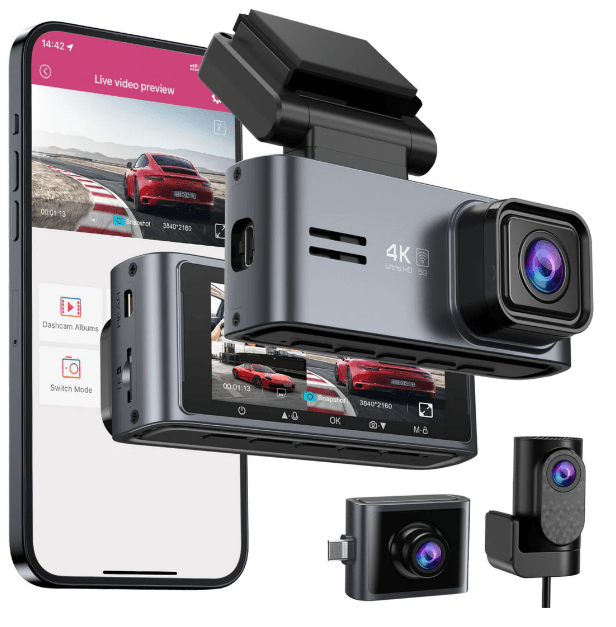
IN THE BOX
Check the box for each of the following items before installing the dash cam.
- Front and Cabin
- Camera x1
- Type-C USB Power
- Cable (3.5m/12ft) x 1
- Rear Camera
- (6m/2Qfl) X 1
- Storage Card x 1
- Cable Clips x5
- Pry Tool x1
- Electrostatic
- Films x4
- User Manual x1
M571 Dash Cam INSTALLATION
Install the front and cabin camera at the top of the front windshield. Remove any foreign matter and clean and dry the windshield before installation. Install the rear camera at the top of the rear windshield.
- Correctly connect the magnetic bracket and M571 dash cam through the strong magnetic attraction. Plug the cabin camera.
- Insert the microSD card into the microSD slot of the dash cam and format your SD card for the first time use.
- Stick the electrostatic film on your windshield, then stick the magnetic bracket on top of the electrostatic film.
- Turn off the car engine.
- Connect the charging cable to the Type-C port of the magnetic bracket. Use the pry tool to lift the edges of the windshield trim/moulding and tuck in the power cord.
- Adjust the angle of the lens by the bracket of the front camera. We recommend pointing the lens slightly downwards (10 below horizontal), so as to record video with a 6:4 road-to-background ratio.
- Turn on the engine. The dashcam will power up and start recording Video files are stored on the microSD card. When the microSD card fills up, the newest video files will start to replace the oldest video files (called loop recording)-so you will always have the most recent video files.
- Peel off the protective film from the double-sided tape and attach the rear camera to the rear windshield. Adjust the angle of the lens by rotating the body of the rear camera, and connecting the front camera and the rear camera.
- Use the pry tool to lift the edges of the rubber window sealing and moulding and tuck in the rear camera connection cable.
- Plug the cigarette lighter power cable into the cigarette lighter socket and the front camera. Use the pry tool to lift the edges of the windshield trim/moulding and tuck in the power cord.c
Note: The length of the original cable for the rear camera is 6m/20ft, suitable for most types of cars.
Dash Cam MENU
Video Settings
- Video Resolution
- Loop Record-1min(default) 12mins 13mins
- Audio Recording-On(default) / Off
- Light Frequency-50Hz / 60Hz(default)
Playback Mode
- Normal: It’s the video files that are saved in a normal loop recording
mode. Event: It’s the video files that the dashcam locks when the car’s shocked. - Parking: It’s the video files that the dashcam locks when the car’s shocked when parking.
- Photo: It’s the picture files that are taken.
Parking Monitor-Off(default) / Time-Lapse 1fps /
Collision
- Time-Lapse 1fps Parking Mode
- Collision Parking Mode
G-Sensorp-Off /High/ Middle(default) / Low
- G-Sensor is a 3-axis impact gravitational accelerometer, designed to detect physical and gravitational forces on the dash cam. Once
- G-Sensor has been triggered due to physical or gravitational impact force on the camera, it switches to emergency recording mode and saves a locked video of 1 min beginning 5 seconds before the event trigger.
WiFi-Off(default ) / 2.4G / 5G
- Turn on/off the WiFi of the dash cam.
- WiFi Name SSID: M571************
- Default PASSWORD: 12345678
Video Stamp-Off/ On(default)
Turn On/Off the Time/GPS Watermark/Speed Stamp shown on recorded files.
Micro SD Card
- Format Reminder
- Format Memory Card
- Memory Card Storage
GPS
- Speed Unit-KM/ H / MPH(default)
- Satellite Signal
System Settings
- Key Tone-On(default) / Off
- Speaker Volume-Low(default) /Medium/ High
- Language-Multilingual
- Screen Saver-Screen Always On / Screen Saver On After 1 MIN
/ Off(default) / Screen off After 1 MIN. - Screen Always On
- Screen Saver On After 1 MIN / Off
- Fatigue Driving Reminder-Off(default ) / 2hour / 3hours / 4hours
- Timezone
- Date / Time
- License Plate
- Default Setting
FAQ of OMBAR M571
Ensure that the output current can reach 5V/2.5A and use our car charger. And ensure that the rear camera is connected correctly. It is to improve stability that the dashcam reboots automatically once it detects that there are different cameras connected.
Remove the protective lens film, clean the lens, and make sure the windshield is clean and clear of grease, dirt, and debris.
It is normal for your camera to run slightly hot. Due to the video being recorded at high speed, the dash cam may be hot during use. (No more than 158°F/70°C).
The cigarette power cable is not working. Inspect the fuse in the car power cable plug. If the fuse is found to be blown, inspect the power cable for damage which may have caused the fuse to blow.
The codecs on your PC may not be compatible or the latest standard download of the latest OMBAR GPS player from www.ombars.com > Support > Downloads.
The video files from the dash cam are in MP4 format and may not be compatible with your PC if suitable playback software is not installed.
Ensure that the “Record Audio” setting is turned ON. Press once the UP button while the video is recording, and it will mute the built-in microphone. Ensure that the “Timelapse Record” setting is turned OFF within the menu.
The dash cam has a minimum focal range of around 2 meters. Objects closer than this are likely to become blurred. LONG PRESS for 2-Seconds to Take Snap.
Using unqualified SD or third-party cards can affect the dashcam’s performance and in some cases, force the dashcam to reboot randomly during recording. If it still can not work normally, it should be that the TF card is unqualified and can not meet the recording requirements of the dash cam. Please contact us to get a new memory card.
Installation is a breeze! The OMBAR M571 comes with an easy-to-follow guide and mountable accessories, allowing you to set it up swiftly and start recording your journeys in no time.