Jayco Embark 2023 Entrance Door User Manual
Entrance Door
Always hold onto the entrance door when opening or closing it. Damage caused because you failed to do so is not covered by the Limited Warranty.
CAUTION
Make sure the entrance door is completely closed and locked when traveling. Locking the door helps prevent it from opening unintentionally and keeps intruders from your recreation vehicle.
The entrance screen door may be equipped with a slide panel that allows access to the en-trance door handle and locks. The entrance door may also be equipped with both a regular door lock and a dead bolt lock.
Keys
Several keys are provided when you purchase your vehicle. Most keys have an individual key number stamped on the plate. Record these key numbers and keep the information in a safe place. You can order a key blank from your dealer to have duplicate keys made. If you lose the keys, contact your dealer or a locksmith for assistance.
Maintenance
Locks on entrance and baggage doors need biannual lubrication using a light coat of silicone spray. Conditions such as rain, salt, dust and pollution may increase maintenance needs.
Keyless Entry
The keyless entry system allows a secure method to lock and unlock the entrance door. The keypad located next to the entrance door controls the keyless entry system. Programming your own personal Authority Code into the system will prevent unauthorized entry into your motor home by those who may know the factory default code. If a correct code is not entered after 20 button presses, the keypad will disable button recognition for one minute. This feature will prevent unauthorized access by entering random codes.
NOTE: An Access Code is not required to lock the doors. Press and hold the (1/2) button. The keypad will beep and doors will begin to lock after two seconds.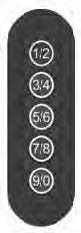
Authority Code
The Authority Code is a unique 5-digit passcode that gives the system administrator (or owner) the ability to program keypad access codes. The Authority Code does not allow for secure operations (like locking the door). It is only used to assign Access Codes. Retrieve the keypad Authority Code from the keyless entry system manual. If the keyless entry Authority Code is still set to the factory default, it should be changed for security purposes.
The default Authority Code = Five presses of the (7/8) button on the keypad.
Assigning a new Authority Code (required to assign a new Access Code)
NOTE: You will need a paperclip to use for programming the keypad.
- Access the program wires located in the dash compartment on the passenger side of the motor home. Remove the tray on the dash by pulling up on the tray.
- Locate the yellow and white wires with spade terminals and a label identifying them as the Program Wires.
- Bend the paperclip, put one end into the spade terminal for the white wire, and the other end into the spade terminal for the yellow wire.
- The keypad will beep for 3 seconds.
- Pull the paperclip out of both wires before the keypad stops beeping. The keypad is now in “Learn Mode”.
- NOTE: Press the keypad only once regard- less of whether you are selecting the first or the second digit on the keypad. For instance, you Program Wires would only press keypad (1/2) one time regardless of whether you were selecting the 1 or the 2
- Enter a new 5-digit Authority Code. Each time you press a number on the keypad it will double beep. When you enter the fifth digit, the keypad will chirp (3) times.
- Re-enter the Authority Code for confirmation. A long beep indicates a failure to change the code.
- Test the new code to confirm it.
- You have (2) minutes to complete this procedure. If you do not complete the process within with in the time limit, or if an error is made, the system will exit Learn Mode and a long chirp will sound indicating an error.
- The keypad automatically leaves Lean Mode when the new code is set.
Assigning a new Access Code (Authority Code must be programmed first)
- Press the (5/6) or third button for (5) seconds until the keypad beeps. The keypad back-light will flash indicating the keypad is in “Learn Mode”.
- Enter the 5-digit Authority Code. If a correct Authority Code is entered, the keypad provides a constant beep that only stops when you assign a defined Memory Bank to store the new Access Code.
- If you enter an incorrect Authority Code the keypad beeps for (1) second and leaves the “Learn Mode”.
- Press and release the button that corresponds to the Memory Bank. For example, press (1/2) or the first button for Memory Bank #1, press (3/4) or the second button for Memory Bank #2. There are (4) Memory Bank locations corresponding to buttons (1/2), (3/4), (5/6) and (7/8).
- Enter a 5-digit Access Code. The keypad chirps (3) times after you enter the fifth digit.
- Re-enter the new Access Code for confirmation. The keypad chirps (3) times to con-firm. A long beep indicates a failure to change the code.
- Test the new code to confirm a successful change.
- Up to (4) Access Codes can be assigned at any time.
- Adding codes to Memory Bank positions with pre-existing codes will over write the previous code.
- If an error is made at any point, or if the time runs out, the keypad will exit “Learn Mode”, beep for 1-2 seconds and not change anything.
Secure Operation
Enter your 5-digit Access Code, keypad will double beep to indicate secure operation. After entering an Access Code, the keypad is enabled for (5) seconds and the next button pressed will initiate a secure operation. Secure operations are:
- (1/2) button unlocks entry doors
- (3/4) button – no function
- (5/6) button – no function
- (7/8) button unlocks entry doors.
- (9/0) Activates light for (5) minutes. Pressing (9/0) again while light is on will turn it off.
Driver and Passenger Seat
- Do not adjust the seat while driving. After adjusting the seat, make sure that it is locked in position. To ensure that the seat is locked securely, try to move the seat forward or backward without using the adjusting lever or button. Do not put packages, pets, or other objects between the driver’s and front passenger cocaptain’s seats.
- Reclining seats: to minimize the risk of personal injury in the event of a collision or sudden stop, always keep both the driver’s captain and passenger co-captain seat backs in a nearly upright position while the motor home is moving. The protection provided by the seat belts may be reduced significantly when the seat back is reclined. Reclining the seats while the motor home is moving may result in serious injury.
- Power seats: keep hands and feet clear of the power seat while operating the power feature.
NOTE: The driver’s and front passenger seat must be locked in the forward-facing position while the motor home is in motion.
Power Seat
Use the controls to slide the power seat to the desired position. Depending on your model, seat controls may be located on the seat or on the door. Release the control, and the seat will lock at that position. Features may include a 3-point adjustable seat belt, lumbar support, swivel, slide, and reclining capabilities. (Not all of these features will be available in all motor home models).
To rotate the driver/passenger seat
Depending on your model, you may have the ability to rotate the driver/passenger seats towards the rear of the motor home. To face the driver or front passenger seat toward the rear of the vehicle, pull the seat swivel release lever up and rotate the seat. To return the seat to the original position, rotate the seat back to the driving position until you hear a click and the seat locks into position.
[amalinkspro_table id=”32452″ new-window=”on” nofollow=”on” addtocart=”off” /]
Reference Links
View Full User Guide: Jayco Embark 2023 User Manual
Download Manuals: https://www.jayco.com/manuals