Jayco Embark 2023 Battery Replacement User Manual
Battery Replacement
If house batteries need to be replaced, only deep cycle batteries of the same size and type should be installed. Refer to the Chassis Guide for information on chassis battery replacement.
Battery Disconnect Solenoid Switch (House Battery Disconnect)
The battery disconnect solenoid switch, or “main power switch,” is located near the entrance door on the front of the passenger’s console.
This switch lights up red when turned on.
NOTE: The combination carbon monoxide/propane alarm is connected to a constant 12-volt power source. The carbon monoxide propane alarm remains operational when the battery disconnect solenoid switch, or “main power switch,” is in the “OFF” position.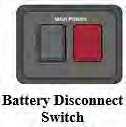
The power steps at the entrance door will also continue to work with these switches in the “OFF” position.
Battery Isolation Manager
Your motor home is equipped with a Battery Isolation Manager (BIM) that monitors the battery voltage of both the chassis and house batteries over long periods of time. If it senses a charging voltage it connects the two batteries together. If the charge system is overburdened, it isolates both batteries. When batteries have reached a float charge state for 1. hour, the batteries are isolated to prevent overcharging. It will reconnect if either battery drops to approximately 80% charge and the other is being charged. If batteries are not being charged they will be isolated to prevent an electrical draw in one system from depleting the other battery.
The “Battery Boost” switch is a manual override of the Battery Isolation Manager. It can be used in an emergency (when chassis or house batteries are discharged) to start the chassis engine or the generator. To operate, press and hold the Battery Boost start switch located on the driver’s left side console. While the battery boost switch is pressed, use the ignition key to start the chassis engine or the generator switch to start the generator. Release the battery boost switch once the engine or generator has started. If your chassis and house batteries are too discharged to start the engine or generator with this method, they need to be recharged with the on-board inverter/charger or by connecting the motor home to shore power.
Automatic Transfer Switch (ATS)
Your motor home is equipped with an Automatic Transfer Switch with built in reverse polarity protection. The ATS is microprocessor controlled and will automatically detect which power source is being used (generator or shore power) and allow power from that connection only. You will not have to plug and unplug power to the coach if you decide to run the generator. If you plug into shore power, the ATS will pass power to the motor home. If the generator is started, it will override the shore power input (called generator dominant) and supply the RV with electrical power from the generator. When the generator is shut down, shore power is restored. There may be a slight flicker of the lights when the ATS changes over from one to the other, but there is no real interruption of power. The ATS will disconnect from shore power completely if the power coming in is not high enough quality (i.e. either low/high voltage, or low/high frequency). When the generator is operating, it powers the inverter/charger which in turn functions as a multi-stage battery charger to charge the house auxiliary and chassis batteries.
Refer to and follow safety information found in the manufacturer’s troubleshooting guide found in your warranty packet.
NOTE: The generator requires 12-volt power from the house auxiliary batteries to start, and draws fuel to operate from the chassis fuel tank. If the fuel level in the chassis fuel tank drops to or below ¼ full, the generator will shut “off” and cannot be re-started until the fuel tank is filled to above ¼ full. Use the prime function to clear air from the fuel lines.
120-Volt Circuit Breakers
The 120-volt AC circuit breakers located inside the load center protect all 120-volt wiring and components from circuit overloads and short circuits. Should a circuit overload or short circuit occur the circuit breaker protecting the affected circuit will “trip” preventing the flow of electricity through that circuit. If a circuit breaker trips, shut off the appliance on that circuit (i.e., power converter, etc.) and allow the circuit breaker to cool down for a brief period of time. After it cools down, reset the circuit breaker by moving its lever “off” and then back to the “on” position. If the circuit breaker re-trips or frequently trips, contact your dealer to have the electrical problem diagnosed and repaired. A circuit breaker identification label is permanently attached to the inside surface of the 120-volt Load Center.
CAUTION
Circuit breakers and fuses will not offer complete protection of the electrical system in the event of a power surge or voltage spike.
Replacement
Only replace circuit breakers with those of the same specified type, voltage, and current rating. Never replace a circuit breaker with one listed at a higher amperage rating. Please contact your dealer for repair assistance when replacing circuit breakers.
WARNING
Replacement circuit breakers must be of the same voltage, amperage rating and type. Never use a higher-rated replacement circuit breaker; doing so may cause a fire by overheating the RV wiring.
Maintenance
At the beginning of the camping season, inspect the circuit breakers and replace as needed. Test by turning each circuit breaker “off” and back “on”. Circuit breakers are wearable parts and must be replaced as needed as part of your RV maintenance. If you have any questions, contact your dealer. A label is provided to explain the function of every 120-volt circuit breaker. This label is located on or near the appropriate load center or sub-panel and must remain permanently affixed to the recreation vehicle.
Approximate Electrical Load Ratings
| 12 VOLT SYSTEM | |
| Exterior Entertainment Center | 5-7 AMPS |
| Fan | 1.5 AMPS |
| Furnace | 12.0 AMPS |
| Generator Start | 95.0 AMPS* |
| Illuminated Switch | .125 AMP |
| Inverter | variable |
| Leveling System | 95.0 AMPS* |
| LP Detector | .125 AMP |
| Light; LED | 1.7 AMPS |
| Light; Vanity | 4.2 AMPS |
| Lights; Aisle | 1.0 AMP |
| Lights; Baggage Compartment / Shower | 1.4 AMPS |
| Lights; Decorative Wall / Map / Porch | 1.5 AMPS |
| Lights; Double -12” | 2.0 AMPS |
| Lights; Double -18” | 2.5 AMPS |
| Power Awning | 10.0 AMPS* |
| Power Vent | 5.0 AMPS |
| Step Cover | 10.0 AMPS* |
| TV Plate/Antenna Booster | 1.0 AMP |
| Water Heater | 6.0 AMPS |
| Water Pump | 7.0 AMPS |
| 120 VOLT SYSTEM | |
| Air Conditioner | 18 AMPS |
| Coffee Maker | 6-12 AMPS |
| Converter (each) | 8 AMPS |
| DVD System | 3 AMPS |
| Fireplace | 15 AMPS |
| Hair Dryer or Curling Iron | 10-14 AMPS |
| Microwave | 15 AMPS |
| Refrigerator | 6 AMPS |
| Satellite Receiver | 2 AMPS |
| TV | 2-4 AMPS |
| Vacuum Cleaner | 8 AMPS |
| Washer/Dryer | 12 AMPS |
| Water Heater | 12 AMPS |
[amalinkspro_table id=”32452″ new-window=”on” nofollow=”on” addtocart=”off” /]
Reference Links
View Full User Guide: Jayco Embark 2023 User Manual
Download Manuals: https://www.jayco.com/manuals