Jayco Embark 2023 Leveling System User Manual
Leveling System
Failure to act in accordance with the following warnings may result in property damage, serious personal injury or death!
The leveling system is designed only for leveling the unit and should never be used to provide service for any reason under the motor home such as changing tires or servicing the system. It is not recommended that you change a tire yourself. Ensure all jack locations are clear of debris, obstructions or depressions. Keep people clear of the motor home prior to turning the leveling system ON and while the leveling system is in operation. After starting the leveling cycle it is important that occupants do not move around in the motor home until the vehicle is level. Failure to re-main still during the leveling cycle can affect the leveling jack system sensors. Never lift the motor home wheels off the ground when leveling the motor home.
- Do not move the motor home while the jacks are still in contact with the ground or extended. Damage to the vehicle could occur.
- Do not rely solely upon warning lights to determine the position of the leveling jacks. It is the operator’s responsibility to check that all the leveling jacks are fully raised in the travel mode before moving the motor home. Failure to operate the vehicle without sufficient air pressure may cause damage or personal injury. Failure to power off the electrical system power and release air pressure may cause damage or personal injury. The Leveling System is a controlled air management system that automatically levels an RV equipped with an air bag suspension. Vehicle and step height can be adjusted after leveling. For detailed operating and safety information, refer to the manufacturer’s user guide.
Leveling System
Key features of the stationary leveling system include:
- The system has both an AUTO and a MANUAL mode allowing four-point manual control of all leveling actuators.
- A slope indicator warns when terrain is too steep for leveling.
- Three digital bubble level indicators show exact vehicle position.
- A twist indicator which warns the operator before potential coach damage can occur.
- Low voltage detection prevents problems associated with low battery power.
- Fault indication provides immediate, accurate diagnosis and troubleshooting.
- There is a built-in speaker for audible alerts.
- A coach can be parked on an angled surface and remain level.
Electronic Ride Enhancement System
Key features of the Electronic Ride Enhancement System include:
- Ride height can be adjusted while traveling.
- The suspension automatically adjusts for changing road conditions.
- Four-corner height sensing with selective averaging.
- Confirmation of travel ride height eliminating guesswork.
- Warning alarm when the suspension is low Step height can be adjusted when leveling is complete
- Reduces excessive roll during cornering, and pitch during acceleration and braking.
- Normal ride height is automatically selected by default. Ride height can be raised or lowered as needed. The high rides may be selected to negotiate uneven terrain; low rides may be selected to gain additional clearance to the top of the RV.
AUTO LEVEL: is used to automatically level the vehicle when it is stationary.
MANUAL LEVEL: allows the operator to raise or lower each corner of the vehicle individually with the air suspension. Up to (2) corners can be operated at the same time, or all corners can be raised or lowered at once. Manual mode can be used with the ignition either ON or OFF, and when the vehicle is traveling at low speeds (up to 5mph).
TRAVEL MODE: is operational when the vehicle is in motion. This mode initiates by default when the parking brake is released or if the vehicle begins moving. It is recommended the operator enter this mode before the vehicle begins moving.
NOTE: The leveling system collects information on the ground speed of the vehicle, so the operational mode can change depending on the speed of the vehicle. In MANUAL mode, the coach can be driven up to 5mph, but if the speed increases to 6 mph the system will switch to TRAVEL mode.
Accessing the Leveling System
The leveling system is accessed via the Video Display Controller (VDC) and the Graphical Instrument Cluster (GIC) interface and is integrated into the digital dashboard. The select-able display area is located in the lower-left corner of the digital dash layout.
NOTE: In order to activate the Leveling System in the Selectable Display area, either the parking brake must be set or vehicle speed must be 0 mph.
Auto Level Operation
Auto level uses the air suspension to level the vehicle. When activated, the system detects the lowest corner of the vehicle and levels (lowers) the remaining corners to that position. If the system determines it cannot lower the vehicle to that level, any corners that are low will be raised to the level of the highest corner. Once auto leveling completes, the system goes into low power mode. The leveling system will store the ride height of the vehicle and when ignition is turned OFF the system will go to sleep. After 2 hours in low power mode the system automatically awakens and checks to see if leveling is required. If no leveling is necessary it goes back to sleep. If leveling is necessary the system restores the ride height to the stored height.
Auto Level Selection
- The ignition should be ON and the air system at full pressure.
- The parking brake is engaged.
- The front wheels are pointing straight ahead.
Rotate the VDC knob in the Selectable Display to find SUSPENSION/LEVELING.
The Suspension/Leveling menu displays PRESS FOR OPTIONS and the current mode the leveling system is in (in this case TRAVEL). Press the
The Suspension/Leveling menu displays PRESS FOR OPTIONS and the current mode the leveling system is in (in this case TRAVEL). Press the VDC knob to select OPTIONS.
In the menu that appears next rotate the VDC knob until Auto Level is selected. Press the knob on the VDC to begin the auto leveling process.
The menu will display PRESS FOR OPTIONS along with AUTO LEVEL and the status at the right will indicate “LEVELING…”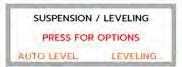

 Auto leveling can be halted at any time by pressing the knob on the VDC.
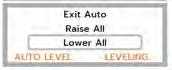 While Auto Level is running, press the VDC knob and the menu will now display Travel, Exit Auto, More. Rotate the VDC knob to highlight Exit Auto and press the VDC knob. Auto leveling will cease.
NOTE: If the system is unable to level the vehicle, the SLOPE status will be displayed and the system goes into low power mode. The system has determined that it would need to exceed the factory set height limits to level the vehicle. Auto Level can be selected to try leveling again, but if the SLOPE status comes on again it is not possible to level the vehicle on that surface and the vehicle should be moved to a more level location. SLOPE indicator is located to the right of the drawing of the chassis with the levels.
[amalinkspro_table id=”32452″ new-window=”on” nofollow=”on” addtocart=”off” /]
Reference Links
View Full User Guide: Jayco Embark 2023 User Manual
Download Manuals: https://www.jayco.com/manuals