 Ferrari F12 BERLINETTA Instruments and Gauges Guide
The Ferrari F12 Berlinetta is a technical marvel famed for its astounding performance and timeless Italian design. The finely built instrument cluster and gauges, which not only serve as practical components but also reflect the legacy and perfection typical with the Ferrari brand, are one of the crucial characteristics that truly set this extraordinary supercar apart. Finally, the Ferrari F12 Berlinetta’s instruments and gauges are more than just utilitarian components; they are fundamental to the car’s overall design and driving experience.
They combine cutting-edge technology with classic elegance to ensure that the driver is not only informed but also deeply connected to the essence of Ferrari’s legendary performance and heritage. Every glance at the instrument cluster in the F12 Berlinetta reminds you of the Italian passion and perfection that defines this automotive masterpiece.
Instruments and Gauges
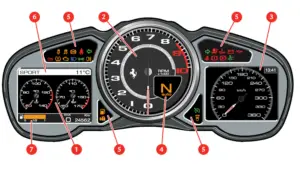 Left TFT display Rev counter Right TFT display Gear display Warning lights on the panel Manettino status Fuel level
Left TFT Display
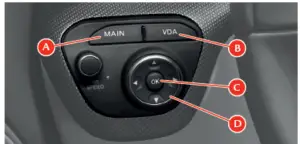
Located on the instrument panel, it performs the following functions: Displays the control parameters Displays general information while driving Displays fault warnings. The driver can interact with the system by selecting the configuration and setting the parameters using the controls on the dashboard to the left of the steering wheel. The display is activated and set by pressing the MAIN (A), VDA (B), OK (C) and UP, DOWN, LEFT, RIGHT (D) buttons.
 MAIN screen page
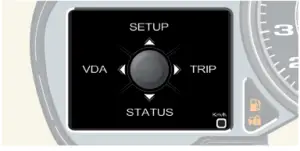
If you press the MAIN button, you activate the MAIN screen page which can be used to access the four screen page groups SETUP, VDA, TRIP and STATUS. These groups contain the following screen pages: SETUP (pressing the UP button) MENU screen page STATUS (pressing the DOWN button) SPORT screen page SPORT 2 screen page TYRES screen page (only if TPMS is present) VDA (pressing the LEFT button) Chronometer screen page Vehicle status screen page Manettino status screen page TRIP (pressing the RIGHT button) TRIP A screen page TRIP B screen page
 Press the RIGHT and LEFT buttons to sequentially switch between screen pages in a group. Press RIGHT to go to the next screen page (for example, in the STATUS group from SPORT to SPORT 2) and press LEFT to go to the previous screen page. Press the RIGHT button after the last screen page to go back to the first screen page and press the LEFT button after the first screen page to go back to the last screen page. When a screen page is called up, it remains on the display until you decide to select another one.
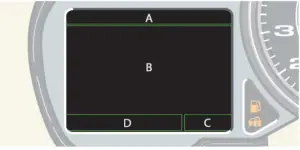
Every screen page consists of four display areas: A – selected driving mode (Manettino position), windscreen wiper status, outside temperature and “Warning: danger of ice” icon B – display of virtual control gauges, parking sensor screen page, display of abnormal events/warnings (message text and special symbol, when available), display of brightness adjustment function C – total or trip odometer (TRIP A or B), range D – fuel level gauge, area for minimised symbol for faults that do not have a specific warning light on the panel (see page 111), speed repetition.
 Display setting and configuration of vehicle parameters
Warning
Display setting and parameter configuration should be performed when the vehicle is stationary.
MENU screen page
Display setting and configuration of the various vehicle parameters is possible using the MENU screen page (the only screen page in the SETUP group) that can be directly called up by pressing the UP button when the MAIN screen page is activated.
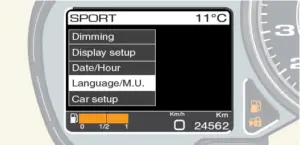 Navigation within the menu is on several levels; the first level offers a list of items through which the following parameters can be set or the following information can be displayed:
- Dimming: display dimming setting
Display setup: display setting
Date/Hour: date and time setting
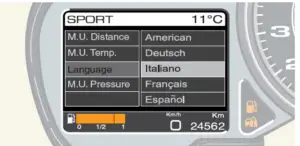
Language/M.U.: language and units of measurement setting
Car setup: vehicle parameter configuration Calibr.
TPMS: TPMS calibration (only if present)
Service: information on scheduled maintenance.
These items are the main menu functions. To scroll through the list of items, press the UP and DOWN buttons; to select the required function, press and quickly release the OK button or the RIGHT button.
 Once the function has been selected, the individual subfunctions or parameters that can be activated are displayed. To select them, use the UP and DOWN buttons and press and quickly release the OK (or RIGHT) button to activate a subsection or activate the selected parameter. To go back to a previous level in the menu hold down the OK button, press the LEFT button or select the BACK item which is normally in the list of subfunctions. If no operation is performed for at least 10 seconds, the first menu level reappears on the display.
Adjusting Brightness
The brightness of the two TFT displays on the instrument panel can be adjusted by selecting the special item on the MENU screen page or by using directly the UP and DOWN buttons when the MENU screen page is not displayed and when the chronometer is off if the Chronometer screen page is displayed. The first time one of the two buttons is pressed, the screen page is displayed. The next time the buttons are pressed, the brightness can be adjusted. The adjustment made, which can be activated even when the vehicle is moving, can be seen immediately and does not affect the brightness of the warning lights on the panel. The screen page disappears when the OK button is pressed or automatically if it is not used for 5 seconds and is replaced by the screen page that was previously displayed. 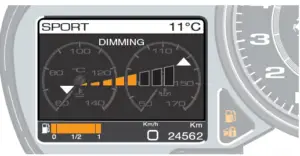 Fuel level gauge
The fuel level gauge is always displayed in area D of the display The gauge has 9 yellow bars that gradually “turn off” as the fuel level drops.![]() When the second bar goes off, the first bar turns red until fuel runs out.
When the second bar goes off, the first bar turns red until fuel runs out.![]() In “Fuel level low” condition, a warning light comes on on the panel and a special symbol and message are displayed for 10 seconds together with information on driving range in km. If the condition that has generated it persists, this signal is repeated every 8 km (5 mi).
In “Fuel level low” condition, a warning light comes on on the panel and a special symbol and message are displayed for 10 seconds together with information on driving range in km. If the condition that has generated it persists, this signal is repeated every 8 km (5 mi).
 In limited cruising range conditions, the information on driving range in km is replaced by the words “Limited cruising range”.
 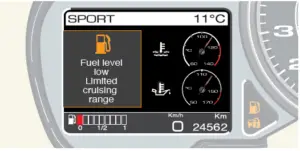 SPORT screen page
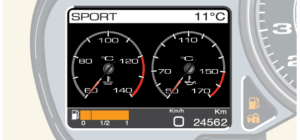
The SPORT screen page displays the following virtual gauges:
- Engine coolant temperature Engine oil temperature
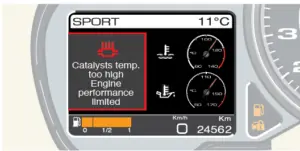
If the SPORT screen page is being displayed and an event occurs that needs to be displayed as a symbol and/or special message, the virtual gauges are minimised. For further information, refer to the “Fault displaying logic” paragraph .
 SPORT 2 screen page
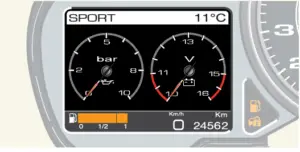
The SPORT 2 screen page displays the following virtual gauges:
- Engine oil pressure Voltmeter
If the SPORT 2 screen page is being displayed and an event occurs that needs to be displayed as a symbol and/or special message, the virtual gauges are minimised. For further information, refer to the “Fault displaying logic” paragraph.
 TYRES screen page (only if TPMS is present)
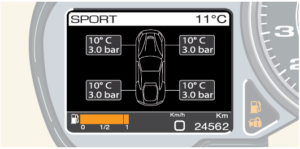
The TYRES screen page, available only if there is a TPMS (tyre pressure and temperature monitoring system), displays the vehicle symbol and indicates the pressure and temperature values for each tyre. If the TYRES screen page is being displayed and an event occurs that needs to be displayed as a symbol and/or special message, the screen page is minimised. For further information, refer to the “Fault displaying logic” .
 VDA ( Vehicle Dynamic Assistance) screen page group
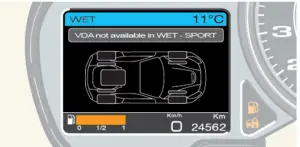
In addition to its chronometer function, the Vehicle Dynamic Assistance (VDA) screen page group provides a valid support for assessing vehicle status when on the track and can be used to intuitively understand the most suitable conditions for performance driving. The VDA group, which is recalled by pressing the LEFT button with the MAIN screen page displayed or directly by pressing the VDA button with any screen page displayed, consists of the “Chronometer”, “Vehicle status” and “Manettino status” screen pages. The “Vehicle status” screen page functions are only available when the “Manettino” driving mode control switch is set to RACE, CT OFF or CST OFF, positions developed especially when using the vehicle on track; however, if the Manettino is set to Low-grip or SPORT mode, the “Vehicle status” screen page is displayed along with the message “VDA available in Race – CT off – CST off”.
 Chronometer screen page
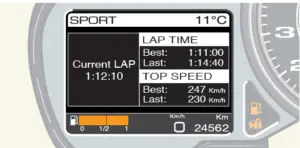
The “Chronometer” screen page is used to time laps and memorise lap time if the vehicle is used on track. The screen page displays the following information:
Current Lap indicates the time elapsed since the start of the chronometer
LAP TIME/Best indicates the time required to complete the last best lap
LAP TIME/Last indicates the time required to complete the last lap
TOP SPEED/Best indicates the maximum speed reached
TOP SPEED/Last indicates the maximum speed reached in the last lap If the“ Chronometer” screen page is being displayed and an event occurs that needs to be displayed as a symbol and/or special message, the screen page is minimised. For further information, refer to the “Fault displaying logic” .
 During display of the event/malfunction, the chronometer remains active. Each time the key is turned to on, the chronometer is reset whereas the last valid Best Lap and Last Lap information is memorised. Chronometer operating logic The chronometer is controlled using the OK, UP and DOWN buttons that perform the following functions:
Pressing and quickly releasing the OK button: when the chronometer is off, starts the Current Lap chronometer when the chronometer is on, resets and restarts the Current Lap and updates the information on previous laps (end of lap/start of next lap)
Pressing and quickly releasing the UP or DOWN button: when the chronometer is on, stops the chronometer and updates information on previous laps when the chronometer is off, displays the screen page for adjusting display brightness
Holding down the UP or DOWN button: when the chronometer is on or off, resets the chronometer and information on previous laps. Note that during display of an event/malfunction, pressing and quickly releasing the OK button interrupts the event/malfunction display cycle (“ESCAPE” function), without affecting the chronometer.
Vehicle status screen page
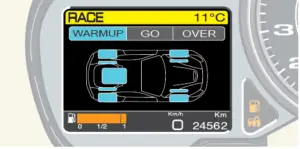
The “Vehicle status” screen page, which is directly called up by pressing the VDA button or by pressing the LEFT button when the MAIN screen page is displayed, is intended to help the user bring the vehicle to optimum performance when driving on high grip surfaces. This is made possible by an algorithm that determines the thermal state of the main vehicle subsystems (tyres, brakes and engine) in relation to the dynamics of various parameters (lateral acceleration, speed, etc.). The status of the vehicle is displayed concisely using three levels which are blue, green and red:
WARMUP
Warm-up stage for components and self-acquisition of control systems; during this stage, the vehicle should be driven so that it is taken to optimum conditions of use.
GO
The vehicle has completed the warm-up stage: all its subsystems have reached optimum conditions of use for performance driving.
 OVER
OVER
One or more systems have reached an overheating condition that may affect vehicle dynamics. Slowing down is therefore recommended to restore these systems to optimum conditions of use. 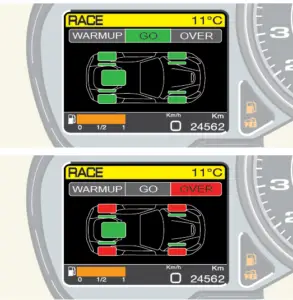 After each start, the CST stability and traction control system compensates for the tyre rolling radius and detects the spare wheel. While this procedure is being performed, the Vehicle Status screen page indicates to the driver that system self-acquisition is in progress by displaying the message “CST autolearning”.
Warning
Use of the vehicle on race tracks: after each start, cover the first straight stretch of the track (at least 500 meters / 0.3 mi) at a constant speed so that the ESC stability and traction control system can calculate exactly the grip available and the rolling radius of the tyres (the calculation is reset every time the engine stops). Failure to observe this rule may lead to reduced system performance. The vehicle, which has been designed and produced for road use, should only be used occasionally on race tracks.
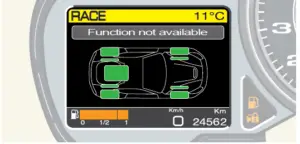
 If one or more signals related to the performance parameters used to calculate the thermal state of the subsystems (lateral acceleration, speed, etc.) are not valid, the Vehicle Status screen page indicates to the driver that the function is not available by displaying the message “Function not available”.
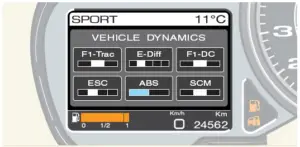
 Manettino status screen page
The “Manettino status” screen page displays a list of parameters which can be configured using the “Manettino” driving mode control switch and indicates the configuration each one assumes in a specific driving mode. The systems involved are the following:
- F1-Trac: traction control
E-Diff: electronic differential
F1-DC: dual clutch F1 gearbox
CST: stability and traction control
ABS: anti-lock braking system
SCM: magnetorheo logically controlled suspension
 If one of the other two VDA screen pages is displayed (“Chronometer” or “Vehicle Status”), the “Manettino Status” screen page is displayed in timed mode for 3 seconds when the position of the Manettino is changed so that the driver is informed of the new status that the systems are in. After 3 seconds, the screen page that was previously displayed reappears. The “Manettino status” screen page is also automatically displayed in timed mode at key-on if one of the other two VDA screen pages was displayed at the previous key-off and the Manettino was in a different position from the current one.
Important note
If there is a Manettino failure, the “Manettino Status” screen page cannot be displayed or recalled.
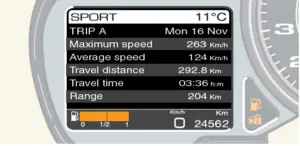
TRIP A and TRIP B screen pages
The TRIP A or TRIP B screen page displays the following information:
- Maximum speed Average speed Travel distance Travel time Range
If the TRIP A or TRIP B screen page is being displayed and an event occurs that needs to be displayed as a symbol and/or special message, the screen page is minimised. For further information, refer to the “Fault displaying logic” .
 “Warning: danger of ice” message
To warn the driver of the presence of ice on the road if the outside temperature is 3 °C (38 °F) or below, the “snow” symbol and the “warning: danger of ice” message are displayed for 10 seconds in the top right of the display. When they are displayed, the symbol and message appear instead of the outside temperature; after 10 seconds, the outside temperature is displayed again and the “snow” symbol appears next to it as long as the outside temperature remains 6 °C (43 °F) or below. 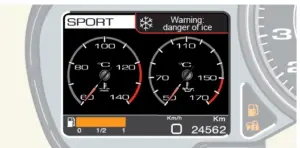 Speed limit setting and “Speed limit exceeded” message
The MENU screen page can be used to set a speed limit in the range 30 – 250 km/h (17 – 155 mph) with 5 km/h (3 mph) steps which sends a message to the driver when exceeded. To set the speed limit, call up the MENU screen page by pressing the UP button when the MAIN screen page is activated. Select “Car setup” and “Speed limit”. To set the value, use the UP and DOWN buttons. When the minimum limit of 30 km/h (17 mph) is reached, press the DOWN button again to deactivate the function or press the UP button after reaching the maximum speed of 250 km/h (155 mph). The function is normally deactivated (OFF). 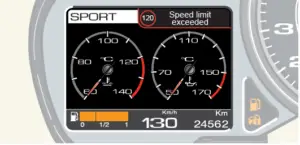 When the set limit is exceeded, the driver is informed in the following way: The symbol showing the set limit and a “speed limit exceeded” message appear in the top right of the display for 10 seconds accompanied by an acoustic signal. Once the warning cycle has ended, the message disappears whereas the symbol continues to be displayed next to the outside temperature until the speed decreases to 5 km/h (3 mph) below the set limit.
Parking sensors (optional)
To help the driver when parking, the vehicle can be fitted on request with four sensors in the rear bumper (rear parking sensors), or four sensors in the front and rear bumpers (front and rear parking sensors).
Warning
The system will only operate correctly if the sensors on the bumpers are free of mud, dirt, snow or ice. When approaching obstacles in front of or behind the vehicle, the parking sensors inform the driver of the distance between the vehicle and the obstacle by way of acoustic signals, which become more frequent as the obstacle approaches, and visual signals in area B of the left TFT display. By supplementing the driver’s direct visual information with that provided by the system acoustic signals and visual warnings, potential collisions can be avoided when parking.
Warning
It is the driver, however, who holds full responsibility for parking manoeuvres and other potentially dangerous situations. The system has only been designed as an aid during parking manoeuvres since it detects obstacles that are outside the driver’s field of vision. Use of the sensors therefore does not mean that the driver can be less careful and attentive and not watch out for persons and obstacles during parking manoeuvres. The rear parking sensors are automatically activated when the key is in position II and reverse gear is engaged. When the rear sensors are activated, an acoustic signal warns the driver that the system has been activated. The front parking sensors can be activated/deactivated by pressing the relative button on the roof panel.
“Stop and Go” function
The “Stop & Go” function automatically activates the front sensors when vehicle speed is 10 km/h (6 mph) or below. This system has been designed to assist the driver in certain traffic conditions (e.g. tailbacks) and signals when the minimum distance is reached between the vehicle and the vehicle in front. To activate or deactivate the system, call up the MENU screen page, select the items “Car setup”, “Parking sensor”, and select one of the two options, “STOP&GO ON” and “STOP&GO OFF”.
Indication of obstacles
The parking sensor system emits acoustic signals as soon as an obstacle is detected which become more frequent as the obstacle approaches. The acoustic signal stops immediately if the distance from the obstacle increases whereas the tone cycle remains constant if the measured distance from the central sensors remains unchanged. The vehicle symbol and sensor detection zones appear on the left TFT display: these zones indicate which part of the vehicle is approaching an obstacle (if front or rear and if left, right or central) and the distance from the obstacle (maximum, medium or minimum). If an obstacle is detected at maximum distance in the central front part, it will be displayed as shown below (green). If an obstacle is detected at medium distance in the central front part, it will be displayed as shown below (orange).
 If an obstacle is detected at minimum distance in the central front part, it will be displayed as shown below (red). The distances between the vehicle and obstacles detected by the rear sensors are represented graphically by the colours green, orange and red as follows: Maximum distance (green): 85 to 65 cm – 33.5 to 25.6 in. (150 to 65 cm – 59.1 to 25.6 in. in central zone) Medium distance (orange): 64 to 41 cm (25.2 to 16.1 in.) Minimum distance (red): 40 to 0 cm (16 to 0 in.).
 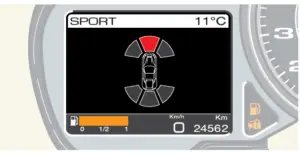 If the front sensors are deactivated, the display does not show the symbols in the front. In the same way, if front sensors are fitted and the rear ones are not activated, the display only shows the symbols in the front. If all the sensors are activated, the system can give several pieces of information at the same time: if an obstacle is detected at a maximum distance in the front central part and at a minimum distance in the rear right part, it will be displayed as shown below.
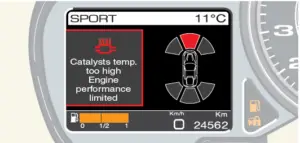
 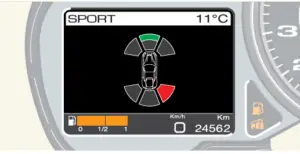 If the parking sensor system symbols are being displayed and an event occurs that needs to be displayed as an icon and/or special message, the symbol is moved from the centre of the display to the right as shown below.
Cleaning the sensors
When cleaning the sensors, be very careful not to scratch or damage them and avoid using dry, rough or hard cloths. The sensors must be washed with clean water and car shampoo added if necessary. In car washes that use steam jet or high pressure water cleaning equipment, quickly clean the sensors keeping the nozzle at a distance of at least 10 cm (4 in.). For the repainting of bumpers or retouching the paintwork in the sensor area, contact the Ferrari Service Network. If paint is applied incorrectly, it may prevent the parking sensors from working properly.
 Indication of parking sensor failure
The system ECU checks all the components each time the reverse gear is engaged. If at least one parking sensor is faulty, the special symbol (see page 118) is displayed on the left TFT display together with the message “Parking sensor failure. Warning! Possible obstacles” accompanied by an acoustic signal.
Important note
The sensors are able to detect obstacles with reasonably large, even surfaces (e.g.: poles with diameters of over 60 mm (2.4 in.), walls, barriers, trees). Detection is not optimum with obstacles with sharp projections or uneven surfaces.
Important note
During parking manoeuvres, always take the utmost care since obstacles may be located above or below the sensors.
Important note
Objects placed close to the rear part of the vehicle are not always detected by the system and may therefore damage the vehicle or be damaged themselves.
Important note
The signals sent by the sensors may also be affected by damage to the sensors caused by dirt, snow or ice on the sensors or by ultrasound systems (e.g. pneumatic brakes on lorries or pneumatic drills) in the vicinity.
Warning
It is the driver, however, who holds full responsibility for parking manoeuvres and other potentially dangerous situations. The system has only been designed as an aid during parking manoeuvres since it detects obstacles that are outside the driver’s field of vision. Use of the sensors therefore does not mean that the driver can be less careful and attentive and not watch out for persons and obstacles during parking manoeuvres.
Fault Display
Fault visualisation logic
When a fault occurs, the corresponding warning light (if present) comes on on the panel whereas a description of the fault (if available) and the relevant symbol (if available) are displayed on the left TFT display. The message appears on the display as soon as the warning light (if present) comes on and the main screen page that is displayed at that time is reduced. The fault remains on the display for 20 seconds. When the display cycle ends, if the fault does not have a special warning light on the panel, the symbol remains minimised in area D of the display (see page 89) until the cause of malfunctioning has been resolved. In area B the main screen page is displayed in “maximum” size.
 When the display cycle ends, if the fault has a special warning light on the panel, the screen page prior to the anomaly is displayed again, and the symbol is not minimised in area D. The warning light on the panel stays on until the cause of malfunctioning has been resolved. If the fault is resolved within 20 seconds, it remains displayed and the warning light remains lit for 2 seconds.
“ESCAPE” function
Displaying a fault on the screen can be interrupted by pressing and quickly releasing the OK button with “ESCAPE” function. When the OK button is pressed, the screen page that was displayed prior to the event reappears. If the fault does not have a special warning light on the panel, the symbol remains minimised in area D until the cause of malfunctioning has been resolved.
 Fault priority levels The simultaneous display of several faults follows a logic that depends on the priority level assigned to it:
Priority level 0 – Extremely critical fault
Priority level 1 – Critical fault
Priority level 2 – Non-critical fault When several fault events occur at the same time, faults with priority level 0 are displayed first, followed by priority level 1 and then priority level 2. The information on the various faults is displayed in turn for 5 seconds each. In any case, the total display time for each fault is never less than 20 seconds. If a fault message with priority level 1 or 2 is being displayed, the priority level 2 message is only displayed once the priority level 1 message has been displayed for at least 2 seconds. If, on the other hand, another new priority level 0 fault occurs, this is displayed immediately.
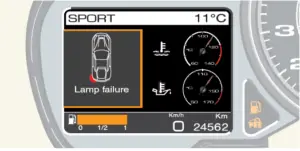
Indication of failure of turn indicators and running lights
A failure of the running lights (front and/or rear) and turn indicators (front and/or rear) is indicated in the same way as other faults but the vehicle symbol with the faulty running light or turn indicator indicated in red is displayed together with a description of the failure instead of the “External lights failure” symbol .When the display cycle ends or the OK button. “ESCAPE” function has been pressed, the “External lights failure” symbol is minimised.
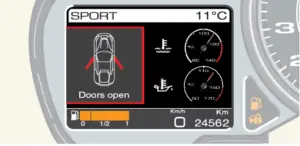
 “Doors, engine or luggage compartment lid open” function display
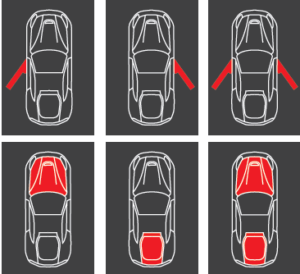
If one or more doors or the engine and/or luggage compartment lid are open, the vehicle symbol appears on the display and indicates which doors or lids are open together with a special message. If the vehicle is in motion, an acoustic signal is also emitted. When the display cycle ends or the OK button with “ESCAPE” function has been pressed, the special symbol is minimised .
FAQs
A high-resolution TFT (Thin-Film Transistor) instrument cluster is standard on the Ferrari F12 Berlinetta.
Yes, the TFT instrument cluster is customisable, allowing you to personalize the information displayed to your tastes.
The prancing horse insignia on the tachometer represents Ferrari’s racing pedigree and emphasizes the car’s performance-oriented design.
Yes, there are analog gauges for things such as engine temperature and oil pressure in addition to the TFT display.
The tachometer in the F12 Berlinetta is centrally located and has a unique redline customized to the performance characteristics of this specific model.
Supplemental gauges often provide engine health and performance data, such as engine temperature and oil pressure.
Yes, the F12 Berlinetta’s steering wheel has controls for altering drive modes and accessing other vehicle information.
Using the specific buttons on the steering wheel, you can choose between several drive modes.
Yes, warning lights are included in the instrument cluster to alert the driver to crucial issues such as low gasoline or engine trouble.
While the F12 Berlinetta may include smartphone connectivity for certain features, compatibility varies depending on model year and choices.
Some F12 Berlinetta models may include a navigation system built into the TFT display.
Vehicle diagnostics and health information are normally accessible via the instrument cluster’s menu.
Instrument cluster software updates may be available through authorized Ferrari service locations.
Because Ferrari offers customization options, you may be able to modify the design of the instrument cluster when ordering your F12 Berlinetta through the company’s Tailor Made program.
Useful Link
View Full PDF : Ferrari F12 BERLINETTA User Manual| Auto User Guide
Ferrari F12 BERLINETTA Seat Adjustment Guidelines