
Genesis GV60 2023 Getting Started Guide
This Genesis GV60 2023 Getting Started Guide is meant to give you all the important information you need to start driving this amazing electric car. The GV60 is the top of the line in terms of comfort, speed, and technology, and we’re excited to have you on board. In this guide, you’ll learn about the most important parts and features of your GV60. You’ll start with an in-depth look at the vehicle’s exterior and interior design, which shows off its beautiful looks and attention to detail. We’ll talk about the advanced electric drivetrain that powers your GV60. We’ll talk about its amazing range, charging options, and the benefits of using electric vehicles that are better for the environment. You’ll also learn how to use the easy-to-use infotainment system, which gives you access to entertainment, mapping, and communication features. We put safety first, so we’ll show you all the driver-assistance systems and safety features that will keep you and your guests safe on the road. We’ll also give you tips on how to take care of your GV60 so that it works at its best.
Genesis GV60 2023
All information in this Owner’s Manual is current at the time of publication. However, Genesis reserves the right to make changes at any time so that our policy of continual product improvement may be carried out.
This manual applies to all Genesis Branded Vehicle models and includes descriptions and explanations of optional as well as standard equipment.
As a result, you may find material in this manual that does not apply to your specific vehicle.
DRIVER POSITION MEMORY SYSTEM
Storing Memory Positions
- Shift to P (Park) while the Start/Stop
- Adjust the driver’s seat position, outside rearview mirror position, and head-up display height to the desired position.
- Hold the button (1 or 2). The system will beep once and notify you ‘Driver 1 (or 2) settings saved’ will appear on the infotainment screen. NOTE: The gear position must be in P (Park).
Recalling
Press the desired memory button (1 or 2). The system will beep once.
DRIVER’S MAIN CONTROLS
Adjusting the outside door mirrors Turn the outer ring to either the L (Left side) or R (Right side) button 1 to select the outside door mirror you would like to adjust. Use the mirror adjustment control switch 2 to position the selected mirror up, down, left or right.
Folding button
The outside door mirrors can be folded or unfolded by pressing the button.
Power Window & Child Safety Lock Button
Disables the power window switches on the rear passenger doors and prevents rear doors from being opened from inside.
Door lock
Locks/unlocks all doors.
Window switches
- Front doors power window switches.
Rear doors power window switches.
If your vehicle is equipped with a vision roof, you can slide open the power sunshade and an all-glass roof appears.
Power sunshade
Use the power sunshade to block direct sunlight coming through the sunroof glass.
The power sunshade can only be operated when Start/Stop button is in the ON or START position.
- Push the switch rearward, the power sunshade automatically slides open.
- Push the switch forward, the power sunshade automatically closes.
To stop the power sunshade at any point, push the switch in any direction.
Resetting the Vision Roof
- It is recommended to perform the reset procedure with the vehicle in the ready mode. Start the vehicle in P (Park).
- Make sure the power sunshade is in the fully closed position. If the power sunshade is open, push the switch forward until the power sunshade and is fully closed.
- Release the switch when the power sunshade is fully closed.
- Push the switch forward until the power sunshade moves slightly. Then release the switch.
- Once again push and hold the switch forward until the power sunshade slides open and close. Do not release the switch until the operation is completed.
HANDS FREE SMART LIFTGATE
On vehicles equipped with Smart Liftgate, the liftgate can be opened with no-touch activation.
To activate
To enable Smart Liftgate, go to User Settings mode on the LCD display, or Setup, then Vehicle on the Navigation display and under the Door menu make sure the Power Liftgate and Smart Liftgate boxes are checked.
Power Liftgate Opening Speed
You can adjust Power Liftgate speed to “Fast” and “Standard”.
Setup -> Vehicle -> Door/Liftgate -> Power Liftgate Speed
Hands Free Smart Liftgate Operation
The liftgate can be opened with no-touch activation after the below conditions are met:
- After 15 seconds from when all doors are closed and locked
- You approach the rear of the vehicle (liftgate area) for at least 3 seconds with the Smart Key in your posession
EV DTE TIPS
- When the vehicle is charged, DTE displayed in the instrument cluster is calculated based on previous operating patterns.
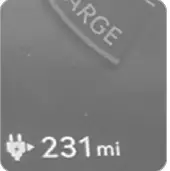
- Distance to Empty (DTE) may depend on many factors such as high voltage battery % charge, weather, temperature, battery condition, geographical features (hills driven recently), and driving style.
- After you first receive your vehicle, the accuracy of the DTE gradually increases by learning your driving pattern (air conditioning/heating usage, weather, driving pattern – including average vehicle speed).
- The more the HVAC air conditioner / heater is used, the less energy is available for driving range. Use seat heater & steering wheel heater (if equipped) or pre-conditioning while still plugged in to reduce the need for cooling / heating while driving.
- It is recommended to set the cabin temperature to 72°F AUTO. This setting provides optimal energy consumption rates while maintaining a constant temperature.
- Depress and hold the accelerator pedal smoothly to maintain speed and to drive economically. Maximize the use of regen
braking to charge battery when reducing speed.
Adjust regen braking level and settings to your preference.
- When using the heater or air conditioning system use the DRIVER ONLY or scheduled air conditioner / heater function.
COLD WEATHER TIPS
- EV battery energy consumption is increased by cold or hot temperatures. It is far more noticeable in cold weather.
- When using the heater during cold weather, the high voltage battery consumes more energy. This may reduce the distance to empty significantly. Usage of seat & steering wheel heater in lieu of heater does not affect DTE.
- In cold weather, pre-scheduled heating helps enhance electric vehicle performance by heating the vehicle in advance.
 You can also use Genesis Connected Services to remotely set the cabin temperatures while charging (subscription required.)
 - Select Winter / Battery Conditioning
Mode in EV Settings to increase battery temperature during winter to improve driving & DC charging performance, however this will reduce DTE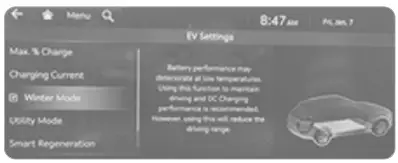
- “Power Limited Due to Low EV
Battery Temperature, Charge Battery” warning message is displayed to protect the electric vehicle system when outside temperature is low.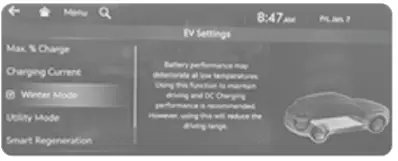 HOMELINK WIRELESS CONTROL SYSTEM
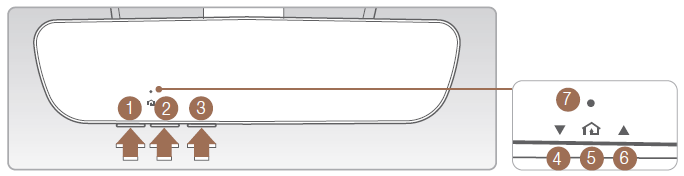
- Press and release 1 , 2, or 3 buttons.
- If the indicator 7 is turned ON in Orange, go to Step 3 (programming mode)
- If the indicator 7 is continuously turned ON or flashes in Green rapidly several times, go to Step 2 (erasing mode)
- Press and hold the button you wish to program for approximately 15- 25 seconds until the LED flashes in Orange several times.
- Hold the Garage Door Opener’s Original Transmitter near the HomeLink Mirror.
- Press the Original Transmitter button until indicator 7 is turned continuously ON or flashes in Green for approximately 10 seconds and it indicates the programing is completed.
NOTE: If indicator 7 flashes in Green continuously, but if the garage door opener does not operate, please continue to follow the Rolling Code Programming steps below.
Two Way Communication
Some new garage door openers come equipped with a two-way communication feature. If your garage door opener has this feature, please also continue to follow the Rolling Code Programming steps below. For more information and programming tips on two-way communication please visit www.homelink.com/compatible/two-way communication or call (800)-355-3515.
2023 GENESIS GV60 Specs, Price, Features, Mileage (Brochure)
FAQ
A: The Genesis GV60 2023 is an all-electric compact luxury SUV by the Genesis brand, known for its premium features and sustainable performance.
A: To start the GV60 2023, ensure the key fob is in the vehicle, press the brake pedal, and then press the “Start/Stop” button.
A: The “Start/Stop” button is used to start and stop the vehicle’s engine or motor, depending on whether it’s powered by an internal combustion engine or an electric motor.
A: The GV60 2023 offers different driving modes such as Eco, Comfort, Sport, and Custom, allowing you to tailor the vehicle’s performance to your preferences.
A: Use the central touchscreen or controls to select the desired driving mode, which can adjust factors like throttle response, steering, and suspension.
A: Yes, the GV60 2023 typically offers regenerative braking modes that allow you to adjust the level of energy recaptured during braking.
A: Depending on the configuration, regenerative braking is often engaged automatically when you lift your foot off the accelerator pedal.
A: Yes, the GV60 2023 supports smartphone integration through technologies like Apple CarPlay and Android Auto.
A: Connect your smartphone via USB or Bluetooth, then follow the on-screen prompts to enable smartphone integration.
A: Yes, the GV60 2023 often comes equipped with advanced driver assistance systems (ADAS) such as adaptive cruise control, lane-keeping assist, and more.
A: Use the controls on the steering wheel to set your desired speed and the following distance to activate the adaptive cruise control.
A: Lane-keeping assist helps keep the vehicle within its lane by providing gentle steering inputs if it detects unintended lane departure.
A: Yes, the GV60 2023 often includes a voice control system that lets you interact with various vehicle functions using voice commands.
A: Activate the voice control system by pressing a dedicated button or using a voice command wake-up phrase, then follow prompts for specific actions.
A: The owner’s manual provides comprehensive information about the vehicle’s features, controls, maintenance, and more, serving as a guide for getting started and maximizing your GV60 experience.
Useful Link
Genesis GV80 2022 Getting Started Guide
Genesis G70 2019 User Manual
Related Article
2023 GENESIS ELECTRIFIED GV70 Specs, Price, Features, Mileage (Brochure)
2023 GENESIS G90 Specs, Price, Features, Mileage (Brochure)
2023 GENESIS GV70 Specs, Price, Features, Mileage (Brochure)