GMC Acadia 2023 Information Displays
The 2023 GMC Acadia Information Display System is a cutting-edge combination of technology and ease. Its advanced multimedia interface makes driving more enjoyable. The large display screen, which is usually between 7 and 8 inches, is at the centre of the dashboard and acts as a hub for all the information and entertainment choices for both the driver and the passengers. With built-in support for Apple CarPlay and Android Auto, display settings that can be changed, voice control that is easy to use, and the option for real-time traffic updates, the Information Display System improves connectivity, safety, and convenience, making every trip in the 2023 GMC Acadia an immersive and informed experience.
2023 GMC ACADIA Specs, Price, Features and Mileage (Brochure)
Information Displays
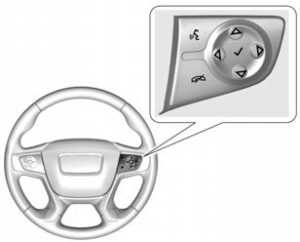
w or x: Press to move up or down in a list.
o or p: Press to move between the interactive display zones in the cluster.
V: Press to open a menu or select a menu item. Press and hold to reset values on certain screens
DIC Info Page Options
The info pages on the DIC can be turned on or off through the Options menu.
- Press o to access the cluster applications.
- Press w or x to scroll to the Options application.
- Press V to enter the Options menu.
- Scroll to Info Pages and press p.
- Press w or x to move through the list of possible information displays.
- Press V while an item is highlighted to select or deselect that item. When an item is selected, a checkmark will appear next to it.
DIC Info Pages
The following is the list of all possible DIC info page displays. Some may not be available for your particular vehicle. Some items may not be turned on by default but can be turned on through the Options app.
See “DIC Info Page Options” earlier in this section.
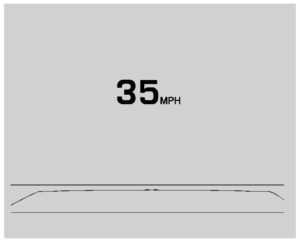
Speed: Shows the vehicle speed in either kilometres per hour (km/h) or miles per hour (mph). A speed limit sign can also be shown if equipped.
Trip A or Trip B: Shows the current distance travelled, in either kilometres (km) or miles (mi), since the trip odometer was last reset.
This also shows the approximate average litres per 100 kilometres (L/100 km) or miles per gallon (mpg). This number is calculated
based on the number of L/100 km (mpg) recorded since the last time this menu item was reset. This number reflects only the approximate average fuel economy that the vehicle has right now, and will change as driving conditions change.
Press and hold V while this display is active to reset the trip odometer and the average fuel economy. Trip A and Trip B can also be reset by pressing p and choosing reset.
Fuel Range: This shows the approximate distance the vehicle can be driven without refuelling. LOW will be displayed when the vehicle is low on fuel. The fuel range estimate is based on an average of the vehicle’s fuel economy over recent driving history and the amount of fuel remaining in the fuel tank.
Remaining Oil Life : This shows an estimate of the oil’s remaining useful life. If REMAINING OIL LIFE 99% is displayed, that means 99% of the current oil life remains.
When the remaining oil life is low, the CHANGE ENGINE OIL SOON message will appear on the display. The oil should be changed as soon as possible. In addition to the engine oil life system monitoring the oil life, additional maintenance is recommended in the Maintenance Schedule.
The Oil Life display must be reset after each oil change. It will not reset itself. Do not to reset the Oil Life display at any time other than when the oil has just been changed. It cannot be reset accurately until the next oil change. To reset
Tire Pressure: Shows the approximate pressures of all four tires. Tire pressure is displayed in either kilopascal (kPa) or in pounds per square inch (psi). If the pressure is low, the value for that tire is shown in amber. See Tire Pressure Monitor System 0 301 and ire Pressure Monitor Operation 0 302.
Average Vehicle Speed: Displays the average vehicle speed of the vehicle in kilometres per hour (km/h) or miles per hour (mph). This average is based on the various vehicle speeds recorded since the last reset. Reset the average speed by pressing V when it is displayed.
Fuel Economy: The center displays the approximate instantaneous fuel economy as a number and bar graph. Displayed above the bar graph is a running average of fuel economy for the most recently travelled selected distance. Displayed below the bar graph is the best average fuel economy that has been achieved for the selected distance.
The selected distance is displayed at the top of the page as “last xxx mi/km.”
Press V to select the distance or reset best value. Use w and x to choose the distance and press V. Press w and x to select “Reset Best Score.” Press V to reset the best average fuel economy. After reset, the best value displays “-,-” until the selected distance has been travelled.
The display provides information on how current driving behaviour affects the running average and how well recent driving compares to the best that has been achieved for the selected distance.
Economy Trend: Shows the history of the Average Fuel Economy from the last 50 km (30 mi). Each bar represents about 5 km (3 mi) of driving. During driving the bars will shift to always reflect the most recent distance on the right side. Press and hold V to clear the graph or to reset through the menu. ECO Index: Provides feedback on the efficiency of current driving behavior. The bar graph shows a value that is based on current fuel consumption compared to what is expected from the vehicle with good and bad driving habits.
Timer: This display can be used as a timer.
To start the timer, press V while this display is active. The display will show the amount of time that has passed since the timer was last reset. To stop the timer,
press V briefly while this display is active and the timer is running. To reset the timer to zero, press and hold V while this display is active, or press p and select reset.
Battery Voltage: Displays the current battery voltage, if equipped. Battery voltage changes are normal while driving.
If there is a problem with the battery charging system, the DIC will display a message.
Transmission Fluid Temperature: Shows the temperature of the automatic transmission fluid in either degrees Celsius (°C) or degrees Fahrenheit (°F).
Blank Page : Shows no information.
Driver Information Center (DIC) (Midlevel)
The DIC displays are shown in the center of the instrument cluster in the Info App. The displays show the status of many vehicle systems.

w or x: Press to move up or down ina list.
o or p : Press to move between the interactive display zones in the cluster.
V: Press to open a menu or select a menu item. Press and hold to reset values on certain screens.
Info Page Options
The info pages on the DIC can be turned on or off through the Options menu.
- Press o or p to scroll to the Options application.
- Press w or x to scroll to the Info Page Options and press V.
- Press w or x to move through the list of possible information displays.
- Press V while an item is highlighted to select or deselect that item. When an item is selected, a checkmark will appear next to it.
Info Pages
The following is the list of all possible DIC info page displays. Some may not be available for your particular vehicle. Some items may not be turned on by default but can be turned on through the Options app.
Speed: Shows the vehicle speed in either kilometres per hour (km/h) or miles per hour (mph). If equipped, press V to open the menu and select to display speed limit signs. The sign will show “− −” when there is no detected speed limit or the system is unavailable.
Speed Signs: Shows sign information, which comes from a roadway database in the onboard navigation if equipped. The sign will show “− −” when there is no detected speed limit or the system is unavailable. Press V while this display is active to toggle the Speed Limit sign on or off.
Trip 1 or Trip 2 : Shows the current distance travelled, in either kilometres (km) or miles (mi), since the trip odometer was last reset.
If equipped, shows the average fuel economy since the last reset. This number reflects only the approximate average fuel economy that the vehicle has right now, and will change as driving conditions change. The average fuel economy can be displayed as mpg, km/L, or L/100km where applicable. If equipped, shows the average speed since the last reset. This number reflects only the approximate average speed that the vehicle has, and will change as driving conditions change. Average speed can be displayed as mph or km/h where applicable. Press V while this display is active to show a confirmation window to reset all values to zero. Use o or p to select yes or no and press V.
Fuel Information or Fuel Range: This shows the approximate distance the vehicle can be driven without refuelling. LOW will be displayed when the vehicle is low on fuel.
The fuel range estimate is based on an average of the vehicle’s fuel economy over recent driving history and the amount of fuel remaining in the fuel tank. If equipped, may also show the instantaneous fuel economy.
Oil Life: This shows an estimate of the oil’s remaining useful life. If REMAINING OIL LIFE 99% is displayed, that means 99% of the current oil life remains.
When the remaining oil life is low, the CHANGE ENGINE OIL SOON message will appear on the display. The oil should be changed as soon as possible. in addition to the engine oil life system monitoring the oil life, additional maintenance is recommended.
The Oil Life display must be reset after each oil change. It will not reset itself. Do not reset the Oil Life display at any time other than when the oil has just been changed.
It cannot be reset accurately until the next oil change. To reset,
Tire Pressure: This shows the approximate pressures of all four tires. Tire pressure is displayed in either kilopascal (kPa) or in pounds per square inch (psi). If the pressure is low, the value for that tire is shown in amber.
Air Filter Life Shows an estimate of the engine air filter’s remaining useful life and the state of the system. Engine Air Filter Life 95% means 95% of the current air filter life remains. Messages will display based on the engine air filter life and the state of the system. When the REPLACE AT NEXT OIL CHANGE message displays, the engine air filter should be replaced at the time of the next oil change. When the REPLACE SOON message displays, the engine air filter should be replaced at the earliest convenience.
The Air Filter Life display must be reset after the engine air filter replacement. To reset,
Fuel Economy: The centre displays the approximate instantaneous fuel economy as a number and bar graph. Displayed above the bar graph is a running average of fuel economy for the most recently traveled selected distance. Displayed below the bar graph is the best average fuel economy that has been achieved for the selected distance.
The selected distance is displayed at the top of the page as “last xxx mi/km.”
Press V to select the distance or reset best value. Use w and x to choose the distance and press V. Press w and x to select “Reset Best Score.” Press V to reset the best average fuel economy. After reset, the best value displays “-,-” until the selected distance has been travelled.
The display provides information on how current driving behaviour affects the running average and how well recent driving compares to the best that has been achieved for the selected distance.
Timer: This display can be used as a timer.
To start the timer, press V to open the menu while this display is active. Use w and x to select Start Timer or Reset. Press V. To stop the timer, press V while this display is active. The display will show the amount of time that has passed since the timer was last reset.
Follow Distance/Gap Setting: If equipped, the current follow time to the vehicle ahead is displayed as a time value on this page.
When Adaptive Cruise Control (ACC) has been engaged, the display switches to the gap setting page. This page shows the current gap setting along with the vehicle head indicator.
Driver Assistance: If equipped, shows information for Lane Keep Assist (LKA), Lane
Departure Warning (LDW), and Forward Collision Alert (FCA).
Battery Voltage: Displays the current battery voltage, if equipped. Battery voltage changes are normal while driving. If there is a problem with the battery charging system, a DIC will display a message.
Economy Trend: Shows the history of the Average Fuel Economy from the last 50 km (30 mi). Each bar represents about 5 km (3 mi) of driving. During driving the bars will shift to always reflect the most recent distance on the right side. Press V to open the menu while this display is active to clear the graph. Select yes or no and press V.
ECO Index: Provides feedback on the efficiency of current driving behaviour. The bar graph shows a value that is based on current fuel consumption compared to what is expected from the vehicle with good and bad driving habits.
Off Road: Displays vehicle pitch and roll information, road wheel angle, a and information, road wheel angle, and four-wheel drive (4WD) status.
Blank Page: Shows no information.
Driver Information Center (DIC) (Up level)
The DIC displays are shown in the center of the instrument cluster in the Info app.
The displays show the status of many vehicle systems. The controls for the DIC are on the right steering wheel control

w or x: Press to move up or down in a list.
o or p: Press to move between the interactive display zones in the cluster.
V: Press to open a menu or select a menu item. Press and hold to reset values on certain screens.
DIC Info Page Options
The info pages on the DIC can be turned on or off through the Options menu.
- Press p to go to the Options application.
- Press V to enter the Options menu.
- Press w or x to move through the list of possible information displays.
- Press V while an item is highlighted to select or deselect that item. When an item is selected, a checkmark will appear next to it.
DIC Info Pages
The following is the list of all possible DIC info page displays. Some may not be available for your particular vehicle. Some items may not be turned on by default but can be turned on through the Options app.
Speed: Shows the vehicle speed in either kilometers per hour (km/h) or miles per hour (mph). The vehicle odometer is also shown on this page.
Trip A or Trip B, Average Fuel Economy, and Average Speed: Shows the current distance traveled, in either kilometre (km) or miles (mi), since the trip odometer was last reset.
The Average Fuel Economy display shows the approximate average liters per 100 kilometres (L/100 km) or miles per gallon (mpg). This number is calculated based on the number of L/100 km (mpg) recorded since the last time this menu item was reset. This number reflects only the approximate average fuel economy that the vehicle has right now, and will change as driving conditions change.
The Average Speed display shows the average speed of the vehicle in kilometres per hour (km/h) or miles per hour (mph). This average is calculated based on the various vehicle speeds recorded since the last reset of this value. Press and hold V while this display is active to reset the trip odometer, the average fuel economy, and the average speed. Or press p and select reset in the menu. Fuel Range and Instantaneous Fuel
Economy: This shows the approximate distance the vehicle can be driven without refuelling.
LOW will be displayed when the vehicle is low on fuel. The fuel range estimate is based on an average of the vehicle’s fuel economy over recent driving history and the amount of fuel remaining in the fuel tank. The Instantaneous Fuel Economy display shows the current fuel economy in either liters per 100 kilometres (L/100 km) or miles per gallon (mpg). This number reflects only the approximate fuel economy that the vehicle has right now and changes frequently as driving conditions change.
Timer: Can be used as a timer. To start the timer, press V while this display is active. The display will show the amount of time that has passed since the timer was last reset. To stop the timer, press V briefly while this display is active and the timer is running. To reset the timer to zero, press and hold V while this display is active.
Oil Life: Shows an estimate of the oil’s remaining useful life. If REMAINING OIL LIFE 99% is displayed, that means 99% of the current oil life remains.
When the remaining oil life is low, the CHANGE ENGINE OIL SOON message will appear on the display. The oil should be changed as soon as possible. In addition to the engine oil life system monitoring the oil life, additional maintenance is recommended in the Maintenance Schedule.
The Oil Life display must be reset after each oil change. It will not reset itself. Do not to reset the Oil Life display at any time other than when the oil has just been changed.
It cannot be reset accurately until the next oil change. To reset,
Tire Pressure: This shows the approximate pressures of all four tires. Tire pressure is displayed in either kilopascal (kPa) or in pounds per square inch (psi). If the pressure is low, the value for that Pressure Monitor Operation 307.
Head-Up Display (HUD)
Warning
If the HUD image is too bright or too high in your field of view, it may take you more time to see things you need to see when it is dark outside. Be sure to keep the HUD image dim and placed low in your field of view. If equipped with HUD, some information concerning the operation of the vehicle is projected onto the windshield. The information is projected through the HUD lens on the driver side of the instrument panel and focused out toward the front of the vehicle.
Caution
If you try to use the HUD image as a parking aid, you may misjudge the distance and damage your vehicle. Do not use the HUD image as a parking aid.
The HUD information can be displayed in various languages. The speedometer reading and other numerical values can be displayed in either English or metric units.
The language selection is changed through the radio and the units of measurement are changed through the instrument cluster.
HUD Display on the Windshield
The HUD may display some of the following vehicle information and vehicle messages or alerts.
- Speed
- Tachometer
- Audio
- Phone
- Navigation
- Collision Alert
- Adaptive Cruise Control and set speed
- Lane Departure Warning/Lane Keep Assist . Low Fuel
Some vehicle messages or alerts displayed in the HUD may be cleared by using the steering wheel controls.
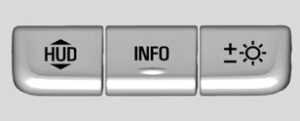
The HUD control is to the left of the steering wheel.
To adjust the HUD image:
- Adjust the driver seat.
- Start the engine.
- Use the following settings to adjust the HUD.
- Press or lift to center the HUD image.
The HUD image can only be adjusted up and down, not side to side.
The HUD image can only be adjusted up and down, not side to side. press will change the display view.
- Lift and hold to brighten the display.
Press and hold to dim the display. Continue to hold to turn the display off.
The HUD image will automatically dim and brighten to compensate for outside lighting. The HUD brightness control can also be adjusted as needed.
The HUD image can temporarily light up depending on the angle and position of sunlight on the HUD display. This is normal.
Polarized sunglasses could make the HUD image harder to see.
HUD Rotation Option
This feature allows for adjusting the angle of the HUD image. Press the V on the steering wheel controls while Head-up Display Rotation is highlighted to enter Adjust Mode. Press w or x to adjust the angle of the HUD display. Press the V to save the setting or press o to cancel the setting. The vehicle must be in P (Park).
Head-Up Display (HUD) Rotation Option
This feature allows for adjusting the angle of the HUD image.
Press the thumbwheel on the steering wheel controls while the Head-Up Display Rotation is highlighted to enter Main View. From Main View, press the thumbwheel to enter the Adjust Menu. Press y or z to adjust the angle of the HUD display. Press S or T to highlight OK, then press the thumbwheel to save the setting. CANCEL can also be selected to cancel the setting. The vehicle must be in P (Park).
There are four views in the HUD. Some vehicle information and vehicle messages or alerts may be displayed in any view.

Speed View : This displays digital speed in English or metric units, speed limit, vehicle ahead indicator, Lane Departure Warning/ Lane Keep Assist, and Adaptive Cruise Control and set speed. Some information only appears on vehicles that have these features, and when they are active.
Performance View: This displays digital speed, indicators from speed view along with rpm reading, vehicle ahead indicator, Lane Departure Warning/Lane Keep Assist, and Adaptive Cruise Control and set speed
Audio/Phone View: This displays digital speed, indicators from speed view along with audio/phone information. The current radio station, media type, and incoming calls will be displayed.
All HUD views may briefly display audio information when the steering wheel controls are used to adjust the audio settings appearing in the instrument cluster.
Incoming phone calls may display in any HUD view.
Audio/Phone View : This displays digital speed, indicators from speed view along with audio/phone information. The current radio station, media type, and incoming calls will be displayed. All HUD views may briefly display audio information when the steering wheel controls are used to adjust the audio settings appearing in the instrument cluster.
Incoming phone calls may display in any HUD view.
Performance View: This displays digital speed, indicators from speed view along with rpm reading, transmission positions, and gear shift indicator (if equipped).
Care of the HUD
Clean the inside of the windshield as needed to remove any dirt or film that could reduce the sharpness or clarity of the HUD image.
Clean the HUD lens with a soft cloth sprayed with glass cleaner. Wipe the lens gently, then dry it.
2023 GMC ACADIA Specs, Price, Features and Mileage (Brochure)
HUD Troubleshooting
If you cannot see the HUD image when the ignition is on, check that:
- Nothing is covering the HUD
- The HUD brightness setting is not too dim or too bright.
- The HUD is adjusted to the proper height and rotation.
- Polarized sunglasses are not
- The windshield and HUD lens are clear.
If the HUD image is not correct, contact your dealer. The windshield is part of the HUD system.
Programming the Universal Remote System
Programming involves time-sensitive actions and may time out, requiring the procedure to be repeated. Read these instructions completely before programming the Universal Remote system. It may help to have another person assist with the programming process.
- Hold the end of the hand-held transmitter about 3 to 8 cm (1 to 3 in) away from the Universal Remote system buttons with the indicator light in view.T
he hand-held transmitter was supplied by the manufacturer of the garage door opener receiver. - Press and release one of the three Universal Remote system buttons to be programmed. Press and hold the hand-held transmitter button. Do not release the hand-held transmitter button until the indicator light changes from a slow to a rapid flash or continuous light. Then release the hand-held transmitter button.
Some garage door openers may require the substitution of Step 2 with the procedure under “Radio Signals for Some Gate Operators” later in this section. - Press and hold the newly programmed Universal Remote system button for five seconds while watching the indicator light and garage door activation.
- If the indicator light stays on
- continuously or the garage door moves when the button is pressed, then programming is complete. There is no need to complete Steps 4–6.
- If the indicator light does not come on or the garage door does not move, a second button press may be required. For a second time, press and hold the newly programmed button for five seconds. If the indicator light stays on continuously or the garage door moves when the button is pressed, then programming is complete. There is no need to complete Steps 4–6.
- If the garage door does not move, continue with programming Steps 4–6.
Learn or Smart Button
- After completing Steps 1–3, locate the Learn or Smart button inside garage on the garage door opener receiver. The name and color of the button may vary by manufacturer.
- Press and release the Learn or Smart button. Step 6 must be completed within 30 seconds of pressing this button.
- Return to the vehicle and firmly press and hold the trained Universal Remote system button for two seconds and release. Repeat the “press/hold/release” sequence up to three times to complete the training process.
The Universal Remote system should now activate the garage door. Repeat the process for programming the remaining two buttons.
For questions or programming help, see www.homelink.com/gm or call 1-800-355-3515. For calls placed outside the U.S., Canada, or Puerto Rico, international
rates will apply and may differ based on landline or mobile phone.
Radio Signals for Some Gate Operators Some gate operators and radio-frequency laws require transmitter signals to time out or quit after several seconds of transmission.
This may not be long enough for the Universal Remote system to pick up the signal during programming. If the programming did not work, replace Step 2 under “Programming the Universal Remote System” with the following
Radio Signals for Some Gate Operators
Some gate operators and radio-frequency laws require transmitter signals to time out or quit after several seconds of transmission. This may not be long enough for the Universal Remote system to pick up the signal during programming.
If the programming did not work, replace Step 2 under “Programming the Universal Remote System” with the following:
Press and hold the Universal Remote system button while pressing and releasing the hand-held transmitter button every two seconds until the signal has been successfully accepted by the Universal Remote system. The Universal Remote system indicator light will flash slowly at first and then change to a rapid flash or continuous solid-light. Proceed with Step 3 under “Programming the Universal Remote System” to complete.
Universal Remote System Operation
Using the Universal Remote System Press and hold the appropriate Universal Remote system button for at least one-half second. The indicator light will come on while the signal is being transmitted. Erasing Universal Remote System Buttons Erase all programmed buttons when vehicle ownership is terminated.
To erase:
- Press and hold the two outside buttons until the indicator light begins to flash.
This should take about 10 seconds. - Release both buttons.
Reprogramming a Single Universal
Remote System Button
To reprogram any of the system buttons:
- Press and hold any one of the buttons.
Do not release the button. - The indicator light will begin to flash after 20 seconds. Without releasing the button, proceed with Step 1 under
“Programming the Universal Remote System.”
FAQ
The Information Display System is a multimedia interface that provides various vehicle information and entertainment options.
How large is the display screen in the 2023 GMC Acadia?
The display screen size can vary, but it typically ranges from 7 to 8 inches, depending on the trim level.
What kind of information does the display system show?
The system can display information like navigation, audio settings, vehicle diagnostics, and more.
Is the system compatible with Apple CarPlay and Android Auto?
Yes, it often comes with compatibility for both Apple CarPlay and Android Auto for seamless smartphone integration.
Can I customize the display settings and layouts?
Yes, many models allow you to customize the display settings and layouts to suit your preferences.
How do I adjust the brightness and contrast of the display?
You can typically adjust these settings through the system’s settings menu.
Does it have voice control functionality?
Yes, it often features voice control for various functions, including navigation and making calls.
Can I connect my smartphone via Bluetooth?
Yes, you can often connect your smartphone to the system via Bluetooth for hands-free calling and audio streaming.
Does it offer real-time traffic information?
Some models may offer real-time traffic updates through the navigation system.
Is there a built-in Wi-Fi hotspot?
Some versions of the 2023 GMC Acadia may offer a built-in Wi-Fi hotspot for internet connectivity.
Can I control the climate settings through the display system?
Yes, you can often control the climate settings through the touchscreen or physical buttons on the system.
Does it have a rearview camera display?
Yes, it usually includes a rearview camera display to assist with parking and reversing.
Is there a user manual accessible through the system?
Some models may provide access to the user manual through the display system.
Can I update the system’s software?
Updates for the system software may be available through authorized dealerships or online.
Does the system offer multiple language options?
Yes, it often supports multiple languages to accommodate different users’ preferences.
How to turn on Heads Up Display GMC Acadia 2023?
To turn on the 2023 GMC Acadia Heads Up Display, press the “HUD” button located on the dashboard near the steering wheel. Adjust the settings using the controls to customize the display to your preferences.
How to change display on GMC Acadia?
To change the display on a GMC Acadia, access the “Settings” menu, then select “Display” or a similar option to adjust settings like brightness and layout. Confirm your changes to apply the new display settings.
Useful Link
View Full User Guide: GMC Acadia 2023 User Guide
Download Manuals: https://www.cadillac.com/support/vehicle/manuals-guides
2023 GMC ACADIA Specs, Price, Features and Mileage (Brochure)