2019 Harley Davidson Boom Box GTS Audio User Manual
The Harley-Davidson Boom! Box GTS 2019 audio system is the best way to get information and listen to music while riding a motorbike. This system is a symphony of cutting-edge features that work together to make your ride more enjoyable and convenient than ever before. It is a true feat of innovation. The 2019 Boom! Box GTS is built into the most popular Harley-Davidson motorcycles. It combines entertainment, navigation, and conversation into a single, sleek interface. With its bright and easy-to-use touchscreen, which is usually about 6.5 inches wide, it lets you explore a world of audio and connection choices, from AM/FM radio to Bluetooth for connecting your phone. Whether you’re looking for exciting adventures or long trips, this system’s GPS navigation, voice control, and ability to connect to your smartphone will keep you on track, in touch, and entertained. The Boom! Box GTS is more than just an audio system; it opens up a world of riding options where the open road, your favorite songs, and the thrill of the ride all work together. Find out about the 2019 Harley-Davidson Boom! Box GTS, where every turn of the throttle is accompanied by a unique soundtrack and a lot of features that keep you linked while you’re on two wheels.
AUDIO
AM-FM-WB RADIO
Tuner
The radio has a multi-band stereo receiver with tune and scan functions. The tuner supports RDS/RBDS data display (according to vehicle configuration). The tuner can be configured to search for particular program types (such as country music or news programming). In some radios, the system can accumulate a list of stations within range, along with current song or program being played.
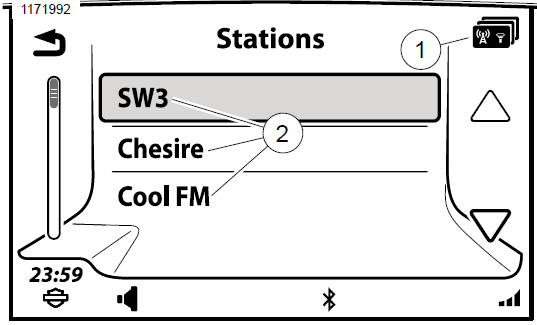
See Figure 49 for a description of Tuner Screen components.
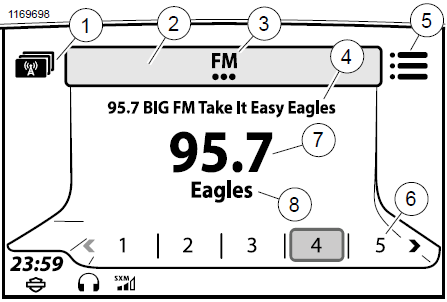
- Categories icon
- Source field (selectable)
- Tuner or media selection
- Station name, song title, artist
- Menu icon
- Presets (1-5, up to 20)
- Frequency
- Artist
Figure 49. Tuner Screen
Selecting a Band
Radios support different frequency bands according to region and radio type.
- Navigate: Home > Audio.
- Select: Source field.
- Select: Desired band (AM, FM, WB or Sirius).
Selecting a Band: Voice Recognition
Select: Voice recognition switch.
Speak the band into microphone “AM, FM, XM or weather band”. Media such as Bluetooth Paired device or USB is also available if connected. See Voice Recognition (Page 179).
Tune/Seek/Preset Stations
Tune and Seek are only available from left hand control switch. See Left Hand Control (Page 37).
Preset selection can be made by right hand control switch or touch screen. See Right Hand Control (Page 39).
When tuning or seeking, tuner continues to wrap around at the beginning or end of frequency range.
- Navigate: Home > Audio.
- Tune (left hand control switch):
- Tap: Increase or decrease frequency by increments.
- Long press: Accelerates up or down through the frequency range until switch is released.
- Seek (left hand control switch): Press for 1 second and release. Seeks up or down frequency range to next station.
- Preset (right hand control switch): Move switch left or right to scroll though presets. Press switch in to select preset.
Tuning a Station: Voice Recognition
- Select: Voice recognition switch.
- Speak: “Tune to” along with the frequency into microphone (such as “Tune to ninety-seven point one”). The radio automatically tunes to appropriate band (such as AM or FM) according to frequency selected.
Seeking a Station: Voice Recognition
- Select: Voice recognition switch.
- Speak: “Seek Up” or “Seek Down” into microphone.
Scanning Stations
Selecting Scan starts the radio scanning through frequencies. The radio remains on each station for five seconds before continuing scan. If the scan does not find any strong station within two complete passes through band frequencies, the scan automatically cancels.
- Navigate: Home > Audio.
- Select: Menu icon.
- Select: Scan.
- To select a station, press the Cursor/Select switch on the right hand controls.
Presets
Presets can store preferred radio stations for easy access. The radio has 20 Satellite radio/media, 15 FM/DAB+, 5 AM, - 5 LW, 5 MW, 5 WB presets. The radio can also be configured with global presets. See Global Presets (Page 68).
- Tune to a station.
- Save station to a preset.
- Touchscreen: Press and hold chosen preset until a beep sounds.
- Cursor/Select Switch: Highlight chosen preset. Press and hold the Cursor/Select Switch in until a beep sounds.
- To tune preset in the future, select preset with touchscreen or Cursor/Select switch.
Categories
NOTE
If no categories are selected or recognized, the radio will not stop scanning or seeking.
The FM band can scan for particular types of radio programming (such as news, sports or classical music). When categories are selected, the radio only scans for stations that are broadcasting programs with selected category codes. Not all stations broadcast these codes.
Selecting Categories
See Table 30 for categories available in North America. See Table 31 for categories available in other regions.
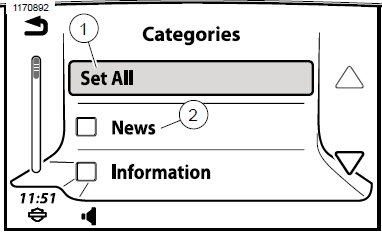
- See Figure 49. While in FM band, select categories icon (1) to access a list of all available categories.
- See Figure 50. Select categories (2) from list.
- Individual categories selected: Radio scans only stations from selected categories.
- Clear All (or no categories selected): Radio scans all stations.
- Set All: Radio scans for stations that are broadcasting any of the program types. The radio does not stop on any station unless it is broadcasting a program type code.
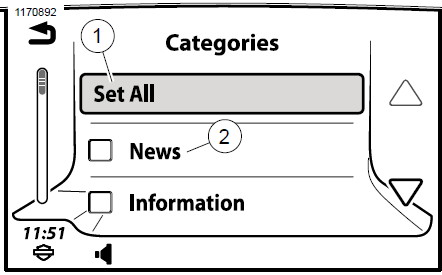
- Set All or Clear All field
- Categories (see regional list)
Figure 50. Categories Screen
Table 30. FM Categories: RBDS, North America
| OPTION | OPTION |
| • News
• Information • Sports • Talk • Rock • Classic Rock • Adult Hits • Soft Rock • Top 40 • Country • Oldies • Soft • Nostalgia • Jazz |
• Classical
• Rhythm & Blues • Soft Rhythm & Blues • Foreign Language • Religious Music • Religious Talk • Personality • Public • College • Spanish Talk • Spanish Music • Hip Hop • Weather |
Table 31. FM Categories: RDS, Other Regions
| OPTION | OPTION |
| • News
• Current Affairs • Information • Sport • Education • Drama • Culture • Science • Varied • Pop Music • Rock Music • Easy Listening • Light Classical • Serious Classical • Other Music |
• Weather
• Finance • Children’s Programs • Social Affairs • Religion • Phone-in • Travel • Leisure • Jazz Music • Country Music • National Music • Oldies Music • Folk Music • Documentary |
Station List (EU)
Radios equipped with station list feature will have a Stat icon in upper left corner on FM screen. The radio scans and creates a list of all available stations in the FM band. Radios with a dual tuner will continually update the list as stations come in and out of range.
See Figure 51. Access station list: Press station categories icon in upper left corner of the FM band screen (if equipped).
See Figure 52. Select a station: Use scroll controls and select desired station from list.
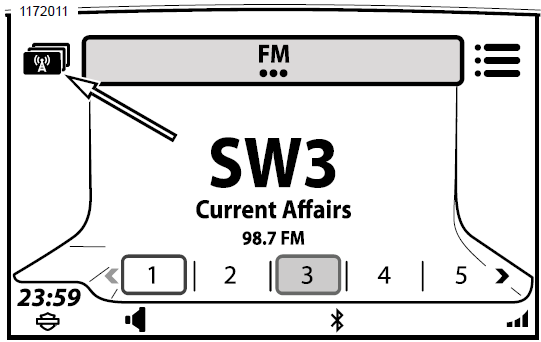
Figure 51. FM Tuner Station List (EU)
- Categories
- Stations (showing current station or program information)
Figure 52. Station List
RBDS/RDS
Some radio stations broadcast data which can be used to display station identification, program information and support other features in the radio (depending on the region).
Radio Broadcast Data System (RBDS) is primarily used in North America. Stations broadcasting RBDS typically provide information such as radio station name, artist and song title to the radio.
Radio Data System (RDS) is primarily used in Europe. Stations broadcasting RDS data may also include time updates, weather, traffic and other regional information. Not all radio stations transmit RBDS or RDS data. When RBDS or RDS is unchecked, or if the service is not available, only the radio frequency is displayed.
Enable RDS/RBDS
- Navigate: Home > Audio.
- Select: Menu icon.
- Select: RDS or RBDS checkbox.
RDS Features: For dual tuner radios with RDS capability, three separate RDS features can be enabled.
- Alternate Frequency Switching (AF): The radio monitors signal strength of other stations playing the same program. The radio automatically switches to another station if signal quality is better.
Regionalization (REG): Some radio stations split their program into separate regional programs on different frequencies. Regionalization automatically uses frequencies of regional related stations for alternate frequency jumps. - Traffic Program/Traffic Announcement (TP/TA): The radio monitors stations for traffic announcements. When a traffic announcement is discovered, the radio automatically tunes to station playing the announcement. Traffic Announcement icon (TA) is displayed in the status bar. When finished, tuner returns to its previous operation. The status bar displays Traffic Program (TP) icon when tuned to a station that regularly plays traffic announcements. When enabled, the radio also monitors stations for Enhanced Other Networks (EON) transmissions.
Weather Band
See Table 32. Weather band is supported on radios for North America. Equipped radios can tune to any of seven weather band frequencies. The five weather band presets are originally set to the first five weather band frequencies.
Generally only one weather band station services an area. Using the seek function would take user to the only available station.
In the US, National Oceanic and Atmospheric Administration (NOAA) operates National Weather Radio (NWR) stations across the country. These stations continually broadcast weather announcements using seven different frequencies designated for weather band.
In Canada, Weather adio Canada broadcasts weather information.
NOTE
RBDS/RDS must be enabled for WB channel to show.
- Listen to weather band:
- Navigate: Home > Audio.
- Select: Source field.
- Select: WB.
- Use Cursor/Select switch to advance through the seven weather band frequencies or select a preset. See Table 32.
Table 32. Weather Band Channels
| CHANNEL | FREQUENCY |
| WB1 | 162.400 MHz |
| WB2 | 162.425 MHz |
| WB3 | 162.450 MHz |
| WB4 | 162.475 MHz |
| WB5 | 162.500 MHz |
| WB6 | 162.525 MHz |
| WB7 | 162.550 MHz |
Weather Alert
Weather band alert feature is only available on radios built for North America with a CB module.
When weather alert feature is turned on, CB module continuously scans the weather band for an alert tone from weather band stations. The rider can continue to play media, listen to other stations or use other features on the radio. When an alert tone is detected, the radio changes to weather band and tunes to the channel with alert announcement. The alerts indicate extreme weather conditions such as tornados, storms, floods or other environmental warnings. See www.weather.gov for weather band and alert broadcast information.
Turn weather alert ON: See Figure 53. On weather band screen, press the weather alert on/off icon (2).
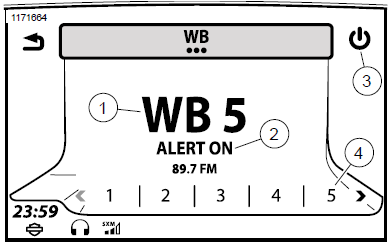
- Current channel
- Alert indicator
- On/Off icon
- Station presets (1-5)
Figure 53. Weather Band
MEDIA
Media Screen
See Figure 54. The Media screen shows the status of the currently playing song. The media screen also displays cover art for the song, if available.
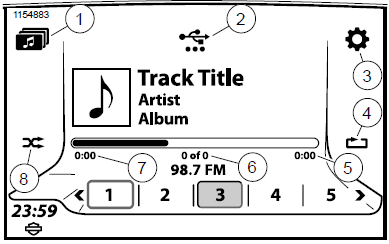
- Media filter (USB shown)
- Media device (USB shown)
- Settings
- Repeat
- Time remaining
- File sequence (device/playlist/album)
- Time elapsed
- Shuffle
Media Devices
NOTE
>A | /void* using these characters in naming media files: . : ? “ <
The radio supports various types of USB and Bluetooth-connected media devices. As a general guideline, support for devices is listed in Table 33. Some features or menus may not be available depending on device, file type or connection type.
For mass storage devices (such as USB drives), the file organization on the device can impact performance. For best performance and indexing of files, store media files at the root directory of the USB device, rather than in multiple levels of folders.
Table 33. Media Device Support
| DEVICE | DEVICES SUPPOR-
TED |
CONNECTIONS | FILES SUPPOR-
TED |
FEATURES OR LIMITATIONS |
| iPod | iPod supporting iAP2 |
Apple proprietary connector. |
All iPod supported file types |
Supports all find features. Ring tone files cannot be downloaded. iPods with a hard drive can be damaged and are not recommended. |
| USB mass storage device |
USB drive (exFAT,
FAT32, NTFS, HFS+) or SD card |
Direct connection to USB port. USB connector and reader required for SD card. | MP3, MP4, MPEG- 4 AAC, M4A, M4B, WAV, WMA |
May support find features. NTFS-formatted drives can only be used for read-only functions (such as playing media). NTFS drives will not support functions like ride/trail exports or navigation database updates. |
Table 33. Media Device Support
| DEVICE | DEVICES SUPPOR-
TED |
CONNECTIONS | FILES SUPPOR-
TED |
FEATURES OR LIMITATIONS |
| Media player | USB-connected
phone. PlaysFor- Sure compatible device. Media |
USB cable. | MP3, MP4, MPEG-
4 AAC, M4A, M4B, WAV, WMA |
May support find features. |
| Bluetooth device | Varies. Requires
minimum Bluetooth profile interoperability. |
A2DP/AVRCP profiles. | Bluetooth device dependent. Bluetooth audio is streamed by the device and not de- coded by radio. | No preset capability. File metadata may not be displayed. Audio from an app or internal player can be streamed to radio. |
Connecting Media Device: USB
- Connect media device to the USB port. Use a connector or reader as needed.
- If the media device is not automatically recognized, check device settings. Some devices need to be configured to connect as a hard drive or as a media device before media files can be accessed. See the device manual.
- If connecting a device for the first time, the radio begins playing the first song found on device. If reconnecting a previously used device, the radio attempts to resume the last played file.
The radio will begin collecting file information from the device. Some information and features may not be available until the radio has finished synchronizing with the device. The radio will play remaining files in alphabetical order.
Connecting Media Device: Bluetooth
- Pair the device. See Bluetooth (Page 112).
- Navigate: Home > Audio.
- Select: Source field.
- Select device from list.
Device Players and Applications: Bluetooth
Streaming audio can be played from an internal player or application on a connected Bluetooth device. The radio can control some features, such as previous or next file selections within some players or applications.
- With motorcycle stopped, connect with the Bluetooth device.
- Start the media application or internal player within the Bluetooth-connected device. The audio begins playing through the motorcycle speakers or headsets.
NOTE
The volume level and equalization within the device can affect the streaming volume to the radio. If sound cannot be heard or is distorted, check the volume within the application or device. - Use the Home/Volume/Previous/Next switch and Mute/Power button on the radio faceplate to operate the application or internal player, as applicable.
Selecting Media Device
- See Figure 55. Navigate: Home > Audio.
- Select: Source field.
- A list of paired or connected devices is displayed. Items are marked with either a USB or Bluetooth symbol.
NOTE
Some bluetooth devices can not be controlled through the radio. - Select a device from the list. If connected, the first song from the device begins playing.
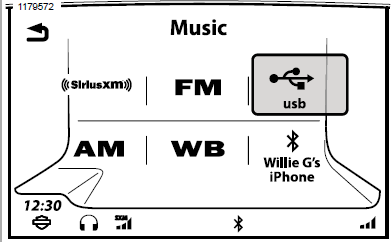
Figure 55. Select Media Device
Play Previous/Next Media File: Previous/Next
The Previous/Next switch on the left hand control will advance to the previous or next song in the device.
Play Previous/Next Media File: Preset
The Cursor/Select switch on the right hand control will advance to the previous or next preset on the radio.
Pause, Rewind or Fast Forward Media File
Pause: Press the Power/Mute button to pause or un pause media.
Rewind: Press and hold Previous switch to the left. Rewinding will accelerate as switch continues to be held.
Fast Forward: Press and hold Next switch to the right. Fast forwarding will accelerate as switch continues to be held.
Scanning Media Files
- Navigate: Home > Audio.
- Select: Menu icon.
- See Figure 56. Select: Scan. The radio begins playing each song on the device sequentially, dwelling on each song for five seconds. The Scan icon is displayed in the status bar.
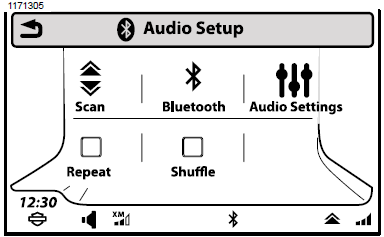
Figure 56. Scan Icon Location (typical)
Press any switch to stop the scan.
Repeat Current File
- Navigate: Home > Audio.
- Select: Menu icon.
- Select: Repeat checkbox. The Repeat icon is displayed and the current file will play repeatedly until unselected. Pressing Repeat a 2nd time will allow the radio to continuously play the existing song list.
Play Random Files: Shuffle
- Navigate: Home > Audio.
- Select: Menu icon.
NOTE
An iPod may exclude audio books and podcasts from shuffle selection.
Select: Shuffle checkbox. The Shuffle icon is displayed. The radio will randomly select files from the device.
Play Songs From Track List
The track list shows a full list of all songs on the connected device. When selecting a song from the list, the radio remains in the track list and does not transition back to the media screen. Track lists are not available for Bluetooth streaming media devices.
- Navigate: Home > Audio.
- Select: Menu icon.
- See Figure 57. Select: Track List. A complete list of all songs from the currently selected device, playlist, artist or album are displayed.
- Select a song from the list to play.
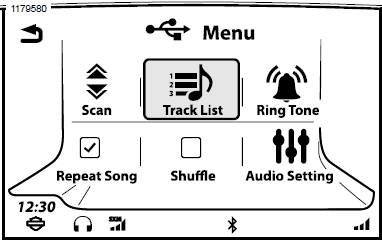
Figure 57. Track List Icon
Media Presets
The radio stores up to 20 presets for each connected device. The screen only shows media presets for the currently connected device. The media presets are retained in memory and are available the next time the media device is connected. Presets are only available for USB connected devices.
Set media preset: With song playing, press and hold one of the presets. When the radio beeps and the preset is stored release preset.
Select media preset: Select desired preset. Song will begin playing.
Finding a Media File
See Figure 58. The Find feature can be used to browse for different types of media files on USB-connected media devices as shown in Table 34. File browsing features are not available for Bluetooth streaming media devices.
- Navigate: Home > Audio.
- Select: Media filters.

Figure 58. Find Media Selections
Table 34. Finding a Media File
| CATEGORY | DESCRIPTION |
| Artist | Lists all songs by selected artist. Radio will play a selected song, then plays remaining songs by the artist. |
| Album | Lists all songs on selected album. Radio will play a selected song, then plays remaining songs on the album. |
| Genre | Lists songs by selected genre. |
| Song Title | Searches for song by title. |
Table 34. Finding a Media File
| CATEGORY | DESCRIPTION |
| Composers | Lists all songs by selected composer.
Radio will play a selected song, then plays remaining songs by the composer. |
| Playlist | List of all playlists on device. |
| Podcast | List of all podcasts on device (Apple devices only). |
| Audio Book | List of all audio books on device (Apple devices only). |
| Video, TV Show,
Movie or Music Video |
List of video files on device (only audio portion is played).
|
Finding a Media File: Playlist
A playlist is a file stored on the device which includes a sequential list of songs. All playlists native to the iPod are supported. The radio also supports the following playlist types for other USB-connected devices.
- Windows Media Player Advanced Stream Redirector format (*.asx)
Windows Media Player Playlist (*.wpl)
M3U Moving Pictures Expert Group Audio Layer 3 Uniform Resource Locator (*.m3u)
PLS file (*.pls) - iTunes XML (*.xml )
RealPlayer Metadata Package (*.rmp)
NOTE
- M3U, PLS and WPL playlists only allow relative pathnames to files. Absolute pathnames are not supported.
All XML files on USB mass storage media will be displayed, even if the files are not actually XML-formatted playlists.
- Navigate: Home > Audio.
- Select: Media filters.
- Select: Playlist.
- Select item from list.
- Select song from the playlist. To play the entire playlist, select the first song.
Finding a Media File: Artist, Album, Genre or Composer
- Navigate: Home > Audio.
- Select: Media filters.
- Select: Artist, Album, Genre or Composer to browse.
- Select item from list.
- Select song from the list. The radio begins playing files for the artist, album, genre or composer starting at the selected file. To play all songs for this artist, album or genre, select the first song from the list.
Finding a Media File: Song Title
- Select Navigate: Home > Audio.
- Select: Media filters.
- Select: Songs. A full list of all songs on the device is displayed.
- Select a song from the list. If necessary, select the letter jump icon between the scroll controls and type the first letter of the song name.
Finding a Media File: Podcast
The Podcast category is displayed in the Find menu when a properly configured podcast is identified on the device. An audio file (ID3 tag) must be coded properly to display on the radio as a podcast. If needed, right-click on the file in iTunes and select the proper option for characterizing the file (movie, music, video, podcast, and so on).
Some files identified as podcasts are not actually podcast files, but just media files. These files may be listed with other song files.
- Navigate: Home > Audio.
- Select: Media filters.
- Select: Podcast.
- Select a podcast from the list.
- Select an episode from the list.
Finding a Media File: Audio Book
The audio book option is displayed when audio book files have been discovered on the device. Some audio books are MP3 files which may be listed with other song files.
- Navigate: Home > Audio.
- Select: Media filters.
- Select: Audio book. A list of audio books is displayed.
- Select an audio book from the list.
- Select a chapter from the audio book, if applicable.
Finding a Media File: Video, TV Show, Movie, Music Video
The radio can play some types of video files. To minimize distraction, the radio only plays the audio portion of the files.
Files from Apple devices may be categorized as TV Show, Movie or Music Video. Supported video files from a USB device are categorized as Video.
- Navigate: Home > Audio.
- Select: Media filters.
- Select: Video, TV Show, Movie or Music Video.
- Select a file from the list. Audio from the video file will begin playing.
Selecting Media File: Using Voice Recognition
See Voice Recognition (Page 179) for detailed instructions on all voice recognition commands.
- Select: Voice recognition switch.
- Speak: Artist, Album, Genre, Playlist or Song followed by the name or title to be played.
- The radio may prompt for more information. Respond to any remaining prompts to select and play the media.
Saving Media File as Favorite
See Favorites (Page 203).
Saving Media File as Ring Tone
NOTE
The media file must be playing.
- Select: Menu. If the current file type is compatible for use as a ring tone, a Ring Tone icon is displayed.
- Select: Ring Tone. The radio will attempt to download the media file for use as a ring tone. The radio allows only one ring tone to be downloaded into the radio. Replace the existing file if necessary.
- Select: OK.
SATELLITE RADIO
SiriusXM Satellite Radio
SiriusXM radio is equipped on select vehicles in North America. See Features and Specifications (Page 21). The radio includes over 200 digital channels of music, news, talk, entertainment and sports. The radio broadcast is over satellite (with ground repeaters) to provide consistent programming and signal quality nationwide without a break in coverage.
SiriusXM specialty services provide weather mapping, weather forecast data, fuel price information and traffic data service. SiriusXM traffic provides information for traffic events and road conditions. This data is integrated with the navigation system to provide speed flow along selected routes and notifications of traffic situations (such as accidents or lane closures).
Optional SiriusXM Accessory
SiriusXM functionality is standard on select vehicles in covered regions. For vehicles not equipped with SiriusXM, the optional SiriusXM accessory can be purchased at www.h-d.com/store or at an authorized Harley-Davidson dealer. See dealer or website for fitment and requirements when adding this accessory.
Follow the instruction sheet procedures or have an authorized Harley-Davidson dealer install the accessory. After installation, use the instructions in this manual to set up, subscribe and operate the SiriusXM features.
Trial Subscription
New vehicles equipped with SiriusXM from the factory include a three-month trial subscription for SiriusXM Radio, Traffic and Travel Link service in regions where service is available. This trial subscription is only available to the original purchaser of a new SiriusXM equipped vehicle. This is not included with SiriusXM modules that may be subsequently purchased or installed by the customer or dealer. Terms and conditions of service may be modified from time to time by SiriusXM. See www.siriusxm.com.
Check Subscription Status
- Navigate: Home > Setup > System Information > XM subscription.
- Select: Radio. See Figure 59. The Radio Services subscription status is displayed with an ESN number and SiriusXM phone number for assistance or activation.
- Select: Specialty Services. See Figure 60. The subscription status for each service (traffic, fuel, weather and forecast services) is displayed with an ESN number and SiriusXM phone number for assistance or activation.
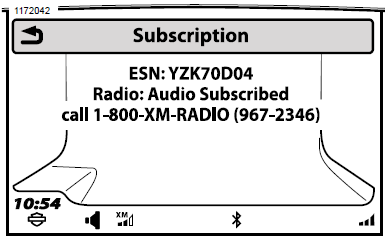
Figure 59. Radio Service Subscription Screen
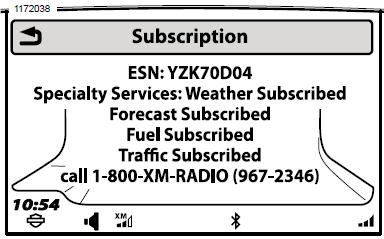
Figure 60. Specialty Services Subscription Information
Subscribing to SiriusXM
- See Figure 60. Get ESN number for radio.
- Verify that the SiriusXM signal is being received. Check the SiriusXM Signal Strength icon in the status bar. Channel 1 (preview channel) should be playing audio. SiriusXM starts up with a preview channel (channel 1) until subscription is active.
- Subscribe:
- See Figure 60. By Phone: Phone number will be displayed after selecting SiriusXM in the Band screen or call the phone number on the ESN screen.
- By Internet: Go to www.siriusxm.com. Click the subscription link.
- Keep the radio turned on until the subscription process is complete. Activation may take up to an hour. Since the vehicle will automatically turn off after 20 minutes in accessory mode, it may be necessary to start up and ride the motorcycle.
Listening to SiriusXM Radio
SiriusXM features take a few moments to be displayed after the motorcycle is first started.
- Navigate: Home > Audio.
- Select: Source field.
- Select: SiriusXM.
SiriusXM Presets
Channel presets can be programmed to quickly access favorite channels. The radio up to 20 SiriusXM presets.
- Navigate: Home > Audio.
- Select: Source field.
- Select: SiriusXM.
- Select a channel.
- Press and hold a preset until the system beeps.
Selecting a Channel: Hand Controls
Press the Previous/Next switch on the left hand control to change the channel.
Selecting a Channel: Channel List
- Navigate: Home > Audio.
- Select: Source field.
- Select: SiriusXM.
- Select: SiriusXM Channels.
- Select a desired category from the list.
Selecting a Channel: Direct Tune
- Navigate: Home > Audio.
- Select: Source field.
- Select: SiriusXM.
- Select: Menu.
- Select: Direct tune.
- See Figure 61. Use the keypad (3) to enter a channel number (2).
- Select Tune (4) to change to the selected channel.
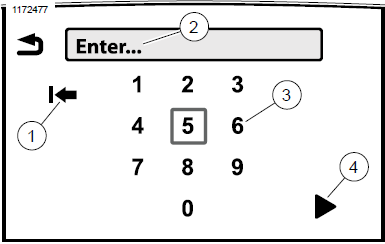
- Backspace/delete
- Channel number
- Keypad
- Tune
Figure 61. Direct Tune
Selecting a Channel: Voice Recognition
See Voice Recognition (Page 179) for more commands and instructions.
- Select: Voice recognition switch.
- Speak one of the following commands into the microphone:
- To listen to SiriusXM radio: SiriusXM
- To select a channel: Channel (followed by the channel name or number)
- To select next channel up: Channel Up
- To select next channel down: Channel Down
- To scan channels: Channel Scan
Scanning SiriusXM Channels
- Navigate: Home > Audio.
- Select: Source field.
- Select: SiriusXM.
- Select: Menu.
Select: Scan. The radio advances through each channel, dwelling for five seconds on each channel. - Press the Cursor/Select hand control switch to select a channel.
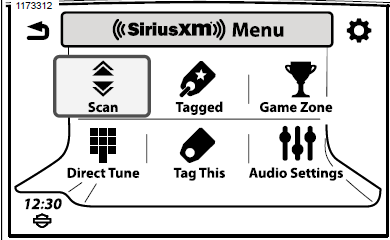
Figure 62. SiriusXM Menu Screen
Tagging an Artist or Song
Tagging allows you to be alerted when a tagged artist or song is playing on any SiriusXM channel. Up to 20 songs or artist tags can be saved.
- Navigate: Home > Audio.
- Select: Source field.
- Select: SiriusXM.
- Select: Menu.
- Select: Tag This.
NOTE
To tag both song and artist, repeat steps for remaining choice. - See Figure 63. The system prompts to tag the song or artist. Once tagged, the system confirms your selection.
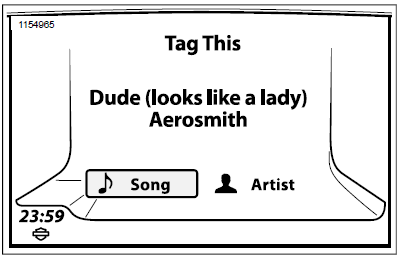
Figure 63. Tagging Screen
Viewing Tagged List
- Navigate: Home > Audio.
- Select: Source field.
- Select: SiriusXM.
- Select: Menu.
- Select: Tagged.
- See Figure 64. To turn off alerts for a particular song or artist, uncheck the item in the list. To resume alerts, check the item again.
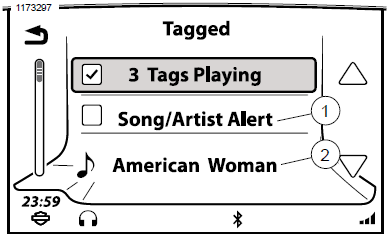
- Tagged artist
- Tagged song
Figure 64. Tagged List
Tag Alert
An alert pops up when a tagged song or artist plays on any channel. Select Listen or Ignore.
Listen: Changes to the channel with the tagged song or artist playing.
Ignore: Remains on the current channel.
SiriusXM Categories
The radio can be configured to scan for particular types of programming (such as news, sports or classical music). When scanning, the radio only stops on stations with the selected categories. The channel list includes only stations with the selected categories.
- Navigate: Home > Audio.
- Select: Source field.
- Select: SiriusXM channels.
- Select: Station categories.
- See Figure 65. Select desired categories from the list.
- Set All or Clear All field
- Categories (see regional list)
Figure 65. Categories Screen
Game Zone
Game Zone can be set up to trigger an alert when games are broadcasting or score changes occur for your favorite teams. The alerts provide an opportunity to tune to the channel and listen to the game.
Enabling Sports Alerts
Sports Alerts must be enabled before the radio provides game or score notifications.
If Sports Alerts is disabled, all the game and score settings configured for your favorite teams are still retained. However, the system will not provide notifications until Sports Alerts is enabled again.
- Navigate: Home > Audio.
- Select: Source field.
- Select: SiriusXM.
- Select: Menu.
- Select: Game zone.
- See Figure 66. Check the Sports Alerts checkbox. Game and score alerts that have been set for any favorite teams will be displayed as they occur.
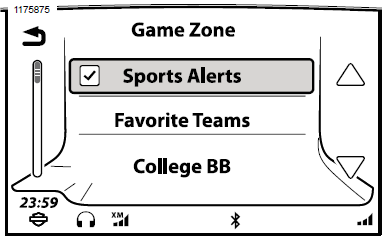
Figure 66. Sports Alerts
Adding a Game Zone Favorite
Up to seven teams can be added as Game Zone favorites.
- Navigate: Home > Audio.
- Select: Source field.
- Select: SiriusXM.
- Select: Menu.
- Select: Game zone.
- Select the type of team (MLB, NBA and so on). A list of teams within the selected league are shown.
- Select a team from the list.
NOTE
Selecting Game or Score checkbox will Automatically add team to favorites. - See Figure 67. Select: Add to Favorites. Game and Score will automatically be selected.
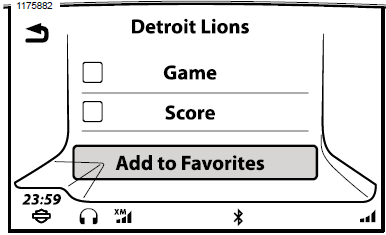
Figure 67. Game Zone Favorites
Setting Game or Score Notification
- See Adding a Game Zone Favorite.
- Game notification: To display an alert whenever a game is being broadcast for this team, select the game checkbox.
- Score notification: To display an alert whenever a score changes in a game for this team, select the score checkbox.
Responding To Game Zone Alert
Depending on the settings, a game zone alert pops up when a game is being broadcast or a score change has taken place for a favorite team.
- Listen: The radio tunes to the channel that is broadcasting the game.
]Ignore: The radio continues with its current audio source.
Removing a Game Zone Favorite
- Navigate: Home > Audio.
- Select: Source field.
- Select: SiriusXM.
- Select: Menu.
- Select: Game zone.
- Select: Sports alert.
- Select: Favorite teams.
- Select team to be removed from the list.
- Select: Clear from Favorites. The team is removed from game zone favorites list.
Displaying Weather
- Navigate: Home > Navigation.
- Select: Menu.
- Select: Weather.
- Select: Forecast. See Figure 68.
- Select: Current location or Other location.
- Current location: Displays weather conditions for current location.
- Other location: Select state and location to view.
- Select: Current, Daily or 5 Day.
- Current: The screen displays current weather conditions. Selecting Details on the screen will give a detailed outlook of weather conditions. See Figure 69.
- Daily: The screen shows forecasted weather conditions in 3 and 6 hours. See Figure 70.
- 5 Day: The screen shows forecasted weather conditions for today and tomorrow. Use scroll or swipe for next five days of weather data. See Figure 71.
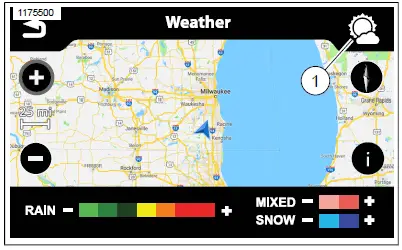
Figure 68. Weather Forecast Icon
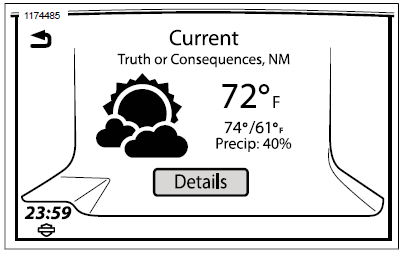
Figure 69. Current Weather
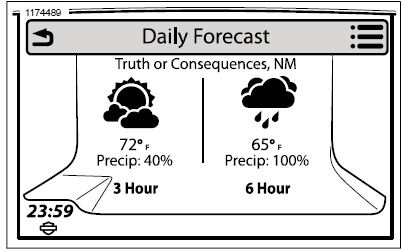
Figure 70. Daily Weather Forecast
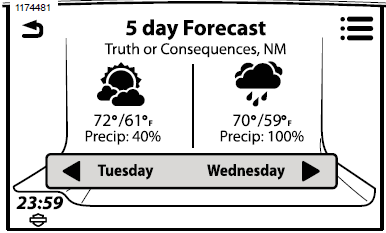
Figure 71. 5 Day Weather Forecast
SiriusXM Weather Map
See Figure 72. SiriusXM weather displays a map with radar and weather front information. The map is displayed in north up orientation and is typically updated every 12 minutes. The weather map displays major roadways, but it is not designed as a tool for navigation.
- Navigate: Home > Navigation.
- Select: Menu.
- Select: Weather. The radio displays a large-scale map with the current location of the vehicle.
- Select settings on the Nav Menu screen to configure the display of the map.
Weather Map Scrolling
See Map (Page 139).
- With the weather map displayed, press a location on the touchscreen or press and hold the Cursor/Select on the hand control switch.
- Scroll or swipe to change the displayed location of the map. Use the zoom controls to zoom in or out.
Weather Map Radar and Fronts
See Figure 72. The radar displays patterns of precipitation on the map. The intensity of rain, snow or mixed precipitation is indicated by the legend on the bottom of the map. The map can also display weather fronts, atmospheric pressure and isobars.
- While in the weather map, select the information icon on the right side of the screen.
- Turn on radar: Check the Radar checkbox.
- Turn on weather fronts: Check the Fronts checkbox.
- Select: Back. Radar formations and weather fronts are displayed on the map.
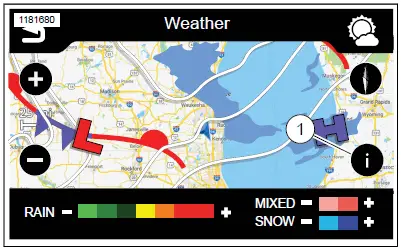
Figure 72. Weather Information
| PRECIPITATION TYPE | INTENSITY |
| Rain | Seven color levels ranging from light rainfall (light green) to severe (red) |
| Snow | Light snowfall (light blue), heavy snow-fall (dark blue) |
| Mixed | Light mixed precipitation (light pink), heavy mixed (dark pink) |
Table 36. Weather Front Information
| INDICATOR | DESCRIPTION |
| Cold front | Shown as a blue line with triangles.
Displays the leading edge of a cold air mass. The triangles show the forward direction of the front. |
| High pressure (H) | Shows center of high atmospheric pressure. |
| Isobar | Thin line which indicates equal or constant atmospheric pressure. |
| Low pressure (L) | Shows center of low atmospheric pressure. |
Table 36. Weather Front Information
| INDICATOR | DESCRIPTION |
| Stationary front | Shown as an alternating red-blue line with triangles and semi-circles. Displays a boundary between warm and cold air masses. |
| Warm front | Shown as a red line with red semicircles. Displays the leading edge of a warm air mass. The semi-circles show the forward direction of the front. |
Display Last Weather Update
- With the weather map displayed, select the option icon on the right side of the screen.
- Select: Update Information. The radio shows the date and time for the last update to the radar and weather front information.
SiriusXM Fuel Prices
The fuel feature provides the fuel prices at stations within a specified distance of the motorcycle. This feature can be used to route to a selected station, or add stations to an existing route.
Selecting Fuel Type
The screen shows locations and prices according to fuel type that is selected (regular, medium, premium or diesel).
NOTE
Use only unleaded gasoline with fuel type and octane specified for your motorcycle. Do not use diesel or other inappropriate fuels for the motorcycle. See vehicle owner’s manual. Using wrong type of fuel can damage the engine, fuel system and other components.
- Navigate: Home > Navigation.
- Select: Menu.
- Select: Fuel prices.
- Select: Fuel type.
- After selecting fuel type, select Back on right hand control to return to fuel prices.
Viewing Fuel Prices
Fuel prices are shown per gallon or liter, depending on the English/Metric setting.
- Navigate: Home > Navigation.
- Select: Menu.
- Select: Fuel prices.
- Select: View prices. A list of up to 30 nearest stations within 100 miles are displayed. Stations are listed by distance from current location.
- See Figure 73. Select: Sort by distance/brand/price icon (2). This will sort the list by brand (station name), fuel price or distance to the station .Select a station from the list.
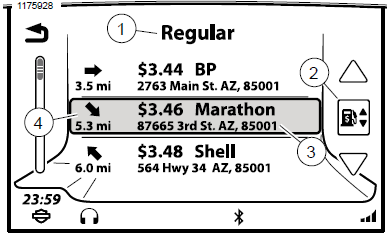
- Fuel grade
- Sort by distance/brand/price
- Price and name of fuel station with address
- Direction and distance to station
Figure 73. Fuel Prices
See Figure 74. Options for the station are displayed.
Fuel Station: The company brand name or brand of fuel is displayed.
Route/View: Selecting Options lets you select desired route. Selecting Save lets you save it to a list or save it as home. Selecting Go calculates and takes you to selected gas station.
Call: With phone connected, the phone dials the gas station (to confirm prices, check operating hours and so on).
Fuel Prices: Displays the price for all fuel types and a date stamp.
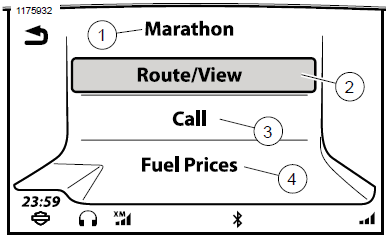
- Fuel station/brand
- Route or view fuel station on map
- Call fuel station
- View all fuel prices at station
Figure 74. Gas Station Selected
SiriusXM Traffic
Displays a list of messages regarding traffic, construction, accidents or other events nearby that may impact your chosen route. The system can be configured to provide popups of traffic events, and provide new routes to avoid traffic obstructions.
Turning Traffic On
When using the traffic feature, the system will automatically prompt to turn on traffic if necessary. Traffic can also be enabled in the system settings. See Traffic (Page 164).
Traffic Notification Popups
The system can be configured to automatically display traffic alerts that affect the current navigation route. The system will only display the notification when a route is active and an alternative route would reduce the current ride time by five minutes or more.
See Traffic (Page 164).
Traffic Icons
Navigate: Home > Setup > Traffic > Legend. A description of all traffic icons are displayed in the Setup menu.
Also see Traffic (Page 164).
Traffic Reroute
See Traffic (Page 164).
Traffic Message List
- Navigate: Home > Navigation.
- Select: Menu.
- Select: (SiriusXM) Traffic.
- If prompted to turn on traffic, select Yes.
- See Figure 75. A list of nearby traffic events (1) is displayed. Each item displays the direction and distance to the traffic event. Road signs and traffic icons are also displayed.
- To toggle between all nearby events or only events along the route, select the switch-view icon (2).
- Select traffic event (1) from list. This displays a detailed traffic message.
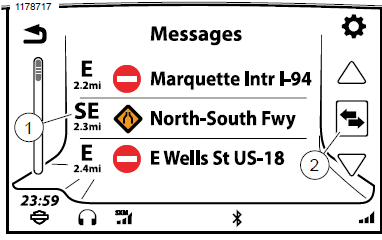
- Traffic event
- Switch-view icon
Figure 75. Traffic Message List
See Figure 76. Select: Traffic event. The radio reads the text message over the speakers or headset by using the text-to-speech feature. While riding, the scroll feature for the message is locked out.
Select the map icon (4) to display the incident location on the map.
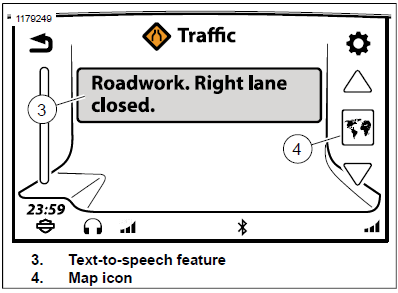
- Text-to-speech feature
- Map icon
Figure 76. Traffic Message
BLUETOOTH
Enabling Bluetooth
NOTE
Bluetooth must be enabled before pairing or connecting with Bluetooth devices.
- Navigate: Home > Setup.
- Select: Bluetooth Setup.
- See Figure 77. Select: Bluetooth to enable. A checkmark appears in the box.
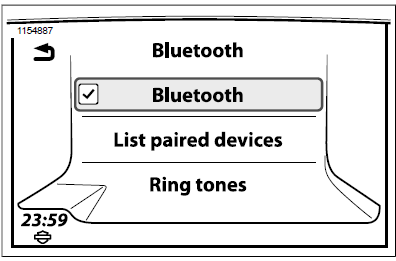
Figure 77. Bluetooth Setup Menu
Pairing a Bluetooth Device
A maximum of six devices can be paired with the radio at one time. However, the radio only maintains an active Bluetooth connection with up to one device for phone service and one device for media at a time.
The motorcycle identifies itself as “Boom! Box GTS”. The name for the Bluetooth device is specified within the settings for your device.
NOTE
Phones may request permission to share information with “Boom! Box GTS” (such as phone book contacts and text messages). These requests may occur during the pairing process or on other occasions when the phone is connecting with the radio.
- In the Bluetooth-compatible device, enable Bluetooth and set the device as discoverable. See the manual for your device.
- Navigate: Home > Setup.
- Select: Bluetooth setup.
- Select: List paired devices.
- Select: Add a new device. All discoverable devices within range appear in the list of found devices.
- Select device to be paired.
- The device displays a PIN code (auto-generated) and prompts for permission to pair with the “Boom! Box GTS”. Allow pairing with the device.
- Select: Yes. The radio attempts to pair and connect with the device.
- The system prompts for an emergency phone number if one is not already stored in the system. Enter a phone number to call in the event of an emergency (such as 911 in the US).
- Select: Save. Located in lower right corner of the screen.
- The system begins downloading the phone book from the device. The Phone Book icon is displayed in the status bar during the download process. During this process, the phone may prompt for permission to share the phone book.
Listening to Music
NOTE
Some Bluetooth devices cannot be controlled through the radio.
- See Figure 78. Navigate: Home > Audio.
- Select: Source Field.
- A connected device is displayed with Bluetooth symbol.
- Select device.
- See Figure 79. When connected, selected song from device begins playing.
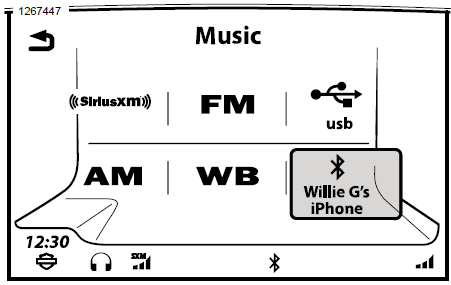
Figure 78. Select Bluetooth Phone
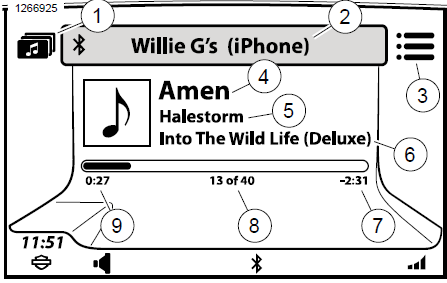
- Media filter
- Device information
- Menu icon
- Track title
- Artist
- Album
- Time remaining
- File sequence (device/playlist/album)
- Time elapsed
Figure 79. Playing Music from Phone
Connecting/Disconnecting a Bluetooth Device
A Bluetooth device can be connected for phone service, media or both. The system only allows one device to be connected for each Bluetooth service (phone or music).
The radio will automatically try to connect with the phone or media device after pairing. For some devices, a setting is required within the device before it will automatically connect. See the manual for the device.
To manually connect or disconnect with a Bluetooth device after pairing, use the following procedure.
- Navigate: Home > Setup.
- Select: Bluetooth setup.
- Select: List Paired Devices. A device with a highlighted phone icon is connected for phone service. A device with a highlighted media icon is connected for media.
- Select a device from the list to connect or disconnect.
- Select icon to connect or disconnect phone service.
- Select icon to connect or disconnect music.
Reconnecting After Vehicle Turns On
When the motorcycle is turned on, the radio will automatically try to establish a Bluetooth connection with the phone from the last vehicle shutdown.
Allow a few moments for the radio to initialize and the phone connection to complete. The status bar displays the Bluetooth icon when the phone is connected.
The radio will not automatically reconnect with media devices over Bluetooth. Manually reconnect the phone and other media devices as necessary.
Deleting a Paired Device
A device will typically remain paired with the radio until deleted.
- Navigate: Home > Setup.
- Select: Bluetooth setup.
- Select: List paired devices.
- Select the device from the list.
- Select: Delete pairing.
FAQ
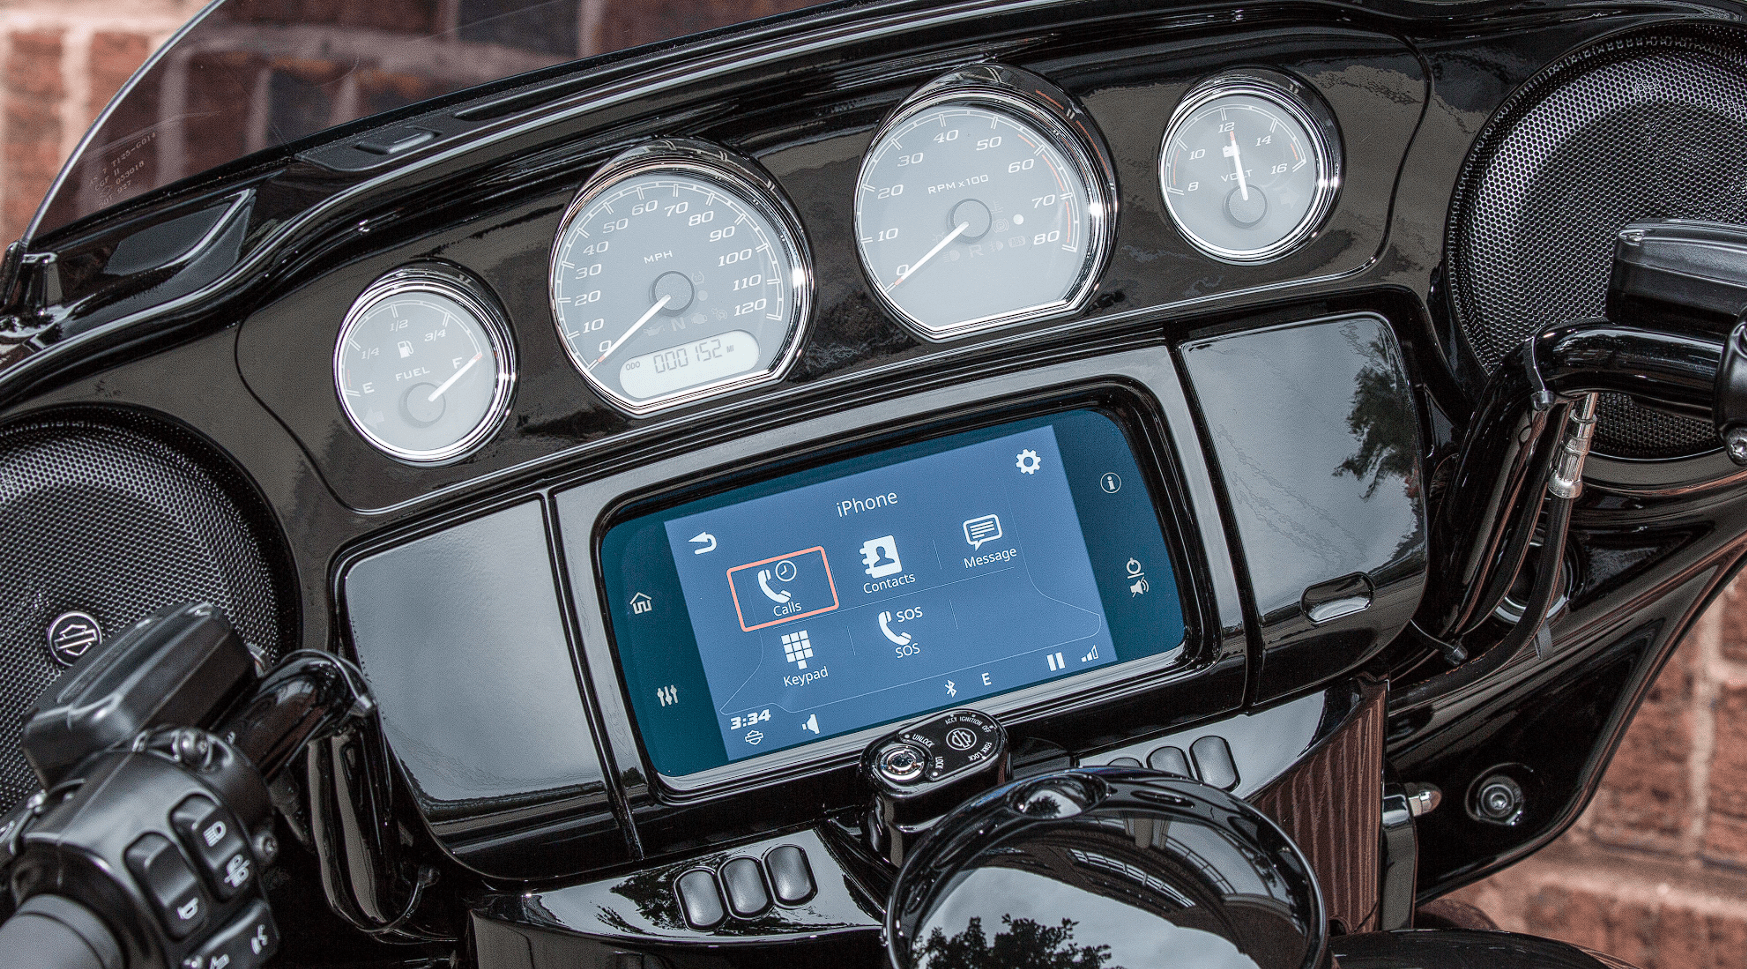
The Harley-Davidson Boom! Box GTS is an infotainment and audio system designed for Harley-Davidson motorcycles, offering entertainment, navigation, and communication features.
The Boom! Box GTS was available on various Harley-Davidson touring and CVO models in 2019.
It typically supports sources like AM/FM radio, Bluetooth connectivity for smartphones, USB media, and auxiliary inputs.
Some later models of the Boom! Box GTS are compatible with Apple CarPlay and Android Auto for enhanced smartphone integration.
The Boom! Box GTS features a touchscreen display, usually around 6.5 inches in size.
Yes, it typically includes GPS navigation functionality with turn-by-turn directions and a map display.
Some versions may offer voice control features for hands-free operation while riding.
It often includes options for built-in speakers, Bluetooth helmet headsets, and auxiliary audio output.
Yes, it typically provides various audio settings for adjusting the sound quality to your preferences.
Yes, you can typically connect your smartphone via Bluetooth to play music and receive calls through the system.
Harley-Davidson offers a range of audio accessories, including premium speakers and amplifiers, to enhance the audio experience.
Yes, it often includes an equalizer for adjusting bass, treble, and other audio settings.
Yes, Harley-Davidson may release firmware updates to enhance features and address issues.
Many Harley-Davidson motorcycles equipped with the Boom! Box GTS allow you to control the audio system using handlebar-mounted buttons.
Typically, you can pair your smartphone via Bluetooth by accessing the system’s settings menu and selecting the Bluetooth pairing option. Follow the on-screen instructions and your phone’s pairing procedure.
Useful Link
View Full User Guide: Harley Davidson Boom Box GTS 2019 User Manual
Harley Davidson Boom Box GTS 2019 Navigation User Manual