2019 Harley Davidson Boom Box GTS Care and Cleaning
The Harley Davidson Boom Box GTS, which came out in 2019 and is the peak of information and entertainment technology, has changed the way Harley fans ride. This high-tech system not only has cutting-edge audio, navigation, and connection features, but it also needs careful care and maintenance to work well and last for a long time. The Boom Box GTS’s touchscreen interface, buttons, and controls need to be used with care and regular attention because they are at the heart of your motorcycle’s entertainment and connection. Care and cleaning of this system are very important, not only to keep it looking good but also to keep it working well. The Boom Box GTS is a great example of how technology and tradition can work together in the world of motorcycling. It should be treated with the greatest care so that it can continue to be the center of your riding experience. In the next parts, we’ll talk about how to take care of and clean your Boom Box GTS so that it stays in great shape and is ready to accompany you on your Harley-Davidson adventures for years to come.
Care and Cleaning and Phone And Phone
AUDIO SYSTEM CARE
Use only Harley-Davidson recommended products and methods to keep the radio, speakers and other audio system components clean and in good condition. Do not use any abrasives, polishes or rubbing compounds to clean the screen or other components. Do not use any ammonia-based cleaners on the screen. Use of other products or methods may cause damage to components.
Screen
NOTE
Do not use any chemical cleaners or chemical containing wipes or cloths. These can cause damage to the screen surface.
Gently clean the display glass surface with a clean, dry microfiber cloth. Prior to cleaning it is suggested to remove any deposits of visible dust, dirt, sand particles with a gentle stream of compressed air. Cleaning the display glass in the presence of above can create scratches.
Cleaning the Radio
Spray a light amount of HARLEY GLOSS on a MICROFIBER DETAILING CLOTH. Be careful to gently remove any sediments without rubbing them into the screen. Apply circular motions from the center and outwards. Use a dry MICROFIBER DETAILING CLOTH to dry the screen. Repeat the process as necessary.
NOTE
Do not use any screen enhancing chemicals or products. These can damage the screen surface.
Speaker Care
If a haze develops on speakers with a protective grille, use HARLEY SEAT, SADDLEBAG, AND TRIM CLEANER and a SOFTCLOTH or SOFT DETAILING PAD to clean. Do not apply wax or any other similar products on speaker grilles. Do not use compressed or forced air on speakers. Vehicles with saddlebag speakers are designed to prevent water intrusion and to allow water to drain during washing or riding in all weather. To remove any standing water from saddlebag speakers, open the saddlebags and gently shake any remaining water from the speakers.
PHONE
PHONE COMPATIBILITY
Some phones may not be compatible with all the features and services in the radio. See the phone compatibility information at www.Harley-Davidson.com. Some features may vary by region or carrier. At a minimum, the phone must support the Bluetooth profiles shown in Table 37 to be compatible with various features in the radio. Even with these basic requirements, the phone may not necessarily be compatible with all features.
Table 37. Required Bluetooth Profiles
| PROFILE | DESCRIPTION |
| A2DP/AVRCP Profile (AV/Music) | Connect media, media controls, metadata |
| Hands-Free Calling Profile (HFP) | Pairing, connecting, call features, battery indicator, signal strength indicator |
| HFP+PBAP+AV Pro- file | Calls and connection |
| Message Access Profile (MAP) | SMS text message features |
| Phonebook Access Profile (PBAP) | Phonebook download, call history download |
BLUETOOTH AND USB CONNECTIONS FOR PHONES
Phone services are only achieved through a Bluetooth connection. Connecting a phone to the USB port allows the phone to charge and may provide additional media features. However, a USB connection alone will not operate the phone features. The phone must be paired and connected through Bluetooth before operation. See Bluetooth (Page 112).
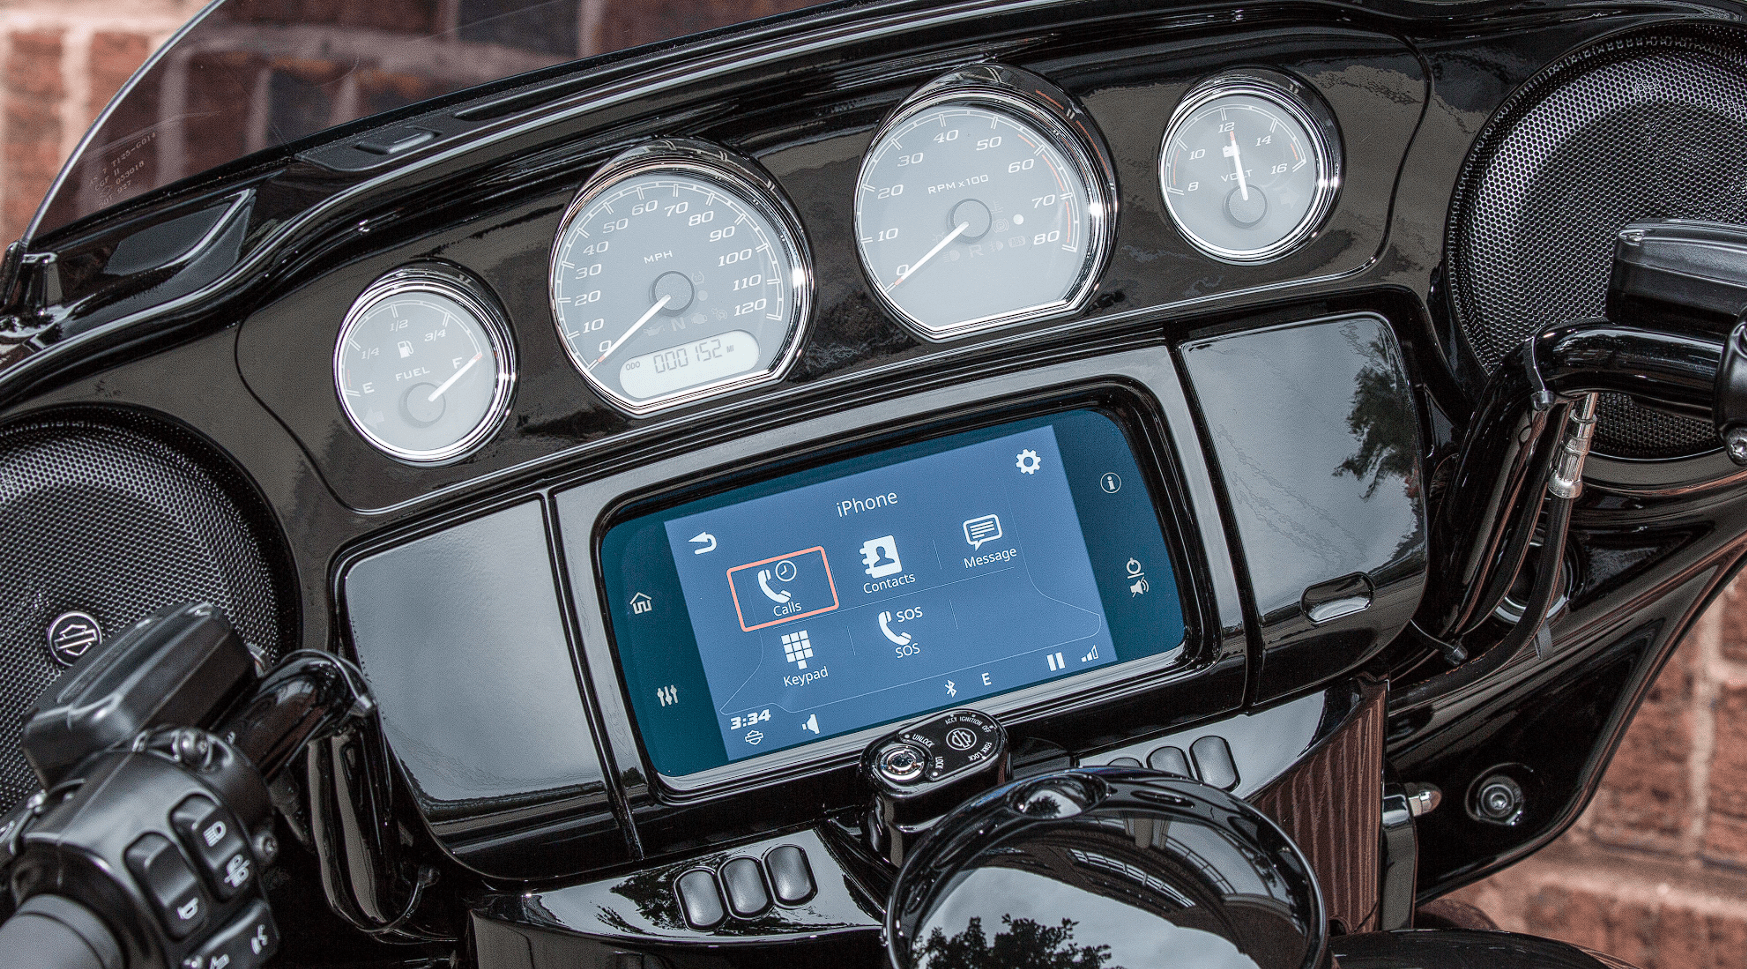
PHONE MENU
- See Figure 80. Navigate: Home > Phone.
- Select one of the phone features.
 Figure 80. Phone Menu
- Call history
- Phone book contacts
- Text messages
- Emergency phone number
- Dial phone number
CALL SCREEN
See Figure 81. When a call is initiated or accepted, the Call screen is displayed. This screen shows information for the current call. While in an active phone call, you can change to other screens and use other features (such as navigation). However, other audio sources remain muted, paused or inaccessible until the phone call is finished. Return to the Call screen to end the call or use other phone features. To return to the Call screen at any time during a call, press the Home switch twice.
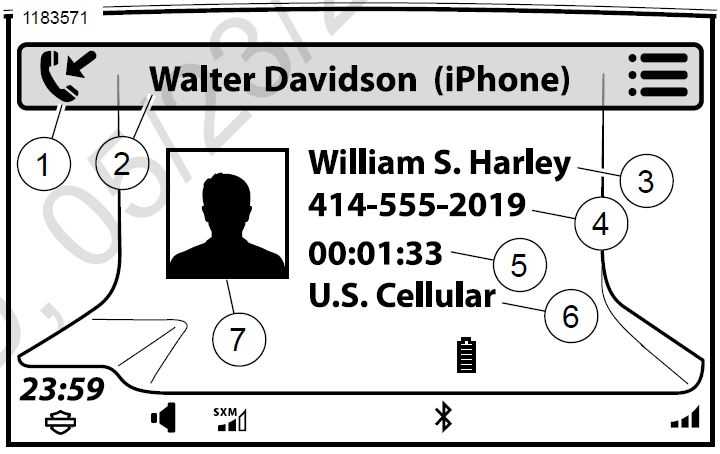 Figure 81. Call Screen
- Type of call
- Owner and phone information
- Caller’s information
- Caller’s phone number
- Length of call
- Cell provider
- Photo of caller
IPHONE: USING SIRI
NOTE
Siri is unavailable while in a phone call or Voice Recognition session.
After pairing the iPhone, the touchscreen will display two instructions confirming operation of the voice command switch.
- See Figure 82. Press and hold voice command until Siri displays on the touchscreen.
NOTE
Placing a phone call through Siri will place a hands-free phone call with the status displayed on the head-unit. - Siri replies How may I help you?
- Speak your command.
- Press voice command to disconnect Siri.
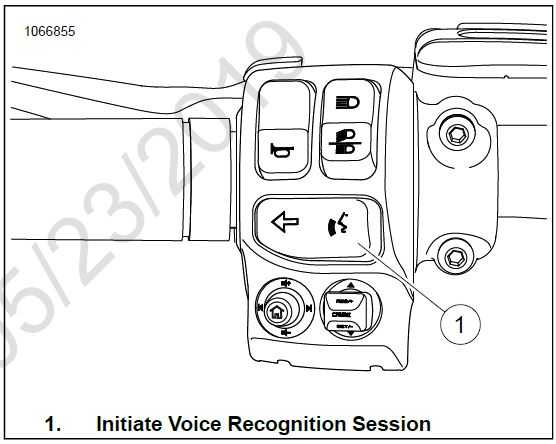
Figure 82. Voice Command Switch
MAKING A CALL
Dialing
- Navigate: Home > Phone.
- Select: Keypad.
- See Figure 83. Type phone number using keypad. Use backspace/delete or other characters as needed.
- Select: Save. To add phone number to Saved list.
- Select: Dial. To call dialed number.

Figure 83. Phone Keypad
- Back
- Dialed phone number
- Add phone number to saved list
- Dial phone number
- Hashtag/pound key (#)
- Press for zero (0), hold for plus (+)
- Asterisk (*)
- Keypad
- Backspace/delete
Phone Book Contact
- Navigate: Home > Phone > Contacts.
- Select: Contacts on Phone.
- Select the contact name from the list. The letter jump feature can be used by pressing the center icon in the scroll controls.
- Select the desired phone number.
Navigation POI
- Navigate: Home > Navigation.
- Select: Search > POI.
NOTE
Use settings icon to define search area to either Near Me or Along Route. - Select: Category.
- Scan through subcategories to desired location.
- Make selection and Call.
Sirius XM Gas Station
- Navigate: Home > Navigation.
- Select: Settings > Fuel Prices.
- Select: Fuel Type first then back out to View Prices.
- Make selection and call.
Emergency Phone Number
- Navigate: Home > Phone.
- Select: SOS.
- Select: Dial.
Dialing with Voice Recognition
See Voice Recognition (Page 179) for more voice recognition instructions.
- Select: Voice Recognition (left-hand control).
- Speak: Dial.
- Speak: Phone number.
Calling a Contact with Voice Recognition
- Select: Voice Recognition (left-hand control).
- Speak: Call.
NOTE
Name must be in the device’s phone book or saved list. - Speak: Name.
RECEIVING A CALL
Accepting/Ignoring
When a call is received, the radio plays the ring tone and displays the incoming call information as shown in Figure 84. The call can either be accepted or ignored. Other audio sources are muted until the phone call ends.
Accepting the call: Select Accept. The call screen is displayed and the call begins.
Declining the call: Select Ignore. The phone declines the call and sends it to voicemail (or other function as determined by the phone manufacturer or carrier). The previous audio source resumes. See Phone Book (Page 126) to display a list of missed calls.

Figure 84. Incoming Call
Radio Turned Off
Phone calls can be received while the radio is turned off. When a call is received, the radio displays the call information and plays the ring tone. If the call is accepted, the phone features operate normally. The radio turns off when the call ends.
CALL OPTIONS
Ending a Call
Selecting End Icon: The call terminates. The caller can be added to the saved list by selecting Save.
Making a New Call: Initiating a new call will terminate the current call.
Accepting a New Call: Accepting a new call will terminate the current call.
Adjusting Call Volume
During a call, use the volume hand control switch to adjust the incoming call audio. The passenger can use the volume controls on the Tour-Pak to adjust volume in the passenger headset.
Muting Call Audio
Muting Microphones: While in a call, select the Menu icon. Select the Mute/Unmute icon until Mute is displayed. The call screen displays a Mute icon in the lower right corner. Audio from the rider and passenger microphones will not be sent over the phone.
Unmuting Microphones: Press the Mute/Unmute icon until Unmute is displayed. The Mute icon is removed and the microphones resume normally.
Muting Inbound Audio: Use the volume hand control switch to adjust incoming audio to minimum volume. The POWER/MUTE button does not mute incoming phone audio.
Routing Call Audio
Outbound call audio is always spoken into the rider and passenger microphones. However, the inbound call audio can be received through either the speakers or headsets. See Speaker (Page 65).
Multiple Calls
The radio only allows one active phone call at a time. When choosing to initiate or accept a new call, the other existing phone call is dropped.
New Incoming Call (while call is in progress)
The system will prompt to either accept or ignore the new incoming call. If the new call is accepted, the existing call is dropped. If the new call is ignored, the current call continues.
Starting New Call (while call is in progress)
Using the keypad, contacts list or emergency phone number, initiate the new call. When prompted, decide whether to continue with the existing call, or to start the new call (terminating the current call).
VOICE MAIL
The radio does not indicate voicemail status. For most phone carriers, voice mail can be accessed by dialing the phone number for the mobile phone that you are using. If a dial tone passcode is required to access voice mail, press the Voice Recognition switch during the call. Speak the passcode numbers and other special characters as needed. For example, to enter a passcode as “1234#”, speak ONE-TWO-THREE-FOUR-POUND into the microphone.
PHONE BOOK
Contacts in a device’s phone book can be used to initiate calls, display incoming caller information and navigate to a contact address. While multiple phone books can be stored in the radio from different paired phones, only the phone book from the currently connected phone is made available for use. See Figure 85. The phone book displays entries for home, mobile, work or other phone numbers, according to the entries in the connected phone. If a contact does not have a phone number stored, the contact will not be displayed in the list. When a paired phone is removed, the phone book is deleted. Pairing the phone again requires the phone book to be downloaded.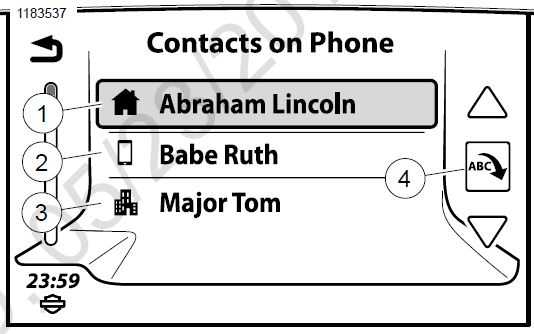
Figure 85. Phone Book
- Home number
- Mobile number
- Work number
- Next letter jumping
Setting Up Contacts in a Phone
Consider setting up contacts such as Emergency, Work, Voicemail, HOG and Dealer in the phone. Use simple names so it is easy to pronounce with the voice recognition commands. Include as much information as possible, such as alternate phone numbers and address information. With these items properly set up in the phone book, it becomes much easier to use voice recognition and say Call Work or to use phone book entries to route to a destination.
Refresh Phone Book
The radio first downloads the phone book during initial pairing, and typically synchronizes with the connected phone when the vehicle is turned on. The phone book can be manually refreshed from the connected phone at any time.
- Navigate: Home > Phone > Contacts.
- Select: Sync Phone Contacts
The system begins downloading the current phone book from the device. During the download process, the phone may prompt for permission to share the phone book. Allow the phone book to be downloaded.
Showing Contact Details
The name, phone numbers and address for the contact are displayed (if populated) as shown in Figure 86. Selecting address begins navigation to that destination.
- Navigate: Home > Phone > Contacts.
- Select: Contacts on Phone.
- Select contact from list.
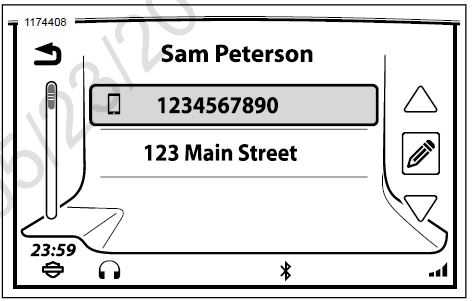
Figure 86. Contact Details
Viewing Saved Contacts and Phone Numbers
- Navigate: Home > Phone > Contacts.
- Select: Contacts on Radio.
- Select contact from list.
- Select phone number to begin call or select address to route navigation to address.
Saving a Phone Book Contact
- Navigate: Home > Phone > Contacts.
- Select: Contacts on Phone.
- Select contact from list.
- Select: Save Contact on Radio.
Saving a Dialed Phone Number
- Navigate: Home > Phone > Keypad.
- Enter phone number.
- Select: Save.
Saving Phone Number from Current Call
When a call is finished, the Save icon is briefly displayed. Select Save to store phone number to saved list.
Delete Saved Contact
- Navigate: Home > Phone > Contacts.
- Select: Contacts on Phone.
- Select contact from list.
- Select: Edit (pencil).
- Select: Delete.
- Select: Yes to confirm.
Call History
- Navigate: Home > Phone > Calls.
- A list of All Call activity for phone is displayed. The radio can display up to 60 total calls (20 missed, 20 received and 20 dialed calls).
- To display only the missed, received or dialed calls, repeatedly select the icon in the upper right corner.
TEXT MESSAGING
The radio can be used to read and listen to incoming text messages (using the text-to-speech feature). An auto-reply feature can also be configured. For safety purposes, the radio cannot be used to send text messages. Not all phones are compatible for text messaging features.
Enabling Text Messaging: SMS
- Navigate: Home > Phone > Messages.
- See Figure 87. Select: SMS.
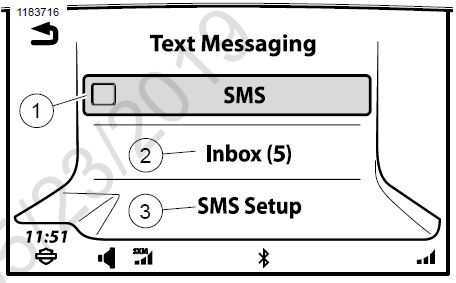
Figure 87. Text Message Menu
Enabling New Message Pop-Up
The radio displays Incoming Message popup screen indicating options: View, Listen, Ignore and Call. Select an icon to acknowledge the message or activate a feature.
- Navigate: Home > Phone > Messages.
- See Figure 87. Select: SMS Setup.
- Select: New Message Popup to enable option.
Text Message (SMS) Auto-reply
The auto-reply feature responds to incoming messages with a heading Auto Generated Text along with the contents of the personal message setting.
- Navigate: Home > Phone > Messages.
- Select: SMS Setup.
- Select: Auto-Reply to enable option.
- Select: View Reply Message to look at the auto generated text.
- Select: Edit Reply Message to compose new auto generated text. OK must be selected for edit to be accepted.
Viewing/Playing A Text Message
When a new message is received, the New Message icon is displayed in the status bar. This icon clears after the text message inbox has been viewed. Text message viewing is locked out while the motorcycle is in motion. Instead, the text-to-speech feature reads the selected text message through the speakers or headsets.
- Navigate: Home > Phone > Messages > Inbox.
NOTE
Texts Will Not be available to view while vehicle is in motion. - Select: Incoming text message to view.
- See Figure 88. Vehicle Not in Motion: Text is shown on the vehicle’s radio screen.
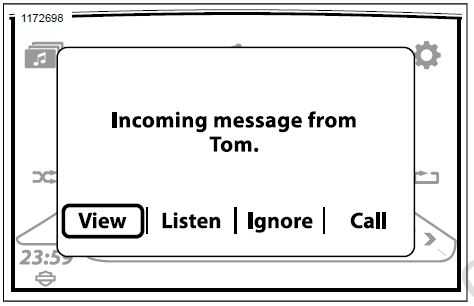 Figure 88. Vehicle Not in Motion
 - See Figure 89. Vehicle in Motion: Text-to-speech feature is activated. Select Listen in the popup.
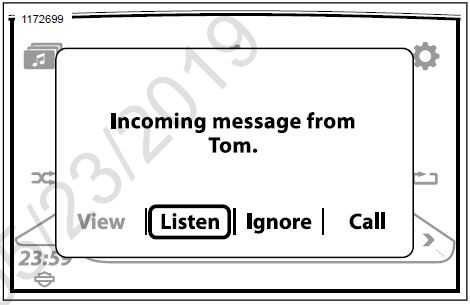 Figure 89. Vehicle in Motion
- See Figure 88. Vehicle Not in Motion: Text is shown on the vehicle’s radio screen.
Enabling Text Message Notification: Apple Devices
Notification settings need to be configured in Apple devices before the radio can receive text messages. See your Apple owner’s manual for proper settings and procedure.
RINGTONE
Selecting
The radio has four built-in ring tones available (Rain, Suspense, Rave and Xylo). An additional ring tone can also be loaded into the radio.
- Navigate: Home > Setup > Bluetooth.
- Select: Ring Tones.
NOTE
Loaded Ring Tone is grayed-out if no ring tone has been loaded. - Select one of the four default ring tones or loaded ring tone.
Adding New Ring Tone: USB
- Plug USB device into USB port.
- Navigate: Home > Setup > Bluetooth.
- Select: Load Ring Tones.
- Select: USB device.
- Select: Artist, Song, Album, Genre, Playlist or Filename.
- Follow the flow of standard media screens down to track list.
- Select: File to load.
- Ring tone file is confirmed with one of two options:
- New Ring Tone Loaded and Set. Select OK
- Replace existing ring tone? Select Yes or No.
RESUMING CALLS AFTER VEHICLE SHUTDOWN
If a call is active while the motorcycle is being turned off, the radio will request to transfer the call back to the phone as shown in Figure 90.
Selecting Yes: The call transfers back to the phone. The Bluetooth connection terminates and the radio shuts down.
Selecting No (or not acknowledging the prompt): The radio continues to support the call for approximately five minutes. At the end of this period, the radio attempts to transfer the call back to the phone and the radio shuts down.
NOTE
Phone audio can only continue through the headset during this shutdown period. If the phone audio is routed through the speakers, the call will continue but the incoming audio will not be heard.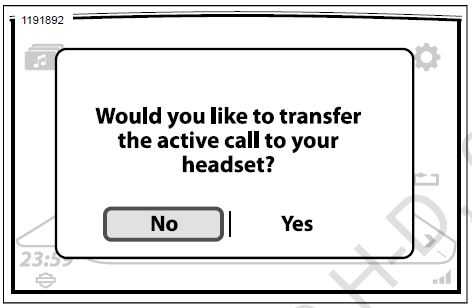 Figure 90. Transfer Phone Call
TRANSFERRING A CALL BACK TO THE PHONE
Only use the phone handset manually while the motorcycle is stopped.
- Navigate: Home > Phone.
- Select: Settings.
- Select: List Paired Devices.
- Select phone that is actively paired to vehicle.
- Select: Disconnect for Phone. The Bluetooth phone connection terminates and the phone call transfers back to the handset.
CHANGING THE EMERGENCY PHONE NUMBER
When the first phone is paired, the radio prompts for an emergency phone number. One emergency phone number can be stored in the radio. This same phone number is used for any phone connected to the radio.
- Navigate: Home > Phone > SOS.
- See Figure 91. Select:
- Edit # (to change phone number).
- Clear# (to delete phone number).
- Enter new emergency phone number (e.g. 911).
- Select: Save.
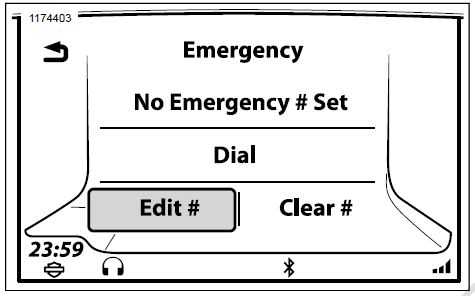 Figure 91. Dialing or Editing Emergency Number
APPLE CARPLAY
During projection mode, the Phone icon on the home screen is replaced with the Apple CarPlay icon. Also, the tuner or media selections are paused, active route is cancelled and projection mode assumes priority. Upon exiting projection mode all items return to normal radio functions. CarPlay is compatible with iPhone 5 and later models.
NOTE
Apple CarPlay does not require an app download. When connected, not all iPhone apps will be displayed on the screen, only Apple approved apps.The rider requires a headset with microphone to enable voice commands.
- Switch power to Accessory, Ignition or Run (CVO).
- Turn projection mode on.
- Navigate: Home > Setup.
- Select: Projection Mode ON.
- Connect: Cord between phone and USB port on vehicle. The CarPlay icon replaces phone icon on the home page.
- See Figure 92. Select: CarPlay.
- See Figure 93. Apple CarPlay is now visible on the radio screen.

Information accurate as of January 28th, 2019. Go to https://serviceinfo.harley-davidson.com to check for the latest version.
FAQ
The Harley Davidson Boom Box GTS is an advanced infotainment system designed for Harley Davidson motorcycles.
Yes, regular cleaning of the screen is important to maintain visibility and touch sensitivity.
Use a microfiber cloth and mild, non-abrasive cleaning solutions specifically designed for electronic screens.
It’s recommended to clean the screen whenever it gets visibly dirty or at least once a month to prevent buildup.
It’s best to avoid using water directly on the screen. Instead, dampen the microfiber cloth slightly and then wipe the screen.
It’s a good practice to turn off the ignition or put the motorcycle in the accessory mode when cleaning to avoid accidental button presses.
Yes, using a screen protector can help prevent scratches and protect the screen.
Use a soft, damp cloth to wipe down the buttons and controls. Avoid getting moisture inside the unit.
Use a clean, damp cloth to wipe the exterior surfaces. Be cautious not to let water or cleaning solutions enter the unit.
It’s a good idea to clean the unit more frequently in adverse weather conditions to prevent buildup of dirt, dust, or moisture.
Yes, compressed air can be used to gently blow away dust and debris from vents and speakers. Do this with the ignition off.
While it’s not necessary to disconnect the battery for routine cleaning, it’s a good safety practice to avoid accidental electrical issues.
Avoid using alcohol-based cleaning solutions, as they may damage the screen and components. Stick to mild, electronic-safe cleaners.
If you notice scratches, consult a Harley Davidson dealership or authorized service center for screen replacement or repair options.
To extend the life of your Boom Box GTS, store your motorcycle in a cool, dry place when not in use, and follow routine cleaning and maintenance guidelines provided in the owner’s manual.
Useful Link
View Full User Guide: Harley Davidson Boom Box GTS 2019 User Manual
Harley Davidson Boom Box GTS 2019 Controls and Components User Manual