Harley Davidson Boom Box GTS 2019 Communications User Manual
COMMUNICATIONS
VOICE RECOGNITION
Voice recognition provides a hands-free alternative to operate many Boom! Box functions. Commands spoken into a headset microphone can instruct the system to play a media file, make a phone call, navigate to a destination, tune to a frequency or perform other features. Voice commands can be used to access functions that are otherwise locked out while the motorcycle is in motion.
To make full use of the system and to reduce distraction while riding, take time to learn voice commands for features that you commonly use.
NOTE
Some vehicles do not have headset connectors. A P&A headset connection kit or Wireless Headset Interface Module (WHIM) kit must be installed on the vehicle to use voice command functions.
Activating Voice Recognition
- Press the Voice Recognition hand control switch. The system beeps and prompts for a command. The system shows a list of commands (teleprompter). The voice recognition icon appears in the status bar.
- After the beep, speak a command into the headset microphone.
- Respond to the system with additional information if needed.
Prompts: The system prompts if additional information is required to complete a command. - Multiple options: If multiple options are available for your command, the system displays a numbered list of options to choose from. Speak the appropriate line number, such as LINE TWO.
- Barging in: To interrupt the prompt, press the Voice Recognition switch during the prompt and speak the desired command after the beep.
- Respond to the system with additional information if needed.
Canceling Voice Recognition
Hand control: Press and hold the Voice Recognition switch.
Voice command: At any time, say Cancel to terminate the current session.
No valid input: If the system does not recognize a voice command, a response to a prompt, or if an extended period of time elapses before a command is spoken, the session automatically cancels.
Teleprompter
See Figure 115. The teleprompter is shown when the Voice Recognition switch is pressed. The teleprompter screen shows commonly used commands, along with a line item to display more commands.
The Cursor/Select switch can be used to select a command. Speaking or selecting MORE COMMANDS displays a list of all commands
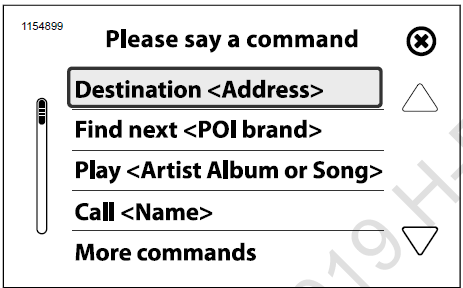
Figure 115. Teleprompter (typical)
Command List
If a command is not spoken or recognized while the teleprompter is displayed, the system shows a list of command categories. Speak one of the categories into the microphone, or use the Cursor/Select switch to show all commands related to a selected category.
Pick List
See Figure 116. Pick lists are presented in the following situations.
- More than one reasonable recognition of a word is available.
Multiple choices are available.
Navigation is attempting to refine a location.
When presented with a pick list, speak the desired line item into the microphone such as LINE THREE.
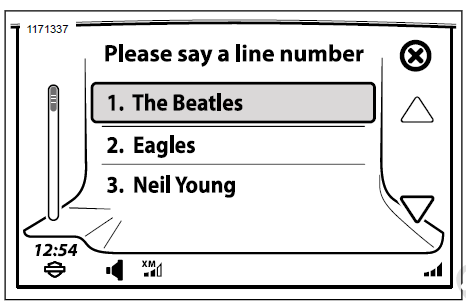
Figure 116. Voice Recognition Pick List
Prompter Responds “Pardon?”
Microphone: Speak voice commands into the microphone of the headset. Proper placement of the microphone is critical to the effectiveness of voice commands.
Speech: Speak naturally into the headset microphone. Articulate each word in a voice command. Do not pause between words. The system cannot recognize rapid speech or a raised voice level.
Numbers: Pronounce numbers as individual numerals. Speak the number 88 as “eight, eight” rather than “eighty-eight”. Speak zeros as “zero” or “oh”. Pronounce decimal points in frequency numbers as “point”.
Voice Recognition Commands
| COMMAND | DESCRIPTION |
| ALL COMMANDS | List all available voice recognition commands. |
| CANCEL | Cancel voice recognition session. |
| LINE <NUMBER> | Select line number from list. |
| LIST | Show list of options. |
| YES | Acknowledge or continue. |
| NO | Decline or end. |
Table 44. Voice Recognition: Tuner Commands
| COMMAND | DESCRIPTION |
| A M | Set tuner to AM band. |
| F M | Set tuner to FM band. |
| WEATHER BAND | Set tuner to weather band. |
| MEDIUM WAVE | Set tuner to MW band. |
| LONG WAVE | Set tuner to LW band. |
| TUNE TO <FREQUENCY> | Tunes to a specified frequency. The radio will automatically change to the appropriate band for the selected frequency.
Example: When saying TUNE TO NINETY-EIGHT POINT SEVEN, the tuner will change to the FM band and tune to 98.7 MHz. |
| SEEK UP/SEEK DOWN | Seeks next station up or down. |
| NEXT PRESET/PREVIOUS PRESET | Selects next/previous preset. |
| STATION <NAME> | Tunes to a selected station (European region only). |
Table 45. Voice Recognition: Media Commands
| COMMAND | DESCRIPTION |
| MEDIA | Enters media mode. |
| PLAY <ARTIST, ALBUM or SONG> | Plays songs from the selected artist. |
| ARTIST <NAME> | Plays songs from the selected artist. |
| ALBUM <NAME> | Plays the selected album. |
| PLAY ALL SONGS | Plays all songs on the media device. |
| GENRE <NAME or LIST ALL> | Plays songs from a selected genre or lists all available genres. |
| NEXT TRACK | Plays next track on media device. |
| PLAY PLAYLIST <NAME> | Plays a selected playlist. |
| PREVIOUS TRACK | Plays previous track on media device. |
Table 46. Voice Recognition: Phone Commands
| COMMAND | DESCRIPTION |
| SONG <NAME> | Plays the selected song. |
| SEARCH FOR MUSIC | Search for a song or list all songs on a device. |
Table 47. Voice Recognition: SiriusXM Commands
| COMMAND | DESCRIPTION |
| X M | Plays SiriusXM radio. |
| CHANNEL <NUMBER or NAME> | Changes to selected channel. The system automatically changes to SiriusXM when channel commands are used. |
| CHANNEL UP | Changes to next channel up. |
| CHANNEL DOWN | Changes to next channel down. |
| CHANNEL SCAN | Scans through the SiriusXM channels. |
Table 48. Voice Recognition: Navigation Commands
| COMMAND | DESCRIPTION |
| DESTINATION <ADDRESS> | Begins a route to the selected address. This “one-shot destination” command is not available in some regions. If not supported, the system will prompt for address elements (city, state and so on) through a series of steps.
Example: It is recommended to say the destination as one string, such as DESTIN- ATION 400 WEST CANAL STREET MILWAUKEE WISCONSIN. Note: Complex street addresses with letters and numbers (such as “N23W2345 River Run Road”) may not be recognized by the voice recognition system. If a destination is not recognized, enter the address using the navigation menu. |
| FAVORITE <SAVED> | Begins a route to a previously saved destination. |
| FIND NEXT <POI> | Provides a list of stores or brands that match the requested POI. Select an item from the pick list to begin navigation to the POI.
Note: POI types (such as FIND NEXT GAS STATION) and brand names (such as FIND NEXT SHELL) are read from the navigation database. Not all POI names are translated by Boom! Box software into recognizable command words. Voice recognition matching can be made more difficult when the names consist of multiple words or syllables. If a particular name does not produce recognizable results, try synonyms or other variations of a POI command. |
| SHOW MAP | Displays the navigation map. |
| CANCEL ROUTE GUIDANCE | Cancels the current route. |
| REPEAT INSTRUCTIONS | Replays the navigation instructions for the next turn. |
| ENTER <COUNTRY, STATE, CITY, ZIP
CODE, STREET, HOUSE NUMBER> |
Begins entering destination information into the address screen.
Example: When saying ENTER STATE, the prompter responds with “Say the State Name”. After providing the state name, the system continues to prompt for the remaining address fields on the screen. |
INTERCOM
The intercom allows the rider and passenger to talk with each other through the headsets. The intercom can be operated by pressing the PTT switch or by using voice operated transmission (VOX). When voice input is picked up by the rider or passenger microphone, the intercom is automatically activated. This process is known as “breaking VOX”.
The rider or passenger can initiate intercom communication. When the intercom is active, tuner and media volume are automatically reduced so the intercom can be heard through the headsets.
For privacy, the intercom is only heard through the rider and passenger headsets. It is not heard through the speakers.
Microphone sensitivity and headset volume can be adjusted. The microphone sensitivity (VOX) applies to both rider and passenger microphones. The rider and passenger headset volumes are adjusted independently.
NOTE
Some local governments prohibit or restrict the use of headset (helmet-mounted) speakers. Check with local authorities and obey all applicable laws and regulations.
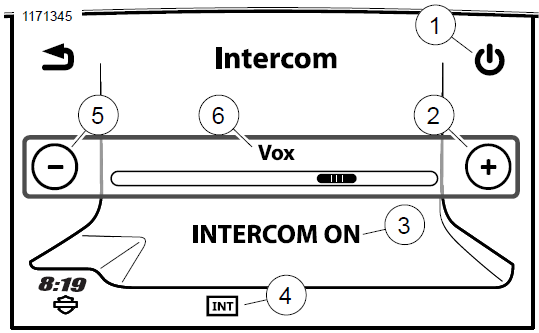
- Intercom on/off icon
- Increase level (open microphone, intercom on continuously)
- Intercom state (on/off)
- Intercom active/idle
- Decrease level (PTT activation only)
- Voice activation (VOX) sensitivity level
Figure 117. Intercom Screen
Turning Intercom On/Off
NOTE
If the Intercom is disabled, the selection button will not be greyed out and not selectable.
- Navigate: Home > Communications > Intercom.
- Select Intercom on/off to turn intercom On or Off. When turned on, the intercom is available for use and the intercom icon is displayed in the status bar. The intercom can be used while on any screen.
Adjusting Microphone Sensitivity: VOX
VOX sensitivity should be adjusted so the microphones break VOX at normal voice volume. The sensitivity level applies to both the rider and passenger microphones.
Adjust the sensitivity as needed if the microphone breaks VOX from unintended sounds, such as road or background noise.
- Navigate: Home > Communications > Intercom.
- While speaking into the microphone, use the controls (+ or -) to adjust the sensitivity until your normal voice volume breaks VOX. The intercom icon in the status bar should be white (active) when speaking at a normal tone.
a. Raise sensitivity: Move the level to the right. The microphone becomes more sensitive. The intercom will activate (break VOX) with quieter sounds through the microphone.- Reduce sensitivity: Move the level to the left. The intercom will only activate (break VOX) with louder voice or sounds.
- Fully open microphone: Raising the sensitivity to the maximum level will keep the intercom microphone open continually.
- PTT only: Reducing the sensitivity to the minimum level will prevent any VOX operation. The intercom can only be activated with the PTT switch.
Speed Volume
Speed volume is applied to the intercom to compensate for engine noise, wind and road input. As the motorcycle speed increases, the sensitivity of the microphones will automatically decrease. This prevents road noise from breaking VOX. It also prevents unnecessary adjustments to the microphone sensitivity while riding.
Adjusting Intercom Volume: Rider and Passenger Headsets
- See Figure 118. Activate the intercom (press the PTT switch or speak loud enough to break VOX).
- Adjust the volume while the intercom is active. The intercom volume displays on the screen while the intercom is activated. Rider and passenger headset volumes are independently controlled.
- Rider: Press the volume controls on the left handlebar.
- Passenger: Press the VOL+/VOL- switch on the side of the Tour-Pak.
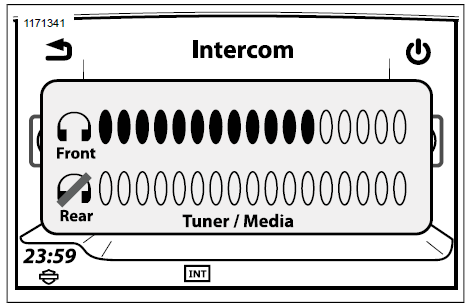
Figure 118. Intercom Volume
Operating Intercom: Voice Activation, VOX
Speak into the microphone at an adequate level to break VOX. The tuner or media volume will reduce into the background so the intercom can be heard. The intercom icon will turn white (active).
The intercom audio will be heard in the headsets. VOX activated communication is not broadcasted over the CB.
Operating Intercom: PTT Switch
- Press and hold the PTT switch (rider or passenger) to activate the intercom. The intercom icon will turn white (active). The tuner or media volume will mute so the intercom can be heard.
- Speak into the microphone. While the PTT switch is held, the microphones will remain active regardless of the VOX setting or sound level.
NOTE
- If the CB is turned on, pressing the PTT switch will also activate the CB. Any sound in the microphones will be shared over the current CB channel. Turn off the CB or use the voice activation (VOX) feature if there is a need to communicate privately.
- To activate the intercom with only the PTT switch (rather than VOX), reduce the VOX sensitivity to its lowest level. See Adjusting Microphone Sensitivity: VOX.
WHIM
NOTE
CVO vehicles come standard with the Sena 20S EVO wireless headset. Instructions are written for this particular set but the procedure is still the same when pairing other products.
Please read the Sena User’s Guide for additional information pertaining to the wireless headset. Also check Harley-Davidson.com > Owners > Infotainment for the latest version of User’s Guide and related information to Boom! Audio Bluetooth products.
Getting Started
Charge the wireless headset by connecting the supplied USB power & data cable into a computer USB port or USB wall charger. You can use any standard micro-USB cable to charge. The LED turns red while the headset is charging and turns blue when it is fully charged. It takes about 2.5 hours to be completely charged.
Powering On and Off
See Figure 119. Press the Jog Dial (1) and the Phone Button (3) at the same time to power the headset either on or off.
When powering on the headset, press the Jog Dial and the Phone button at the same time until the blue LED (2) appears while hearing the ascending beeps. When powering off the headset, press the Jog Dial and the Phone Button at the same time until the red LED (2) appears briefly and the headset turns off completely while hearing descending beeps.
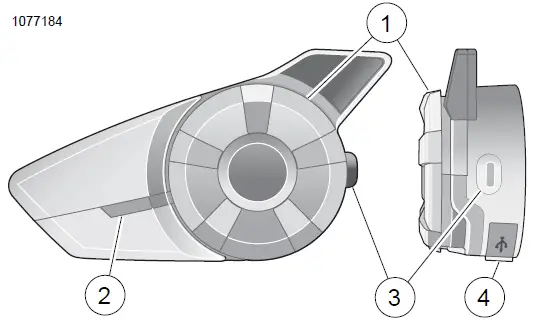
- Jog dial
- Status LED
- Phone button
- Charging and firmware port
Figure 119. Boom Wireless Headset
Wireless Headset Setup
Before using the wireless headset with any Bluetooth devices for the first time, you will need to pair them together. For example, it can be paired with Bluetooth mobile phones, Bluetooth stereo devices such as MP3 players, or motorcycle specific Bluetooth GPS navigation, and with other Boom! Audio Bluetooth headsets. This pairing operation is only required once for any Bluetooth device. The headset remains paired with the devices and automatically reconnects to them when they are within range. You will hear a high tone single beep and a voice prompt when the headset connects to the paired device automatically:
When a headset is paired to the motorcycle, it will say Your Headset is Paired, Boom Audio Connected. After this initial pairing, every time the headset connects to the motorcycle you will hear Boom Audio Connected.
When a headset is paired to a phone, it will confirm the pairing by saying Your Headset is Paired.. After this initial pairing, every time the headset reconnects to the phone it will say Phone Connected.
- Turn on wireless headset.
- Navigate: Home > Setup > Wireless Headset.
NOTE
Place headset in pairing mode before selecting Pair Rider Headset. Press phone button for 5 seconds until red and blue LED’s alternately flash. - Put Headset into pairing mode.
- Touchscreen will display Pairing in Process with Headset.
NOTE
Rider’s headset should be paired first followed by the passenger.
- Touchscreen will display Pairing in Process with Headset.
- See Figure 120. Select: Pair Rider Headset.
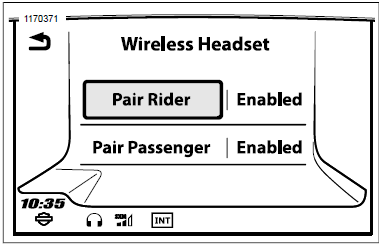
Figure 120. Pair Rider Headset
NOTE
Harley Davidson headsets will show up as Boom Audio and the version of its software. See owner’s manual of non-Harley Davidson headset products for display options.
See Figure 121. Confirm wireless headset display information on the touchscreen. Select the model of wireless headset to pair.

Figure 121. Place Headset Into Pairing Mode
See Figure 122. Touchscreen will display confirmation status that the wireless headset has been Connected.
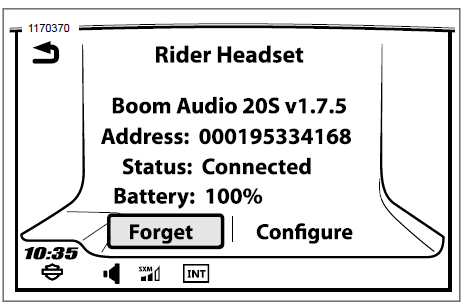
Figure 122. Paired Headset
Perform the same procedure for pairing the wireless headset for a passenger.
Headset to Headset Intercom Pairing
NOTE
When in pairing mode, do one device at a time in the area of the motorcycle and headset.
Please read the Sena User’s Guide for information pertaining to the wireless headset to headset intercom set up and usage.
Headset Configurations
NOTE
The wireless headset must be turned on and paired with the system for the following configurations to appear on the touchscreen.
The headset configurations only affect headset performance when it is paired to a phone or other headset. They do not directly impact the performance of the headset when it is paired to the vehicle. The Side tone setting is the only configuration option that will directly impact the headset when it is paired to a vehicle.
The 12 configuration modes can be accessed though the Boom! Box Infotainment system.
Select Home > Setup > Wireless Headset > Manage Rider or Passenger Headset > Config to manage headset configurations.
Smart Vol. Control: Smart Volume Control automatically changes the level of the speaker volume based on the level of the environmental noise. When it is disabled, volume is controlled manually. You can enable it by setting the sensitivity to low, medium, or high. Smart Volume Control responds to smaller environmental noises as the sensitivity level becomes higher. The default setting is disabled.
SideTone: Sidetone is the sound of your own voice as picked up by your headset’s microphone and reproduced in your own ear, by your own speaker. It helps you to naturally speak at the correct level according to varying helmet noise conditions. If this feature is enabled, you can hear what you are speaking during an intercom conversation or a phone call. The default setting is disabled.
Voice Prompt: You can disable voice prompts, but the following voice prompts are always on:
- Voice prompts for configuration setting menu
Voice prompts for battery level Indicator
Voice prompts for factory reset
Voice prompts for speed dial
Voice prompts for FM radio functions
Adv. Noise Control: When Advanced Noise Control is enabled, the background noise is reduced during an intercom conversation. When it is disabled, the background noise is mixed with your voice during intercom. The default setting is enabled.
Motion Sensitivity: Motion Sensor Sensitivity determines the sensitivity when you double tap on the surface of the Boom! Audio 20S EVO to enter voice command mode. The default setting is low, but you may change it to high, or disable the feature.
VOX Phone: If this feature is enabled, you can answer incoming calls by simply saying a word loudly enough, unless you are connected to intercom. For example, when you hear a series of beeps for an incoming call, you can answer the phone by saying Hello or any other word loudly. However, the VOX Phone feature does not work if you are connected to the intercom. This feature is enabled from the factory but can be disabled through the configuration menu, Device Manager, or the Sena Smartphone App. If this mode is disabled, you have to tap the Jog Dial or the Phone Button to answer an incoming call.
HD Intercom: HD Intercom enhances the two-way intercom audio from normal quality to HD quality. HD Intercom will become temporarily disabled when you enter into a multi-way intercom. If this feature is disabled, the two-way intercom audio will change to normal quality. The default setting is enabled.
Audio Multitasking: Audio Multitasking allows you to have an intercom conversation while simultaneously listening to music, FM radio, or GPS instructions. The overlaid audio is played in the background with reduced volume whenever there is an intercom conversation and will return to normal volume once the conversation is finished. If this feature is disabled, any incoming or outgoing intercom will interrupt your audio channel. The default setting is enabled.
INT-Audio Sensitivity: When the Audio Multitasking setting is enabled, if you talk over the intercom while music is playing, then the music volume will be lowered to play in the background. You can adjust the intercom sensitivity to activate this background music mode. Level 1 has the lowest sensitivity and level 10 has the highest sensitivity. The default setting is 6.
Nav. App Support: When Audio Multitasking is enabled, your smartphone’s GPS application reduces in volume whenever there is an ongoing intercom conversation. To listen to your smartphone’s GPS navigation clearly without this volume reduction, enable Navigation App Support. The default setting is disabled.
Eight-way Intercom: Disabling the Eight-way Intercom optimizes the intercom performance for a small group up to four participants. Enabling the Eight-way Intercom optimizes the intercom performance for a larger group up to eight participants. The default setting is disabled.
FM Station Guide: When FM Station Guide is enabled, FM station frequencies are given by voice prompts as you select preset stations. When FM Station Guide is disabled, the voice prompts on FM station frequencies will not be given as you select preset stations. The default setting is enabled.
Headset Software Version
NOTE
The Boom! Audio 20S EVO supports firmware upgrade
function. Visit www.Harley-Davidson.com to check for the latest software downloads.
The information given in this topic is only informational. The exact Model/Software Version and Address will vary upon the product that is paired to the vehicle.
See Figure 122. When the wireless headset is properly paired it will confirm:
- Model/Software Version:
Bluetooth Address:
Status: Connected - Unpair Wireless Headset
- Select: Home > Setup > Wireless Headset.
- Select: Manage Rider or Passenger headset.
- See Figure 122. Select: Forget. This will unpair rider or passenger wireless headset from the Boom system.
Reset Factory Headset Settings
NOTE
When performing this procedure, the link between the Boom Infotainment system and headset will be broken. The wireless headsets must be paired again for system communications to operate properly.
- To restore the Boom! Audio 20S EVO to factory default settings, press and hold the Phone Button for 12 seconds until the LED shows solid red and you hear double beeps. You will hear a voice prompt saying Factory reset.
- Within 5 seconds, press the Jog Dial to confirm reset. The headset will be restored to factory settings and switched off automatically. You will hear a voice prompt saying Headset reset, good-bye.
- If you press the Phone Button or don’t press the Jog Dial within 5 seconds, the reset attempt is canceled and the headset returns to stand-by mode. You will hear a voice prompt saying Canceled.
- Unpair current wireless headset(s) in Boom system. See Unpair Wireless Headset in this section.
- Perform pairing procedure. See Wireless Headset Setup in this section.
Fault Reset
See Figure 123. When the Boom! Audio 20S EVO is not working properly or is in faulty status for any reason, you may reset by pushing the pin-hole reset button at the back of the headset main unit. Insert a paper clip into the reset pin-hole and press the reset button for a second with light pressure. The Boom! Audio 20S EVO will be switched off, and you have to turn the system back on and try again. However, this will not restore the headset to factory default settings.
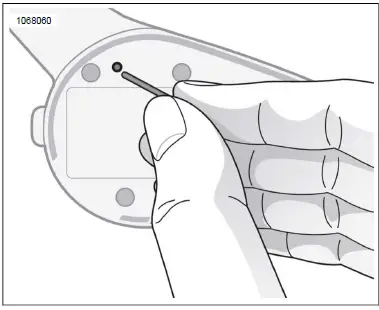
Figure 123. Fault Reset
CITIZEN BAND (CB) RADIO
WARNING
Set CB channel, squelch threshold and volume before riding to minimize adjustments on the road. Distractions can lead to loss of control, resulting in death or serious injury. (00089a)
NOTICE
Operating the CB radio without an antenna or with a broken antenna cable can result in damage to the transmitter circuitry. (00176a)
NOTICE
There are no adjustments internal to the CB transceiver chassis that can be performed without risking non-compliance with Federal Communications Commission (FCC) rules. Refer to the original equipment manufacturer for any service required during the warranty period. For transmitter service after the warranty period, refer to a certified repair service. Any frequency determining components, such as crystals, or power determining semi-conductors, etc., should only be replaced with the original component manufacturer’s part or equivalent. Substitutes can result in violation of FCC rules. (00175a)
Some models in select regions have a CB module. The CB radio can be used to communicate with other CB-equipped motorcycles (or other CB users) on any of the 40 Citizen Band channels.
Regulations for CB operation, specific frequencies or power output may be unique for different regions. Check local laws and regulations before operating the CB radio. In the United States, read Part 95, FCC Rules and Regulations before operating your transmitter.
Turning CB On
NOTE
If the CB is disabled, the selection button will not be greyed out and not selectable.
The CB must be turned on before using. After the CB is turned on and a channel has been selected, you can leave the CB screen and use other radio features (such as listening to tuner stations, making phone calls, using navigation features, or listening to media files). The CB remains muted but continues operating in the background. The rider and passenger can transmit or receive CB audio at any time while on any screen.
- Navigate: Home > Communications > CB.
- See Figure 124. Press the On/Off icon. The middle of the screen shows the current channel and CB On. The CB icon is displayed in the status bar while the CB remains on.
Turning CB Off
See Figure 124. On the CB screen, press the On/Off icon. The CB presets will be disabled, the middle of the screen will show CB Off and the CB icon in the status bar will turn off.
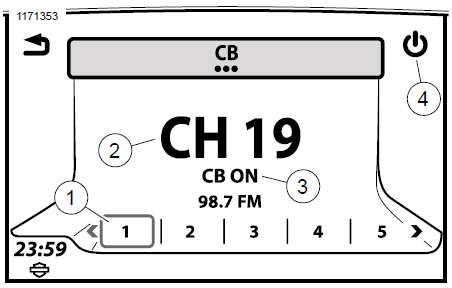
- Preset
- Current channel
- ON/OFF Indicator
- ON/OFF Icon
Conflicting Transmissions
CB channels are mutually shared among many users. Interruptions and conflicting transmissions from multiple users on a channel can make it difficult for your intended recipient to understand your message. To make sure that your transmission is received well, and as a courtesy to others, wait until the channel is clear before pressing the PTT switch.
If too many users are actively using a channel, try to specify another possible channel to your intended recipients so you can resume your conversation together on that channel.
For important communications, make sure that your recipient acknowledges that they have received and understand your message.
Emergency Operation: Channel 9
In the US, the FCC has reserved channel 9 for emergency or traveler assistance use only. Use of this channel should only be for issues involving personal safety, damage to property or other required assistance. Channel 9 is also reserved for emergency use in most other countries that allow Citizen Band radio.
When using this channel for emergencies or assistance, clearly identify the nature of the problem and your location. If no response is received, try other channels or find another way to get help.
Transmitting on CB
Start transmitting: While on any screen, wait until other active CB transmissions are finished and the channel is clear. Press and hold the PTT switch to begin transmitting on the current CB channel. Any sound picked up from the rider and passenger microphones will be transmitted. While the PTT switch is held, all other audio is muted, including any inbound CB messages that may be coming in. The CB Active icon will be displayed in the status bar during the transmission. See Figure 125.
Stop transmitting: Release the PTT switch to stop transmitting. The status bar will show the CB Idle icon. Audio will be resumed, and any CB audio that breaks squelch will be received.
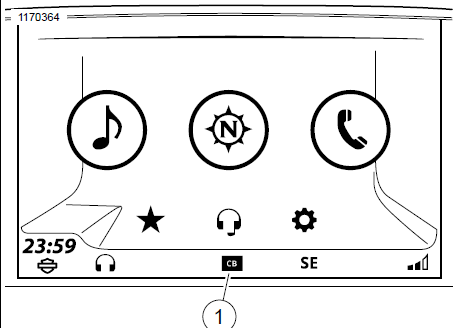
Figure 125. CB Active
Receiving CB Audio
The radio will receive inbound CB audio while on any screen. When an incoming CB signal breaks squelch, the CB audio interrupts (or mixes) with the current audio source in the radio. While CB audio is being received, the CB Active icon is displayed in the status bar.
If necessary, adjust the squelch level so noise does not break squelch, but desired CB audio is still received.
CB audio is received through the speakers or the headsets, depending on the audio routing settings. See Speaker (p-29) Both rider and passenger headsets will receive inbound CB audio.
Tuning CB Channels
The CB radio can access all 40 channels. While on the CB screen, press the Previous/Next hand control to advance through the CB channels individually. Channels can only be changed while in the CB screen.
Refer to local regulations for any further restrictions or recommendations on local channel use. For some of the popular CB channels used, Refer to Table 49.
Table 49. CB Channels: Popular or Reserved
| CHANNEL | DESCRIPTION |
| Channel 8 | Unofficial travelers channel (Australia) |
| Channel 9 | Reserved for emergency and traveler assistance use only (most countries) |
| Channel 13 | Unofficial travelers channel (Greece) |
| Channel 15 | Unofficial travelers channel (Russia) |
| Channel 17 | North-south freeway trucker channel (US) |
| Channel 19 | East-west freeway trucker channel (US)
Unofficial travelers channel (most countries) |
CB Presets
The CB screen stores six preset channels. Save your most commonly used channels as presets so they can be easily accessed. Some recommended presets include channel 9 (emergency channel) and channel 19 (unofficial travelers channel).
Setting CB preset: Tune to a CB channel. Press and hold a CB preset until the system beeps and the channel is saved.
Recalling CB preset: With the CB turned on, press the desired CB preset.
NOTE
CB channels cannot be configured as global presets or favorites.
Squelch
The squelch level determines the minimum signal strength that will unmute CB reception. When a CB signal exceeds the selected threshold, the radio will “break squelch”. The current audio source (such as a radio station or media file) mutes and the CB channel is unmuted.
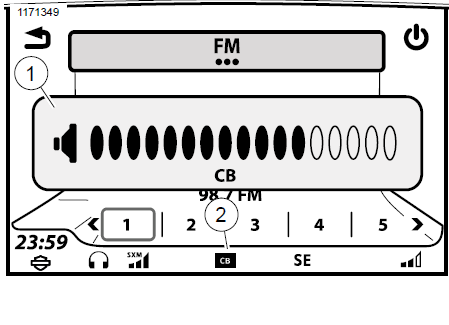
Adjusting squelch: See Figure 126. With the CB turned on, push down the squelch switch (SQ-) until noise and static are heard. The CB Active icon will be displayed. Then push up the squelch switch (SQ+) one or two levels. This eliminates noise while allowing any stronger signals to break squelch.
Intermittent noise: If intermittent noise or undesired weak CB signals continue to break squelch, consider raising the squelch further. However, setting the squelch too high can prevent desired CB audio from being received.
Maximum squelch: At maximum squelch, the radio will not break squelch for any signal. All inbound CB signals are effectively muted.
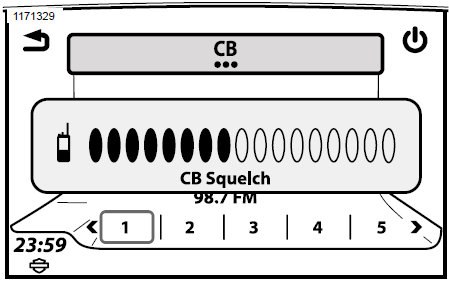
Figure 126. CB Squelch Level
CB Volume
CB Audio Routing: CB audio can be routed to the speakers or the rider/passenger headsets. See Speaker (Page 65).
Adjusting CB volume (while on CB screen): Use rider volume controls to adjust speaker or rider headset volume. Use passenger volume controls to adjust passenger headset volume.
Adjusting CB volume (while not on CB screen): See Figure 127. While CB audio is being received, use the rider or passenger volume controls. If necessary, first reduce the squelch until CB audio breaks squelch, then adjust the volume. Raise the squelch to its original level.
- CB volume
- CB active
Figure 127. CB Volume
Passenger CB Operation
The passenger can also transmit over the current CB channel, adjust CB volume for the passenger headset and listen to inbound CB audio in the passenger headsets. The passenger cannot adjust speaker volume, adjust squelch or change CB channels.
Initiating CB transmission (passenger): When channel is clear, press and hold the passenger PTT switch on side of Tour-Pak. Both the rider and passenger microphones become active. Release PTT switch when finished.
Adjusting CB volume (passenger): While on CB screen (or while CB is in operation), use UP/DN switch on side of Tour-Pak to adjust passenger headset volume. The volume switch does not affect the speakers or rider headset volume.
Factors Affecting CB Range
Adverse weather, buildings, hills and valleys can affect the maximum range for the CB radio. Degraded reception or transmission capability can also occur in tunnels or parking garages. The CB transmitter is the most powerful allowed under US federal law. However, since there is no large steel area to create a ground plane, the CB may not transmit as strongly as CBs mounted in a car or truck.
Adding an Optional CB Module
Bike-to-bike (CB) communication is standard on some vehicles in select locations. For vehicles not equipped with a CB, the optional CB accessories can be purchased at www.h-d.com/store or at an authorized Harley-Davidson dealer.
Installation of the CB module may only be allowed in particular regions. See www.h-d.com/store or your authorized Harley-Davidson dealer for fitment and requirements. Follow the instruction sheet procedures or have an authorized Harley-Davidson dealer install the accessory. For set up and operation, use the instructions in this manual.
Reference Links
View Full User Guide: Harley Davidson Boom Box GTS 2019 User Manual
Download link: https://www.harley-davidson.com/be/nl/index.html