Harley Davidson Boom Box GTS 2019 Controls and Components User Manual
Controls and Components
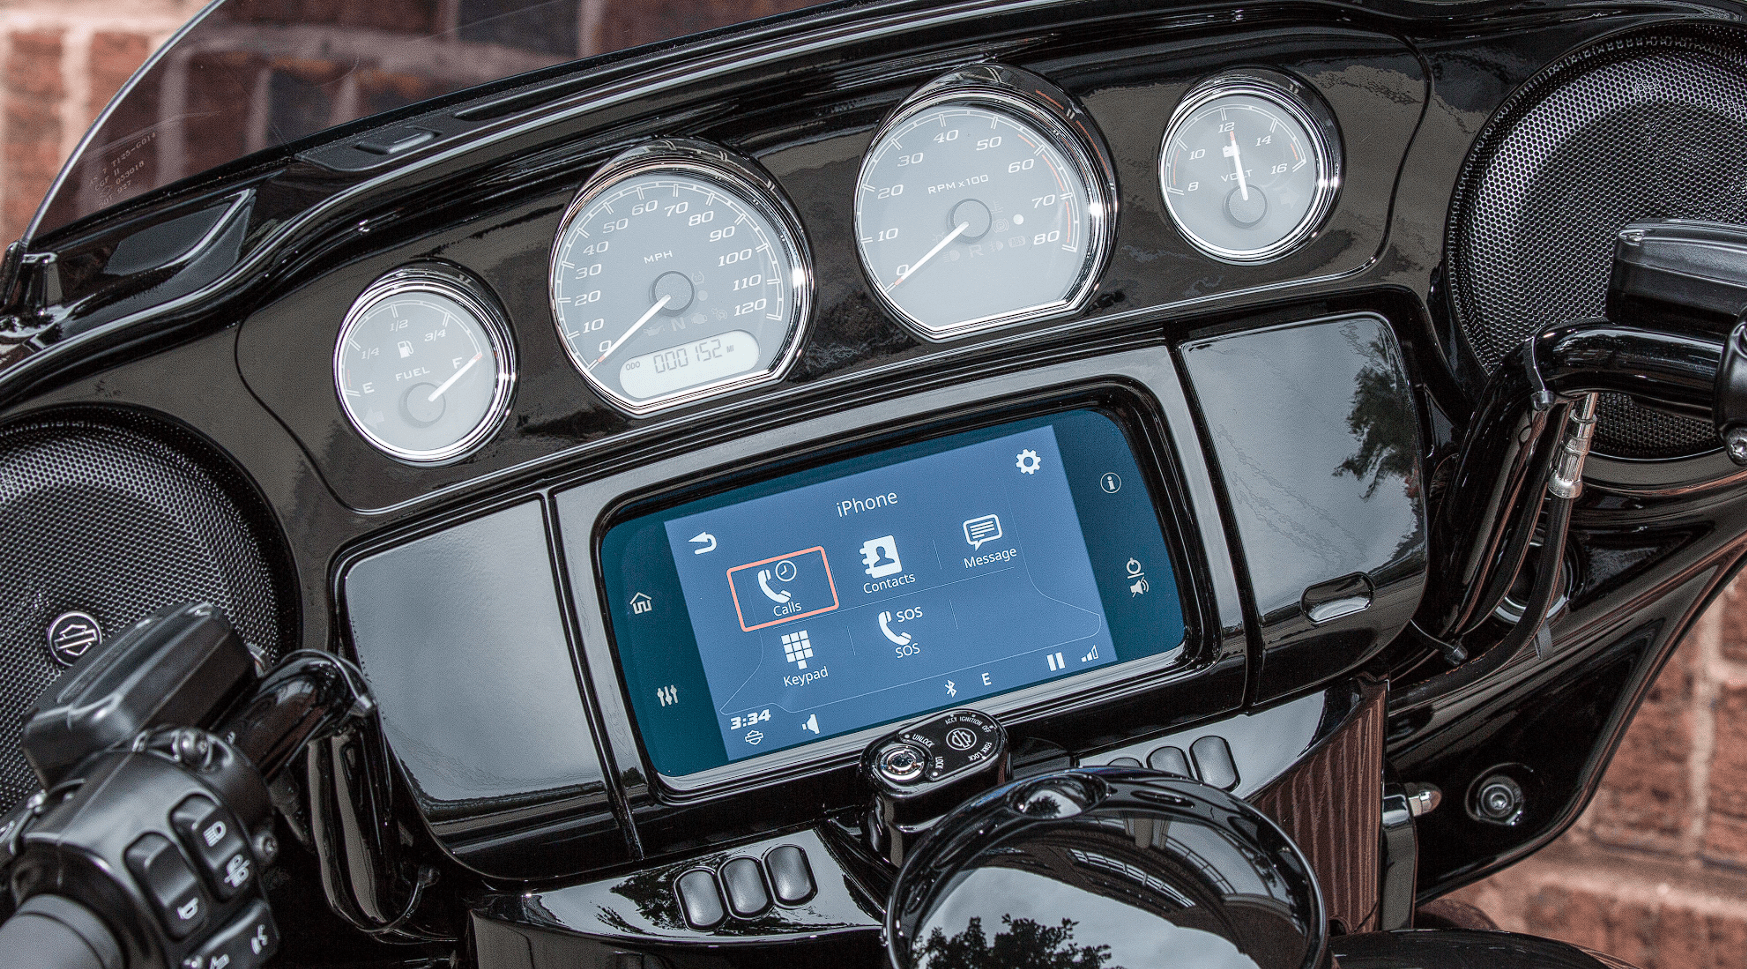
TOUCHSCREEN
See Figure 21. Press on touchscreen to select menu items and operate the radio. The touchscreen can be operated while wearing riding gloves.
The screen is designed to minimize glare, be viewable in all lighting conditions and be operable in wet weather conditions.
To properly care for the radio faceplate and touchscreen, see Audio System Care (Page 117).
- Home
- Audio
- Navigation
- Phone
- Information (Vehicle Status)
- Power/Mute
- Setup
- Communications
- Favorites
- Audio Settings
Figure 21. Faceplate Home Screen Selections
Home
Select Home to display the Home screen. Press Home again to show the current audio source (tuner station, media file, or phone screen).
Audio
Select Audio to display the audio sources (tuner station, media file or phone ).
Tuner (NA): AM, FM, WB (weather band)
Tuner (EU): MW, LW, FM, DAB+
Media: iPod, USB Media, Bluetooth Audio, Phone, SiriusXM (if applicable)
Navigation
Select Navigation to display the map. The current location will be shown at the top of the map screen and selecting the search icon will be able to do some of the following:
- Setting Go Home address
Perform a search, input a destination or selecting a POI
Selecting from a list of preset destinations: Gas, Food, Hotel, H-D Dealers, Emergency
Compass: For radios without navigation, press the Navigation icon to display the compass. See Navigation (Page 137) to configure and operate the navigation features.
Phone
Select Phone to display available phone lists and dialing choices.
Calls: Displays the call activity list for the current phone. The list can be filtered to show all, missed, received or dialed.
Contacts: Choose from contacts on radio, contacts on phone or sync phone contacts.
Message: Text message from paired phone.
Keypad: Used to manually enter a phone number.
SOS: Emergency number stored in radio.
Information (Vehicle Status)
Press Vehicle Information to display various vehicle information. Press the button again to cycle the Vehicle Status screen.
Power/Mute
When turning the motorcycle on, the radio resumes its previous state (radio on or off).
Power On: With the motorcycle turned on or in accessory mode, press POWER/MUTE to turn on the system. The system returns to the last state as when it was last turned off (media file, station, and so on).
Power Off: Press and hold POWER/MUTE for three seconds to turn the system off. The screen goes black and the clock is displayed. The radio remains in sleep mode and continues to draw current while the motorcycle is turned on or in accessory mode. The radio does not reinitialize unless the vehicle is turned off for up to 30 seconds.
Unmute/Resume: To resume audio or media files, briefly press POWER/MUTE again.
NOTE
- Audio can also be unmuted by pressing the volume switch on the left hand control.
Media can also be resumed by pressing the PREVIOUS/NEXT switch on the left hand control.
POWER/MUTE does not mute phone call audio. Use the Mute function in the phone menu to mute inbound/outbound phone audio during a call.
Setup
Configure the system settings before riding the motorcycle, with the motorcycle stationary and set to accessory mode. Adjust the options to match your personal riding style, and to make best use of any features or devices that you may be using. If there are problems with any features in the radio, first check the relevant settings.
Most settings are similar for all radios. However, some features or selections may be unique or unavailable on some vehicles. Some settings may also be specific for particular countries or regions. See Specifications (Page 24) for more information about the features available on your motorcycle and in your region.
If audio accessories have been added to the motorcycle, see the instruction sheets for proper configuration and operation of those accessories.
Communications
The intercom allows the rider and passenger to talk with each other through the headsets. The intercom can be operated by pressing the PTT switch or by using voice operated transmission (VOX). When voice input is picked up by the rider or passenger microphone, the intercom is automatically activated. This process is known as “breaking VOX”.
The rider or passenger can initiate intercom communication. When the intercom is active, tuner and media volume are automatically reduced so the intercom can be heard through the headsets.
For privacy, the intercom is only heard through the rider and passenger headsets. It is not heard through the speakers.
Microphone sensitivity and headset volume can be adjusted. The microphone sensitivity (VOX) applies to both rider and passenger microphones. The rider and passenger headset volumes are adjusted independently.
NOTE
Some local governments prohibit or restrict the use of headset (helmet-mounted) speakers. Check with local authorities and obey all applicable laws and regulations.
Favorites
Selecting the favorites icon displays up to six saved favorites.
- Navigate: Home > Favorites.
- Press and hold desired preset until screen title changes to Select a Favorite Type.
NOTE
To overwrite a currently stored favorite, repeat the procedure for setting. - Select: Type.
- Tuner: Currently playing station, SXM, AM, FM or WB.
- Phone: Recent, Contacts on Radio or Contacts on Phone. Select from list.
- Location: Recent or Saved. Select from list.
- Media: usb. Select from list.
- Listen to favorite: Briefly press the favorites icon. Select from list.
Audio Settings
The audio settings are used to custom tune the radio output.
Bass: Adjust audio bass from minimum to maximum.
Treble: Adjust audio treble from minimum to maximum.
Audio Routing: Direct audio through speakers or headset.
Fade: Adjust center of audio output.
Volumes: Adjust speaker, rider headset and passenger headset volumes. Also, turn speed volume on or off.
LEFT HAND CONTROL
Some features and functions shown are model and/or region-specific.
See vehicle owner’s manual for functionality of other hand control switches.
See Figure 22. The Home/Volume/Previous/Next five-way switch operates radio features on equipped vehicles.
Home: Press to display the Home screen. Press again to display current audio source (tuner station, media file, or phone screen).
Previous/Next: Tap left or right to select previous/next radio frequency or media file.
NOTE
- A one second press will seek the next transmitting station.
A long press will accelerate through frequencies, or fast forward/rewind through media files.
Volume: Press up to increase volume or down to decrease volume to speakers or rider headset. Volume control can also unmute audio and resume media.
NOTE
- Unlike the Mute switch, decreasing volume to zero does not pause media.
Volume output is also affected by the speed volume setting. See Speed Volume (Page 67).
CB, intercom, phone calls and system prompts have independent volume levels. Adjust volume for these different audio sources while they are active. See appropriate sections for each of these functions for operation.
Voice Recognition: This switch activates voice recognition features on equipped vehicles. With a headset connected, press Voice Recognition switch. The radio beeps and shows a list of available commands. Speak desired command into headset microphone. See Voice Recognition (Page 179).
To cancel voice recognition, press and hold Voice Recognition switch for three seconds, or press Home hand control switch.
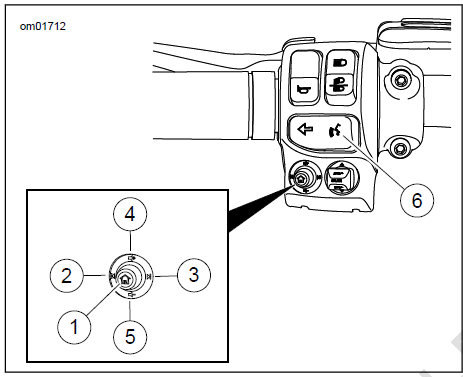
Figure 22. Left Hand Control Audio Functions (typical)
Table 22. Left Hand Control Audi o Functions
| ITEM | ICON | NAME | FUNCTION |
| 1 |  |
Home | Short Press: Toggles between current screen and Home screen. Long Press: Toggles the Quick Jump screen. |
| 2 |  |
Previous /Seek Down |
Media: Previous media file. Tuner: Tune/seek down. |
Table 22. Left Hand Control Audio Functions
| ITEM | ICON | NAME | FUNCTION |
| 3 |  |
Next/Seek
Up |
Media: Next media file.
Tuner: Tune/seek up. |
| 4 |  |
Volume Up | Increases volume. |
| 5 |  |
Volume
down |
Decreases volume. |
| 6 |  |
Voice Recognition | Initiates a voice recognition session. Also, a long press initiates Siri for Bluetooth paired iPhone or Apple CarPlay when a headset is connected. |
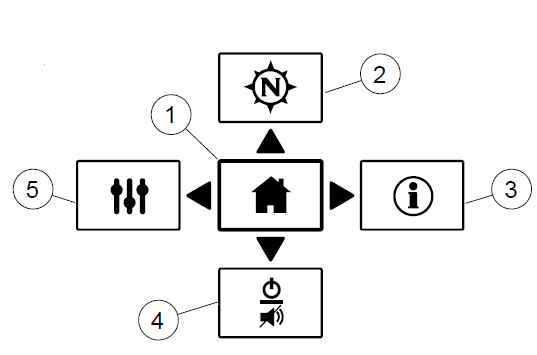
- Home
- Navigation
- Information (Vehicle Status)
- Power/Mute
- Audio Settings
Figure 23. Quick Jump
RIGHT HAND CONTROL
Some features and functions shown are model and/or region-specific.
See vehicle owner’s manual for functionality of other hand control switches.
See Figure 24. Back: Press to view previous screen on radio.
NOTE
- A long press will change the screen between normal day and high contrast color.
Push-To-Talk/Squelch (PTT): Press to transmit over CB or intercom. Both rider and passenger microphones are live. Intercom can also be operated by voice activation (VOX).
Squelch (SQ+/SQ-): Raise squelch (SQ+) to prevent noise or unwanted weak signals from unmuting the CB. Lower squelch (SQ-) to a level that allows desired CB signals to unmute the CB.
Cursor/Select: The Cursor/Select five-way switch can be used to select items on the radio screen.
- Cursor: Press switch in desired direction to move highlighted cursor to another selection on radio screen.
Select: Press switch straight in to select a highlighted item or toggle a feature on radio screen.
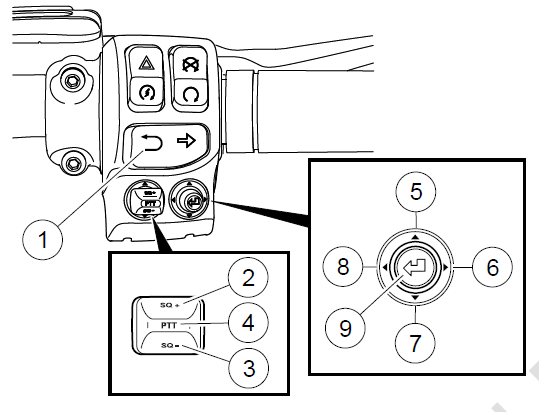
Figure 24. Right Hand Control Audio Functions
Table 23. Right Hand Control Audio Functions
| ITEM | ICON | NAME | FUNCTION |
| 1 |  |
Back | Short Press: Back to previous screen.
Long Press: Screen transitions between normal day color and high contrast color. |
| 2 | SQ+ | CB
Squelch + |
Increases CB squelch level (if equipped). |
| 3 | SQ- | CB
Squelch – |
Decreases CB squelch level (if equipped). |
| 4 | PTT | CB Push
to Talk |
Press and hold to transmit on
CB/intercom (if equipped). |
| 5 |  |
Cursor Up | Moves the highlighting up through the selections. |
| 6 |  |
Cursor
Right |
Moves the highlighting right through the selections. Tuner: Next preset up. |
| 7 |  |
Cursor
Down |
Moves the highlighting down
through the selections. |
| 8 |  |
Cursor
Left |
Moves the highlighting left through
the selections. Tuner: Next preset down. |
| 9 |  |
Select
/Enter |
Selects highlighted item. |
REAR (PASSENGER) CONTROLS
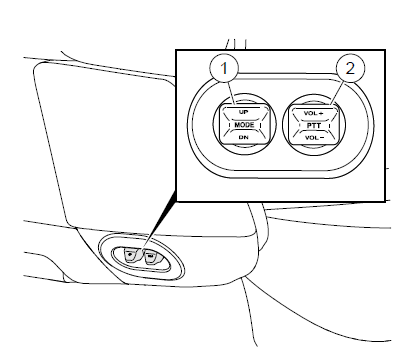
See Figure 25. Some vehicles have passenger controls on the right side of the Tour-Pak. These controls allow the passenger to operate functions in the radio.
MODE/UP/DN Switch
MODE: Press switch straight in to select the next available audio source.
UP/DN: Press switch up/down to select the previous/next radio station or media file.
Push-To-Talk (PTT)/Volume (VOL) Switch
PTT: Press switch to transmit over CB or intercom.
VOL+/VOL-: Press switch up (or down) to raise (or lower) the volume to the passenger headset. This switch does not affect the rider headset volume or speaker volume.
Enabling Rear Controls
The PTT/VOL switch is always enabled. However, the MODE/UP/DN switch can be enabled or disabled through the setup screens. See Rear Controls (Page 68) to enable these rear controls.
- MODE/UP/DOWN Switch
- Push-To-Talk (PTT)/Volume (VOL±) Switch
Figure 25. Passenger Controls
Table 24. Rear (Passenger) Control Audio Functions
| ITEM | ICON | NAME | FUNCTION |
| 1 | Mode | Cycles to next available audio source. | |
| Next/Seek
Up |
Tuner: Seek up.
Media: Next file. |
||
| Previous
/Seek Down |
Tuner: Seek down.
Media: Previous file. |
||
| 2 | CB Push- to-Talk | If Equipped: Press and hold to transmit on CB/intercom. | |
| Volume Up | Increases volume. | ||
| Volume
Down |
Decreases volume. |
HEADSET CONNECTION
WARNING
Do not select a volume level that blocks out traffic noise or interrupts the concentration necessary for safe operation of the motorcycle. Distractions or a volume level that blocks out traffic noise could cause loss of control resulting in death or serious injury. (00539b)
NOTICE
Do not pull on the cord to remove the headset from the socket. Pull on the headset jack to disconnect the headset from the socket. (00174a)
See Figure 26 and Figure 27. Some vehicles have a rider headset connector on the fuel tank panel and a passenger headset connector on the left speaker pod. The headsets are used to operate the CB, intercom, voice recognition commands and other features on equipped models.
Use the Harley-Davidson 7-pin DIN headset that is supplied with equipped models or purchased from a Harley-Davidson dealer. Other headset microphones are not compatible. See the instructions that are included with the headset to install in a helmet. Connect the headset by aligning the ridge on the headset with the slot on the connector as shown in Figure 26. The headset only works if the connector is properly installed.
When using headsets, set the volume to a level where traffic and sounds from the surrounding environment can still be heard.
The socket caps remain shut when not in use to prevent dirt and water from entering the socket. Close both socket caps before washing the motorcycle.
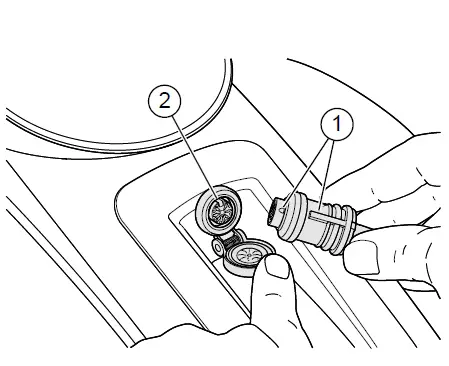
- Headset connector index
- Console index
Figure 26. Rider Headset Connector (typical)
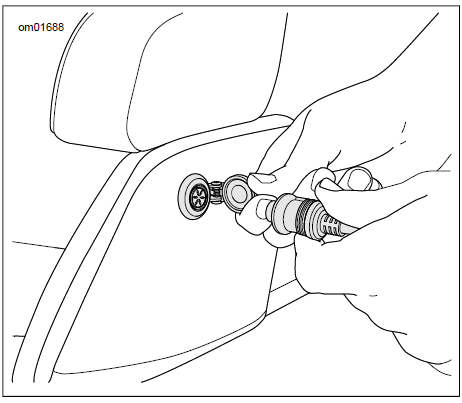
Figure 27. Passenger Headset Connector
Microphone Positioning
NOTE
Poor or improper microphone placement may result in VOX setting issues.
Full face helmets: See Figure 28. Route the boom below the helmet, with the microphone oriented upright inside the helmet, so the boom does not touch the chin.
Open face or half helmets: See Figure 28 and Figure 29. Position the microphone lightly touching or directly to the left of the mouth.
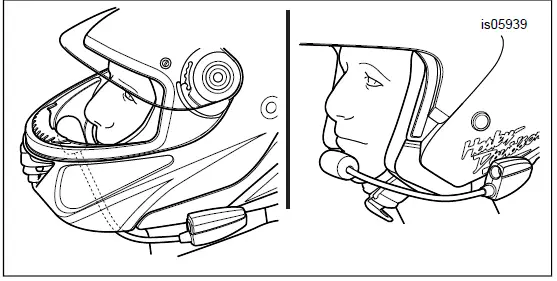
Figure 28. Microphone Positioning
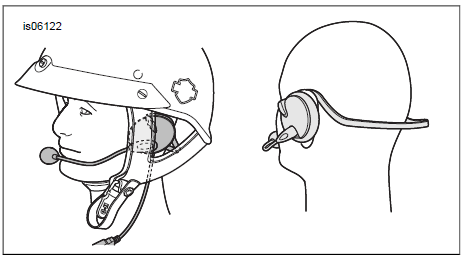
Figure 29. Headset and Microphone Positioning
MEDIA COMPARTMENT: USB PORT
See Figure 30 and Figure 31. The media compartment has a USB port to connect with a phone, media device or USB drive. An interface cable may be needed to connect with devices. The USB port is powered and operational when the vehicle is turned on or in accessory mode. Connected devices may be used for the following purposes.
Phone: Charges the phone and plays media files from the phone. However, phone calling and text messaging features are achieved only through Bluetooth connection.
Media device: Charges the device and plays media files.
USB drive: Plays media files, imports/exports navigation files, loads software updates, and imports ring tones.
Memory card: Some types of memory cards can be connected to play media files. Connection requires an adapter or reader.
H-D App (DOM only): Enables Rides and Points of Interest (POIs) to be transferred from the phone to the radio navigation system. USB cable is iOS only. Bluetooth works for both iOS and Android.
NOTE
Do not use media players with hard drives. Vibration may cause internal damage.
Devices can be added or removed while the radio is on. However, when importing/exporting files or installing updates to the radio, do not disconnect the USB device until the task has completed.
Keep the compartment door closed while riding to prevent items from falling out. Remove valuable items from the media compartment before leaving the vehicle unattended.
Media Compartment: Fixed Fairing Vehicles
See Figure 30. Fixed fairing vehicles have a media compartment in the right side of the fairing.
Open: Pull up on the front of the compartment door to open as shown.
Cleaning: The rubber or fabric insert in the compartment is attached with hook and loop fastening tape and can be removed for cleaning.
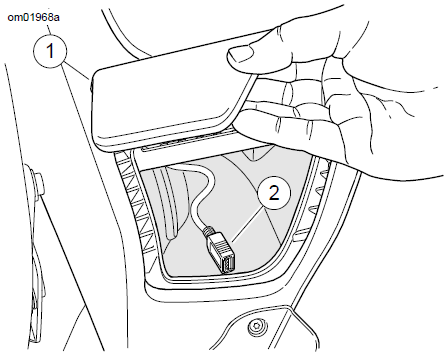
- Storage/media compartment door
- USB port
Figure 30. Storage/Media Compartment: Fixed Fairing Models
Media Compartment: Fork Mounted Fairing Vehicles
See Figure 31. Fork mounted fairing vehicles have a media compartment on the right side of the radio as shown. Insert the phone or media device into the foam cradle to secure the device and isolate it from vibration.
Open: Push lower portion of door and release to open.
Close: Firmly push the door shut until the latch engages.
Reset door latch: If compartment door was forced open or is not latching properly, the door latch may need to be reset. Push the door shut. Open the door. Close the door again to engage the latch mechanism.
Cleaning: The cradle can be removed for cleaning or to assist with installing or removing a device from the compartment.
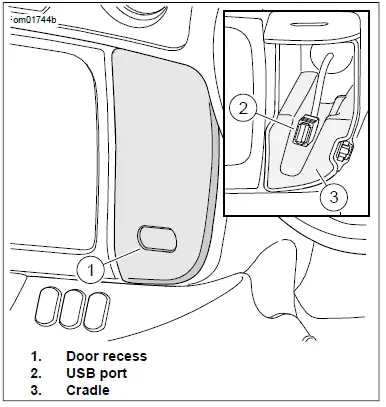
- Door recess
- USB port
- Cradle
Figure 31. Media Compartment
SPEAKERS
The speaker types and arrangements are different across models. All speakers are weatherproof and sealed for use in all riding weather conditions. See Audio System Care
(Page 117) to properly care for speakers. See www.h-d.com/store for available speaker options.
Fairing Speakers
Front speakers are designed into a ported enclosure in the fairing for additional bass response and higher fidelity. Models include different speaker specifications and arrangements within the inner fairing.
Fairing Lower Speakers
Fairing lower speakers are equipped on some models to provide more volume for the sound system. These are also available as accessories for vehicles with air-cooled engines.
Saddlebag Speakers
Saddlebag speakers are equipped on some models to provide additional surrounding volume for the sound system. These speakers use the saddlebag enclosure to provide enhanced bass response. A small amount of water may occasionally collect in the speaker cavities while parked outdoors. The saddlebag speakers are weatherproof, and the heat from speaker operation would soon evaporate the water, but there could be a temporary effect on sound quality. To promptly empty the speaker cavities, lift the saddlebag lids. Saddlebag speakers are also available as accessories.
Tour-Pak Speakers
These forward-facing speakers direct sound to the rider and passenger. The bass boost ports use the enclosed space in the Tour-Pak to provide an enhanced bass response with reduced distortion. The bass response of these ports may be affected when items are stored in the Tour-Pak or when the Tour-Pak lid is open.
AMPLIFIER
Some vehicles include an additional amplifier to drive greater sound output to the speakers. Boom! audio amplifiers bypass the internal amplifier in the radio to provide increased volume, reduced clipping, lower Total Harmonic Distortion (THD), optimized equalization and a fuller sound that cuts through wind and road noise. The amplifier is also available as an accessory.
Additional amplifiers may be needed when adding speakers to a vehicle.
ANTENNAS AND RECEPTION
NOTICE
Operating the CB radio without an antenna or with a broken antenna cable can result in damage to the transmitter circuitry. (00176a)
Tuner and CB antennas: See Figure 32. Antennas on the rear of the vehicle may be removed during vehicle storage. Make sure to install antennas before operating the radio. To install, hand tighten the antennas to the mounts. Antennas for the tuner and CB are different. For vehicles with a CB, always install the CB antenna (marked with the letters “CB” at the base of the mast) on the right side of the motorcycle. The antenna marked “AM/FM” is for tuner reception. Installing the incorrect antenna for the tuner or CB will result in degraded reception.
Hidden tuner antenna: Some vehicles have an antenna installed in the fairing for tuner reception (AM/FM/WB).
Satellite antennas: SiriusXM and GPS antennas are mounted within the fairing on equipped models. These antennas require no maintenance. SiriusXM satellite radio and GPS reception may be weaker when the vehicle is indoors.
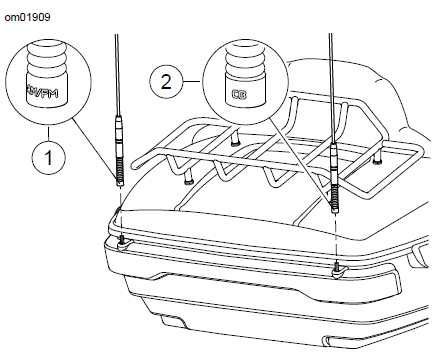
- Tuner antenna: AM/FM
- CB antenna: equipped models
Figure 32. Antennas
BLUETOOTH
The system has Bluetooth capability for accessing media files and phone operation. See the Bluetooth (Page 112) section to set up and connect devices.
TURNING MOTORCYCLE ON, OFF OR TO ACCESSORY MODE
Turning on motorcycle: When the motorcycle is turned on, the radio returns to its previous state before shutdown. Features such as CB, intercom, current station or media playing resume as before the vehicle was turned off. A Bluetooth connection to the phone will attempt to resume.
Starting the engine: When starting the engine, the audio mutes and the screen turns off momentarily.
Radio on/off: If the radio is turned off before the vehicle is shutdown, it will remain turned off when the vehicle is turned back on.
Restart radio: To reinitialize the radio, allow the vehicle to remain turned off for up to 30 seconds before turning the vehicle back on.
Accessory mode: When the vehicle is in accessory mode, operation of the radio will result in some battery drain. The motorcycle will automatically turn off after two hours in accessory mode. Keyed vehicles enter/exit accessory mode by turning the ignition switch to the appropriate position. Keyless vehicles enter/exit accessory mode by holding the trigger switch on left control module.
Turning off motorcycle: If turning off the motorcycle while in an active phone call, the radio will prompt to transfer the call back to the phone. If the prompt is not accepted, the radio will continue to support the call for approximately five minutes before automatically transferring the call back to the phone and shutting down. See Resuming Calls After Vehicle Shutdown (Page 132).
DISCONNECTING THE VEHICLE BATTERY
The system retains user data and system settings when the vehicle battery has been disconnected or main fuse is removed. Features such as navigation routes, paired devices, phone books, favorites, presets and system settings are retained in memory. The radio returns to its previous functionality after the battery is reconnected to the vehicle.
Reference Links
View Full User Guide: Harley Davidson Boom Box GTS 2019 User Manual
Download link: https://www.harley-davidson.com/be/nl/index.html