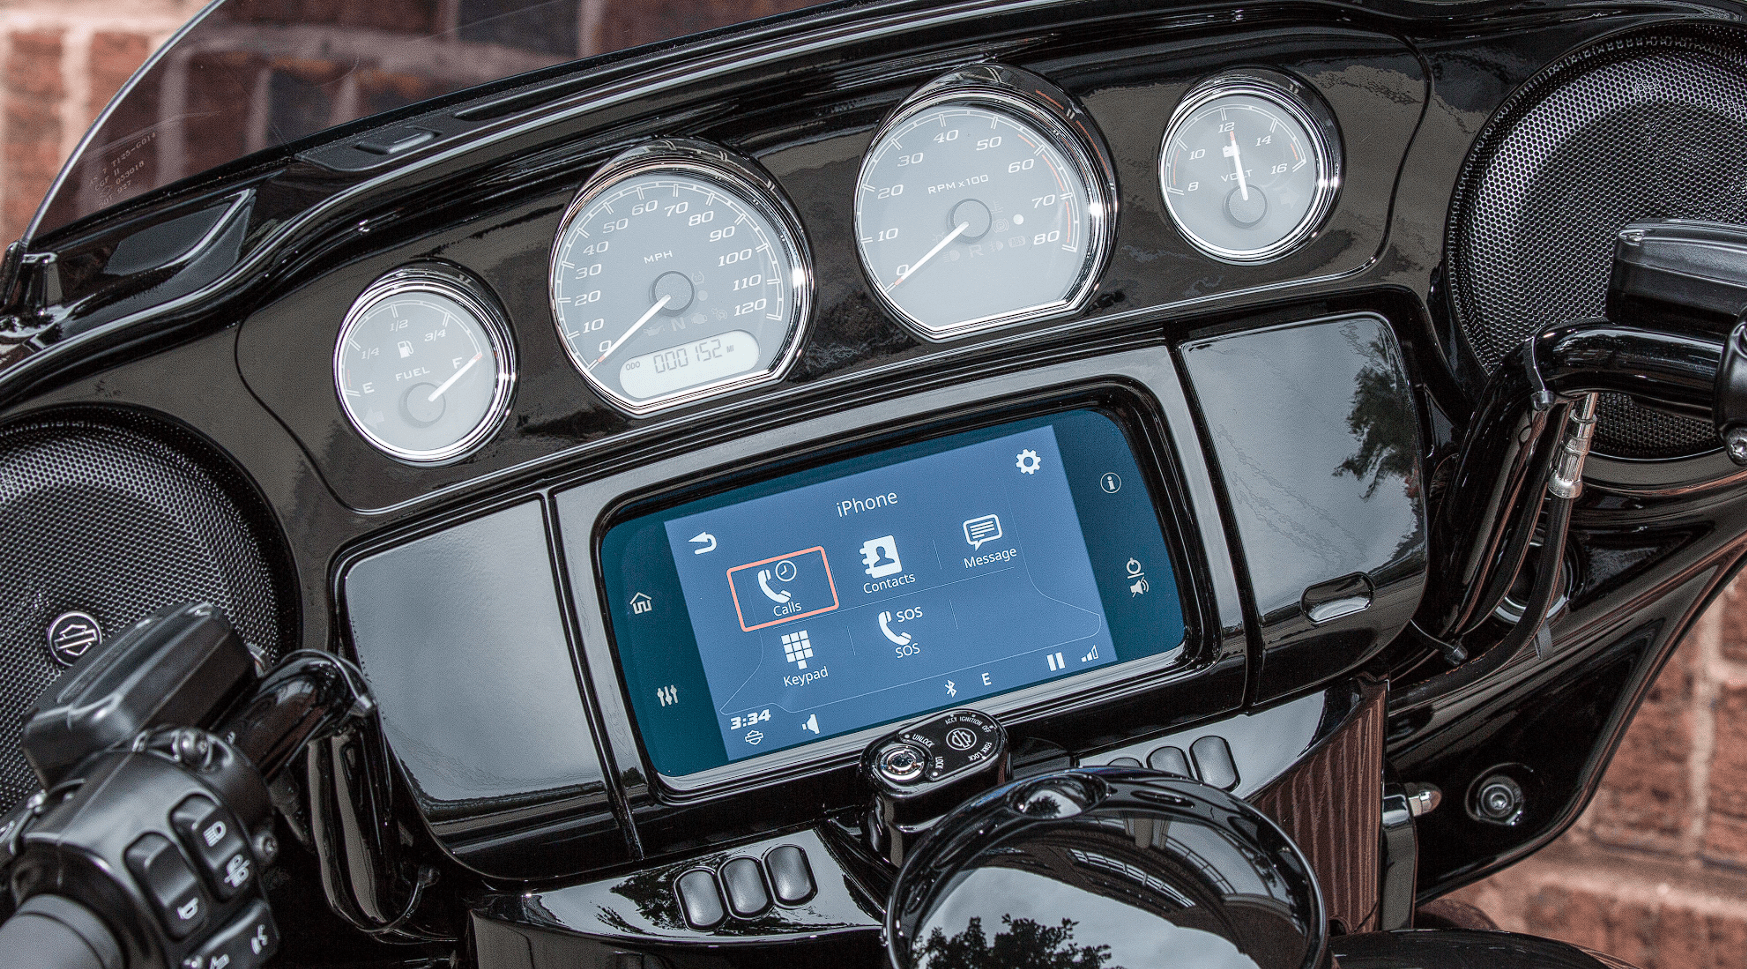
Harley Davidson Boom Box GTS 2019 Navigation User Manual
NAVIGATION
The Navigation features on the GTS system are available in select regions. To prevent distraction while riding, plan your Rides and select destinations before riding the motorcycle. The navigation system can route to address entries, phone book contacts, point of interest (POI) destinations in the navigation database or by manually selecting locations on the touchscreen map. Domestic (DOM) market vehicles can also do the same plus import Rides and destinations from Ride Planner (https://maps.harley-davidson.com) and the H-D App.
NOTE
- There will be a slight delay after the vehicle or the radio has been powered on while the navigation system initializes. Wait until the system has finished the initialization process before using the navigation system.
- There may be some limitations when operating the navigation system in buildings or underground structures (such as tunnels or underground parking).
One Box Search (OBS)
One Box Search destination entry supports the standard United States and Canadian state/province/territory two-letter abbreviations. User can enter street/city and state/state abbreviations.
- Navigate: Home > Navigation.
- Select: Search.
- Select: Search.
- See Figure 94. Input in search field:
- Latitude/Longitude (Example: 40.44611, -79.98222 or 40° 26′ 46″ N 79° 58′ 56″ W or 40.446° N 79.982°W)
- Intersections/Cross Roads (Example: 37th Street and Juneau Avenue. Valid symbols to separate streets: and, &, @, at)
- Street Address (Example: 3700 W. Juneau Avenue Milwaukee WI 53208)
- Phone Number POI search only (Example: 4143434056 and result is Harley-Davidson customer care representative)
- POI search (Example: Gas Stations and result is Sunoco, Mobile, Shell, etc.)
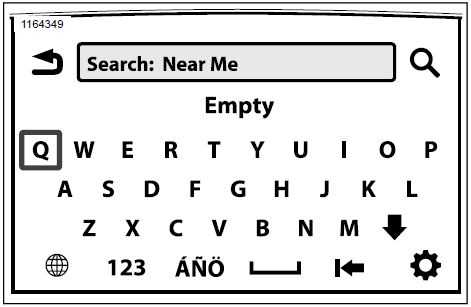
Figure 94. Input Address
Map Compass Setting
The motorcycle must be in motion to determine the current heading. If the current heading is not known, the full-size compass displays question marks. The compass is displayed in the upper right corner of the map. The heading indicator is displayed in the center of the map. The icons operate differently according to the map orientation setting (north up or heading up).
The compass needle is divided into two sections. The red section is the part of the needle that points north. And the white section is the part of the needle that points south.
North Up: The map is always orientated with north up (top of screen). And the compass is always pointed up (north).
Heading Up: The heading directional display will now operate as a traditional compass with the top representing the direction ahead and the rotating needle shall point to the direction of North.
3D or 3 Dimensional: This is the same as Heading Up but the mapping has gone from a two-dimensional plane to three-dimensional points.
NOTE
While on other screens, the system can display current heading in either the left or right data wing. Press data wing and select Heading.
Full-Size Compass (equipped without Navigation)
For regions that do not support navigation features on the radio, selecting Navigation displays a full-size compass.
Navigate: Home > Navigation.
MAP
Display Map
NOTE
See Figure 95. When the Heading Indicator/Current Position Icon (10) is fading or flashing, it represents that there is a very low GPS signal. See GPS Information in this section.
- Home Screen:
- Navigate: Home > Navigation.
- Left Hand Control:
- Short Press on Home: Toggles between current screen and Home screen.
- Long Press on Home: Toggles to Quick Jump screen.
- Voice Recognition:
- Press Voice Recognition on left hand control.
- Speak Show Map into microphone.
- Quick Jump:
- Long Press on Home: Toggles to Quick Jump screen.
Some of the highlights for the map screen are:
- Search: Used to search, find and select a destination, route, ride or other location that can be used in navigation.
- Menu: Select menu to show map and navigation options and their settings.
- Data Fields: Select left or right data fields to change information shown in these fields.
- Next Turn Guidance: Displays distance, turn information and a repeat icon which will repeat the last navigation voice prompt.
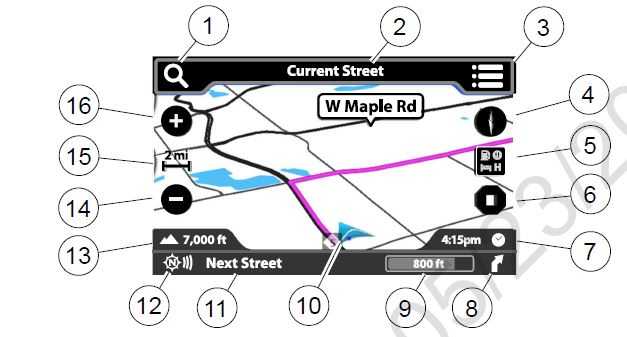
Figure 95. Navigation Map
- Search
- Current street
- Menu
- Map compass setting
- Highway services
- Stop or pause route, skip waypoint
- Right data field
- Next maneuver turn9. Distance to next maneuver
- Heading indicator/current position icon11. Next maneuver street
- Repeat voice instruction
- Left data field (or current audio source)
- Zoom out
- Map scale
- Zoom in
Change Map Settings
Map settings will allow the user to select from a list to set the appearance of the screen. Features can be turned on, off or adjusted.
NOTE
The asterisk denotes system default.
- Navigate: Home > Navigation.
- Select: Menu.
- Select: Settings.
- POI Icons: Check the POI items to be displayed on the map.
- Map View: 2D North*, 2D heading, 3D.
- Auto Zoom: Off*, Near, Normal, Far.
- When auto zoom is enabled, the navigation system will automatically zoom the map view as the vehicle is approaching predetermined locations. Upon passing the location, the navigation system will automatically zoom out to the rider’s selected Near/Normal/Far zoom level. When disabled the map zoom level remains fixed at the rider’s last setting regardless of the current or approaching locations alone the route.
- Nav Prompts: ON/OFF.
- Audio guidance prompts.
- Current Street: ON*/OFF.
- Displays the current street along the top of the map.
- Next Street Bar: ON*/OFF.
- Displays the next turn at the bottom of the map.
- Lane Guidance: ON*/OFF.
- Displays lane guidance arrows along the highlighted route. When a turn is required on a multi-lane highway, the map displays bright orange arrows to suggest the proper lanes. Graphical representations of signposts and junctions are displayed.
- Audio Information Bar: ON/OFF*.
- Displays the current audio source along the bottom of the map.
- Left and Right Data Fields: ON*/OFF. Displays the left and right wing data fields.
- Speed and Flow: ON*/OFF. Displays traffic overlay colors on the map.
- Signposts: ON*/OFF.
- Junction View: ON*/OFF.
- 3D Terrain: ON*/OFF.
- 3D Buildings: ON*/OFF.
- Highway Services: Enabled/Disabled.
- This helps the rider identify what services are available at the next few highway exits along their route. This also identifies which exit to use.
- Motorcycle Icon: Blue Arrow, Electra Glide, Road Glide or Street Glide.
- Shows position of motorcycle on map.
- Restore Defaults: Selecting Yes resets the menu to factory default and goes back to the top of menu.
Change Nav Settings
Map settings allow the user to select from a list to set the appearance of the screen. Nav settings allow the user to select from a list to set how the NAV engine performs searches, route calculations and displays results.
NOTE
The asterisk denotes system default.
- Navigate: Home > Navigation.
- Select: Search.
- Select: Settings.
- Search Area:
- Near Me*
- Around Location
- Near Destination
- Along Route
- Route Preferences:
- Fastest*
- Shortest
- Twisty
- Scenic
- Sort Preferences:
- Relevance*
- Distance
- Alphabetical
NOTE
Only a single destination is supported by the Round Trip option. The icon is disabled when routing is active. If Round Trip is checked, the Location is saved as the return point when Go is pressed.
- Round Trip:
- ON/OFF
- Alternate Routes:
- Different Types
- Same Type
- OFF
- Avoidance:
- Highways
- Toll Roads
- Ferries
- Tunnels
- In-Process Data (IPD)
- Car/Train
- Unpaved Roads
- Seasonal Restrictions
- Borders
- Restore Defaults:
- Yes or No
Change Data Field
- Navigate: Home > Navigation.
- Select: Left or right data wing field.
- See Table 38. Choose an option from the list to display in the field. Many of the data field settings (such as Time to Via or Arrival Distance) are only relevant during an active route.
Table 38. Data Field Options
| DATA FIELD OPTIONS | ||
| Arrival Distance | Arrival Time | Clock |
| Current Speed | Elevation | GPS Accuracy |
| Heading | Moving Time | Overall Average Speed |
| Speed Limit | Stopped Time | Temperature |
| Time Remaining | Time To Turn | Time To Via |
| Total Time | Via Distance | |
Map Navigation Option Menu
- Navigate: Home > Navigation.
- Select: Menu.
NOTE
The asterisk denotes if the route is active, the option is displayed.
The following options are available:
- Stop*
- Pause*
- Skip Waypoint*
- Location
- Maneuvers
- Destination*
- Weather
- Traffic
- Fuel Prices
Route Preferences and Avoidances
Route Preferences is selected if the rider is looking for a specific type of road or path for their route calculation: Scenic, Fastest, Shortest, Twisty. Selections can also be made to avoid specific types of roads or routes during a calculation such as: Highways, Toll Roads, Ferries, Tunnels, In-Process Data (IPD), Car/Train, Unpaved Roads, Seasonal Restrictions, Borders.
- Navigate: Home > Navigation.
- Select: Search.
- Select: Settings.
Auto zoom
Auto zoom can be set up one of four ways when the rider’s touchscreen map approaches it predetermined location.
- Navigate: Home > Navigation.
- Select: Menu.
- Select: Settings.
- Select Auto Zoom to the desired option:
- OFF: Auto zoom is disabled.
- Near: Will return to narrow scale.
- Normal: Will return to middle scale.
- Far: Will return to wide scale.
Map Scrolling: Touchscreen
- With the map displayed, press on the touchscreen. The scrolling tool (circle with arrows) is shown on the map. The title bar displays the name of the street that is being viewed.
- Scroll: Press and hold the screen to scroll.
- Jump: Press another location on the map to jump.
- Route to Location: Select icon in upper right corner of map to route to location.
- End Scrolling: Select back to end scrolling and return to current position on map.
Map Scrolling: Hand Controls
- Select: Top title bar.
- Press and Release: Cursor/Select on right hand control.
- Select: Arrow down to engage scrolling.
- Select: Directional arrow with Cursor/Select. Press and hold to scroll to destination.
- Route to Location: Select the center circle to route to the location on the map.
Selecting POI on Map
NOTE
Use Map Scrolling Hand Controls.
POI icons are only visible on the map at closer zoom levels. See Change Map Settings to change the types of POI icons that are displayed on the map.
- See Figure 96. Scroll: POI icon on map. Zoom-in close to the icon.
- Refer to Table 39. Select: POI location in the circle. The radio calculates a route to the selected POI. If multiple POIs are in the same location, the system prompts with a list of POIs.
- Select: Option icon to show more POI options. Otherwise, select Go to begin route.
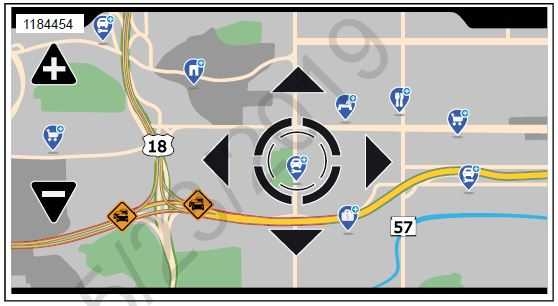
Figure 96. POI on Map
Table 39. POI Icons
| ICON | DESCRIPTION |
|
|
ATM/Banking |
|
|
Automotive |
|
|
Airport |
|
|
Coffee shop |
|
|
Community |
|
|
Entertainment |


Table 39. POI Icons
| ICON | DESCRIPTION |
|
|
Gas stations |
|
|
Harley-Davidson |
|
|
Health and beauty |
|
|
Highway exit |
|
|
Hospital |
|
|
Hotel/Motels |
|
|
Other |
|
|
Parking |
|
|
Recreation |
|
|
Rest Areas |
|
|
Restaurant |


| ICON | DESCRIPTION |
|
|
Shopping |
|
|
Travel |
ROUTE
Route To Destination: Address
- Navigate: Home > Navigation.
- 2. Select: Search.
- Select: Search.
- Enter address.
NOTE
- The system uses the smart speller to narrow entries according to the contents of the navigation database.
- The system provides lists of possible destinations based on the input. For example, entering “Birch Street” generates a list of all cities with a “Birch Street” in the database.
- As a minimum, the system requires either a postal code or a city and state. If a street address is not entered, the system navigates to the city center. Requirements may vary slightly according to region.
Route To Destination: Home
NOTE
If home is not programmed, see Saving A Destination: Home
- Navigate: Home > Navigation.
- Select: Search.
- Select: Go Home.
NOTE
- To delete or change the home destination, activate a route to home and select Options on the Go Home screen.
- Once a home address has been saved, a voice command can also be used to navigate home. Press the Voice Recognition switch and say Home.
Route To Destination: Recent
- Navigate: Home > Navigation
- Select: Search.
- Select: Recent.
- Select a recent route from list. Select Go.
Route To Destination: Contacts
- Navigate: Home > Navigation
- Select: Search.
- Select: Contacts.
- Select: Phone or Radio.
- Select: Address and route to destination.
Route To Destination: Saved
- Navigate: Home > Navigation
- Select: Search.
- Select: Saved.
- Select: Saved item from list.
- Select: Route/View.
- Select: Go from Destination screen.
Route To Destination: Map Scroll Tool
NOTE
Use Map Scrolling Hand Controls.
- With the map displayed, press on the touchscreen to activate the scrolling tool.
- Scroll to a location or POI.
- Select the center circle to route to the location or POI on the map.
Select: Go.
NOTE
See Map (Page 139) for scrolling operation.
Route To Destination: POI
- Navigate: Home > Navigation
- Select: Search.
- Select: POI’s.
- Select: Item from Category list.
- Select: Item from subcategory list.
- Select a location from list. Select Go.
Route To Destination: Dealership
- Navigate: Home > Navigation
- Select: Search.
- Select: H-D Bar and Shield.
- Select a location from list. Select Go.
Route To Destination: Emergency
- Navigate: Home > Navigation
- Select: Search.
- Select: Emergency.
- Select: Hospital, Police or Fire Dept.
- Select a location from the list. Select Go.
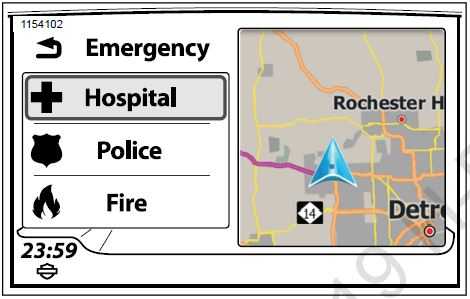
Figure 97. Route To Destination: Emergency
Route To Destination: Coordinates
- Navigate: Home > Navigation.
- Select: Search.
- Select: Search.
- Input: Latitude and longitude coordinates. The formats can include heading (h) such as North, degrees (d), minutes (m), and seconds (s).
- h ddd.ddddd°
- h ddd° mm” ss.s’
- h ddd° mm.mmm’
Table 40. Destination Coordinates
| Format Examples | |
| Latitude, Longitude | 40.44611, -79.98222 |
| Degrees,Minutes,Seconds | 40° 26′ 46″ N 79° 58′ 56″ W |
| Degrees,Decimal,Minutes | 40° 26.767′ N 79° 58.933′ W |
| Decimal Degrees | 40.446° N 79.982° W |
Route to Destination: Fuel
NOTE
The radio must have a Sirius XM subscription for this feature to work.
- Navigate: Home > Navigation.
- Select: Menu.
- Select: Fuel Prices.
- Select: Fuel type. Back out of screen when selection is made.
- Select: View Prices.
- See Figure 98. Select a fuel station from list.
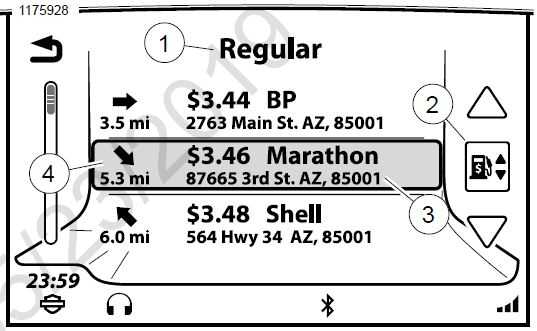
Figure 98. Station Selection
- Fuel grade/type
- Sort by distance/brand name/price
- Fuel price with station name and address
- Direction of station with distance
- See Figure 99. Select: Route/View.
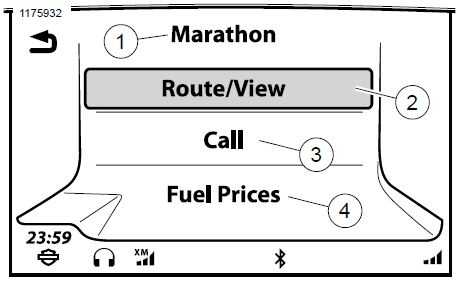
Figure 99. Route/View
- Fuel station selected
- Engage route
- Dial gas station
- Display prices for all fuel types at station
- Select: Go.
Route To Destination: Voice Command
- With route active, press the Voice Recognition button on left hand control.
- Select one of the following:
- Route to Destination: Address Speak Destination followed by the address.
- Route to Destination: Saved Speak Favorite followed by the saved destination name.
- Route to Destination: POI Speak Find Next followed by the type of destination or brand name (such as Bank or Gas Station).
Route to Destination: Repeat Navigation Instruction
- See Figure 100. Select: Repeat icon (1). This will repeat the last command given by navigation.
Canceling or Pausing a Route: Using Menu
- See Figure 100. Select: Stop icon (2) on the map screen.
- Select: Stop or Pause.
NOTE
When selecting a new route, the system provides a notification to either add or replace the existing route. There is no need to manually cancel the current route when adding or replacing it with a new route.
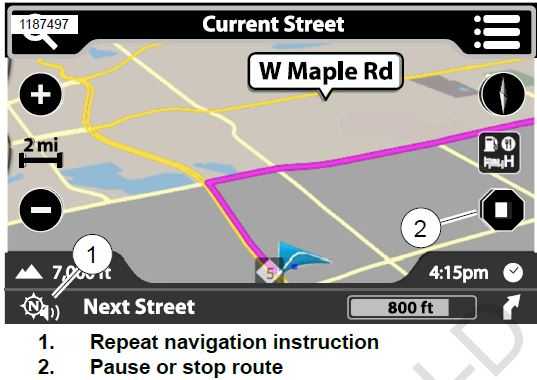
Figure 100. Navigational Instruction
Canceling a Route: Voice Command
- Press: Voice Recognition switch on left hand control.
- Speak: Cancel route guidance.
Showing a Planned Route
NOTE
An entered route is displayed before committing to the route.
- Navigate: Home > Navigation.
- Select a Destination to route.
- Select: Options.
- Select: Show Route. The map shows the entire highlighted route.
- To commit to the route, select Back twice.
- Select: Go.
Simulating a Route
A route simulation can be viewed before committing to the route. The route simulation can only be used while the motorcycle is not moving.
- Navigate: Home > Navigation.
- Select a Destination to route.
- Select: Options.
- Select: Simulate Route. The route simulation is played on the map. Audible turn guidance will also be played.
- To commit to the route, select Back twice.
- Select: Go.
Calling a Destination: Route Active
There are occasions when calling a destination is helpful to determine operating hours or get information.
- With a phone connected and a route active on the map, select the Menu button.
- Select: Destination.
- Select: Call.
Calling a Destination: Route Not Active
- With a phone connected, select a destination (such as a POI).
- Select: Call. This is on the Destination screen.
Saving A Destination
NOTE
When the current destination list consists of more than one destination, it may have originated as either a Ride, or from the user adding one or more stopovers one at a time, or both. When the current destination list consists of more than one destination, it may have originated as either a Ride, or from the user adding one or more stopovers one at a time, or both.
- Navigate: Home > Navigation.
- Select: Menu.
- Select a destination (such as a POI, address, recent destination or GPS coordinate).
- Select: Save. This is after the route is calculated.
- From Save To screen, select Saved List.
- From Destinations screen, select Save As Ride.
- Enter: Name to be saved as Destination.
- Select: OK.
Saving A Destination: Home
- Navigate: Home > Navigation.
- Select: Search.
- Select: Go Home.
- From Set Home screen, select a destination (perform a search, select a recent destination, select a POI or a Saved file).
- Select: Save.
- Select: As Home.
Saving Current Location
The current location is stored as a Saved Destination or can be saved as the Home Destination when the option is displayed.
- Navigate: Home > Navigation.
- Select: Menu.
- Select: Location.
- Select: Save.
- From Save To screen, select Saved List.
- From Add to Saved Destinations? screen, select Yes.
- Enter: Name to be saved as Destination.
- Select: OK.
RIDES
Rides are useful when visiting a number of POIs during an extended ride, planning rides with intermediate destinations (waypoints) or when planning a ride with restaurants and overnight lodging. The number and limit of Rides can only be determined by the amount of storage space available in the system. Each ride can include up to 400 destinations (waypoints). A ride can be created using the navigation menus or by creating a ride on the map screen. Rides can also be imported from Ride Planner which is available for domestic (DOM) markets only. See Importing a Route (Page 162).
Creating a Ride: Using Menus
- Navigate: Home > Navigation.
- Select: Search.
- Carousel to: Rides.
- Select: New.
- Input: Name of your ride and select OK.
- Select: Edit.
- Select: Add destination.
- Select: Search, Map, Recent, Saved, POI’s or Contacts. Use one of the methods to enter a destination.
- Select: Add in the Destination screen.
- Select: Start Route.
Creating a Ride: Using Map
- Navigate: Home > Navigation.
- With map displayed, press touchscreen.
- Scroll to a POI or location on the map.
- Select: Go (upper right corner).
- Select: POI or location to confirm.
- Select: Options. Adjust ride preferences if needed.
- Select: Go.
Round Trip
When the Round Trip function is enabled, the system calculates a return route to the original position of the vehicle. The round trip feature can only be enabled before a route is activated.
- Navigate: Home > Navigation.
- Select: Search.
- Select: Settings.
- Select: Round Trip.
Editing a Ride: Adding Waypoints In Menu
- Navigate: Home > Navigation.
- Select: Search.
- Select: Rides.
- Select current ride destination.
- Select: Edit.
- Select: Add Destination.
- Enter a destination (address, POI, recent destination, saved location or intersection).
- Select: Add.
- Screen: Add Another Destination.
- Select: No. System returns to ride screen.
- Select: Yes. Add waypoints as needed.
- Reorder waypoints as needed.
- Select: Start Route.
Editing a Ride: Adding Waypoints On Map
NOTE
A Ride must be already programmed into the radio.
- Navigate: Home > Navigation.
- With map displayed, press touchscreen.
- Scroll and select a POI or location on the map between the start and end of the ride.
- Select: Go (upper right corner).
- Select: POI or location to confirm.
- Select: Route.
- Select: Add.
- Select: Go.
Editing a Ride: Reordering Waypoint
NOTE
There has to be a minimum of three destinations pre-populated in the Rides for this operation to work.
- Navigate: Home > Navigation.
- Select: Search.
- Select: Rides.
- Select a ride from list.
- Select: Edit.
- Select: Reorder.
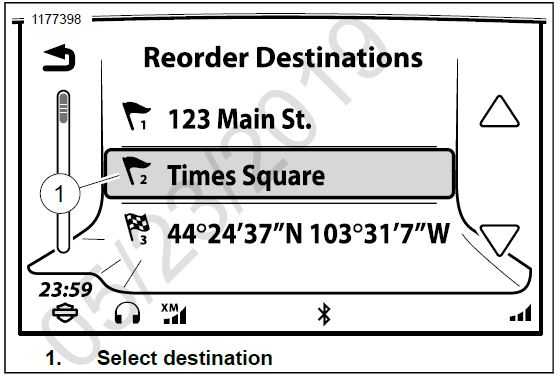
- See Figure 101. Select a destination (1) to reposition.
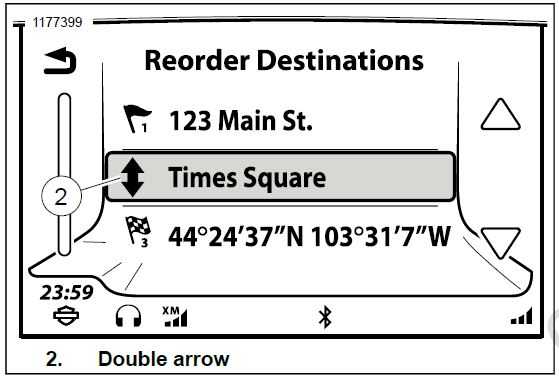
Figure 101. Select Destination
- See Figure 102. A double arrow (2) will appear on the selection meaning it is ready to move.
Figure 102. Double Arrow
- See Figure 103. Select order of destination (3) by pressing the position where it needs to be moved.
- Figure 103. Move Destination
- Back out to ride screen.
- Select: Start Route.
Editing a Ride: Skipping Next Waypoint
- With an active route, select Menu.
- Select: Skip.
- Select: Yes.
Editing a Ride: Skipping Waypoint
- With an active route, select Menu.
- Select: Destination.
- Select: Edit.
- Select: Remove Destination.
- Select: Waypoint to skip.
- Select: Yes. The system removes the waypoint from the current route. However, the waypoint is not removed from the originally stored ride.
TRAILS
A trail is a specific path which is recorded during your ride. While the trail is recording, the system stores ongoing location points along the ride. This is different than saving a destination or ride, which only store a number of locations rather than a specified path. A trail can be used to repeat the ride along the same path in the future or to route back to the start of the trail using the same path. A trail can be recorded at any time. A route does not need to be active to begin recording a trail. The maximum amount of Trails the radio can record is 20. When the number of Trails is at capacity, the Start Recording icon will be enabled and following message is displayed Maximum number of trails reached. Please delete a trail first.
Record a Trail
- Navigate: Home > Navigation.
- Select: Search.
- Select: Trails.
- Select: Start recording. The trail begins recording.
NOTE
Turning off the vehicle does not stop recording a trail. Recording needs to be stopped manually in order for a trail file to be created.
- Select: Stop recording. The trail stops recording and is stored in the list of trails.
Rename a Trail
- Navigate: Home > Navigation.
- Select: Search.
- Select: Trails.
- Select: Trail from list.
- Select: Rename.
- Use keyboard to enter new name and select OK.
Navigating a Trail
A trail can be used to ride the originally recorded route (from start to end) or a return route (from end to start). When selecting a trail, the route includes navigation from your current location to the beginning of the trail.
- Navigate: Home > Navigation.
- Select: Search.
- Select: Trails.
- Select: Trail from list.
- Select:
- Route to Start: Take return route (end to start).
- Route to End: Take original route (start to end).
Deleting a Trail
- Navigate: Home > Navigation.
- Select: Search.
- Select: Trails.
- Select: Trail from list.
- Select: Delete.
EXPORTING A ROUTE
NOTE
RIDE PLANNER AND THE H-D APP ARE FOR DOMESTIC VEHICLE USE ONLY.
When using GPX files, after being imported onto the GTS radio unit via USB or Mobile App, the Alternate Routes needs to be set to OFF. This will make the GPX Route accurate to design on the Ride Planner website or H-D App. The system can import ride, trail and destination files saved in GPS Exchange Format (GPX). The files may have been exported by another motorcycle equipped with a Boom! Box, created by Ride Planner (https://maps.harley-davidson.com/) or using the H-D App. A single GPX file may contain multiple rides and destinations. The system can use GPX files exported by other GPS devices or mapping websites. While GPX is a standard format for navigation files, due to differences in how the file is generated and the data in that file from different programs, there may be some differences in the route once imported. Differences may be in the destinations or waypoints on the route or the route path between points. Review the route before riding.
Imported routes are stored in respective locations within the radio. Destinations are stored in the Saved list. Imported rides are stored in the Rides list. Imported phone book contact files (V-card files, VCF) are added to the Book list in the navigation menu. In some instances, the imported GPX file may load as a trail instead of a ride due to the data from other mapping sites.
Harley-Davidson recommends using Ride Planner (https://maps.harley-davidson.com) for creating, saving and exporting routes to guarantee system compatibility. There are two methods for getting Rides on to the GTS radio: USB Drive and H-D App.
USB Drive
- Position vehicle in a stationary position and set ignition in the ON or ACCY position.
- Connect a USB device containing the GPX or VCF files to the vehicle.
- Navigate: Home > Navigation.
- Select: Search.
- Select: Import. A list of GPX and VCF files are displayed.
- Select: GPX or VCF file. A list of all Saved Rides, Trails and Destinations within the GPX file are displayed.
- Select: Saved Rides, Destinations and Contacts to import.
- Select: Import.
- Select: OK.
- Procedure is complete and the USB drive can be removed.
Mobile App
- Download the Harley-Davidson App onto your phone.
- Apple iPhones see App Store.
- Android phones see Play Store.
- Position vehicle in a stationary position and set ignition in the ON or ACCY position.
- Log in to the H-D App.
- Connect phone using a USB cable (iOS only) or Bluetooth connection (works for both iOS and Android).
- If the phone is connected properly and a valid user has logged in, H-D App should be illuminated.
- Navigate: Home > Navigation.
- Select: Search.
- Select: H-D App. A list of My Rides list will be displayed.
- Select: Ride from list. The contents will immediately be saved to the radio.9.
- The radio will automatically display the first segment of the imported Ride, prompting the rider to Start.
TRAFFIC
See Figure 104. The navigation system can provide traffic information when RDS Traffic (TMC) or Sirius XM Traffic is equipped on the vehicle and available in the region. When traffic is enabled, the map shows traffic flow and events along the currently selected route. Refer to Table 41. and Table 42 for traffic icon descriptions. The system also stores a list of all traffic events that are nearby or along the active route. When an event (such as an accident or lane closure) is discovered along the current route, the navigation system notifies of the event and may attempt to calculate an alternate route. The system will either prompt to make the change or will automatically adjust the route, according to the system settings.
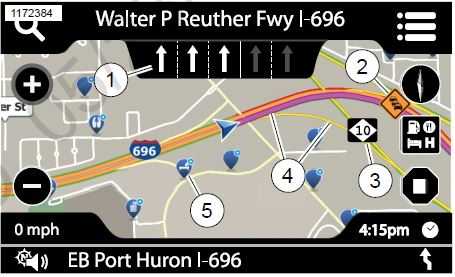
Figure 104. Traffic
- Lane guidance
- Traffic event
- Road sign
- Traffic flow
- POI (point of interest)
Table 41. Traffic Conditions
| COLOR | ICON | DESCRIPTION |
| Green overlay | Thin line | Free flowing traffic |
| Yellow overlay | Thin line | Slow traffic |
| Red overlay | Thin line | Stopped |
| Magenta overlay | Thick line | Active route |
| Teal overlay | Thick line | Recorded trail |
Table 42. Traffic Conditions
| ICON (NA) | ICON (EU) | DESCRIPTION |
 |
 |
Accident |
 |
 |
Construction |
 |
 |
Warning |
 |
 |
Narrow road |
 |
 |
Security checkpoint |
 |
 |
Weather |
 |
 |
Frost |
 |
|
Blockage |
 |
|
Slippery |
 |
|
Traffic |
Table 42. Traffic Conditions
| ICON (NA) | ICON (EU) | DESCRIPTION |
|
|
Heavy traffic |
 |
 |
Information |
|
|
Wind |
Turning Traffic On/Off
On equipped vehicles, traffic automatically turns on with the RDS traffic feature or when selecting the Sirius XM traffic feature.
- Navigate: Home > Navigation.
- Select: Menu.
- Select: SXM traffic or TMC traffic.
- Select: Settings.
- Check (enable) or uncheck (disable) the Traffic checkbox.
Traffic Notification Settings
- Navigate: Home > Navigation.
- Select: Menu.
- Select: SXM traffic or TMC traffic.
- Select: Settings.
- Select: Notification.
- Selections Displayed:
- Popup Beep: Beep when traffic popup is displayed.
- Message Filter: Choose the maximum distance of traffic events to be displayed in the event list.
Rerouting
The system can be configured to manually or automatically select a new route based on traffic data. The system will only provide a new route when it is calculated to be at least five minutes faster than the current route.
- Navigate: Home > Navigation.
- Select: Menu.
- Select: SXM traffic or TMC traffic.
- Select: Settings.
- Select: Re-route to Off or Auto.
- Auto: The system will automatically adjust the route according to traffic data.
- Off: The system will not prompt with any new routes based on traffic data.
Traffic Event List: RDS Traffic
If a route is active, the system displays traffic events along the route. If a route is not active, the system displays all nearby traffic events.
- Navigate: Home > Navigation.
- Select: Menu.
- Select: SXM traffic or TMC traffic.
- See Figure 105. Select traffic message (1) from list.
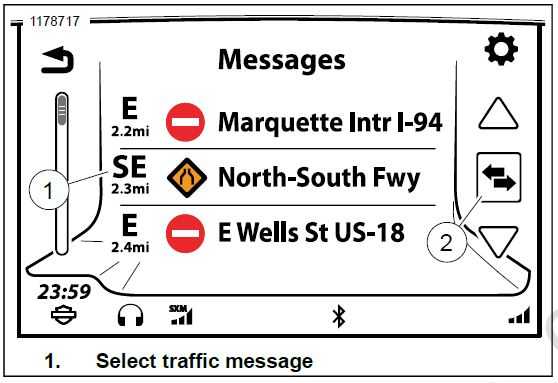 Figure 105. Traffic List
 - See Figure 106. The traffic message (2) is displayed. Select message on screen to hear voice recognition.
- Select: Map. This will display the event location on the map.
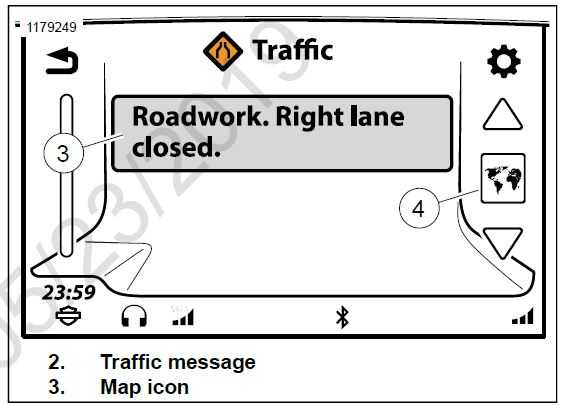 Figure 106. Traffic Message
Maneuvers: Turn-By-Turn Instructions
While the route is active a list of turns will be displayed to your destination.
- Navigate: Home > Navigation.
NOTE
Select the next turn displayed at the bottom of the map as a shortcut to bypass Steps 2 and 3. - Select: Menu. This must be done in an active route.
- Select: Maneuvers. A list of all turns in the route are displayed.
- Selecting a next turn from the maneuvers list displays the following options:
- Avoid: The system calculates new directions to avoid the selected road.
- Zoom: The map displays the selected maneuver on the map.
- OK: Returns to the list of maneuvers.
Maneuvers: Avoid a Road
NOTE
This must be done in an active route.
- Navigate: Home > Navigation.
NOTE
Select the next turn displayed at the bottom of the map as a shortcut to bypass Steps 2 and 3. - Select: Menu.
- Select: Maneuvers. A list of all turns in the route are displayed.
- From the displayed list, scroll and select a turn that you would like to perform a detour.
- Select: Avoid. The system calculates new directions to avoid the selected road.
- Select: Yes. A new detour route is calculated and displayed in the list.
- Select: Back. This sends you back to the active map screen.
Maneuvers: Zoom
NOTE
This must be done in an active route.
- Navigate: Home > Navigation.
NOTE
Select the next turn displayed at the bottom of the map as a shortcut to bypass Steps 2 and 3. - Select: Menu. This must be done in an active route.
- Select: Maneuvers. A list of all turns in the route are displayed.
- From the displayed list, scroll and select a turn that you would perform a Zoom.
- Select: Zoom. The map shows the maneuver with details on the bottom of the screen.
- Select: Previous/Next Maneuvers arrow. This will display the previous or next turn from the list.
Maneuvers: Restoring an Avoided Road
NOTE
This must be done in an active route.
- Navigate: Home > Navigation.
NOTE
Select the next turn displayed at the bottom of the map as a shortcut to bypass Steps 2 and 3. - Select: Menu. This must be done in an active route.
- Select: Maneuvers. A list of all turns in the route are displayed.
- See Figure 107. Select: Avoid road.
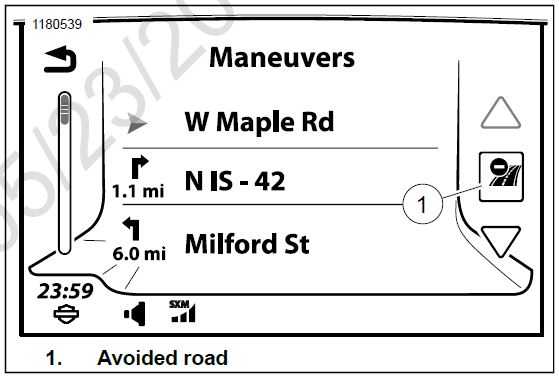 Figure 107. Avoided Road
 - Select the road that was avoided. This would be the Avoid a Road selection that was made in a previous topic in this section.
- See Figure 108. Select: Detour.
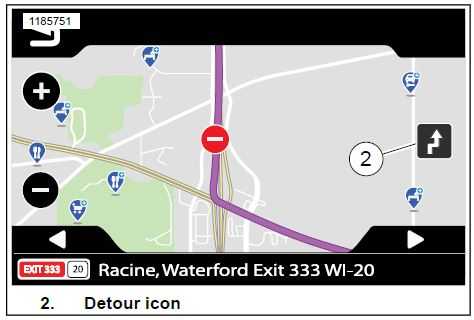 Figure 108. Detour Icon
 - Select: Yes. When asked to Restore this Maneuver?
- Select:
- Back Once: This returns rider back to maneuver list.
- Back Twice: This returns rider back to map.
Lane Guidance
See Figure 109. When an upcoming turn or road divergence is required on a multi-lane highway, the map displays lane guidance arrows to suggest the proper lanes to use. Safely change to the suggested lane and follow the direction of the white arrows. When approaching the turn, the system shows a representation of the signposts and upcoming road junction. Continue to follow the guidance of the white arrows.
Figure 109. Lane Guidance
- Lanes required for next turn (white arrows)
- Other lanes (grayed out)
- Next turn guidance
- Direction and highway information
Trip Summary
NOTE
This must be done in an active route. A summary of the current route can be displayed at any point during a ride. The summary shows start and end time, mileage information and other data.
- Select: Info. This is on the radio’s faceplate.
- See Figure 110. Select: Trip Summary.
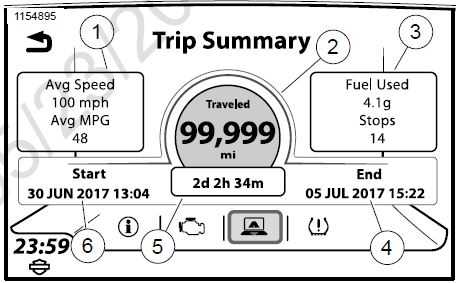
Figure 110. Trip Summary Screen
- Average speed/MPG
- Distance traveled
- Fuel used/stops
- Destination arrival date
- Time spent traveling
- Destination start date
Low Fuel Alert
When the vehicle detects low fuel, the radio shows an alert and prompts to search for nearby fuel stations. The low fuel alert automatically displays even when the radio is turned off.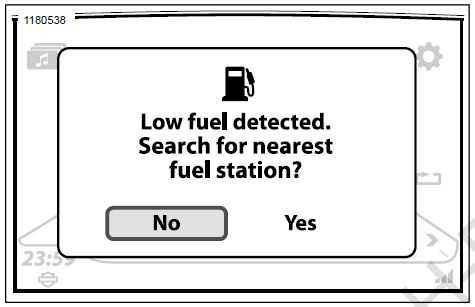
Figure 111. Low Fuel Alert
GPS Information
- Navigate: Home > Navigation.
- Select: Menu.
- Select: Location. The system displays the GPS coordinates and address for the current location (if available).
- Select: GPS. The system displays coordinates, elevation, signal and position information. See Figure 104.
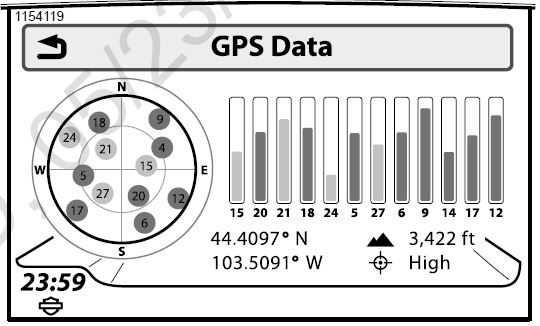
Figure 112. GPS Information
NAVIGATION PROMPTS
Navigation Prompts: Turning On/Off
- Navigate: Home > Navigation
- Select: Menu.
- Select: Settings.
- Check (enable) or uncheck (disable) the Nav Prompts checkbox.
Navigation Prompts: Adjusting Volume Using Menus
- Navigate: Home > Setup > Audio Settings.
- Select: Volumes.
- Select: Speaker or headset.
- Adjust: Prompt/Nav volume.
Navigation Prompts: Adjusting Volume with Hand Controls
While a prompt is being heard, adjust the volume using the left hand control. All prompts are adjusted to the selected level: Speaker or headset.
Navigation Prompts: Speaker/Headset Selection
- Navigate: Home > Setup > Audio Settings.
- Select: Audio Routing.
- In Prompts select speaker or headset.
NAVIGATION DATABASE AND SOFTWARE
Update, replacement and restoration map databases are downloaded from https://harleydavidson.welcome.naviextras.com.
Update: Motorcycles are delivered with the latest map database. Newer database versions are periodically released and are made available for purchase.
Intercontinental Replacement: Riders traveling outside of their home navigation database area can purchase a replacement database which covers the intended area of travel.
Intercontinental Restoration: After returning from extended travel in a different continent or in a region requiring a unique database, the navigation database can be restored to its home database.
Download the Toolbox to install free updates and purchase a wide variety of maps. Once you connect your navigation device to the Toolbox, you can browse and purchase compatible items in the online catalogue. In addition, the application enables you to upload your own points of interest onto your device, remove unnecessary content and to make backups to avoid any data loss.
NOTE
Supported platforms: Windows 7, Windows 8, Windows 10 or OS X 10.8 (or later). Note that Toolbox requires a minimum display resolution of 1024 x 768 and 10-GB free space on your hard drive.
For step-by-step instructions, download the detailed user guide.
- Insert a USB drive into your Boom!™ Box GTS Navigation System and save its navigation data.
- Download the Toolbox and insert the USB drive.
- Follow the instructions on the screen to update your map.
- Insert the USB drive into your Boom!™ Box GTS Navigation System and upload the data.
RIDE PLANNER
NOTE
Rides created using the Ride Planner (https://maps.harley-davidson.com) or H-D App can be transferred to the GTS radio using a phone with the H-D App installed. See Importing a Route (Page 162).
- Connect a USB drive to the computer. The USB drive must be formatted to FAT32 or exFAT (commonly used by most PCs).
- Open Ride Planner in https://maps.harley-davidson.com
- Select: Create a new Ride or existing Ride.
- See Figure 113. Add locations for major destinations, such as the start point and end point.
- Add waypoints for other minor stopping points or desired roadways to be traveled.
- Select: Download GPX.
- Save GPX file to USB drive and rename file as your destination.
- Remove USB drive and connect it to the radio. See Importing a Route (Page 162).
NOTE
See Figure 114. Ride Planner exports each pair of locations as a separate Ride (even though the entire Ride is exported as a single GPX file). In the example, the route from Location 1 to Location 2 (with the intermediate waypoints) is exported as a Ride. The route from Location 2 to Location 3 is exported as a separate Ride.
- The Boom! Box navigation system does not differentiate between locations and waypoints. All items are imported as destinations.
- Ride Planner exports locations and waypoints into the GPX file. It does not export the highlighted route. The exact routing between destinations may be calculated differently within the radio than shown in Ride Planner. To plot a particular path, you may need to add waypoints along the desired route. See Rides (Page 155).
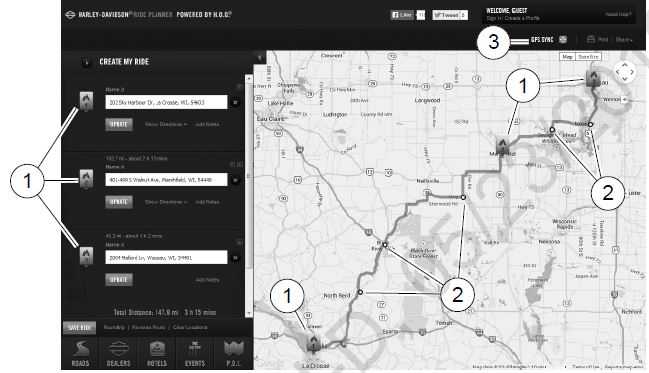
Figure 113. Ride Planner
- Locations
- Waypoints
- GPS Sync (export to GPX file)
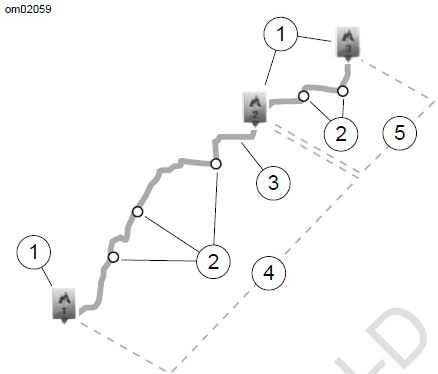
Figure 114. Ride Planner Example
- Locations
- Waypoints
- Highlighted route (not exported)
- Exports into GPX file as first ride
- Exports into GPX file as second ride
Reference Links
View Full User Guide: Harley Davidson VRSC 2013-2023 User Manual
Download link: https://www.harley-davidson.com/be/nl/index.html