Harley Davidson Boom Box GTS 2019 SETUP User Manual
SETUP
HOME SCREEN
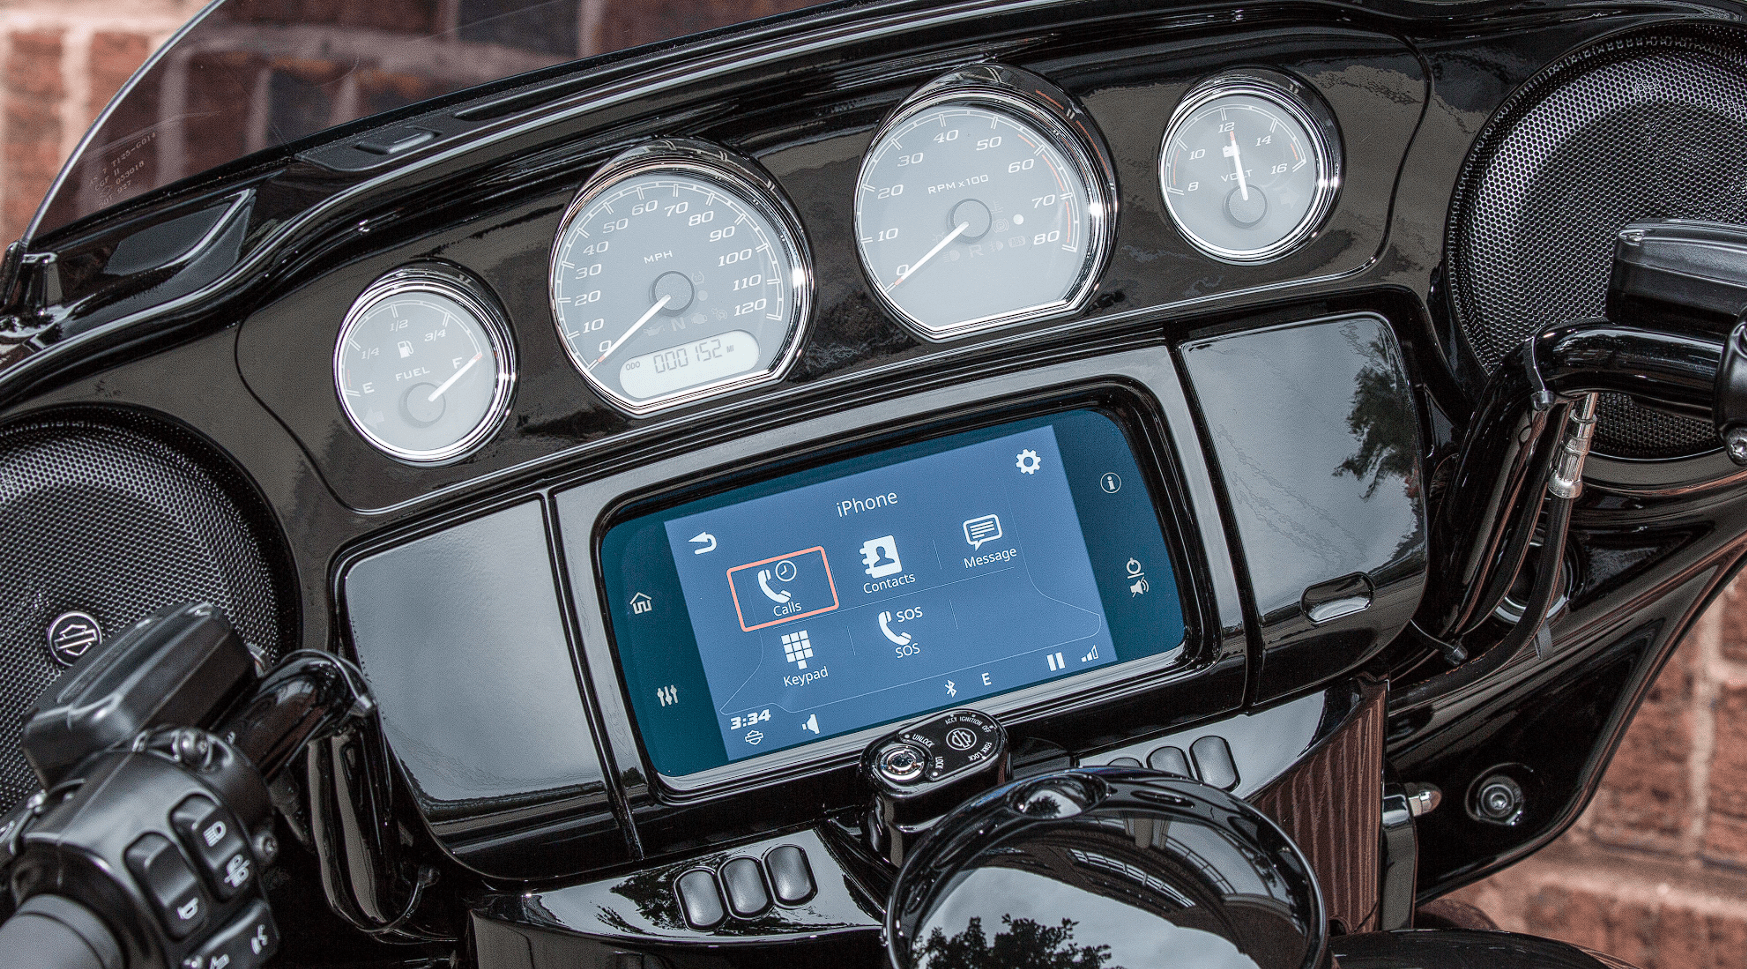
See Figure 33. The Home screen provides access to all the features available for the system. The layout of items on this screen may be different depending on radio type and installed features. According to the radio type, use the touchscreen or Cursor/Select hand control switch to make selections and operate the system. During initialization and startup, some features may be unavailable for a short time (such as navigation, Sirius XM, media and voice recognition).
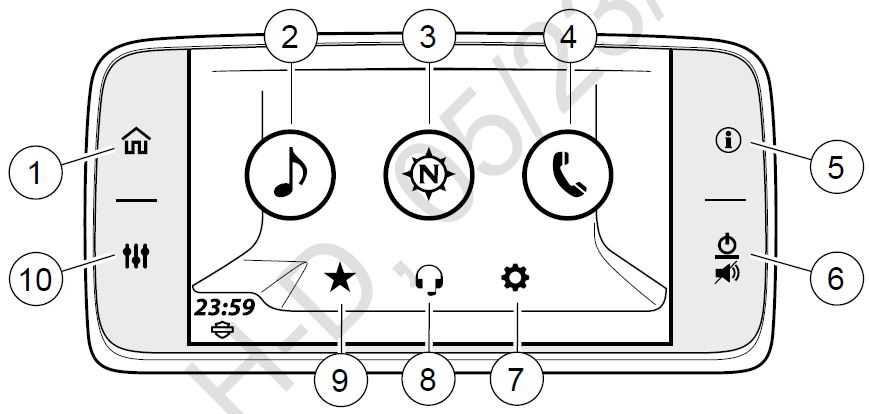
Figure 33. Faceplate Home Screen Selections
- Home
- Power/Mute
- Audio
- Setup
- Navigation
- Communications
- Phone
- Favorites
- Information (Vehicle Status)
- Audio Settings
SCREEN MENU BAR
Many screens on have a menu bar at the top of the screen. The menu bar and its components change according to the screen being displayed.
Icons: Some menu bars contain a selectable icon on the right, left or both sides of the source field.
Title: The title of the screen or function is located in the center of the menu bar. Some of the screen titles are selectable, used for typing in data or informational. Figure 34 shows the media and menu icons along with the source field selected to FM tuner. All of these items are located in the Menu Bar.
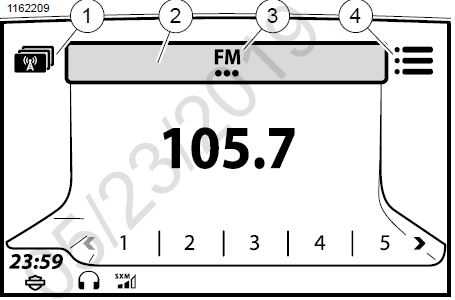
Figure 34. Screen Menu
- Media icon
- Source field
- Tuner or media selection
- Menu icon
CHECKBOX AND MULTISELECT
See Figure 35. Some options are selected or enabled with a checkbox (1).For multiselect (2), repeatedly press the icon or Cursor/Select switch until the desired selection is displayed.
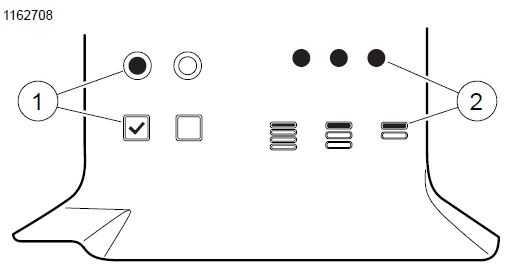
Figure 35. Checkboxes and Multiselect
SCROLL CONTROLS
See Figure 36, Figure 37 and Figure 38. Scroll controls are displayed on the screen when there is more than one page of available options. Using your finger on the touchscreen: Drag, Swipe or Touch to navigate to available options. The Cursor/Select switch may be used to scroll through multiple pages of options. Press and hold the Drag or Touch scroll controls to rapidly scroll through long lists. Some screens have a center icon on the right side for functions such as letter jump, information, editing or reordering of a list.
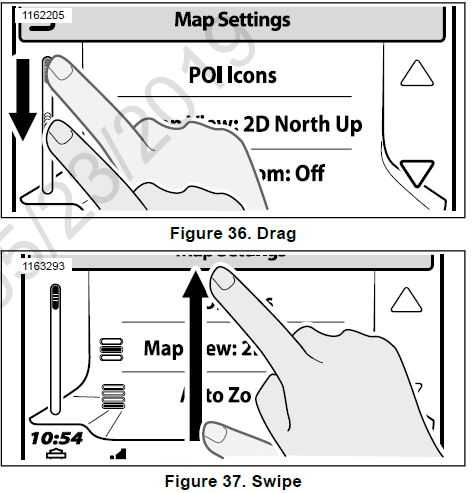
Figure 38. Touch
Table 25. List Function Buttons
| BUTTON | NAME | DESCRIPTION |
|
|
Menu button | Opens a menu of additional options. Select the button again to return to the original screen. |
|
|
Settings/Setup | Opens a menu of additional settings. Select the button again to return to the original screen. |
|
|
Search | Opens up search bar. |
|
|
Return to previous | Select this button to return to the previous screen. |


Table 25. List Function Buttons
| BUTTON | NAME | DESCRIPTION |
 |
Letter jump | Jumps to a selected location within the list. For example, to jump to entries starting with the letter ‘S’, select the letter jump button, then select ‘S’ from the keyboard. |
| Information | Displays more information related to the list contents. | |
|
|
Edit | Select this button to view or edit information related to the screen con- tents. |
| Delete | Deletes data associated with the list (such as all recent destinations). |

KEYBOARD
The keyboard is used for selecting navigation destinations, searching media files, saving contact information or entering other data into the radio when needed. The keyboard is operated by touchscreen or by using the Cursor/Select hand control switch to select letters. The radio supports a full size keyboard or a large keyboard. The large keyboard may be more suitable for use when wearing riding gloves. When using the keyboard, some letters may be blanked out. This is a feature of the smart speller, which only enables valid strings of letters according to the entries in the database.
Input is displayed in the title bar. Select the icons for numbers, symbols or extended characters to display keypads with additional characters as needed. When finished with a keyboard entry, select OK.
- Navigate: Home > Setup.
- Select: Keyboard multiselect icon to select the keyboard type.
- Full Keyboard: See Figure 39. When input is required, the screen displays a full keyboard with alphabetically arranged characters A-Z.
- Large Keyboard: See Figure 40. When input is required, the screen displays a keypad with larger icons. Use the keypad selectors on the right side to display different portions of the alphabet (A-I, J-R or S-Z).
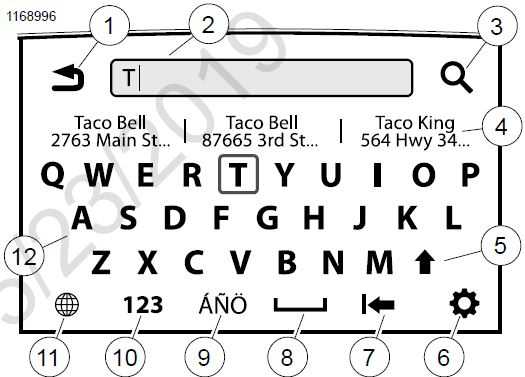
Figure 39. Full Keyboard
- Back
- Search
- Multiple search results (closest to farthest)
- Search results (top 3)
- Shift (upper/lower case)
- Settings
- Backspace/delete
- Space
- Extended characters
- Numeric keypad
- Global settings
- Keyboard
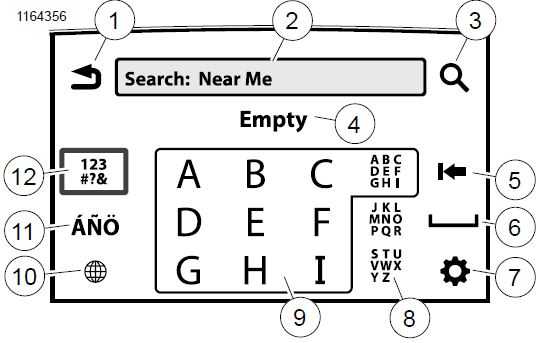
Figure 40. Large Keyboard
- Back
- Search
- Multiple search results (closest to farthest)
- Search results (top 3)
- Backspace/delete
- Space
- Settings
- Keypad selectors (A-I, J-R, S-Z)
- Keypad
- Global settings
- Extended characters
- Numeric keypad
SMART SPELLER
The smart speller assists you when entering information into the radio. When entering information (such as a search for a navigation address), the keyboard only enables strings of letters that match the entries in the database. After a number of letters have been entered, the system will predict the word or location that you are trying to enter by providing matching data from the database. For example, entering “ROCH” could cause the system to suggest “ROCHESTER”. The smart speller can also accept partial entries. If pressing OK with only a partial string of text, the radio will provide a list of items that begin with that text. For example, entering “SAN” and pressing OK could provide a list including “SAN FRANCISCO” and “SANTA ANA”. The smart speller can also assist when entering multiple words. Entering the first few letters of each word, separated by a space, will cause the system to respond with matching words. For example, entering “N D” (including space) could cause the system to respond with “NORTH DAKOTA”.
VOLUME CONTROLS
A volume indicator is shown when the rider or passenger presses the volume control switch.
Rider (controls on handlebar): Adjusts the volume level for the speakers and the rider headphones (if active).
Passenger (on Tour-Pak equipped models): Adjusts the volume level for the passenger headphones only.
If the volume controls are pressed during a prompt or a specific function (such as during voice recognition, navigation prompt, CB or intercom activity), the volume for that particular function will be changed and displayed on the screen.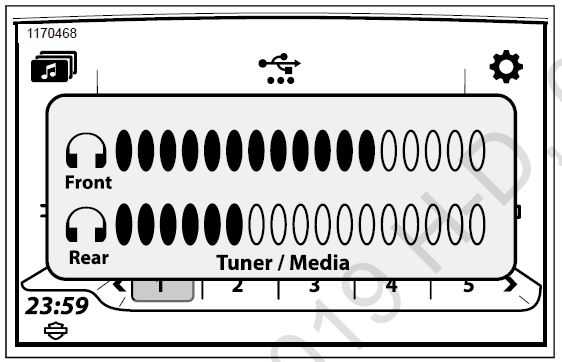
Figure 41. Adjusting Headset Volume
POPUP SCREENS
The radio displays popup screens to explain when a feature is unavailable, display a low fuel message, indicate an incoming phone call, and so on. These screens may interrupt normal system operation. Some screens require a choice (Yes/No) or require confirmation (OK). Select the icon to acknowledge the message or activate the feature.
LOCKOUT SCREENS
Some screens, features or menu items may be locked out or unavailable, such as when the vehicle is in motion. To operate the features, follow the guidance that is provided on the popup screen. If necessary, use hands-free voice recognition commands or safely park the vehicle to perform the task.
STATUS BAR
See Figure 42. The status bar is at the bottom of the screen. It displays the clock and status icons in nine available slots. The icons are informational and not selectable.
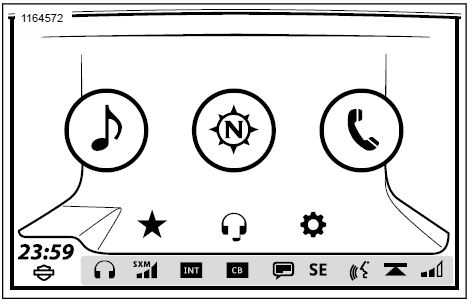 Figure 42. Status Bar
Table 26. Status Bar Icons
ICON NAME FUNCTION
![]() Speakers not muted
Speakers not muted
Music/media is playing through the speakers.
![]() Speakers muted
Speakers muted
Music/media is routed to the speakers Speakers are muted.
![]() Headsets not muted
Headsets not muted
Music/media is playing through the headsets.
![]() Headset is Bluetooth connected
Headset is Bluetooth connected
Bluetooth device is connected. Music/media is routed to the wireless headset speakers.
 Headsets muted
Music/media is routed to the headsets. The rider headset is muted.
Table 26. Status Bar Icons
| ICON | NAME | FUNCTION |
|
|
Traffic Announcement | The tuned RDS station is actively broad casting an audio traffic announcement (select international markets only). |
|
|
Traffic Program | The tuner is set to an RDS station that regularly broadcasts traffic bulletins (select international markets only). |
|
|
Sirius XM Signal Strength | Sirius XM satellite signal strength (3 bars). |
|
|
Intercom microphone idle | Intercom is turned on, but not currently in use. |
 |
Intercom microphone active | Intercom is actively in use (PTT switch pressed or VOX activated). |
 |
Harley-Davidson Bar & Shield | Symbol is displayed on the left of the status bar. |
 |
Citizen Band (CB) idle | CB is turned on. Not currently transmitting. No CB signals are being received (squelch not broken). |
 |
CB active | CB is transmitting or incoming CB signal is being received (squelch has been broken). |
 |
Bluetooth | Bluetooth device is connected. Not displayed when Roaming, New Messages, Low Battery or Phonebook icons are shown. |
 |
Roaming | Bluetooth-connected phone is in a roaming area. |
 |
New Messages | Bluetooth-connected phone has received a text message. |
 |
Low Battery | Bluetooth-connected phone has a low battery. |


Table 26. Status Bar Icons
| ICON | NAME | FUNCTION | ||
|
|
Phonebook | Bluetooth-connected phone is downloading phonebook data to the infotainment system. | ||
|
|
Voice Recognition active | Voice recognition switch has been pressed.
System is prompting or processing voice commands. |
||
|
|
Voice Recognition not
ready |
Voice recognition system is initializing. | ||
|
|
Media paused | Media is paused. Press POWER/MUTE switch to resume audio. | ||
|
|
Scan up | System is scanning up, briefly dwelling on each active frequency or media file. | ||
|
|
Scan down | System is scanning down, briefly dwelling on each active frequency or media file. | ||
|
|
Seek up | Tuner is seeking up for the next active frequency. | ||
|
|
Seek down | Tuner is seeking down for the next active frequency. | ||
|
|
Phone Signal Strength | Bluetooth-connected phone signal strength (3 bars). | ||
|
|
North (direction) | Navigation system has determined the vehicle is traveling north. | ||
|
|
South (direction) | Navigation system has determined the vehicle is traveling south. | ||
|
|
East (direction) | Navigation system has determined the vehicle is traveling south. | ||
|
|
West (direction) | Navigation system has determined the vehicle is traveling west. | ||


| ICON | NAME | FUNCTION |
|
|
Northeast (direction) | Navigation system has determined the vehicle is traveling northeast. |
|
|
Northwest (direction) | Navigation system has determined the vehicle is traveling northwest. |
|
|
Southeast (direction) | Navigation system has determined the vehicle is traveling southeast. |
|
|
Southwest (direction) | Navigation system has determined the vehicle is traveling southwest. |
SYSTEM SETUP
Configure the system settings before riding the motorcycle, with the motorcycle stationary and set to accessory mode. Adjust the options to match your personal riding style, and to make best use of any features or devices that you may be using. If there are problems with any features in the radio, first check the relevant settings. Most settings are similar for all radios. However, some features or selections may be unique or unavailable on some vehicles. Some settings may also be specific for particular countries or regions. See Features and Specifications (Page 21) for more information about the features available on your motorcycle and in your region.
If audio accessories have been added to the motorcycle, see the instruction sheets for proper configuration and operation of those accessories.
SETUP MENU
See Figure 43. Some of the settings may be disabled or not displayed, depending on the radio type and region. For a list of all the categories that can be configured, refer to Table 2Table 27.
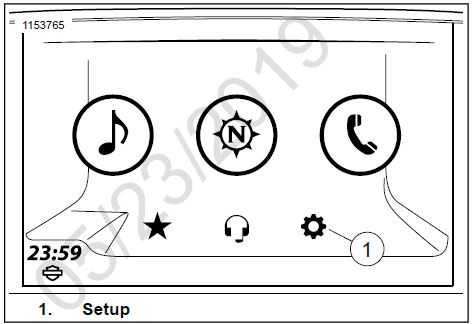
Figure 43. System Setup
Table 27. System Setup
| Selections | Settings |
| 1 [Audio Settings] | Select: Treble, Bass, Fade, Audio Routing, Volumes |
| Options for: | Audio Routing: Select speaker or headset for directed audible output.
Volumes
|
| 2 [Display] | Select: Screen Brightness, Button Brightness, Colors |
| Options for: | Screen Brightness: Manual or automatic
Button Brightness: Plus or minus Colors:
|
Table 27. System Setup
| Selections | Settings |
|
Select: Enabled or Disabled (select up to pages 4) |
|
[Keyboard] |
Select: Full or Large |
| 5 [Bluetooth Setup] | Select: Bluetooth (default is OFF), List Paired Devices, Ring Tones |
| 6 [Wireless Headset Setup] | Select: Pair/Manage Rider Headset, Pair/Manage Passenger Headset, Enable/Disable |
| 7 [Units] | Select: English or Metric |
| 8 [Clock] | Select: Daylight Savings Time (on or off), Clock Format (12 or 24 hour), Time Set (GPS
or manual), Time Zone |
| 9 [Rear Controls] | Select: Enabled or Disabled |
| 10 [System Information] | Select: Software, Hardware, EQ, Navigation, XM Subscription, Reset |
| 11 [Language] | Select: English (US), English (UK), French (France), French (Canada), Spanish (Spain),
Spanish (Mexico), Portuguese (Portugal), Portuguese (Brazil), Italian, German, Russian, Czech, Polish, Dutch, Turkish, Japanese |
| 12 [Projection Mode] | Select: On, Off |
LANGUAGE
Navigate: Home > Setup > Language.
The system can be configured for any of the languages shown in Table 27. The selected language affects the text displayed on the screen, voice prompts from the system, and voice recognition features. To make sure that the system works properly for your use, select the proper language and dialect as applicable.
SCREEN BRIGHTNESS
- Navigate: Home > Setup > Display > Screen Brightness.
- To switch between manual and automatic:
- Automatic: Check the Automatic checkbox. The screen brightness automatically adjusts according to the ambient light measured by the sensor in the speedometer.
- Manual: Uncheck the Automatic checkbox. Adjust the brightness level.
BUTTON BRIGHTNESS
- Navigate: Home > Setup > Display > Button Brightness.
- Adjust the brightness level.
NOTE - The brightness settings do not affect the brightness of vehicle instruments, illuminated hand control switches (on select models) or other accessories.
- The faceplate button lighting remains off when the radio is in Day Colors mode.
COLORS
COLORS
- Navigate: Home > Setup > Display > Colors.
- See Figure 44. Press the Colors multiselect icon until the desired color mode is displayed.
- Day Colors: Screen shows brighter colors.
- Night Colors: Screen shows darker subdued colors. Navigation map is also shown in night color scheme. No other background colors can be selected while in night color mode.
- Automatic Colors: Screen automatically adjusts
- day/night color modes according to ambient light measured by the sensor in the speedometer.
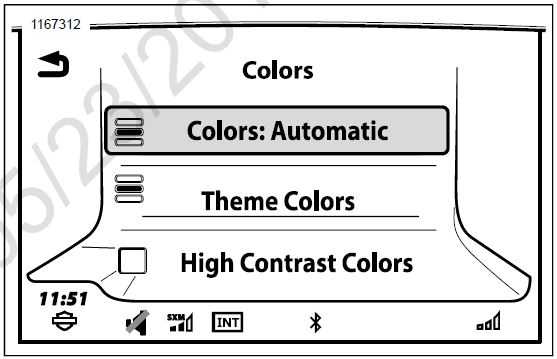
Figure 44. Colors
Theme
- Navigate: Home > Setup > Display > Colors > Theme Color.
- Scroll through list until desired color is selected.
- Select: Default, Orange, Blue, Green, Red, Purple.
High Contrast
High contrast day colors can be activated to enhance visibility of the screen in bright sunlight. This feature is activated through the color settings or by holding the Back switch for five seconds on the right hand control. The feature cannot be activated while the display is showing night colors.
- Navigate: Home > Setup > Display > Colors.
- With Day Colors or Automatic Colors selected, check the High Contrast Colors checkbox.
ENGLISH UNITS METRIC
- Navigate: Home > Setup.
NOTE
The English unit/metric selection also affects how units are displayed in the odometer. - Press the multiselect icon until the desired unit type is displayed.
- English Units: Measurements are displayed as miles, yards, feet, mph, gallons, degrees F (Fahrenheit) and PSI (pound per square inch).
- Metric: Measurements are displayed as kilometers, meters, km/h, liters, degrees C (Celsius) and kPa (kilopascals).
CLOCK
- Navigate: Home > Setup > Clock.
- Manual Time Adjustment:
- Manual mode selected: Manually adjust the clock to the current time with the (+) and (-) controls.
- GPS mode selected: An offset can be applied to the GPS time. The offset is shown next to the time setting.
- DST (Daylight Savings Time): Does not automatically account for daylight savings time when time set is in GPS or Manual mode. Enable DST to advance the clock one hour (during spring in the northern hemisphere) and disable to return to the original time.
- 12/24 Hour Format: Press multiselect icon to choose
12- Hour or 24-Hour clock mode. - Time Mode: Press the multiselect icon to choose GPS or Manual.
- GPS Automatically synchronizes the clock with data from incoming GPS signals. GPS time is only available on radios with navigation.
- Manual Time is manually entered.
- RDS Automatically synchronizes time with radio stations broadcasting RDS data. RDS is only available on radios within regions that support RDS operation.
NOTE
Time zone will automatically default to Zone (AUTO) when GPS is selected as a Time Mode.
- Time zone: Select time zone. For GPS time, AUTO causes the clock to adjust to the time zone for the vehicle location. The clock updates as the motorcycle passes into other time zones.
SPEAKER/HEADSET SELECTION
- See Figure 45. Navigate: Home > Setup > Audio Settings
> Audio Routing. - For each category shown, select whether the audio routes through the headsets or speakers.
- Media/Tuner Tuner stations, Sirius XM channels and media files.
- Phone/Com CB, intercom and phone.
- Prompts/Nav Voice recognition, navigation prompts, text-to-speech and other audio feedback from the radio.
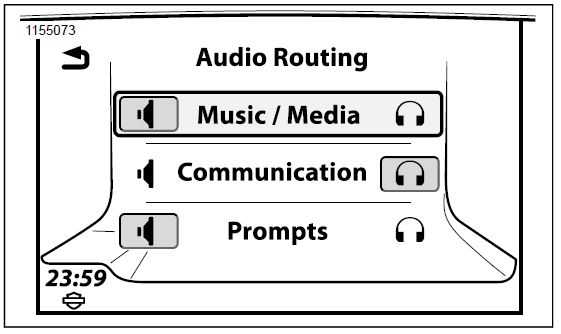
Figure 45. Speaker or Headset
AUDIO SETTINGS: BASS/TREBLE
- Navigate: Home > Setup > Audio Settings.
- Adjust the Bass and Treble settings using the (+) and (-) controls. The tone settings are applied for all audio output through the speakers and headsets.
FADE
NOTE
If the audio configuration is such that no front/back fading is possible, then the vertical bar that slides left and right would not be shown on-screen. Similarly, if no top or bottom fading is possible, then the horizontal bar that slides up and down would not be shown on-screen. The fade crosshair moves to the pressed position and set appropriate fade levels. Based on external amp configuration, the horizontal or vertical axis may not exist. The fade setting adjusts the balance of volume between the front and rear speakers. By default, the fade is set at the center with an equal balance of volume. The fade setting does not affect headset or microphone audio levels. Fade does not apply to models without rear speakers.
- Navigate: Home > Setup > Audio Settings > Fade.
- Adjust the front to rear fade.
- Fade adjustment (typical): Press the R (rear) or F (front) controls to adjust the balance of the speaker volume between the front and rear speakers. The center circle indicates an equal balance of volume to both front and rear speakers.
- Graphical fade adjustment (select models):Adjust the front to rear sound balance by pushing left or right cursor controls. The fade adjustment line displays the balance of sound between the front and rear speakers. The center dashed line represents the equal balance of volume for front and rear speakers. Vehicles with lower speakers will have a horizontal line to adjust balance between the upper and lower speakers.
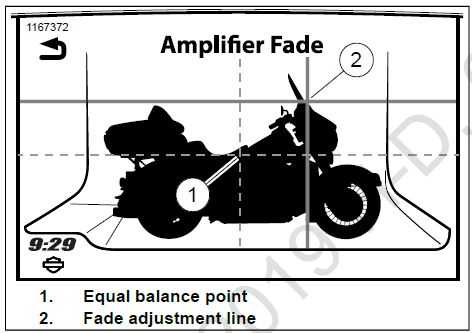
Figure 46. Graphical Fade Adjustment (Select Models)
NOTE
Fade will be removed when speaker configuration does not support Fade settings.
SPEED VOLUME
The speed volume setting adjusts the volume according to vehicle speed. This function allows the volume to be set to a comfortable level while the motorcycle is stopped or traveling slowly. The volume automatically increases to compensate for engine, wind and other ambient noise factors as vehicle speed increases. The speed volume setting affects the voice activation (VOX) of the intercom. This prevents ambient noise from activating VOX transmissions when at greater speeds. It also prevents the need to continually adjust the VOX sensitivity setting. Speed volume is also known as automatic volume control (AVC) on previous Harley-Davidson sound systems.
- Navigate: Home > Setup > Audio Settings > Volumes > Speed Volume.
- Adjust speed volume to one of four different levels. Each level defines the amount of volume that is added as vehicle speed increases.
- If not required, speed volume may be turned OFF.
NOTE - Setting speed volume to the lowest level effectively turns off this feature. The volume remains constant while riding. However, the radio has equalizers with dynamic filters which modify certain frequency bands depending on speed. So there may still be a change in sound as the speed changes, even with speed volume turned off.
- The effects of the speed volume will be less noticeable under certain conditions, such as when the volume is already turned up near its maximum setting and bass and treble settings.
- If not required, speed volume may be turned OFF.
FEEDBACK PROMPTS
The prompt volume affects audible feedback, such as navigation prompts, voice recognition prompts, text-to-speech features and others. Prompt volume can be adjusted by the volume hand controls while the prompt is playing.
- Navigate: Home > Setup > Audio Settings > Volumes > Speaker Volumes.
- Select: Media/Tuner, Prompt/Nav, Phone, CB, Beep.
- Adjust volume by pressing (-) to decrease sound or (+) to increase sound.
REAR CONTROLS
- Navigate: Home > Setup > Rear Controls.
- Select checkbox to enable audible.
- Checked: All passenger controls on the side of the Tour-Pak function normally.
- Unchecked: The passenger volume and PTT controls continue to operate normally. However, the MODE/UP/DN switch is disabled. The passenger cannot change audio sources or tune/seek to other channels or songs.
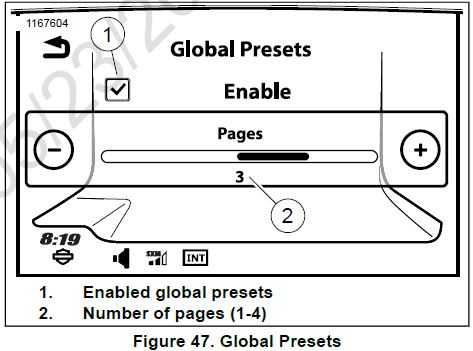
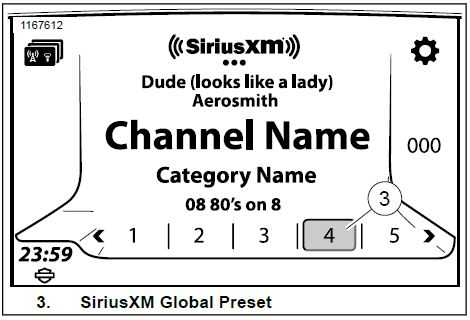
GLOBAL PRESETS
The global preset feature shows a common set of presets for all audio sources. Presets for all tuner band stations (AM, LW, MW, FM, WB), media files and Sirius XM channels are commonly displayed on all audio source screens. This allows easier access to the most commonly used channels and media, without having to manually change to different devices or audio sources. When enabled, the system supports up to 20 global presets.
NOTE
When global presets are used for media files those presets will be grayed-out and unavailable without the media connected.
When global presets are not enabled, each tuner band or media device will only display its own unique presets. The total number of presets is different when global presets are not enabled. CB channels, phone contacts and navigation destinations cannot be stored as global presets. See AM-FM-WB Radio (Page 75) for more information.
- Navigate: Home > Setup > Global Presets.
- See Figure 47. Select: Enable checkbox.
- Adjust by pressing (-) to decrease or (+) to increase page count. Select up to four pages.
- To set a global preset: See Figure 48. Select the desired audio source (tuner station, media file or Sirius XM channel). Press and hold the desired preset icon to store the new preset.
- To select a global preset: While displaying any audio source, select the desired preset. The system changes to the necessary band or media device to play the selected preset.
BLUETOOTH
See the Bluetooth (Page 112) section and other applicable sections for configuration and operation of Bluetooth devices.
RING TONES
See Ring Tone (Page 132) for setting up or installing a new ring tone.
SIRIUSXM
See Satellite Radio (Page 93) for setting up and subscribing to Sirius XM on equipped vehicles.
TRAFFIC
See Traffic (Page 164) to set up and operate traffic features.
SYSTEM INFORMATION
- Navigate: Home > Setup > System Information.
- Select: Software, Hardware, EQ (equalizer), Navigation, XM Subscription, Reset or Software License.
Table 28. Software Update
| Selections | Result |
| Software | Shows the current software version installed on the radio. Software updates for Boom! Box are
available on www.harley-davidson.com or Software Updates (Page 72) |
| Hardware | Shows the Harley-Davidson part number, supplier part number and a unique serial number for the radio. Use the Harley-Davidson part number along with the information in Specifications (Page 24) to determine the features available on this radio. |
Table 28. Software Update
| Selections | Result |
| EQ | Shows the equalizer (EQ) file installed in the radio. This is based on the vehicle, fairing type and speaker configuration. The EQ may be updated by the dealer when adding new accessory speakers to the motorcycle. |
| Navigation | Select: Software, Map Database, Dealer Database, Export for Update |
| Software: Shows the current software version for the navigation software engine. | |
| Map Database: Shows the current map database version that is installed in the radio. | |
| Dealer Database: Shows the current dealer database version that is installed in the radio. | |
| Export for Update: Used when updating or purchasing new map sets. See Navigation Database
and Software (Page 173) to install or update maps. |
|
| XM Subscription | Select: Radio, Specialty Services |
| Radio: The Radio Services subscription status is displayed with an ESN number and SiriusXM phone number for assistance or activation. | |
| Specialty Services: The subscription status for each service (traffic, fuel, weather and forecast
services) is displayed with an ESN number and Sirius XM phone number for assistance or activation. |
|
| Reset | Select: Privacy Reset, Reset to Factory Defaults |
| Privacy Reset :A privacy reset can be performed by the dealer to remove all personal information
from the radio memory. This can be useful when selling the motorcycle or when completely re- configuring the radio with new personal settings. |
|
| Reset to Factory Defaults: A factory restore can be performed by the dealer to restore the radio to its original factory settings. This removes all user settings in radio. See an authorized Harley- Davidson dealer to have this service performed. | |
| Software License | List of all open source licenses |
SOFTWARE UPDATES
Harley-Davidson periodically provides software updates for the radio on www.harley-davidson.com.
NOTE
When looking for radio hardware part number information, the eight-digit base number is only required. For example, H-D Part#: 76000783. Disregard any suffix attached to the base H-D Part# with an alpha designator.
Confirm Software
Check that you are using the latest version of software and update the software when a newer version is available.
- Navigate: Home > Setup > System Information > Hardware.
- Record the radio’s H-D Part#.
- Refer to Table 29. Locate and match your radio’s
H- D Part#.
- Check for the latest radio software version on the Infotainment Support Resources page in https://serviceinfo.harley-davidson.com (all markets).
- Navigate: Home > Setup > System Information > Software.
- Compare the software version in the radio with the latest version.
- Same Version Number: You have the latest software available. There is no need to update.
- Higher Version Number: Continue with Update Software procedure.
Update Software
Updates can be done by using the following procedure or by bringing the vehicle to a Harley-Davidson dealer.
NOTE
Downloading software updates requires a computer platform loaded with the Windows operating system. Do Not use Apple products for downloading updates.
NOTE
Password encrypted drives are not compatible. Make sure that there are no other files on the USB drive.
- Download Requirements:
- USB Drive Storage Capacity: 16 GB (minimum).
- Importing GPX File: USB Drive formatted to FAT32 or exFAT.
- Performing Software Update: USB Drive formatted to NTFS, FAT32, or exFAT.
NOTE
Do not interrupt the installation process. Leave the vehicle and radio turned on, and keep the USB drive installed until the installation process is complete.
- Download the latest software version from the website.
- Select update for radio (GTS or GTS (CVO)).
- Refer to Table 29. Select proper region/vehicle configuration, if applicable.
- Unzip the software package to a folder. The folder includes an installation file with an .ISO extension (.txt files are not needed).
- Copy the .ISO file to the root directory (the first or top directory) of a USB drive.
- Set vehicle ignition:
- Keyed ignition motorcycle: Turn the vehicle ignition switch to ACCESSORY.
- Keyless ignition motorcycle: With the OFF/RUN switch turned off, press and hold the trigger switch until the vehicle enters accessory mode.
- Turn on the radio.
NOTE
If the incorrect file is on the USB drive, the radio displays an error message. - Connect USB drive to vehicle USB port.
- The radio detects the new software and prompt for the update.
- Select: Yes.
- The software installation begins.
- The display prompts to remove the USB drive when the update is complete.
Table 29. Boom Box GTS Software
| H-D Part No. | Software and Application |
| 76000783 |
BOOM! BOX GTS – North America (DOM) |
| 76000779 | |
| 76000786 | |
| 76000796 | |
| 76000784 |
BOOM! BOX GTS – Europe (HDI) |
| 76000780 | |
| 76000787 | |
| 76000797 | |
| 76000785 | BOOM! BOX GTS – Rest of World
(ROW) |
| 76000781 |
PRIVACY RESET
A privacy reset can be performed by the dealer to remove all personal information from the radio memory. This can be useful when selling the motorcycle or when completely reconfiguring the radio with new personal settings. The reset will remove information and history from the radio such as phone pairing, downloaded phone books, call history, navigation history, favorites and presets. A privacy reset does not affect other basic settings like the clock or audio configuration. See an authorized Harley-Davidson dealer to have this service performed.
FACTORY RESTORE
A factory restore can be performed by the dealer to restore the radio to its original factory settings. This removes all user settings in radio. See an authorized Harley-Davidson dealer to have this service performed.
Reference Links
View Full User Guide: Harley Davidson Boom Box GTS 2019 User Manual
Download link: https://www.harley-davidson.com/be/nl/index.html