
![]()
2017 Hyundai Tucson Fuse Diagrams and Relay Guide
The 2017 Hyundai Tucson Fuse Diagram and Relay guide is very helpful for owners who want to fix electrical problems or do routine maintenance on the fuse box and relay system in their cars. The fuse box and relay system are important parts of the car’s electrical system because they keep sensitive computer parts from getting damaged by electrical surges or faults. This detailed guide includes a schematic map that shows where each fuse and relay is located and what it does in the system. This makes it easy for owners to find and fix any problems that may come up. This guide teaches owners how to quickly find and fix electrical problems in their 2017 Hyundai Tucson, whether it’s a blown fuse affecting the headlights or a broken relay affecting the air conditioning system. This way, the car will continue to run reliably and efficiently.
2023 – 2024 Hyundai Tucson Review, Specs, Price And Mileage (Brochure)
FUSES

A vehicle’s electrical system is protected from electrical overload damage by fuses. This vehicle has 2 (or 3) fuse panels, one located in the driver’s side panel bolster, and the other in the engine compartment near the battery. If any of your vehicle’s lights, accessories, or controls do not work, check the appropriate circuit fuse. If a fuse has blown, the element inside the fuse will be melted or broken. If the electrical system does not work, first check the driver’s side fuse panel. Before replacing a blown fuse, turn the engine and all switches off, and then disconnect the negative battery cable. Always replace a blown fuse with one of the same ratings. If the replacement fuse blows, this indicates an electrical problem. Avoid using the system involved and immediately consult an authorized HYUNDAI dealer.
Information
Three kinds of fuses are used: blade type for lower amperage ratings, cartridge type, and fusible link for higher amperage ratings.
WARNING
NEVER replace a fuse with anything but another fuse of the same rating.
- A higher capacity fuse could cause damage and possibly cause a fire.
- Do not install a wire or aluminum foil instead of the proper fuse – even as a temporary repair. It may cause extensive wiring damage and possibly a fire.
CAUTION
Do not use a screwdriver or any other metal object to remove fuses because it may cause a short circuit and damage the system.
Instrument Panel Fuse Replacement
- Turn the engine off.
- Turn all other switches OFF.
- Open the fuse panel cover.
- Refer to the label on the inside of the fuse panel cover to locate the suspected fuse location.

- Pull the suspected fuse straight out. Use the removal tool provided in the engine compartment fuse panel.
- Check the removed fuse; replace it if it is blown. Spare fuses are provided in the instrument panel fuse panels (or in the engine compartment fuse panel).
7. Push in a new fuse of the same rating, and make sure it fits tightly in the clips. If it fits loosely, consult an authorized HYUNDAI dealer.
In an emergency, if you do not have a spare fuse, use a fuse of the same rating from a circuit you may not need for operating the vehicle, such as the cigarette lighter fuse. If the headlamps or other electrical components do not work and the fuses are OK, check the fuse panel in the engine compartment. If a fuse is blown, it must be replaced with the same rating.
Fuse switch Always, place the fuse switch in the ON position. If you move the switch to the OFF position, some items such as the audio system and digital clock must be reset and the smart key may not work properly.
Information
If the fuse switch is OFF, the above message will appear.
NOTICE
- Always place the fuse switch in the ON position while driving the vehicle.
- Do not move the transportation fuse switch repeatedly. The fuse switch may be damaged.
Engine Compartment Panel Fuse Replacement
- Turn the engine off.
- Turn all other switches OFF.
- Remove the fuse panel cover by pressing the tap and pulling up.
- Check the removed fuse; replace it if it is blown. To remove or insert the fuse, use the fuse puller in the engine compartment fuse panel.
- Push in a new fuse of the same rating, and make sure it fits tightly in the clips. If it fits loosely, consult an authorized HYUNDAI dealer.
Main fuse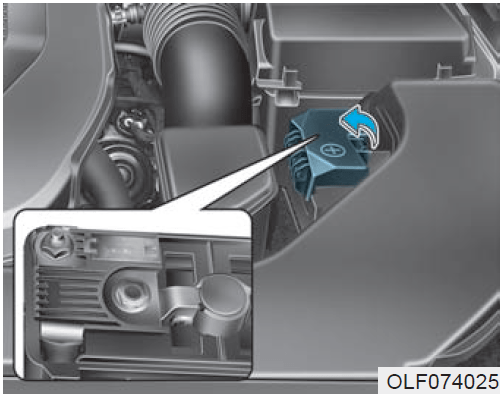
If the main fuse is blown, it must be removed as follows:
- Turn off the engine.
- Disconnect the negative battery cable.
- Remove the fuse panel cover by pressing the tab and pulling it up.
- Remove the nuts shown in the picture above.
- Replace the fuse with a new one of the same rating.
- Reinstall in the reverse order of removal.
Information
If the main fuse is blown, consult an authorized HYUNDAI dealer.
Multi fuse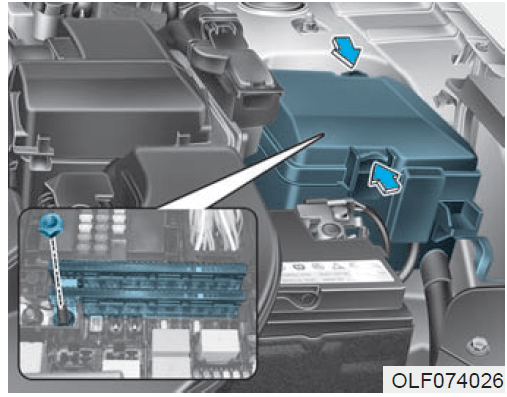
If the multi fuse is blown, it must be removed as follows:
- Turn off the engine.
- Disconnect the negative battery cable.
- Remove the fuse panel cover by pressing the tab and pulling it up.
- Remove the nuts shown in the picture above.
- Replace the fuse with a new one of the same rating.
- Reinstall in the reverse order of removal.
Information
If the multi fuse is blown, consult an authorized HYUNDAI dealer.
Fuse/Relay Panel Description
Instrument panel fuse panel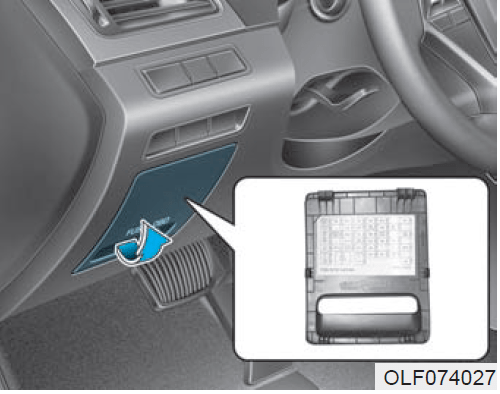
Inside the fuse/relay box cover, you can find the fuse/relay label describing the fuse/relay name and capacity.
Information
Not all fuse panel descriptions in this manual may apply to your vehicle; the information is accurate at the time of printing. When you inspect the fuse box on your vehicle, refer to the fuse box label.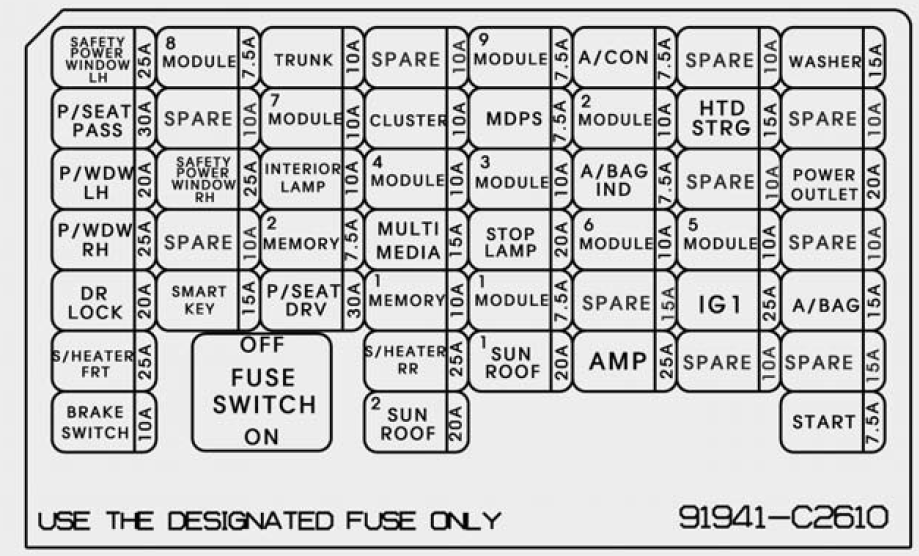
Instrument panel fuse panel
| Fuse Name | Fuse rating | Protected Component |
| SAFETY WINDOW LH | 25A | Driver Safety Power Window Module |
| P/SEAT PASS | 30A | Passenger Seat Manual Switch |
| P/WDW LH | 20A | Power Window Main Switch, Rear Power Window Module LH |
| P/WDW RH | 25A | Power Window Main Switch, Rear Power Window Module RH, Passenger Door Module, Passenger Power Window Switch |
| DR LOCK | 20A | Door Lock Relay, Door Unlock Relay |
| S/HEATER FRT | 25A | Front Air Ventilation Seat Module, Front Seat Warmer Module |
| BRAKE SWITCH | 10A | Stop Lamp Switch, Immobilizer Module, Smart Key Control Module |
| 8 MODULE | 7.5A | BCM, Smart Key Control Module |
| SAFETY POWER WINDOW RH | 25A | Passenger Safety Power Window Module |
| SMART KEY | 15A | Smart Key Control Module |
| TRUNK | 10A | Trunk Lid Relay, Fuel Filler Door & Trunk Lid Switch |
| 7 MODULE | 10A | Digital Clock, Driver/Passenger Door Module |
|
INTERIOR LAMP |
10A |
Glove Box Lamp, Ignition Key Illumination & Door Warning Switch, Front Vanity Lamp Switch LH/RH, Overhead Console Lamp, Room Lamp, Rear Personal Lamp LH/RH, Trunk Room Lamp, Driver/Passenger Smart Key Outside Handle, Driver/Passenger Door Lamp |
| 2 MEMORY | 7.5A | – |
| P/SEAT DRV | 30A | Driver Seat Manual Switch, Driver IMS Module |
| CLUSTER | 10A | Instrument Cluster |
| Fuse Name | Fuse rating | Protected Component |
| 4 MODULE | 10A | Immobilizer Module, Smart Key Control Module |
| MULTIMEDIA | 15A | Audio, A/V & Navigation Head Unit, TMU Unit |
| 1 MEMORY | 10A | Immobilizer Module, Smart Key Control Module |
| S/HEATER RR | 25A | Rear Seat Warmer Module |
| 2 SUN ROOF | 20A | Panoramic Sunroof Motor |
| 9 MODULE | 7.5A | Front Air Ventilation Seat Module, Front Seat Warmer Module, Rear Seat Warmer Module |
| MDPS | 7.5A | MDPS Unit (Column Type/Rack Type) |
| 3 MODULE | 10A | BCM, Sport Mode Switch, Stop Lamp Switch |
| STOP LAMP | 20A | Stop Signal Electronic Module |
| 1 MODULE | 7.5A | Key Solenoid, Driver/Passenger Door Module |
| 1 SUN ROOF | 20A | Panoramic Sunroof Motor |
| A/CON | 7.5A | A/C Control Module, E/R Junction Block (RLY. 3 – Blower Relay) |
|
2 MODULE |
10A |
Audio, A/V & Navigation Head Unit, TMU Unit, Digital Clock, BCM, AMP, Power Outside Mirror Switch, Smart Key Control Module, Overhead Console Lamp, E/R Junction Block (RLY. 5 – Power Outlet Relay) |
| A/BAG IND | 7.5A | Instrument Cluster |
|
6 MODULE |
10A |
Multipurpose Check Connector, A/C Control Module, TMU Unit, A/V & Navigation Head Unit, Electro Chromic Mirror, Front Air Ventilation Seat Module, Front Seat Warmer Module, Rear Seat Warmer Module, Driver IMS Module, A/T Shift Lever IND. |
| AMP | 25A | AMP (JBL/MOBIS) |
| HTD STRONG | 15A | BCM |
| Fuse Name | Fuse rating | Protected Component |
|
5 MODULE |
10A |
Front Console Switch, Tire Pressure Monitoring Module, Lane Departure Warning Unit, Smart Cruise Control Unit, Fuel Filler Door & Trunk Lid Switch, Sport Mode Switch, Rear Parking Assist Sensor LH/RH, Rear Parking Assist Sensor, LH/RH (Center), Blind Spot Detection Radar LH/RH |
| IG1 | 25A | PCB Block |
| WASHER | 15A | Multifunction Switch (Wiper Low & Washer Switch) |
| POWER OUTLET | 20A | Front Power Outlet |
| A/BAG | 15A | SRS Control Module, Occupant Detection Sensor |
|
START |
7.5A |
[Without Smart Key & Immobilzer] ICM Relay Box (Burglar Alarm Relay), Immobilzer] ICM Relay Box (Burglar Alarm Relay), Transaxle Range Switch, PCM (G4KJ/G4KH) |
Engine compartment fuse panel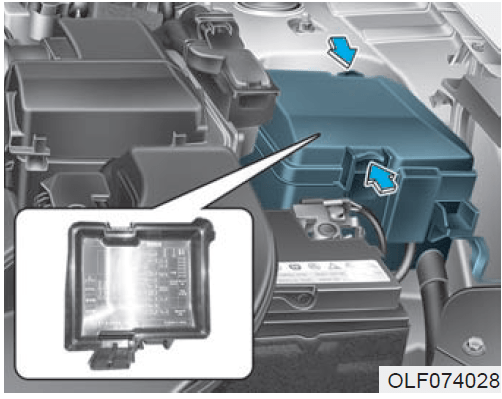
Inside the fuse/relay box cover, you can find the fuse/relay label describing the fuse/relay name and capacity.
2023 – 2024 Hyundai Tucson Review, Specs, Price And Mileage (Brochure)
Information
Not all fuse panel descriptions in this manual may apply to your vehicle; the information is accurate at the time of printing. When you inspect the fuse panel in your vehicle, refer to the fuse panel label.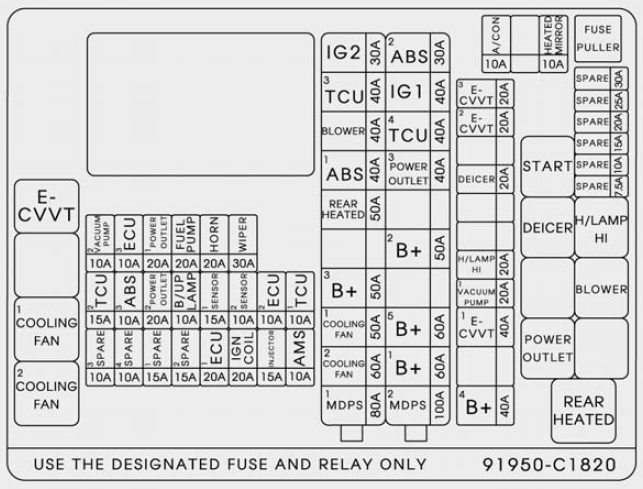
Engine compartment main fuse panel
| Fuse Name | Fuse rating | Protected Component | |
|
MULTI FUSE (TYPE A) |
IG2 | 30A | [Without Smart Key] Relay 8 (Start Relay), Ignition Switch, [With Smart Key] Relay 8 (Start Relay), PCB Block (IG2 Relay) |
| 3 TCU | 40A | [G4FJ – DCT] TCM | |
| BLOWER | 40A | Relay 3 (Blower Relay) | |
| 1 ABS | 40A | ESC Module | |
| REAR HEATED | 50A | Relay 1 (Rear Heated Relay) | |
| 1 B+ | 50A | Smart Junction Block (IPS2 (4CH), IPS3 (4CH), Fuse – F28/F29) | |
| 1 COOLING FAN | 50A | [G4KH/G4FJ] Relay 11 (Cooling Fan Relay), [G4KJ] Relay 12 (Cooling Fan Relay) | |
| 2 COOLING FAN | 60A | [G4KH/G4FJ] Relay 12 (Cooling Fan Relay) | |
| 1 MDPS | 80A | MDPS Unit (Column Type) | |
|
MULTI FUSE (TYPE B) |
2 ABS | 30A | ESC Module, Multipurpose Check Connector |
| IG1 | 40A | [Without Smart Key] Ignition Switch, [With Smart Key] PCB Block (IG1/ACC Relay) | |
| 4 TCU | 40A | [G4FJ – DCT] TCM | |
| 3 POWER OUTLET | 40A | Relay 5 (Power Outlet Relay) | |
| 2 B+ | 50A | Smart Junction Block (IPS1 (4CH), IPS4 (4CH), IPS5 (4CH), Fuse – F36) | |
| 5 B+ | 60A | PCB Block (Engine Control Relay, Fuse – F4/F5/F6/F13/F14/F22) | |
| 1 B+ | 60A | Smart Junction Block (Power Window Relay, Fuse – F1/F2/F3/F4/F10/F13/F17/F23/F24/F30) | |
| 2 MDPS | 100A | MDPS Unit (Rack Type) | |
| Fuse Name | Fuse rating | Protected Component | |
|
FUSE |
3 E-CVVT | 20A | [G4KJ/G4KH] PCM |
| 2 E-CVVT | 20A | [G4KJ/G4KH] PCM | |
| DEICER | 20A | Relay 5 (Deicer Relay) | |
| H/LAMP HI | 20A | [With HID] Relay 5 (Head Lamp High Relay) | |
| 1 VACUUM PUMP | 20A | [G4KH/G4FJ] Vacuum Pump | |
| 1 E-CVVT | 40A | [G4KJ/G4KH] Relay 9 (E-CVVT Relay) | |
| 4 B+ | 40A | Smart Junction Block (Leak Current Autocut Device Fuse – F15/F21/F22, Fuse – F5/F6/F7/F12) | |
| A/CON | 10A | A/C Control Module | |
| HEATED MIRROR | 10A | ECM (G4FJ), A/C Control Module, Drover/Passenger Power Outside Mirror | |
| 2 VACUUM PUMP | 10A | [G4KH/G4FJ] Vacuum Pump | |
| 3 ECU | 10A | PCM/ECM | |
| 1 POWER OUTLET | 20A | Cigarette Lighter | |
| FUEL PUMP | 20A | Fuel Pump Relay | |
| HORN | 20A | Horn Relay, ICM Relay Box (Burglar Alarm Horn Relay) | |
| WIPER | 30A | Front Wiper (Low) Relay, Front Wiper (High) Relay | |
| 2 TCU | 15A | Transaxle Range Switch, TCM (G4FJ-DCT) | |
| 3 ABS | 10A | ESC Module, MDPS Unit | |
| 2 POWER OUTLET | 20A | Rear Power Outlet | |
| Fuse Name | Fuse rating | Protected Component | |
|
FUSE |
B/UP LAMP | 10A | Transaxle Range Switch, PCM (G4KJ/G4KH-A/T), TCM (G4FJ-DCT), Audio, Electro Chromic Mirror, Rear Combination Lamp (IN) LH/RH |
| 1 SENSOR | 15A | Oxygen Sensor (Up/Down) | |
|
2 SENSOR |
15A |
Purge Control Solenoid Valve, Canister Close Valve, RCV Control Solenoid Valve, Fuel Pump Relay, E/R Junction Block (RLY. 12 – Cooling Fan 2 Relay), [G4KJ/G4KH] Variable Intake Solenoid Valve, Oil Control Valve (Exhaust), [G4FJ] Oil Control Valve #1/#2 (Intake/Exhaust) | |
| 1 ECU | 10A | PCM/ECM | |
| 1 TCU | 10A | PCM (G4KJ/G4KH-A/T), TCM (G4FJ-DCT) | |
| 1 ECU | 10A | PCM/ECM | |
| IGN COIL | 20A | Ignition Coil #1/#2/#3/#4, Condenser (G4FJ) | |
| INJECTOR | 15A | – | |
| AMS | 10A | Battery Sensor | |
How to Replace Fuses of Hyundai Tucson
Replacing fuses in a Hyundai Tucson is a relatively straightforward process. Here’s a detailed guide along with some tips:
-
Locate the Fuse Box: The fuse box in the Hyundai Tucson is typically located in one of two places: either in the engine bay or inside the cabin, often beneath the dashboard on the driver’s side.
-
Turn Off the Vehicle: Before replacing any fuses, ensure that the vehicle’s ignition is turned off, and the key is removed from the ignition switch to prevent any electrical mishaps.
-
Select a Replacement Fuse: Check the amperage rating printed on the blown fuse and select a replacement fuse with the exact same amperage rating. Using a fuse with a different amperage rating could cause electrical issues or damage to your vehicle.
-
Remove the Blown Fuse: Once you’ve identified the blown fuse and selected a replacement, use a fuse puller tool or a pair of needle-nose pliers to grip the blown fuse firmly. Pull the fuse straight out of its socket, being careful not to damage the fuse box or adjacent fuses in the process.
-
Insert the Replacement Fuse: Take the replacement fuse and insert it into the empty socket in the fuse box. Make sure the fuse is seated securely and fully inserted into the socket to ensure proper electrical connection.
-
Check for Proper Fit: Double-check that the replacement fuse fits snugly into the socket and is of the correct amperage rating. It should not be loose or protruding from the socket.
-
Replace the Fuse Box Cover: Once you’ve replaced the blown fuse with a new one, carefully replace the fuse box cover and ensure that it is securely fastened. This helps to prevent water or debris from entering the fuse box.
-
Test the Circuit: Turn the ignition key to the accessory position or start the vehicle to test the circuit associated with the replaced fuse. Verify that the electrical component or system is functioning properly.
-
Dispose of the Blown Fuse: Dispose of the blown fuse properly. You can keep it as a spare in case of future emergencies or dispose of it according to local regulations for electronic waste.
Tips:
-
- Use the Fuse Puller Tool: If your Hyundai Tucson comes with a fuse puller tool, use it to remove the blown fuse. This can help prevent damage to the fuse or the fuse box.
- Check Other Fuses: If you find one blown fuse, it’s a good idea to check the surrounding fuses as well. Sometimes, multiple fuses may blow simultaneously due to the same issue.
- Keep Spare Fuses: It’s wise to keep a set of spare fuses of various amperage ratings in your vehicle’s glove compartment for quick replacement in case of emergencies.
FAQs
The fuse diagram can typically be found in the owner’s manual of the vehicle. It may also be located on the inside of the fuse box cover.
A fuse diagram shows the locations and functions of the various fuses in the vehicle’s electrical system. It helps identify which fuse corresponds to which electrical component.
The 2017 Hyundai Tucson typically has two fuse boxes. One is located in the engine compartment, and the other is usually found in the interior of the vehicle.
The main fuses are usually located in the fuse box in the engine compartment.
Common electrical components protected by fuses include headlights, tail lights, power windows, radio, and air conditioning systems.
A relay is an electromechanical switch that controls high-current circuits with low-current signals. It helps to control various electrical components in the vehicle.
Relays are often located in the fuse box in the engine compartment or the interior fuse box.
A blown fuse can usually be identified by a visible break in the metal filament inside the fuse. Additionally, some fuses have a small LED indicator that illuminates when the fuse is blown.
If you find a blown fuse, you should replace it with a new fuse of the same amperage rating. It’s important to address the underlying cause of the blown fuse to prevent it from happening again.
Yes, using a fuse with a higher amperage rating than specified can potentially cause damage to the electrical system and components by allowing too much current to flow.
Signs of a failing relay may include intermittent or non-functioning electrical components, clicking sounds from the relay, or issues with starting the vehicle.
Relays can be tested using a multimeter to check for continuity and proper operation when energized.
It’s always a good idea to check for any recalls or common issues related to the electrical system in your specific vehicle. You can do this by contacting your local Hyundai dealership or checking online databases.
Replacing a fuse or relay is typically a straightforward task that can be done by most vehicle owners. However, if you’re unsure or uncomfortable with the process, it’s always best to consult a professional mechanic.
Replacement fuses and relays can be purchased from auto parts stores, online retailers, or directly from Hyundai dealerships. Make sure to get the correct type and amperage rating for your vehicle.
Useful Links:
View Full PDF: 2017 Hyundai Tucson Owner’s Manual | Auto User Guide
2023 – 2024 Hyundai Tucson Review, Specs, Price And Mileage (Brochure)
Display Features: 2017 Hyundai Tucson Instrument Cluster Guide