
Hyundai Elantra Hybrid 2023 LCD Display
The LCD Display (Type A) Guidelines for the Hyundai Elantra Hybrid of 2023 present a cutting-edge digital interface that completely transforms the driving experience. This introduction offers a thorough rundown of the LCD Display’s features, which range from sophisticated driver-assistance functions to navigation and entertainment, as it is the centerpiece of the car’s interior. This high-resolution display on the 2023 Hyundai Elantra Hybrid puts seamless connectivity, customizable settings, and real-time information at your fingertips thanks to its elegant design and simple controls. It also makes sure that the LCD Display (Type A) on this vehicle serves as your entryway to a contemporary, connected, and informed driving experience.
2023 Hyundai Elantra Specs, Price, Features, Milage (Brochure)
LCD Display (Type A)

LCD Display Modes
| Modes | Symbol | Explanation |
| Trip Computer | This mode displays driving information such as the tripmeter, fuel economy, etc.
For more details, refer to “Trip Computer” in this chapter. |
|
| Turn By Turn (TBT) |
This mode displays the state of the navigation. |
|
|
Driving Assist |
– Smart Cruise Control (SCC)
– Lane Keeping Assist (LKA) – Lane Following Assist (LFA) – Driver Attention Warning (DAW) |
|
| User Settings | In this mode, you can change settings of the doors, lamps, etc. | |
|
Warning |
– This mode displays warning messages related to the lamp malfunction, etc.
– Tire pressure information |
The information provided may differ depending on which functions are applicable to your vehicle.
Trip computer mode

The trip computer mode displays information related to vehicle driving parameters including fuel economy, trip meter information and vehicle speed.
For more information, refer to “Trip Computer” in this chapter.
Turn By Turn (TBT) mode

This mode displays the state of the navigation.
Driving Assist mode

SCC/LKA /LFA/DAW
This group displays the state of the Smart Cruise Control, Lane Keeping Assist.
For more details, refer to each function information in chapter 7.
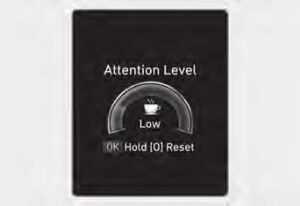
Driver Attention Warning
This group displays information related to Driver Attention Warning.
For more details, refer to “Driver Attention Warning (DAW)” in chapter 7.
Master warning mode

This warning light informs the driver the following situations.
- Forward Collision-Avoidance Assist malfunction (if equipped)
- Forward Collision-Avoidance Assist radar blocked (if equipped)
- Blind-Spot Collision Warning malfunction (if equipped)
- Blind-Spot Collision Warning radar blocked (if equipped)
- High Beam Assist malfunction (if equipped)
- Lamp malfunction (if equipped)
- Smart Cruise Control malfunction (if equipped)
- Tire Pressure Monitoring System (TPMS) malfunction (if equipped)
The Master Warning Light illuminates if one or more of the above warning situations occur. At this time, a Master Warning icon ( ) will appear beside the User Settings icon ( ), on the LCD display. (if equipped If the warning situation is solved, the master warning light will be turned off and the Master Warning icon will disappear.

Tire Pressure
This mode displays information related to Tire Pressure.
For more information, refer to “Tire Pressure Monitoring System (TPMS)” in chapter 8.
User Settings Mode

In this mode, you can change the settings of the instrument cluster, doors, lamps, etc.
- Driver Assistance
- Door
- Lights
- Sound
- Convenience
- Service interval
- Theme selection
- Other
- ECO vehicle
- Language
- Reset
The information provided may differ depending on which functions are applicable to your vehicle.
Shift to P to edit settings / Engage parking brake to edit settings
This warning message illuminates if you try to select an item from the User Settings mode while driving.
- Intelligent variable transmission For your safety, change the User Settings after parking the vehicle, applying the parking brake and moving the shift level to P(Park).
- Manual transmission
For your safety, change the User Settings after engaging the parking brake.
Quick guide (Help)
This mode provides quick guides for the systems in the User Settings mode.
Select an item, press and hold the OK button.
For more details about each system, refer to this Owner’s Manual.
Driver Assistance
| Items | Explanation |
|
Driving Assist |
• Highway Driving Assist: The function assists the driver in maintaining the set speed, keeping a safe distance from a vehicle ahead, and keeping the vehicle inside of the lane while driving on the highway.
For more details, refer to “Highway Driving Assist (HDA)” in chapter 7. |
| Warning Timing | To adjust the warning timing of the driver assistance system.
• Normal / Late |
| Warning Volume | To adjust the warning timing of the driver assistance system.
• High / Medium / Low / Off |
|
Driver Attention Warning |
• Leading Vehicle Departure Alert
To activate or deactivate the Leading vehicle departure alert. • Inattentive Driving Warning To activate or deactivate Driver Attention Warning. For more details, refer to the “Driver Attention Warning (DAW)” in chapter 7. |
|
Forward Safety |
To adjust Lane Keeping Assist.
• Active Assist/Warning Only/Off For more details, refer to the “Forward Collision-Avoidance Assist (FCA)” in chapter 7. |
|
Lane Safety |
To adjust the Lane Keeping Assist function.
• Lane Keeping Assist/Lane Departure Warning/Off For more details, refer to “Lane Keeping Assist (LKA)” in chapter 7. |
|
Blind-Spot Safety (if equipped) |
• Safe Exit Assist (SEA)
To activate or deactivate Safe Exit Assist. For more details, refer to the “Safe Exit Assist (SEA)” in chapter 7.
• Active Assist/Warning Only/ Off For more details, refer to “Blind-Spot Collision-Avoidance Assist (BCA)” in chapter 7. |
|
Parking Safety (if equipped) |
• Parking Distance Warning Auto ON
• Rear Cross-Traffic Safety To Activate or deactivate Rear Cross-Traffic Collision-Avoidance Assist. • Active Assist/Warning Only/ Off For more details, refer to “Rear Cross-Traffic Collision-Avoidance Assist (RCCA)” in chapter 7. |
Door
| Items | Explanation |
|
Auto Lock |
• Enable on Shift: All doors will be automatically locked if the shift lever is moved from the P (Park) position to the R (Reverse), N (Neutral), or D (Drive) position. (Only when the engine is running)
• Enable on Speed: All doors will be automatically locked when the vehicle speed exceeds 15km/h (9.3mph). • Disable: The auto door lock operation will be deactivated. |
|
Auto Unlock |
• On Shift to P: All doors will be automatically unlocked if the shift lever is moved to P (Park) position. (Only when the engine is running)
• On key out/Vehicle Off: All doors will be automatically unlocked when the ignition key is removed from the ignition switch or the Engine Start/Stop button is set to the OFF position. • Disable: The auto door unlock operation will be canceled. |
|
Two Press Unlock |
• Off: The two-press unlock function will be deactivated. Therefore, all doors will unlock if the door unlock button is pressed.
• On Only the driver’s door will unlock if the door unlock button is pressed. When the door unlock button is pressed again within 4 seconds, the remaining doors will unlock. |
|
Horn Feedback |
To activate or deactivate the horn feedback.
If the horn feedback is activated, after locking the door by pressing the lock button on the remote key and pressing it again within 4 seconds, the horn feedback sound will operate once to indicate that all doors are locked (if equipped with a remote key). |
| Smart Trunk | To activate or deactivate the smart trunk.
For more details, refer to “Smart Trunk” in chapter 5. |
2023 Hyundai Elantra Specs, Price, Features, Milage (Brochure)
Lights
| Items | Explanation |
| Illumination | Adjust the illumination level.
– Level 1~20 |
|
One Touch Turn Signal |
• Off: The one-touch turn signal function will be deactivated.
• 3, 5, 7 Flashes: The turn signal indicator will blink 3, 5, or 7 times when the turn signal lever is moved slightly. For more details, refer to “Lighting” in chapter 5. |
| Headlight Delay | • To activate or deactivate the headlight delay function.
For more details, refer to “Lighting” in chapter 5. |
| High Beam Assist | • To activate or deactivate the High Beam Assist function.
For more details, refer to “High Beam Assist (HBA)” in chapter 5. |
Sound
| Items | Explanation |
| Cluster Voice Guidance Volume |
To adjust the cluster voice guidance volume. |
| Welcome sound | To activate or deactivate the welcome sound. |
Convenience
| Items | Explanation |
|
Seat Easy Access |
• Off: The seat easy access function is deactivated.
• Normal/Extended: When you turn off the engine, the driver’s seat will automatically move rearward short (Normal) or long (Extended) for you to enter or exit the vehicle more comfortably. For more details, refer to “Driver Position Memory System” in chapter 5. |
| Rear Occupant Alert | • To activate or deactivate the rear occupant alert system.
For more details, refer to the “Rear Occupant Alert (ROA)” in chapter 5. |
|
Welcome Light |
• On door unlock: The welcome light turns on automatically when the doors are unlocked.
• On driver approach: The welcome light turns on automatically when the vehicle is approached with the smart key. For more details, refer to ‘’Welcome System’’ in chapter 5. |
| Wireless Charging System | To activate or deactivate the wireless charging system in the front seat.
For more details, refer to “Wireless cellular phone charging system” in Chapter 5. |
| Wiper/Lights Display | To activate or deactivate the Wiper/ Light mode.
When activated, the LCD display shows the selected Wiper/Light mode whenever you changed the mode. |
| Icy Road Warning | To activate or deactivate the icy road warning function. |
Service interval
| Items | Explanation |
| Enable Service Interval |
To activate or deactivate the service interval function. |
Information
To use the service interval menu, consult an authorized HYUNDAI dealer.
If the service interval is activated and the time and distance are adjusted, messages are displayed in the following situations each time the vehicle is turned on.
- Service in
- Displayed to inform the driver of the remaining mileage and days to service.
- Service required
- Displayed when the mileage and days to service have been reached or passed.
Information
If any of the following conditions occur, the mileage and number of days to service may be incorrect.
- The battery cable is disconnected.
- The fuse switch is turned off.
- The battery is discharged.
Theme selection
To select the style of instrument cluster graphic style and setting.
Theme A / Theme B / Theme C
Other
| Items | Explanation |
|
Fuel Econ. Reset |
• Off: The average fuel economy will not reset automatically whenever refueling.
• After ignition: When the engine has been OFF for 4 hours or longer the average fuel economy will reset automatically. • After refueling: The average fuel economy will reset automatically after adding 6 liters (1.6 gallons) of fuel or more and after driving speed exceeds 1 km/h (1 mph). For more details, refer to “Trip Computer” in this chapter. |
| Speed Unit (if equipped) | To select the speed unit. (km/h, MPH) |
| Fuel Econ.
Unit |
To select the fuel economy unit. (km/L, L/100km, MPG) |
| Temperature Unit | Select the temperature unit. (°C,°F) |
| Tire Pressure Unit | Select the tire pressure unit. (psi, kPa, bar) |
ECO vehicle
| Items | Explanation |
|
Coasting Guide |
• Enable Coasting Guide: On/Off
To inform the driver when taking the foot off from accelerator pedal by getting information from Navigation system.
• Sound To adjust the sound of the coasting guide. |
| Start Coasting | • Early/Normal/Late
Select options when the Coasting Pop-up is displayed. |
Language (if equipped)
| Items | Explanation |
| Language | Choose the language. You can choose the language in the infotainment system. (if equipped) |
Reset
| Items | Explanation |
|
Reset |
You can reset the menus in the User Settings Mode. All menus in
the User Settings Mode is reset to factory settings, except for language and service interval. |
Trip Computer
The trip computer is a microcomputer-controlled driver information system that displays information related to driving.
Information
Some driving information stored in the trip computer (for example Average Vehicle Speed) resets if the battery connector is disconnected.
Trip modes

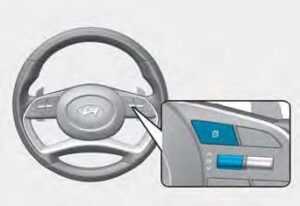
To change the trip mode, toggle the “, ” switch on the steering wheel.
Average fuel economy/ Instant fuel economy

Average Fuel Economy (1)
- The average fuel economy is calculated by the total driving distance and fuel consumption since the last average fuel economy reset.
- The average fuel economy can be reset both manually and automatically.
Manual reset
To clear the average fuel economy manually, press the OK button on the steering wheel for more than 1 second when the average fuel economy is displayed.
Automatic reset
To automatically reset the average fuel economy after refueling, select the “Fuel Econ. Reset” mode in the User Settings menu on the LCD display.
- After Ignition: When the engine has been OFF for 4 hours or longer the average fuel economy will reset automatically.
- After Refueling: The average fuel economy will reset automatically after adding 1.6 gallons (6 liters) of fuel or more and after driving speed exceeds 1 mph (1 km/h).
Information
The vehicle must be driven for a minimum of 0.19 miles (300 meters) since the last ignition key cycle before the average fuel economy will be recalculated.
Instant Fuel Economy (2)
The instantaneous fuel economy is displayed according to the bar graph in the LCD display while driving.
Accumulated Info display

This display shows the accumulated trip distance (1), the average fuel economy (2), and the total driving time (3). The information is accumulated starting from the last reset.
To reset the information, press and hold the OK button when viewing the Accumulated driving info. The trip distance, the average fuel economy, and total driving time will reset simultaneously. The accumulated driving information will continue to be counted while the engine is still running (for example, when the vehicle is in traffic or stopped at a stop light).
Information
The vehicle must be driven for a minimum of 300 meters (0.19 miles) since the last ignition key cycle before the average fuel economy will be recalculated.
Drive Info display

This display shows the trip distance (1), the average fuel economy (2), and the total driving time (3). The information is combined for each ignition cycle. However, when the engine has been OFF for 4 hours or longer the Drive Info screen will reset. To manually reset the information, press and hold the OK button when viewing the Drive Info. The trip distance, the average fuel economy, and total driving time will reset simultaneously. The driving information will continue to be counted while the engine is still running (for example, when the vehicle is in traffic or stopped at a stop light).
Information
The vehicle must be driven for a minimum of 0.19 miles (300 meters) since the last ignition key cycle before the average fuel economy will be recalculated.
Digital speedometer

The digital speedometer display shows the speed of the vehicle.
Auto Stop accumulated time

This mode displays the Auto Stop accumulated time within ISG vehicles.
Smart shift

This mode displays the currently selected drive mode. For more information, refer to “Drive Mode Integrated Control System” in Chapter 6
FAQ
Use the control buttons located on the steering wheel to navigate through the LCD display. The buttons typically include menu, up, down, and OK buttons to access different features and settings.
You can adjust the brightness of the LCD display by going to the settings menu. Look for the display or screen settings, where you should find an option to adjust the brightness level.
Yes, you can often customize the information displayed on the LCD screen. Explore the settings menu to find options for selecting different information to be displayed, such as fuel economy, trip information, audio details, and more.
Use the control buttons on the steering wheel to switch between different screens or modes. Typically, there will be a mode or screen switch button that allows you to cycle through options like trip information, audio, navigation, and settings.
To connect your smartphone to the LCD display, use the designated USB port or Bluetooth pairing feature. Follow the on-screen prompts or refer to the vehicle’s manual for detailed instructions on how to establish the connection.
Yes, the LCD display often provides a rearview camera feed when you engage the reverse gear. The screen will automatically switch to display the live view from the rear camera, helping you with parking and maneuvering.
Use the audio or media button on the steering wheel to access the audio controls on the LCD display. This will allow you to change radio stations, adjust volume, switch audio sources, and control other audio settings.
In some models, you can adjust the climate control settings through the LCD display. Look for a climate or HVAC button on the steering wheel to access the climate control options on the screen. Alternatively, there may be dedicated physical buttons for climate control.
Yes, the LCD display often provides access to vehicle diagnostics and maintenance information. Look for a dedicated menu option or settings section that includes details such as tire pressure, oil life, service reminders, and more.
To pair your phone via Bluetooth, access the Bluetooth settings on the LCD display. Enable Bluetooth on your phone and search for available devices. Once the vehicle’s Bluetooth system is detected, select it and follow the prompts to complete the pairing process.
To adjust the display language, go to the settings menu on the LCD display. Look for language or display settings, where you should find an option to select your preferred language.
If your Hyundai Elantra Hybrid is equipped with built-in navigation, you can access navigation features through the LCD display. Look for a navigation or maps button on the screen or use the dedicated voice command button to initiate voice-guided navigation.
Useful Link
View Full User Guide: Hyundai Elantra Hybrid 2023 User Guide
Download Manuals: https://owners.hyundaiusa.com/us/en/resources/manuals-warranties.html
2023 Hyundai Elantra Specs, Price, Features, Milage (Brochure)