2023 Hyundai Kona-EV Charge Types for Electric Vehicle
The 2023 Hyundai Kona-EV is at the forefront of the electric vehicle (EV) change. It offers a wide range of charge types that are the epitome of flexibility and ease of use, making the switch to environmentally friendly driving not only possible but also incredibly simple. This innovative EV is designed to easily accommodate a variety of charging options, so it can fit the wants and lifestyles of all of its drivers. The Kona-EV makes sure that charging your car fits in with your daily life and travel plans. It offers fast and easy DC fast charging, level 2 home charging that is common, and level 1 charging can be done with a normal wall outlet. With its flexible approach to recharging, this electric marvel changes the way people think about owning an EV. It lets you go on eco-friendly trips with ease and trust, making the 2023 Hyundai Kona-EV a real leader in the world of electric cars.
2023 Hyundai Sonata Specs, Price, Features, Milage (Brochure)
Charge Types for Electric Vehicles
Charging Information
- Level 2 AC Charging: You can charge your vehicle using a 240-volt AC electrical EV charger in your home or at a public Level 2 charging station.
- DC Fast Charging: You can charge your vehicle using a DC fast charger with a compatible charge cable at a public EV charging station. Make sure that the station has a compatible connector for your vehicle.
- Note that prolonged and continuous use of DC fast charging may reduce the long-term life of the EV battery. Usage of a DC fast charger should be minimized when possible in order to help prolong the life of the EV battery.
- Level 1 AC Charging: The Electric vehicle can be charged by using household electricity. The electrical outlet in your home must comply with regulations and can safely accommodate the Voltage / Current (Amps) / Power (Watts) ratings specified on the portable charge.
Charging Time Information
| Charging type | Economical battery type | Extended battery type | |
|
AC charge |
7.2 kW |
Takes approx. 6 hours at room temperature when charged to 100% | Takes approx. 9 hours 15 minutes at room temperature when charged to 100%. |
|
10.5 kW |
Takes approx. 4 hours 20 minutes at room temperature when charged to 100% | Takes approx. 6 hours 50 minutes at room temperature when charged to 100%. | |
|
DC charge |
100 kW charger |
Takes about 47 minutes at room temperature when charged to 80%. Can be charged to 100%. | Takes about 47 minutes at room temperature when charged to 80%. Can be charged to 100%. |
|
50 kW charger |
Takes about 48 minutes at room temperature when charged to 80%. Can be charged to 100%. | Takes about 64 minutes at room temperature when charged to 80%. Can be charged to 100%. | |
|
Portable charge |
Takes approx. 34 hours at room temperature when charged to 100%. | Takes approx. 56 hours at room temperature when charged to 100%. | |
Information
Depending on the condition and durability of the high-voltage battery, charger specifications, and ambient temperature, the time required for charging the high-voltage battery may vary.
Charging Types
| Category | Charging inlet (Vehicle) | Charging connector | Charging outlet | How to charge |
|
AC Charge |
 |
 |
 |
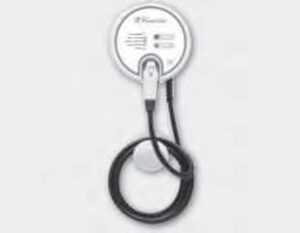
Use 240-volt AC charging station installed at a home or a public charging station |
|
DC Charge |
|
 |
 |
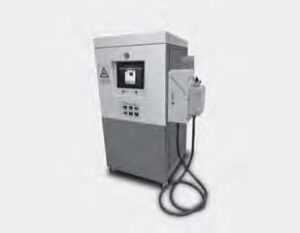
Use a DC fast charger at a public charging station |
|
Portable Charge |
|
 |
 |
Use a standard household 110-volt outlet and the Hyundai charging cord that is equipped with your vehicle |
- Depending on the condition and durability of the high-voltage battery, charger specifications, and ambient temperature, the time required for charging the high-voltage battery may vary.
- The actual charger image and charging method may vary by the charger manufacturer.
Charge Indicator Lamp for Electric Vehicle
Charging Status
When charging the high-voltage battery, the charge level can be checked from outside the vehicle.
- Charging status
| Lamp status | Details |
 |
Charging door open (charging standby) |
| white ON | |
 |
Charging |
| green ON | |
 |
Scheduled charging set |
| green blink | |
 |
Charging error (charging system malfunction) |
| red blink | |
 |
Charging 12 V auxiliary battery or scheduled air conditioner/heater is operating |
| yellow ON |
- Charging status
Lamp status Details
Before charging (illuminate) While charging (blink) 
High voltage battery level very low
yellow yellow 
High voltage battery level low
green green 
High voltage battery level middle
green green 
High voltage battery level high
green green - High voltage indicator
Lamp status Details An LED in the front of the vehicle near the inner portion of the H-emblem indicates when the EV battery is being used while the vehicle is stationary.
The EV battery may be in use to charge the 12V auxiliary battery or
when charge management is set to control the climate setting and the heater or air conditioner is turned on.
- Immediate charging
Lamp status Details To override any charge scheduling that has previously been set, you can press the scheduled charging deactivation button. Scheduled charging will be deactivated allowing you to charge immediately.
Charging Connector Lock
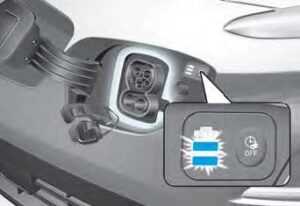
Charging Connector AUTO/ LOCK Mode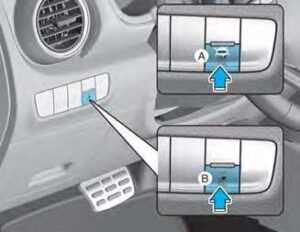
[A] : Auto mode, [B] : Lock mode
You can change the setting that locks the charging connector to the charging port on the vehicle. Change the mode using the Charging AUTO / LOCK button located on the left of the driver-side dash panel. Press the button to change between AUTO mode and LOCK mode.
Information
The charging inlet is locked during the DC charge regardless of AUTO/ LOCK mode. After charging is complete the locked charging inlet is unlocked.
When the charging connector is locked
- LOCK mode (button indicator off) : The connector locks when the charging connector is plugged into the charging port. The connector is locked until all doors are unlocked by the driver. This mode can be used to prevent charging cable theft.
- If the charge connector is not disconnected within 15 seconds after unlocking all doors, the connector will be automatically locked again.
- The charge connector will automatically relock when all the doors of the vehicle are locked.
- AUTO mode (button indicator on) : The connector locks when charging starts. The connector unlocks when charging is complete. This mode can be used when charging in a public charging station.
Scheduled Charging
- You can set up a charging schedule for your vehicle using the Audio or Navigation screen or Blue Link application. Refer to the Multimedia manual or the Blue Link manual for detailed information about setting scheduled charging.
- Scheduled charging can only be done when using a Level 2 AC charging station or the Level 1 AC charger with the Hyundai-supplied charging power cord.
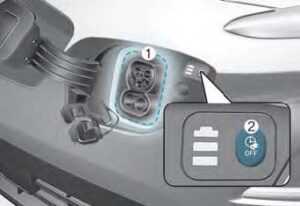
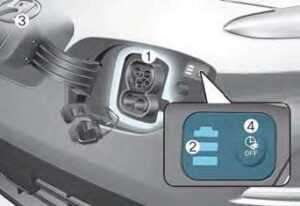
- When scheduled charging has been set and the charging cable is connected, the indicator lamp blinks green (1) for 3 minutes, indicating that scheduled charging is enabled.
- If immediate charging is required, use the audio/infotainment screen menus to deactivate the scheduled charge setting, or press the scheduled charging deactivation button (2) for 3 seconds.
Precautions for Charging Electric Vehicle
Charging Precautions
The actual charger image and charging method may vary in accordance with the charger manufacturer.
WARNING
- Electromagnetic waves that are generated from the charger can seriously impact medical electric devices such as implantable cardiac pacemakers.
When using medical electric devices such as an implantable cardiac pacemaker, make sure to ask the medical team and manufacturer whether charging your electric vehicle will impact the operation of the medical electric devices such as an implantable cardiac pacemaker. - Inspect the charging cable connector for any signs of water or excess dust or dirt. Connecting the cable when there is water or dirt on the connector may initiate a short circuit and cause a fire or electric shock.
WARNING
- Use caution not to touch the charging connector or the charging port when connecting the cable from the charger to the charging port on the vehicle.
- Comply with the following in order to prevent electrical shock when charging:
- Use caution when connecting the charger to the charging port when it is raining or snowing.
- Use caution when there are adverse weather conditions such as lightning.
- Use caution when the charging connector or the charging plug is wet.
- Do not touch the charging connector and charging plug with your hands wet, or do not stand in water or snow while connecting the charging cable.
WARNING
- Immediately stop charging when you find abnormal symptoms (odor, smoke).
- When connecting or removing the charging cable, make sure to hold the charging connector handle and charging plug.
If you pull the cable itself (without using the handle), the internal wires may be disconnected or get damaged. This may lead to electric shock or fire.
CAUTION
- Kepp the charging connector and charging plug in clean and dry condition. Be sure to keep the charging cable in a condition where there is no water or moisture.
- Before charging the battery, turn the vehicle OFF.
- When the vehicle is switched OFF while charging, the cooling fan inside the motor compartment may automatically operate. Do not touch the cooling fan while charging.
Charging Electric Vehicle (AC Charge)
AC Charge

The actual charger image and charging method may vary in accordance with the charger manufacturer.
How to Connect AC Charger
- Depress the brake pedal and apply the electronic parking brake.
- Shift to P (Park) and turn OFF the vehicle using the POWER button.
Information
If charging is initiated without the gear in P (Park), charging will start only after the gear is automatically shifted to P (Park).

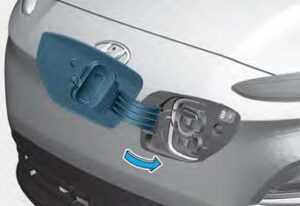
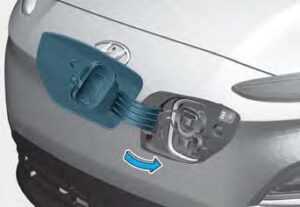
- Unlock the vehicle before opening the charging door. From the outside the vehicle, push on the charging door in the area indicated by the arrow to open the door.
Information
If you cannot open the charging door due to freezing weather, tap lightly or remove any ice near the charging door. Do not try to forcibly open the charging door.

- Remove the charging port dust cover
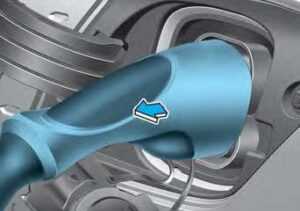
- Inspect the charging port to make sure it is free from any dust or debris. Hold the charging connector handle firmly and insert the connector into the
- charging port all the way. If the connector is not completely inserted into the charging port, arcing may occur. This may cause a fire.
Information
Charging connector AUTO/LOCK mode
The charging connector is locked in the inlet at a different period according to which mode is selected.- LOCK mode: The connector locks
- AUTO mode: The connector locks when charging starts.
For more details, refer to “Charging Connector AUTO/ LOCK Mode” in this chapter.

- Once the vehicle is connected, confirm that charging has been initiated from the EV charging station display screen.
- Check if the charging indicator light ( ) of the high voltage battery
in the instrument cluster is turned ON. Charging is not active when the charging indicator light ( ) is OFF. If the charging indicator light is OFF, it may be necessary to disconnect the charging connector from the vehicle and repeat the connection process. Refer to the charging station display screen for more information.
Information- During AC charging, the radio reception may be bad.
- During charging, the gear cannot be shifted from P (Park) to any other gear.
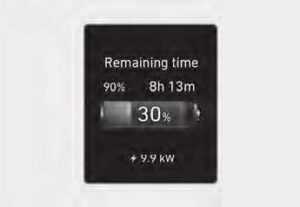
- After charging has started, the estimated charging time is displayed on the instrument cluster for about 1 minute.
If you open the driver seat door while charging, the estimated charging time is also displayed on the instrument cluster for about 1 minute. When scheduled charging or scheduled
air conditioner/heater is set, the estimated charging time is displayed as “–” .
Information
Depending on the condition and durability of the high-voltage battery, charger specifications, and ambient temperature, the time required for charging the battery may vary.
Checking Charging Status
When charging the high-voltage battery, the charge level can be checked from outside the vehicle.
| Lamp status |
Details |
|
| Before charging (illuminate) | While charging (blink) | |
|
|
High voltage battery level very low |
| yellow | yellow | |
|
|
High voltage battery level low |
| green | green | |
|
|
High voltage battery level middle |
| green | green | |
|
|
High voltage battery level high |
| green | green | |
How to Disconnect AC Charger

- Confirm that charging has stopped on the EV charging station display screen.
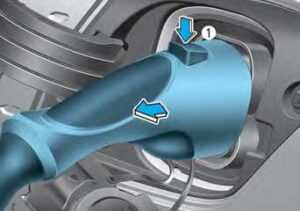
- Hold the charging connector handle and pull it while pressing the release button (1).
Information
To prevent charging cable theft,
the charging connector cannot be disconnected from the charging port when the doors are locked. Unlock all doors to disconnect the charging connector from the charging port.
However, if the vehicle is in the charging connector AUTO mode, the charging connector automatically unlocks from the charging port when charging is completed.
For more details, refer to “Charging Connector AUTO/LOCK Mode” in this chapter.
- Make sure to re-install the charging port dust cover(s) before closing the charging door.
- The charging door must be fully closed before driving the vehicle.
Unlock Charging Connector in the Emergency
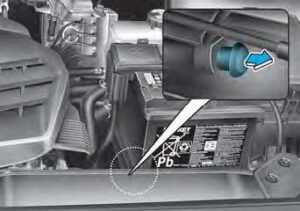
If the charging connector does not disconnect from the charging inlet
due to battery discharge and failure of electric wires, open the hood and slightly pull the emergency cable. The charging connector will be disconnected from the charging inlet.
2023 Hyundai Sonata Specs, Price, Features, Milage (Brochure)
DC Charge

DC fast charging (also known as Level
3 charging) provides high-power DC current directly to the EV battery. DC charging stations are capable of charging the EV battery to 80% in less than 75 minutes under normal conditions.
While DC charging is very fast compared to AC charging, prolonged and continuous use of DC fast charging may reduce the long term life of the
EV battery. Usage of a DC fast charger should be minimized when possible in order to help prolong the life of the EV battery.
Actual charger image and charging method may vary by the charger manufacturer.
Information
If you use a DC charger when the vehicle is already fully charged, some DC chargers will send out an error message. When the vehicle is fully charged, do not charge the vehicle.
How to Connect DC Charger
- Depress the brake pedal and apply the electronic parking brake.
- Shift to P (Park) and turn OFF the vehicle using the POWER button.
Information
If charging is initiated without the gear in P (Park), charging will start only after the gear is automatically shifted to P (Park).
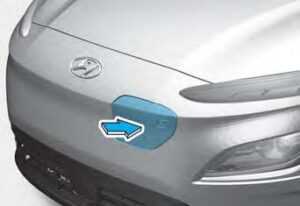
- Unlock the vehicle before opening the charging door. From the outside the vehicle, push on the charging door in the area indicated by the arrow to open the door.
Information
If you cannot open the charging door due to freezing weather, tap lightly or remove any ice near the charging door. Do not try to forcibly open the charging door.
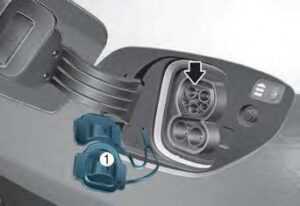
- Remove the charging port dust cover (1).
- Inspect the charging port to make sure it is free from any dust or debris.
- Hold the charging connector handle firmly and insert the connector into the charging port all the way.
If the connector is not completely inserted into the charging port, arcing may occur. This may cause a fire. Check if the charging indicator light ( ) of the high voltage battery
in the instrument cluster is turned ON. Charging is not active when the charging indicator light ( ) is OFF. If the charging indicator light is OFF, it may be necessary to disconnect the charging connector from the vehicle and repeat the connection process. Refer to the charging station display screen for more information.
During cold weather, DC charging may not be available to prevent high voltage battery degradation.
Information
To control the temperature of the high voltage battery while charging or when the battery temperature is high, the air conditioner is used to cool down the battery. It may generate noise or vibration from operation of the air conditioner compressor and cooling fan, but it is a normal condition when charging the high voltage battery. Also, the air conditioner’s performance may be degraded due to operation of the cooling system to charge the high voltage battery. This is a normal condition.
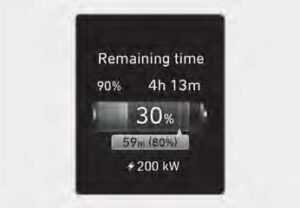
- After charging has started, the estimated charging time is displayed on the instrument cluster for about 1 minute.
If you open the driver seat door while charging, the estimated charging time is also displayed on the instrument cluster for about 1 minute.
Information
Depending on the condition and durability of the high-voltage battery, charger specifications, and ambient temperature, the time required for charging the battery may vary.
Checking Charging Status

When charging the high voltage battery, the charge level can be checked from outside the vehicle.
| Lamp status |
Details |
|
| Before charging (illuminate) | While charging (blink) | |
|
|
High voltage battery level very low |
| yellow | yellow | |
|
|
High voltage battery level low |
| green | green | |
|
|
High voltage battery level middle |
| green | green | |
|
|
High voltage battery level high |
| green | green | |
How to Disconnect DC Charger
- Refer to the instructions on the on-screen display of the DC charging station before disconnecting the charging connector from the vehicle. Once charging is stopped, remove the charging connector.

- Make sure to re-install the charging port dust cover(s) before closing the charging door.
- The charging door must be fully closed before driving the vehicle.
Portable Charge
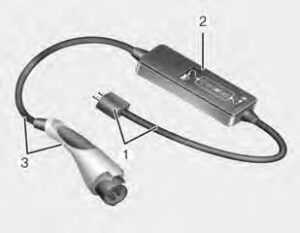
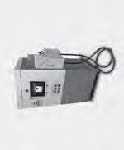
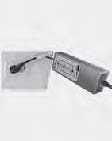
- Code and Plug (Code set)
- Control Box
- Charging Cable and Charging Connector
A portable charger that is used for Level 1 charging on a standard wall outlet is stored in the vehicle rear cargo area.
Level 1 charging can be used when Level 2 AC charging or Level 3 DC fast charging is not available.
How to set the charging rate of the portable charger
Charging an electric vehicle at home can stress the household electrical system more than a typical household appliance. Most modern residential electrical circuits are rated at 15 or 20 amps. The EV portable charger is rated to supply a 12A continuous load. To avoid tripping a fuse or breaker in the household, the portable charger charging rate can be reduced. Follow the steps below to set the charging rate of the portable charger.
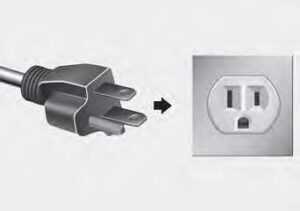
- Check the current output of the electrical outlet prior to connecting the portable charger in order to determine the permissible charging rate.
- Connect the plug to a household electric outlet.
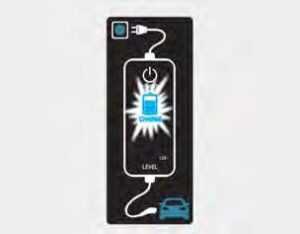
- Check the LED display on the portable charger controller. The indicator 8A, 10A or 12A will be displayed.
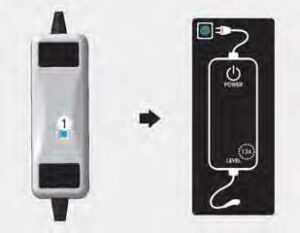
- The charging rate (amps) can be adjusted on the portable charger controller. Press the button (1) on the back of the controller.
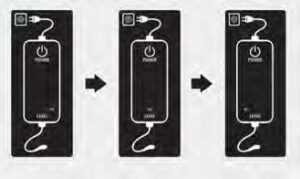
- The charging rate (12A, 10A, 8A) on the LED display changes each time you press the button. Refer to the table to adjust the charging rate based on the electrical outlet current output.
- When the charging rate is set, follow the procedure in the next section to connect your vehicle.
Example for setting the ICCB charge level
The example is only for reference and may vary according to the surrounding environment.
| Outlet current | ICCB charge level | Control box display window |
|
14-16A |
12A |
 |
|
13-12A |
10A |
|
|
11-10A |
8A |
CAUTION
Please make sure that charge level selection matches the capacity of your circuit breaker to avoid blown fuse.
How to connect portable charger (ICCB: In-Cable Control Box)

- Connect the plug to a household
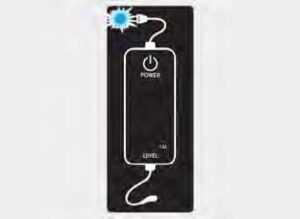
- Check if the power lamp (green) illuminates on the controller.
- Depress the brake pedal and apply the electronic parking brake.
- Shift to P (Park) and turn OFF the vehicle using the POWER button.
Information
If charging is initiated without the gear in P (Park), charging will start only after the gear is automatically shifted to P (Park).
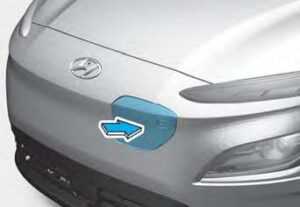
- Unlock the vehicle before opening the charging door. Push on the charging door in the area indicated by the arrow to open the door.
Information
If you cannot open the charging door due to freezing weather tap lightly or remove any ice near the charging door. Do not try to forcibly open the charging door.
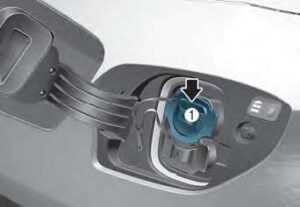
- Remove the charging port dust cover (1).
- Inspect the charging port to make sure it is free from any dust or debris.
- Hold the charging connector handle firmly and insert the connector into the charging port all the way.
If the connector is not completely inserted into the charging port, arcing may occur. This may cause a fire.
- Charging starts automatically (charging lamp blinks).
- Check if the charging indicator light ( ) of the high voltage battery
in the instrument cluster is turned ON. Charging is not active when the charging indicator light ( ) is OFF. If the charging indicator light is OFF, it may be necessary to disconnect the charging connector from the vehicle and repeat the connection process.
Information Note that the vehicle cannot be shifted out of Park (P) when the vehicle is charging.
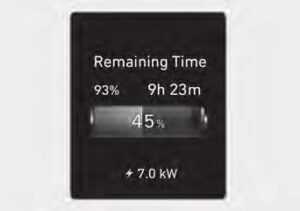
- After charging has started, the estimated charging time is displayed on the instrument cluster for about 1 minute.
If you open the driver seat door while charging, the estimated charging time is also displayed on the instrument cluster for about 1 minute. When scheduled charging or scheduled air conditioner/heater is set, the estimated charging time is displayed as “–” .
Information
Depending on the condition and durability of the high voltage battery, charger specifications, and ambient temperature, the time required for charging the battery may vary.
Checking Charging Status
 When charging the high voltage battery, the charge level can be checked from outside the vehicle.
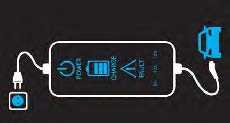
Charging Status Indicator Lamp for Portable Charger
| Control Box | Indicator | Details | |||||
|
|
PLUG |
(Green) | On: Power on Blink: Plug temperature sensor failure |
||||
| (Red) | On: Plug high temperature protection Blink : Plug high temperature warning | ||||||
| POWER | On: Power on | ||||||
| CHARGE | Blink: Charging in power saving mode, only the CHARGE indicator is illuminated. | ||||||
| FAULT | Blink: Charging interrupted | ||||||
|
CHARGE LEVEL |
Charging current 12 A | The charging current changes (3 level) whenever the button (1) is pressed for 1 sec with the charger plugged into an electrical outlet but not the vehicle. | * Back of the control box | ||||
| Charging current 10 A | |||||||
| Charging current 18 A | |||||||
|
VEHICLE |
(Green) | Charging connector plugged | |||||
| (Blue) | Charging | ||||||
| (Red) | Blink: Charging impossible | ||||||
| NO | Control Box | Status / Diagnosis / Countermeasure | NO | Control Box | Status / Diagnosis / Countermeasure |
| 1 |
Contact an authorized HYUNDAI dealer. |
2 |
|
||
| 3 |
|
4 |
Contact an authorized HYUNDAI dealer. |
How to Disconnect Portable Charger (ICCB: In-Cable Control Box)
- Hold the charging connector handle and pull it while pressing the release button (1).
 Information
To prevent charging cable theft, the charging connector cannot be disconnected from the charging port when the doors are locked. Unlock all doors to disconnect the charging connector from the charging port. However, if the vehicle is in the charging connector AUTO mode, the charging connector automatically unlocks from the charging port when charging is completed. For more details, refer to “Charging Connector AUTO/LOCK Mode” in this chapter.
- Make sure to re-install the charging port dust cover(s) before closing the charging door.
- The charging door must be fully closed before driving the vehicle.
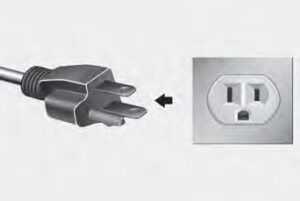
- Disconnect the plug from the household electric outlet. Do not pull the cable when disconnecting the plug.
- Re-apply the protective dust cover for the charging connector so that foreign material cannot get into the terminal.
- Carefully wrap the cord and store the portable charger inside the carrying case when you are finished charging.
Charging Connector Manual Release
If for some reason the charging connector fails to disconnect normally, the connector may be released manually using the Charging Connector Manual Release. Open the hood and slightly pull the manual release shown in the figure. The charging connector can then be disconnected.
Precautions When Using the Portable Charger
- Use the portable charger that is certified by HYUNDAI.
- Do not try to repair, disassemble, or adjust the portable charger.
- If an extension cord is used it must be rated for heavy duty of at least 15A. Keep as short as possible.
- Stop using immediately when failure occurs.
- Do not touch the plug and charging connector with wet hands.
- Do not touch the terminal part of the AC charging connector and the AC charging port on the vehicle.
- Do not let the controller to be in contact with water.
- Keep the normal charging connector or plug terminal free of foreign substances.
- Do not step on the cable or cord. Do not pull the cable or cord and do not twist or bend it.
- Do not drop the controller or place heavy objects on the equipment.
- Do not place an object that can generate high temperatures near the charger when charging.
- Stop using the portable charger immediately if the household electric outlet or any components become overheated or has a burning smell.
EV Charging – Troubleshooting
EV Charging Troubleshooting – Steps to Consider
If the vehicle fails to charge after being plugged in to a charging station or if plugged in when using the portable charger, check the following:
- Verify the charge mode is set to immediate. (for example, confirm that scheduled charging is turned OFF)
- Check the operation status of the charging station or the portable charger.
- Check to see if there are any warning messages in the LCD cluster. Refer to “LCD Display Messages” in this section.
- If there is an error message on the charging station display screen, there may be a problem with the charging station. Try to charge the vehicle with a different charging station.
- If the vehicle fails to charge with different charging station equipment, there may be a problem with the vehicle. Contact an authorized HYUNDAI dealer for inspection.
FAQs
What charge types are available for the Hyundai Kona-EV 2023?
Three different charge types are available for the Hyundai Kona-EV 2023: Level 1, Level 2, and DC Fast Charging.
What is Level 1 charging?
The slowest charging option, Level 1, can be completed using a regular 120-volt household outlet. Although it takes longer to fully charge the vehicle, it is convenient for charging over night.
What is Level 2 charging?
Level 2 charging uses a dedicated 240-volt charging station and is faster than Level 1 charging. It greatly cuts down on charging times and is appropriate for daily charging at home, work, or public charging stations.
What is DC Fast Charging?
The quickest charging method is DC Fast Charging, also referred to as Level 3 Charging. Direct current (DC) is used, and a few public charging stations offer it. It is perfect for short trips or quick top-ups.
How long does it take to charge the Hyundai Kona-EV with Level 1 charging?
Depending on the starting charge level and battery capacity, level 1 charging typically takes longer to fully charge the vehicle, usually overnight or around 20 to 24 hours.
How long does it take to charge the Hyundai Kona-EV with Level 2 charging?
Significantly shorter charging times result from level 2 charging. The Kona-EV can be fully charged in 6 to 8 hours, depending on the starting charge level and battery capacity.
How long does it take to charge the Hyundai Kona-EV with DC Fast Charging?
Rapid charging is possible with DC Fast Charging. Depending on the power output of the charging station and the state of the battery, it can charge the Kona-EV up to 80% in roughly 45 minutes.
What connector types does the Hyundai Kona-EV support?
The CCS (Combined Charging System) and CHAdeMO connector types are both supported by the Hyundai Kona-EV, depending on the model and region.
Where can I find Level 2 charging stations?
Level 2 charging stations are available in a variety of settings, including homes, workplaces, retail establishments, and public charging stations. As the use of electric vehicles increases, they are turning up more and more frequently.
Where can I find DC Fast Charging stations?
Common locations for DC Fast Charging stations include commercial districts, major thoroughfares, and a few public charging stations. For urgent top-ups and long-distance travel, they provide quick charging options.
Is it possible to install a Level 2 charging station at home?
You can set up a Level 2 charging station at home, yes. Professional installation and a dedicated 240-volt electrical circuit are needed. Hyundai offers advice and assistance with home charging solutions.
Can I use a Level 1 charging cable with a Level 2 charging station?
No, charging stations and cables for levels 1 and 2 cannot be used interchangeably. A dedicated 240-volt charging station is necessary for level 2 charging.
Are there smartphone apps or platforms that help locate nearby charging stations?
Yes, there are numerous mobile applications and online resources that can help users find nearby charging stations. They offer up-to-date details on the availability of charging stations, their costs, and the connector types that work with them.
Can I charge the Hyundai Kona-EV at any public charging station?
Yes, the majority of public charging stations with compatible charging connectors can be used to recharge the Hyundai Kona-EV. Before using a charging station, it’s critical to confirm the connector type and any other conditions.
What is the cost of charging the Hyundai Kona-EV at public charging stations?
Depending on the charging network, location, and speed, different public charging stations have different prices. While some charging stations are free, others may charge based on electricity usage or on a subscription basis.
Useful Link
View Full User Guide: Hyundai Kona-EV 2023 User Guide | Auto User Guide
Download Manuals: https://owners.hyundaiusa.com/us/en/resources/manuals-warranties.html
2023 Hyundai Sonata Specs, Price, Features, Milage (Brochure)