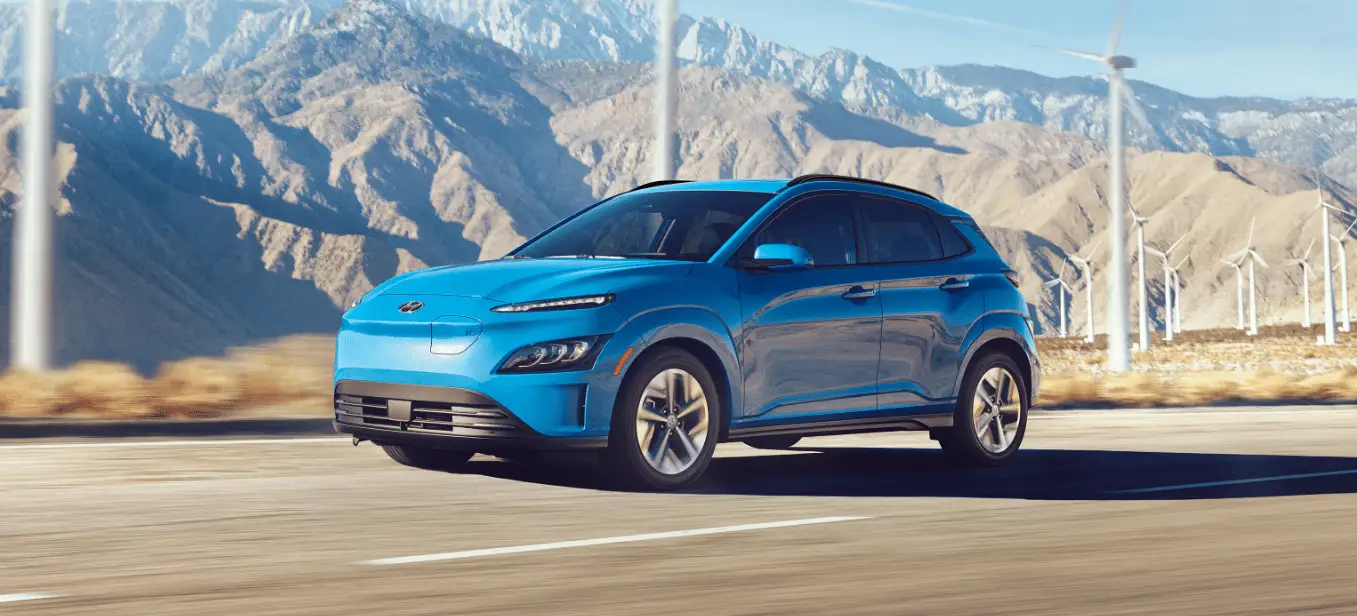
Hyundai Kona-EV 2023
The 2023 Hyundai Kona-EV User Guide redefines our understanding of mobility by providing access to a world of electrifying and sustainable driving experiences. This book is your reliable travel companion as we set off on this electric voyage together, introducing you to the state-of-the-art technology, environmentally sensitive design, and exceptional performance of the Kona-EV. Hyundai welcomes you to discover a new era of driving where sustainability meets excitement, all while offering priceless advice and instructions to make the most of your electric experience. Hyundai is dedicated to environmental stewardship and the joy of innovation.
2023 Hyundai Tuscon Specs, Price, Features, Milage (Brochure)
Hyundai Kona-EV 2023 Foreword and EV Mode User Guide
2023 Hyundai Kona-EV Foreword and EV Mode Instructions
Foreword
Congratulations, and thank you for choosing HYUNDAI. We are pleased to welcome you to the growing number of discerning people who drive HYUNDAIs. We are very proud of the advanced engineering and high-quality construction of each HYUNDAI we build. Your Owner’s Manual will introduce you to the features and operation of your new HYUNDAI. To become familiar with your new HYUNDAI, so that you can fully enjoy it, read this Owner’s Manual carefully before driving your new vehicle. This manual contains important safety information and instructions intended to familiarize you with your vehicle’s controls and safety features so you can safely operate your vehicle. This manual also contains information on maintenance designed to enhance safe operation of the vehicle. It is recommended that all service and maintenance on your car be performed by an authorized HYUNDAI dealer. HYUNDAI dealers are prepared to provide high-quality service, maintenance and any other assistance that may be required. This Owner’s Manual should be considered a permanent part of your vehicle and should be kept in the vehicle so you can refer to it at any time. The manual should stay with the vehicle if you sell it to provide the next owner with important operating, safety and maintenance information.
Hyundai Motor America
CAUTION
Severe vehicle damage may result from the use of poor-quality lubricants that do not meet HYUNDAI specifications. You must always use high quality lubricants that meet the specifications listed on Page 2-11 in the Vehicle Specifications section of the Owner’s Manual.
Copyright 2022 HYUNDAI Motor America. All rights reserved. No part of this publication may be reproduced, stored in any retrieval system or transmitted in any form or by any means without the prior written permission of HYUNDAI Motor America.
How to Use This Manual
We want to help you get the greatest possible driving pleasure from your vehicle. Your Owner’s Manual can assist you in many ways. We strongly recommend that you read the entire manual. In order to minimize the chance of death or injury, you must read the WARNING and CAUTION sections in the manual.
Illustrations complement the words in this manual to best explain how to enjoy your vehicle. By reading your manual, you will learn about features, important safety information, and driving tips under various road conditions.
The general layout of the manual is provided in the Table of Contents. Use the
index when looking for a specific area or subject; it has an alphabetical listing of all information in your manual.
Sections: This manual has nine chapters plus an index. Each section begins with a brief list of contents so you can tell at a glance if that section has the information you want.
Safety Messages
Your safety, and the safety of others, is very important. This Owner’s Manual provides you with many safety precautions and operating procedures. This information alerts you to potential hazards that may hurt you or others, as well as damage to your vehicle.
Safety messages found on vehicle labels and in this manual describe these hazards and what to do to avoid or reduce the risks.
Warnings and instructions contained in this manual are for your safety. Failure to follow safety warnings and instructions can lead to serious injury or death.
Throughout this manual DANGER, WARNING, CAUTION, NOTICE and the SAFETY ALERT SYMBOL will be used.
This is the safety alert symbol. It is used to alert you to potential physical injury hazards. Obey all safety messages that follow this symbol to avoid possible injury or death. The safety alert symbol precedes the signal words DANGER, WARNING, and CAUTION.
DANGER
DANGER indicates a hazardous situation that, if not avoided, will result in death or serious injury.
WARNING
WARNING indicates a hazardous situation that, if not avoided, could result in death or serious injury.
CAUTION
CAUTION indicates a hazardous situation that, if not avoided, could result in minor or moderate injury.
NOTICE
NOTICE indicates a situation that, if not avoided, could result in vehicle damage.
Vehicle Modifications
- This vehicle should not be modified. Modification of your vehicle could affect its performance, safety, or durability and may even violate governmental safety and emissions regulations.
In addition, damage or performance problems resulting from any modification may not be covered under warranty. - If you use unauthorized electronic devices, it may cause the vehicle to operate abnormally, wire damage, battery discharge, and fire.
For your safety, do not use unauthorized electronic devices.
Read all Instructions for the Foreword and EV Mode User Guide
Hyundai Kona-EV 2023 Charge Types for Electric Vehicle User Guide
2023 Hyundai Kona-EV Charge Types for Electric Vehicle
Charge Types for Electric Vehicles
Charging Information
- Level 2 AC Charging: You can charge your vehicle using a 240-volt AC electrical EV charger in your home or at a public Level 2 charging station.
- DC Fast Charging: You can charge your vehicle using a DC fast charger with a compatible charge cable at a public EV charging station. Make sure that the station has a compatible connector for your vehicle.
- Note that prolonged and continuous use of DC fast charging may reduce the long-term life of the EV battery. Usage of a DC fast charger should be minimized when possible in order to help prolong the life of the EV battery.
- Level 1 AC Charging: The Electric vehicle can be charged by using household electricity. The electrical outlet in your home must comply with regulations and can safely accommodate the Voltage / Current (Amps) / Power (Watts) ratings specified on the portable charge.
Charging Time Information
| Charging type | Economical battery type | Extended battery type | |
|
AC charge |
7.2 kW |
Takes approx. 6 hours at room temperature when charged to 100% | Takes approx. 9 hours 15 minutes at room temperature when charged to 100%. |
|
10.5 kW |
Takes approx. 4 hours 20 minutes at room temperature when charged to 100% | Takes approx. 6 hours 50 minutes at room temperature when charged to 100%. | |
|
DC charge |
100 kW charger |
Takes about 47 minutes at room temperature when charged to 80%. Can be charged to 100%. | Takes about 47 minutes at room temperature when charged to 80%. Can be charged to 100%. |
|
50 kW charger |
Takes about 48 minutes at room temperature when charged to 80%. Can be charged to 100%. | Takes about 64 minutes at room temperature when charged to 80%. Can be charged to 100%. | |
|
Portable charge |
Takes approx. 34 hours at room temperature when charged to 100%. | Takes approx. 56 hours at room temperature when charged to 100%. | |
Information
Depending on the condition and durability of the high-voltage battery, charger specifications, and ambient temperature, the time required for charging the high-voltage battery may vary.
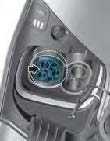
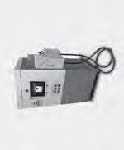
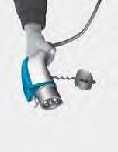
Charging Types
| Category | Charging inlet (Vehicle) | Charging connector | Charging outlet | How to charge |
|
AC Charge |
 |
 |
 |
Use 240-volt AC charging station installed at a home or a public charging station |
|
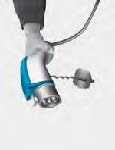
DC Charge |
|
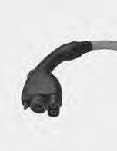 |
 |
Use a DC fast charger at a public charging station |
|
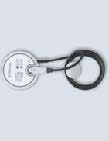
Portable Charge |
|
 |
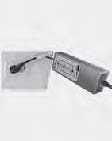 |
Use a standard household 110-volt outlet and the Hyundai charging cord that is equipped with your vehicle |
- Depending on the condition and durability of the high-voltage battery, charger specifications, and ambient temperature, the time required for charging the high-voltage battery may vary.
- The actual charger image and charging method may vary in accordance with the charger manufacturer.
Charge Indicator Lamp for Electric Vehicle
Charging Status
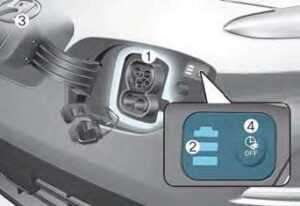
When charging the high-voltage battery, the charge level can be checked from outside the vehicle.
- Charging status
| Lamp status | Details |
 |
Charging door open (charging standby) |
| white ON | |
 |
Charging |
| green ON | |
 |
Scheduled charging set |
| green blink | |
 |
Charging error (charging system malfunction) |
| red blink | |
 |
Charging 12 V auxiliary battery or scheduled air conditioner/heater is operating |
| yellow ON |
- Charging status
Lamp status Details
Before charging (illuminate) While charging (blink) 
High voltage battery level very low
yellow yellow 
High voltage battery level low
green green 
High voltage battery level middle
green green 
High voltage battery level high
green green - High voltage indicator
Lamp status Details An LED in the front of the vehicle near the inner portion of the H-emblem indicates when the EV battery is being used while the vehicle is stationary.
The EV battery may be in use to charge the 12V auxiliary battery or
when charge management is set to control the climate setting and the heater or air conditioner is turned on.
- Immediate charging
Lamp status Details To override any charge scheduling that has previously been set, you can press the scheduled charging deactivation button. Scheduled charging will be deactivated allowing you to charge immediately.
Charging Connector Lock
Charging Connector AUTO/ LOCK Mode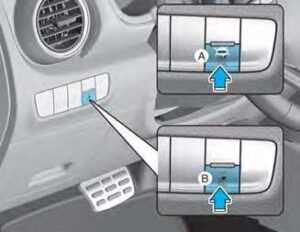
[A] : Auto mode, [B] : Lock mode
You can change the setting that locks the charging connector to the charging port on the vehicle. Change the mode using the Charging AUTO / LOCK button located on the left of the driver-side dash panel. Press the button to change between AUTO mode and LOCK mode.
Information
The charging inlet is locked during the DC charge regardless of AUTO/ LOCK mode. After charging is complete the locked charging inlet is unlocked.
Read all Instructions for Charge Types for Electric Vehicle User Guide
Hyundai Kona-EV 2023 Driving and Operating Information User Guide
2023 Hyundai Kona-EV Driving And Operating Information
Driving and Operating Information
How to Start the Vehicle
- Holding the smart key, sit in the driver’s seat.
- Fasten the seat belt before starting the vehicle.
- Make sure to engage the parking brake.
- Turn OFF all electrical devices.
- Make sure to depress and hold the brake pedal.
- While depressing the brake pedal, shift to P (Park).
- Depress and hold the brake pedal while pressing the Start/Stop button.
- When the “ ” indicator is ON, you can drive the vehicle.
When the “ ” indicator is OFF, you cannot drive the vehicle. Start the vehicle again. - Depress and hold the brake pedal and shift to the desired position.
Information
While the charging cable is connected, the gear cannot be shift from P (Park) to any other gear for safety reasons. - Release the parking brake and slowly
release the brake pedal. Check if the vehicle slowly moves forward, then depress the accelerator pedal.
How to Stop the Vehicle
- Hold down the brake pedal while the vehicle is parked.
- While depressing the brake pedal, shift to P (Park).
- While depressing the brake pedal, engage the parking brake.
- While depressing the brake pedal, press the Start/Stop button and turn off the vehicle.
- Check if the “ ” indicator is turned OFF on the instrument cluster.
When the “ ” indicator is ON and the gear is in a position other than P (Park), the driver can accidently depress the accelerator pedal, causing the vehicle to move unexpectedly.
Virtual Engine Sound System
The Virtual Engine Sound System generates engine sound for pedestrians to hear vehicle sound because there is no sound while the Electric Vehicle (EV) is operating.
- If the vehicle is in the ready ( ) mode and the gear is not in P (Park), the VESS will be operated.
- When the gear is shifted to R (Reverse), an additional warning sound will be heard.
CAUTION
- The vehicle is much quieter while driving than a conventional gasoline-powered vehicle. Be aware of your surroundings and always drive safely.
- Check if there is something behind the vehicle when driving in reverse. Pedestrians may not hear the sound of the vehicle.
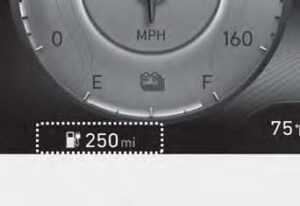
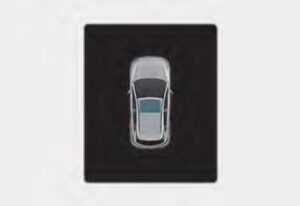
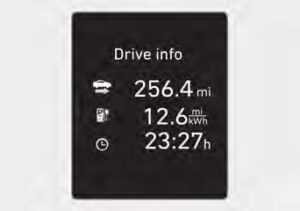
Distance to Empty
The location of where the vehicle range is displayed is different depending on which drive mode is active.
For more details, refer to “Drive Mode System” in chapter 5.
When the destination is not set
- On average, a vehicle can drive about 250 miles (400 km). Under certain circumstances where the air conditioner/heater is ON, the range is affected, resulting in a possible distance range from 210~250 miles (335~400 km). When using the heater during cold weather or driving at high speed, the high-voltage battery consumes a lot more electricity. This may reduce the range significantly.
- After “—” has been displayed, the vehicle can drive an additional 2~5 miles (3~8 km) depending on driving speed, heater/air conditioner, weather, driving style, and other factors.
- The range that is displayed on the instrument cluster after completing a recharge may vary significantly depending on previous driving patterns.
When the previous driving patterns include aggressive or high-speed driving (for example, predominantly highway miles, etc.), the estimated range on the next full charge will be lower than normal.
When the previous driving patterns are predominantly mild or economical (for example, city driving), the estimated range on the next full charge will be increased. - The calculated range may depend on many factors such as the charge amount of the high-voltage battery, weather, temperature, durability of the battery, geographical features, heater/air conditioning use and driving style. When the ambient temperature is low such as in winter, the actual driving distance may
be reduced due to battery cold temperature effects. - Natural degradation may occur with the high voltage battery depending on the number of years the vehicle is used. This may reduce the vehicle range.
Navigation – when a destination is set
When a destination is set using the vehicle navigation system (if equipped), the vehicle range may change. The vehicle range is recalculated using the destination route information. While driving, the range may vary based on traffic conditions, driving patterns and vehicle settings, etc.
Tips for Improving Range When Using the Climate Control System
- Operating the climate control system consumes electrical energy from
the EV battery. Continuous use may reduce the vehicle range.
When using the climate control system, it is recommended to set the control to 72°F (22°C) AUTO. The climate control system has been optimized to operate at this setting for maximum comfort and efficiency. - When possible, use the DRIVER ONLY feature on the climate control system. This will discontinue airflow to the passenger side and reduce climate control power consumption.
Tips for Improving Range While Driving
- Depress and hold the accelerator pedal to maintain speed and drive economically.
- Gradually depress and release the accelerator pedal when accelerating or decelerating.
- Always maintain specified tire pressures.
- Do not use unnecessary electrical components while driving.
- Do not load unnecessary items in the vehicle.
- Do not mount parts that may increase air resistance.
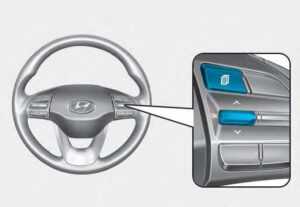
- Set regen to a higher level 1-2 using the steering wheel paddles.
Power/Charge Gauge

Read all Instructions for Driving and Operating Information User Guide
Hyundai Kona-EV 2023 Vehicle Information User Guide
2023 Hyundai Kona-EV Introduction and Your Vehicle at a Glance
Exterior overview
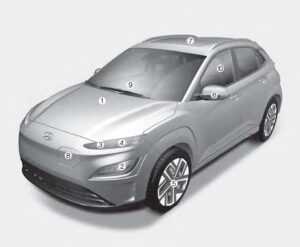
The actual shape may differ from the illustration.
- Hood
- Headlamp
- DRL (Daytime Running Light)
- Turn signal lamp
- Tires and wheels
- Outside rearview mirror
- Sunroof
- Charging door
- Front windshield wiper blades.
- Windows
Exterior overview
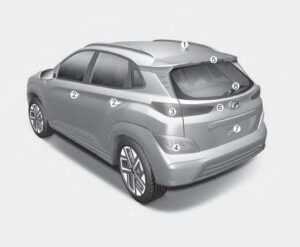
The actual shape may differ from the illustration.
- Antenna
- Doors
- Rear combination lamp
- Turn signal lamp, Back-up lamp
- High-mounted stop lamp
- Liftgate
- Rear view camera
- Rear window wiper blades
Interior Overview (I)
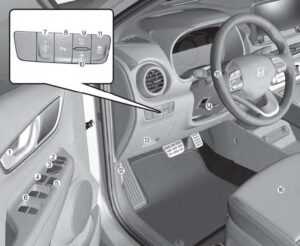
The actual shape may differ from the illustration
- Door lock/unlock button
- Outside rearview mirror folding switch
- The outside rearview mirror control switch
- Central door lock switch
- Power window lock switch
- Power window switches
- Instrument panel illumination control switch
- Parking Safety button
- Head-up display button
- AUTO/LOCK mode selection button
- ESC OFF button
- Hood release lever
- Fuse box
- Steering wheel tilt/telescope lever
- Steering wheel
- Seat
Interior Overview (II)
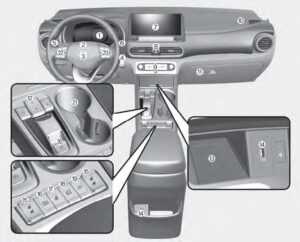
The actual shape may differ from the illustration.
- Instrument cluster
- Horn6
- Driver’s front airbag
- START/STOP button
- Light control/Turn signals
- Wiper/Washer8
- Infotainment system
- Hazard warning flasher
- Automatic climate control system
- Passenger’s front airbag
- Glove box
- Reduction gear (shift button)
- Wireless cellular phone charging system
- USB and iPod® port
- Seat warmer/Air ventilation seat
- Drive mode button
- Heated steering wheel
- Auto hold
- Parking/View button
- EPB (Electronic Parking brake)
- Cup holder
- Steering wheel audio controls/ Bluetooth® wireless technology hands-free controls
- Driving Assist button
Read all Instructions for Vehicle Information User Guide
Hyundai Kona-EV 2023 Safety Precautions, Seats, and Seat Belts User Guide
2023 Hyundai Kona-EV Safety Precautions | Seats and Seat Belts
IMPORTANT SAFETY PRECAUTIONS
You will find many safety precautions and recommendations throughout this section, and throughout this manual. The safety precautions in this section are among the most important.
Always Wear Your Seat Belt
A seat belt is your best protection in all types of accidents. Airbags are designed to supplement seat belts, not replace them. So even though your vehicle is equipped with airbags, ALWAYS make sure you and your passengers wear your seat belts and wear them properly.
Restrain All Children
All children under age 13 should ride in your vehicle properly restrained in the rear seat, not the front seat. Infants and small children should be restrained in an appropriate Child Restraint System. Larger children should use a booster seat with the lap/shoulder belt until they can use the seat belt properly without a booster seat.
Air Bag Hazards
While airbags can save lives, they can also cause serious or fatal injuries to occupants who sit too close to them, or who are not properly restrained. Infants, young children, and young adults are at the greatest risk of being injured by an inflating airbag. Follow all instructions and warnings in this manual.
Driver Distraction
Driver distraction presents a serious and potentially deadly danger, especially for inexperienced drivers. Safety should be the first concern when behind the wheel and drivers need to be aware of the wide array of potential distractions, such as drowsiness, reaching for objects, eating, personal grooming, other passengers, and using cellular phones.
Drivers can become distracted when they take their eyes and attention off the road or their hands off the wheel to focus on activities other than driving. To reduce your risk of distraction and an accident:
- ALWAYS set up your mobile devices (for example, MP3 players, phones, navigation units, etc.) when your vehicle is parked or safely stopped.
- ONLY use your mobile device when allowed by laws and conditions permit safe use. NEVER text or email while driving. Most states have laws prohibiting drivers from texting. Some states and cities also prohibit drivers from using handheld phones.
- NEVER let the use of a mobile device distract you from driving. You have a responsibility to your passengers and others on the road to always drive safely, with your hands on the wheel as well as your eyes and attention on the road.
Control Your Speed
Excessive speed is a major factor in crash injuries and deaths. Generally, the higher the speed, the greater the risk, but serious injuries can also occur at lower speeds. Never drive faster than is safe for current conditions, regardless of the maximum speed posted.
Keep Your Vehicle In Safe Condition
Having a tire blowout or a mechanical failure can be extremely hazardous. To reduce the possibility of such problems, check your tire pressures and condition frequently, and perform all regularly scheduled maintenance.
SEATS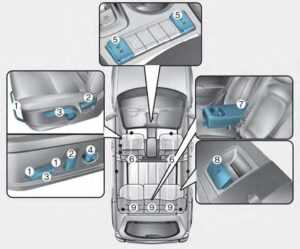 [A] : Front seat, [B] : Rear seat
Front seat
- Forward and backward
- Seatback angle
- Seat cushion height*
- Lumbar support (Driver’s seat)*
- Seat warmer*/Air ventilation seat*
- Head Restraint
Rear seat - Armrest*
- Seatback folding
- Head Restraint
* : if equipped
Safety Precautions
Adjusting the seats so that you are sitting in a safe, comfortable position plays an important role in driver and passenger safety, together with seat belts and airbags, in an accident.
WARNING
Do not use a cushion that reduces friction between the seat and the passenger. The passenger’s hips may slide under the lap portion of the seat belt during an accident or a sudden stop.
Serious or fatal internal injuries could result because the seat belt cannot operate properly.
Read all Instructions for Safety Precautions, Seats, and Seat Belts User Guide
Hyundai Kona-EV 2023 Child Restraint System (CRS) User Guide
2023 Hyundai Kona-EV Child Restraint System (CRS)
Child Restraint System (CRS)
Children Always In The Rear
WARNING
Always properly restrain children in the vehicle. Children of all ages are safer when restrained in the rear seat. A child riding in the front passenger seat can be forcefully struck by an inflating air bag resulting in SERIOUS INJURY or DEATH.
Children under age 13 should always ride in the rear seats and must always be properly restrained to minimize the risk of injury in an accident, sudden stop or sudden maneuver.
According to accident statistics, children are safer when properly restrained in the rear seats than in the front seat. Even with airbags, children can be seriously injured or killed. Children too large for a Child Restraint System must use the seat belts provided. All 50 states have child restraint laws that require children to travel in approved Child Restraint Systems.
The laws governing the age or height/weight restrictions at which seat belts can be used instead of the Child Restraint System differs among states, so you should be aware of the specific requirements in your country, and where you are traveling. Child Restraint Systems must be properly placed and installed in the rear seat. You must use a commercially available Child Restraint System that meets the requirements of the Federal Motor Vehicle Safety Standards (FMVSS 213).
Child Restraint Systems are generally designed to be secured in a vehicle seat by lap belt portion of a lap/shoulder belt, or by a LATCH system in the rear seats of the vehicle.
Child Restraint System (CRS)
Infants and younger children must be restrained in an appropriate rearward-facing or forward-facing CRS that has first been properly secured to the seat of the vehicle. Read and comply with the instructions for installation and use provided by the manufacturer of the Child Restraint System.
WARNING
An improperly secured child restraint can increase the risk of SERIOUS INJURY or DEATH in an accident. Always take the following precautions when using a Child Restraint System:
- NEVER install a child or infant restraint in the front passenger’s seat.
- Always properly secure the child restraint to a rear seat of the vehicle.
- Always follow the child restraint system manufacturer’s instructions for installation and use.
- Always properly restrain your child in the child restraint.
- If the vehicle head restraint prevents proper installation of a child seat (as described in the child restraint system manual), the head restraint of the respective seating position shall be readjusted or entirely removed.
- Do not use an infant carrier or a child safety seat that “hooks” over a seatback, it may not provide adequate protection in an accident.
- After an accident, have an authorized HYUNDAI dealer check the child restraint system, seat belts, tether anchors and lower anchors.
Selecting a Child Restraint System (CRS)
When selecting a Child Restraint System for your child, always:
- Make sure the Child Restraint System has a label certifying that it meets applicable Federal Motor Vehicle Safety Standards (FMVSS 213).
- Select a Child Restraint System based on your child’s height and weight. The required label or the instructions for use typically provide this information.
- Select a Child Restraint System that fits the vehicle seating position where it will be used.
- Read and comply with the warnings and instructions for installation and use provided with the Child Restraint System.
Child Restraint System types
There are three main types of Child Restraint Systems: rearward-facing, forward-facing, and booster Child Restraint Systems. They are classified according to the child’s age, height, and weight.
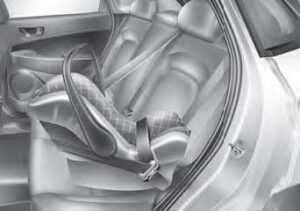
Rearward-facing Child Restraint System
A rearward-facing Child Restraint System provides restraint with the seating surface against the back of the child. The harness system holds the child in place, and in an accident, acts to keep the child positioned in the Child Restraint System and reduce the stress to the fragile neck and spinal cord.
All children under the age of one year must always ride in a rearward-facing Child Restraint System. Convertible and 3-in-1 Child Restraint Systems typically have higher height and weight limits for the rearward-facing position, allowing you to keep your child rearward-facing for a longer period of time.
Keep using Child Restraint Systems in the rearward-facing position as long as children fit within the height and weight limits allowed by the Child Restraint System’s manufacturer.
Continue using Child Restraint Systems in the rearward-facing position as long as children fit within the height and weight limits allowed by the Child Restraint System’s manufacturer. It’s the best way to keep them safe. Once your child has outgrown the rearward-facing Child Restraint System, your child is ready for a forward-facing Child Restraint System with a harness.
WARNING
NEVER install a child or infant restraint in the front passenger’s seat.
Placing a rearward-facing child restraint in the front seat can result in SERIOUS INJURY or DEATH if the child restraint is struck by an inflating air bag.
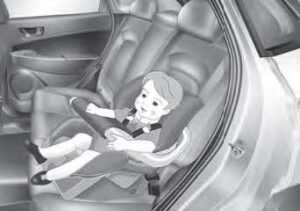
Forward-facing Child Restraint System
A forward-facing Child Restraint System provides restraint for the child’s body with a harness. Keep children in a forward-facing Child Restraint System with a harness until they reach the top height or weight limit allowed by your Child Restraint System’s manufacturer.
Once your child outgrows the forward-facing Child Restraint System, your child is ready for a booster seat.
Booster seats
A booster seat is a Child Restraint System designed to improve the fit of the vehicle’s seat belt system. A booster seat positions the seat belt so that it fits properly over the stronger parts of your child’s body. Keep your children in booster seats until they are big enough to fit in a seat belt properly.
For a seat belt to fit properly, the lap belt must lie comfortably across the upper thighs, not the stomach. The shoulder belt should lie comfortably across the shoulder and chest and not across the neck or face. Children under age 13 must always be properly restrained to minimize the risk of injury in an accident, sudden stop or sudden maneuver.
Read all instructions for Child Restraint System (CRS) User Guide
Hyundai Kona-EV 2023 Air Bag – Supplemental Restraint System User Guide
2023 Hyundai Kona-EV Air Bag Restraint System | How To Use
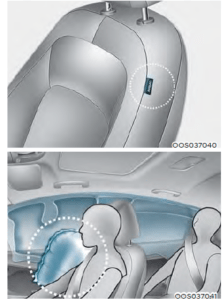
Air Bag – Supplemental Restraint System
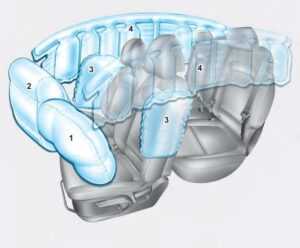
The actual airbags in the vehicle may differ from the illustration.
- Driver’s front airbag
- Passenger’s front airbag
- Side airbag*
- Curtain air bag*
*: if equipped
This vehicle is equipped with a Supplemental Air Bag System for the driver’s seat and front passenger’s seats.
The front airbags are designed to supplement the three-point seat belts. For these airbags to provide protection, the seat belts must be worn at all times when driving.
You can be severely injured or killed in an accident if you are not wearing a seat belt. Airbags are designed to supplement seat belts but do not replace them. Also, airbags are not designed to deploy in every collision. In some accidents, seat belts are the only restraint protecting you.
WARNING
AIRBAG SAFETY PRECAUTIONS
ALWAYS use seat belts and Child Restraint Systems – every trip, every time, everyone! Even with airbags, you can be seriously injured or killed in a collision if you are improperly belted or not wearing your seat belt when the airbag inflates.
NEVER place a child in any Child Restraint System or booster seat in the front passenger seat, unless the air bag is deactivated. An inflating air bag could forcefully strike the infant or child causing serious or fatal injuries.
ABC – Always Buckle Children under age 13 in the back seat. It is the safest place for children of any age to ride. If a child age 13 or older must be seated in the front seat, he or she must be properly belted and the seat should be moved as far back as possible.
All occupants should sit upright with the seatback in an upright position, centered on the seat cushion with their seat belt on, legs comfortably extended and their feet on the floor until the vehicle is parked and the vehicle is turned off. If an occupant is out of position during an accident, the rapidly deploying air bag may forcefully contact the occupant causing serious or fatal injuries.
You and your passengers should never sit or lean unnecessarily close to the airbags or lean against the door or center console. Move your seat as far back as possible from front airbags, while still maintaining control of the vehicle. The U.S.
National Highway Traffic Safety Administration
(NHTSA) recommends that drivers allow at least 10 in. (25 cm) between the center of the steering wheel and the chest.
Where are the Air Bags?
Driver’s and passenger’s front airbag
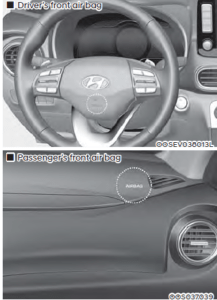
Your vehicle is equipped with a Supplemental Restraint System (SRS) and lap/shoulder belts at both the driver and passenger seating positions.
The SRS consists of airbags that are located in the center of the steering wheel, in the driver’s side lower crash pad below the steering wheel and in the passenger’s side front panel pad above the glove box. The airbags are labeled with the letters “AIR BAG” embossed on the pad covers.
The purpose of the SRS is to provide the vehicle’s driver and front passengers with additional protection than that offered by the seat belt system alone. The SRS uses sensors to gather information about the driver’s and front passenger’s seat belt usage and impact severity. The seat belt buckle sensors determine if the driver’s and front passenger’s seat belts are fastened. These sensors provide the ability to control the SRS deployment based on whether or not the seat belts are fastened, and how severe the impact is. The advanced SRS offers the ability to control airbag inflation within two levels. A first-stage level is provided for moderate severity impacts. A second stage level is provided for more severe impacts. According to the impact severity, and seat belt usage, the SRS Control Module (SRSCM) controls airbag inflation. Failure to properly wear seat belts can increase the risk or severity of injury in an accident.
WARNING
To reduce the risk of serious injury or death from inflating front airbags, take the following precautions:
- Seat belts must be worn at all times to help keep occupants positioned properly.
- Move your seat as far back as possible from the front airbags, while still maintaining control of the vehicle.
- Never lean against the door or center console.
- Do not allow the front passenger to place their feet or legs on the dashboard.
- No objects (such as crash pad cover, cellular phone holder, cup holder, air fresheners or stickers) should be placed over or near the airbag modules on the steering wheel, instrument panel, windshield glass, and the front passenger panel above the glove box. Such objects could cause harm if the vehicle is in a crash severe enough to cause the airbags to deploy.
- Do not attach any objects on the front windshield and inside mirror.
Side airbags (if equipped)
Your vehicle is equipped with a side airbag in each front seat. The purpose of the airbag is to provide the vehicle’s driver and the front passenger with additional protection than that offered by the seat belt alone.
The side airbags and front center airbags are designed to deploy during certain side-impact collisions, depending on the crash severity.
For vehicles equipped with a rollover sensor the front center airbag, side and/or curtain airbags and pre-tensioners on both sides of the vehicle may deploy if a rollover or possible rollover is detected. The side airbags and front center airbag are not designed to deploy in all side impact or rollover situations.
Read all Instructions for Air Bag – Supplemental Restraint System User Guide
Hyundai Kona-EV 2023 Instrument Cluster User Guide
2023 Hyundai Kona-EV Instrument Cluster Guidelines
Instrument Cluster
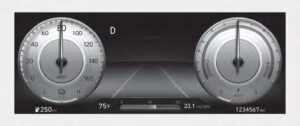
- Power/Charge gauge
- Speedometer
- Warning and indicator lights
- LCD display (including Trip computer)
- Battery SOC (State of Charge) gauge
Instrument Cluster Control
Instrument panel illumination
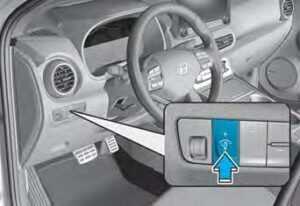
When the vehicle’s position lights or headlights are on, press the illumination control button to adjust the brightness of the instrument panel illumination.
When pressing the illumination control button, the interior switch illumination intensity is also adjusted.
WARNING
Never adjust the instrument cluster while driving. This could result in loss of control and lead to an accident that may cause death, serious injury, or vehicle damage.
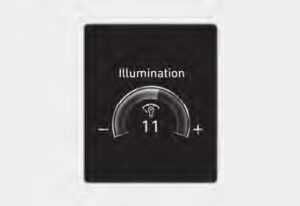
- The brightness of the instrument panel illumination is displayed.
- If the brightness reaches the maximum or minimum level, an alarm will sound.
Gauges and Meters
Speedometer
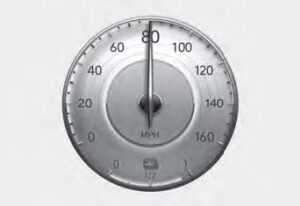
The speedometer indicates the speed of the vehicle and is calibrated in miles per hour (MPH).
Power/Charge gauge
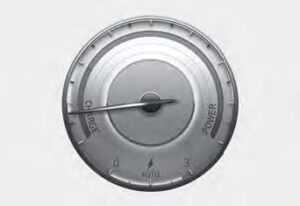
The Power/Charge gauge shows the energy consumption rate of the vehicle and the charge/discharge status of the regenerative brakes.
- POWER :
It shows the energy consumption rate of the vehicle when driving uphill or accelerating. The more electric energy is used, the higher the gauge level. - CHARGE :
It shows the charging status of the battery when it is being charged by the regenerative brakes (decelerating or driving on a downhill road). The more electric energy is charged, the lower the gauge level.
State of Charge (SOC) gauge for high voltage battery

The SOC gauge shows the charging status of the high-voltage battery.
“L (Low)” position on the indicator indicates that there is not enough energy in the high-voltage battery. “H (High)” position indicates that the driving battery is fully charged.
When driving on highways or motorways, make sure to check in advance if the driving battery is charged enough.
When there are 2 gauge bars (near the “L (Low)” area) on the SOC gauge, the warning light ( ) turns ON to alert you of the battery level.
When the warning light ( ) turns ON, the vehicle can drive an additional 12~18 miles (20~30 km) depending on the driving speed, heater/air conditioner, weather, driving style, and other factors. Charging is required.
NOTICE
When there are 1-2 gauge bars left for the high voltage battery, the vehicle speed is limited and then eventually the vehicle will turn OFF. Charge the vehicle immediately.
Outside Temperature Gauge 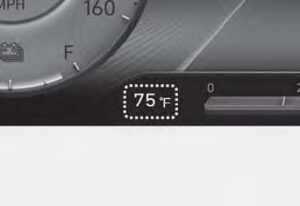
This gauge indicates the current outside air temperatures either in Celsius (°C) or Fahrenheit.
- Temperature range : -40°F ~ 140°F (-40°C ~ 60°C)
- The outside temperature on the display may not immediately change like a general thermometer not to distract the driver.
- The temperature unit (from °C to °F or from °F to °C) can be changed by:
- User Settings mode in the Cluster: You can change the temperature unit in the “Units
- Temperature unit” . Automatic climate control system: While pressing the OFF button, press the AUTO button for 3 seconds or more.
The temperature unit of the instrument cluster and climate control system will change at once.
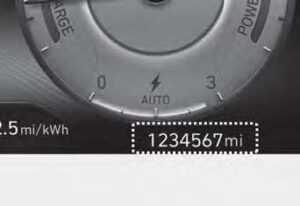
Odometer
Read all Instructions for Instrument Cluster User Guide
Hyundai Kona-EV 2023 LCD Display Messages User Guide
2023 Hyundai Kona-EV LCD Display Messages Guidelines
LCD DISPLAY MESSAGES
Shift to P
This warning message is displayed if you try to turn off the vehicle when the gear is not in the P (Park) position.
At this time, the START/STOP button changes to the ACC position (If you press the START/STOP button once more, it will turn to the ON position).
Low key battery
This warning message is displayed if the battery of the smart key is discharged while changing the START/STOP button to the OFF position.
Press the START/STOP button while turning the wheel
This warning message is displayed if the steering wheel does not unlock normally when the START/STOP button is pressed.
You should press the START/STOP button while turning the steering wheel right and left.
Check the steering wheel lock system
This warning message is displayed if the steering wheel does not lock normally while the START/STOP button changes to the OFF position.
Press the brake pedal to start the vehicle
This warning message is displayed if the START/STOP button changes to the ACC position twice by pressing the button repeatedly without depressing the brake pedal. You can start the vehicle by depressing the brake pedal.
Key not in the vehicle
This warning message is displayed if the smart key is not in the vehicle when you press the START/STOP button.
When attempting to start the vehicle, always have the smart key with you.
Key not detected
This warning message is displayed if the smart key is not detected when you press the START/STOP button.
Press the START/STOP button again
This message is displayed if you were unable to start the vehicle when the START/STOP button was pressed.
If this occurs, attempt to start the vehicle by pressing the START/STOP button again.
If the warning message appears each time you press the START/STOP button, have your vehicle inspected by an authorized Hyundai dealer.
Press the START/STOP button with key
This warning message is displayed if you press the START/STOP button while the warning message “Key not detected” is displayed.
At this time, the immobilizer indicator light blinks.
Check the BRAKE SWITCH fuse
This warning message is displayed if the brake switch fuse is disconnected.
You need to replace the fuse with a new one before starting the vehicle. If that is not possible, you can start the vehicle by pressing the START/STOP button for 10 seconds in the ACC position.
Shift to P to start the vehicle
This warning message is displayed if you try to start the vehicle without shifting to the P (Park) position.
Low washer fluid (if equipped)
This warning message is displayed if the washer fluid level in the reservoir is nearly empty.
Has the washer fluid reservoir been refilled?
12V battery discharging due to additional electrical devices
This warning message is displayed if the 12V battery discharge is detected due to use of unauthorized electrical/electronic devices. Some vehicle functions will not be able to use and the 12V battery may discharge. If the message continues to appear even though the external electrical/electronic device is removed, have your vehicle inspected by an authorized HYUNDAI dealer.
Door, Hood, and Liftgate open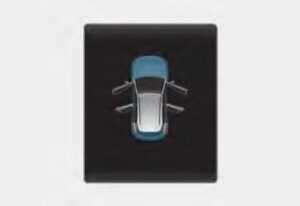
This warning is displayed indicating which door, or hood, or liftgate is open.
CAUTION
Before driving the vehicle, you should confirm that the door/hood/liftgate is fully closed. Also, check there is no door/hood/liftgate open warning light or message displayed on the instrument cluster.
Sunroof open (if equipped)
This warning is displayed if you turn off the vehicle when the sunroof is open.
Close the sunroof securely when leaving your vehicle.
Read all Instructions for LCD Display Messages User Guide
Hyundai Kona-EV 2023 LCD Display User Guide
2023 Hyundai Kona-EV LCD Display System Guidelines
LCD Display
LCD Display Control
The LCD display modes can be changed by using the control buttons.
| Switch | Function |
| MODE button for changing modes | |
| , | MOVE switch for changing items |
| OK | SELECT/RESET button for setting or resetting the selected item |
View Modes
| View modes | Symbol | Explanation |
| Driving Assist | |
This mode displays the state of :
– Lane Keeping Assist, Smart Cruise Control, Highway Driving Assist – Intelligent Speed Limit Warning For more information, refer to “Lane Keeping Assist (LKA)”, “Intelligent Speed Limit Warning (ISLW)”, “Driver Attention Warning (DAW)”, “Smart Cruise Control (SCC)”, “Highway Driving Assist (HDA)” in chapter 7. |
| Trip Computer | |
This mode displays driving information such as the tripmeter, electric energy economy, etc.
For more details, refer to “Trip Computer” in this chapter. |
| Turn By Turn (TBT) | |
This mode displays the state of the navigation. |
| User Settings (if equipped) | |
In this mode, you can change settings of the doors, lamps, etc. |
|
Warning |
|
This mode displays warning messages related to the broken lamps, etc.
This mode displays information related to the tire pressure (TPMS), the state of driving force distribution and the amount of remaining urea solution. |
The information provided may differ depending on which functions are applicable to your vehicle.
Trip computer mode
The trip computer mode displays information related to vehicle driving parameters including Energy consumption, trip meter information and vehicle speed.
For more information, refer to “Trip Computer” in this chapter.
Turn By Turn (TBT) mode
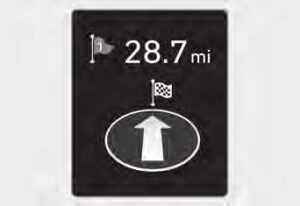
Turn-by-turn navigation, distance/time to destination information is displayed when Turn by Turn view is selected.
Driving Assist mode
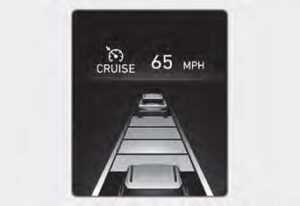
LKA/ISLW/DAW/SCC
This mode displays the state of Lane Keeping Assist, Intelligent Speed Limit Warning, Driver Attention Warning and Smart Cruise Control.
For more details, refer to each function information in chapter 7.
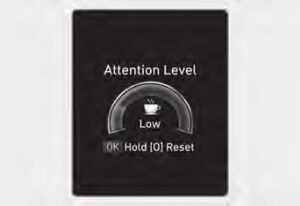 This mode displays the state of Driver Attention Warning.
For more details, refer to “Driver Attention Warning (DAW)” in chapter 7.
Master warning group
This warning light informs the driver of the following situations.
Read all Instructions for the LCD Display User Guide
Hyundai Kona-EV 2023 Accessing Your Vehicle User Guide
2023 Hyundai Kona-EV Accessing Your Vehicle Guidelines
ACCESSING YOUR VEHICLE
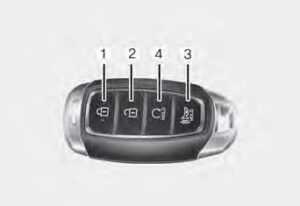 Your HYUNDAI uses a Smart Key, which you can use to lock or unlock doors (and liftgate) and start the vehicle.
- Door Lock
- Door Unlock
- Liftgate Unlock
- Panic
Locking your vehicle (Button type)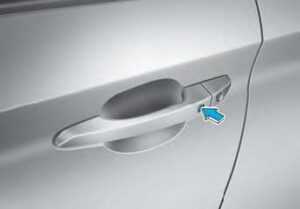 To lock your vehicle using the door handle button or the Smart Key:
- Close all doors, hood and liftgate.
- Either press the door handle button or press the Door Lock button (1) on the smart key.
- The hazard warning lights will blink and the chime will sound once.
- When the doors are locked, the indicator light on the central door lock/unlock switch will be illuminated.
Information
The door handle button will only operate when the smart key is within 28~40 inches (0.7~1 m) from the outside door handle.
Note that you cannot lock your vehicle using the door handle button if any of the following occur:
- The Smart Key is in the vehicle.
- The Start/Stop button is in ACC or ON position.
- Any of the doors are open except for the liftgate.
Locking your vehicle (Touch sensor type)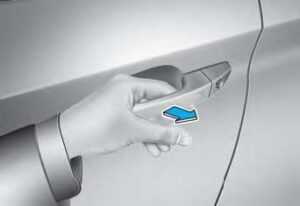
- Close all of the doors, the hood, and the liftgate.
- Make sure you have the smart key in your possession and touch either the touch sensor on the door handle (the engraved part) or press the Door Lock button (1) on the smart key within 1 second.
- The doors, hood, and trunk are locked.
The chime will sound once and the hazard warning lights will blink.
- The door handle button will only operate when the smart key is within 28~40 inches (0.7~1 m) from the outside door handle.
- Make sure the doors are locked by pulling the door handle.
- If you lock the door with the touch sensor on the door handle, the doors cannot be unlocked with the sensor within 3 seconds.
Even though you press the outside door handle button, the doors will not lock and the chime will sound for three seconds if any of the following occurs:
- The Smart Key is in the vehicle.
- The Start/Stop button is in the ACC or ON position.
- Any door except the liftgate is open.
CAUTION
When you leave your vehicle with the smart key, make sure to press the button on the front door handle or touch the touch sensor on the front door handle to lock the doors after close all of the doors, the hood and the liftgate. If you do not press the button or touch the touch sensor firmly, the doors might not be locked so please use caution.
WARNING
Do not leave the Smart Key in your vehicle with unsupervised children. Unattended children could press the Start/ Stop button and may operate power windows or other controls, or even make the vehicle move, which could result in serious injury or death.
Unlocking your vehicle (Button type) To unlock your vehicle:
- Make sure you have the smart key in your possession.
- Press either the button on the door handle or the Door Unlock button (2) on the smart key. The driver’s door will unlock and the hazard warning lights will blink two times.
- Two Press Unlock Feature
The priority for unlocking the driver door only, or unlocking all the doors with one press may be adjusted in the User Settings menu in the LCD cluster display.
The Two Press Unlock feature, when enabled, will require the user to press the door unlock button once for driver door only and twice for unlocking all the doors.
Select or Deselect the Two Press Unlock Feature in the User Settings menu in the LCD cluster display. The option can be found under the following menu:
USER SETTING DOOR TWO PRESS UNLOCK
The Two Press Unlock Feature can also be enabled or disabled by pressing the door lock and unlock buttons simultaneously on the Key FOB:
Press and hold both the DOOR LOCK button and the DOOR UNLOCK button simultaneously until the hazard warning lights blink.
This will enable or disable the Two Press Unlock feature. Repeat this procedure to enable/disable the mode again.
Information
- The door handle buttons will only operate when the smart key is within 28-40 inches (0.7~1m) from the outside door handle
- Either the driver or front passenger door can be opened with the door handle button when the smart key is within this range
- If you press the front passenger outside door handle with the smart key in your possession, all the doors will unlock
2023 Hyundai Tuscon Specs, Price, Features, Milage (Brochure)
Unlocking your vehicle (Touch sensor type, When the Two Press Unlock feature is off)
Read all Instructions for Accessing Your Vehicle User Guide
Hyundai Kona-EV 2023 Theft-alarm System and Steering Wheel User Guide
2023 Hyundai Kona-EV Theft-alarm System and Steering Wheel
Theft-alarm System
This system helps to protect your vehicle and valuables. The horn will sound and the hazard warning lights will blink continuously if any of the following occurs:
- A door is opened without using the smart key.
- The liftgate is opened without using the smart key.
- The hood is opened.
The alarm continues for 30 seconds, then the system resets. To turn off the alarm, unlock the doors with the smart key.
The Theft Alarm System automatically sets 30 seconds after you lock the doors and the liftgate. For the system to activate, you must lock the doors and the liftgate from outside the vehicle with the smart key or by pressing the button on the outside of the door handles with the smart key in your possession.
The hazard warning lights will blink and the chime will sound once to indicate the system is armed.
Once the security system is set, opening any door, the liftgate, or the hood without using the smart key will cause the alarm to activate.
The Theft Alarm System will not set if the hood, the liftgate, or any door is not fully closed. If the system will not set, check the hood, the liftgate, or the doors are fully closed.
Do not attempt to alter this system or add other devices to it.
Information
- Do not lock the doors until all passengers have left the vehicle. If the remaining passenger leaves the vehicle when the system is armed, the alarm will be activated.
- If the vehicle is not disarmed with the smart key, open the doors by using the mechanical key and start the vehicle (for smart key) and wait for 30 seconds.
- When the system is disarmed but a door or liftgate is not opened within 30 seconds, the system will be rearmed.
STEERING WHEEL
Motor Driven Power Steering (MDPS)
The system assists you with steering the vehicle. If the vehicle is off or if the power steering system becomes inoperative, the vehicle may still be steered, but it will require increased steering effort.Also, the steering effort becomes heavier as the vehicle’s speed increases and becomes lighter as the vehicle’s speed decreases for better control of the steering wheel. Should you notice any change in the effort required to steer during normal vehicle operation, have the system checked by an authorized HYUNDAI dealer.
NOTICE
- If the Motor Driven Power Steering System does not operate normally, the warning light will illuminate or blink on the instrument cluster. The steering wheel may become difficult to control or operate. Take your vehicle to an authorized HYUNDAI dealer to have the system checked as soon as possible.
- When an abnormality is detected in the electric power steering system, to prevent a deadly accident, the steering assist function will stop. At this time, the warning light turns on or blinks on the cluster. The steering wheel may become difficult to control or operate. Have your vehicle checked immediately, after moving the vehicle to a safe zone.
Information
The following symptoms may occur during normal vehicle operation:
The steering effort may be high immediately after placing the START/STOP button in the ON position.
This happens as the system performs the MDPS system diagnostics. When the diagnostics are completed, the steering wheel will return to its normal condition.
- When the battery voltage is low, you might have to put more steering effort. However, it is a temporary condition so it will return to normal condition after charging the battery.
- A click noise may be heard from the MDPS relay after the START/STOP button is placed in the ON or OFF position.
- Motor noise may be heard when the vehicle is at a stop or at a low driving speed.
- When you operate the steering wheel in low temperatures, abnormal noise may occur. If the temperature rises, the noise will disappear. This is a normal condition.
- When the vehicle is stationary, if you turn the steering wheel all the way to the left or right continuously, the steering wheel effort increases. This is not a system malfunction. As time passes, the steering wheel effort will return to its normal condition.
Tilt Steering/Telescopic Steering
WARNING
Never adjust the steering wheel while driving. You may lose steering control and cause severe personal injury, death or accidents.
Information
After adjustment, sometimes the lock-release lever may not lock the steering wheel.
It is not a malfunction. This occurs when two gears are not engaged correctly. In this case, adjust the steering wheel again and then lock the steering wheel.
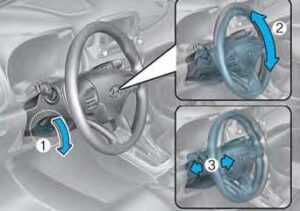 To change the steering wheel angle and height:
- Pull down the lock-release lever (1).
- Adjust the steering wheel to the desired angle (2) and height (3). Move the steering wheel, so it points toward your chest, not toward your face. Make sure you can see the instrument panel warning lights and gauges.
- Pull up the lock-release lever to lock the steering wheel in place.
Push the steering wheel both up and down to be certain it is locked in position.
CAUTION
While adjusting the steering wheel height, please do not push or pull it hard since the fixture can be damaged.
Heated Steering Wheel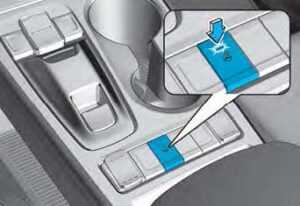
When the vehicle is ON, press the heated steering wheel button to warm the steering wheel.
The indicator on the button will illuminate.
To turn the heated steering wheel off, press the button again. The indicator on the button will turn off.
Information
The heated steering wheel will turn off automatically approximately 30 minutes after the heated steering wheel is turned on.
Read all Instructions for the Theft-alarm System and Steering Wheel User Guide
Hyundai Kona-EV 2023 Mirrors and Windows User Guide
2023 Hyundai Kona-EV Mirrors and Windows Installation Guide
Mirrors
Inside Rearview Mirror
Before you start driving, adjust the rearview mirror to the center on the view through the rear window.
WARNING
Make sure your line of sight is not obstructed. Do not place objects in the rear seat, cargo area, or behind the rear head restraints which could interfere with your vision through the rear window.
WARNING
To prevent serious injury during an accident or deployment of the airbag, do not modify the rearview mirror and do not install a wide mirror.
WARNING
NEVER adjust the mirror while driving. This may cause loss of vehicle control resulting in an accident.
NOTICE
When cleaning the mirror, use a paper towel or similar material dampened with glass cleaner. Do not spray glass cleaner directly on the mirror as that may cause the liquid cleaner to enter the mirror housing.
Day/night rearview mirror (if equipped)
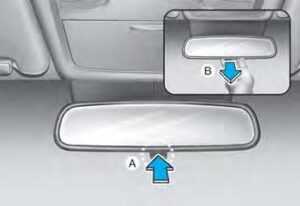
[A] : Day, [B] : Night
Make this adjustment before you start driving and while the day/night lever is in the day position. Pull the day/night lever towards you to reduce glare from the headlights of the vehicles behind you during night driving. Remember that you lose some rearview clarity in the night position.
Electrochromic mirror (ECM) with HomeLink® system, Blue Link®, and compass (if equipped)
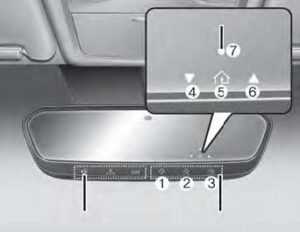
Your vehicle may be equipped with a Gentex Automatic-Dimming Mirror with a Z-Nav™ Electronic Compass Display and an Integrated HomeLink® Wireless Control System. During nighttime driving, this feature will automatically detect and reduce rearview mirror glare while the compass indicates the direction the vehicle is traveling. The HomeLink® Universal Transceiver allows you to activate your garage door(s), electric gate, home lighting, etc.
- HomeLink Channel 1
- HomeLink Channel 2
- HomeLink Channel 3
- Garage Door Opener Status Indicator: Closing or Closed
- HomeLink Operation Indicator
- Garage Door Opener Status Indicator: Opening or Opened
- HomeLink User Interface Indicator
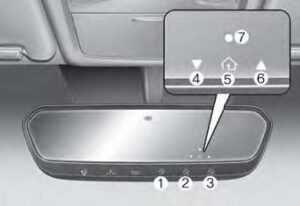
Automatic-Dimming Night Vision Safety™ (NVS®) Mirror (if equipped)
The NVS® Mirror automatically reduces glare by monitoring light levels in the front and the rear of the vehicle. Any object that obstructs either light sensor will degrade the automatic dimming control feature.
For more information regarding NVS® mirrors and other applications, please refer to the Gentex website: www.gentex.com
Your mirror will automatically dim
upon detecting glare from the vehicles traveling behind you.
The mirror defaults to the ON position each time the vehicle is started.
Z-Nav™ Compass Display (for Canada)
The NVS™ Mirror in your vehicle is also equipped with a Z-Nav™ Compass that shows the vehicle Compass heading in the Display Window using the 8 basic cardinal headings (N, NE, E, SE, etc.).
Integrated HomeLink® Wireless Control System
The HomeLink® Wireless Control System provides a convenient way to replace up to three hand-held radio-frequency transmitters used to activate compatible devices such as gate operators, garage door openers, entry door locks, security systems, and home lighting.
NOTICE
HomeLink® operates while the ignition switch is in the ACC or ON position for safety reasons. It is to prevent unintentional security problems from happening when the vehicle is parked outside the garage.
WARNING
Before programming HomeLink® to a garage door opener or gate operator, make sure people and objects are out of the way of the device to prevent potential harm or damage. Do not use the HomeLink® with any garage door opener that lacks the safety stop and reverse features required by U.S. federal safety standards (this includes any garage door opener model manufactured before April 1, 1982).
A garage door that cannot detect an object – signaling the door to stop and reverse – does not meet current U.S. federal safety standards. Using a garage door opener without these features increases the risk of serious injury or death.
For more information, contact HomeLink® at www.homelink.com, or call HomeLink customer support at 1-800-355-3515.
It is also recommended that a new battery be replaced in the handheld transmitter of the device being trained to HomeLink® for quicker training and accurate transmission of the radio frequency.
Programming HomeLink®
The following steps show how to program HomeLink. If you have any questions or are having difficulty programming your HomeLink buttons, refer to the HomeLink website or call the HomeLink customer support toll-free number. Do this, before going back to the dealer who sold you the car.
- Visit the HomeLink website at: www.homelink.com. Then at the top of the page, choose your vehicle make. Then watch the YouTube video, and/or access additional website information.
- If you choose to access the website via your cell phone, scan the QR code.
- Or, call HomeLink customer support at 1-800-355-3515 (Please have the vehicle make/model AND the opener device make/model readily available.)
Programming Preparation
- When programming a garage door opener, it is advised to park the vehicle outside of the garage.
- It is recommended that a new battery be placed in the handheld transmitter of the device being programmed to HomeLink for quicker training and accurate transmission of the radio-frequency signal.
- Place the ignition switch to the ACC (Accessory) position for programming of HomeLink.
Programming a New HomeLink®
Read all Instructions for Mirrors and Windows User Guide
Hyundai Kona-EV 2023 Sunroof User Guide
2023 Hyundai Kona-EV Sunroof Features Guidelines
Sunroof
If your vehicle is equipped with a sunroof, you can slide or tilt your sunroof with the sunroof control switch located on the overhead console.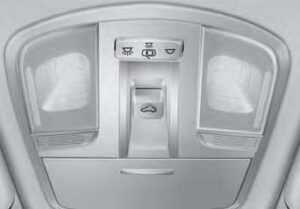
The sunroof can be operated for approximately 30 seconds after the Start/Stop button is in the ACC or OFF position.
The sunroof can be operated for approximately 30 seconds after the START/STOP button is removed or turned to the ACC or LOCK/OFF position.
However, if the front door is opened, the sunroof cannot be operated even within 30 seconds.
Information
- In cold and wet climates, the sunroof may not work properly due to freezing conditions.
- After the vehicle is washed or in a rainstorm, be sure to wipe off any water that is on the sunroof before operating it.
WARNING
- Adjust the sunroof or sunshade when your vehicle stops. This could result in loss of control and an accident that may cause death, serious injury, or property damage.
- Make sure heads, other body parts, or objects are out of the way before using the sunroof.
- Do not extend your head, arms, or body outside the sunroof while driving, to avoid serious injury.
- Do not leave the vehicle on and the key in your vehicle with unsupervised children.
- Unattended children could operate the sunroof, which could result in serious injury.
- Do not sit on the top of the vehicle. It may cause injuries or vehicle damage.
NOTICE
Do not continue to move the sunroof control lever after the sunroof is fully opened, closed, or tilted. Damage to the motor or system components could occur. Make sure the sunroof is closed fully when leaving your vehicle. If the sunroof is open, rain or snow may leak through the sunroof and wet the interior as well as allow theft.
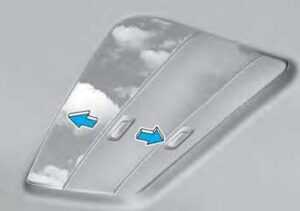
Sunroof Opening and Closing
 To open:
Press the sunroof control lever backward to the first detent position. Release the switch when you want the sunroof to stop.
To close:
Press the sunroof control lever forward to the first detent position. Release the switch when you want the sunroof to stop.
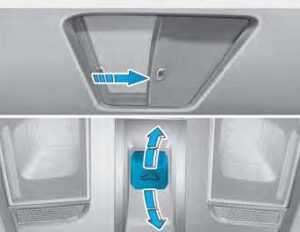
Sliding the Sunroof
Pressing the sunroof control lever backward or forward momentarily to the second detent position completely opens or closes the sunroof even when the switch is released. To stop the sunroof at the desired position while the sunroof is in operation, press the sunroof control lever backward or forward and release the switch.
Information
To reduce wind noise while driving, it is recommended that you drive with the sunroof slightly closed (stop the sunroof about 2.7 inch (7 cm) before the maximum slide open position).
Automatic reverse (if equipped)
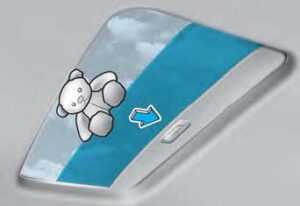 If the sunroof senses any obstacle while it is closing automatically, it will reverse direction then stop to allow the object to be cleared. The auto reverse function does not work if a small obstacle is between the sliding glass and the sunroof sash. You should always check that all passengers and objects are away from the sunroof before closing it.
WARNING
Small objects that can get caught between the sunroof glass and the front glass channel may not be detected by the automatic reverse system. In this case, the sunroof glass will not detect the object and will not reverse direction.
Tilting the Sunroof
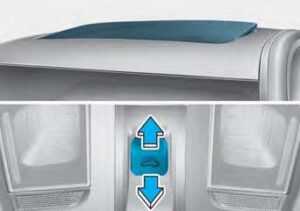 Tilt the sunroof open:
Push the sunroof control lever upward until the sunroof moves to the desired position.
To close the sunroof:
Press the sunroof lever forward until the sunroof moves to the desired position.
NOTICE
- Periodically remove any dirt that may accumulate on the sunroof guide rail or between the sunroof and roof panel, which can make a noise. Do not try to open the sunroof when the temperature is below freezing or when the sunroof is covered with snow or ice, otherwise, the motor could be damaged. In cold and wet climates, the sunroof may not work properly.
Sunshade
 The sunshade will open automatically with the sunroof when the glass panel moves. If you want it closed, move the sunshade manually.
NOTICE
The sunroof is made to slide together with the sunshade. Do not leave the sunshade closed while the sunroof is open.
Resetting the Sunroof
The sunroof may need to be reset if the following conditions occur:
- The battery is discharged or disconnected or the sunroof fuse has been replaced or disconnected
- The one-touch sliding function of the sunroof does not normally operate
To reset the sunroof, perform the following steps:
- Place the START/STOP button to the ON position or when the vehicle is in the ready mode. It is recommended to reset the sunroof while the vehicle is in the ready mode.
- Push the control lever forward. The sunroof will close completely or tilt depending on the condition of the sunroof.
- Release the control lever when the sunroof stops moving.
- Push the control lever forward for about 10 seconds.
- When the sunroof is in the closed position :
- The glass will tilt and slightly move up and down.
- When the sunroof is in the tilt position:
The glass will slightly move up and down.
Do not release the lever until the operation is completed.
If you release the lever during operation, try again from step 2.
- Within 3 seconds, push the control lever forward until the sunroof operates as follows:
Tilt down Slide Open Slide Close.
Do not release the lever until the operation is completed.
If you release the lever during operation, try again from step 2. - Release the sunroof control lever after all operations has completed (The sunroof system has been reset).
Read all Instructions for the Sunroof User Guide
Hyundai Kona-EV 2023 Lighting and High Beam Assist (HBA) User Guide
2023 Hyundai Kona-EV Lighting and High Beam Assist (HBA)
Lighting
Exterior Lights
To operate the lights, turn the knob at the end of the control lever to one of the following positions:
- OFF
- AUTO light
- Position lamp
- Headlight
Daytime Running Light (DRL)
The Daytime Running Lights (DRL) can make it easier for others to see the front of your vehicle during the day, especially after dawn and before sunset.
The DRL system will turn the dedicated lamp OFF when :
- The headlights are ON.
- The parking brake is applied.
- The vehicle is turned off.
AUTO light (if equipped)
When the light switch is in the AUTO position, the position lamp and headlight will be turned ON or OFF automatically depending on the amount of light outside the vehicle.
Even with the AUTO light feature in operation, it is recommended to manually turn ON the lamps when driving at night or in fog, or when you enter dark areas, such as tunnels and parking facilities.
NOTICE
- Do not cover or spill anything on the sensor (1) located on the instrument panel.
- Do not clean the sensor using a window cleaner, the cleanser may leave a light film which could interfere with sensor operation.
- If your vehicle has window tint or other types of metallic coating on the front windshield, the AUTO light system may not work properly.
Position lamp ( )
The position lamp, license plate lamp and instrument panel lamp are turned ON.
Headlight
The headlight, position lamp, license plate lamp and instrument panel lamp are turned ON.
Information
The START/STOP button must be in the ON position to turn on the headlight.
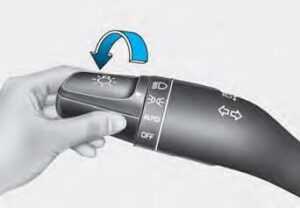
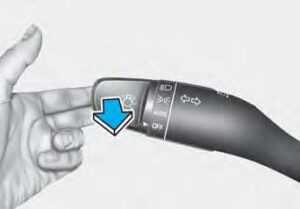
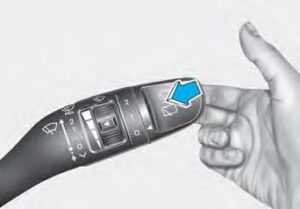
High beam operation
To turn on the high beam headlight, push the lever away from you. The lever will return to its original position. The high beam indicator will light when the headlight high beams are switched on. To turn off the high beam headlight, pull the lever towards you. The low beams will turn on.
WARNING
Do not use high beam when there are other vehicles approaching you. Using a high beam could obstruct the other driver’s vision.
To flash the high beam headlight, pull the lever towards you, then release the lever. The high beams will remain ON as long as you hold the lever towards you.
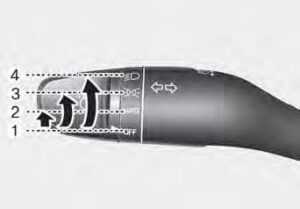
Turn signals and lane change signals
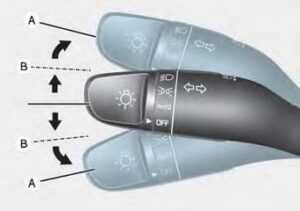
To signal a turn, push down on the lever for a left turn or up for a right turn in position (A). To signal a lane change, move the turn signal lever slightly and hold it in position (B).The lever will return to the OFF position when released or when the turn is completed. If an indicator stays on and does not flash or if it flashes abnormally, one of the turn signal bulbs may be burned out and will require replacement.
One-touch turn signal function
To activate a one-touch turn signal function, move the turn signal lever slightly and then release it. The lane change signals will blink 3, 5, or 7 times. You can activate/deactivate the One Touch Turn Signal function or choose the number of blinks (3, 5, or 7) from the User Settings mode on the LCD display. For more details, refer to “LCD Display” in Chapter 4.
Battery saver function
The purpose of this feature is to prevent the battery from being discharged. The system automatically turns off the position lamp when the driver turns the vehicle off and opens the driver-side door.
Read all Instructions for Lighting and High Beam Assist (HBA) User Guide
Hyundai Kona-EV 2023 Wipers and Washers User Guide
2023 Hyundai Kona-EV Wipers and Washers System Guidelines
Wipers and Washers
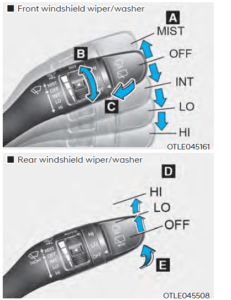
- Wiper speed control
- MIST – Single wipe
- OFF – Off
- INT – Intermittent wipe
- AUTO* – Auto control wipe
- LO– Low wiper speed
- HI – High wiper speed
- Auto control wipe time adjustment
- Wash with brief wipes (front) (pull the lever towards you)
- Rear wiper control*
- HI – High wiper speed
- LO – Low wiper speed
- OFF – Off
- Wash with brief wipes (rear) (push the lever away from you)
*: if equipped
Front Windshield Wipers
Operate as follows when the START/STOP button is in the ON position.
MIST: For a single wiping cycle, move the lever down ( ) or up (MIST) and release it. The wipers will operate continuously if the lever is held in this position.
OFF: The wiper is not in operation.
INT: Wipers operate intermittently at the same wiping intervals. Use this mode in light rain or mist. To vary the speed setting, turn the speed control knob.
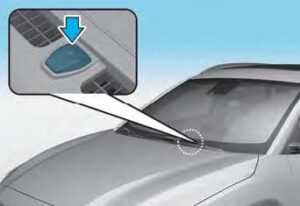
AUTO: The rain sensor located on the upper end of the windshield glass senses the amount of rainfall and controls the wiping cycle for the proper interval. The more it rains, the faster the wiper operates. When the rain stops, the wiper stops. To vary the speed setting, turn the speed control knob (B).
LO: Normal wiper speed
HI : Fast wiper speed
Information
If there is heavy accumulation of snow or ice on the windshield, defrost the windshield for about 10 minutes, or until the snow and/or ice is removed before using the windshield wipers to ensure proper operation.
If you do not remove the snow and/or ice before using the wiper and washer, it may damage the wiper and washer system.
AUTO (Automatic) control (if equipped)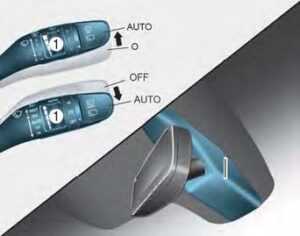
The rain sensor located on the upper end of the windshield glass senses the amount of rainfall and controls the wiping cycle for the proper interval. The wiper operation time will be automatically controlled depending on rainfall. When the rain stops, the wiper stops. To vary the sensitivity setting, turn the sensitivity control knob (1).
If the wiper switch is set in AUTO mode when the START/STOP button is in the ON position, the wiper will operate once to perform a self-check of the system.
Set the wiper to the OFF position when the wiper is not in use.
WARNING
To avoid personal injury from the windshield wipers, when the vehicle is running and the windshield wiper switch is placed in the AUTO mode:
- Do not touch the upper end of the windshield glass facing the rain sensor.
- Do not wipe the upper end of the windshield glass with a damp or wet cloth.
- Do not put pressure on the windshield glass.
- Set the wiper switch to the OFF position when the wiper is not in use.
NOTICE
- When washing the vehicle, set the wiper switch in the O (OFF) position to stop the auto wiper operation. The switch is set in AUTO mode while washing the vehicle.
- Do not remove the sensor cover located on the upper end of the passenger-side windshield glass. Damage to system parts could occur and may not be covered by your vehicle warranty.
- Because of using a photo sensor, a temporary malfunction could occur according to sudden ambient light change made by stone and dust while driving.
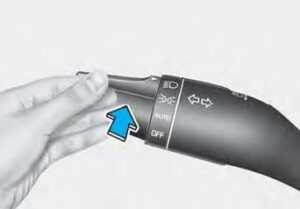
Front Windshield Washers
 In the OFF (O) position, pull the lever gently toward you to spray washer fluid on the windshield and to run the wipers 1-3 cycles.
The spray and wiper operation will continue until you release the lever. If the washer does not work, you may need to add washer fluid to the washer fluid reservoir.
WARNING
When the outside temperature is below freezing, ALWAYS warm the windshield using the defroster to prevent the washer fluid from freezing on the windshield and obscuring your vision which could result in an accident and serious injury or death.
Read all Instructions for Wipers and Washers User Guide
Hyundai Kona-EV 2023 Automatic Climate Control System User Guide
2023 Hyundai Kona-EV Automatic Climate Control System Guidelines
Automatic Climate Control System

- Temperature control knob
- Fan speed control knob
- AUTO (automatic control) button
- OFF button
- Mode selection button
- Air conditioning button
- Climate control information screen selection
- Driver only button
- Front windshield defroster button
- Rear window defroster button
- HEAT button
- Air intake control button
Automatic Heating and Air Conditioning
The Automatic Climate Control System is controlled by setting the desired temperature.
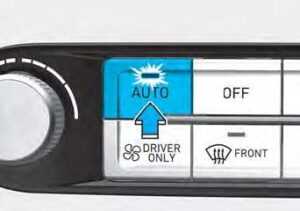 Press the AUTO button. (3)
The modes, fan speeds, air intake, and air-conditioning will be controlled automatically by the temperature setting you select. 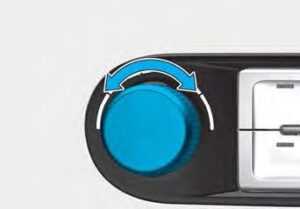 Turn the temperature control knob to the desired temperature. If the temperature is set to the lowest setting (17 °C), the air conditioning system will operate continuously. After the interior has cooled sufficiently, adjust the knob to a higher temperature set point whenever possible.
Information
- To turn the automatic operation off, select any button of the following:
- Mode selection button
- Air conditioning button
- Front windshield defroster button (Press the button one more time to deselect the front windshield defroster function. The ‘AUTO’ sign will illuminate on the information display once again.)
- Fan speed control button
- HEAT button
- Air intake control button
- (The previous state will be maintained, even if the air intake control button is pressed.)
- The selected function will be controlled manually while other functions operate automatically.
- For your convenience, use the AUTO button and set the temperature to 22°C (72°F).
 Information
Never place anything near the sensor to ensure better control of the heating and cooling system.
Manual Heating and Air Conditioning
The heating and cooling system can be controlled manually by pushing buttons other than the AUTO button. In this case, the system works sequentially according to the order of buttons selected. When pressing any button except the AUTO button while using automatic operation, the functions not selected will be controlled automatically.
- Start the vehicle.
- Set the mode to the desired position. To improve the effectiveness of heating and cooling, select:
- Heating:
- Cooling:
- Set the temperature control to the desired position.
- Set the air intake control to the outside (fresh) air position.
- Set the fan speed control to the desired speed.
- If air conditioning is desired, turn the air conditioning system on.
- Press the AUTO button to convert to full automatic control of the system.
Mode selection

 The mode selection button controls the direction of the airflow through the ventilation system.
The airflow outlet port is converted as follows:
![]() Face-Level (B, D)
Face-Level (B, D)
Air flow is directed toward the upper body and face. Additionally, each outlet can be controlled to direct the air discharged from the outlet.
![]() Bi-Level (B, C, D, E)
Bi-Level (B, C, D, E)
Read all Instructions for the Automatic Climate Control System User Guide
Hyundai Kona-EV 2023 Windshield Defrosting, Defogging, and Climate Control Additional Features User Guide
2023 Hyundai Kona-EV Windshield Defrosting And Defogging | Climate Control Features
Windshield Defrosting and Defogging
Windshield heating
Do not use the ( ) or ( ) position during cooling operations in extremely humid weather. The difference between the temperature of the outside air and that of the windshield could cause the outer surface of the windshield to fog up, causing loss of visibility. In this case, set the mode selection knob or button to the ( ) position and fan speed control knob or button to lower speed. For maximum windshield defrosting, set the temperature control knob to the highest temperature setting and the fan control knob to the highest fan speed. Select the front defrost button on the climate control display. If warm air to the floor is desired while defrosting or defogging, set the mode to the floor-defrost position. Before driving, clear all snow and ice from the windshield, rear window, outside side view mirrors, and all side windows. Clear all snow and ice from the hood and air inlet in the cowl grill to improve the heater and defroster efficiency and to reduce the probability of fogging up inside of the windshield.
To Defog Inside Windshield
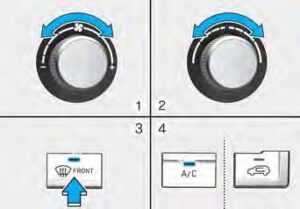
- Select any fan speed except the “0” position.
- Select the desired temperature.
- Select the ( ) position.
- The outside (fresh) air will be selected automatically.
Check to make sure the air intake control is in Fresh mode. If the air intake control indicator light is illuminated, press the button once to enable Fresh mode (indicator light OFF). If the ( ) position is selected, the fan speed is automatically increased.
To Defrost the Outside Windshield
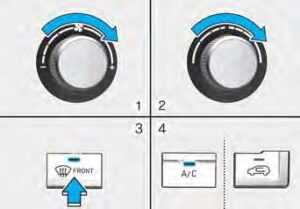
- Set the fan speed to the highest (extreme right) position.
- Set the temperature to the extremely hot position.
- Select the ( ) position.
- The outside (fresh) air and air conditioning (if equipped) will be selected automatically.
Check to make sure the air intake control is in Fresh mode. If the air intake control indicator light is illuminated, press the button once to enable Fresh mode (indicator light OFF). If the ( ) position is selected, the fan speed is automatically increased.
Defogging Logic
To reduce the probability of fogging up the inside of the windshield, the air intake or air conditioning is controlled automatically according to certain conditions such as ( ) or ( ) position.
To cancel or return the defogging logic, do the following:
- Turn the START/STOP button to the ON position.
- Press the defroster button ( ).
- While pressing the air conditioning button (A/C), press the air intake control button at least 5 times within 3 seconds.
The air intake control button indicator will blink 3 times. It indicates that the defogging logic is canceled. If the battery has been discharged or disconnected, it resets to the defog logic status.
Auto Defogging System
(only for the automatic climate control system, if equipped)
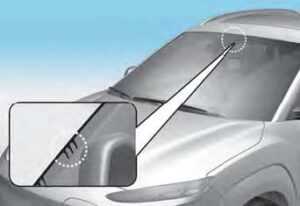
Auto defogging reduces the possibility of fogging up the inside of the windshield by automatically sensing the moisture on inside the windshield. The auto-defogging system operates when the heater or air conditioning is on. When the Auto Defogging System operates, the indicator will illuminate.If a high amount of humidity is detected in the vehicle, the Auto Defogging System will be enabled.
The following steps will be performed automatically:
- Step 1) The air intake control will change to Fresh mode.
- Step 2) The mode will be changed to defrost direct airflow to the windshield.
- Step 3) The A/C button will turn ON. Step 4) The fan speed will be set to MAX.
If the air conditioning is off or the recirculated air position is manually selected while the Auto Defogging System is ON, the Auto Defogging System Indicator will blink 3 times to signal that the manual operation has been canceled.
To cancel the auto-defogging system
- Press the START/STOP button to the ON position.
- Press the front defroster button over 3 seconds.
- The front defroster button indicator will blink 3 times and then ADS OFF will illuminate on the climate control information screen when the auto-defogging system is canceled.
To reactivate the auto-defogging system
- Press the START/STOP button to the ON position.
- Press the front defroster button over 3 seconds.
- The front defroster button indicator will blink 6 times and then ADS OFF will go out on the climate control information screen when the auto-defogging system is reactivated
Information
- When the air conditioning is turned on by the Auto defogging system, if you try to turn off the air conditioning, the indicator will blink 3 times and the air conditioning will not be turned off.
- To maintain the effectiveness and efficiency of the Auto Defogging System, do not select Recirculation mode while the system is operating.
- When the Auto Defogging System is operating, the fan speed adjustment knob, the temperature adjustment knob, and the air intake control button are all disabled.
NOTICE
Do not remove the sensor cover located on the top of the windshield glass. Damage to system parts could occur and may not be covered by your vehicle warranty.
Defroster
NOTICE
To prevent damage to the conductors bonded to the inside surface of the rear window, never use sharp instruments or window cleaners containing abrasives to clean the window.
Information
If you want to defrost and defog the front windshield, refer to “Windshield Defrosting and Defogging” in this chapter.
Rear Window Defroster
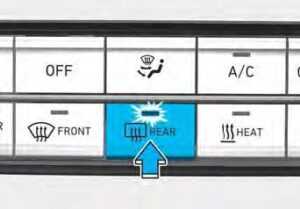
The defroster heats the window to remove frost, fog, and thin ice from the interior and exterior of the rear window, while the vehicle is in the ready ( ) mode.
- To activate the rear window defroster, press the rear window defroster button located in the center facia switch panel. The indicator on the rear window defroster button illuminates when the defroster is ON.
- To turn off the defroster, press the rear window defroster button again.
Information
- If there is a heavy accumulation of snow on the rear window, brush it off before operating the rear defroster.
- The rear window defroster automatically turns off after approximately 20 minutes or when the START/STOP button is in the OFF position.
Hyundai Kona-EV 2023 Storage Compartment, Interior Features and Infotainment System User Guide
2023 Hyundai Kona-EV Storage Compartment and Infotainment System
Storage compartment
WARNING
Never store cigarette lighters, propane cylinders, or other flammable/explosive materials in the vehicle. These items may catch fire and/or explode if the vehicle is exposed to hot temperatures for extended periods.
WARNING
ALWAYS keep the storage compartment covers closed securely while driving. Items inside your vehicle are moving as fast as the vehicle. If you have to stop or turn quickly, or if there is a crash, the items may fly out of the compartment and may cause an injury if they strike the driver or a passenger.
NOTICE
To avoid possible theft, do not leave valuables in the storage compartments.
Center Console Storage
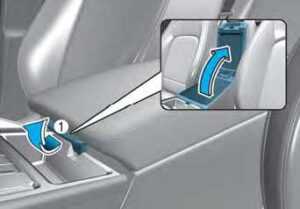
To open :
Grab and hold the latch (1) on the armrest then lift the lid.
Glove Box
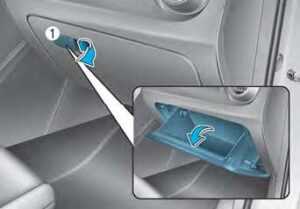
To open:
Pull the lever (1).
WARNING
ALWAYS close the glove box door after use.
An open glove box door can cause serious injury to the passenger in an accident, even if the passenger is wearing a seat belt.
Sunglasses Holder (if equipped)
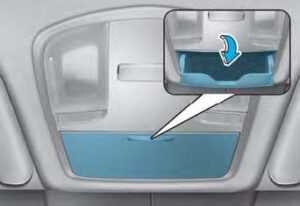
To open :
Press the cover and the holder will slowly open. Place your sunglasses in the compartment door with the lenses facing out.
To close:
Push back into position.
Make sure the sunglasses holder is closed while driving.
WARNING
- Do not keep objects except sunglasses inside the sunglasses holder. Such objects can be thrown from the holder in the event of a sudden stop or an accident, possibly injuring the passengers in the vehicle.
- Do not open the sunglass holder while the vehicle is moving. The side view mirror of the vehicle can be blocked by an open sunglass holder.
- Do not attempt to force sunglasses into the sunglass holder. If the sunglasses become jammed and you try to open it forcibly, personal injury may occur.
Luggage Tray (if equipped)

You can place a first aid kit, a reflector triangle (front tray), tools, etc. in the box for easy access.
- Grasp the handle on the top of the cover and lift it.
To increase luggage space
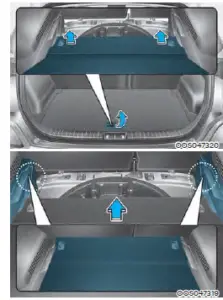
- Grasp the handle on the top of the cover and pull out the luggage tray board backward.
- Pull out the luggage tray board completely and remove the luggage tray. (If the luggage tray is equipped.)
- Push the luggage tray board forward into the lower sliding slot.
INTERIOR FEATURES
Cup Holder
Front
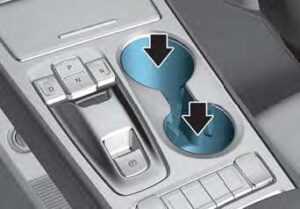
Read all Instructions for Storage Compartment, Interior Features and Infotainment System User Guide
Hyundai Kona-EV 2023 Before Driving and Smart Recuperation System User Guide
2023 Hyundai Kona-EV Before Driving and Smart Recuperation Instructions
Before Driving
WARNING
CALIFORNIA PROPOSITION 65 WARNING
Engine exhaust and a wide variety of automobile components including components found in the interior furnishings in a vehicle, contain or emit harmful chemicals known to the State of California to cause cancer and birth defects, and reproductive harm. In addition, certain fluids contained in vehicles and certain product of components contain or emit chemicals known to the State of California to cause cancer and birth defects or other reproductive harm.
Before Entering the Vehicle
- Be sure all windows, outside mirror(s), and outside lights are clean and unobstructed.
- Remove frost, snow, or ice.
- Visually check the tires for uneven wear and damage.
- Check under the vehicle for any signs of leaks.
- Be sure there are no obstacles behind you if you intend to back up.
Before Starting
- Make sure the hood, the liftgate, and the doors are securely closed and locked.
- Adjust the position of the seat and steering wheel.
- Adjust the inside and outside rearview mirrors.
- Verify all the lights work.
- Fasten your seat belt. Check that all passengers have fastened their seat belt.
- Check the gauges and indicators in the instrument panel and the messages on the instrument display when the START/STOP button is in the ON position.
- Check that any items you are carrying are stored properly or fastened down securely.
WARNING
To reduce the risk of SERIOUS INJURY or DEATH, take the following precautions:
- ALWAYS wear your seat belt. All passengers must be properly belted whenever the vehicle is moving. For more information, refer to “Seat Belts” in chapter 3.
- Always drive defensively. Assume other drivers or pedestrians may be careless and make mistakes.
- Stay focused on the task of driving.
- Driver distraction can cause accidents.
- Leave plenty of space between you and the vehicle in front of you.
WARNING
NEVER drink or take drugs and drive.
Drinking or taking drugs and driving is dangerous and may result in an accident and SERIOUS INJURY or DEATH. Drunk driving is the number one contributor to the highway death toll each year. Even a small amount of alcohol will affect your reflexes, perceptions, and judgment. Just one drink can reduce your ability to respond to changing conditions and emergencies and your reaction time gets worse with each additional drink.
Driving while under the influence
of drugs is as dangerous as or more dangerous than driving under the influence of alcohol. You are much more likely to have a serious accident if you drink or take drugs and drive. If you are drinking or taking drugs, don’t drive. Do not ride with a driver who has been drinking or taking drugs. Choose a designated driver or call a taxi.
START/STOP BUTTON
WARNING
To reduce the risk of SERIOUS INJURY or DEATH, take the following precautions:
- NEVER allow children or any person who is unfamiliar with the vehicle to touch the START/STOP button or related parts. Unexpected and sudden vehicle movement can occur.
- NEVER reach through the steering wheel for the START/STOP button or any other control, while the vehicle is in motion. The presence of your hand or arm in this area may cause a loss of vehicle control resulting in an accident.
| Button Position | Action | Notice |
| OFF
|
To turn off the vehicle, press the START/STOP button with the gear in P (Park). Also, the vehicle will turn off when the START/STOP button is pressed with the gear in D (Drive) or R (Reverse) because the gear automatically shifts to the P (Park) position. But, when it is pressed in N (Neutral), the START/ STOP button will go to the ACC position. The steering wheel locks to protect the vehicle from theft |
If the steering wheel is not locked properly when you open the driver’s door, the warning chime will sound. |
| ACC
ON START |
Press the START/STOP button when the button is in the OFF position without depressing the brake pedal. Some of the electrical accessories are usable. The steering wheel unlocks. |
If the steering wheel doesn’t unlock properly, the START/ STOP button will not work. Press the START/STOP button while turning the steering wheel right and left to release tension. |
| Press the START/STOP button while it is in the ACC position without depressing the brake pedal. The warning lights can be checked before the vehicle is started. |
Do not leave the START/STOP button in the ON position when the vehicle is not in the ready () mode to prevent the battery from discharging |
|
| To start the vehicle, depress the brake pedal and press the START/STOP button with the gear in the P (Park) position. | If you press the START/STOP button without depressing the brake pedal, the vehicle does not start and the START/STOP button changes as follows:
OFF ➔ACC ➔ ON ➔ OFF or ACC |


Starting the Vehicle
WARNING
Always wear appropriate shoes when operating your vehicle. Unsuitable shoes, such as high heels, ski boots, sandals, flip-flops, etc., may interfere with your ability to use the brake, accelerator, and clutch pedals. Do not start the vehicle with the accelerator pedal depressed. The vehicle can move which can lead to an accident.
Information
The vehicle will start by pressing the START/STOP button, only when the smart key is in the vehicle. Even if the smart key is in the vehicle, and when it is far away from the driver, the vehicle may not start. When the START/STOP button is in the ACC or ON position, and any door is open, the system checks for the smart key. When the smart key is not in the vehicle, the ” ” indicator will blink and the warning “Key not in the vehicle” will come on. When all doors are closed, the chime will also sound for about 5 seconds. Keep the smart key in the vehicle when in the ACC position or if the vehicle is in the ready ( ) mode.
Read all Instructions for Before Driving and Smart Recuperation System User Guide
Hyundai Kona-EV 2023 Braking System User Guide
2023 Hyundai Kona-EV Braking System Guidelines
Braking System
Power Brakes
Your vehicle has power-assisted brakes that adjust automatically through normal usage. In the event of a vehicle power failure, the power assist for the brakes will not work. You can still stop your vehicle, but it will require greater force and increased pedal travel than normal. The stopping distance, however, will be longer than with power brakes.
Information
When the brake pedal is depressed under certain driving conditions or weather conditions, you may temporarily hear a noise. This is normal and does not indicate a problem with your brakes. While driving on a road with deicing chemicals, brake noise or abnormal tire wear may occur due to deicing chemicals. In safe traffic conditions, additionally, apply the brakes to remove deicing chemicals on the brake discs and pads.
WARNING
Take the following precautions:
Do not drive with your foot resting on the brake pedal. This will create abnormally high brake temperatures, excessive brake lining and pad wear, and increased stopping distances. When descending a long or steep hill, shift to a lower gear and avoid continuous application of the brakes. Applying the brakes continuously will cause the brakes to overheat and could result in a temporary loss of braking performance. Wet brakes may impair the vehicle’s ability to safely slow down; the vehicle may also pull to one side when the brakes are applied. Applying the brakes lightly will indicate whether they have been affected in this way. Always test your brakes in this fashion after driving through deep water. To dry the brakes, lightly tap the brake pedal to heat up the brakes while maintaining a safe forward speed until brake performance returns to normal. Avoid driving at high speeds until the brakes function correctly.
NOTICE
- Do not continue depressing the brake pedal if the ” ” indicator is OFF. The battery may be discharged.
- Noise and vibration generated during braking is normal.
- Under normal operation, electric brake pump noise and motor vibration may occur temporarily in the below cases.
- When the pedal is depressed suddenly.
- When the pedal is repeatedly depressed in short intervals.
- When the ABS function is activated while braking.
Disc Brakes Wear Indicator
When your brake pads are worn and new pads are required, you will hear a high-pitched warning sound from your front or rear brakes. You may hear this sound come and go or it may occur whenever you depress the brake pedal.
NOTICE
To avoid costly brake repairs, do not continue to drive with worn brake pads.
Information
Always replace brake pads as complete front or rear axle sets.
Electronic Parking Brake (EPB)
Applying the parking brake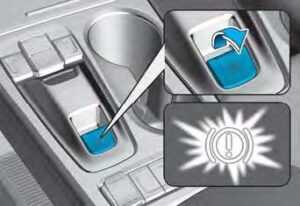
To apply EPB (Electronic Parking Brake):
- Depress the brake pedal.
- Pull up the EPB switch.
Make sure the Parking Brake Warning Light comes on. With the Auto Hold feature enabled, the EPB is automatically applied when the vehicle is shut off.
However, if Auto Hold is OFF when the vehicle is turned off, the EPB will not be applied.
WARNING
To reduce the risk of SERIOUS INJURY or DEATH, do not operate the EPB while the vehicle is moving except in an emergency situation. It could damage the brake system and lead to an accident.
Releasing the parking brake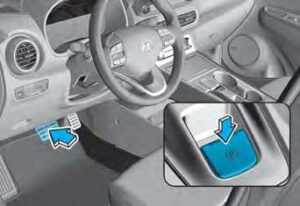
To release EPB (Electronic Parking Brake):
- Place the START/STOP button in the ON position.
- Depress the brake pedal.
- Press the EPB switch.
- Make sure the Parking Brake Warning Light goes off.
To release EPB (Electronic Parking Brake) automatically:
- Shift lever in P (Park)
- With the vehicle in the ready ( ) mode, depress the brake pedal and shift out of P (Park) to R (Reverse) or D (Drive).
- Shift lever in N (Neutral)
- With the vehicle in the ready ( ) mode, depress the brake pedal and shift out of N (Neutral) to R (Reverse) or D (Drive).
Satisfy the following conditions
- Ensure seat belts are fastened and the doors, hood and liftgate are closed.
- With the vehicle in the ready ( ) mode, depress the brake pedal and shift out of P (Park) to R (Reverse), D (Drive).
- Depress the accelerator pedal.
- Make sure the Parking Brake Warning Light goes off.
Information
For your safety, you can engage EPB even though the START/STOP button is in the OFF position (only if battery power is available), but you cannot release it. For your safety, depress the brake pedal and release the parking brake manually with the EPB switch when you drive downhill or when backing up the vehicle.
NOTICE
If the parking brake warning light is still on even though the EPB has been released, have the system checked by an authorized HYUNDAI dealer. Do not drive your vehicle with EPB applied. It may cause excessive brake pad and brake rotor wear.
EPB (Electronic Parking Brake) may be automatically applied when:
- Requested by other systems.
- The driver turns the vehicle off while Auto Hold is operating.
Read all Instructions for Braking System User Guide
Hyundai Kona-EV 2023 Drive Mode Integrated Control System and SPECIAL DRIVING CONDITIONS User Guide
2023 Hyundai Kona-EV Drive Mode Integrated Control System | Driving Conditions
Drive Mode Integrated Control System
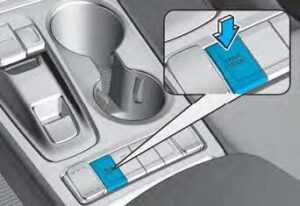
The drive mode may be selected according to the driver’s preference or road condition. The mode changes, as below, whenever the DRIVE MODE button is pressed.
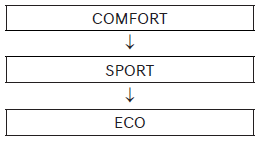
- Press and hold the DRIVE MODE button to select ECO+ mode.
The system resets to be in COMFORT mode (except if it is in ECO mode), when the vehicle is restarted.
When the vehicle is restarted, Drive Mode is set to ECO by default.
Information
If there is a problem with the instrument cluster, the drive mode will be in COMFORT mode and may not change to SPORT mode. The mode changes, as below, whenever the DRIVE MODE button is pressed.
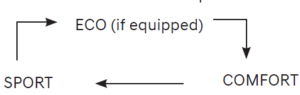
When COMFORT mode is selected, it is not displayed on the instrument cluster.
ECO mode (if equipped)

When the Drive Mode is set to ECO mode, the motor and transmission control logic are changed to maximize energy efficiency.
- When the ECO mode is selected by pressing the DRIVE MODE button, the ECO indicator will illuminate.
- If the vehicle is set to ECO mode, when the vehicle is turned OFF and restarted, the Drive Mode setting will remain in ECO mode.
- Whenever the vehicle is restarted, the Drive Mode will change to ECO mode.
Information
Electric energy efficiency depends on the driver’s driving habits and road conditions.
When ECO mode is activated:
- The acceleration response may be slightly reduced as the accelerator pedal is depressed moderately.
- The air conditioner’s performance may be limited.
- The shift pattern of the reduction gear may change.
The above situations are normal conditions when ECO mode is activated, to improve electric energy efficiency.
| Drive mode | COMFORT | SPORT | ECO | ECO+ *1 |
|
Feature |
Normal driving mode | Sporty driving mode | Optimal for eco- driving | Ultra power saving driving mode |
| Button activation | Press | Press | Press | Press and hold |
| The indicator on the cluster |
|
 |
|
 |
| Air conditioner/ heater system control | COMFORT (ECO/ COMFORT) *2 | COMFORT (ECO/ COMFORT) *2 |
ECO |
Off |
| Regenerative braking level | 1 (1~3) *2 | 1 (1~3) *2 | 2 (1~3) *2 | 2 |
- Change to ECO+ mode
- Distance to empty may not change when the air conditioner/heater system is off. However, the actual distance may be extended.
- The air conditioner/heater system turns off (except the defroster) but you may turn it on if necessary.
- When the drive mode is switched from the ECO+ mode to a different mode, it is changed to the air conditioner/heater operation status of the ECO mode.
- It is possible to set the driving condition for each drive mode (except the ECO+ mode) at the drive mode setting in the Audio and AVN system. For more information, refer to the
SPECIAL DRIVING CONDITIONS
Hazardous Driving Conditions
When hazardous driving elements are encountered such as water, snow, ice, mud, and sand, take the following precautions:
- Drive cautiously and maintain a longer braking distance.
- Avoid abrupt braking or steering.
- When your vehicle is stuck in snow, mud, or sand, accelerate slowly to avoid unnecessary wheel spinning.
- Put sand, rock salt, tire chains, or other non-slip materials under the wheels to provide additional traction while being stuck in ice, snow, or mud.
Rocking the Vehicle
If it is necessary to rock the vehicle to free it from snow, sand, or mud, first turn the steering wheel right and left to clear the area around your front wheels. Then, shift back and forth between R (Reverse) and forward gear. Try to avoid spinning the wheels, and do not race the vehicle. To prevent a reduction in gear wear, wait until the wheels stop spinning before shifting gears. Release the accelerator pedal while shifting, and press lightly on the accelerator pedal while the reduction gear wear is in gear. Slowly spinning the wheels in forward and reverse directions causes a rocking motion that may free the vehicle.
WARNING
If the vehicle is stuck and excessive wheel spin occurs, the temperature in the tires can increase very quickly. If the tires become damaged, a tire blowout or tire explosion can occur. This condition is dangerous – you and others may be injured. Do not attempt this procedure if people or objects are anywhere near the vehicle. If you attempt to free the vehicle, the vehicle can overheat quickly, possibly causing a motor compartment fire or other damage. Try to avoid spinning the wheels as much as possible to prevent overheating of either the tires or the vehicle. DO NOT allow the vehicle to spin the wheels above 35 mph (56 km/h).
Information
The ESC system must be turned OFF before rocking the vehicle.
NOTICE
If you are still stuck after rocking the vehicle a few times, have the vehicle pulled out by a tow vehicle to avoid vehicle overheating, possible damage to the reduction gear, and tire damage. See “Towing” in chapter 8.
Smooth Cornering
Avoid braking or gear changing in corners, especially when roads are wet. Ideally, corners should always be taken under gentle acceleration.
Driving at Night
Night driving presents more hazards than driving in the daylight. Here are some important tips to remember:
- Slow down and keep more distance between you and other vehicles, as it may be more difficult to see at night, especially in areas where there may not be any street lights.
- Adjust your mirrors to reduce the glare from other driver’s headlights.
- Keep your headlights clean and properly aimed. Dirty or improperly aimed headlights will make it much more difficult to see at night.
- Avoid staring directly at the headlights of oncoming vehicles. You could be temporarily blinded, and it will take several seconds for your eyes to readjust to the darkness.
Driving in the Rain
Rain and wet roads can make driving dangerous. Here are a few things to consider when driving in the rain or on the slick pavement:
FAQ
You can typically find the User Guide on the Hyundai website, in the owner’s manual provided with the vehicle, or by requesting a copy from your Hyundai dealership.
The User Guide should offer detailed explanations of the Kona-EV’s electric drivetrain components, including the motor, battery, and regenerative braking system.
Yes, it should provide instructions on how to charge the Kona-EV, including recommended charging methods and safety precautions.
It typically includes information about the vehicle’s estimated electric range, factors affecting range, and tips for maximizing battery life.
Yes, the User Guide usually includes information about the vehicle’s safety features and instructions on how to use them effectively.
Yes, it should provide maintenance guidelines specific to the Kona-EV’s electric components, including the battery.
Yes, the User Guide often includes driving tips to optimize energy efficiency and range.
It should offer instructions on how to use various charging options, including both public charging stations and home charging equipment.
The User Guide should provide information on how to handle charging emergencies and contact information for support.
Yes, it typically includes instructions on how to use the vehicle’s infotainment system and connectivity features.
It may include information on how to use the Hyundai mobile app for features like remote start and charging status.
It should provide details on the vehicle’s warranty coverage, including the electric vehicle components.
Yes, it often includes guidance on battery storage and care to maximize its lifespan.
Yes, it may include tips on how to optimize driving in cold weather conditions, which can affect electric vehicle performance.
The User Guide should provide instructions on what to do in case of electric-related issues or breakdowns.
Useful Link
2023 Hyundai Kona Guidelines
Download Manuals: https://owners.hyundaiusa.com/us/en/resources/manuals-warranties.html
2023 Hyundai Tuscon Specs, Price, Features, Milage (Brochure)