
Hyundai Kona-N 2023 Exterior Features and Lighting
On the road, the dynamic and sporty external appearance of the 2023 Hyundai Kona-N is guaranteed to draw attention. The Kona-N epitomizes a high-performance appearance with its aggressive front fascia that includes a strong grille, unique LED headlamps, and aerodynamic modifications. Its aerodynamic efficiency and aesthetic appeal are both increased by its muscular profile, crisp body lines, and aerodynamic spoilers. The Kona-N stands out in the small sports SUV class thanks to its advanced LED lighting system, which offers better visibility as well as a distinctive visual signature. LED headlights, taillights, and daytime running lights contribute to the car’s overall contemporary and energizing appearance.
2023 Hyundai KONA Specs, Price, Features, Milage (Brochure)
Exterior Features
Hood
Opening the hood
- Park the vehicle and set the parking brake.
- Pull the release lever to unlatch the hood. The hood should pop open slightly.
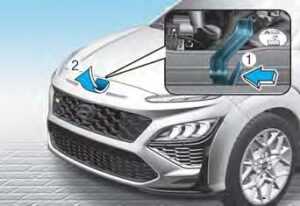
- Go to the front of the vehicle, raise the hood slightly, push up the secondary latch (1) inside of the hood center and lift the hood (2).
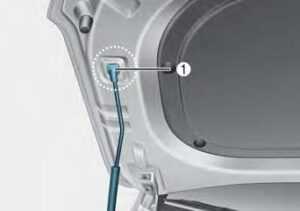
- Pull out the support rod and hold the hood open with the support rod (1).
WARNING
When handling the support rod, grasp the rod in the area wrapped with rubber only. In some cases where the engine has been running the support rod may be hot. Caution should be taken to avoid getting burned by the support rod. The support rod must be inserted completely into the hole provided whenever you inspect the engine compartment. This will prevent the hood from becoming dislodged and falling and causing potential injury.
Closing the hood
- Before closing the hood, check in and around the engine compartment to ensure the following:
- Any tools or other loose objects are removed from the engine room area or hood opening area All gloves, rags, or other combustible material is removed from the engine compartment Lower the hood halfway (lifted approximately 12 in. (30 cm) from the closed position) and push down to securely lock in place Then double check to be sure the hood is secure. If the hood can be raised slightly, it is not securely locked. Open it again and close it with more force.
WARNING
Before closing the hood, ensure all obstructions are removed from around the hood opening. Always double-check to be sure that the hood is firmly latched before driving away. Check there is no hood open warning light or message displayed on the instrument cluster. Driving with the hood opened may cause a total loss of visibility, which might result in an accident. Do not move the vehicle with the hood in the raised position, as vision is obstructed, which might result in an accident, and the hood could fall or be damaged.
Liftgate
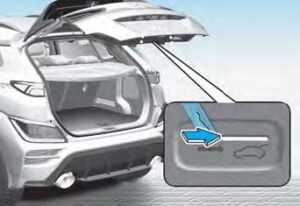
Opening the liftgate
Make sure the vehicle is in P (Park) and set the parking brake.
Then do one of the following:
With the doors unlocked, press the liftgate handle button and open the liftgate. If the doors are locked, you can have the smart Key in your possession, press the liftgate handle button and open the liftgate.
Closing the liftgate

Lower the liftgate lid and press down until it locks. To be sure the liftgate lid is securely fastened, always check by trying to pull it up again without pressing the liftgate handle button.
WARNING
Always keep the liftgate lid completely closed while the vehicle is in motion. If it is left open or ajar, poisonous exhaust gases containing carbon monoxide (CO) may enter the vehicle and serious illness or death may result.
NOTICE
To prevent damage to the liftgate lift cylinders and the attached hardware, always close the liftgate before driving.
Information
In cold and wet climates, liftgate lock and liftgate mechanisms may not work properly due to freezing conditions.
WARNING
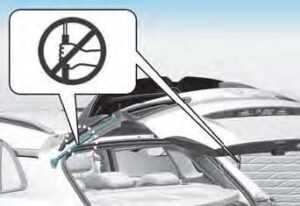
Do not hold the part (gas lifter) that supports the liftgate. Be aware that the deformation of the part may cause vehicle damage and a risk of injury.
WARNING
NEVER allow anyone to occupy the luggage compartment of the vehicle at any time. If the liftgate is partially or totally latched and the person is unable to get out, serious injury or death could occur due to lack of ventilation, exhaust fumes, and rapid heat build-up, or because of exposure to cold weather conditions. The luggage compartment is also a highly dangerous location in the event of a crash because it is not a protected occupant space but is a part of the vehicle’s crush zone. Your vehicle should be kept locked and keys should be kept out of the reach of children. Parents should teach their children about the dangers of playing in luggage compartments.
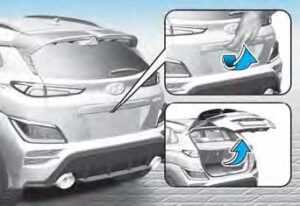
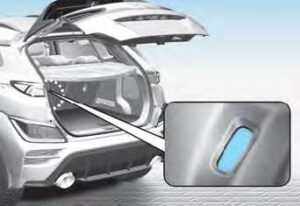
Emergency liftgate safety release
Your vehicle is equipped with an emergency liftgate safety release lever located on the bottom of the liftgate inside the vehicle.
To unlock and open the liftgate manually from inside the luggage compartment, perform the following steps:
- Insert the mechanical key from the key fob or a small screwdriver into the slot at the bottom of the liftgate inside the luggage compartment.
- Slide the key or screwdriver to the right to engage the safety release lever.
- Push the liftgate outward and upward.
WARNING
For emergencies, be fully aware of the location of the emergency liftgate safety release lever in the vehicle and how to open the liftgate if you are accidentally locked in the luggage compartment. No one should be allowed to occupy the luggage compartment of the vehicle at any time. The luggage compartment is a very dangerous location in the event of a crash. Use the release lever for emergencies only. Use with extreme caution, especially while the vehicle is in motion.
Fuel Filler Door
Opening the fuel filler door
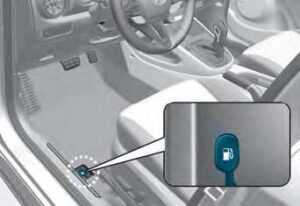
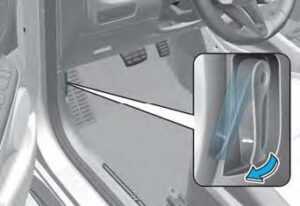
- The fuel filler door is opened from inside the vehicle using the fuel filler door release lever.
- Turn the engine off. Locate the fuel filler door release lever on the floor on the left side of the driver seat.
- Pull up on the release lever.
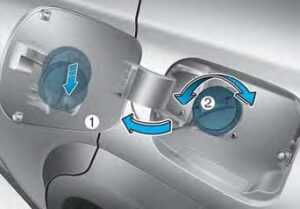
- Pull the fuel filler door (1) outward to access the fuel tank cap.
- To remove the fuel tank cap (2), turn it counterclockwise. You may hear a hissing noise as the pressure inside the tank equalizes.
- Place the cap on the fuel filler door.
Information
If the fuel filler door does not open because ice has formed around it, tap lightly or push on the door to break the ice and release the door. Do not pry on the door. If necessary, spray around the door with an approved de-icer fluid (do not use radiator anti-freeze) or move the vehicle to a warm place and allow the ice to melt.
Closing the fuel filler door
- To install the fuel tank cap, turn it clockwise until it “clicks” one time.
- Close the fuel filler door until it is latched securely.
WARNING
Gasoline is highly flammable and explosive. Failure to follow these guidelines may result in SERIOUS INJURY or DEATH:
Read and follow all warnings posted at the gas station. Before refueling, note the location of the Emergency Fuel Shut-Off, if available, at the gas station. Before touching the fuel nozzle, you should eliminate the potential build-up of static electricity by touching a metal part of the vehicle, a safe distance away from the fuel filler neck, nozzle, or another gas source, with your bare hand. Do not use cellular phones while refueling. Electric current and/or electronic interference from cellular phones can potentially ignite fuel vapors and cause a fire. Do not get back into a vehicle once you have begun refueling. You can generate a buildup of static electricity by touching, rubbing or sliding against any item or fabric capable of producing static electricity. Static electricity discharge can ignite fuel vapors causing a fire. If you must re-enter the vehicle, you should once again eliminate potentially dangerous static electricity discharge by touching a metal part of the vehicle, away from the fuel filler neck, nozzle or other fuel source, with your bare hand. When using an approved portable fuel container, be sure to place the container on the ground prior to refueling. Static electricity discharge from the container can ignite fuel vapors causing a fire. Once refueling has begun, contact between your bare hand and the vehicle should be maintained until the filling is complete. Use only approved portable fuel containers designed to carry and store fuel. When refueling, always shift the gear to the P (Park) position, set the parking brake, and press the Engine Start/Stop button to the OFF position. Sparks produced by electrical components related to the engine can ignite fuel vapors causing a fire. Do not use matches or a lighter and do not smoke or leave a lit cigarette in your vehicle while at a gas station, especially during refueling. Do not over-fill or top-off your vehicle tank, which can cause fuel spillage or long-term damage to the evaporative system. If a fire breaks out during refueling, leave the vicinity of the vehicle, immediately contact the manager of the gas station and then contact the local fire department. Follow any safety instructions they provide. If pressurized fuel sprays out, it can cover your clothes or skin and thus subject you to the risk of fire and burns. Always remove the fuel cap carefully and slowly. If the cap is venting fuel or if you hear a hissing sound, wait until the condition stops before completely removing the cap. Always check that the fuel cap is installed securely to prevent fuel spillage in the event of an accident.
Information
Make sure to refuel your vehicle according to the “Fuel Requirements” section in suggested in Chapter 1.
NOTICE
Do not spill fuel on the exterior surfaces of the vehicle. Any type of fuel spilled on painted surfaces may damage the paint. If the fuel filler cap requires replacement, use only a genuine HYUNDAI cap or the equivalent specified for your vehicle. An incorrect fuel filler cap can result in a serious malfunction of the fuel system or emission control system.
LIGHTING
Exterior Lights
Lighting control
To operate the lights, turn the knob at the end of the control lever to one of the following positions:
- OFF
- AUTO headlight
- Position lamp
- Headlight
Daytime Running Light (DRL)
The Daytime Running Lights (DRL) can make it easier for others to see the front of your vehicle during the day, especially after dawn and before sunset.
The DRL system will turn the dedicated lamp OFF when :
- The headlights are ON.
- The parking brake is applied.
- The vehicle is turned off.
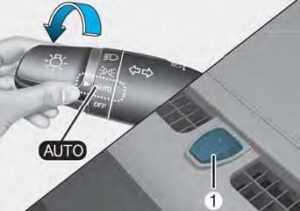
AUTO headlight
The position lamp and headlight will be turned ON or OFF automatically depending on the amount of daylight as measured by the ambient light sensor (1) at the upper end of the windshield glass. Even with the AUTO headlight feature in operation, it is recommended to manually turn ON the headlights when driving in a fog, driving in the rain, or when entering dark areas, such as tunnels and parking facilities.
NOTICE
Do not cover or spill anything on the sensor (1) located at the upper end of the windshield glass. Do not clean the sensor using a window cleaner, the cleanser may leave a light film which could interfere with sensor operation. If your vehicle has window tint or other types of metallic coating on the front windshield, the AUTO headlight system may not work properly.
Position lamp ( )
The position lamp, license plate lamp, and instrument panel lamp are turned ON.
Headlight ()
The headlight, position lamp, license plate lamp, and instrument panel lamp are turned ON.
Information
The Engine Start/Stop Button must be in the ON position to turn on the headlight.
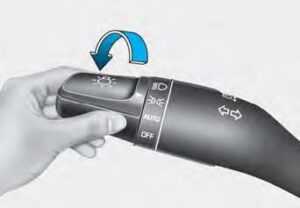
High beam operation
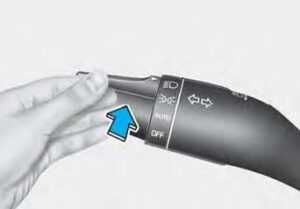
To turn on the high beam headlight, push the lever away from you. The lever will return to its original position. The high beam indicator will light when the headlight high beams are switched on. To turn off the high beam headlight, pull the lever towards you. The low beams will turn on.
WARNING
Do not use a high beam when there are other vehicles approaching you. Using a high beam could obstruct the other driver’s vision. For more information, refer to the “High Beam Assist (HBA) ” section in this chapter.
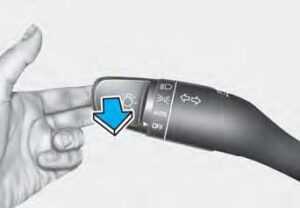
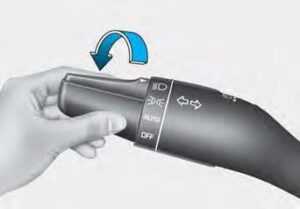
To flash the high beam headlight, pull the lever towards you, then release the lever. The high beams will remain ON as long as you hold the lever towards you.
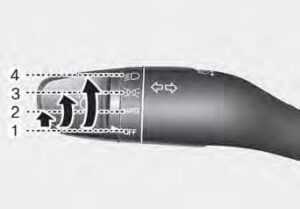
Turn signals and lane change signals
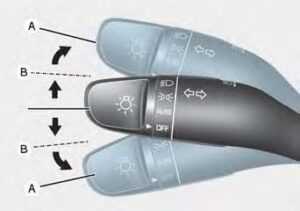
To signal a turn, push down on the lever for a left turn or up for a right turn in position (A). If an indicator stays on and does not flash or if it flashes abnormally, one of the turn signal bulbs may be burned out and will require replacement.
One-touch turn signal function
To activate the One Touch Turn Signal function, push the turn signal lever up or down to position (B) and then release it.
The lane change signals will blink 3, 5 or 7 times. You can activate or deactivate the One Touch Turn Signal function or choose the number of blinks (3, 5, or 7) from the User Settings mode in the LCD display. For more information, refer to the “LCD Display” section in this chapter.
Battery saver function
The purpose of this feature is to prevent the battery from being discharged. The system automatically turns off the position lamp when the driver turns the vehicle off and opens the driver-side door. With this feature, the position lamps will turn off automatically if the driver parks on the side of the road at night. However, the position lamps stay ON even when the driver-side door is opened if the headlight switch is turned to the position lamp or AUTO (if equipped) position after the engine is turned off. If necessary, to keep the lamps on turn the position lamps OFF and ON again using the headlight switch on the steering column after the engine is turned off.
Headlight delay function (if equipped)
If the Engine Start/Stop button is in the ACC position or the OFF position with the headlights ON, the headlights (and/or parking lamps) remain on for about 5 minutes. However, if the driver’s door is opened and closed, the headlights are turned off after 15 seconds. Also, with the engine off if the driver’s door is opened and closed, the headlights (and/or parking lamps) are turned off after 15 seconds. The headlights (and/or parking lamps) can be turned off by pressing the lock button on the smart key twice or turning the headlight switch to the OFF or AUTO position. You can activate or deactivate the Headlight Delay function from the User Settings Mode in the LCD display. For more information, refer to the “LCD Display” section in this chapter.
NOTICE
If the driver exits the vehicle through another door besides the driver door, the battery saver function does not operate and the headlight delay function does not turn OFF automatically. This may cause the battery to discharge. To avoid battery discharge, turn OFF the headlights manually from the headlight switch before exiting the vehicle.
Interior Lights
WARNING
Do not use the interior lights when driving in the dark. The interior lights may obscure your view and cause an accident.
NOTICE
Do not use the interior lights for extended periods when the vehicle is turned off or the battery will discharge.
Interior lamp AUTO cut
The interior lamps will automatically go off approximately 20 minutes after the vehicle is turned off and the doors are closed. If a door is opened, the lamp will go off 40 minutes after the vehicle is turned off. If the doors are locked by the smart key and the vehicle enters the armed stage of the theft alarm system, the lamps will go off five seconds later.
Front lamps
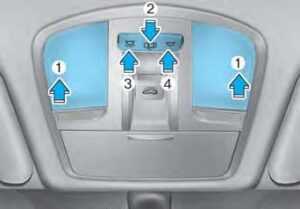
Front map lamp (1)
Press the map lamp. lens (1) to turn ON the map lamp. Re-press the map lamp lens to turn OFF the map lamp.
Front Door Lamp ( ) (2) :
The room lamp for the front/rear seats is automatically turned ON for approximately 30 seconds when a door is opened. The room lamp for the front/rear seats is automatically turned ON for approximately 15 seconds when the smart key unlocks the doors. The room lamp fades out when the Engine Start/Stop button is placed in the ON position in 15 seconds. The room lamp remains ON for up to 20 minutes when a door is opened with the Engine Start/Stop button in either the ACC or OFF position.
Front room lamp
- (3): Press the button to turn ON the room lamp for the front/rear seats.
- (4): Press the button to turn OFF the room lamp for the front/rear seats.
Rear lamps
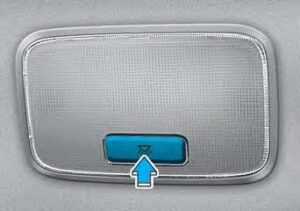
Rear room lamp switch :
Press this button to turn the room lamp on and off.
NOTICE
Do not leave the lamp switches on for an extended period of time when the engine is turned off.
Vanity mirror lamp
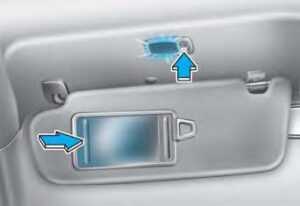
Push the switch to turn the light on or off. The lamp will turn on if this button is pressed. The lamp will turn off if this button is pressed.
NOTICE
Always have the switch in the off position when the vanity mirror lamp is not in use. If the supervisor is closed without the lamp off, it may discharge the battery or damage the sunvisor.
Luggage Compartment Lamp
The luggage compartment lamp comes on when the liftgate is opened.
NOTICE
The luggage compartment lamp comes on as long as the liftgate is open. To prevent unnecessary battery system drain, close the liftgate securely after using the luggage compartment.
Interior lamp
When the interior lamp switch is in the DOOR position and all doors are closed and locked, the room lamp will come on for 30 seconds if any of the below is performed. When the door unlocks button is pressed on the remote key or smart key. When the button on the outside door handle is pressed. At this time, if you press the door lock or unlock button on the remote key or smart key the room lamp will turn off immediately.
FAQ
The 2023 Hyundai Kona-N has a length of approximately 165.2 inches, a width of about 70.9 inches, and a height of around 58.9 inches.
The 2023 Kona-N features full LED headlights for improved visibility and a modern look.
Yes, the Kona-N comes with adaptive headlights that can automatically adjust their intensity and direction based on driving conditions.
Yes, it comes with LED daytime running lights that enhance visibility and add a distinctive style to the front end.
The Kona-N features a cascading grille design, which is a characteristic of Hyundai’s N performance models.
Yes, the Kona-N features aerodynamic elements such as a rear spoiler and unique body sculpting to improve performance and aesthetics.
Yes, Hyundai offers a range of paint colors for the Kona-N, including various metallic and solid options.
The 2023 Kona-N comes with 19-inch alloy wheels as standard.
Yes, you can opt for a panoramic sunroof, which provides an open and airy feel to the interior.
Yes, the side mirrors on the Kona-N are power-folding for convenience and safety in tight spaces.
Yes, it typically comes equipped with heated side mirrors to prevent fogging and ice buildup.
Hyundai may offer various exterior packages or trim levels with unique styling and features to suit different preferences.
The rear lights of the 2023 Kona-N are LED taillights, providing improved visibility and a modern appearance.
Yes, the Kona-N typically comes with a rear spoiler that enhances the vehicle’s aerodynamics and sporty look.
Yes, it comes with LED fog lights to improve visibility in adverse weather conditions.
Useful Link
View Full User Guide: Hyundai Kona-N 2023 User Guide
Download Manuals: https://owners.hyundaiusa.com/us/en/resources/manuals-warranties.html
2023 Hyundai KONA Specs, Price, Features, Milage (Brochure)