
Hyundai Kona 2023 Mirrors, Windows and Sunroof
The Mirrors, Windows, and Fuel Filler Door Guidelines for the Hyundai Kona (2023) provide drivers with a thorough set of directions to ensure maximum visibility, comfort, and fuel management. These guidelines cover important aspects of vehicle operation and convenience. These instructions cover operating power windows with child lock functionality, adjusting and defrosting side mirrors, operating sunroofs or moonroofs, and opening and locking the gasoline filler door. Following these guidelines will allow drivers to keep good visibility, improve their overall driving experience, and effectively handle refueling—all of which demonstrate Hyundai’s dedication to offering a practical and easy-to-use driving environment in the 2023 Kona.
2023 Hyundai KONA Specs, Price, Features, Milage (Brochure)
Mirrors
Inside Rearview Mirror
Before driving your vehicle, check to see that your inside rearview mirror is properly positioned. Adjust the rearview mirror so that the view through the rear window is properly centered.
WARNING
Make sure your line of sight is not obstructed. Do not place objects in the rear seat, cargo area, or behind the rear head restraints which could interfere with your vision through the rear window.
WARNING
To prevent serious injury during an accident or deployment of the airbag, do not modify the rearview mirror and do not install a wide mirror.
WARNING
NEVER adjust the mirror while driving. This may cause loss of vehicle control resulting in an accident.
NOTICE
When cleaning the mirror, use a paper towel or similar material dampened with glass cleaner. Do not spray glass cleaner directly on the mirror as this may cause the liquid cleaner to enter the mirror housing.
Day/night rearview mirror (if equipped)

[A]: Lever, [B]: Day, [C]: Night
Make this adjustment before you start driving and while the day/night lever is in the day position. Pull the day/night lever towards you to reduce glare from the headlights of the vehicles behind you during night driving. Remember that you lose some rearview clarity in the night position.
Electrochromic mirror (ECM) with HomeLink® system (if equipped) Your vehicle may be equipped with a Gentex Automatic-Dimming Mirror with an Integrated HomeLink® Wireless Control System. During nighttime driving, this feature will automatically detect and help reduce rearview mirror glare. The HomeLink® Universal Transceiver allows you to activate your garage door(s), electric gate, home lighting, etc.
- HomeLink Channel 1
- HomeLink Channel 2
- HomeLink Channel 3
- Garage Door Opener Status Indicator: Closing or Closed
- HomeLink Operation Indicator
- Garage Door Opener Status Indicator: Opening or Opened
- HomeLink User Interface Indicator
Automatic-Dimming Night Vision Safety™ (NVS®) Mirror (if equipped)
The NVS® Mirror automatically helps reduce glare by monitoring light levels in the front and rear of the vehicle. Any object that obstructs either light sensor will degrade the automatic dimming control feature.
For more information regarding NVS® mirrors and other applications, please refer to the Gentex website: www.gentex.com
Your mirror will automatically dim upon detecting glare from the vehicles traveling behind you. The mirror defaults to the ON position each time the vehicle is started.
Integrated HomeLink® Wireless Control System
The HomeLink® Wireless Control System can replace up to three hand-held radio-frequency (RF) transmitters with a single built-in device. This innovative feature will teach the radio frequency codes of most current transmitters to operate devices such as gate operators, garage door openers, entry door locks, security systems, and even home lighting. Both standard and rolling code-equipped transmitters can be programmed by following the outlined procedures.
Additional HomeLink® information can be found at: www.homelink.com, www.youtube.com/HomeLinkGentex or by calling 1-800-355-3515. Retain the original transmitter of the RF device you are programming for use in other vehicles as well as for future HomeLink® programming. It is also suggested that upon the sale of the vehicle, the programmed HomeLink® buttons be erased for security purposes.
WARNING
Before programming HomeLink® to a garage door opener or gate operator, make sure people and objects are out of the way of the device to prevent potential harm or damage. Do not use the HomeLink® with any garage door opener that lacks the safety stop and reverse features required by U.S. federal safety standards (this includes any garage door opener model manufactured before April 1, 1982). A garage door that cannot detect an object – signaling the door to stop and reverse – does not meet current U.S. federal safety standards. Using a garage door opener without these features increases the risk of serious injury or death.
Programing HomeLink®
Please note the following:
- When programming a garage door opener, it is advised to park the vehicle outside of the garage. It is recommended that a new battery be placed in the hand-held transmitter of the device being programmed to HomeLink® for quicker training and accurate transmission of the radio-frequency signal. Some vehicles may require the Engine Start/Stop button to be in the ACC (or “Accessories”) position for programming and/or operation of HomeLink®. In the event that there are still programming difficulties or questions after following the programming steps listed below, contact HomeLink® at: www.homelink.com, www.youtube.com/HomeLink Gentex or by calling 1-800-355-3515.
Programming
To program most devices, follow these instructions:
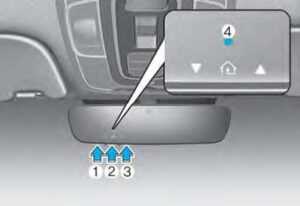
- Press and release (1), (2) or (3) button.
- If indicator (4) is turned ON in Orange, go to Step 3) since it is a new program.
- If indicator (4) is continuously turned ON or flashes in Green rapidly several times, go to Step 2) since it is a programmed button.
- Press and hold the button you wish to program for approximately 15- 25 seconds until the LED flashes in Orange several times.
- Hold the Garage Door Opener’s Original Transmitter near the HomeLink Mirror.
- Press the Original Transmitter button until the indicator (4) is turned continuously ON or flashes in Green for approximately 10 seconds and it indicates the programming is completed.
- However, indicator (4) flashes in Green continuously, but if the garage door opener does not operate, please continue to follow step 6 and 7 (“Rolling Code Programing” procedures).
- Firmly press and release the “Learn,” “Smart,” or “Program” buttons while the indicator (4) flashes in Green. Once the button is pressed, you have approximately 30 seconds to initiate the next step.
Information
At the garage door opener motor, (security gate motor, etc.) locate the “Learn,” “Smart,” or “Program” button. This can usually be found where the hanging antenna wire is attached to the motor-head unit (see the device’s manual to identify this button). The name and color of the button may vary by manufacturer. A ladder and/or second person may simplify the following steps.
- Return to the vehicle and firmly press, hold for two seconds, and release the HomeLink button up to three times. Do not press the HomeLink button rapidly. At this point programming is complete and your device should operate when the HomeLink button is pressed and released.
Information
Some garage door openers require you to press the programmed button on the mirror up to three times right after the programming is just completed to operate the garage door. The indicator (4) is turned ON in Orange and flashes for about 60 seconds, during the programming mode and if a programming is not succeeded within the 60 seconds, the programming mode will be aborted. HomeLink® should now activate your rolling code-equipped device.
Gate operator & Canadian programming
During programming, your handheld transmitter may automatically stop transmitting. Continue to press the Integrated HomeLink® Wireless Control System button while you press and re-press () your handheld transmitter every two seconds until the frequency signal has been learned. The indicator light will flash slowly and then rapidly after several seconds upon successful training.

Operating HomeLink®
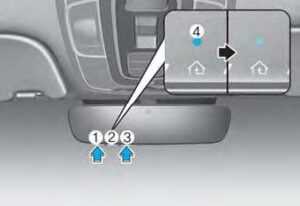
- Press and release one of the HomeLink buttons (1, 2, or 3) that are programmed.
- The HomeLink indicator (4) will operate as below:
- Indicates Green and is continuously ON (Fixed Code Garage Door Opener)
- Flashes in Green rapidly (Rolling Code Garage Door Opener)
Erasing HomeLink® buttons
- Press and hold the button (1) and (3) simultaneously.
- The indicator (4) is turned continuously ON in orange for about 10 seconds.
- Then the indicator (4) color changes to Green and flashes rapidly. Release the buttons once the green indicator flashes.
- Now HomeLink buttons (1), (2), and (4) memories are all cleared. NVS® is a registered trademark and Z-Nav™ is a trademark of the Gentex Corporation, Zeeland, Michigan. HomeLink® is a registered trademark owned by Johnson Controls, Incorporated, Milwaukee, Wisconsin.
FCC ID: NZLUAHL5A
IC: 4112A-UAHL5A
Information
This device complies with Part 15 of the FCC Rules.
Operation is subject to the following three conditions:
- This device may not cause harmful interference.
- This device must accept any interference received, including interference that may cause undesired operation.
- The transceiver has been tested and complies with FCC and Industry Canada rules. Changes or modifications not expressly approved by the party responsible for compliance could void the user’s authority to operate the device.
Two-Way Communication Programming
- Complete the HomeLink Programming first.
- Before the first 10 times the HomeLink button is pressed after the programming, the following steps MUST occur to program two-way communication. (only for some older garage doors)

- Press and release the programmed HomeLink button to activate the garage door.
- Once the garage door is stopped, press and release the “Learn” or “Smart” button on the Garage door opener within 1 minute from the time of pressing the programmed HomeLink button on the mirror.
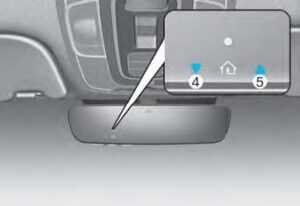
- If both indicators (4) and (5) are flashing rapidly for about 5 seconds, the two-way synchronization is completed.
Information
Some newer garage door openers provide two-way communication synchronizing when programming the original transmitter.

Operating Two Way Communication
- Press and release (1), (2) or (3) button.

- The indicator (4) and (5) operates as below:
- If indicator (4) flashes in Orange, it indicates that the garage door is “closing”.
- If indicator (4) is ON continuously in Green, it indicates that the garage door is “closed”.
- If indicator (5) flashes in Orange, it indicates that the garage door is “Opening”.
- If indicator (5) is ON continuously in Green, it indicates that the garage door is “Opened”.
- If the indicator (4) or (5) does not turn to Green, it indicates that the last status of the garage door was not received properly. The HomeLink mirror tries to receive the last known status of the garage door for a few seconds.
Recalling Garage Door Status
Homelink mirror with two-way communication provides a way to view the last stored message from the garage door opener. In order to recall the last known status of the last activated device, press the buttons and 2 OR, and 3 simultaneously.
- If the indicator (4 ) is ON continuously in Green, it indicates that the last activated device was “closed” properly.
- If the indicator (5) is ON continuously in Green, it indicates that the last activated device was “open” properly.
Information
The two-way communication range distance between the vehicle and the garage door opener is 100m. The range may be reduced or increased a little due to obstacle conditions around the garage door opener, such as houses or trees.
Side View Mirrors

Make sure to adjust the side view mirrors to your desired position before you begin driving. Your vehicle is equipped with both left-hand and right-hand side view mirrors. The mirrors can be adjusted remotely with the remote switch. The side view mirrors can be folded to help prevent damage when going through an automatic car wash or when passing through a narrow street. The right-side view mirror is convex. Objects seen in the mirror are closer than they appear. Use the inside rearview mirror or look back directly to determine the actual distance of other vehicles prior to changing lanes.
WARNING
Do not adjust or fold the side view mirrors while driving. This may cause loss of vehicle control resulting in an accident.
NOTICE
Do not scrape ice off the mirror face; this may damage the surface of the glass. If the mirror is jammed with ice, do not adjust the mirror by force. Use an approved deicer (not radiator antifreeze) spray, or a sponge or soft cloth with very warm water, or move the vehicle to a warm place and allow the ice to melt.
Side View Mirror Adjustment
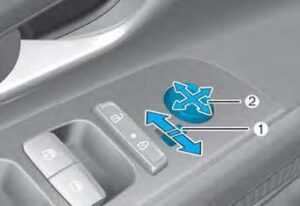
- Press either the L (left side) or R (right side) button (1) to select the side view mirror you would like to adjust.
- Use the mirror adjustment control (2) to position the selected mirror up, down, left, or right.
- After adjustment, put the button into the neutral (center) position to prevent inadvertent adjustment.
NOTICE
The mirrors stop moving when they reach the maximum adjusting angles, but the motor continues to operate while the switch is pressed. Do not press the switch longer than necessary, because this can damage the motor. Do not attempt to adjust the side view mirrors by hand, because this can damage the motor.
Folding the side-view mirrors
 To fold the side view mirrors, grasp the housing of the mirror and then fold it inwards.
WINDOWS

- Driver’s door power window switch
- Front passenger’s door power window switch
- Rear door (left) power window switch
- Rear door (right) power window switch
- Window opening and closing
- Automatic power window
- Power window lock switch
Power Windows
The ignition switch must be in the ON position to be able to raise or lower the windows. Each door has a Power Window switch to control that door’s window. The driver has a Power Window Lock switch which can block the operation of rear passenger windows. The power windows will operate for approximately 30 seconds after the ignition switch is placed in the ACC or LOCK/OFF position. However, if the front doors are opened, the Power Windows will not operate even within the 30-second period.
WARNING
To avoid serious injury or death, do not extend your head, arms, or body outside the windows while driving.
Information
In cold and wet climates, power windows may not work properly due to freezing conditions. While driving with the rear windows down or with the sunroof (if equipped) opened (or partially opened), your vehicle may demonstrate a wind buffeting or pulsation noise. This noise is normal and can be reduced or eliminated by taking the following actions. If the noise occurs with one or both of the rear windows down, partially lower both front windows approximately one inch. If you experience the noise with the sunroof open, slightly close the sunroof.
Window opening and closing
To open:
Press the window switch down to the first detent position (5). Release the switch when you want the window to stop.
To close:
Pull the window switch up to the first detent position (5). Release the window switch when you want the window to stop.
Auto down window (if equipped)
Pressing the power window switch down momentarily to the second detent position (6) completely lowers the window even when the switch is released. To stop the window at the desired position while the window is in operation, pull up or press down and release the switch.
Auto up/down window (if equipped)
Pressing or pulling up the power window switch momentarily to the second detent position (6) completely lowers or lifts the window even when the switch is released. To stop the window at the desired position while the window is in operation, pull up or press down and release the switch.
To reset the power windows
If the power windows do not operate normally, the automatic power window system must be reset as follows:
- Place the ignition switch to the ON position.
- Close the window and continue pulling up on the power window switch for at least one second.
If the power windows do not operate properly after resetting, have the system checked by an authorized HYUNDAI dealer.
WARNING
The automatic reverse feature doesn’t activate while resetting the power window system. Make sure body parts or other objects are safely out of the way before closing the windows to avoid injuries or vehicle damage.
Automatic reverse (if equipped)
 If a window senses any obstacle while it is closing automatically, it will stop and lower approximately 12 inches (30 cm) to allow the object to be cleared.
If the window detects the resistance while the power window switch is pulled up continuously, the window will stop upward movement and then lower approximately 1 inch (2.5 cm).
If the power window switch is pulled up continuously again within 5 seconds after the window is lowered by the automatic window reverse feature, the automatic window reverse will not operate.
Information
The automatic reverse feature is only active when the “Auto Up” feature is used by fully pulling up the switch to the second detent.
WARNING
Make sure body parts or other objects are safely out of the way before closing the windows to avoid injuries or vehicle damage. Objects less than 0.16 inch (4 mm) in diameter caught between the window glass and the upper window channel may not be detected by the automatic reverse window and the window will not stop and reverse direction.
NOTICE
Do not install any accessories on the windows. The automatic reverse feature may not operate.
Power window lock switch

The driver can disable the power window switches on the rear passenger doors by pressing the power window lock switch.
When the power window lock switch is pressed:
- The rear passenger control will not be able to operate the rear passenger power window
- Note that the front passenger control is still able to operate the front passenger window and that the driver master control can still operate all the power windows.
NOTICE
To prevent possible damage to the power window system, do not open or close two windows or more at the same time. This will also ensure the longevity of the fuse. Never try to operate the main switch on the driver’s door and the individual door window switch in opposite directions at the same time. If this is done, the window will stop and cannot be opened or closed.
WARNING
NEVER leave the keys in your vehicle with unsupervised children, when the engine is running. NEVER leave any child unattended in the vehicle. Even very young children may inadvertently cause the vehicle to move, entangle themselves in the windows, or otherwise injure themselves or others. Always double-check to make sure arms, hands, heads, and other obstructions are safely out of the way before closing a window. Do not allow children to play with the power windows. Keep the driver’s door power window lock switch in the LOCK position (pressed). Serious injury can result from unintentional window operation by the child. Do not extend your head, arms, or body outside the windows while driving.
Sunroof
If your vehicle is equipped with a sunroof, you can slide or tilt your sunroof with the sunroof switch located on the overhead console.
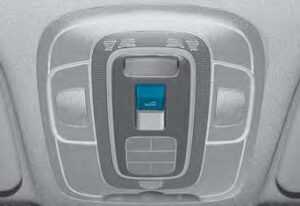
The sunroof can only be operated when the ignition switch or Engine Start/Stop button is in the ON or START position.
The sunroof can be operated for approximately 3 minutes after the ignition switch or Engine Start/Stop button is in the ACC or LOCK/OFF position. However, if the front door is open, the sunroof cannot be operated even within the 3-minute period.
WARNING
Adjust the sunroof or sunshade when your vehicle stops. This could result in loss of control and an accident that may cause injury or property damage. Do not leave the engine running and the key in your vehicle with unsupervised children. Unattended children could operate the sunroof, which could not sit on the top of the vehicle. It may cause injury or vehicle damage.
NOTICE
Do not operate the sunroof when roof bars are installed on the vehicle or when there is luggage on the roof.
Tilt Open/Close
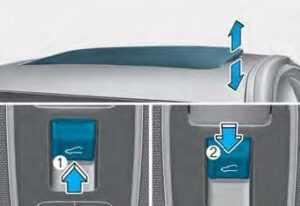
[1] : Tilt open
[2] : Tilt close
- Push the sunroof switch upward, and the sunroof glass tilts open.
- Push the sunroof switch forward, and the sunroof glass automatically closes.
To stop the sunroof movement at any point, push the sunroof switch in any direction.
Information
The sunroof glass cannot slide open and tilt open at the same time. You cannot tilt the sunroof glass open while the sunroof glass is slide open. Also, you cannot slide the sunroof glass open while the sunroof is tilt open. Slide open or tilt open the sunroof glass when the sunroof glass is completely closed.
Slide Open/Close
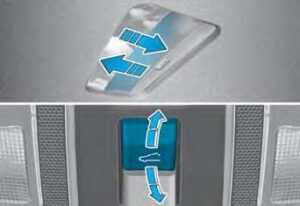
- Push the sunroof switch rearward, and the sunshade and sunroof glass slide open.
Push the sunroof switch forward, only the sunroof glass closes. - Push the sunroof switch forward or rearward to the first detent position, the sunroof glass moves until the switch is released.
- Push the sunroof switch forward or rearward to the second detent position, and the sunroof glass operates automatically (auto slide feature). To stop the sunroof movement at any point, push the sunroof switch in any direction.
- The sunroof glass stops halfway (first detent position) before it is fully opened. To fully open the sunroof glass, push the sunroof switch rearward once more. At this time, the sunroof glass opens only while the switch is pushed.
Information
To reduce wind noise while driving, we recommend that you drive at the recommended position before the maximum slide open position.
Automatic Reversal (if equipped)
If the sunroof glass senses any obstacle while it is closing automatically, it will reverse direction and then stop at a certain position. The auto reverse function may not work if an object thin or soft is caught between the sliding sunroof glass and sunroof sash.
WARNING
- Make sure heads, hands, arms or any other body parts or objects are out of the way before operating the sunroof. Body parts or objects may get caught causing injuries or vehicle damage.
- Never deliberately use your body parts to test the automatic reversal function. The sunroof glass may reverse direction, but there is a risk of injury.
NOTICE
- Do not continue to push the sunroof switch after the sunroof is fully opened, closed, or tilted. Damage to the sunroof motor could occur.
- Continuous operations such as slide open/close, tilt open/close, etc. may cause the motor or sunroof system to malfunction.
- Regularly remove any accumulated dust on the sunroof rail.
- Dust accumulated between the sunroof and roof panel can make noise. Open the sunroof and remove dust regularly using a clean cloth.
- Do not try to open the sunroof when the temperature is below freezing or when the sunroof is covered with snow or ice. The sunroof may not work properly and may break if opened by force.
- Do not open or drive with the sunroof glass open immediately after rain or washing the vehicle. Water may wet the interior of the vehicle.
- Do not extend any luggage outside the sunroof while driving. Vehicle damage may occur if the vehicle suddenly stops.
WARNING
Do not extend your head, arms, body parts, or objects outside the sunroof while driving. Injuries may occur if the vehicle suddenly stops.
Resetting the Sunroof

In some circumstances resetting the sunroof operation may need to be performed. Some instances where resetting the sunroof may be required include:
- When the battery connector is either disconnected or discharged
- When the sunroof fuse is replaced
- If the sunroof one-touch AUTO OPEN/ CLOSE operation is not functioning properly
Sunroof resetting procedure:
- It is recommended to perform the reset procedure with the vehicle engine running. Start the vehicle in P (Park).
- Make sure the sunroof glass is in the fully closed position. If the sunroof glass is open, push the switch forward until the sunroof glass is fully closed.
- Release the switch when the sunroof glass is fully closed.
- Push the switch forward until the sunroof glass moves slightly. Then release the switch.
- Once again push and hold the sunroof switch forward until the sunroof glass slides open and close. Do not release the switch until the operation is completed. If you release the switch during operation, start the procedure again from step 2.
Information
If the sunroof is not reset when the vehicle battery connector is disconnected or discharged, or the sunroof fuse is blown, the sunroof may not operate normally.
Sunroof Open Warning (if equipped)
If the driver turns off the engine when the sunroof is not fully closed, the warning chime will sound for several seconds and the sunroof open warning will appear on the cluster LCD display. Close the sunroof securely when leaving your vehicle.
CAUTION
Make sure the sunroof is closed fully when leaving your vehicle. If the sunroof is left open, rain or snow may wet the interior of the vehicle. Also, leaving the sunroof open when the vehicle is unattended may invite theft.
HOOD
Opening the hood

- Park the vehicle and set the parking brake.
- Pull the release lever to unlatch the hood. The hood should pop open slightly.
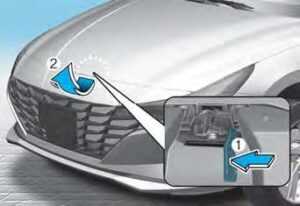
- Go to the front of the vehicle, raise the hood slightly, push the secondary latch up (1) inside of the hood center and lift the hood (2).
- Pull out the support rod.
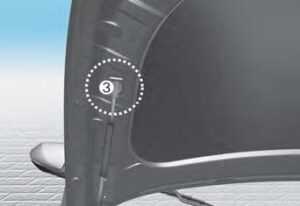
- Hold the hood open with the support rod (3).
WARNING
Support rod
- After driving, the engine compartment and support rod will be hot. Grasp the support rod in the area wrapped in rubber to prevent burns. The support rod must be inserted completely into the hole provided whenever you inspect the engine compartment. This will prevent the hood from falling and possibly injuring you.
Closing the hood
- Before closing the hood, check the following:
- All filler caps in engine compartment must be correctly installed.
- Gloves, rags or any other combustible material must be removed from the engine compartment.
- Return the support rod to its clip to prevent it from rattling.
- Lower the hood halfway (lifted approximately 30 cm from the closed position) and push down to securely lock it in place. Then double-check to be sure the hood is secure.
If the hood can be raised slightly, it is not securely locked. Open it again and close it with more force.
WARNING
- Before closing the hood, ensure all obstructions are removed from around the hood opening.
- Always double-check to be sure that the hood is firmly latched before driving away. Check there is no hood open warning light or message displayed on the instrument cluster. Driving with the hood opened may cause a total loss of visibility, which might result in an accident.
- Do not move the vehicle with the hood in the raised position, as vision is obstructed, which might result in an accident, and the hood could fall or be damaged.
TRUNK
Opening the trunk
- Make sure the shift lever is in P (Park, for Dual clutch transmission/Intelligent variable transmission) or first gear or R (Reverse, for manual transmission) and set the parking brake.
- Then do one of the following:
- Hold down the trunk unlock button located on your remote key or smart key for more than 1 second.
- Additionally, for vehicles equipped with smart keys:
- While all doors are unlocked, press the switch in the trunk to open the trunk with or without the smart key in your possession.
- If any door is locked or all doors are locked, the switch can still be used to open the trunk, as long as the smart key is in your possession.
- Use the trunk release lever.
- Lift the trunk lid up.
Closing the trunk
Lower the trunk lid and press down until it locks. To be sure the trunk lid is securely fastened, always check by trying to pull it up again.
WARNING
Always keep the trunk lid completely closed while the vehicle is in motion. If it is left open or ajar, poisonous exhaust gases containing carbon monoxide (CO) may enter the vehicle and serious illness or death may result.
Information
To prevent damage to the trunk lift cylinders and the attached hardware, always close the trunk before driving.
NOTICE
In cold and wet climates, trunk lock and trunk mechanisms may not work properly due to freezing conditions.
Emergency Trunk Safety Release
Your vehicle is equipped with an Emergency Trunk Safety Release lever located inside the trunk. When someone is inadvertently locked in the trunk, the trunk can be opened by moving the lever in the direction of the arrow and pushing the trunk open.
WARNING
- You and your passengers must be aware of the location of the Emergency Trunk Safety Release lever in this vehicle and how to open the trunk in case you are accidentally locked in the trunk.
- NEVER allow anyone to occupy the trunk of the vehicle at any time. If the trunk is partially or totally latched and the person is unable to get out, serious injury or death could occur due to lack of ventilation, exhaust fumes, rapid heat build-up, or because of exposure to cold weather conditions. The trunk is also a highly dangerous location in the event of a crash because it is not a protected occupant space but is a part of the vehicle’s crush zone.
- Your vehicle should be kept locked and the Smart Key should be kept out of the reach of children. Parents should teach their children about the dangers of playing in trunks.
- Use the release lever for emergencies only.
Smart Trunk Release (if equipped)

On a vehicle equipped with a smart key, the trunk can be opened using the Smart Trunk release system.
How to use the Smart Trunk release
The trunk can be opened with no touch activation satisfying all the conditions below.
- After 15 seconds when all doors are closed and locked
- Positioned in the detecting area for more than 3 seconds
Information
The Smart Trunk release does not operate when:
- The smart key is detected within 15 seconds after the doors are closed and locked and is continuously detected.
- The smart key is detected within 15 seconds after the doors are closed and locked, and 1.5 m from the front door handles. (for vehicles equipped with Welcome Light)
- A door is not locked or closed.
- The smart key is in the vehicle.
- Setting
To activate the Smart Trunk release, go to User Settings Mode and select Smart Trunk on the LCD display.
For more details, refer to LCD Display in this chapter. If your vehicle is equipped with additional navigation, please refer to the infotainment system manual separately supplied.
- Detect and Alert
If you are positioned in the detecting area (20 ~ 40 inches behind the vehicle) carrying a smart key, the hazard warning lights will blink and a chime will sound to alert you the smart key has been detected and the trunk will open.
Information
Do not approach the detecting area if you do not want the trunk to open. If you have unintentionally entered the detecting area and the hazard warning lights and chime start to operate, leave the detecting area with the smart key. The trunk will stay closed.
- Automatic opening
The hazard warning lights will blink and chime will sound 6 times and then the trunk will open.
WARNING
- Make sure you close the trunk before driving your vehicle.
- Make sure there are no people or objects around the trunk before opening or closing the trunk.
- Make sure objects in the trunk do not come out when opening the trunk on a slope. It may cause serious injury.
- Make sure to deactivate the Smart Trunk when washing your vehicle. Otherwise, the trunk may open inadvertently.
- The key should be kept out of reach of children. Children may inadvertently open the Smart Trunk release while playing around the rear area of the vehicle.
How to deactivate the Smart Trunk release function using the smart key
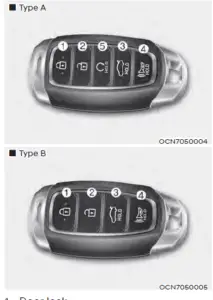
- Door lock
- Door unlock
- Trunk open
- Panic
- Remote Start (if equipped)
If you press any button of the smart key during the Detect and Alert stage, the Smart Trunk release function will be deactivated. Make sure to be aware of how to deactivate the Smart Trunk release function for emergency situations.
Information
If you press the door unlock button(2), the Smart Trunk release function will be deactivated temporarily. But, if you do not open any door for 30 seconds, the smart trunk function will be activated again. If you press the trunk open button (3) for more than 1 second, the trunk opens. If you press the door lock button (1) or trunk open button (3) when the Smart Trunk release function is not in the Detect and Alert stage, the smart trunk function will not be deactivated. In case you have deactivated the Smart Trunk function by pressing the smart key button and opening a door, the Smart Trunk release function can be activated again by closing and locking all doors.
Detecting area

- The Smart Trunk release operates with a welcome alert if the smart key is detected within 20 ~ 40 inches from the trunk. The alert stops at once if the smart key is positioned outside the detecting area during the Detect and Alert stage.
Information
- The Smart Trunk release function will not work if any of the following occurs:
- The smart key is close to a radio transmitter such as a radio station or an airport which can interfere with the normal operation of the transmitter.
- The smart key is near a mobile two-way radio system or a cellular phone.
- Another vehicle’s smart key is being operated close to your vehicle.
- The detecting range may decrease or increase when :
- One side of the tire is raised to replace a tire or to inspect the vehicle.
- The vehicle is slantingly parked on a slope or unpaved road, etc.
FUEL FILLER DOOR
Opening the fuel filler door

The fuel filler door must be opened from inside the vehicle by pulling up the fuel filler door opener.
- Turn the engine off.
- Pull up the fuel filler door opener.
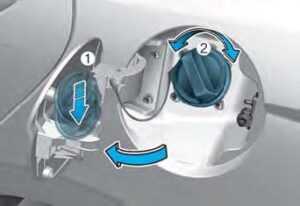
- Pull the fuel filler door (1) out to fully open.
- To remove the fuel tank cap (2), turn it counterclockwise. You may hear a hissing noise as the pressure inside the tank equalizes.
- Place the cap on the fuel filler door.
Information
Open and close the reservoir cap by using the handle on the cap cover for safety.
Information
If the fuel filler door does not open because ice has formed around it, tap lightly or push on the door to break the ice and release the door. Do not pry on the door. If necessary, spray around the door with an approved deicer fluid (do not use radiator anti-freeze) or move the vehicle to a warm place and allow the ice to melt.
Closing the fuel filler door
- To install the fuel tank cap, turn it clockwise until it “Clicks”.
- Close the fuel filler door until it is latched securely.
Tighten the cap until it clicks one time,) light otherwise the Check Engine ( will illuminate.
NOTICE
There may be an intermittent noise near the refueling hole while the engine is idling if the fuel cap is not closed securely. This occurs normally with the OBD system.
NOTICE
When refueling on unlevel ground, the fuel gauge may not point to the F position. It is not a malfunction. If you move your vehicle to a level ground, the fuel gauge will move to the full position.
WARNING
Gasoline is highly flammable and explosive. Failure to follow these guidelines may result in SERIOUS INJURY or DEATH:
- Read and follow all warnings posted at the gas station.
- Before refueling, note the location of the Emergency Gasoline Shut-Off, if available, at the gas station.
- Before touching the fuel nozzle, you should eliminate the potential build-up of static electricity by touching a metal part of the vehicle, a safe distance away from the fuel filler neck, nozzle, or another gas source, with your bare hand.
- Do not use cellular phones while refueling. Electric current and/or electronic interference from cellular phones can potentially ignite fuel vapors and cause a fire.
- Do not get back into a vehicle once you have begun refueling. You can generate a build-up of static electricity by touching, rubbing, or sliding against any item or fabric capable of producing static electricity. Static electricity discharge can ignite fuel vapors causing a fire. If you must re-enter the vehicle, you should once again eliminate potentially dangerous static electricity discharge by touching a metal part of the vehicle, away from the fuel filler neck, nozzle or another gasoline source, with your bare hand.
- When refueling, always move the shift lever to the P (Park) position, set the parking brake, and place the ignition switch in the LOCK/OFF position.
- Sparks produced by electrical components related to the engine can ignite fuel vapors causing a fire.
- When using an approved portable fuel container, be sure to place the container on the ground prior to refueling. Static electricity discharge from the container can ignite fuel vapors causing a fire. Once refueling has begun, contact between your bare hand and the vehicle should be maintained until the filling is complete.
- Use only approved portable plastic fuel containers designed to carry and store gasoline.
- Do not use matches or a lighter and do not smoke or leave a lit cigarette in your vehicle while at a gas station, especially during refueling.
- Do not over-fill or top off your vehicle tank, which can cause gasoline spillage.
- If a fire breaks out during refueling, leave the vicinity of the vehicle, immediately contact the manager of the gas station, and then contact the local fire department. Follow any safety instructions they provide.
- If pressurized fuel sprays out, it can cover your clothes or skin and thus subject you to the risk of fire and burns. Always remove the fuel cap carefully and slowly. If the cap is venting fuel or if you hear a hissing sound, wait until the condition stops before completely removing the cap.
- Always check that the fuel cap is installed securely to prevent fuel spillage in the event of an accident.
Information
Make sure to refuel your vehicle according to the “Fuel Requirements” suggested in the Introduction chapter.
NOTICE
Do not spill fuel on the exterior surfaces of the vehicle. Any type of fuel spilled on painted surfaces may damage the paint. If the fuel filler cap requires replacement, use only a genuine HYUNDAI cap or the equivalent specified for your vehicle. An incorrect fuel filler cap can result in a serious malfunction of the fuel system or emission control system.
FAQ
You can typically adjust the side mirrors using the mirror adjustment controls inside the vehicle. Consult the owner’s manual for specific instructions.
Some models may come equipped with heated side mirrors. Check the trim level and features of your specific Kona for details.
Many models have power-folding side mirrors that can be electronically folded with the press of a button. Consult the owner’s manual for instructions.
Typically, you can activate the side mirror defrosters through the vehicle’s climate control system. Refer to the owner’s manual for specific instructions.
You can usually adjust the rearview mirror manually using the mirror’s adjustment tab or electronically through the vehicle’s control system. Instructions can be found in the owner’s manual.
Yes, you can typically control all the power windows from the driver’s seat using the window controls on the door panel.
Many models include a child lock feature to prevent rear passengers from operating the power windows. Check the owner’s manual for details on how to use it.
If your Hyundai Kona is equipped with a sunroof or moonroof, you can typically open and close it using the controls located on or near the ceiling of the vehicle. Refer to the owner’s manual for specific instructions.
To open the fuel filler door, there is usually a release lever or button located either on the driver’s door panel or near the driver’s seat. The owner’s manual will provide details.
Some models may have a locking mechanism for the fuel filler door that can be activated from inside the vehicle. Check the owner’s manual for information on how to use it.
The fuel type required can vary depending on the engine and trim level. Typically, it’s recommended to use regular unleaded gasoline, but the owner’s manual will specify the appropriate fuel.
In many cases, there is a manual release inside the vehicle that can be used to open the fuel filler door in the event of a power failure. Consult the owner’s manual for details.
Some models may have auto-dimming features for the mirrors to reduce glare. Refer to the owner’s manual for details on how to use this feature.
Yes, you can typically manually fold in the side mirrors if needed, but it’s important to follow the instructions in the owner’s manual to avoid damage.
The owner’s manual usually includes guidance on cleaning and maintaining the mirrors and windows to ensure clear visibility.
Useful Link
View Full User Guide: Hyundai Kona 2023 User Guide
Download Manuals: https://owners.hyundaiusa.com/us/en/resources/manuals-warranties.html
2023 Hyundai KONA Specs, Price, Features, Milage (Brochure)